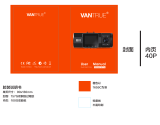
Full HD 1080p Dual Camera Driving Recorder
User Manual
China toll free No.:
400-8401030
(For other region, please
contact the local agent.)
China toll free No.:
400-8401030
(For other region, please
contact the local agent.)

EN-1
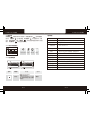
About this Guide ..................................................................................1
Battery Warning .................................................................................1
Notes on Installation ..........................................................................1
Caution .............................................................................................2
1 Introduction...................................................................................3
1.1 Features .....................................................................................3
1.2 Package Contents ........................................................................3
1.3 Product Overview .........................................................................4
2 Getting Started...............................................................................5
2.1 Inserting the Memory Card.............................................................5
2.2 Installing in Vehicles......................................................................5
2.3 Connecting to Power .....................................................................6
2.4 Powering the Device On / Off .........................................................7
2.4.1 Auto Power On / Off ....................................................................7
2.4.2 Manual Power On / Off and Reset ................................................7
2.4.2.1 Manual Power On / Off .............................................................7
2.4.2.2 Reset the Device .....................................................................8
2.5 Set the Date / Time........................................................................8
2.6 Mode Selection.............................................................................8
3 Using the Driving Recorder.............................................................8
3.1 Recording Videos ..........................................................................8
3.1.1 The Recording Screen ................................................................9
3.1.2 Dual Camera Recording...............................................................9
3.1.3 A key Protection .........................................................................9
3.1.4 Motion Detection .......................................................................11
3.1.5 G-sensor Collision Recording Protection......................................11
3.1.6 Audio On / Off.............................................................................11
3.1.7 Adjusting EV...............................................................................11
3.1.8 Switch Screen Display................................................................11
3.1.9 Video Menu Operation................................................................12
3.1.10 Video Menu Options ...................................................................12
3.2 Playing Videos ...............................................................................15
3.2.1 Play Video Screen .......................................................................15
3.2.2 Playback Menu Options..............................................................15
4 Specications ................................................................................16
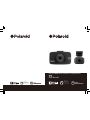
Polaroid·DS301

About this Guide
The content in this document is for information purpose and is subject to change
without prior notice. We made every effort to ensure that this User Guide is
accurate and complete, however, no liability is assumed for any errors and
omissions that may have occurred.
Battery Warning
·Always charge using the provided system. Improper handling of the battery
may result in explosion.
·Never dismantle or pierce the battery or allow the battery to short-circuit.
·Batteries may explode if exposed to naked re. Never dispose of batteries in
a re.
·Disposed of used batteries observing local regulations.
·Never replace the battery on your own, have the dealer do it for you.
Notes on Installation
·This product shall be installed near the rear view-mirror, at the center of
windshield, if possible, for optimal viewing.
·Make sure that the lens is within the wiping range of the windscreen wiper to
ensure a clear view even when it rains.
·A protective lm on the lens will affect the video or photographic effect, remove
the protective lm before using the device.
·Do not touch the lens with your ngers. Finger grease may be left on the lens
and will result in unclear videos or snapshots. Clean the lens on a regular basis.
·Do not install the device on a tinted window. Doing so may damage the tint lm.
·Make sure that the installation position is not hindered by the tinted window.
·To use the contained car power adaptor only. In order to avoid equipment burn
or cause the battery explosion, please do not use other brand car power adaptor.
.
Do not attempt to disassemble or alter any part of the device that is not
described in this guide.
Caution
·Due to local laws and vehicles safety considerations, do not operate the
device while driving.
·Set up time and date accurately before you use this device.
·This product gets warm when in use, this is normal.
·Do not place the device near a heat source or directly expose it to ame or heat.
·Never place the device in vicinity of equipments generating strong
electromagnetic elds. Exposure to strong magnetic elds may cause
malfunctions or data corruption and loss.
·The system is used only for non-commercial use, within the maximum limits
permitted by applicable law. Our company does not accept any responsibility
for any data loss during the operation.
·Improper use or operation of the product may result in damage of the product
or its accessories and void the warranty.
Before you start using the system, it is assumed that you agree to the
above statement.
Polaroid·DS301
EN-2EN-1
Polaroid·DS301

EN-4EN-3
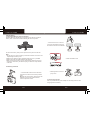
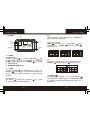
1.3 Product Overview
1
2
3
4
5
6
7
9
10
11
12
13
14
15
Rear camera
USB port
VIDEO port (for rear camera)
Mount slot
Power button
OK button
HDMI interface
Up button
Down button
Mode button
Microphone
SD card slot
Reset button
LED light
1 Introduction
Thank you for purchasing this advanced Driving Recorder. This device is
specically designed for real time video , audio recording.
1.1 Features
·Full HD 1080p Dual Camera Driving Recorder
·Front Camera Full HD 1080P at 30fps
·Rear Camera Full HD 1080p at 30fps
·2 Megapixel CMOS Sensor
·3.0” TFT Display
·155˚ Wide Angle Lens
·Support up to 32GB Micro SD Memory Card
·G-sensor Collision Recording Protection
·Seamless Loop Recording
1.2 Package Contents
The package contains the following items. In case there is any missing
or damaged item, contact your dealer immediately.
Inside your package
8
16
Menu button
Video port
Driving Recorder
Rear Camera
3M Mount
Car Power
Adaptor
3 Suction Cups
USB Cable
User Manual
Warranty Card
Polaroid·DS301Polaroid·DS301
5.5m Video Cable
1
2 3
4 65
7
8
9
10
11
12
13
14
15
16

EN-6EN-5
2 Getting Started
2.1 Inserting the Memory Card (not included)
Follow the direction indicated by the silk printing on the device to insert the
memory card, a click sound is heard indicating the card is in position.
To remove the memory card, push to eject the memory card out of the slot.
Note:
1. Do not remove or insert the memory card when the device is turned on. This
may damage the memory card.
2. Please use a Class 6 or higher rating Micro SD card, max. up to 32GB.
3. Please format the micro SD card before the initial use.
4. When removing the memory card, be careful that the card may spring out
and get lost. The memory slot has this spring-out feature for easy removal
of the card.
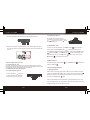
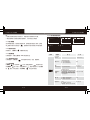
2.2 Installing in Vehicles
←Push the head of the mount into the device
slot, make sure the mount is securely locked in
place.
Note: To use suction mount, please remove the
3M base from the mount and then tted 3
suction cups into the mount.
→ Rotating the device to have
proper view.
→Position the mount or 3 suction
cups on the windshield, make sure
the mount is xed on the windshield.
2.3 Connecting to Power
Use only the attached car power adaptor for activating the device and
charging the built-in battery.
(not included)
Polaroid·DS301 Polaroid·DS301
←Cables installation chart

EN-8EN-7
2.4 Powering the Device On / Off
2.4.1 Auto Power On / Off
Once the vehicle engine is started, the device automatically turns on and
recording (must have SD Card). After the car engine stopped, the device will
automatically save the last recorded le and shutdown.
2.4.2 Manual Power On / Off and Reset
2.4.2.1 Manual Power On / off
1. Connect one end of power connector to USB port on the device.
2. Plug the other end of the power adaptor to the cigarette lighter socket of
your vehicle. Once the vehicle engine is started, the device automatically
turns on.
Press Power button to turn it on.
To power off the device press the
Power button with 3 seconds.
2.5 Set the Date / Time
To set the correct date and time, press Menu button to enter the menu
setting, then press Up / Down button to select 2015/01/19 17:56 ,
press OK button to enter date / time setting, then press Up / Down button
to adjust the value, press Mode button switch to next setting, after
nished all the settings, press OK button to back menu option, press
Menu button to exit from menu setting.
2.4.2.2 Reset the Device
2.6 Mode Selection
The default setting is Video Mode , press Mode button can switch to
Videos View Mode .
3 Using the Driving Recorder
3.1 Recording Videos
Before starting recording, please insert a SD card (not included) into the SD
card slot. Press OK button to start recording, the video recording icon
ashes on the screen. The recorded les are saved on the SD card. To stop
recording, press OK button again.
In case the device fails to function
normally due to unknown causes, press
the button, then press the button
to restart the device.
With car power adaptor connected the device will automatically turn on and
start recording when the car engine starts. When the engine stops, the device
will automatically save the last le and turn off.
Polaroid·DS301 Polaroid·DS301

EN-10EN-9
Remove the protection for current movie clip:
Press Power button again to remove protection for current movie clip,
lock icon will disappear from the screen, the movie clip will not be
protected and can be replaced if the SD card is full.
Note:
The recording will stop automatically and the screen will show SD card is full
if the SD card is full of protected les. To continue recording, please change
a SD card or delete the protected les manually.
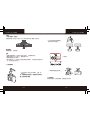
Manual remove lock from videos steps:
Press Mode button switch to Playback Mode (1), press Up/Down
button to the locked le (2), then press Power button to unlock
the protection of the le, the lock icon will disappear from the le(3).
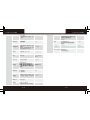
3.1.1 The Recording Screen
3.1.2 Dual Camera Recording
The default setting is dual camera recording.
On the video recording mode, press Menu button to enter menu setting,
then press Up/Down button to Output Dual Mode, press OK button ,
then press Up/Down button to select Output Dual Mode, press OK
button conrm and back menu setting, then press Menu button
to exit menu setting, dual camera recording display on the screen.
Note: The similar way to display the front camera or rear camera on the
screen.
3.1.3 A Key Protection
During recording, press Power button to protect current video, the lock
icon appears on the screen, the current movie clip will be protected and
cannot be replaced (the default setting for a movie clip is 3-minute), the next
movie clip will unlock automatically and can be replaced if the SD card is full.
101-006
(1)
101-006
(2)
101-006
(3)
Note:
To protect the recording le, press Up/Down button to the le(1), press
Power button to lock the le, the lock icon will appear on the
le(2), the le is protected.
101-006
(2)
101-006
(1)
Polaroid·DS301 Polaroid·DS301
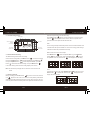
0.0EV 2015/05/26 14:43:46
1920
1080
Video recording mode
Resolution
Power adaptor
SD card status
Front camera
exposure value
System date & time
Audio status
0.0EV
Rear camera
exposure value

EN-12EN-11
3.1.9 Video Menu Operation
Press Menu button to enter menu setting , press Up / Down button
to select sub menu, then press OK button to enter the setting,
press Up / Down button conrm. After nished the setting, press Menu
button again to exit menu setting.
3.1.10 Video Menu Options
3.1.4 Motion Detection
If Motion Detection is activated (the default setting is Off), the motion
detection icon appears on the top of the screen, and if the device is
powered on and standby for recording, it will recording automatically once
the device detected any motion in front of lens within 2.5m, the device will
stop recording and standby for next detection if no motion detected within
15 seconds recording.
Notes:
1. When the battery is fully charged and is in good condition, the device can
record continuously for about 10 minutes.
2. As the device is used, the battery storage capacity will decrease gradually.
This is normal phenomenon for the battery.
3.1.5 G-sensor Collision Recording Protection
If the setting for G-sensor is 2G / 4G / 8G, the lock icon will appear on
the screen when a collision is detected while recording, the current movie
clip will be protected automatically and can not be replaced.
3.1.6 Audio On / Off
During recording, press Menu button can turn Off / On the audio.
3.1.7 Adjusting EV
On the Video Mode or during recording, press UP/Down button can
adjust the exposure value.
3.1.8 Switch Screen Display
During recording, press Mode button can switch screen display to be
front camera, rear camera, dual camera recording.
0.0EV 2015/05/26 14:43:46
1920
1080
1920x1080 30P 16:9
Date stamp: ON
Record Time: 3 min
0.0EV 2015/05/26 14:43:46
1920
1080
Lcd auto power off: Off
Motion detect: Off
G-Sensor: 4G
Mute Mic: Off
0.0EV 2015/05/26 14:43:46
1920
1080
Language
Light Freq: 50Hz
Output Front Mode
Volume
0.0EV 2015/05/26 14:43:46
1920
1080
AE bias
2015/01/14 06:48
Plate setup
0.0EV 2015/05/26 14:43:46
1920
1080
DS301.VYYYYMMDD
Main Menu Function List
Description
Available Option
Setting for video resolution.
1920*1080 30P 16:9
1280*720 30P 16:9
Setting for enabling automatic loop record and
the movie clip time.
Off - The recording will stop when the SD card
is full.
Record Time: 1 min
Record Time: 2 min
Record Time: 3 min
Record Time: Off
1920x1080 30P 16:9
Setting for the indication of date and logo
stamp on the video recorded.
ON - Date and logo is displayed on the video.
Off - No date or logo is displayed on the video.
Date stamp: Off
Date stamp: ON
Date stamp: ON
Setting for rear camera recording resolution.
Rear CH: 1920 x 1080 30P
Rear CH: 1280 x 720 30P
Rear CH:
1920 x 1080 30P
Record Time: 3 min
Polaroid·DS301 Polaroid·DS301
0.0EV
0.0EV 0.0EV
0.0EV 0.0EV
Default set
Format
Rear CH Mirror: Off
Rear CH: 1920 x 1080 30P

EN-14EN-13
1 Minute / 2 Minutes / 3 Minutes – Select to
limit recording time per le.
3 Minutes, for example, the recording time for per
le is 3 minutes. If 21 minutes of video is recorded,
then 7 les of 3 minutes in length is created.
Manage the backlighting and presentation of the
LCD. It is advisable to enable this feature to
preserve battery power.
Off - Select to disable power saving for the LCD.
This is the default setting for this option.
1 min / 3 min – The driving recorder
automatically shut down the LCD after 1 min/3
min of inactivity or during video recording.
Note: If enabled, the driving recorder continues
to record video even when the LCD is shut off.
Press any button to power up the LCD.
Lcd auto power off: Off
Lcd auto power off: 1 min
Lcd auto power off: 3 min
Setting for activating the motion detection.
On: Select this to enable the motion detection.
Off: Disable the motion detction.
Motion detect: Off
Motion detect: ON
Setting for the sensitivity of G-sensor to detect
collision to protect the recording video.
Off - Disable the G-sensor function.
2G / 4G / 8G - The higher sensitivity the collision
will be detected easier. The default setting is 4G.
G-Sensor: 2G
G-Sensor: 4G
G-Sensor: 8G
G-Sensor: Off
Setting for the audio recording volume.
0,+1,+2,+3,+4,
+5,+6,+7
Setting for activating audio in the video.
Off - This enables the audio recording.
This is the default setting for this option.
On - This records video without audio.
Mute Mic: Off
Mute Mic: ON
Setting for the camera recording display on the
screen.
Output Front Mode: Only the front camera
recording display on the screen.
Output Rear Mode: Only the rear camera
recording display on the screen.
Output Dual Mode: The dual camera recording
display on the screen.
Output Front Mode
Output Rear Mode
Output Dual Mode
Setting for mirroring recording of rear camera.
Off: Disable mirroring recording.
ON: Enable mirroring recording
Rear CH Mirror: Off
Rear CH Mirror: ON
Manual compensation for low or bright light levels.
The more negative “-“in scale, the darker the
recorded video appears. The more positive “+”,
the lighter the recorded video appears. 0 is the
neutral setting for this option and is the default
value.
Mute Mic: Off
Lcd auto
power off: Off
Motion detect: Off
G-Sensor: 4G
Volume
Select the desired OSD language.
English / 简体中⽂ /
繁體中⽂
Language
Set the suitable frequency.
Light Freq: 50Hz
Light Freq: 60Hz
Light Freq: 50Hz
Output Dual Mode
Rear CH Mirror:
Off
AE bias
+2.0 / +1.0 / +0.0
/ -1.0 / -2.0
Set the system date and time.
2015/01/10 22:02
Setting for the plate information stamp on the
video recorded.
The default setting is 000000000, no plate
information.
Note: For simple Chinese, can set Chinese,
letters and numbers; for traditional Chinese and
English, only can set letters and numbers.
Plate setup
Format the inserted micro SD card.
YES - Selecting this option completes the format
process.
NO - Select this to abort the format.
Warning: ALL les are be permanently deleted and
CANNOT be recovered once the memory card is
formatted.
Format
YES / NO
This option sets the driving recorder to the original
factory default settings.
Default set
YES / NO
This option displays the current rmware number
of the driving recorder. This information may be
important for service and support communications.
DS301.VYYYYMMDD
YES / NO
Polaroid·DS301 Polaroid·DS301

EN-16EN-15
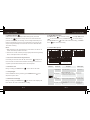
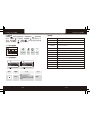
3.2 Playing Videos
Press Mode button switch to videos view mode, press Up / Down button
to select the video to play, press OK button to playing mode, then
press OK button again to start playing video. Press OK button
can pause the playing, press Mode button to back videos view mode,
then press Mode button again to back video recording mode.
3.2.1 Play Video Screen
101-006
Videos
view mode
Power
adaptor
SD card
status
Video
name
101-006
3.2.2 Playback Menu Options
Main Menu Function List
Description
Available Option
This option allows for the deletion of one or all
video les from the memory card.
Delete Current - This option allows a single
video to be deleted from the micro SD memory
card per action.
Delete All - This option allows all video les to
be deleted from the micro SD memory card per
action.
Note: To delete the protected les, please
unlock the protection before deletion.
Warning: Deleted les cannot be recovered.
Ensure the les have backup before deletion.
Delete Current
Delete All
Delete Current
4 Technical Specications
LCD display
3.0" color TFT screen
Image sensor
2.0MP, 1/2.7" CMOS sensor
1920 x 1080 30P 16:9
1280 x 720 30P 16:9
Video resolution
Picture resolution
12M (Interpolated)
Video format
Mp4
Picture format
JPG
Memory
Support Class 6 or higher rating Micro SD card,
maximum up to 32GB
Microphone
Built-in
Speaker
Built-in
G-sensor
Yes
Power source
Built-in battery, car power adaptor
Interface
Micro USB 2.0, SD card slot, VIDEO port, HDMI interface
Operating temperature
0°~ 45° C
Dimensions
95mm*55mm*38mm
Weight
77g
View angle
155°
Polaroid·DS301 Polaroid·DS301
Delete Current Delete All

1080p全高清双录行车记录仪
使用说明书
China toll free No.:
400-8401030
(For other region, please
contact the local agent.)

EN-1
有關本手冊 .......................................................................................1
電池注意事項 ....................................................................................1
安裝須知 ..........................................................................................1
安全注意事項 ....................................................................................2
1 導論..............................................................................................3
1.1 功能 .......................................................................................................3
1.2 包裝內容 ................................................................................................3
1.3 產品概要 ................................................................................................4
2 開始.............................................................................................5
2.1 插入存儲卡.............................................................................................5
2.2 安裝於車內.............................................................................................5
2.3 連接電源 ...............................................................................................6
2.4 設備開/關 ..............................................................................................7
2.4.1 自動開/關 ...........................................................................................7
2.4.2 手動開/關及重置設備 .........................................................................7
2.4.2.1 手動開/關機 ....................................................................................7
2.4.2.2 重置設備 ........................................................................................8
2.5 時間設定 ..............................................................................................8
2.6 模式選擇 ..............................................................................................8
3 使用行車記錄儀...........................................................................8
3.1 錄影 ......................................................................................................8
3.1.1 錄影畫面 ............................................................................................9
3.1.2 雙錄視頻 ............................................................................................9
3.1.3 一鍵保護 ............................................................................................9
3.1.4 運動檢測 ...........................................................................................10
3.1.5 重力感應 ...........................................................................................11
3.1.6 關閉/開啟錄音 ...................................................................................11
3.1.7 調整曝光值 ........................................................................................11
3.1.8 屏幕顯示畫面切換...............................................................................11
3.1.9 使用功能表 ........................................................................................11
3.1.10 錄影模式功能表選項 ...................................................................12
3.2 播放錄影 ............................................................................................15
3.2.1 錄影檔瀏覽畫面 .....................................................................................15
3.2. 2 重播功 能表選項 ... .. .. ..... .. ....... .. ..... .. ....... .. ..... .. ......... .. .. .. .......15
4 技術規格 .....................................................................................16
Polaroid·DS301

有關本手冊
本手冊中的內容資訊僅供參考,如有更改,恕不另行通知。本公司已儘量確保本使
用手冊的正確與完整,但有任何錯誤與遺漏,概不負責。廠家保留不需事先通知,
直接更改技術規格的權利。
電池注意事項
· 請務必使用隨附的車載充電器進行充電。電池處置不當可能導致爆炸。
· 切勿拆卸電池或在電池上鑽孔,切勿使電池短路。
· 電池暴露在明火下可能爆炸。處理電池時切勿放入火中。
· 請按照當地法規處理廢電池。
· 切勿自行更換電池;請交由經銷商進行更換。
安裝須知
· 本產品應安裝在靠近後視鏡之處,並儘量接近前擋風玻璃中央位置,以獲得最好的
視野。
· 確定鏡頭是在擋風玻璃雨刷的範圍內,確保視野良好,即使雨天也同樣好。
· 鏡頭上的保護膜會影響錄影或拍照效果,使用前務必撕掉鏡頭上的保護膜。
· 不要用手指觸摸鏡頭。手指上的油脂可能會留在鏡頭上,導致攝像或攝影不清楚。
定期清潔鏡頭。
· 不要將產品安裝在有色車窗上。因為這樣會損壞淺色薄膜。
· 確定安裝位置不會受有色車窗的阻礙。
· 本設備僅適用產品所附之車載充電器,請勿使用其他廠牌以免設備燒毀或導致電池
爆炸。
如本指南未說明,請勿拆卸或改動本產品的任何配件或零部件。
TC- 2TC- 1
安全注意事項
· 使用者須遵守當地法律並以行車安全為優先考量,請勿於行車中操作本設備。
· 使用設備前請先確認日期與時間已設置完成。
· 本產品使用時會變熱,這屬於正常現象。
· 請勿將本產品靠近熱源或與火焰、高溫接觸。
· 請勿將本產品靠近產生強大電磁場的設備或環境,與強磁場接觸可能會導致發生故
障或資料損壞、丟失。
· 本設備僅供使用於非商業用途,適用法律允許的最大限度內,本公司對使用者因使
用本設備造成之損失不承擔任何責任。
· 產品使用或操作不當可能導致產品或其附件損壞,並會使保修失效。
開始使用本設備視為同意以上聲明事項。
Polaroid·DS301 Polaroid·DS301

1 導論
謝謝購買這套先進的行車記錄儀。這套設備專門用在行車時的即時錄影、錄音。
1.1 功能
1080p全高清雙錄行車記錄儀
前置記錄儀:全高清1080p
後置記錄儀:全高清1080p
200萬像素CMOS
3.0寸彩色液晶顯示屏
155度廣角鏡頭
支持高達32GB外置Micro SD儲存卡
重力感應保護當前文件檔
無縫循環錄影
1.2 包裝內容
以下為包裝清單。如果有任何遺漏或損壞項目,請立即聯繫您的經銷商,外觀請依
實際內容物為主。
TC- 4TC- 3
1.3 產品概要
1
2
3
4
5
6
7
9
10
11
12
13
14
15
後置攝像頭
USB接口
後置攝像頭接口
支架槽
電源鍵
Ok鍵
HDMI接口
向上鍵
向下鍵
模式鍵
麥克風
存儲卡槽
復位鍵
LED燈
8 16
菜單鍵 視頻線接口
行車記錄儀
後置攝像頭
吸盤支架
車載充電器
說明書, 保用證
3个吸盤
USB線
5.5米視頻線
包裝內容
Polaroid·DS301 Polaroid·DS301
1
2 3
4 65
7
8
9
10
11
12
13
14
15
16

← 佈線圖
→ 旋轉設備調整合適視角。
2 開始
2.1 插入存儲卡(不包含)
按產品絲印指示方向插入存儲卡,推入存儲卡直到咔嗒一聲插入定位為止。
取出存儲卡
往裡推存儲卡,彈出插槽。
注意:
1. 設備在開機狀態時,不要取出或插入存儲卡,以免損壞存儲卡。
2. 請使用存儲卡Class 6或以上,最高支援32GB。
3. 使用前請先格式化存儲卡。
4. 取出存儲卡時,小心存儲卡快速彈出導致遺失存儲卡,此為存儲卡插槽彈片特
性,便於使用者易於取出。
2.2 安裝與車內
→ 將支架座輕壓於擋風玻璃上。
確認支架已牢牢固定。
← 將支架頭推入設備上的支架槽中,注意一定
要到位。
注:如果要使用吸盤支架,則請拆卸3M膠底座,
裝上3個透明的小吸盤。
2.3 連接電源
限使用產品所附之車載充電器,啟動設備以及充電。
TC- 6TC- 5
Polaroid·DS301 Polaroid·DS301
( 不包含 )

2.4.2.2 重置設備
1. 將車載充電器的一端連接到設備的 USB接口。
2. 將車載充電器的另一端插接汽車內的
點煙器的插孔。汽車引擎一旦發動,
設備即自動開機並錄影。
2.4 設備開/關
2.4.1 自動開/關機
連接車載充電器後,汽車引擎發動會自動開機並開始錄影(須有存儲卡情況下)。
汽車引擎停止後,設備會自動保存最後錄製的文檔並關機。
2.4.2 手動開/關機及重置設備
2.4.2.1 手動開/關機
長按電源鍵 開機,再長按電
源鍵 3秒關機。
當設備因不明因素導致無法正常操作,請按
內復位鍵 ,再按電源鍵 重新啟動。
TC- 8TC- 7
2.5 日期/時間設置
設置正確的日期和時間。開機後按菜單鍵 進入菜單設置,再按向上/向下鍵
選擇2015/01/19 17:56,按錄影鍵 進入日期和時間設置,按向上/向
下鍵 調整數值,按模式鍵 進入下一項設置,全部完成正確設置後,
按錄影鍵 確認並返回到設置功能表,按菜單鍵 退出功能表設置。
2.6 模式選擇
出廠預設設置為錄影模式 ,按模式鍵 可切換到錄影重播模式 。
3 使用行車記錄儀
3.1 錄影
開始錄影前,請確保已插入存儲卡(不包含)。按錄影鍵 開始錄影,錄影
圖示 閃爍;錄影文檔保存在存儲卡上;若需停止錄影,請再按錄影鍵 。
如設備在車內連接車載充電器,預設設置為汽車引擎開啟時自動開機並開始錄
影,汽車引擎停止後保存檔並停止錄影。
Polaroid·DS301 Polaroid·DS301

備註:
如果所有文檔都被保護,則存儲卡錄滿後錄影自動停止;如需繼續錄影,需
更換存儲卡或把存儲卡內文檔手動刪除。
手動解除錄影檔案保護步驟:
按模式鍵 切換到重播模式(圖一),再按向上/向下鍵 選擇已
保護的視頻檔(圖二),再按電源鍵 會直接取消保護,鎖定圖示
消失即解除保護(圖三)。
3.1.1 錄影畫面
3.1.2 雙錄視頻
預設設置為雙錄視頻。
在錄影模式下,按菜單鍵 進入功能表設置,再按向上/向下鍵 選擇
輸出雙路,按錄影鍵 進入選擇,再按向上/向下鍵 選擇輸出雙路,
再按錄影鍵 確認並返回功能表設置,再按功能表鍵 退出功能表設
置,螢幕會顯示雙路視頻。
注:輸出前路或輸出後路設置方式同上。
3.1.3 一鍵保護
在錄影過程中,按電源鍵 進行一鍵保護當前錄影片段,螢幕的上方會出
現鎖形圖示 ,這時錄製的當前片段(時長取決於單段影片時間設置,默
認3分鐘)會被保護起來,被保護的片段不會被替換;下一個錄影片段會自動取
消錄影保護。
取消當前錄影片段保護:
再按一次電源鍵 取消保護,螢幕上方的鎖定圖示 消失,這時錄製
的片段不會被保護並在存儲卡滿時會自動刪除替換。
TC- 10TC- 9
錄影模式
分辨率
車充圖示
存儲卡圖示
前置攝像頭曝光值
日期和時間
錄音狀態
0.0EV 2015/05/26 14:43:46
1920
1080
0.0EV
後拉攝影像頭
曝光值
101-006
(1)
101-006
(2)
101-006
(3)
備註:
手動保護錄影檔,按向上/向下鍵 選擇自己需要保護的視頻檔(圖一),
再按電源鍵 視頻檔上出現鎖形圖示 即保護此視頻(圖二)。
101-006
(2)
101-006
(1)
3.1.4 移動偵測
在開啟移動偵測功能後(預設為關閉),螢幕上方會出現移動偵測圖示 。
設備在開機待機錄影時,如果偵測到距鏡頭2.5m以內有移動的物體會自動錄
影,錄影時在15秒內如果沒有偵測到移動的物體會自動停止錄影,等待下一次
移動物體的偵測。
Polaroid·DS301 Polaroid·DS301

3.1.10 錄影模式功能表選項
注:
1. 在電池充滿電與狀態良好的情況下,移動偵測可持續時間約10分鐘。
2. 電池的蓄電能力會隨著設備使用逐漸減少,此為電池的正常現象。
3.1.5 重力感測器
當行車時遇到碰撞、搖晃或振動等情況時,設備會自動啟動重力感應,這時螢
幕上會顯示保護片段鎖形圖示 ,當前錄製片段會被保護起來不會被替換。
3.1.6 關閉/開啟錄音
錄影模式下,按菜單鍵 可關閉/開啟錄音。
3.1.7 調整曝光值
在錄影過程中,按向上/向下鍵 可調整曝光值。
3.1.8 螢幕顯示畫面切換
在錄影過程中,按模式鍵 可切換螢幕顯示前路、後路、雙路錄影。
3.1.9 使用功能表
按菜單鍵 進入錄影菜單 設置,按向上/向下鍵 來選擇功能表,
再按錄影鍵 進入選項,按向上/向下鍵 確定所要的選項,再按錄影
鍵 確認。完成設置後,再按菜單鍵 可退出菜單設置。
TC- 12TC-11
0.0EV 2015/05/26 14:43:46
1920
1080
1920 x1080 30P 16: 9
時間水印:開
後路:1920x1080 30P
錄像時間大小:3分鐘
0.0EV 2015/05/26 14:43:46
1920
1080
靜音: 關
自動關屏:關
移動偵測:關
重力傳感器:4G
0.0EV 2015/05/26 14:43:46
1920
1080
音量大小
語言
光頻: 50Hz
輸出雙路
0.0EV 2015/05/26 14:43:46
1920
1080
後路鏡像:關
曝光補償
2015/01/10 15:41
車牌設置
0.0EV 2015/05/26 14:43:46
1920
1080
格式化
恢復預設值
0.0EV 0.0EV0.0EV
0.0EV 0.0EV
DS301.VYYYYMMDD
主菜單 功能選項
描 述
選 項
設置錄影解析度。
1920*1080 30P 16:9
1280*720 30P 16:9
設置顯示在錄影檔上的資訊。
開:顯示日期時間在錄影檔上。
關:不顯示日期時間在錄影檔上。
關/開
設置後拉攝像頭的錄影解析度。
1920*1080 30P 16:9
1280*720 30P 16:
設置循環錄影片段的時間。
關 – 選擇此選項在存儲卡錄滿時會自動停止錄影。
1分鐘/2分鐘/3分鐘 – 設置循環錄影分段單個錄
影片段時間,例如選擇3分鐘,則循環錄影的每
個錄影片段為3分鐘,如果錄影21分鐘,則會有
7個3分鐘的錄影片段
1分鐘/2分鐘/3分鐘/關
1920x1080
30P 16:9
時間水印:開
後路:
1920x1080 30P
錄像時間大小:
3分鐘
開啟或關閉錄影時的聲音。
開:關閉聲音,錄影檔不會有聲音。
關:開啟聲音,預設為此選項。
靜音: 關
關/開
設置在錄影時是否關掉螢幕顯示省電,以及關
屏時間。
關:不關屏省電,預設為此選項。
1分鐘/3分鐘:錄影時在1分鐘/3分鐘內如果無
關/1分鐘/3分鐘
自動關屏:關
Polaroid·DS301 Polaroid·DS301

TC- 14TC-13
操作,會自動關屏。
注:選擇自動關屏時間後,會繼續錄影,可以按
任一鍵開屏。
設置重力感應碰撞的靈敏度。
關:關閉重力感應功能,碰撞時不會重力感應保
護當前文檔。
2G/4G/8G:重力感應設置的數字越低,越容易
感應到碰撞保護當前文檔。默認為4G。
2G/4G/8G/關
設置聲音的音量(0最小,7最大)。
0,+1,+2,+3,+4,
+5,+6,+7
設置功能表語言。
English / 简体中文 /
繁體中文
設置選擇適合市電的頻率。
50Hz/60Hz
開啟或關閉移動偵測。
開:開啟移動偵測。
關:關閉移動偵測。
關/開
手動調整補光,負值越大,光線會越暗,正值越
大,光線越明亮,默認設置是0,為自然的光亮度。
+2.0/+1.0/+0.0
/-1.0/-2.0
移動偵測:關
重力傳感器:4G
音量大小
語言
光頻: 50Hz
選擇在螢幕預覽的畫面。
輸出前路:螢幕顯示為前置攝像頭的畫面。
輸出後路:螢幕顯示為後拉攝像頭的畫面。
輸出雙路:螢幕顯示為前後兩個攝像頭的畫面。
注:如果未接後拉攝像頭,此功能表顯示為灰色,
無法選取。
輸出前路/輸出後路/
輸出雙路
輸出雙路
設置後置攝像頭鏡像顯示。
開:開啟鏡像顯示。
關:關閉鏡像顯示。
開/關
後路鏡像:關
曝光補償
設置系統日期時間。
2015/01/10
15:41
設置錄影文件上的車牌號碼。
如果設置為000000000,則影片不顯示車牌號,
車牌設置
預設為此選項。
注:簡體中文可以設置文字、字母和數位;繁體
中文和英文只可以設置字母和數字。
格式化存儲卡
是:選擇此選項確認格式化。
否:選擇此選項放棄格式化。
警示:選擇格式化後,所有的錄影檔會被刪除,
不可恢復。
格式化
恢復出廠設置。
恢復預設值
當前的軟體版本號。
此資訊對售後服務很重要。
DS301.VYYYYMMDD
是/否
是/否
Polaroid·DS301 Polaroid·DS301

TC- 16TC- 15
3.2.2 重播功能表選項
刪除當前:刪除當前所選擇的的影片。
刪除所有:刪除所有的影片。
已保護的錄影檔需要先解除保護,再進行刪除。
警示:刪除的檔不能恢復。刪除前,請確保檔
留有備份。
刪除當前
刪除所有
刪除當前
3.2 播放錄影
按模式鍵 切換到錄影檔瀏覽模式,按向上/向下鍵 選擇需要播放
的影片,按錄影鍵 進入播放畫面,再按錄影鍵 開始播放錄影,如
需暫停,請再按錄影鍵 ,按模式鍵 可停止播放並返回到錄影檔
瀏覽模式,再按模式鍵 可返回到錄影模式。
3.2.1 錄影檔瀏覽畫面
101-006
錄影檔流覽模式
車充圖示
存儲卡圖示
檔案名稱
101-006
主菜單
功能選項
描 述
選 項
4 技術規格
螢 幕
3.0寸彩色螢幕
影像感測器
2百萬像素,1/2.7"
1920 x 1080 30P 16:9
1280 x 720 30P 16:9
影像解析度
錄影格式
Mp4
存儲卡
支援Class 6以上的Micro 存儲存儲卡,最高支援32GB
麥克風
是
揚聲器
是
重力感應
是
電 源
內置可充電電池、車載充電器
接 口
Mini USB接口、視頻接口、存儲卡槽、HDMI接口
工作溫度
0°~ 45° C
尺 寸
95mm x 55mm x 38mm
重 量
77g
視 角
155 度
Polaroid·DS301 Polaroid·DS301
刪除當前 刪除所有
ページが読み込まれています...
ページが読み込まれています...
ページが読み込まれています...
ページが読み込まれています...
ページが読み込まれています...
ページが読み込まれています...
ページが読み込まれています...
ページが読み込まれています...
ページが読み込まれています...
ページが読み込まれています...
-
 1
1
-
 2
2
-
 3
3
-
 4
4
-
 5
5
-
 6
6
-
 7
7
-
 8
8
-
 9
9
-
 10
10
-
 11
11
-
 12
12
-
 13
13
-
 14
14
-
 15
15
-
 16
16
-
 17
17
-
 18
18
-
 19
19
-
 20
20
-
 21
21
-
 22
22
-
 23
23
-
 24
24
-
 25
25
-
 26
26
-
 27
27
-
 28
28
-
 29
29
-
 30
30