ND795说明书 / 尺寸:70*100mm / 四色印刷 / 铜板纸157G /文字内容要与纸张页面居中 / 20页骑马钉英文封面(前)
英文封底
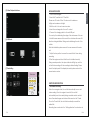
6.86" TOUCH IPS SCREEN
User Manual
ND795
nakamichihomeaudionakamichicaraudio.com Nakamichi.global

英文内页(左) 英文内页(右)
INTRODUCTION
ACCESSORY LIST
Thank you for your purchase and welcome to the world of Nakamichi! Please
keep your original proof of purchase or invoice in a safe place in case of any
warranty claims. Do also mail or register your warranty with the official Naka
michi service centers and/or agents to ensure that you are provided with the
relevant technical support if required.
1. User Manual
2. DVR
3. Wires
4. Rear Camera
5. Car Charger
6. 3M Glue
7. Screws
1pc
1pc
2pcs
1pc
1pc
1pc
2pcs
SPECIFICATIONS
CONTENTS
Introduction
Accessories list
Specification
Dimensions
Panel controls and features
Touch TP
Installation guide
Function introduction
2 EN
2 EN
2 EN
3 EN
4 EN
5 EN
8 EN
9 EN
2 EN1 EN
Product Name
Product Size
Net Weight
Front Resolution
Rear Resolution
Lens Angle
Video Resolution
Language
Compression Format
Video Format
Touch Panel
Storage Temperature
Operating Temperature
Driving Video Recorder
302x33x85 (Unit:mm)
330g
500W
854x480
170 degrees
1920x1080,30fps
Chinese (Simplified), Chinese
Traditional, Russian, Spanish,
English, Thai, etc.
H.264
MOV
Single Touch
-20 ° C ~ 70 ° C
0°C~50°C
English
Operating Humidity
Memory Card Capacity
Battery
Input Voltage

PANEL CONTROLS AND FEATURES
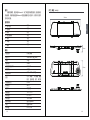
DIMENSIONS(UNIT: MM)
4 EN3 EN
302mm
85mm
33mm
A
B
C D
G
M
E
F
Operating Humidity
Memory Card Capacity
Battery
Input Voltage
15-65% RH
Max Capacity 64GB
Capacity 500mA
DC5V/1.5A
A. Speaker:
Unit broadcasts sound through the speaker here.
B. Reset Button:
If the recorder is unresponsive, please reset the unit here using a sharp
object.
C. Attachment Point:
This mounts the unit to the rear view mirror.
D. Front Camera:
This is the main camera of the unit.
E. TF Card Slot:
Insert a compatible TF card here.
English
H I J K
L

PANEL CONTROLS AND FEATURES
DIMENSIONS(UNIT: MM)
4 EN3 EN
302mm
85mm
33mm
A
B
C D
G
M
E
F
Operating Humidity
Memory Card Capacity
Battery
Input Voltage
15-65% RH
Max Capacity 64GB
Capacity 500mA
DC5V/1.5A
A. Speaker:
Unit broadcasts sound through the speaker here.
B. Reset Button:
If the recorder is unresponsive, please reset the unit here using a sharp
object.
C. Attachment Point:
This mounts the unit to the rear view mirror.
D. Front Camera:
This is the main camera of the unit.
E. TF Card Slot:
Insert a compatible TF card here.
English
H I J K
L

6 EN5 EN
F. Rear Camera Interface:
Connect the rear camera through this port.
G. USB Power Supply:
Connect the power supply to the unit here.
H. Date and Time Display:
I. Video Recording Interface:
Access video recording functions.
J.
Touch into camera interface:
Enter camera interface;
k. Playback Interface:
Access playback functions.
L. Settings Interface:
Access unit settings.
M. Power Button:
When the unit is turned off, press and hold the button for 2 seconds
to turn the unit on.
When the unit is turned on, press and hold the button for 2 seconds
to shut down the unit.
When the unit is turned on, short press the unit to turn the screen on
and off.
TOUCH PANEL
You can also operate the unit using the touch panel
(1)
Video Recording Interface
(2) Photo Recording Interface
(3) Main Interface
(4) Setting Interface
Protection Shutdown Frequency key Sound
Language
Default
Date&Time Format Version
English
Setting
Photo/Video
Menu
Photo
Setting
Photo/Video
Menu
Front/Rear Cam
Locked
Recording
Sound Record

(5) Video Playback Interface
(6) USB Mode
(7) Time Setting
INSTALLATION GUIDE
1. Turn off the car engine.
2. Insert the TF card into the TF Card Slot.
Please use a TF card of Class 10 or above with a minimum
of 8gb and a maximum of 64gb.
3. Affix the unit to the car’s rear view mirror.
4. Insert the car charger into the car 12v socket.
5. Connect the charging cable to the units USB port.
You can lay the cable along the edge of the windscreen of the car.
6. Install the rear camera at the rear of the vehicle and be sure of it’s
direction during installation. Wiring can be laid along the roof of the
vehicle.
After the installation, please connect the rear camera to the main
unit.
7. Adjust the lens position to ensure the correct field of view during
recording.
8. Start the engine and check that the unit is installed correctly.
During normal operation, the system indicator will light up, and the
unit will start recording with the recording indicator flashing. Please
check the display and if the display is inverted, please contact the
nearest service centre.
FUNCTION INTRODUCTION
1. Automatic Recording
When the car engine starts, the unit will automatically turn on and
start recording. Once the engine is turned off, the unit will
automatically save the currently being recorded content and shut
down. Recorded images and videos will be saved on the TF card.
Once the TF card is full, the unit will automatically overwrite the
earliest file.
Recording time can be set in the “Settings Interface” and can be set
-Date time-
OK
2018 03 13
2019 04 14
2020 05 15
23 44
00 45
01 46
English
8 EN7 EN

from 1 minute / 3 minutes / 5 minutes / Closed.
a. If 1, 3 or 5 minute option is selected, the unit will overwrite the
earliest file once the TF card is full.
b. If the Close function is selected, the files will be saved in 3 minute
intervals but once the TF card is full the earliest file will not be
overwritten and the recording will stop.
c. The video is saved in the 1 and 2 folder in the DCIM folder of the TF
Card, with 1 saving front recordings and 2 saving rear recordings.
2. Manual Recording
Pressing the unit’s power button, and then pressing the enter button,
the unit will start manual recording, showing the recorded time. To
turn off, just press and hold the power button for 2 seconds and the
unit will shut down, saving all data before doing so.
3. Collision Detection
The built in collision sensor (G-Sensor) will detect if there is a serious
impact. Once it detects a collision, the unit will automatically lock the
recording and save it with a higher priority, and a lock image will be
shown on the upper left corner of the image. The locked image and
recording will not be overwritten during the regular recording loop.
a. Locked files are recorded beginning with SOS, normal recordings
are recorded beginning with REC.
b. The collision sensor can be adjusted for sensitivity in the settings
menu.
4. Vehicle Reversing
For this function, the camera must be connected to the reverse
sensor. The unit will function as per normal, but once the car is put into
reverse, the reverse image will be displayed. The unit will go back to
normal functions once the car is out of reverse mode.
5. Motion Detect
During standby mode, any movement infront of the unit’s camera will
be recorded automatically.
9 EN
前言
1 CN
繁體中文
前言
配件清單
規格
產品尺寸
面板控制和功能
觸摸TP
安裝指南
功能简介
2 CN
2 CN
2 CN
3 CN
4 CN
5 CN
7 CN
8 CN

前言
配件清單
感謝您的購買,歡迎來到Nakamichi!為了享受更好我們的服務,請妥善保管
原始發票。你最好發帖回到Nakamichi的指定服務代理人的副本,以便您可以獲得
更多技術支援。
1. 用戶手冊
2. 記錄儀
3. 綁帶
4. 後拉攝像頭
5. 車充
6. 3M膠
7. 螺絲
1個
1個
2個
1個
1個
1個
2個
規格
尺寸(單位:mm)
產品名稱
產品尺寸
淨重
攝影像素
後置攝像頭分辨率
鏡頭視角
錄像分辨率
存儲壓縮方式
視頻格式
觸摸TP
儲藏溫度
操作溫度
操作濕度
儲存卡容量
電池
標準電壓
行車記錄儀
302x33x85 (單位:mm)
330g
500W
854*480
170度
1920x1080, S/30幀
中文(簡體)、中文繁體、俄羅
斯文、西班牙語、英文、泰文等
H.264
MOV
單點觸摸
-20℃~70℃
0℃~50℃
15-65%RH
最大支持64GB
容量500mA
DC5V/1.5A
302mm
85mm
33mm
語言
2 CN
繁體中文
3 CN

a) 接後置攝像頭。
G. USB電源接口:
a) 接DC 5V電源。
H. 時間日期顯示:
I. 進入視頻界面觸摸:
a) 進入視頻錄像界面
J. 觸摸相機界面
a)進入攝像頭界面;
K. 進入播放屏幕觸摸:
a) 進入播放界面
L. 菜單界面觸摸:
M. 電源鍵:
a) 功能一:開關機功能
b) 在關機狀態下,長按2秒鐘【電源鍵】可開啟本機電源,機器自動開始工作。
c) 在開機狀態下長按【電源鍵】並保持2秒鐘本機自動保存錄像文件及用戶設置
並關機。
d) 功能二:關屏
e) 在開機狀態下,短按【電源鍵】可開啟或關閉屏幕
觸摸TP
在不使用按鍵操作的情況下,可點擊觸摸TP代替按鍵。
(1)錄像界面
A
B
C D
G
M
E
F
繁體中文
4 CN 5 CN
A. 揚聲器:
播放視頻或者有聲文件的擴音孔,做操音提醒。
B. RESET:
如記錄儀發生死機故障,按復位孔然後開機,她就可以正常工作了
C. 背夾固定鉤:
固定錄像機
D. 前置鏡頭:
觀察窗
E. TF卡槽:
a) 插TF卡,視頻文件將存入TF卡內。
F. 後置攝像頭接口:
面板控制和功能
前後路切換
設置選項
拍照
主菜單
加鎖
錄像
錄像聲音
H I J K
L

拍照鍵
-日期時間-
确认
2018 03 13
2019 04 14
2020 05 15
23 44
00 45
01 46
(2)拍照界面
(3)主菜單界面
(4)設置菜單界面
(5)視頻回放
(6)USB模式
(7)時間設置
安裝指南
1. 關閉汽車發動機。
2. 將TF卡插入記錄儀卡槽中。
【注意】請使用高速TF卡(Class10 以上),容量不小於8G,TF卡最大支持
64GB。
3. 將記錄儀固定於汽車的原後視鏡上。
4. 將車載充電器插入汽車點煙器中。
繁體中文
6 CN 7 CN
設置選項
切換錄像
主菜單

拍照鍵
-日期時間-
确认
2018 03 13
2019 04 14
2020 05 15
23 44
00 45
01 46
(2)拍照界面
(3)主菜單界面
(4)設置菜單界面
(5)視頻回放
(6)USB模式
(7)時間設置
安裝指南
1. 關閉汽車發動機。
2. 將TF卡插入記錄儀卡槽中。
【注意】請使用高速TF卡(Class10 以上),容量不小於8G,TF卡最大支持
64GB。
3. 將記錄儀固定於汽車的原後視鏡上。
4. 將車載充電器插入汽車點煙器中。
繁體中文
6 CN 7 CN
設置選項
切換錄像
主菜單

5. 用充電延長線將記錄儀的USB接口和車載充電器連接起來。
【注意】佈線時可將充電延長線沿汽車擋風玻璃邊緣敷設。
6. 將後置攝像頭安裝在車輛後部,安裝時注意方向。佈線可沿車輛頂棚敷設。
安裝完成後將後插頭接入記錄儀後置攝像頭接口。
7. 調整鏡頭位置,確保鏡頭與地面保持水平。
8. 發動引擎,檢查機器是否已安裝正確。
【注意】當機器安裝正確,系統工作指示燈點亮;機器啟動進入記錄狀態,錄像
指示燈閃爍。請注意檢查顯示屏上的畫面是否正常,如顯示畫面為倒像,請及時
與我們聯絡。
功能簡介
1. 使用自動記錄功能
啟動汽車發動機,記錄儀自動啟動並開啟記錄功能。關閉汽車發動機,記錄儀自
動保存記錄內容並關機。記錄的影像分段保存於TF卡上,當TF卡存儲滿後記錄
儀將覆蓋較早前錄製的影像。記錄的時間段可自行在“錄像界面的設置選項中設
置”,範圍為 1分鐘/3分鐘/5分鐘/關閉四個檔。
【注意】如果選擇為“1/3/5”分鐘這三個檔中的任意一檔時,當TF卡存儲滿後
記錄儀將覆蓋較早前錄製的影像;
b.如果選擇“關閉”,則以3分鐘一個文件進行保存,當卡滿後不會繼續錄像。
c.前、後攝像頭的錄像保存於TF卡的“DCIM”中的“1”“2”文件夾中。
2. 使用手動記錄功能
按記錄儀【電源鍵】,記錄儀啟動後按確認鍵開始錄像,錄像小圓點閃爍並顯示
錄製時長。如需關機則長按【電源鍵】2秒,記錄儀即可自動保存記錄並關機。
3. 碰撞感應功能
本機內置碰撞感應器(G-sensor),如果發生嚴重車輛碰撞,記錄儀會鎖定事故發
生時的本斷錄像保存為一個特殊影像,同時顯示屏左上角顯示鎖的圖標。被鎖定
的影像不會被循環覆蓋。
【提示】
a.鎖定的錄像文件名為SOS開頭,普通記錄文件為REC開頭。
b.碰撞感應器(G-sensor)支持靈敏度調節,可根據實際需要在設置菜單中自
行更改設置。
繁體中文
8 CN 9 CN
4. 倒車可視
首先,必須把車充連接好記錄儀,拉線攝像頭上的紅線連接倒車燈。插車充機器
會自動啟動錄像狀態,在任意狀態下如果有倒車,會顯示倒車影像。結束倒車可
視後機器自動返回錄像模式。
5. 運動檢測
在待機狀態的情況下,自動記錄移動過程移動目標。

ND795说明书 / 尺寸:70*100mm / 四色印刷 / 铜板纸157G /文字内容要与纸张页面居中 / 20页骑马钉英文封面(前)
英文封底
6.86" TOUCH IPS SCREEN
User Manual
ND795
nakamichihomeaudionakamichicaraudio.com Nakamichi.global
-
 1
1
-
 2
2
-
 3
3
-
 4
4
-
 5
5
-
 6
6
-
 7
7
-
 8
8
-
 9
9
-
 10
10
-
 11
11
-
 12
12
-
 13
13
-
 14
14
-
 15
15
-
 16
16
-
 17
17
-
 18
18
-
 19
19
-
 20
20