申し訳ありませんが、Ricoh IM 2702 の製品情報は提供できません。インターネットに接続したり、PDF ファイルやその他のファイルを開いたりすることはできません。
申し訳ありませんが、Ricoh IM 2702 の製品情報は提供できません。インターネットに接続したり、PDF ファイルやその他のファイルを開いたりすることはできません。

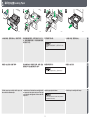
安装指南
为了安全正确地使用本机器,在使用之前,请务
必仔细阅读“安全信息”。
安裝指南
為了能正確安全地使用本機,請務必先閱讀本手
冊中的「安全資訊」,再開始使用。
安装指南
安裝指南
Setup Guide
Setup Guide
For safe and correct use, be sure to read the
Safety Information before using the machine.
CN
TW
EN

2
CN
TW
EN
1.
准备工作
/
準備事項
/Preparing
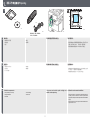
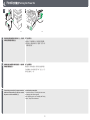
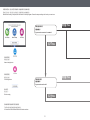
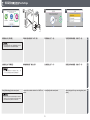
确认组件。
•
安装指南(本手册)
•
安全信息
•
光盘
•
墨盒
•
电源线
电源线和墨盒存放在输出纸盘上。 确认环境条件。
•
请将机器安装在机器周围温度和湿度均在上图中所示允许
范围(白色区域)的地方。(蓝色区域:建议范围)
•
请将机器安装在高度差在5 mm以内的水平位置上。
確認元件。
•
安裝指南(本手冊)
•
安全資訊
•
CD-ROM光碟
•
碳粉匣
•
電源線
電源線和碳粉匣存放在接紙盤上。 確認環境條件。
•
將機器安裝在周圍溫度和濕度符合上述允許範圍(白色區
域)的地方。(藍色區域:建議的範圍)
•
將機器安裝在高度差距5 mm以內的水平位置。
Confirm the components.
• Setup Guide (This manual)
• Safety Information
• CD-ROM
• Print Cartridge
• Power cord
The power cord and the print cartridge are
stored on the output tray.
Confirm the environmental conditions.
• Install the machine in a place where the temperature and
humidity around the machine is within the permissible
range (white area) shown above. (Blue area: Recommended
range)
• Install the machine on a level spot where the difference in
height is within 5 mm.
1
EBW079
DVK204
2
220-240 V, 10 A, 50/60 Hz
110 V, 15 A, 60 Hz
EBW052
EBW053
2
EBW031
2
DVL205

3
CN
TW
EN
设置
/
安裝
/Setup
设置/
安裝
/
Setup
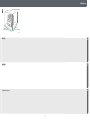
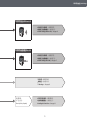
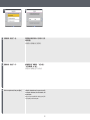
确认空间。
確認空間。
Confirm the space.
3
EBW062
136 cm
(53.6 inches)
139 cm (54.8 inches)
171 cm
(67.4 inches)

4
CN
TW
EN
2.
安装机器
/
安裝機器
/Installing the Machine
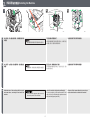
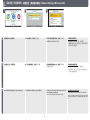
如上图所示,四人握住机器两侧,然后慢慢抬起并移
动机器。
•
请勿握持曝光玻璃盖或控制面板来抬起机器。
在定位机器时将其慢慢放下。
请勿在机器周围的空间里放置任何物品,以便可以轻
松地装入纸张、更换耗材和清除卡纸。
从机器外部撕下所有窄胶带和保护膜。
如上圖所示,由四個人抓住機器兩側,然後慢慢抬起
移動。
•
抬起機器時,請勿抓住曝光玻璃蓋板和控制面板。
固定定位時,請緩緩慢慢放下機器。
請勿在機器周圍放置任何物品,以便裝入紙張、更換
耗材或清除夾紙。
從機器外部撕下所有窄膠帶和保護膜。
Hold both sides of the machine with four people
as shown above, and slowly lift and move the
machine.
• Do not hold the exposure glass cover nor
the control panel to lift the machine.
Lower the machine slowly when positioning it.
Do not put anything in the space around the ma-
chine, so that you can load paper, replace consum-
ables, and clear paper jams easily.
Remove all the narrow adhesive tapes and pro-
tective sheet from the outside of the machine.
1
EBW054
2
EBW055
2
EBW061
51 cm
(20.1 inches)
45 cm
(17.8 inches)
75 cm
(29.6 inches)
30 cm
(11.9 inches)
30 cm
(11.9 inches)
3
EBW032

5
CN
TW
EN
设置
/
安裝
/Setup
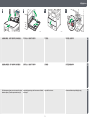
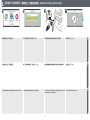
抬起曝光玻璃盖,以撕下内部胶带(1)和保护膜(2)。 打开手送台,然后撕下所有胶带。 打开前盖。 撕下标签上贴的胶带。
提起曝光玻璃蓋板,撕下內部膠帶(1)和保護膜(2)。 打開手送台,然後撕下所有膠帶。 打開前蓋。 撕下固定標籤的膠帶。
Lift the exposure glass cover to remove the inner
adhesive tapes (1) and the protective sheet (2).
Open the bypass tray, and then remove all adhe-
sive tapes.
Open the front cover. Remove adhesive tape holding the tag.
4
EBW064
(1)
(2)
5
EBW040
6
EBW033
7
EBW034
如上图所示,四人握住机器两侧,然后慢慢抬起并移
动机器。
•
请勿握持曝光玻璃盖或控制面板来抬起机器。
在定位机器时将其慢慢放下。
请勿在机器周围的空间里放置任何物品,以便可以轻
松地装入纸张、更换耗材和清除卡纸。
从机器外部撕下所有窄胶带和保护膜。
如上圖所示,由四個人抓住機器兩側,然後慢慢抬起
移動。
•
抬起機器時,請勿抓住曝光玻璃蓋板和控制面板。
固定定位時,請緩緩慢慢放下機器。
請勿在機器周圍放置任何物品,以便裝入紙張、更換
耗材或清除夾紙。
從機器外部撕下所有窄膠帶和保護膜。
Hold both sides of the machine with four people
as shown above, and slowly lift and move the
machine.
• Do not hold the exposure glass cover nor
the control panel to lift the machine.
Lower the machine slowly when positioning it.
Do not put anything in the space around the ma-
chine, so that you can load paper, replace consum-
ables, and clear paper jams easily.
Remove all the narrow adhesive tapes and pro-
tective sheet from the outside of the machine.

6
CN
TW
EN
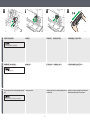
向您所在方向拉出保护膜。
•
如果没有拉出胶带,则会发生错误。
抬起绿色杆。 推动绿色杆(1),然后轻轻拉出支架(2)。 水平拿住新墨盒,左右摇动5到6次。
將保護膜朝自己的方向直接拉出。
•
不拉出膠帶會發生錯誤。
抬起綠色拉桿。 壓下綠色拉桿(1),然後輕輕拉出支架(2)。 水平握住新的碳粉匣左右搖晃五到六次。
Pull out the protective sheets straight towards
you.
• An error occurs if you do not pull out the tape.
Lift the green lever. Push the green lever (1), and then gently pull out
the holder (2).
Hold the new print cartridge horizontally and
shake it from side to side five or six times.
8
EBW065
(1)
(2)
9
EBW035
10
EBW066
(1)
(2)
11
DZV115

7
CN
TW
EN
设置
/
安裝
/Setup
取下黑色盖。
•
摇动前不要取下黑色盖。
•
不要取下内盖。
将墨盒放到支架上,然后向前拉墨盒顶部。 推入绿色杆,直到其卡嗒一声到位为止。 确认绿色杆返回其原始位置。
取下黑蓋。
•
搖晃之前不要取下黑蓋。
•
請勿取下內蓋。
將碳粉匣放在支架上,然後將頂部向前拉。 推入綠色拉桿,直到發出卡嗒聲。 檢查綠色拉桿是否回到原位。
Remove the black cap.
• Do not remove the black cap before shaking.
• Do not remove the inner cap.
Put the print cartridge on the holder, and then
pull its top forward.
Push in the green lever until it clicks. Check that the green lever returns to its original
position.
12
DZV116
13
EBW037
14
EBW038
15
EBW041
向您所在方向拉出保护膜。
•
如果没有拉出胶带,则会发生错误。
抬起绿色杆。 推动绿色杆(1),然后轻轻拉出支架(2)。 水平拿住新墨盒,左右摇动5到6次。
將保護膜朝自己的方向直接拉出。
•
不拉出膠帶會發生錯誤。
抬起綠色拉桿。 壓下綠色拉桿(1),然後輕輕拉出支架(2)。 水平握住新的碳粉匣左右搖晃五到六次。
Pull out the protective sheets straight towards
you.
• An error occurs if you do not pull out the tape.
Lift the green lever. Push the green lever (1), and then gently pull out
the holder (2).
Hold the new print cartridge horizontally and
shake it from side to side five or six times.

8
CN
TW
EN
设置
/
安裝
/Setup
按下绿色杆。 合上前盖。
按下綠色拉桿。 關上前蓋。
Press down the green lever. Close the front cover.
16
EBW042
17
EBW043
2 2

9
CN
TW
EN
3.
装纸
/
裝入紙張
/Loading Paper
小心地拉出纸盘,直到它停住为止,然后撕下胶带。 握住背面挡板的控制杆,并将其与纸张尺寸对齐。之
后,握住右侧挡板的控制杆,并将右侧挡板和左侧挡
板与纸张尺寸对齐。
将打印面朝下装入纸张。
•
纸张堆叠不要超过限制标记(上图所示的气球上的
标记)。
小心地推入纸盘,直到它停住为止。
將紙匣小心拉出到底,然後撕下膠帶。 捏住後擋板的拉桿,與紙張尺寸對齊。接著,捏住右
擋板的拉桿,將左右擋板與紙張尺寸對齊。
將紙張列印面朝下裝入。
•
堆疊的紙張請勿超過限制標記(上圖氣球中的標記)。
將紙匣小心推入到底。
Pull the paper tray carefully until it stops, and
then remove the adhesive tape.
Pinch the lever of the back fence and align it with
the paper size. Next, pinch the lever of the right
fence and align the right and left fences with the
paper size.
Load the paper print side down.
• Do not stack paper over the limit mark (the mark in
the balloon shown above).
Push the tray in carefully until it stops.
1
EBW044
2
EBW045
3
EBW046
4
EBW047

10
CN
TW
EN
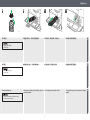
将电源线连接到机器背面的电源接头(1)上,然后将
电源线连接到墙壁电源插座(2)。
按下主电源开关。
机器启动。在开始屏幕之后,将出现语言选择屏幕。
安装选件时,请参阅网络手册,并查看“设置”中的
“安装和设置选件”。
將電源線連接到機器背面的電源連接器(1),然後將電
源線連接到牆壁插座(2)。
按下主電源開關。
機器啟動。出現開始畫面後,隨即出現語言選擇畫面。
安裝選購件時,請參閱網頁版手冊中「設定」的「安
裝和設定選購件」一節。
Connect the power cord to the power connector
at the back of the machine (1), and then connect
the power cord to the wall outlet (2).
Press the main power switch.
The machine starts up. Following the start screen,
the language select screen appears.
When installing option, see “Installing and Setting
Options”, Setup in the web manual.
1
EBW067
(1)
(2)
2
EBW056
2 2
4.
开启电源
/
打開電源
/Turning the Power On

11
CN
TW
EN
5.
基本设置
/
基本設定
/Basic Settings
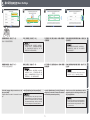
选择要使用的语言,然后按 [下一步]。
例如,本手册使用英文屏幕。
选择 [立即设置],然后按 [下一步]。
•
如果选择 [稍后设置],则 [管理员1] 的登录用户
名设置为“admin”,登录密码未设置(设置为
空)。请参阅网络手册,并查看“安全”中的“更
改管理员设置”来更改名称和密码。
按 [管理员1] 和 [密码] 对话框,分别输入管理员的
名称和密码。
再次输入管理员的名称和密码进行确认,然后按 [确
定] 注册它们。
•
请务必记住管理员的名称和密码。有关详细信息,
请参阅网络手册,并查看“安全”中的“在使用机
器之前注册管理员”。
選擇要使用的語言,然後按 [下一步]。
本手冊以英文畫面當作範例。
選擇 [立即設定],然後按 [下一步]。
•
如果選擇 [稍後設定],會將 [管理員1] 的登入使用
者名稱設為「admin」,但不會沿用登入密碼(設
為空白)。請參閱網頁版手冊中「安全性」的「變
更管理員設定」一節,以變更名稱和密碼。
按下 [管理員1] 和 [密碼] 對話方塊,分別輸入管理員
名稱和密碼。
再次輸入管理員名稱和密碼進行確認,然後按下 [確
定] 註冊。
•
務必記住管理員名稱與密碼。關於詳細資訊,請參閱
網路版手冊「安全性」的「使用本機前註冊管理員」。
Select the language that you want to use, and
then press [Next].
English screens are used in this manual for exam-
ple.
Select [Set Up Now], and then press [Next].
• If you select [Set Up Later], the login user name
for [Administrator 1] is set to “admin” and the login
password is not set (set as blank). See “Changing
the Administrator Settings”, Security in the web
manual to change the name and the password.
Press the [Administrator 1] and the [Password]
dialog boxes, enter and the name of the adminis-
trator and the password respectively.
Enter the name of the administrator and the
password again for confirming, and then press
[OK] to register them.
• Be sure not to forget the name of the administrator
and the password. For details, see “Registering the
Administrator Before Using the Machine”, Security
in the web manual.
1
EBW050
2 3 4
Initial Settings

12
CN
TW
EN
按 [基本设置]。 选择所在的国家/地区,然后按 [下一步]。
按照屏幕上的说明根据需要指定时区、日期、时间、
夏令时和声音。
按下 [基本設定]。 選擇國家/地區,然後按 [下一步]。
依照畫面指示,視需求指定時區、日期、時間、日光
節約時間和音效。
Press [Basic Settings]. Select your country/region, and then press [Next].
Follow the instructions on the screen to specify time
zone, date, time, daylight saving time, and sound as
necessary.
5 6
Country/Region
Select the country/region to use the fax function.
2 2

13
CN
TW
EN
初始设置
/
初始設定
/Initial Settings
2 2 2 2
按 [基本设置]。 选择所在的国家/地区,然后按 [下一步]。
按照屏幕上的说明根据需要指定时区、日期、时间、
夏令时和声音。
按下 [基本設定]。 選擇國家/地區,然後按 [下一步]。
依照畫面指示,視需求指定時區、日期、時間、日光
節約時間和音效。
Press [Basic Settings]. Select your country/region, and then press [Next].
Follow the instructions on the screen to specify time
zone, date, time, daylight saving time, and sound as
necessary.

14
CN
TW
EN
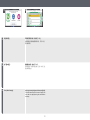
网络设置按钮。
網路設定按鈕。
Network settings button.
传真设置按钮。
傳真設定按鈕。
FAX settings button.
退出设置。
退出設定。
Exits the setting.
有线局域网和无线局域网不能同时使用。
不能同時使用有線區域網路和無線區域網路。
You cannot use Wired LAN and Wireless LAN at the same time.
否
/
否
/No
否
/
否
/No
是
/
是
/Yes
是
/
是
/Yes
完成基本设置后,将显示设置的初始屏幕。根据要使用的功能继续设置。
基本設定完成後,將出現設定的初始畫面。根據要使用的功能繼續設定。
When the basic setting is completed, the initial screen for the setup appears. Proceed the setup according to the function you want to use.
您要连接到网络吗?
要連線網路?
Do you want to connect to the network?
您要使用传真吗?
要使用傳真?
Do you want to use the fax?

15
CN
TW
EN
初始设置
/
初始設定
/Initial Settings
有线局域网
/
有線區域網路
/Wired LAN
无线局域网
/
無線LAN
/Wireless LAN
6.
网络设置(有线局域网)→ 请参见第17页。
6.
網路設定(有線區域網路)→ 請參閱第17頁。
6. Network Settings (Wired LAN) → See page 17.
6.
网络设置(无线局域网)→ 请参见第16页。
6.
網路設定(無線區域網路)→ 請參閱第16頁。
6. Network Settings (Wireless LAN) → See page 16.
7.
传真设置 → 请参见第19页。
7.
傳真設定 → 請參閱第19頁。
7. FAX settings → See page 19.
8.
安装打印机驱动程序 → 请参见第22页。
8.
安裝印表機驅動程式 → 請參閱第22頁。
8. Installing the Printer Driver → See page 22.
按 [设置完成]。
按下 [設定完成]。
Press the [Set Up Complete].

16
CN
TW
EN
按控制面板上的 [网络设置]。 按 [无线局域网],然后按 [下一步]。 指定如何将机器连接到网络,然后按 [下一步]。
按照屏幕上的指示继续进行设置。
无线局域网设置完成后:
当使用传真时,请转到第19页“传真设置”。
当不使用传真时,请按 [设置完成],然后转到第22页
“8安装打印机驱动程序”。
在控制面板上按下 [網路設定]。 按下 [無線區域網路],然後按 [下一步]。 指定將機器連線網路的方法,然後按 [下一步]。
依照畫面指示設定。
完成無線區域網路設定後:
若要使用傳真,請參閱第19頁「傳真設定」。
不使用傳真時,按下 [設定完成],然後參閱第22頁
「8安裝印表機驅動程式」。
Press [Network Settings] on the control panel. Press [Wireless LAN], then press [Next]. Specify how to connect the machine to the net-
work, and then press [Next].
Proceed the settings by following the screen.
After Wireless LAN settings:
When using the fax, go to page 19 “Fax Settings”.
When not using the fax, press [Set Up Complete]
and then go to page 22 “8 Installing the Printer Driv-
er”.
1 2 3 2
6.
网络设置(无线局域网)
/
網路設定(無線區域網路)
/Network Settings (Wireless LAN)

17
CN
TW
EN
6.
网络设置(有线局域网)
/
網路設定(有線區域網路)
/Network Settings (Wired LAN)
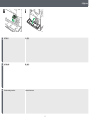
按控制面板上的 [网络设置]。 按 [有线局域网],然后按 [下一步]。 将局域网电缆连接到机器左侧的以太网端口。 按屏幕上的 [下一步]。
在控制面板上按下 [網路設定]。 按下 [有線區域網路],然後按 [下一步]。 將區域網路纜線連接到機器左側的以太網路連接埠。 在畫面上按 [下一步]。
Press [Network Settings] on the control panel. Press [Wired LAN], then press [Next]. Connect the LAN cable to the Ethernet port at
the left side of the machine.
Press [Next] on the screen.
1 2 3
EBW049
4

18
CN
TW
EN
初始设置
/
初始設定
/Initial Settings
选择设置IP地址的方法,然后按 [下一步]。
按照屏幕上的指示继续进行设置。
有线局域网设置完成后:
当使用传真时,请转到第19页“传真设置”。
当不使用传真时,请按 [设置完成],然后转到第22
页“8安装打印机驱动程序”。
選擇設定IP位址的方法,然後按 [下一步]。
依照畫面指示設定。
完成有線區域網路設定後:
若要使用傳真,請參閱第19頁「傳真設定」。
不使用傳真時,按下 [設定完成],然後參閱第22頁
「8安裝印表機驅動程式」。
Select the method to set the IP address, and then
press [Next].
Proceed the settings by following the screen.
After Wired LAN settings:
When using the fax, go to page 19 “Fax Settings”.
When not using the fax, press [Set Up Complete]
and then go to page 22 “8 Installing the Printer Driv-
er”.
5 2 2 2

19
CN
TW
EN
7.
传真设置
/
傳真設定值
/Fax Settings
按控制面板上的 [传真设置]。
•
将公用交换电话网(外线)连接到线路。将外线以
外的线路连接到本机可能会导致其出现故障。
将模块化连接线连接到“LINE”接口。 按控制面板上的 [下一步]。 选择正在使用的线路类型,然后按 [下一步]。
在控制面板上按下 [傳真設定]。
•
將公用交換電話網路(PSTN)連接到「線路」。將
PSTN以外的線路連接到本機可能會導致故障。
將模組纜線連接到「線路」接頭。 在控制面板上按 [下一步]。 選擇正在使用的線路類型,然後按 [下一步]。
Press [Fax Settings] on the control panel.
• Connect the public switched telephone network
(PSTN) to Line. Connecting lines other than PSTN
to this machine may cause it to malfunction.
Connect the modular cable to the “LINE” con-
nector.
Press [Next] on the control panel. Select the type of line you are using, then press
[Next].
1 2
EBW063
3 4

20
CN
TW
EN
选择接收模式,然后按 [下一步]。 按照屏幕上的说明指定传真头、自己的名称、自己的
传真号和音量。
完成设置后,按控制面板上的 [设置完成]。
選擇接收模式,然後按 [下一步]。 依照畫面指示指定「傳真標題」、「自己的名稱」、
「自己的傳真號碼」和「音量」。
完成設定後,在控制面板上按下 [設定完成]。
Select a reception mode, then press [Next]. Follow the instructions on the screen to specify
Fax Header, Own Name, Own Fax Number, and
Sound Volume.
When you have completed the settings, press [Set
Up Complete] on the control panel.
5 6 2 2
ページが読み込まれています...
ページが読み込まれています...
ページが読み込まれています...
ページが読み込まれています...
ページが読み込まれています...
ページが読み込まれています...
ページが読み込まれています...
ページが読み込まれています...
-
 1
1
-
 2
2
-
 3
3
-
 4
4
-
 5
5
-
 6
6
-
 7
7
-
 8
8
-
 9
9
-
 10
10
-
 11
11
-
 12
12
-
 13
13
-
 14
14
-
 15
15
-
 16
16
-
 17
17
-
 18
18
-
 19
19
-
 20
20
-
 21
21
-
 22
22
-
 23
23
-
 24
24
-
 25
25
-
 26
26
-
 27
27
-
 28
28


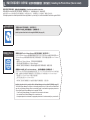
申し訳ありませんが、Ricoh IM 2702 の製品情報は提供できません。インターネットに接続したり、PDF ファイルやその他のファイルを開いたりすることはできません。
他の言語で
- English: Ricoh IM 2702 Installation guide
その他のドキュメント
-
HP Business Inkjet 1200 Printer series クイックスタートガイド
-
HP LaserJet M4345 Multifunction Printer series クイックスタートガイド
-
-
HP LaserJet 9050 Printer series クイックスタートガイド
-
HP Photosmart 330 Printer series ユーザーガイド
-
Sony KDL-42W670A ユーザーマニュアル
-
-
Sony Bravia KDL-32W600A Operating Instructions Manual
-
HP Photosmart Pro B8800 Printer series ユーザーガイド
-
MIMAKI SIJ-320UV 取扱説明書