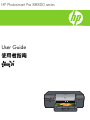
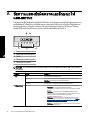
HP Photosmart Pro B8800 Printer series ユーザーガイド
- カテゴリー
- 印刷
- タイプ
- ユーザーガイド

User Guide
HP Photosmart Pro B8800
HP Photosmart Pro B8800 series
使用者指南
คู่มือผู้ใช้

Hewlett-Packard Company notices
The information contained in this document is subject to change without notice.
All rights reserved. Reproduction, adaptation, or translation of this material is prohibited without prior written permission of Hewlett-Packard, except
as allowed under copyright laws. The only warranties for HP products and services are set forth in the express warranty statements accompanying
such products and services. Nothing herein should be construed as constituting an additional warranty. HP shall not be liable for technical or editorial
errors or omissions contained herein.
© 2007 Hewlett-Packard Development Company, L.P.
Windows, Windows 2000, and Windows XP are U.S. registered trademarks of Microsoft Corporation.
Windows Vista is either a registered trademark or trademark of Microsoft Corporation in the United States and/or other countries.
Intel and Pentium are trademarks or registered trademarks of Intel Corporation or its subsidiaries in the United States and other countries.
The Bluetooth trademarks are owned by its proprietor and used by Hewlett-Packard Company under license.

HP Photosmart Pro B8800 series
HP Photosmart Pro B8800 series User Guide
English

Contents
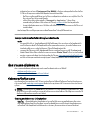
1Welcome
Find more information...........................................................................................................................................................2
Printer parts..........................................................................................................................................................................3
2 Basic printing
Paper trays...........................................................................................................................................................................6
Choose the right paper or other media.................................................................................................................................7
Print from the main tray........................................................................................................................................................8
Print from the specialty media tray (single-sheet feed)......................................................................................................10
Print from a software program............................................................................................................................................12
Change print settings.........................................................................................................................................................14
Set the default print settings...............................................................................................................................................16
Make the HP Photosmart Pro B8800 series the default printer..........................................................................................17
3 Color management
What is color management?...............................................................................................................................................18
Use the HP Photosmart Pro print plug-in for Adobe Photoshop
®
(versions 7.0, CS, and CS 2 only).................................18
Use application-based color management.........................................................................................................................19
Use printer-based color management................................................................................................................................20
4 Care and maintenance
Leave the printer plugged in...............................................................................................................................................21
Use the Toolbox (Windows) or HP Printer Utility (Mac)......................................................................................................21
Ink cartridge care................................................................................................................................................................21
Clean the printer.................................................................................................................................................................24
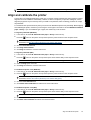
Align and calibrate the printer.............................................................................................................................................25
Print a test page.................................................................................................................................................................26
Print a sample page...........................................................................................................................................................26
Download printer software updates....................................................................................................................................26
Uninstall the printer software..............................................................................................................................................27
5 Troubleshooting and support
Printer software installation problems................................................................................................................................29
Printer hardware setup problems.......................................................................................................................................30
Printing problems...............................................................................................................................................................31
Error messages..................................................................................................................................................................33
HP support..........................................................................................................................................................................36
Regulatory model identification number SDGOA-0842......................................................................................................36
Environmental statements..................................................................................................................................................36
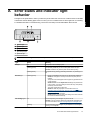
A Error states and indicator light behavior.......................................................................................................................37
B Specifications
System requirements..........................................................................................................................................................39
Printer specifications..........................................................................................................................................................39
Media specifications...........................................................................................................................................................40
CHP Warranty......................................................................................................................................................................41
Index........................................................................................................................................................................................42
1
English

1Welcome
Thank you for purchasing an HP Photosmart Pro B8800 series printer.
Designed especially for professional and serious amateur photographers, this printer yields rich, bright,
fade-resistant, and color-accurate photos, especially when used with HP Advanced Photo paper.
Find more information
The printer comes with the following documentation:
• Setup instructions: Read this document first. The setup instructions explain how to set up the printer and install
the HP Photosmart software. This document may be called Quick Start Guide or Setup Guide depending on
your country/region, language, or printer model.
• HP Photosmart software CD: The HP Photosmart software CD contains a detailed and animated Quick Start
Tutorial. The animated Quick Start Tutorial on the CD provides instructions for setting up the printer and installing
the software. The CD also contains the printer driver and other essential software needed to operate the printer.
• User Guide: The User Guide is the book you are reading. This book describes the basic features of the printer
and contains troubleshooting information.
• Onscreen Help: The onscreen Help provides detailed instructions on using all of the features of the
HP Photosmart. It provides complete printer specifications and troubleshooting information.
After you have installed the HP Photosmart software on a computer, open and explore the onscreen Help:
◦ Windows: From the Start menu, select Programs or All Programs, point to HP, HP Photosmart Pro
B8800 series, and then click HP Photosmart Printer Help.
◦ Mac: Select Help, Mac Help in the Finder, and then choose Library, HP Product Help.
• HP Solution Center (Windows only): The HP Solution Center provides information about all of your HP devices.
Visit the HP Solution Center to:
◦ Learn about the printer and its software, and view troubleshooting solutions, including informative How Do
I? animations
◦ Check printer status and access the printer Toolbox for maintenance utilities
◦ Update your printer software
◦ Change printer settings
◦ Order supplies
◦ Start HP Photosmart software
After you have installed the HP Photosmart software on a computer, open and explore the HP Solution Center.
◦ Right-click the HP Digital Imaging Monitor icon on the Windows taskbar, and then click Launch/Show
HP Solution Center.
NOTE: In this User Guide, printer software refers to the HP Photosmart software that comes on the CD with
the printer. The printer driver is the part of the printer software that controls the printer.
2Welcome
English

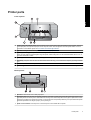
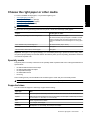
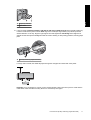
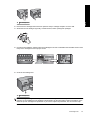
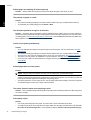
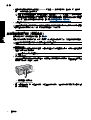
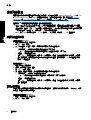
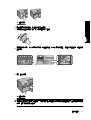
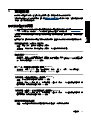
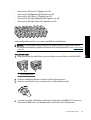
Printer parts
Front of printer
1 Control panel and indicator lights: Use the buttons on the control panel to open the Toolbox on the computer, resume or
cancel print jobs, and respond to prompts on the computer screen. View the lights to check the printer status. For more
information on the indicator lights, see Error states and indicator light behavior.
2 Top door: Lift to gain access to the printheads and to clear paper jams.
3 Specialty media tray (closed): Lower to insert a single sheet of heavy media, such as card stock or canvas. Use this tray
when you want media to be fed straight through the printer, without being bent. Do not load media thicker than 0.7 mm, or
more than one sheet at a time.
4 Main tray: Place a stack of plain paper or photo paper in this tray for printing.
5 Output tray: Print jobs come out here. For easier access to the main tray, you can remove the output tray by sliding it towards
you.
6 On button: Press to turn on the printer.
7 Ink cartridge door: Press the raised bumps on the surface of the door to open and insert or remove ink cartridges.
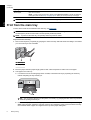
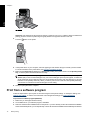
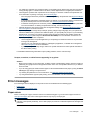
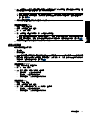
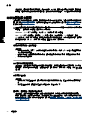
Back of printer
1 Rear door: Remove this door to clear paper jams.
2 Rear paper slot: Print jobs from the specialty media tray pass back and forth through this slot before being ejected on the
output tray at the front of the printer. Check that there is enough room behind the printer for the paper to pass back and forth
through the slot without any obstructions. When you are printing from the specialty media tray, the space behind the printer
should be equivalent to the length of paper you are printing on.
3 Power cord connection: Use this port to connect the power cord included with the printer.
Printer parts 3
English

4 USB port: Use this port to connect the printer to a computer.
5 Rear door releases: Press the two releases on either side of the rear paper slot to remove the rear door.
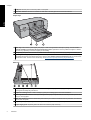
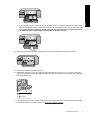
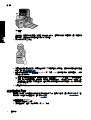
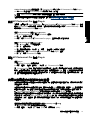
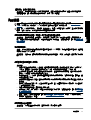
Paper trays
1 Main tray: Place a stack of photo paper, plain paper, or other non-rigid media in this tray for printing. Load the media in
portrait orientation and with the side to be printed facing down. Squeeze the main tray release to lengthen or shorten
the main tray, depending on the size of paper you are loading.
2 Output tray: Print jobs come out here. For easier access to the main tray, remove this tray by pulling it out towards you.
3 Specialty media tray (open): Insert a single sheet of heavy media, such as card stock, in this tray. Media from this tray is
fed straight through the printer without being bent. Load the media with the side to be printed facing up. Do not load media
thicker than 0.7mm. To learn how to use this tray, see
Print from the specialty media tray (single-sheet feed).
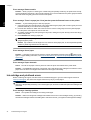
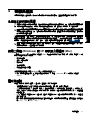
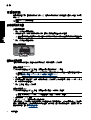
Main tray
1 Paper-width guide: Adjust this guide to fit close to the left edge of the paper in the tray by pressing the button on the front
of the guide and sliding the guide across.
2 Paper-size markings: Refer to these markings to guide you for loading paper in the correct orientation.
3 Main tray extension: Extend the main tray to load larger sizes of paper. Fully extended, the main tray can hold up to 33 x 48.3
cm (13 x 19 inch) paper.
4 Main tray release: Squeeze this release and pull it towards you to extend or retract the main tray extension, or to remove
the tray from the printer.
5 Paper stops: Align the paper against these stops so that the paper feeds correctly into the printer.
6 Paper-length guide: Adjust this guide to fit close to the end of the paper in the tray.
Chapter 1
4Welcome
English

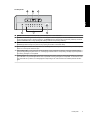
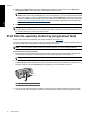
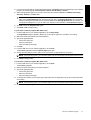
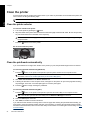
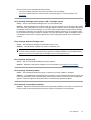
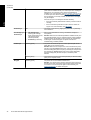
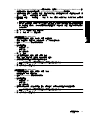
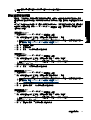
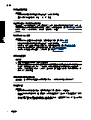
Control panel
1 Cancel: Press to stop the current print job, printhead alignment, or color calibration.
2 Resume: The Resume light flashes if the printer is out of paper or there is a paper jam. Press the Resume button to resume
printing after loading paper or clearing a paper jam. The Resume light is solid amber when the specialty media tray is lowered.
Press the Resume button to begin printing after loading media into the specialty media tray.
3 Toolbox: Press once to open the printer Toolbox (Windows) or HP Printer Utility (Mac) on the computer screen. The amber
Toolbox light flashes slowly if the printer is busy opening the Toolbox or HP Printer Utility.
4 On: The On light is solid blue when the printer is on. The On light flashes slowly when the printer is busy, and flashes rapidly
when one or more printer doors are open.
5 Ink cartridge lights: These eight lights indicate the status of each individual ink cartridge. A solid light indicates that the
corresponding cartridge might be low on ink. A flashing light indicates that the corresponding cartridge might be depleted of
ink, missing, damaged, or incompatible.
6 Printhead light: The printhead light is solid amber when the printer is busy servicing, aligning the printheads, or performing
color calibration. The printhead light flashes when a printhead is missing, damaged, or incompatible. To show which of the
four printheads has a problem, two cartridge lights corresponding to the colors that serve the affected printhead will also
flash.
Printer parts 5
English

2 Basic printing
This section explains how to load media in the paper trays, change printer settings, and print from your computer.
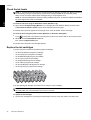
Paper trays
The printer has two trays for paper and other media:
• Main tray: The main tray can hold multiple sheets of media and automatically feed each sheet for printing. Only
thin, flexible media can be loaded into this tray, due to the bending that media is subject to as it passes through
the printer from this tray.
• Specialty media tray: The specialty media tray is designed primarily for thicker, less flexible media. Paper from
this tray is fed straight through the printer, without being bent. When you use this tray, check that there is clear
space behind the printer at least equal to the length of the media you are printing on. Load one sheet of media
at a time into this tray, and be sure that the media is no thicker than 0.7 mm.
Any media that can be used in the main tray can also be used in the specialty media tray. However, some of the
media types supported in the specialty media tray should not be loaded in the main tray.
TIP: Use the specialty media tray for small print jobs on lightweight, flexible paper when you want to avoid
changing the paper stack in the main tray.
The table below summarizes the differences between the two media trays and provides guidelines for determining
which tray to use for a specific print job.
Feature Main tray Specialty media tray
Paper feed Multiple sheets Single sheet
Paper path Curved paper path Straight-through paper path
Media Thin, flexible Thin and thick (not more than 0.7 mm)
Media orientation Print-side DOWN Print-side UP
Supported paper sizes 7.6 x 12.7 cm to 33 x 48.3 cm
(3 x 5 inches to 13 x 19 inches)
7.6 x 12.7 cm to 33 x 111.8 cm
(3 x 5 inches to 13 x 44 inches)
Use the following guidelines for determining which tray to load a particular type of media into:
Media Main tray Specialty media tray
Photo, Inkjet, and Plain Papers
Examples: HP Advanced Photo paper,
HP Professional Satin Photo paper,
brochure, photo, inkjet, and plain papers
Recommended Supported
Digital Fine Art Papers <220 gsm
Examples: Photo rag
Supported Recommended
Digital Fine Art Papers >220 gsm
Examples: Canvas; Photo rag;
Watercolor paper
Not supported Recommended
Any media thicker than 0.7 mm Not supported Not supported
NOTE: You do not need to remove media from the main tray before you use the specialty media tray.
See Choose the right paper or other media for a description of specific paper types for use with this printer.
6 Basic printing
English

Choose the right paper or other media
For a list of available HP inkjet paper, or to purchase supplies, go to:
•
www.hpshopping.com (U.S.)
•
www.hp.com/eur/hpoptions (Europe)
•
www.hp.com/jp/supply_inkjet (Japan)
•
www.hp.com/paper (Asia/Pacific)
NOTE: HP Premium and HP Premium Plus Photo papers are not supported with this printer.
To get the best and longest-lasting results from the printer, choose from these high quality papers.
To print Use this paper or media
High quality, long lasting prints and enlargements HP Professional Satin Photo paper
HP Advanced Photo paper (This paper is available in several
finishes, including glossy and satin-matte/soft gloss. Not all
finishes are available in all countries/regions or in every paper
size.)
Color calibration and printhead alignment HP Advanced Photo paper - Glossy
Casual photos from e-mail and the Web Plain paper
Text documents, draft versions, and test pages Plain paper
Important: Store paper in its original packaging or in a resealable plastic bag to prevent excessive curling, which
can prevent proper feeding. Do not leave media in the main tray when you are not printing, because the media can
curl when left exposed to air.
Specialty media
The printer prints on a variety of HP and non-HP specialty media. Experiment with some of the types listed here for
special effects:
• HP Hahnemühle Smooth Fine Art Paper
• HP Hahnemühle Watercolor Paper
• HP Aquarella Art Paper
• HP Artist Matte Canvas
•Photo rag
Some media types may not be available in all countries/regions. Check with your local media provider.
WARNING! Do not load media thicker than 0.7 mm, as it can damage the printer.
Supported sizes
The HP Photosmart supports a wide range of paper sizes including:
Paper type Size
Metric 10 x 15 cm (with or without tab), Panorama 10 x 30 cm, 13 x 18 cm, A3, A4, A5, A6, B4, B5, E
Imperial Index card 3 x 5 to 5 x 8 inches, 3.5 x 5 to 12 x 12 inches, 4 x 6 inches (with or without tab), Panorama
4 x 10 inches to 4 x 12 inches, 13 x 19 inches (B+)
U.S. Letter, Legal, Executive, Tabloid
Japan L, 2L, Hagaki, Ofuku Hagaki
Envelopes Envelope No. 10, A2 envelope, C6 envelope, DL envelope
Choose the right paper or other media 7
English

Paper type Size
Banner paper Up to 13 x 44 inches
NOTE: To learn how to print banners, please visit the Resource Center on the HP Professional
Photography Web site at www.hp.com/go/prophoto. Select your country at the top of the page.
WARNING! Do not load media thicker than 0.7 mm, as it can damage the printer.
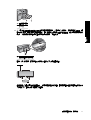
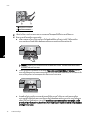
Print from the main tray
To learn which media can be loaded into the main tray, see Paper trays.
WARNING! Do not load canvas or other digital fine art media heavier than 220 gsm into the main tray, as it
can damage the printer and the media. Use the specialty media tray instead.
NOTE: To print from the main tray, the specialty media tray must be closed.
To print from the main tray
1. Remove the output tray completely by grasping the sides of the tray with both hands and sliding it out towards
you. The main tray is now accessible.
1 Main tray
2 Output tray
2. Move the paper-width and paper-length guides to their outermost position to make room for the paper.
3. Load paper in the main tray.
a. For easier access or for loading larger sizes of media, extend the main tray by squeezing the main tray
release and pulling the tray towards you.
TIP: You can remove the tray from the printer, if necessary, by grasping the sides of the tray with both
hands and pulling it towards you.
b. Place a stack of paper in the main tray, in portrait orientation and with the side to be printed facing
down. Align the paper against the right side of the tray and against the paper stops at the back of the tray.
Check that the stack of paper is no higher than the top of the paper-width guide.
Chapter 2
(continued)
8 Basic printing
English

c. If you extended or removed the main tray to load paper, push in the main tray extension to the end of the
paper by squeezing the release and pushing in the extension, and push the tray back into the printer until it
is fully seated. Be sure to adjust the length of the main tray and reseat the tray in the printer before
you adjust the paper-length and paper-width guides or the paper will jam.
4. Adjust the paper-width and paper-length guides so they rest gently against the edges of the paper.
5. Check that the paper is lying flat in the tray.
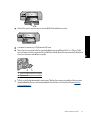
6. Replace the output tray. If you are printing on paper larger than 21.6 x 28 cm (8.5 x 11 inches), pull out the
output tray extension by holding the output tray with one hand and pulling out the extension with your other hand.
Flip up the paper catch.
1 Output tray extension
2 Paper catch
7. In the printer driver on your computer, select the paper type that matches the type of media you have loaded.
For more information on the printer driver, see
Print from a software program.
Print from the main tray 9
English

8. Make sure the Paper Source (Windows) or Source (Mac) setting in the printer driver is set to Main tray or
Automatically Select, so that the printer will feed media from the main tray.
NOTE: When you select a Paper Type, the driver automatically sets the Paper Source (Windows) or
Source (Mac) to the recommended paper tray. For some media types, you may override the recommended
paper source setting. However, if a yellow warning symbol appears (Windows), or the driver does not allow
that selection (Mac), use the specialty media tray instead to avoid printer damage or poor print quality. See
Print from the specialty media tray (single-sheet feed) for information on printing from the specialty media
tray.
9. Send your print job from the computer.
NOTE: If you are using non-HP brands of glossy media in the main tray, and the printer does not feed the paper
or feeds multiple sheets through at once, try reducing the number of sheets in the main tray to 20 sheets, or use
the specialty media tray to print on one sheet at a time.
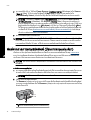
Print from the specialty media tray (single-sheet feed)
To learn which media can be loaded into the specialty media tray, see Paper trays.
It is recommended that before you print on expensive specialty media, you practice using the specialty media tray
by loading a single sheet of plain paper and printing an image or document.
NOTE: You do not need to remove media from the main tray before you use the specialty media tray.
To print from the specialty media tray
1. Check that there is space behind the printer for the paper to pass back and forth through the rear paper slot.
The space behind the printer should be equivalent to the length of the paper you are printing on.
NOTE: Do not feed paper into the rear paper slot.
2. Lower the specialty media tray.
The Resume light flashes while the printer raises the printhead assembly in preparation for printing from the
specialty media tray. When the Resume light stops flashing, you can load media into the tray.
1 Specialty media tray (single-sheet feed)
3. Pull out the output tray extension by holding the output tray with one hand and pulling out the extension with
your other hand. Flip up the paper catch at the end of the output tray extension to prevent paper from falling.
Chapter 2
10 Basic printing
English

1 Output tray extension
2 Paper catch
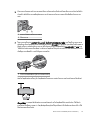
4. Load one sheet in portrait orientation and with the side to be printed facing up in the specialty media tray.
Feed the media into the printer until the back edge of the media (the edge nearest you) is lined up with the
dashed white line on the tray. Align the right edge of the media against the raised edge of the tray and not
against the side of the printer. Misaligned media can result in skewing or other printing problems, including paper
jams.
1 Specialty media tray (single-sheet feed)
For large sizes of media, the media will project through the rear paper slot at the back of the printer.
Important: If you are printing on canvas, or if the media is slightly curled, open the top door to check that the
media feeds under the rollers smoothly. Be sure to close the top door again.
Print from the specialty media tray (single-sheet feed) 11
English

1 Rollers
Important: If the media is not flat enough for printing, a paper jam can occur. To flatten a sheet of media before
printing, place the media in a plastic bag and gently bend it in the opposite direction of the curl.
5.
Press the button on the printer.
6. In the printer driver on your computer, select the paper type that matches the type of media you have loaded.
For more information on the printer driver, see
Print from a software program.
7. Make sure the Paper Source (Windows) or Source (Mac) setting in the printer driver is set to Specialty media
tray, so that the printer will feed media from that tray.
NOTE: When you select a Paper Type, the driver automatically sets the Paper Source (Windows) or
Source (Mac) to the recommended paper tray. For some media types (such as photo papers, for which the
single-sheet feed may be used less often), the recommended source is the main tray although you can also
load them in the specialty media tray. When you want to print on such media from the specialty media tray,
you will need to override the recommended paper source setting.
8. Send your print job from the computer.
Print from a software program
Follow the steps below to print a photo or document using the basic printer settings. To modify the settings, see
Change print settings. To use the more advanced color management settings, see Color management.
To print from a software program (Windows)
1. Make sure you have paper loaded correctly.
2. On the File menu in your software program, click Print.
3. Select HP Photosmart Pro B8800 series as the printer. If you have already set the HP Photosmart Pro B8800
series as the default printer, you can skip this step. The HP Photosmart Pro B8800 series will already be selected.
Chapter 2
12 Basic printing
English

4. If you need to change settings, click the button that opens the Properties dialog box. Depending on your software
program, this button might be called Properties, Options, Printer Setup, or Printer.
5. Select the appropriate options for your print job by using the features available in the Advanced, Printing
Shortcuts, Features, and Color tabs.
TIP: You can easily select the appropriate options for your print job by choosing one of the predefined print
tasks on the Printing Shortcuts tab. Click a type of print task in the Printing Shortcuts box. The default
settings for that type of print task are set, and summarized on the Printing Shortcuts tab. If necessary, you
can adjust the settings here, or you can make your changes on the other tabs in the Properties dialog box.
6. Click OK to close the Properties dialog box.
7. Click Print or OK to begin printing.
To print from a software program (Mac OS X v10.4)
1. From the File menu in your software application, choose Page Setup.
The Page Setup dialog box appears, allowing you to specify the paper size, orientation, and scaling.
2. Make sure the HP Photosmart is the selected printer.
3. Specify the page attributes:
• Choose the paper size.
• Select the orientation.
• Enter the scaling percentage.
4. Click OK.
5. From the File menu in your software application, choose Print.
The Print dialog appears with the Copies & Pages pane open.
6. Change the print settings for each option in the pop-up menu, as appropriate for your project.
NOTE: When printing a photo, you must select options for the correct paper type and photo enhancement.
7. Click Print to begin printing.
To print from a software program (Mac OS X v10.5)
1. From the File menu in your software application, choose Print.
The Print dialog appears.
2. Make sure the HP Photosmart is the selected printer.
3. Specify the page attributes:
• Choose the paper size.
• Select the orientation.
• Enter the scaling percentage.
4. To change other options, such as paper type, select them from the Application pop-up menu toward the bottom
of the dialog.
NOTE: When printing a photo, you must select options for the correct paper type and photo enhancement.
5. Click Print to begin printing.
Print from a software program 13
English

Change print settings
Read this section to learn about the print settings available in the printer driver. You can also adjust print settings
in the HP Photosmart Pro print plug-in for Adobe Photoshop 7, CS, and CS2. For more information, see
Use the
HP Photosmart Pro print plug-in for Adobe Photoshop®(versions 7.0, CS, and CS 2 only).
For more information on the HP printer driver, see the onscreen Help:
• Windows: Right-click the HP Digital Imaging Monitor icon on the Windows taskbar and then select Launch/
Show HP Solution Center. Click Help from the options on the bottom of the HP Solution Center home page.
In the Additional Resources area, point to Documents, and then select Onscreen Guide. Also, in the print
dialog itself, right-click any option and click the What's This? box to learn more about that option.
• Mac: Choose Help, Mac Help in the Finder, and then choose Library, HP Product Help.
Select a print quality option
To select a print quality (Windows)
1. Open the Printer Properties dialog box.
2. Click the Features tab.
3. From the Print quality drop-down list, select the appropriate speed and quality setting for your project:
• Fast Draft: Prints at the fastest printing speed with most economical ink usage.
• Normal: Provides the best balance between print quality and speed. This is the appropriate setting for most
documents.
• Best: Provides high-quality printing.
• Maximum dpi: Provides high-quality, sharp images but takes longer to print than the Bestprint quality setting
and requires a large amount of disk space. To enhance color matching and detail in the photo, use
HP Advanced Photo paper when using the Maximum dpi print quality setting.
To select a print quality (Mac)
1. Open the Print dialog box.
2. Choose the Paper Type/Quality pane.
3. Click the Paper tab.
4. From the Quality pop-up menu, select the appropriate speed and quality setting for your project:
• Fast Draft: Prints at the fastest printing speed.
• Normal: Provides the best balance between print quality and speed. This setting is appropriate for most
documents.
• Best: Provides high quality printing.
• Maximum dpi: Provides high-quality, sharp images but takes longer to print than the Best print quality setting
and requires a large amount of disk space.
Set the paper type
The default paper type setting for printing is based on the printing shortcut you select. If you print on special papers,
you can change the paper type from the Printer Properties dialog box.
To select a specific paper type (Windows)
1. Open the Printer Properties dialog box.
2. Click the Features tab.
Chapter 2
14 Basic printing
English

3. Select the paper type from the Paper Type drop-down list. If the loaded paper type is not listed, add a custom
paper type. For more information on adding a custom paper type, see the onscreen Help.
NOTE: When you select a Paper Type, the driver automatically sets the Paper Source to the
recommended paper tray. Depending on the paper type you are using, overriding the recommended Paper
Source setting may result in printer or media damage. For more information, see
Paper trays.
4. Select any other print settings that you want, and then click OK.
To select a specific paper type (Mac)
1. Open the Print dialog box.
2. Choose the Paper Type/Quality pane.
3. Click the Paper tab.
4. In the Paper Type pop-up menu, click the appropriate paper type.
NOTE: When you select a paper type, the driver automatically sets the Source to the recommended paper
tray. Depending on the paper type you are using, overriding the recommended Source setting may result
in printer or media damage. For more information, see
Paper trays.
5. Choose any other print settings that you want, and then click Print.
Select a paper source
The printer offers two sources for paper:
• Main tray
• Specialty media tray
NOTE: When you select a paper type, the driver automatically sets the Paper Source (Windows) or Source
(Mac) to the recommended paper tray. Depending on the paper type you are using, overriding the recommended
Paper Source or Source setting may result in printer or media damage. For more information, see
Paper
trays.
To select a paper source (Windows)
1. Open the Printer Properties dialog box.
2. Click the Features tab.
3. Select one of the following options from the drop-down list:
• Automatically Select: Prints from the main tray.
• Main tray: Prints from the main tray.
• Specialty media tray: Prints from the specialty media tray.
To select a paper source (Mac)
1. Open the Print dialog.
2. Choose the Paper Type/Quality pane.
3. In the Source pop-up menu, click one of the following options:
• Main tray: Prints from the main tray.
• Specialty media tray: Prints from the specialty media tray.
Change print settings 15
English

Print in grayscale
You can print documents or photos in grayscale for dramatic black and white photos.
To print in grayscale (Windows)
1. Open the Printer Properties dialog box.
2. Click the Color tab, and then click Print in Grayscale in the Color Options area.
NOTE: The Print in Grayscale setting is not available if the Color management field on the same tab is
set to Application Managed Colors. To enable grayscale printing, choose a printer-based color
management scheme (ColorSmart/sRGB or Adobe RGB). For more information on color management
settings, see
Color management.
3. In the Print in Grayscale drop-down list, select one of the following:
• Composite gray
• Gray inks only
4. Select any other print settings you want, and then click OK.
To print in grayscale (Mac)
1. Open the Print dialog box.
2. Select the Paper Type/Quality pane.
3. Click the Paper tab.
4. In the Color pop-up menu, select Grayscale.
5. Click the Color Options tab, and select one of the following:
• Composite gray
• Gray inks only
6. Choose any other print settings that you want, and then click Print.
NOTE: For more information on color settings in the printer driver, see Color management.
Set the default print settings
If you frequently print photos or documents on the same size and type of paper, you can set print defaults or presets
with all your preferred settings.
To change the default print settings (Windows)
1. Right-click the HP Digital Imaging Monitor icon on the right side of the Windows taskbar, and then select
Launch/Show HP Solution Center to open the HP Solution Center home page.
2. Click Settings on the bottom of the HP Solution Center home page.
3. Click Printer Settings in the Print Settings area.
4. Make changes to the print settings, and then click OK.
To create presets (Mac)
1. On the File menu in your software program, click Print.
2. Choose the settings on each pane that you want to use frequently.
3. In the Presets pop-up menu, choose Save as.
4. Type the name of your new preset, and then click OK.
Chapter 2
16 Basic printing
English

Make the HP Photosmart Pro B8800 series the default
printer
Windows
1. On the Windows taskbar, click Start, and then click Control Panel.
2. Open Printers (Windows Vista) or Printers and Faxes (Windows XP).
3. Right-click the HP Photosmart printer icon, and then click Set as Default Printer.
Mac
1. In the System Preferences, click Print & Fax, and then click Printing.
2. Choose an option from the Selected printer in Print Dialog pop-up menu.
Make the HP Photosmart Pro B8800 series the default printer 17
English
ページが読み込まれています...
ページが読み込まれています...
ページが読み込まれています...
ページが読み込まれています...
ページが読み込まれています...
ページが読み込まれています...
ページが読み込まれています...
ページが読み込まれています...
ページが読み込まれています...
ページが読み込まれています...
ページが読み込まれています...
ページが読み込まれています...
ページが読み込まれています...
ページが読み込まれています...
ページが読み込まれています...
ページが読み込まれています...
ページが読み込まれています...
ページが読み込まれています...
ページが読み込まれています...
ページが読み込まれています...
ページが読み込まれています...
ページが読み込まれています...
ページが読み込まれています...
ページが読み込まれています...
ページが読み込まれています...
ページが読み込まれています...
ページが読み込まれています...
ページが読み込まれています...
ページが読み込まれています...
ページが読み込まれています...
ページが読み込まれています...
ページが読み込まれています...
ページが読み込まれています...
ページが読み込まれています...
ページが読み込まれています...
ページが読み込まれています...
ページが読み込まれています...
ページが読み込まれています...
ページが読み込まれています...
ページが読み込まれています...
ページが読み込まれています...
ページが読み込まれています...
ページが読み込まれています...
ページが読み込まれています...
ページが読み込まれています...
ページが読み込まれています...
ページが読み込まれています...
ページが読み込まれています...
ページが読み込まれています...
ページが読み込まれています...
ページが読み込まれています...
ページが読み込まれています...
ページが読み込まれています...
ページが読み込まれています...
ページが読み込まれています...
ページが読み込まれています...
ページが読み込まれています...
ページが読み込まれています...
ページが読み込まれています...
ページが読み込まれています...
ページが読み込まれています...
ページが読み込まれています...
ページが読み込まれています...
ページが読み込まれています...
ページが読み込まれています...
ページが読み込まれています...
ページが読み込まれています...
ページが読み込まれています...
ページが読み込まれています...
ページが読み込まれています...
ページが読み込まれています...
ページが読み込まれています...
ページが読み込まれています...
ページが読み込まれています...
ページが読み込まれています...
ページが読み込まれています...
ページが読み込まれています...
ページが読み込まれています...
ページが読み込まれています...
ページが読み込まれています...
ページが読み込まれています...
ページが読み込まれています...
ページが読み込まれています...
ページが読み込まれています...
ページが読み込まれています...
ページが読み込まれています...
ページが読み込まれています...
ページが読み込まれています...
ページが読み込まれています...
ページが読み込まれています...
ページが読み込まれています...
ページが読み込まれています...
ページが読み込まれています...
ページが読み込まれています...
ページが読み込まれています...
ページが読み込まれています...
ページが読み込まれています...
ページが読み込まれています...
ページが読み込まれています...
ページが読み込まれています...
ページが読み込まれています...
ページが読み込まれています...
ページが読み込まれています...
ページが読み込まれています...
ページが読み込まれています...
ページが読み込まれています...
ページが読み込まれています...
ページが読み込まれています...
ページが読み込まれています...
ページが読み込まれています...
ページが読み込まれています...
ページが読み込まれています...
ページが読み込まれています...
ページが読み込まれています...
ページが読み込まれています...
ページが読み込まれています...
ページが読み込まれています...
ページが読み込まれています...
ページが読み込まれています...
ページが読み込まれています...
ページが読み込まれています...
ページが読み込まれています...
ページが読み込まれています...
ページが読み込まれています...
ページが読み込まれています...
ページが読み込まれています...
-
 1
1
-
 2
2
-
 3
3
-
 4
4
-
 5
5
-
 6
6
-
 7
7
-
 8
8
-
 9
9
-
 10
10
-
 11
11
-
 12
12
-
 13
13
-
 14
14
-
 15
15
-
 16
16
-
 17
17
-
 18
18
-
 19
19
-
 20
20
-
 21
21
-
 22
22
-
 23
23
-
 24
24
-
 25
25
-
 26
26
-
 27
27
-
 28
28
-
 29
29
-
 30
30
-
 31
31
-
 32
32
-
 33
33
-
 34
34
-
 35
35
-
 36
36
-
 37
37
-
 38
38
-
 39
39
-
 40
40
-
 41
41
-
 42
42
-
 43
43
-
 44
44
-
 45
45
-
 46
46
-
 47
47
-
 48
48
-
 49
49
-
 50
50
-
 51
51
-
 52
52
-
 53
53
-
 54
54
-
 55
55
-
 56
56
-
 57
57
-
 58
58
-
 59
59
-
 60
60
-
 61
61
-
 62
62
-
 63
63
-
 64
64
-
 65
65
-
 66
66
-
 67
67
-
 68
68
-
 69
69
-
 70
70
-
 71
71
-
 72
72
-
 73
73
-
 74
74
-
 75
75
-
 76
76
-
 77
77
-
 78
78
-
 79
79
-
 80
80
-
 81
81
-
 82
82
-
 83
83
-
 84
84
-
 85
85
-
 86
86
-
 87
87
-
 88
88
-
 89
89
-
 90
90
-
 91
91
-
 92
92
-
 93
93
-
 94
94
-
 95
95
-
 96
96
-
 97
97
-
 98
98
-
 99
99
-
 100
100
-
 101
101
-
 102
102
-
 103
103
-
 104
104
-
 105
105
-
 106
106
-
 107
107
-
 108
108
-
 109
109
-
 110
110
-
 111
111
-
 112
112
-
 113
113
-
 114
114
-
 115
115
-
 116
116
-
 117
117
-
 118
118
-
 119
119
-
 120
120
-
 121
121
-
 122
122
-
 123
123
-
 124
124
-
 125
125
-
 126
126
-
 127
127
-
 128
128
-
 129
129
-
 130
130
-
 131
131
-
 132
132
-
 133
133
-
 134
134
-
 135
135
-
 136
136
-
 137
137
-
 138
138
-
 139
139
-
 140
140
-
 141
141
-
 142
142
-
 143
143
-
 144
144
-
 145
145
-
 146
146


HP Photosmart Pro B8800 Printer series ユーザーガイド
- カテゴリー
- 印刷
- タイプ
- ユーザーガイド
他の言語で
関連論文
-
HP Photosmart D6100 Printer series クイックスタートガイド
-
HP Photosmart C4600 All-in-One Printer series 取扱説明書
-
-
-
-
-
HP Photosmart 330 Printer series ユーザーガイド
-
-
HP LaserJet 8150 Multifunction Printer series クイックスタートガイド
-
その他のドキュメント
-
Dell V505 All In One Inkjet Printer ユーザーガイド
-
Dell V105 All In One Inkjet Printer ユーザーガイド
-
IBM Infoprint 1116 ユーザーマニュアル
-
MIMAKI JV33 取扱説明書
-
Lexmark 5400 Series ユーザーマニュアル
-
-
Panasonic TYTP50P30K 取扱説明書
-
Ricoh IM 2702 インストールガイド
-
-
Avery Dennison 9906 Quick Reference Manual