MIMAKI SIJ-320UV 取扱説明書

タイプ
取扱説明書

このマニュアルも適しています

MIMAKI SIJ-320UVは、柔軟性、印刷品質、生産性を兼ね備えた、高機能なUVプリンターです。幅3.2mのロールメディアに対応し、最大120㎡/時の高速印刷を実現します。また、独自のインク技術により、高発色で鮮やかな印刷が可能です。

MIMAKI SIJ-320UVは、看板や横断幕などの屋外広告、壁紙や床材などの内装材、テキスタイルやアパレルなどのファッションアイテムなど、幅広い用途に使用できます。その高い印刷品質と生産性により、ビジネスの効率化と収益性の向上に貢献します。

MIMAKI SIJ-320UVの主な機能は以下の通りです。

  • 幅3.2mのロールメディアに対応
  • 最大120㎡/時の高速印刷
  • 独自のインク技術による高発色で鮮やかな印刷
  • 屋外広告、内装
MIMAKI ENGINEERING CO., LTD.
URL: http://mimaki.com/
D203034-10
ソフトメディア搬送キット
Soft Media Feeding Kit
OPT-J0400
Table of Contents
For English For Japanese
Foreword ...............................................2
DISCLAIMER OF WARRANTY...............2
On This Operation manual ......................2
Requests .................................................2
About installing this machine .................3
Where to Install This Machine.................3
Names of Parts and Functions ..............4
Front Side of the Machine .......................4
Rear Side and Right Side of
the Machine.............................................4
Media.....................................................5
Usable sizes of media .............................5
Caution in handling of medias.................5
Setting a Media......................................6
Adjusting the Head Height.......................6
Setting a roll media..................................6
Please check the work after setting the
media.......................................................8
When using small take-up device............9
Maintenance ........................................11
Precautions for Maintenance.................11
About Cleaning Solution........................11
Cleaning the tension roller.....................11
Troubleshooting................................... 12
Media get jammed / media is soiled ...... 12
Image quality is poor .............................12
When media heaves up at feeding........13
If the wrinkles on the platen...................13
If the ink landing position is shifted in
the Y direction ......................................13
When using non-recommended
medias...................................................13
はじめに.............................................. 15
ご注意................................................... 15
取扱説明書について ............................. 15
おねがい ............................................... 15
本機の設置について............................ 16
設置場所について................................. 16
各部の名称とはたらきについて.......... 17
装置前面 ............................................... 17
装置背面 / 側面 ..................................... 17
メディアについて ............................... 18
使用可能メディアサイズ...................... 18
メディア取り扱い上の注意 .................. 18
メディアをセットする ........................ 19
ヘッド高さを調整する ......................... 19
ロールメディアをセットする............... 19
メディアをセットした後確認作業
行ってください .................................... 21
小巻取装置をお使いになる場合 ........... 22
日常のお手入れ ................................... 24
お手入れ上のご注意 ............................. 24
メンテナンス洗浄液について............... 24
引張りローラーのお手入れ .................. 24
故障?と思う前に ............................... 25
メディア詰まり / メディアが汚れる..... 25
画質不良が発生したときは .................. 25
メディアが搬送時に波打つ場合 ........... 26
プラテン上にシワが発生する場合 ....... 26
インクの着弾位置が Y 方向に
ずれる場合 ........................................... 26
弊社が推奨していないメディアを使用す
る場合................................................... 26
Foreword
2
Foreword
Congratulations on your purchase of “Soft Media Feeding Kit” for MIMAKI color ink jet printer .
DISCLAIMER OF WARRANTY
THIS LIMITED WARRANTY OF MIMAKI SHALL BE THE SOLE AND EXCLUSIVE WARRANTY AND IS IN LIEU OF ALL
OTHER WARRANTIES, EXPRESS OR IMPLIED, INCLUDING, BUT NOT LIMITED TO, ANY IMPLIED WARRANTY OF
MERCHANTABILITY OR FITNESS, AND MIMAKI NEITHER ASSUMES NOR AUTHORIZES DEALER TO ASSUME
FOR IT ANY OTHER OBLIGATION OR LIABILITY OR MAKE ANY OTHER WARRANTY OR MAKE ANY OTHER
WARRANTY IN CONNECTION WITH ANY PRODUCT WITHOUT MIMAKI’S PRIOR WRITTEN CONSENT.
IN NO EVENT SHALL MIMAKI BE LIABLE FOR SPECIAL, INCIDENTAL OR CONSEQUENTIAL DAMAGES OR FOR
LOSS OF PROFITS OF DEALER OR CUSTOMERS OF ANY PRODUCT.
On This Operation manual
• This Operation manual is describing the operations and maintenance of “Soft Media Feeding Kit” (called as this
machine hereafter)
• Read this Operation manual carefully and understand them thoroughly to use.
• It is also necessary to keep this Operation manual on hand.
• This Operation manual has been carefully prepared for your easy understanding, however, please do not hesitate to
contact a distributor in your district or our office if you have any inquiry.
• Descriptions contained in this Operation manual are subject to change without any notice for improvement.
• You can also download the latest manual from our website.
Requests
• This Operation manual has been carefully prepared for your easy understanding.
However, please do not hesitate to contact a distributor in your district or our office if you have any inquiry.
• Description contained in this Operation manual are subject to change without notice for improvement.
Reproduction of this manual is strictly prohibited.
All Rights Reserved.Copyright
© 2016 MIMAKI ENGINEERING Co., Ltd.
About installing this machine
3
About installing this machine
Where to Install This Machine
This unit is an optional kit for feeding the soft media for the Mimaki inkjet printer.
Listing in the following table the space required when mounting this unit to the Mimaki printer.
Please set up taking into account the size of the unit attached to the printer and the space necessary for the print.
Width Depth
The width of the printer The depth of the printer +25mm (Front side) + 70mm (Rear side)
Names of Parts and Functions
4
Names of Parts and Functions
Front Side of the Machine
Rear Side and Right Side of the Machine
Here, the soft media feeding kit is described with the figures of the kit mounted on the “SIJ-320UV”Mimaki UV inkjet printer.
Tension roller
This roller feeds media.
Media set unit
Set a wide media.
Media
5
Media
Usable media sizes and notes for handling are described.
Usable sizes of media
Caution in handling of medias
Pay attention to the followings for handling of medias.
Type of Recommended media
*1
*1. Depending on a media to be used, it may not adhere or the media may not be properly fed. Always try and check the media to be used beforehand.
Soft PVC film (DELUN 4025A (thickness = 0.25mm))
Maximum width 3250mm
Minimum width 210mm
Maximum printing width 3200mm
Roll media
Thickness 1mm or less (Should not cause trouble during media transport)
Roll outside diameter Φ250mm or less
Roll weight 100kg or less
Roll inside diameter 3 inches
Side printed Depends on the media to be used
Roll end treatment
The roll end is gently fixed to the core with weak-adhesive tape or weak glue for easy
removal.
When handling media, wear the gloves.
If you touch the media with your bare hand, the media may be stained due to fingerprints or oil of your finger. Be careful
about it.
Do not use the heater.
Waviness may occur on the media and it may cause media clogging.
Use media recommended by MIMAKI to ensure reliable, high-quality printing.
Set the heater temperature to meet the characteristics of the media.
Pay attention to the expansion and contraction of the media.
Do not use media immediately after unpacking. The media can be affected by the room temperature and humidity, and
thus it may expand and contract.
The media have to be left in the atmosphere in which they are to be used for 1 day or more after unpacked.
Do not use curled media.
This may result in paper jamming.
If a regular-sized coated sheet of media is rolled and stored, the coated side has to face outside.
Be careful to dusts on the edge face of the media.
Some rolls have dusts contained in the package gathered on the edge surface of the roll. If you use as it is, the drawing
quality may be degraded due to nozzle missing or ink drops. Be sure to set the roll after removing dusts adhering on the
edge face of the roll.
6
Setting a Media
Setting a Media
The method for setting media when using the Soft Media
Feeding Kit is explained below.
Adjusting the Head Height
If you use a soft PVC, adjust the head height as follows;
Setting a roll media
Loading the media on the media set
shaft
1
Insert the “Media set shaft”, which is
included in the Soft Media Feeding Kit box,
into the roll media.
Put roll media at the center of the wide media set
area.
2
Set the roll holder for right and left.
(1) Insert the roll holder (right and left) in a paper
core and tighten with the fixing screw.
(2) Turn the handle of the take-up roll holder to
tightly secure the paper core.
3
Open the AMF cover.
In general, this section describes the changes that
should be made in the media setting procedure
when using the Soft Media Feeding Kit.
For more information about the basic media
setting procedure, refer to the operation manual
that came with your printer.
Lever position Vinyl Standard
Distance between platen and head 1.7mm
Please raise the lever when the media is prone to
gather dust in the head or is often stained with ink
traces.
When you set the roll media, please use a "media
set axis" and "roll holder” shipped with the Soft
Media Feeding Kit.
When secure the media to the take-up device,
secure the media with face in or face out
according to the soft PVC media to be used.
(Please refer to the operation manual of your
printer for the method of securing media.)
After tightening the screw, turn
the ratchet handle in toward the
roll holder. If ratchet handle
protrudes, it will cause to be
involved.
Fixed area of the roll
holder
Install the unit so that the
handle is fixed within the
“green area” of the sticker
on the roll holder.
Fixing screw
Handle
Handle
Fixed area
AMF cover
7
Setting a Media
4
Install the media set shaft (with the roll
media) on the feeding device, and then
close the AMF cover.
5
Regarding the procedure for feeding the
media to the front of the unit, refer to the
operation manual that came with your
printer.
To secure the media to a media take-up
device
In the case ofsoft PVC media(4025A)
Set to ON the setting of the tension roller.
Set to ON the take-up unit and feeding unit.
In the case of tarpaulin media
Turn OFF the setting of the tension roller.
Set up the take-up unit and the feeding unit to ON.
In the case of PVC / Film media
Turn OFF the setting of the tension roller.
Set the torque of the small take-up unit to MAX..
Prior to securing the media, please check the
printing side of the media (inside / outside) always.
When taping the media to the roll axis, it is
recommended that you put a tape evenly so that
the media does not float in between the tape and
the tape.
8
Setting a Media
Installing the counter weight for adjusting
the take-up/ feeding tension-bar weight
Install the proper number of the counter weight depending
on the media type.
Counter weight can be installed up to three sets in each of
the right and left of the tension bar.
If you want to heavier take-up / feeding tension-bar,
please attach the weights in the following manner.
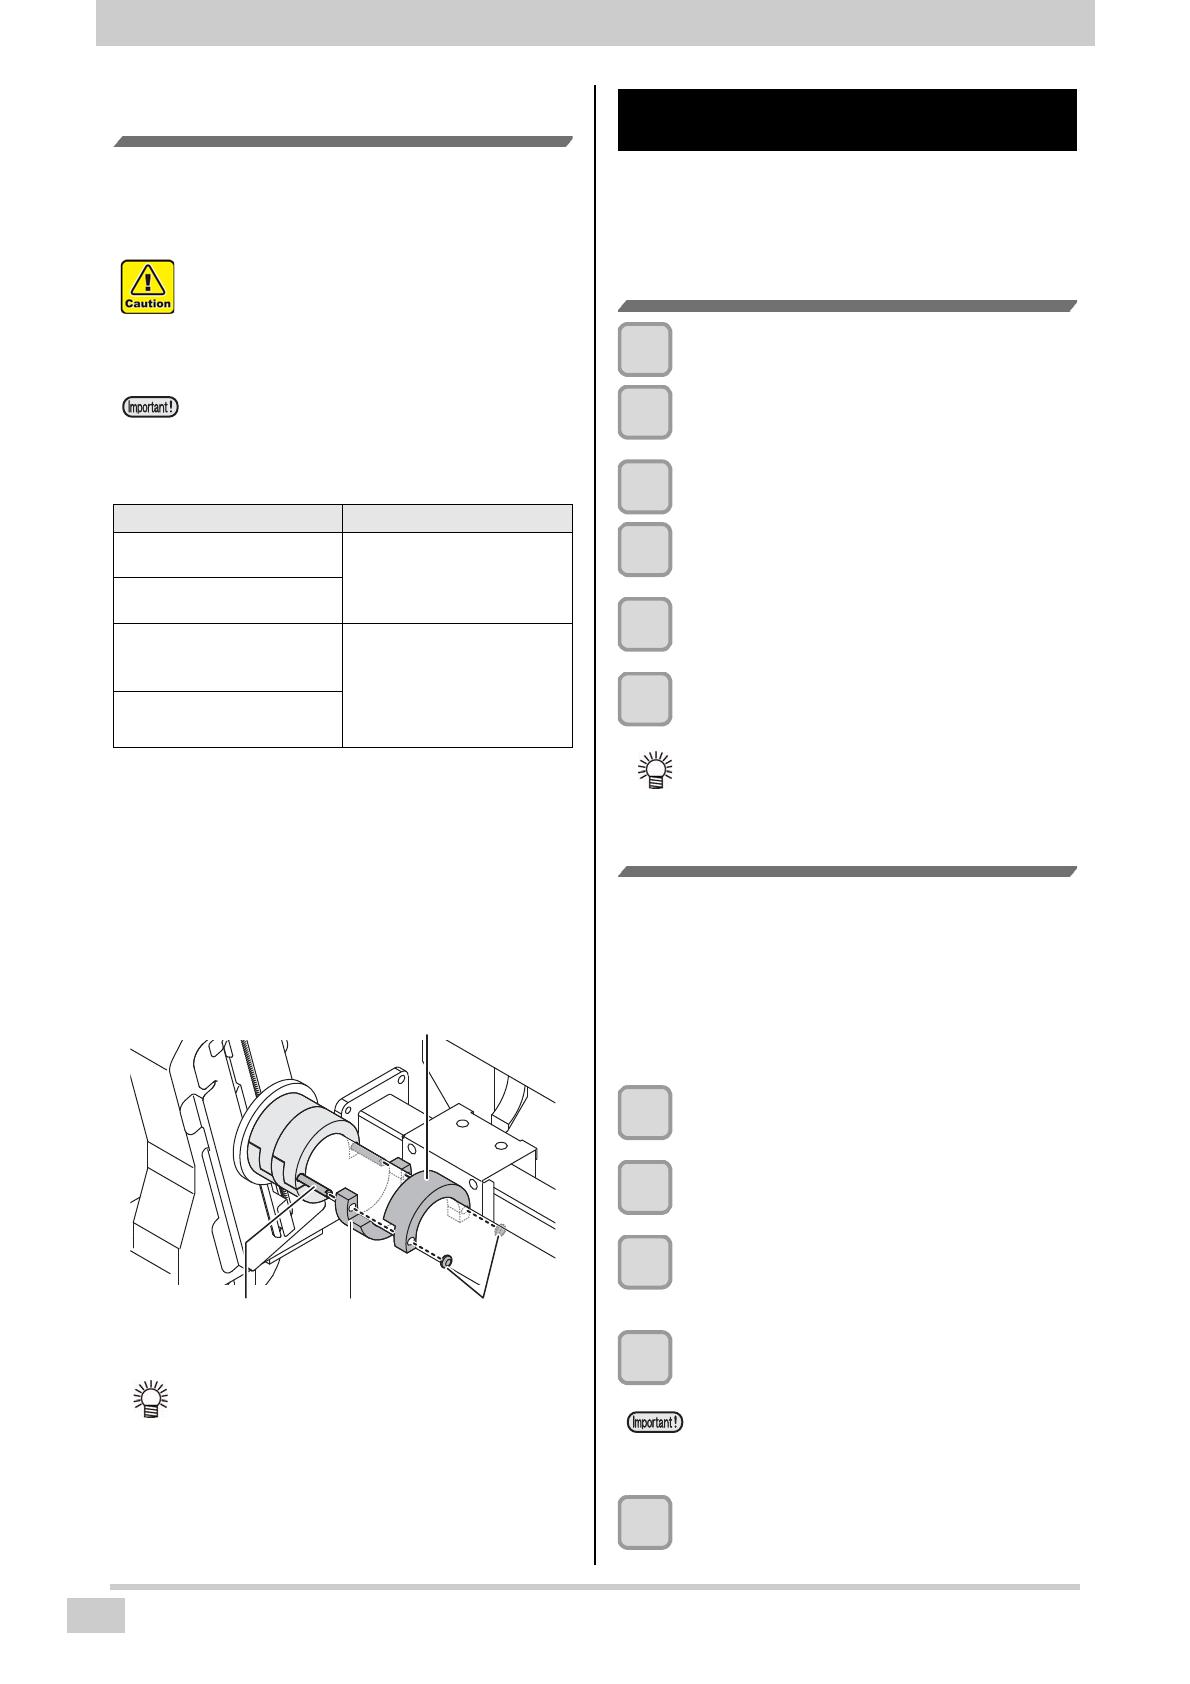
(1) Insert a counter weight for the lower into the
mounting shaft
(2) Insert the counter weight for the upper into the
mounting shaft, and combine with a counter weight
for the lower
(3) Fasten the counter weight with the weight fixing
rubber
Please check the work after setting
the media
Once you have set the soft media, please execute ”Print
of the media check pattern” and ”Media confirmation feed”
in order to check if it can properly feed the media and
successfully print.
Set the tension roller to ON
1
Press the [FUNC1](
MENU
) in Local.
2
Press [][] to select “Machine
setup”, and press the [ENTER] key.
3
Press the [FUNC1].
4
Press [][] to select “Tension
Roller”, and press the [ENTER] key.
5
Press [][] to select “ON”, and press the
[ENTER] key.
6
Press the [END/POWER] key several times
to end the setting.
Perform a media check feed
In the media confirmation feed, please focus to check the
following two points.
• If the media can successfully feed
• If wrinkles do not occur in the media during the feed
If there is an abnormality in the above two points, please
adjust the weight of the tension bar by changing the
number of counterweight.
1
Press the [FUNC2](
TEST PRINT/CLEANING
)
in Local.
2
Press [][] to select “Media Check”,
and press the [ENTER] key.
3
Press [][] to select “Feed”, and
press the [ENTER] key.
Execution screen will be displayed.
4
Press the[ENTER] key to start the feed
When wrinkle occurs, please add a counterweight
to tension bar.
5
Press the [END/POWER] key several times
to end the setting.
The weight of the counterweight will be about
500g each. (The combination of up and down, one
set is about 1kg)
Handle the counter weight with care.
If your finger or foot is stuck in the weight, you may
be injured.
There is no distinction between "for the upper” and
"for the lower" to the counterweight.
Counterweight can be installed either up or down.
Not to lose the unused counter weight, put it in the
storage box.
Media condition Solution
Ruck is generated in the media
feeding direction.
The tension applied on the
media is too strong.
According to your media,  
reduce the counter weight.
The media skews at printing.
The media sags and the
machine cannot take it up
beautifully.
The tension applied on the
media is too weak.
According to your media,
increase the counter weight.
The media floats on the platen.
If you are using the recommended media (DELUN
made 4025A), please attach12 pieces of
counterweight to the tension bar (about 6kg / top
and bottom of the combination in 6 pairs)
When installing a counterweight to the tension bar,
please set to be on the left and right equally.
f you are using the recommended media, install
triplicate on one side.
counter weight (Up)
counter weight
(Down)
Weight
Fixing rubber
Mounting
shaft
Setting of the tension roller can be set on the
screen after the media detection.
If the tension bar is too heavy, the media will be
stretched. Please attach the counter weight of the
appropriate amount according to the
characteristics of the media.
9
Setting a Media
Print a media check pattern
Print a media check pattern, and make sure there is no ink
landing deviation caused by the media stretch.
1
Press the [FUNC2](
TEST PRINT/CLEANING
)
in Local.
2
Press [][] to select “Media Check”,
and press the [ENTER] key.
3
Press [][] to select “Print”, and
press the [ENTER] key.
Execution screen will be displayed.
4
Press the [ENTER] key to start the print
5
Verify the printed patterns
The following pattern is printed.
If the dot placement shift does not occur :
Magenta will fall between the two of cyan line. It is
considered that there is no deterioration of image
quality due to the media stretch.
If there is a risk of impact of the dot placement
shift :
Magenta will not fall between the two of cyan line.
It is considered that the media is stretched due to
too heavy tension bar.
Since it becomes a cause of deterioration in
image quality, please make adjustments of the
counterweight.
6
Press the [END/POWER] key several times
to end the setting.
When using small take-up device
When using small take-up device, please do the following
tasks in order to stabilize the image quality.
• Set the "Tension rollers”, " feeding unit ", " take-up unit
"of the machine settings to OFF
• Set the torque limiter of small take-up device to
"LMAX..”
Set the Tension roller to OFF.
1
Press the [FUNC1](
MENU
) in Local.
2
Press [][] to select “Machine setup”.
3
Preess the [FUNC1](
<<
) in Local.
4
Press [][] to select “Tension Roller”,
and press the [ENTER] key.
5
Press [][] to select “OFF”, and press
the [ENTER] key.
6
Press the [END/POWER] key several times
to end the setting.
Set the Feeding unit and Take-up unit to
OFF.
1
Press the [FUNC1](
MENU
) in Local.
2
Press [][] to select “Machine setup”.
3
Press [p][q] to select “Feeding Unit”, and
press the [ENTER] key.
4
Press [][] to select “OFF”, and press
the [ENTER] key.
5
Press [][] to select “Take-up Unit”,
and press the [ENTER] key.
6
Press [][] to select “OFF”, and press
the [ENTER] key.
7
Press the [END/POWER] key several times
to end the setting.
Please perform the entire media for the
confirmation of pattern,
Setting of the tension roller can be set on the
screen after the media detection.
If the dot placement
shift
If there is a risk of
the dot placement
Media feeding
direction
10
Setting a Media
Set the torque limiter of the small take-
up device to "MAX."
Put out about 1mm
11
Maintenance
Maintenance
Maintain the machine regularly or as necessary so that its
accuracy will be maintained and it can continue to be
used for a long time.
Precautions for Maintenance
Pay attention to the following items when maintaining this
machine.
About Cleaning Solution
Use the cleaning liquid dedicated for the ink being used.
Cleaning the tension roller
Remove ink stain etc. adhering to the tension roller at the
front side of the machine.
Moisten soft cloth with water or waterish mild detergent,
squeeze tightly and then wipe it off.
When using cleaning solution for maintenance, be
sure to wear the supplied glove and protective
glasses.
Never disassemble the machine.Disassembling it
can result in electric shock hazards or damage to
the machine.
Before maintenance, be sure to turn off the power
button and main power switch, and unplug the
power cable;otherwise, an unexpected accident
may occur.
Prevent moisture from entering the
machine.Moisture inside the machine can cause
electric shock hazards or damage to the machine.
To ensure stable ink jetting, it is necessary for the
machine to eject a small amount of ink (flushing)
regularly when a printing (outputting) operation
has not been performed for a long time.
When the machine is not to be used for a long
time, turn off only the power button on the front
side, leave the main power switch at the side
turned ON (in the position of | ), and leave the
power cable connected.
Do not use benzene, thinner, or any chemical
agent containing an abrasive.Such materials can
deteriorate or deform the surface of the cover.
Do not apply a lubricant, etc. to any parts inside
the machine. Doing so can cause printing failure.
Be careful that the cleaning solution, ink, etc. not
to stick to the cover because this may cause the
surface of the cover to deteriorate or deform.
Type of Ink Applicable maintenance washings
UV ink Washing liquid for maintenance (SPC-0568)
Tension roller
12
Troubleshooting
Troubleshooting
Take appropriate actions as described below before taking the trouble as a failure.
If still the problem is not solved after troubleshooting, contact your dealer or an office of MIMAKI.
Media get jammed / media is soiled
Media jamming or stained media is considered to be due to the use of an unsuitable media or improper setting of media.
If the media gets clogged, perform the work below:
Image quality is poor
This section describes the corrective actions to be taken in case the image quality is not satisfactory.
Take remedy for particular problems with image quality. If the remedy does not work, contact your dealer or an office of
MIMAKI.
Is a recommended media used ? Use recommended media.
Is the appropriate tension applied to the
media?
Adjust the counterweight, and apply the tension
that fits your media.
(→P.8)
Is the media not curled or bent ends ?
Avoid using any media with curls or bent ends.
In addition, when the tip is bent, it will be the
cause of the wound wrinkles.
Yes
Is the height of the head proper?
Adjust the distance between the media and the
head will be 1.7 mm to 2 mm.
Open the front cover and
raise the clamp lever.
Remove the clogged media. Close the front cover.
Phenomenon Measures
White lines / blur / dark stripes (in the direc-
tion of travel of the heads)
(1) Execute the head cleaning.
(2) Perform maintenance of the inside of the station.
(3) Execute the [Feed Comp.] function.
(4) If any pieces of paper or dust is attached on the path of the heads such
as media press, remove it.
Characters are double- or triple-printed in
the media feed direction
(1) Execute the [Feed Comp.] function.
Ink drops falling on media during printing
(1) Execute the wiper cleaning.
(2) Execute the ink cap cleaning.
(3) Clean around the head.
(4) Execute the head cleaning [Normal].
(5) Set a shorter interval of Interval Wiping operation.
No
No
No
No
13
Troubleshooting
When media heaves up at feeding
We call the status of heaving media at feeding “cockling”.
When media cockling occurs, check the following items:
If the wrinkles on the platen
If the ink landing position is shifted in the Y direction
When using non-recommended medias
Note/ checking items Measures
Checking media set status
(1) Check that the media is set straight and reset it.
Media feeding
(1) For roll media, feed the media by about tens of centimeters to one
meter.
(2) For leaf media, press [][] and perform feed/ back feed.
Heighten the head
(1) Please raise the height of the head, correct the dot position then print.
Note/ checking items Measures
Check the media tension
(1) Please apply higher tension to the media. Low tension may cause
wrinkles.
Note/ checking items Measures
Check the media tension
(1) Please lower the tension applied to the media. The media applied high
tension are not fed smoothly and it will cause the shift of the ink landing
position.
Note/ checking items Measures
Understand the characteristics of the media
(1) Reduce the tension applied to the media. The media applied high tension
are not fed smoothly and it will cause the shift of the ink landing position.
14
Troubleshooting
はじめに
15
はじめ
この度は、カラー インクジェットプリンタ用オプション「ソフトメディア搬送キット」をお買いあげいただき、誠にあ
りがとうございます。
ご注意
株式会社ミマキエンジニアリングの保証規定に定めるものを除き、本製品の使用または使用不能から生ずるいかなる損害
( 逸失利益、間接損害、特別損害またはその他の金銭的損害を含み、これらに限定しない ) に関して一切の責任を負わな
いものとします。
また、株式会社ミマキエンジニアリングに損害の可能性について知らされていた場合も同様とします。
一例として、本製品を使用したメディア等の損失や、作成された物によって生じた間接的な損失等の責任負担もしないも
のとします。
本装置を使用したことによる金銭上の損害および逸失利益、または第三者からのいかなる請求についても、当社は一切そ
の責任を負いかねますので、あらかじめご了承ください。
取扱説明書について
本書は、「ソフトメディア搬送キット」( 以後本機と称します ) の操作やメンテナンスなどの取り扱いについて説明い
たします。
本書をお読みになり、十分理解してからお使いください。また、本書をいつも手元に置いてお使いください。
本書は、本機をお使いになる担当者のお手元に確実に届くようお取りはからいください。
本書は、内容について十分注意して作成していますが、万一不審な点がありましたら、販売店または弊社営業所まで
ご連絡ください。
本書は、改良のため予告なく変更する場合があります。ご了承ください。
取扱説明書の最新版は、弊社ホームページからもダウンロードできます。
おねがい
この取扱説明書は、内容について十分注意しておりますが、万一ご不審な点などがありましたら、販売店または弊社
営業所までご連絡ください。
この取扱説明書は、改良のため予告なく変更する場合があります。
本書の内容を無断で転載することは禁止されています。
© 株式会社ミマキエンジニアリング
All Rights Reserved.Copyright
16
本機の設置について
本機設置
設置場所について
本機はミマキ製インクジェットプリンタで、柔らかいメディアを搬送するためのオプションキットです。
本機をミマキ製プリンタに取り付けたときに必要なスペースを下表に記載します。
プリンタに本機を取り付けたときの大きさとプリントのために必要なスペースを考慮して設置してください。
横幅 奥行き
プリンタの幅 プリンタの奥行き + 25mm ( 置前面 ) + 70mm ( 装置背面 )
17
各部の名称とはたらきについて
各部名称
装置前面
装置背面 / 側面
ここでは、ソフトメディア搬送キットをミマキ製 UV インクジェットプリンタ “SIJ-320UV” に取り付けている図で説明
します。
引張りローラ
メディアを送るためのローラです。
メディアセットユニット
幅の広いメディアをセットします。
18
メディアについて
メデ
使用可能なメディアサイズと、その取り扱い方法について説明します。
使用可能メディアサイズ
メディア取り扱い上の注意
メディアの取り扱いについて、次の点にご注意ください。
推奨メディアの種類
*1
*1. 使用するメディアにより、密着しない場合や正常にメディアを搬送できない場合があります。必ず使用するメディアで事前に試してください。
ソフト PVC (DELUN 4025A ( 厚さ =0.25mm))
最大幅
3250mm
最小幅
210mm
最大プリント範囲
3200mm
ロールメディア
厚さ 1mm 以下 ( メディア搬送に支障なきこと )
ロール外径 Φ250mm 以下
ロール重量 100kg 以下
紙管内径 3 インチ
プリント面 使用するメディアによる
巻き終り処理 紙管にテープ止めまたは弱粘着
メディアを扱うときは手袋を着用してください
素手でメディアに触れると、指紋や手の脂などでメディアが汚れるので注意してください。
ヒーターを使用しないでください。
メディアが波打ち、メディア詰まりの原因になります。
推奨メディアをご使用ください。
安定した高画質でプリントするには、弊社推奨のメディアをご使用ください。
メディアの伸縮にご注意ください。
包装を開けて間もないメディアは、使用しないでください。室内の温度や湿度によって、メディアが伸縮する場合があ
ります。包装を開けて、使用する環境で 1 日以上さらしてから装置に取り付けてください。
カールしたメディアは使用しないでください。
紙詰まりの原因になります。コーティングした定型サイズ紙をまるめて保管する場合は、コーティング面が外側になる
ようにしてください。
メディアのフチに付着したホコリにご注意ください。
ロールによっては、包装に含まれるホコリがロール端面に溜まっていることがあります。そのままお使いになると、ノ
ズル抜けやインクのボタ落ちなどによるプリント品質劣化の原因となりますので、ロール端面に付着したホコリを取り
除いてからセットしてください。
19
メディアをセットする
メデアを
ソフトメディア搬送キットを使用したときのメディア
セット方法を説明します。
ヘッド高さを調整する
メディアとしてソフト PVC をセットする場合、ヘッド高
さは次のように調整してください。
ロールメディアをセットする
メディアをメディアセット軸に取り付ける
1
ソフトメディア搬送キットの箱に入ってい
る、「メディアセット軸」をメディアに通す
ロールメディアは、大幅メディアセットエリアの
中央に乗せます。
2
ロールホルダー ( 左右 ) をセットする
(1) ロールホルダー ( 左右 ) を紙管に差し込み、
固定ネジで締める
(2) 巻取ロールホルダーのハンドルを回して、
紙管をきつく固定する
3
AMF カバーを開ける
ここでは、ソフトメディア搬送キットを使用する
ことによって生じるメディアセット方法の変更箇
所を中心に説明します。
基本的なメディアセット方法については、お使い
のプリンタの取扱説明書をご覧ください。
レバー位置
Vinyl Standard
プラテンとヘッドの間隔
1.7mm
ヘッドにホコリが付着しやすい場合やインクこす
れが発生する場合、レバーを上げてください。
ロールメディアをセットするときは、ソフト
ディア搬送キットに同梱されている「メディア
セット軸」と「ロールホルダー」をお使いくださ
い。
メディアを巻取装置に固定する場合、お使いのソ
フト PVC メディアで定められているプリント面
に従って、内巻きまたは外巻きでメディアを固定
してください。( メディアの固定方法は、お使い
のプリンタの取扱説明書を参照してください。)
ネジを締めたあとは、ラチェッ
トハンドルをロールホルダーに
沿わせるようにしてください。
ラチェットハンドルが飛び出て
いると、巻き込まれる原因にな
ります
ロールホルダーの固定範囲
ロールホルダーに付いてい
るシールの「緑地」の範囲
内でハンドルが固定できる
ようにしてください。
固定ネジ
ハンドル
ハンドル
固定エリア
AMF カバー
20
メディアをセットする
4
メディアをセットしたメディアセット軸を繰
出装置にセットし、AMF カバーを閉める
5
後は、お使いのプリンタに付属している取扱
説明書を参考にして、メディアを装置前面に
送る
メディアをメディア巻取装置に固定する
ソフト PVC メディア (4025A) の場合
引張りローラの設定を ON に設定します。
巻取りユニットおよび繰出しユニットの設定を ON
します。
ターポリンメディア (510B) の場合
引張りローラの設定を OFF に設定します。
巻取りユニットおよび繰出しユニットの設定を ON
します。
塩ビ / フィルムメディアの場合
引張りローラの設定を OFF に設定します。
小巻取りユニットのトルクを MAX. に設定します。
メディアを固定する前に、必ずメディアのプリン
ト面 ( 内側 / 外側 ) を確認してください。
メディアをロール軸にテープで固定するときは、
テープとテープの間でメディアが浮かないように
テープをまんべんなく貼ることをお勧めします。
  • Page 1 1
  • Page 2 2
  • Page 3 3
  • Page 4 4
  • Page 5 5
  • Page 6 6
  • Page 7 7
  • Page 8 8
  • Page 9 9
  • Page 10 10
  • Page 11 11
  • Page 12 12
  • Page 13 13
  • Page 14 14
  • Page 15 15
  • Page 16 16
  • Page 17 17
  • Page 18 18
  • Page 19 19
  • Page 20 20
  • Page 21 21
  • Page 22 22
  • Page 23 23
  • Page 24 24
  • Page 25 25
  • Page 26 26
  • Page 27 27
  • Page 28 28

MIMAKI SIJ-320UV 取扱説明書

タイプ
取扱説明書
このマニュアルも適しています

MIMAKI SIJ-320UVは、柔軟性、印刷品質、生産性を兼ね備えた、高機能なUVプリンターです。幅3.2mのロールメディアに対応し、最大120㎡/時の高速印刷を実現します。また、独自のインク技術により、高発色で鮮やかな印刷が可能です。

MIMAKI SIJ-320UVは、看板や横断幕などの屋外広告、壁紙や床材などの内装材、テキスタイルやアパレルなどのファッションアイテムなど、幅広い用途に使用できます。その高い印刷品質と生産性により、ビジネスの効率化と収益性の向上に貢献します。

MIMAKI SIJ-320UVの主な機能は以下の通りです。

  • 幅3.2mのロールメディアに対応
  • 最大120㎡/時の高速印刷
  • 独自のインク技術による高発色で鮮やかな印刷
  • 屋外広告、内装

他の言語で