
SERIAL # ____________________ MFG. DATE ______________________PURCHASE DATE: ____________________
序列號____________________ 生產日期_____________________ 購買日期:_____________________
Questions, problems, missing parts? For replacement part, contact call our customer service
department at 1- 866-984-7455 in USA and 1-800-648-5864 in Canada, language spoken: English,
French, Spanish 8 a.m.-5 p.m., PST. Monday-Friday. [email protected].
• This instruction manual contains important information necessary for the
proper assembly and safe use of the appliance.
• Read and follow all warnings and instructions before assembling and
using the appliance.
• Keep this manual for future reference.
19000746A0
720-0896CG FOR OUTDOOR USE ONLY. NOT FOR COMMERCIAL USE.
僅供戶外使用。非商業用途。
ITM. / ART. 1900702
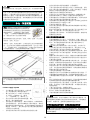
Outdoor Gas Grill
Operating Instructions
Pages 2 - 17
戶外瓦斯烤爐操作說明
頁數 18 - 30
• 本使用手冊內含正確組裝及安全使用所須的重要資訊。
• 在組裝及使用本裝置之前請閱讀及遵照所有警告及指示說明。
• 本手冊請妥為留存以便日後參考使用。
遇到難題、有疑問或是遺失零件嗎?需要更換零件,請與我們的客服部門聯絡,美國當地請撥:1-
866-984-7455,加拿大當地請撥:1-800-648-5864,我們提供英語、西語、法語的服務。來電請於
大平洋標準時間,禮拜一至禮拜五上午8點至下午5點。
或寄送電子郵件至: [email protected].

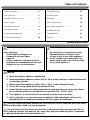
Table of Contents
Troubleshooting. . . . . . . . . . . . . . . . . . . . . . .
Ordering Parts . . . . . . . . . . . . . . . . . . . . . .
Grill Hints . . . . . . . . . . . . . . . . . . . . . . . . . . . .
Grill Cooking Chart . . . . . . . . . . . . . . . . . . .
Grill Recipe Suggestion . . . . . . . . . . . . . . .
Limited Warranty . . . . . . . . . . . . . . . . . . . .
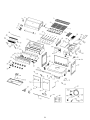
Exploded View . . . . . . . . . . . . . . . . . . . . . .
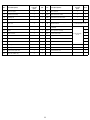
Part List . . . . . . . . . . . . . . . . . . . . . . . . . . . .
11
12
12
13
15
17
31
32
Safety Instruction . . . . . . . . . . . . . . . . . . . . .
Gas Hook–Up . . . . . . . . . . . . . . . . . . . . . . .
Installer Final Check List. . . . . . . . . . . . . . . .
Leak Testing . . . . . . . . . . . . . . . . . . . . . . . .
Operation Instruction . . . . . . . . . . . . . . . . . .
Lighting Instruction . . . . . . . . . . . . . . . . . . . .
Component Identification. . . . . . . . . . . . . . . .
Care and Maintenance . . . . . . . . . . . . . . . . .
2
6
6
7
8
8
9
10
2
Safety Instruction
Failure to comply with these instructions could result in a fire or explosion that could cause
serious bodily injury, death, or property damage.
Your grill will be very hot. Never lean over the cooking area while using your grill. Do not
touch cooking surfaces, grill housing, lid or any other grill parts while the grill is in operation,
or until the gas grill has cooled down after use.
DANGER
1. Never operate this appliance unattended.
2. Never operate this appliance within 3.05 m / 10 ft. of any structure, combustible material
or other gas cylinder.
3. Never operate this appliance within 7.62 m / 25 ft. of any flammable liquid.
4. Do not fill cooking vessel beyond maximum fill line.
5. Heated liquids remain at scalding temperatures long after the cooking process. Never
touch cooking appliance until liquids have cooled to 45ºC / 115ºF or less.
6. This appliance is not intended for and should never be used as a heater.
7. If a fire should occur, keep away from the appliance and immediately call your fire
department. Do not attempt to extinguish an oil or grease fire with water.
DANGER
If you smell gas:
• Shut off gas to the appliance.
• Extinguish any open flame.
• Open lid.
• If odor continues, keep away from the
appliance and immediately call your gas
supplier or your fire department.
WARNING
1. Do not store or use gasoline or other
flammable liquids or vapors in the
vicinity of this or any other appliance.
2. An LP cylinder not connected for use
shall not be stored in the vicinity of this
or any other appliance.

WARNING
Do not try lighting this appliance without reading the
“LIGHTING INSTRUCTIONS” section of this manual.
CAUTION: Beware of Flashback
TESTED IN ACCORDANCE WITH ANSI Z21.58-2015 •
CSA 1.6-2015 STANDARD FOR OUTDOOR COOKING
GAS APPLIANCE. THIS GRILL IS FOR OUTDOOR USE
ONLY.
CAUTION: Spiders and small insects occasionally
spin webs or make nests in the grill
burner tubes during transit and
warehousing. These webs can lead
to gas flow obstruction, which could
result in a fire in and around burner
tubes. This type of fire is known as
“FLASH-BACK” and can cause serious damage to your
grill and create an unsafe operating condition for the user.
Although an obstructed burner tube is not the only cause of
“FLASH-BACK”, it is the most common cause.
To reduce the chance of “FLASH-BACK”, you must clean
the burner tubes before assembling your grill, and at least
once a month in late summer or early fall when spiders are
most active. Also perform this burner tube cleaning
procedure if your grill has not been used for an extended
period of time. A clogged tube can be lead to a fire
beneath the grill.
Grill Installation Codes
Check your local building codes for the proper method of
installation. in the absence of local codes, this unit should
be installed in accordance with the National Fuel Gas Code,
ANSI Z223.1/NFPA 54, Storage and Handling of Liquefied
Petroleum Gases, ANSI /NFPA B149.2 or CSA B149.1
Natural Gas and Propane Installation Code, and the
National Electrical Code, ANSI/NFPA 70.
Correct LP Gas Tank Use
LP gas grill models are designed for use with a standard 20
lb. Liquid Propane Gas tank, not included with grill. Never
connect your gas grill to an LP gas tank that exceeds this
capacity.
NOTE: The normal flow of gas through the regulator and
hose assembly can create a humming noise. A low volume
of noise is perfectly normal and will not interfere with
operation of the grill. If humming noise is loud and
excessive you may need to purge air from the gas line or
reset the regulator excess gas flow device. This purging
procedure should be done every time a new LP gas tank is
connected to your grill.
3
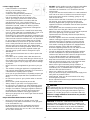
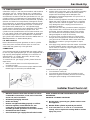
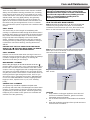
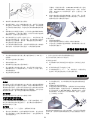
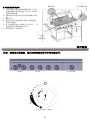
Visually check the burner flames prior to each use. The
flames should look like this picture. If they do not, refer to
the burner main tenancy part of this manual.

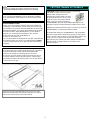
304.8 mm
/ 12 in.
469.9 mm
/ 18.5 in.
LP-Gas Supply System
• If the information is not followed
exactly, a fire resulting in death
or serious injury could occur.
• A 20lb tank of approximately 304.8 mm
/ 12 in diameter by 469.9 mm / 18.5 in
high is the maximum size LP gas tank to use.
• The LP gas supply cylinder to be used must be
constructed and marked in accordance with the
specifications for LP –Gas cylinder of the U.S.
Department of Transportation (DOT) or the National
Standard of Canada, CAN/CSA –B339, Cylinders,
Spheres and Tubes for Transportation of Dangerous
Goods and Commission .
• The LP gas tank must have a shutoff valve terminating
in an LP valve outlet that is compatible with a Type 1. LP
gas supply cylinder must have a shut off valve
terminating in a valve outlet specified for connection type
QCC1 in the standard for compressed gas cylinder valve
outlet and inlet connection ANSI/CGA-V-1 as applicable.
LP gas supply cylinder must be fitted with an Overfill
Protection Device (O.P.D) The LP gas tank must also
have a safety relief device that has a direct connection
with the vapor space of the tank. This safety feature
prevents the tank from being overfilled, which can cause
malfunction of the LP gas tank, regulator and/or grill.
• The tank supply system must be arranged for vapor
withdrawal.
• The LP gas tank used must have a collar to protect the
tank valve.
• Place dust cap on cylinder valve outlet whenever the
cylinder is not in use. Only install the type of dust cap on
the cylinder valve outlet that is provided with the cylinder
valve. Other types of cap or plugs may result in leakage
of propane.
• Never connect an unregulated LP gas tank to your gas
grill.
• This outdoor cooking gas appliance is equipped with a
high capacity hose/regulator assembly for connection to
a standard 20 lb Liquid propane cylinder.
• Have your LP gas tank filled by a reputable propane gas
dealer and visually inspected and re-qualified at each
filling.
• Do not store a spare LP gas cylinder under or near this
appliance.
• Never fill the cylinder beyond 80 percent full.
• Always keep LP gas tanks in an upright position.
• Do not store or use gasoline or other flammable vapors
and liquids in the vicinity of this or any other appliance.
• Storage of an outdoor cooking gas appliance indoors is
permissible only if the cylinder is disconnected and
removed from the outdoor cooking gas appliance.
• When your gas grill is not in use the gas must be turned
off at LP gas tank.
Proper Placement And Clearance Of Grill
• Never use your gas grill in a garage, porch, shed,
breezeway or any other enclosed area. Your gas grill is
to be used outdoors only.
Do Not install this unit into combustible enclosures.
Minimum clearance from sides and back of unit to
combustible construction, 91 cm / 36 in. from sides and
91 cm / 36 in. from back.
• DO NOT use this appliance under overhead combustible
surfaces. This outdoors cooking gas appliance is not
intended to be installed in or on recreational vehicles
and/or boats.
• LP gas tank must be stored outdoors in a well-ventilated
area and out of reach of children. Disconnected LP gas
tanks must not be stored in a building, garage or any
other enclosed area.
• Do Not obstruct the flow of ventilation air around the gas
grill housing. Only use the regulator and the hose
assembly supplied with your gas grill. Replacement
regulators and hose assemblies must be those specified
in this manual.
• The regulator and hose assembly must be inspected
before each use of the grill. If there is excessive
abrasion or wear or if the hose is cut, it must be replaced
prior to the grill being put into operation. The
replacement hose assembly shall be that specified by
the manufacturer.
• Pressure regulator and hose assembly supplied with the
outdoor cooking gas appliance must be used. Never
substitute other types of regulator. Contact customer
service for manufacturer specified replacement parts.
• This outdoor cooking gas appliance is equipped with a
pressure regulator comply with the standard for
Pressure Regulating Valves for LP Gas ANSI/ UL 144.
• Do not use briquettes of any kind in the grill.
• The grill is designed for optimum performance without
the use of briquettes. Do not place briquettes on the
radiant as this will block off the area for the grill burners
to vent. Adding briquettes can damage ignition
components and knobs, and void the warranty.
• Keep the back and side cart free and clear from debris.
Keep any electrical supply cord, or the rotisserie motor
cord away from the heated areas of the grill.
• Never use the grill in extremely windy conditions. If
located in a consistently windy area (oceanfront,
mountaintop, etc.) a windbreak will be required. Always
adhere to the specified clearance.
• Never use a dented or rusty propane tank.
• Keep any electrical supply cord and the fuel supply hose
away from any heated surface.
• While lighting, keep your face and hands as far away
from the grill as possible.
• Burner adjustment should only be performed after the
burner have cooled.
WARNING
Your grill will get very hot. Never lean over the cooking
area while using your grill. Do not touch cooking surfaces,
grill housing, lid or any other grill parts while the grill is in
operation, or until the gas grill has cooled down after use.
Failure to comply with these instructions may result in
serious bodily injury.
CAUTION: TO ENSURE CONTINUED PROTECTION
AGAINST RISK OF ELECTRIC SHOCK, CONNECT TO
PROPERLY GROUNDED OUTLETS ONLY, TO REDUCE
THE RISK OF ELECTRIC SHOCK, KEEP EXTENSION
CORD CONNECTION DRY AND OFF THE GROUND.
4

WARNING
Keep a spray bottle of soapy water near the gas supply
valve and check the connections before each use.
DO NOT USE ALUMINUM FOIL TO LINE THE GRILL
RACKS OR GRILL BOTTOM.
This can severely upset combustion airflow or trap
excessive heat in the control area.
SAFETY PRACTICES TO AVOID PERSONAL INJURY
When properly cared for your grill will provide safe, reliable
service for many years. However, extreme care must be used
as the grill produces intense heat that can increase accident
potential. When using this appliance basic safety practices
must be followed, including the following:
Do not repair or replace any part of the grill unless
specifically recommended in this manual. All other service
should be referred to a qualified technician.
This grill is not intended to be installed in or on recreational
vehicles or boats.
Children should not be left alone or unattended in an area
where the grill is being used. Do not allow them to sit, stand
or play in or around the grill at any time.
Do not store items of interest to children around or below the
grill.
Do not permit clothing, pot holders or other flammable
materials to come in contact with or too close to any grate,
burner or hot surface until it has cooled. The fabric could
ignite and cause personal injury.
For personal safety, wear proper apparel. Loose fitting
garments or sleeves should never be worn while using this
appliance. Some synthetic fabrics are highly flammable and
should not be worn while cooking.
Only certain types of glass, heat-proof glass ceramic,
earthenware, or other glazed utensils are suitable for grill use.
These materials may break with sudden temperature
changes. Use only on low or medium heat settings in
accordance with the manufacturer’s guidelines.
Do not heat unopened food containers. A build-up of
pressure may cause the containers to burst.
Use a covered hand when opening the grill lid.
Never lean over an open grill.
When lighting a burner, pay close attention to what you are
doing. Make certain you are aware of which burner you are
lighting, so your body and clothing remain clear of open
flames.
WARNING
This outdoor cooking gas appliance is not intended to be
installed in or on boats. And other recreational vehicles.
When using the grill, do not touch the grill rack, burner grate
or immediate surroundings as these areas become
extremely hot and could cause burns. Use only dry
potholders. Moist or damp potholders on hot surfaces may
cause steam burns. Do not use a towel or bulky cloth in
place or potholders. Do not allow potholders to touch hot
portions of the grill rack.
Grease is flammable. Let hot grease cool before attempting
to handle it. Do not allow grease deposits to collect in the
grease tray at the bottom of the grill’s firebox. Clean the
grease tray often
Do not use aluminum foil to line the grill racks or grill bottom.
This can severely upset combustion air flow or trap
excessive heat in the control area.
For proper lighting and performance of the burners keep the
burner ports clean. It is necessary to clean them periodically
for optimum performance. The burners will only operate in
one position and must be mounted correctly for safe
operation.
Clean the grill with caution. To avoid steam burns, do not
use a wet sponge or cloth to clean the grill while it is hot.
Some cleaners produce toxic fumes or can ignite if applied
to a hot surface.
Turn off grill controls and make certain the grill is cool before
using any type of aerosol cleaner on or around the grill. The
chemical that produces the spraying action could, in the
presence of heat, ignite or cause metal parts to corrode.
Do not use the grill to cook excessively fatty meats or other
products which promote flare-ups.
Do not operate the grill under unprotected combustible
constructions. Use only in well ventilated areas. Do not use
in buildings, garages, sheds, breezeways or other such
enclosed areas.
Keep the area surrounding the grill free from combustible
materials including, fluids, trash, and vapors such as
gasoline or charcoal lighter fluid. Do not obstruct the flow of
combustion and ventilation air.
NEVER CONNECT AN UNREGULATED GAS
SUPPLY LINE TO THE APPLIANCE. USE THE
REGULATOR/HOSE ASSEMBLY SUPPLIED.
This is a liquid propane configured grill. Do not attempt
to use a natural gas supply unless the grill has been
reconfigured for natural gas use.
Total gas consumption (per hour) of this stainless
steel gas grill with all burners on :
Main Burner 6 x 9,000 BTU/hr.
Sear Burner 15,000 BTU/hr.
Rotisserie Burner 13,000 BTU/hr.
Total 82,000 BTU/hr.
5

Gas Hook-Up
L.P. TANK REQUIREMENT
A dented or rusty L.P. tank may be hazardous and should be
checked by your L.P. supplier. Never use a cylinder with a
damaged valve. The L.P. gas cylinder must be constructed
and marked in accordance with the specifications for L.P. gas
cylinders of the U.S. Department of Transportation (DOT) or
the National Standard of Canada, CAN/CSA-B339, Cylinders,
Spheres and Tubes for Transportation of Dangerous Goods;
and Commission, as applicable. Overfilling prevention device
(OPD) shall be provided on cylinder & QCC1 connection on
the cylinder valve, ANSI/CGA-V-1. The cylinder supply
system must be arranged for vapor withdrawal. The cylinder
must include a collar to protect the cylinder valve. The
cylinder must be provided with a shut off valve terminal in an
L.P. gas supply cylinder valve outlet specified, as applicable,
for connection type QCC1 in the standard for compressed
gas cylinder valve outlet and inlet connection ANSI/CGA-V-1.
Manifold pressure: 11” water column (W.C.).
L.P. GAS HOOK-UP
Ensure that the black plastic grommets on the LP cylinder
valve are in place and that the hose does not come into
contact with the grease tray or the grill head.
CONNECTION
Your stainless steel grill is equipped with gas supply orifices
for use only with liquid propane gas. It is also equipped with a
high capacity hose/regulator assembly for connection to a
standard 20lb. L.P. cylinder 469.9 mm / 18-1/4 in. high,
304.8 mm / 12-1/4 in. diameter).
To connect the L.P. gas supply cylinder, please follow the
steps below:
1. Make sure tank valve is in its full off position (turn
clockwise to stop).
2. Check tank valve to assure it has proper external male
threads (type 1 connection per ANSIZ21.81).
3. Make sure all burner valves are in their off position.
4. Inspect valve connections, port, and regulator assembly.
Look for any damage or debris. Remove any debris.
Inspect hose for damage. Never attempt to use
damaged or obstructed equipment. See your local L.P.
gas dealer for repair.
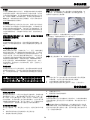
5. When connecting regulator assembly to the valve, hand
tighten the quick coupling nut clockwise to a complete
stop. Do not use a wrench to tighten. Use of a wrench
may damage the quick coupling nut and result in a
hazardous condition.
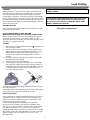
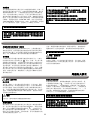
6. Open the tank valve fully (counterclockwise). Apply the
soap solution with a clean brush to all gas connections.
See below. If growing bubbles appear in the solution
the connections are not properly sealed. Check each
fitting and tighten or repair as necessary.
7. If you have a gas connection leak you cannot repair,
turn gas OFF at supply tank, disconnect fuel line from
your grill and call 1- 866-984-7455 in USA and 1-800-
648-5864 in Canada or your gas supplier for repair
assistance.
8. Also apply soapy solution to the tank seams. See below.
If growing bubbles appear, shut tank OFF and do not
use or move it! Contact an LP gas supplier or your fire
department for assistance.
To disconnect L.P. gas cylinder:
1. Turn the burner valves off.
2. Turn the tank valve off fully (turn clockwise to stop).
3. Detach the regulator assembly from the tank valve by
turning the quick coupling nut counterclockwise.
Installer Final Check List
USER, PLEASE RETAIN THIS MANUAL FOR FUTURE
REFERENCE.
PROPANE CYLINDER CAUTIONS
a) Do Not store a spare LP-gas cylinder under or near
this appliance.
b) NEVER fill the cylinder beyond 80 percent full.
c) If the information in “a” and “b” is not followed
exactly, a fire or explosion causing death or serious
injury may occur.
✓ Minimum clearance from sides and back of unit to
combustible construction, 91 cm / 36 in. from sides
and 91 cm / 36 in. from back
✓ All internal packaging removed.
✓ Knobs turn freely.
✓ Burners are tight and sitting properly on orifices.
✓ Pressure regulator connected and set. Gas
connections to grill using hose & regulator
assembly provided (pre-set for 11 in. water column).
✓ Unit tested and free of leaks.
✓ User informed of gas supply shut off valve location
6

GENERAL
Although all gas connections on the grill are leak tested at
the factory prior to shipment, a complete gas leak test check
must be performed at the installation site due to possible
mishandling in shipment, or excessive pressure unknowingly
being applied to the unit. Periodically check the whole system
for leaks following the procedures listed below. If the smell of
gas is detected at anytime you should immediately check the
entire system for leaks.
BEFORE TESTING
Make sure that all packing material is removed from the grill
including tie-down straps.
DO NOT SMOKE WHILE LEAK TESTING.
NEVER PERFORM LEAK TEST WITH AN OPEN FLAME.
Make a soap solution of one part liquid detergent and one
part water. You will need a spray bottle, brush, or rag to
apply the solution to the fittings. For the initial leak test, make
sure the L.P. cylinder is 80% full.
TO TEST
1. Make sure the control valves are in the “○” position, and
turn on the gas supply.
2. Check all connections from the L.P. gas regulator and
supply valve up to and including the connection to the
manifold pipe assembly (the pipe that goes to the
burners). Soap bubbles will appear where a leak is
present.
3. If a leak is present, immediately turn off the gas supply
and tighten the leaky fittings.
4. Turn the gas back on and recheck.
5. Should the gas continue to leak from any of the fittings,
turn off the gas supply and contact customer service at
1- 866-984-7455 in USA and 1-800-648-5864 in Canada,
language spoken: English, French, Spanish 8 a.m.-5
p.m., PST. Monday-Friday.
Only those parts recommended by the manufacturer should
be used on the grill.
Substitution will void the warranty. Do not use the grill until all
connections have been checked and do not leak.
GAS FLOW CHECK
Each grill burner is tested and adjusted at the factory prior to
shipment; however, variations in the local gas supply may
make it necessary to adjust the burners. The flames of the
burners should be visually checked.
Flames should be blue and stable with no yellow tips,
excessive noise or lifting. If any of these conditions exist,
check to see if the air shutter or burner ports are blocked by
dirt, debris, spider webs, etc. If you have any questions
regarding flame stability, please call customer service 1- 866-
984-7455 in USA and 1-800-648-5864 in Canada, language
spoken: English, French, Spanish 8 a.m.-5 p.m., PST.
Monday-Friday.
Leak Testing
ALWAYS CHECK FOR LEAKS AFTER EVERY L.P.
TANK CHANGE
Check all gas supply fittings for leaks before each use.
It is handy to keep a spray bottle of soapy water near
the shut-off valve of the gas supply line. Spray all the
fittings. Bubbles indicate leaks.
Your grill is ready to use!
7

GENERAL USE OF THE GRILL AND ROTISSERIE
Each main burner is rated at 9,000 BTU/hr. The main grill
burners encompass the entire cooking area and are side
ported to minimize blockage from falling grease and debris.
The knobs are located on the lower center portion of the
control panel. Each knob is labeled on the control panel.
USING THE GRILL
Grilling requires high heat for searing and proper browning.
Most foods are cooked at the “ ” heat setting for the entire
cooking time. However, when grilling large pieces of meat or
poultry, it may be necessary to turn the heat to the lower
setting after the initial browning. This cooks the food through
without burning the outside. Foods cooked for a long time or
foods basted with a sugary marinade may need the lower
heat setting near the end of the cooking time.
NOTE: This grill is designed to grill efficiently without the
use of lava rocks or briquettes of any kind. Heat is radiated
by the stainless steel flame tamers positioned above each
burner.
TO LIGHT THE MAIN BURNER
Make sure all knobs are off then turn on the gas supply from
the LP (Liquid Propane) tank. Always keep your face and
body as far from the grill as possible when lighting.
To light your main burner, push and turn main burner control
knob to , at the same time, press and hold electronic
ignition button to light the burner. Once the burner is lit,
release the electronic ignition button and knob. If the burner
does not light wait 5 minutes for any excess gas to dissipate
and then retry.
TO LIGHT THE SEAR BURNER
To light the sear burner, remove any cooking utensils from
the burner grate. Push and turn the control knob to , at
the same time, press and hold electronic ignition button to
light the burner. Once the burner is lit, release the electronic
ignition button and knob. If the burner does not light, turn
the control knob to “○”. If the smell of gas is detected and
the igniter is not functioning, immediately turn the control
knob “○”. Allow 5 minutes for any accumulated gas to
dissipate. If the sear burner igniter is not functioning, see
the following section for match lighting.
Operating Instructions
NOTE: The hot grill sears the food, sealing in the juices. The
more thoroughly the grill is preheated, the faster the meat
browns and the darker the grill marks.
DO NOT LEAVE THE GRILL UNATTENDED WHILE
COOKING.
WARNING: IMPORTANT!
USING THE SEAR BURNER
Inspect the gas supply hose prior to turning the gas “ON”. If
there is evidence of cuts, wear or abrasion, it must be
replaced prior to use. Do not use the sear burner if the odor
of gas is present.
Lighting Instructions
WARNING: IMPORTANT!
BEFORE LIGHTING
Inspect the gas supply hose prior to turning the gas “ON”. If
there is evidence of cuts, wear, or abrasion, it must be
replaced prior to use. Do not use the grill if the odor of gas is
present. Only the pressure regulator and hose assembly
supplied with the unit should be used.
Never substitute regulators and hose assembly for those
supplied with the grill. If a replacement is necessary, contact
the manufacturer for proper replacement. The replacement
must be that specified in the manual.
WARNING
Always keep your face and body as far away from the
burner as possible when lighting.
Each burner is adjusted prior to shipment;
however, variations in the local gas supply may
make minor adjustments necessary.
Keep a spray bottle of soapy water near the gas
supply valve and check the connections before
each use.
8
CAUTIONS
Place dust cap on cylinder valve outlet when the
cylinder is not in use. Only install the type of dust cap
on the cylinder valve outlet that is provided with the
cylinder valve. Other types of caps or plugs may result
in leakage of propane.
The gas must be turned off at the supply cylinder
when the unit is not in use.
If the appliance is stored indoors the cylinder must be
disconnected and removed from the appliance.
Cylinders must be stored outdoors in a well-ventilated
area out of the reach of children.
Do not attempt to light the grill if odor of gas is
present. Call for service 1- 866-984-7455 in USA
and 1-800-648-5864 in Canada, language spoken:
English, French, Spanish 8 a.m.-5 p.m., PST.
Monday-Friday.

Match Light
1. If the burner will not light after several
attempts then the burner can be match lit,
before using the match allow 5 minutes for
any accumulated gas to dissipate.
2. Clip a match on one end of the lighting rod.
3. Light match.
4. Hold lighting rod and insert lighted match
right next to the burner ports or ceramic file.
5. Push and turn the designated control knob
to .
6. Burner should ignite immediately.
Main Burner
Sear Burner
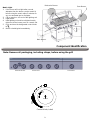
Component Identification
Note: Remove all packaging, including straps, before using the grill
Control Knob, Label
Push In
2
3
9
Rotisserie Burner
Sear Burner
Main Burner
Rotisserie Burner

Care and Maintenance
Warning: If you wish to replace main burner, we
strongly recommend that you hire a professionally
trained technician to replace it. Please understand that
we will not be responsible for any liability, personal
injury, or property damage resulting from an
improperly assembled burner.
HOW TO REPLACE MAIN BURNER
Step 1. Remove the main burner “R” pin on the back wall
of fire box by using needle nose pliers. Use a flathead
screwdriver to remove burner pin cover, then remove the
burner on the front wall of fire box, as shown below.
Step 2. Insert the burner onto the orifice and secure the
burner pin cover on the burner, as shown below, make
sure burner hole aim at orifice .
Step 3. Secure the main burner on the back wall of fire box
with “R” Pin.
STAINLESS STEEL
There are many different stainless steel cleaners available.
Always use the mildest cleaning procedure first, scrubbing
in the direction of the grain. Do not use steel wool as it will
scratch the surface. To touch up noticeable scratches in the
stainless steel, sand very lightly with dry 100 grit emery
paper in the direction of the grain. Specks of grease can
gather on the surfaces of the stainless steel and bake on to
the surface and give the appearance of rust. For removal
use a mild abrasive pad in conjunction with a stainless steel
cleaner.
GRILL GRATE
The easiest way to clean the grill is immediately after
cooking is completed and after turning off the flame. Wear a
barbeque mitt to protect your hand from the heat and steam.
Dip a brass bristle barbeque brush in water and scrub the
hot grill. Dip the brush frequently in the bowl of water.
Steam, created as water contacts the hot grill, assists the
cleaning process by softening any food particles. If the grill
is allowed to cool before cleaning, cleaning will be more
difficult.
ENSURE THAT THE GAS SUPPLY AND THE KNOBS
ARE IN THE “○” POSITION. MAKE SURE THE RANGE
TOP BURNER IS COOL BEFORE REMOVAL.
GRILL BURNERS
Extreme care should be taken when moving a burner as it
must be correctly centered on the orifice before any attempt
is made to relight the grill. Frequency of cleaning will
depend on how often you use the grill.
MAIN BURNER CLEANING
Ensure the gas supply is off and the knobs are in the “○”
position. Make sure the grill is cool. Clean the exterior of the
burner with a wire brush. Clear stubborn scale with a metal
scraper. Clear any clogged ports with a straightened paper
clip. Never use a wooden toothpick as it may break off and
clog the port. Please note if insects or other obstructions are
blocking the flow of gas through the burner, and if so you
will need to call our customer service line 1- 866-984-7455
in USA and 1-800-648-5864 in Canada, language spoken:
English, French, Spanish 8 a.m.-5 p.m., PST. Monday-
Friday.
GREASE TRAY CLEANING
The grease tray should be emptied and wiped down
periodically and wash with a mild detergent and warm water
solution. A small amount of sand may be placed in bottom
of grease tray to absorb the grease. Check the grease tray
frequently, do not allow excess grease to accumulate and
overflow out of the grease tray.
10
CAUTION
1. Keep outdoor cooking gas appliance area clear and
free from combustible materials, gasoline and other
flammable vapors and liquids.
2. Do not obstruct the flow of combustible and ventilation
air.
3. Keep the ventilation openings of the cylinder enclosure
free and clear from debris.

Troubleshooting
SPIDER AND INSECT WARNING
Checking and cleaning burner/ venturi tubes for insects and
insect nests. A clogged tube can lead to a fire beneath the
grill. Although an obstructed burner tube is not the only cause
of “FLASH-BACK”, it is the most common cause.
To reduce the chance of “FLASH-BACK”, you must clean the
burner tubes before assembling your grill, and at least once a
month in late summer or early fall when spiders are most
active. Also perform this burner tube cleaning procedure if
your grill has not been used for an extended period of time.
WHEN TO LOOK FOR SPIDERS
You should inspect the burners at least once a year or
immediately after any of the following conditions occur:
1. The smell of gas in conjunction with the burner flames
appearing yellow.
2. The grill does not reach temperature.
3. The grill heats unevenly.
4. The burners make popping noises.
BEFORE CALLING FOR SERVICE
If the grill does not function properly, use the following check
list before contacting your dealer for service. You may save
the cost of a service call.
PREHEATING: The grill lid should be in a closed position
during the preheat time period. It is necessary to preheat the
grill before cooking certain foods, depending on the type of
food and the cooking temperature. Food that requires a high
cooking temperature needs a pre-heat period of five minutes;
food that requires a lower cooking temperature needs only a
period of two to three minutes.
COOKING TEMPERATURES
High setting-Use this setting for fast warm-up, for searing
steaks and chops, and grilling.
Low setting-Use this setting for all roasting, baking, and when
cooking very lean cuts such as fish.
These temperatures vary with the outside temperature and
the amount of wind.
Cooking with in-direct Heat: You can cook poultry and large
cuts of meat slowly to perfection on one side of the grill by
indirect heat from the burner on the other side. Heat from the
lit burner circulates gently throughout the grill, cooking the
meat or poultry without any direct flame touching it. This
method greatly reduces flare-ups when cooking extra fatty
cuts, because there is no direct flame to light the fats and
juices that drip down during cooking.
CAUTION: If burners go out during operation, close gas
supply at source, and turn all gas valves off. Open lid and
wait five minutes before attempting to relight (this allows
accumulated gas fumes to clear).
CAUTION: Should a grease fire occur, close gas supply at
source, turn off all burners and leave lid closed until fire is out.
CAUTION: DO NOT attempt to disconnect any gas fitting
while your grill is in operation. As with all appliances, proper
care and maintenance will keep them in top operating
condition and prolong their life. Your gas gill is no exception.
CAUTION: Sear burner lid will get hot if used when lid is
closed.
PROBLEM SOLUTION
When attempting to light my grill, it will
not light immediately.
Make sure you have a spark while you are trying to light the burner (if no spark).
Check if the battery is installed properly.
Ensure that the wire is connected to the electrode assembly.
Clean wire (s) and / or electrode with rubbing alcohol and a clean swab. Wipe
with a clean cloth.
Check to see if the other burners operate. If so, check the gas orifice on the
malfunctioning burner for an obstruction.
Rotisserie burner will not light when the
igniter button is pushed.
Check to see if debris is blocking the electrode.
Check to see if there is a spark that jumps to the burner from the electrode. If no
spark is seen, check the battery located inside the igniter box. To open, turn
counter clockwise.
Does the infrared back burner light when attempting to light with a match? If not,
check to ensure the gas is on.
Regulator makes noise. Vent hose on the regulator may be plugged or regulator may be faulty. Ensure
the vent hole on the regulator is not obstructed. Clear the hole, close the gas
control valves. Wait ten minutes and re-start.
Check your flames for proper performance. If the flames are not correct,
replace regulator.
Full size cover does not fit the grill. Cover may be incorrect for your grill. It may be a tight fit.
Ensure the cover is the correct length for your grill.
Measure it from left to right. Compare to the grill’s measurement.
Compare the location and size of the hood portion of the cover to your grill.
Spread the cover and allow it to relax, preferably in warm sunlight or in a warm
room.
For grills with a side shelf, bunch the cover like a sock and put on left to right.
11

PROBLEM SOLUTION
Rotisserie motor will not turn. Ensure the motor is connected to a properly grounded power supply.
Ensure the on / off switch is in the on position.
Ensure that the spit is fully inserted into the rotisserie motor.
Ensure that the load does not exceed the 40 pounds operational capacity.
Ensure that there is no encumbrance or drag.
Grill only heats to 93-149°C / 200-300°F.
Check to see if the fuel hose is bent or kinked.
Make sure the grill area is clear of dust.
Make sure the burner and orifices are clean.
Check for spiders and insects.
The regulator has a safety device that restricts the flow of gas in the event of a
leak. This safety device can be triggered without a gas leak. To reset the safety
device, turn off all burners and close the LP tank valve. Disconnect the
regulator from the LP tank and wait one minute. Reconnect the regulator to the
LP tank and slowly open the LP tank valve until the valve is fully open. Light all
burners and observe the temperature.
Grill takes a long time to preheat.
Normal preheat 260-316°C / 500-600°F, takes about 10-15 min. Cold weather
and wind may effect your preheat time.
If you are using volcanic rock or briquettes they can increase the preheat time
and maximum temperature.
Burner flames are not light blue. Too much or not enough air for the flame.
Elevation is the principal cause, however cold weather can affect the mixture.
Burner adjustment may be required.
Grill is in a windy location.
Ordering Parts
HOW TO ORDER REPLACEMENT PARTS
To make sure you obtain the correct replacement part (s) for
your gas grill, please refer to the parts list on pages 32. The
following information is required to assure getting the correct
part. Please note the shipping cost for the delivery of any
replacement parts will be on yourself.
• Gas grills model number (see data sticker on grill).
• Part number of replacement part needed.
• Description of replacement part needed.
• Quantity of parts needed.
To obtain replacement parts, contact our customer
service hotline, 1- 866-984-7455 in USA and 1-800-
648-5864 in Canada, language spoken: English,
French, Spanish 8 a.m.-5 p.m., PST. Monday-Friday.
IMPORTANT
Use only factory authorized parts. The use of any part
that is not factory authorized can be dangerous. This
will also void your warranty.
Keep this assembly and operating instruction manual
for convenient referral, and for replacement parts
ordering.
Grill Hints
The doneness of meat, whether rare, medium, or well done,
is affected to a large degree by the thickness of the cut.
Expert chefs say it is impossible to have a rare doneness
with a thin cut of meat.
The cooking time is affected by the kind of meat, the size and
shape of the cut, the temperature of the meat when cooking
begins, and the degree of doneness desired.
When defrosting meats it is recommended that it be done
overnight in the refrigerator as opposed to a microwave. This
in general yields a juicier cut of meat.
Use a spatula instead of tongs or a fork to turn the meat, as
a spatula will not puncture the meat and let the juices run out.
To get the juiciest meats, add seasoning or salt after the
cooking is finished on each side and turn the meat only once
(juices are lost when the meat is turned several times). Turn
the meat just after the juices begin to bubble to the surface.
Trim any excess fat from the meat before cooking. To
prevent steaks or chops from curling during cooking, slit the
fat around the edges at 51mm / 2-in. intervals.
DO NOT LEAVE THE GRILL UNATTENDED WHILE
COOKING.
12

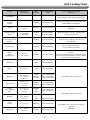
FOOD
WEIGHT OR
THICKNESS
HEAT
SETTING
APPROXIMATE
TIME
SPECIAL INSTRUCTIONS
AND TIPS
Vegetables
Slice. Dot with butter or margarine. Wrap in
heavy -duty foil. Grill, turning occasionally.
Fresh Beets
Carrots
Turnips
Medium 12 to 20 minutes
Grill, turning once. Brush occasionally with
melted butter or margarine.
Onion
1.3mm / 1/2 in.
slices
Medium 8 to 20 minutes
Season with Italian dressing, butter, or
margarine.
Potatoes Sweet
White
Whole
170 to 226g
/ 6 to 8 oz
Medium
High
40 to 60 minutes
45 to 60 minutes
Wrap individually in heavy - duty foil. Grill,
rotating occasionally.
Frozen Asparagus
Peas Green beans
Sprouts
Medium 15 to 30 minutes
Dot with butter or margarine.
Wrap in heavy -duty foil. Grill, turning
occasionally.
French fries Medium 15 to 30 minutes
Place in aluminum foil pan.
Grill, stirring occasionally
Meats
Beef
Hamburgers
1-2 cm
/ 1/2 - 3/4 in.
Medium 10 to 18 minutes
Grill, turning once when juices rise to the
surfaces.
Do not leave hamburgers unattended since a
flare-up could occur quickly. Cook to internal
temperature of 160 degrees
Tenderloin High 8 to 15 minutes
Rare 2.5 cm / 1 in. High 8 to 14 minutes
Trim edges. Grill, turning onceMedium
1.3 cm / 1/2 in.
2.5 cm / 1 in.
2.5 - 3.8 cm
/ 1-1/2 in.
High
Medium
to High
11 to 18 minutes
12 to 22 minutes
16 to 27 minutes
Well - done
2.5 cm / 1 in.
2.5 - 3.8 cm
/ 1-1/2 in.
Medium
Medium
18 to 30 minutes
16 to 35 minutes
Lamb
Chop & Steaks
Rare
2.5 cm / 1 in.
2.5 - 3.8 cm
/ 1-1/2 in.
Medium
to
High
10 to 15 minutes
14 to 18 minutes
Trim edges. Grill, turning once.
Medium
2.5 cm / 1 in.
2.5 - 3.8 cm
/ 1-1/2 in.
Medium
to
High
13 to 20 minutes
18 to 25 minutes
Pork
Chops
2.5 cm / 1 in. Medium 20 to 30 minutes
Trim edges. Grill, turning once. Cook to
desired
doneness.
Well -done
2.5 - 3.8 cm
/ 1-1/2 in.
Medium 30 to 40 minutes
Grill Cooking Chart
13

FOOD
WEIGHT OR
THICKNESS
HEAT
SETTING
APPROXIMATE
TIME
SPECIAL INSTRUCTIONS
AND TIPS
Ribs Medium
30 to 40
minutes
Grill, turning occasionally.
During last few minutes brush with barbecue
sauce. Turn several times.
Ham steaks
(precooked)
2.5 cm / 1 in.
slices
High 4 to 8 minutes Trim edges. Grill, turning once.
Hot dogs Low 5 to 10 minutes Slit skin. Grill, turning once.
Poultry
900 to 1400 g
/ 2 to 3 lb
Low
or
Medium
Up to 1 hour
Place skin side up. Grill, turning and
brushing frequently with melted butter,
margarine, oil or marinade.
Breasts
well –done
Medium
30 to 45
minutes
Marinate as desired.
Fish and
Seafood
Halibut
Salmon
Swordfish
2 to 2.5 cm
/ 3/4 to 1 in.
Medium
to
High
8 to 15 minutes
Grill, turning once. Brush with melted butter,
margarine or oil to keep moist.
Whole
Catfish
Rainbow trout
113 to 226 g
/ 4 to 8 oz
Medium
to
High
12 to 20
minutes
Grill, turning once. Brush with melted butter,
margarine or oil. Brush with melted butter
and lemon juice.
14

Grill Recipe Suggestion
BBQ SALMON
2 large salmon steaks
2 tbs. Oil
Salt & pepper
2 oz. thin bacon slices
2 tbs. Butter
1 tbs. Lemon juice
Spring of parsley
Lemon wedges
Preheat the BBQ. Brush the steaks with
oil and season with salt and pepper.
Place on BBQ grill and cook for 10
minutes, turning steaks over halfway
cooking time.
Meanwhile, fry the bacon in a pan on the
side burner. Drain on paper towels. Melt
the butter in a small saucepan taking
care not to discolor it. Arrange the fish
and bacon on serving plates. Pour the
butter over and sprinkle with lemon juice.
Garnish with parsley springs and lemon
wedges. Serve with boiled potatoes
tossed in butter and sprinkled with
chopped parsley and a crisp lettuce
salad.
Note: Substitute catfish, halibut or cod
for salmon.
BAKED CHILI CORN
6 medium ears corn, husked
3 tbs. Butter or margarine, melted
Dash ground cumin
Dash ground coriander
About ½ hour before cooking, turn the
butter on for grill. Place each corn on a
heavy-duty foil. In a bowl, combine
remaining ingredients. Mix well. Brush 1-
1/2 tsp. Butter mixture over each ear.
Close foil and fold up ends to seal.
Place on grill. Cook, turning packets
occasionally 10 to 12 minutes or until
cooked through.
TANGY SEAFOOD KABOBS
1 lb. Large shrimp, shelled & deveined
¾ lbs. sea scallops
2/3 c. chili sauce
¼ c. cider vinegar
butter and sprinkled with chopped
parsley and a crisp lettuce salad
In medium bowl, combine shrimp and
scallops. In small bowl combine chili
sauce and next six ingredients. Pour
over seafood. Toss to coat. Cover,
refrigerate 2 hours.
3 tbs. chopped parsley
1 tbs. vegetable oil
1 tbs. Worcestershire sauce
½ tsp. prepared horseradish
1 cove garlic, minced
1 20 oz. Can pineapple chunks in juice,
drained half hour before cooking, turn
the burner to the grill on full. Drain
seafood reserving marinade. On each of
twelve 10” skewers, thread 2 shrimps
and 2 scallops, alternating with
pineapple chunks. Place skewers on grill.
Cook 7-10 minutes, often basting and
turning.
PORK CHOPS
4 Pork chops
Marinade
1 large onion
2 tbs. lemon juice or vinegar
2 tbs. oil
½ tsp. powdered mustard
2 tsp. Worcestershire sauce
½ tsp. freshly ground black pepper
1 tsp. sugar
½ tsp. paprika
1 clove garlic
Peel, grate onion, and add rest of the
ingredients except the pork chops. Mix
well. Pour over chops and marinate one
hour in a cool place. Turn the BBQ grill
on full. Heat 10 minutes.
BBQ the chops brushing with the
marinade occasionally. Serve with
mixed salad, dressed with vinaigrette
flavored with fresh dill.
BARBECUED LONDON BROIL
4 to 6 servings
¾ c. Italian dressing
1 tsp. Worcestershire sauce
1 tsp. dry mustard
¼ tsp. thyme, crushed
1 medium onion, sliced
1 pound flank steak, scored
2 tbs. butter, melted
Combine first 4 ingredients, add onion
and marinade flank steak with it.
Refrigerate at least 4 hours or overnight.
Remove steak and grill on your
preheated BBQ grill. Grill 5 to 7 minutes
on each side basting frequently with the
marinade. In the meantime sauté onions
from the marinade in butter in a skillet
on your side burner for 3 minutes. To
serve, slice steak diagonally into thin
slices, sprinkle onions over top. Garnish
with vegetable kabobs.
BARBECUED POTATOES and
CHEESE
1-1/2 cups shredded cheddar cheese
1 can (10-3/4 oz.) condensed cream of
mushroom soup
1/3 cup milk
2 tbs. barbecue sauce
¼ tsp. oregano
¼ tsp. salt
1/8 tsp. pepper
4 cups thinly sliced potatoes (4 medium-
sized potatoes)
Preheat grill. Combine cheese,
condensed soup, milk, BBQ sauce,
oregano, salt and pepper in a large
mixing bowl. Stir in potatoes until well
coated. Turn into well buttered1-1/2
quart rectangular baking dish. Cover
dish with aluminum foil. Bake covered
25 minutes on medium with the lid of
your BBQ grill closed. Remove foil and
continue baking 15 minutes longer or
until potatoes are tender. Let stand 5
minutes before serving.
VEGETABLE KABOBS
3 medium-sized zucchini
12 cherry tomatoes
12 fresh mushrooms
Grated Parmesan cheese
Parboil whole zucchini 5 minutes on
your side burner or until just tender.
Drain and cut into ½ inch slices. Thread
zucchini, tomatoes and mushrooms
alternately on each of six skewers.
Brush with marinade made of Italian
dressing, Worcestershire sauce,
mustard and thyme. Grill 5 to 7 minutes
turning and basting occasionally.
Sprinkle liberally with Parmesan cheese.
FAJITAS
1-1/2 lb. flank steak or boned chicken
breasts
2 tbs. oil
½ cup limejuice
½ tsp. salt
½ tsp. celery salt
¼ tsp. garlic powder
½ tsp. pepper
¼ tsp. oregano
¼ tsp. cumin
Flour tortillas lemon
Pound flank steak to ¼ inch thickness or
flatten chicken breasts. Mix oil, lime
juice and seasonings in a zip lock bag.
Add meat and shake bag to coat the
meat. Refrigerate overnight or at least 6
to 8 hours. Wrap tortillas in foil. Remove
meat from marinade. Cook on a
preheated gas grill for 5 to 8 minutes on
each side. While meat is cooking, heat
tortillas on grill. Slice meat across grain
in thin slices. Place on hot platter.
Squeeze lemon juice over. Wrap meat
and any of the following toppings in
tortillas: chopped tomatoes, guacamole,
sour cream, taco sauce.
15

FAJITAS
1-1/2 lb. flank steak or boned chicken
breasts
2 tbs. oil
½ cup limejuice
½ tsp. salt
½ tsp. celery salt
¼ tsp. garlic powder
½ tsp. pepper
¼ tsp. oregano
¼ tsp. cumin
Flour tortillas lemon
Pound flank steak to ¼ inch thickness
or flatten chicken breasts. Mix oil, lime
juice and seasonings in a zip lock bag.
Add meat and shake bag to coat the
meat. Refrigerate overnight or at least 6
to 8 hours. Wrap tortillas in foil. Remove
meat from marinade. Cook on a
preheated gas grill for 5 to 8 minutes on
each side. While meat is cooking, heat
tortillas on grill. Slice meat across grain
in thin slices. Place on hot platter.
Squeeze lemon juice over. Wrap meat
and any of the following toppings in
tortillas: chopped tomatoes, guacamole,
sour cream, taco sauce.
BEEF AND LAMB KABOBS
Serve 4
½ lb. boneless sirloin or beef cut into 1”
cubes
½ lb. boneless loin of lamb cut into 1”
cubes
2/3 c. water, divided
¼ c. chopped onion
2 tbs. soy sauce
¼ c. vegetable oil, divided
1 tbs. dark brown sugar
1 tbs. fresh lemon juice
2 cloves garlic, minced
¼ tsp. ground cumin
¼ tsp. ground coriander
¼ tsp. ground turmeric
1/8 tsp. ground red pepper
1/8 tsp. ground ginger
1 red pepper cut into chunks
1 large banana, cut into chunks
8 small mushrooms
1/3 c. smooth peanut butter
About ½ hour before cooking, turn the
butter on for grill. Place each corn on a
heavy-duty foil. In a bowl, combine
remaining ingredients. Mix well. Brush
1-1/2 tsp. Butter mixture over each ear.
Close foil and fold up ends to seal.
Place on grill. Cook, turning packets
occasionally 10 to 12 minutes or until
cooked through. Bring marinade to boil
on the side burner in a saucepan. Add
remaining 1/3 c. water and peanut
butter. Stir to blend. Heat through. If
sauce gets too thick, add 1 tbs. water.
Serve sauce with kabobs.
EGGPLANT CAVIAR
1 large eggplant
2 tbs. olive oil
2 tbs. wine vinegar
2 tbs. finely chopped onion
½ clove garlic, minced
1 medium tomato, chopped salt and
pepper
Roast eggplant on gas grill over
medium flame, turning occasionally until
thoroughly cooked. This may take 30
minutes. Remove from grill and cool for
handling. Strip off the skin and chop
eggplant finely. Add all the seasonings.
Chill thoroughly and serve on toast.
CHICKEN TANDOORI STYLE
8 large chicken thighs or drumsticks
1 c. plain nonfat yogurt
½ c. lemon juice
2 tsp. salt
½ tsp. cayenne
½ tsp. black pepper
½ tsp. crushed garlic
½ tsp. grated ginger
1 tbs. corn oil
Combine all the ingredients in a large
mixing bowl and marinate the chicken
for 8 hours in the refrigerator. Drain the
chicken and spread on the spit running
the rod on the fleshier side of the bone.
Roast using the rotisserie burner. Cook
on medium high heat for 40 minutes
basting occasionally with the remainder
of the marinade mixture. Serve with
sliced onions and lemon wedges.
SPARE RIBS
Marinade:
1 c. soy sauce
½ c. honey
½ c. vinegar
½ c. dry sherry
2 tsp. chopped garlic
2 tsp. sugar
1 c. water
1 chicken bouillon cube
1 can beer for basting sauce
Marinade ribs for 3 hours. Use
marinade for basting by adding beer to
it. Place pan under the ribs and baste
frequently. To cook ribs select lean,
meaty ribs and accordion pleat them
with your spit. Slide four prong meat
hook down the length of spit and tighten.
At the beginning of the rack and to its
center, penetrate the second rib with
the pointed end of the spit and push it
between the meat. Skip a couple and
continue the process until the entire
rack is accordion pleated. Fasten the
second meat hook into the rack. Turn
your rotisserie burner on high. Roast for
50 minutes or until done.
PORK ROAST
Apple cider vinegar basting sauce:
1 c. apple cider vinegar
6 oz. water
½ stick butter
Salt, pepper, parsley and garlic
seasoning
2 oz. lemon juice
10 lbs. pork roast
Time: 1-1/2 hours to 2 hours
Bring pork to room temperature before
placing it on the spit rod. Place on the
rod and test for balance. Light rotisserie
burner. Turn control knob to high. Use
the above basting sauce for rotissing.
TURKEY
12 lb. turkey
Beer basting sauce:
1 can beer
12 oz. water
1 stick butter
1 tsp. salt
1 tsp. pepper
½ tsp. garlic flakes
1 tsp. parsley
Thaw the bird completely. Wash inside
out. Securely tie the legs and wings.
Light rotisserie burner. Turn to high.
Combine all the ingredients for basting
sauce in a shallow pan. Place it under
the turkey 15 to 20 minutes. Cook for
approximately 3 hours. The basting
sauce combined with turkey drippings
makes a delicious gravy.
16

The manufacturer warrants to the original consumer-purchaser only that this product (Model #720-0958AE) shall be free from defects in
workmanship and materials after correct assembly and under normal and reasonable home use for the periods indicated below beginning on
the date of purchase. The manufacturer reserves the right to require photographic evidence of damage, or that defective partsbe returned,
postage and/or freight pre-paid by the consumer, for review and examination. Nexgrill’s obligation is limited to repair, replacement, or
depreciated value, at the option of Nexgrill.
• TUBE BURNERS: 10 year LIMITED warranty against perforation.
• COOKING GRIDS and FLAME TAMERS: 1 year LIMITED warranty; does not cover dropping, chipping, scratching, or surface damage.
• STAINLESS STEEL PARTS: 1 year LIMITED warranty against perforation; does not cover cosmetic issues like surface corrosion,
scratches and rust.
• ALL OTHER PARTS: 1 year LIMITED warranty (Includes, but not limited to, valves, frame, housing, cart, control panel, igniter, regulator,
hoses) *Does not cover chipping, scratching, cracking surface corrosion, scratches or rust.
Upon consumer supplying proof of purchase as provided herein, Manufacturer will repair or replace the parts which are proven defective
during the applicable warranty period. Parts required to complete such repair or replacement shall be free of charge to you except for shipping
costs, as long as the purchaser is within the warranty period from the original date of purchase. The original consumer-purchaser will be
responsible for all shipping charges of parts replaced under the terms of this limited warranty. This limited warranty is applicable in the United
States and Canada only, is only available to the original owner of the product and is not transferable. Manufacturer requires reasonable proof
of your date of purchase. Therefore, you should retain your sales receipt and/or invoice. If the unit was received as a gift,please ask the gift-
giver to send in the receipt on your behalf, to the below address. Defective or missing parts subject to this limited warranty will not be replaced
without registration or proof of purchase. This limited warranty applies to the functionality of the product ONLY and does not cover cosmetic
issues such as scratches, dents, corrosions or discoloring by heat, abrasive and chemical cleaners or any tools used in the assembly or
installation of the appliance, surface rust, or the discoloration of stainless steel surfaces. Surface rust, corrosion, or powder paint chipping on
metal parts that does not affect the structural integrity of the product is not considered a defect in workmanship or material and is not covered
by this warranty. This limited warranty will not reimburse you for the cost of any inconvenience, food, personal injury or property damage. If an
original replacement part is not available, a comparable replacement part will be sent. You will be responsible for all shipping charges of parts
replaced under the terms of this limited warranty.
MANUFACTURER WILL NOT PAY FOR:
• Service calls to your home.
• Repairs when your product is used for other than normal, single-family household or residential use.
• Damage resulting from accident, alteration, misuse, lack of maintenance/cleaning, abuse, fire, flood, acts of God, improper installation,
and installation not in accordance with electrical or plumbing codes or misuse of product.
• Any food loss due to product failures.
• Replacement parts or repair labor costs for units operated outside the United States or Canada.
• Pickup and delivery of your product.
• Postage fees or photo processing fees for photos sent in as documentation.
• Repairs to parts or systems resulting from unauthorized modifications made to the product.
• The removal and/or reinstallation of your product.
• Shipping cost, standard or expedited, for warranty/non warranty and replacement parts.
DISCLAIMER OF IMPLIED WARRANTIES; LIMITATION OF REMEDIES
Repair or replacement of defective parts is your exclusive remedyunder the terms of this limited warranty. Manufacturer will not be
responsible for any consequential or incidental damages arising from the breach of either this limited warranty or any applicable implied
warranty, or for failure or damage resulting from acts of God, improper care and maintenance, grease fire, accident, alteration, replacement of
parts by anyone other than manufacturer, misuse, transportation, commercial use, abuse, hostile environments (inclement weather, acts of
nature, animal tampering), improper installation or installation not in accordance with local codes or printed manufacturer instructions.
THIS LIMITED WARRANTY IS THE SOLE EXPRESS WARRANTY GIVEN BY THE MANUFACTURER. NO PRODUCT PERFORMANCE
SPECIFICATION OR DESCRIPTION WHEREVER APPEARING IS WARRANTED BY MANUFACTURER EXCEPT TO THE EXTENT SET
FORTH IN THIS LIMITED WARRANTY. ANY IMPLIED WARRANTY PROTECTION ARISING UNDER THE LAWS OF ANY STATE,
INCLUDING IMPLIED WARRANTY OF MERCHANTABILITY OR FITNESS FOR A PARTICULAR PURPOSE OR USE, IS HEREBY LIMITED
IN DURATION TO THE DURATION OF THIS LIMITED WARRANTY.
Neither dealers nor the retail establishment selling this product has any authority to make any additional warranties or to promise remedies in
addition to or inconsistent with those stated above. Manufacturer's maximum liability, in any event, shall not exceed the documented purchase
price of the product paid by the original consumer. This warranty only applies to units purchased from an authorized retailerand or re-seller.
NOTE: Some states do not allow an exclusion or limitation of incidental or consequential damages, so some of the above limitations or
exclusions may not apply to you; this limited warranty gives you specific legal rights as set for herein. You may also have other rights which
vary from state to state.
If you wish to obtain performance of any obligation under this limited warranty, you should write to:
Nexgrill Customer Relations
14050 Laurelwood PI
Chino, CA 91710
All consumer returns, parts orders, general questions, and troubleshooting assistance can be acquired by calling 1- 866-984-7455 in USA and
1-800-648-5864 in Canada, language spoken: English, French, Spanish 8 a.m.-5 p.m., PST. Monday-Friday.
LIMITED WARRANTY
17

18
目錄
故障排除 . . . . . . . . . . . . . . . . . . . . . .
訂購零件. . . . . . . . . . . . . . . . . . . . . .
烤爐烹飪對照表. . . . . . . . . . . . . . . . . . . . . . .
建議食譜. . . . . . . . . . . . . . . . . . . . . . . . . .
有限保固. . . . . . . . . . . . . . . . . . . . . . . . . .
展開視圖. . . . . . . . . . . . . . . . . . . . . . . . . . .
零件清單. . . . . . . . . . . . . . . . . . . . . . . . . . . . .
24
26
26
28
30
31
34
安全說明. . . . . . . . . . . . . . . . . . . . . . . . . . . . .
安裝瓦斯. . . . . . . . . . . . . . . . . . . . . . . . . . . . .
安裝著最終檢核表. . . . . . . . . . . . . . . . . . . . .
洩漏測試. . . . . . . . . . . . . . . . . . . . . . . . . . . . .
操作說明 . . . . . . . . . . . . . . . . . . . . . . . . . . . .
烤爐點火說明. . . . . . . . . . . . . . . . . . . . . . . . .
保養及維護. . . . . . . . . . . . . . . . . . . . . . . . . . .
18
20
21
21
22
22
24
安全說明
未確實遵守這些說明可能導致火災或爆炸,造成人員嚴重的身體傷害、死亡或財物毀損。
烤爐裝會變得很燙。使用時千萬不要靠在烹煮區域。不要碰觸使用中的烤爐的烹煮區表面、烤爐外
殼、蓋板或是其他的烤爐零件。
危險
1. 使用本裝置時需隨時有人看顧。
2. 操作本裝置時,切勿於3公尺(10英尺)的距離內接觸任何結構物、可燃材料或其他的瓦斯桶。
3. 操作本裝置時,切勿於7.5公尺(25英尺)的距離內有任何可燃液體。
4. 不要超過烹飪容器的最大容量的指示標線。
5. 在烹調過程後,熱的液體仍會於較長的時間內保持炙熱的高溫。切勿觸摸烹調裝置,除非液體
已降至45°C(115°F)或更低的溫度。
6. 本裝置並不適用於,並且絕不能做為加熱器使用.
7. 若發生火災,請遠離本裝置並立即呼叫消防局。切勿嘗試以水撲滅油火。
危險
如果聞到瓦斯異味:
• 關掉裝置的瓦斯開關。
• 撲滅任何明火。
• 打開烤爐蓋板。
• 若還是聞得到瓦斯異味,請遠離烤爐並馬上聯
絡瓦斯供應商或消防局。
1. 警告
1. 不要在本裝置或其他裝置附近儲存或使用汽
油或其他可燃液體或氣體。
2. 不要把未使用的液態瓦斯桶放在本裝 置或其
他裝置附近。

19
危險
在未閱讀本手冊「點火說明」的段落之前,切勿點燃本裝置。
注意: 瓦斯正常流動經過調節器及軟管組合件時會產生嗡嗡
的雜音。少量的雜音是很正常的並不會影響烤爐的操作。若
雜音過大且過度,可能需要清除瓦斯管線中的氣體或是重新
安裝調節器的瓦斯過量裝置。清除氣體的程序需在每次烤爐
安裝新的瓦斯桶時進行。
每次使用前以目視檢查燃燒器火焰。火焰看起來應如以上圖
示。若外觀並非如圖中所示,請參考本手冊的燃燒器維護段
落。
小心:注意逆燃
小心: 蜘蛛和小昆蟲在運送及倉儲期間可
能會在燒烤爐的燃燒器管內結網或築巢。
結網會導致瓦斯流動受阻並造成燃燒器管
周圍燃燒起火。這類的起火源即所謂的
「逆燃」,它會導致烤爐嚴重的毀損並形
成一個對使用者不安全的操作環境。
雖然燃燒器管受阻並非造成「逆燃」的唯一因素,但它是最
常造成「逆燃」的主因。
要降低「逆燃」的發生機率,必須在組裝之前先清理燃燒器
管,並且於夏末秋初蜘蛛活動最頻繁的季節,每月至少清理
一次。若烤爐已經有一段時間未使用,也應依未使用過的程
序清理燃燒器管。管路阻塞會導致烤爐下方起火。
警告
烤爐會變得很燙。在使用烤爐時千萬不要靠在烹調區域。烤
爐在運轉或是烤爐使用後直到冷卻的這段時間,不要碰觸烹
煮表面、烤爐外殼、蓋板或是烤爐的其他任何零件。
未確實遵照這些指示說明,會導致身體嚴重的傷害。
小心: 為確保能持續的保護以避免觸電的風險,插頭僅能確
實地與接地電源相接。為降低觸電的風險,延長線接頭需保
持乾燥並離地。
LP-Gas Supply System
• 若未確實遵守所提供的資訊,可能會發
生火災而導致死亡或嚴重的傷害。
• 最大可使用9分斤(20磅)的瓦斯桶,
尺寸約為:直徑32.0公分(12英
寸)、高度45.6公分(18.5英寸)。
• 此安全特性可預防瓦斯桶填充過量,而造成瓦斯桶、調節
器以及/或是烤爐的故障。
• 瓦斯桶的出口閥必須配有一個停止閥終端,可與類型1的
瓦斯桶搭配使用。瓦斯供給鋼瓶出口閥必須配有一個停止
閥終端專為連接類型QCC1。瓦斯供給鋼瓶需安裝過充保
護裝置(O.P.D)。而瓦斯桶也必需安裝直接連接揮發氣
空間的安全洩壓裝置。
• 瓦斯桶供給系統必須具有揮發氣回收的設計安排。
32.0公分
/ 12 英寸
45.6
公
分
/
18.5
英
寸
• 使用的瓦斯桶必須要安裝護圈,以保護閥門。
• 不使用瓦斯桶時須在瓦斯桶出口閥上方加裝防塵蓋。瓦斯
桶出口閥只能安裝與鋼瓶閥門一同附上的防塵蓋。其他種
類的蓋子或栓塞可能會造成丙烷氣洩露。
• 烤爐切勿與未受規範的瓦斯桶連結。
• 本瓦斯戶外用烹飪裝置配有高容量軟管/調節器組合件,
做為與標準的9公斤(20磅)容量的瓦斯桶連接使用。
• 瓦斯桶應該交由具聲譽的丙烷氣經銷商填充,而在每次填
充後以目視檢查並重新檢測取得合格資格。
• 切勿將額外的瓦斯桶放置於本裝置的下方或靠近它的區域。
• 瓦斯桶的填充量不可超過八分滿。
• 瓦斯桶必須隨時直立放置。
• 切勿存放汽油或是其他可燃的揮發氣或液體於本產品或任
何其他裝置附近。
• 唯有在瓦斯桶拆卸下來並將其由瓦斯戶外用烹飪裝置上移
除後,才可將瓦斯戶外用烹飪裝置貯存於室內。
• 當烤爐並未使用瓦斯時,必需關閉瓦斯桶開關。烤爐正確
的擺放位置與清理。
烤爐正確的擺放位置與間隙
• 瓦斯烤爐僅限於戶外使用,切勿於車庫、前廊、棚架、穿
堂或是其他封閉的區域使用。本產品切勿安裝於可燃的圈
地內,與可燃的結構物兩側及後方最少應保持91公分
(36英寸)的淨空距離。
• 切勿 在架空的可燃物表面下方使用本裝置。本瓦斯戶外
用烹飪裝置並非設計於露營車輛以及/或是船隻上使用。
• 烹飪瓦斯裝置不使用時必需關閉瓦斯桶的開關。
• 瓦斯桶必須貯存於通風良好且孩童接觸不到的區域。拆卸
下來的瓦斯桶不可存放在建築物、車庫或是其他任何的封
閉場所。
• 烤爐外殼四周的通風不可受阻。僅能使用烤爐所附的調節
器及軟管組合件。更換調節器及軟管組合件時只能使用本
手冊所指定的規格。
• 每次使用烤爐前必需檢查調節器及軟管組合件。若有過度
的磨損、耗損或是軟管遭切割受損,則必須在使用烤爐前
進行更換。軟管組合件應使用製造商所指定的規格。
• 必需使用瓦斯戶外用烹飪裝置所附的壓力調節器及軟管組
合件。切勿置換其他類型的調節器。請與客服部門聯絡詢
問製造商所指定的替換零件。
• 不論是何種烤爐皆不可使用煤磚。
• 烤爐設計為可在不使用煤磚時可達到最佳的使用狀態。不
可將煤磚放在熱輻射的區域,因會阻斷烤爐的通風孔。加
入煤磚會損壞點火裝置的零件及旋鈕,而這將會使保固失
效。
• 後方及兩側的車架不可有垃圾碎屑。所有的電源連接線或
是回轉式烤肉架馬達電線需遠離烤爐熱源區域。
• 切勿在強風的狀況下使用烤爐。若位於風大的區域(沿海
地帶、山頂等處)需要準備擋風設備。必須隨時保持指定
的間隔距離。
• 千萬不可使用凹陷、生鏽的瓦斯桶。
• 任何的電源線及燃料供應管線必須遠離熱的表面。
• 點火時,臉與手請儘量遠離烤爐。
• 只能在燃燒器冷卻後才能調整燃燒器。

20
警告
將內裝肥皂水的噴霧罐放在靠近瓦斯供給閥的地方,並在每
次使用前檢查接點。
警告
本瓦斯戶外用烹飪裝置並非設計於露營車輛以及/或是船隻
上使用。
勿將鋁箔紙排列擺放在烤架上或是烤爐底。
這會嚴重地阻礙到控制區域的燃燒氣流或是會讓過高的熱度
無法排除。
避免人身傷害的安全措施
雖然正確地保養可以提供烤爐長年安全、可靠的使用。然而,
在烤爐產生高熱時會增加意外事故潛在性,需格外留意。在使
用本裝置時,包含以下所列的基本安全操作事項必須加以遵
守 : 不可維修或更換烤爐的任何零件,除非本手冊有特別明確
的建議。其他的維修服務應請教合格的技術人員。 本烤爐並
非設計安裝或放置於露營車輛或是船隻上。
在使用烤爐時的周遭區域不可獨留孩童或是任其無人看顧。無
論何時都不能允許孩童在烤爐上或是周圍坐著、站立或是遊戲。
不要存放會使孩童感到興趣的物品於烤爐周圍或是其下方。
切勿允許衣物、隔熱手套或是其他可燃材質在烤爐還未冷卻前
與任何烤架、燃燒器或是熱的表面接觸或是過於靠近。布料可
能會點燃並造成人身傷害。
為了人身安全,請穿戴合適的服裝。寬鬆的衣著或袖子千萬不
可在使用本裝置時穿戴。部分合成纖維織物極其易燃,不應於
烹飪時穿戴。
只有部分種類的玻璃、耐熱玻璃陶瓷,陶器或是其他釉面器皿
才適合用於烤爐。這些材質會因溫度驟變而破裂,請依製造商
的指示以低溫或是中度溫度設定使用。
不要將未拆封的食物容器加熱。加熱累積的壓力會造成容器破
裂。
打開烤爐上蓋時要戴手套。不要倚靠在烤爐上。
在點燃燃燒器時,需專注於自己所進行的動作。確認您所要點
燃的是那一個燃燒器,這樣才能使身體及衣物與點燃的火源保
持一定的距離。
烤爐在使用時,切勿觸摸烤爐架、燃燒器格柵或是緊鄰烤爐
周圍的區域,因這些區域會變得很燙,而可能造成灼傷。只
能使用乾燥的隔熱墊。潮溼的隔熱墊與熱表面接觸後可能會
導致蒸氣灼傷。不要以毛巾或是粗重布料置於該處或是做為
隔熱墊。不得將隔熱墊接觸烤架灼熱的部位。
油脂具可燃性。熱的油脂待冷卻後再進行清理。切勿讓油脂
堆積於烤爐火箱底部的集油盤內。須經常清理集油盤。
勿將鋁箔紙排列擺放在烤架上或是烤爐底。這會嚴重地阻礙
到控制區域的燃燒氣流或是會讓過高的熱度無法排除。為使
烤爐能準確的點火及操作,燃燒器端口需保持乾淨。必須定
時地清潔以便達到最佳的使用狀態。燃燒器只能固定一個位
置使用並且必須正確架設以便能安全的進行操作。
清理烤爐時須小心。為免被蒸氣燙傷,在烤爐仍灼熱時不要
使用溼海綿或是布料清理。部分清潔用品會在塗於熱的表現
時散發出有毒氣體或是被引燃。
在使用任何種類的噴霧清潔劑於烤爐及其周圍之前,先關閉
烤爐控制開關並確認烤爐已冷卻。製造噴露的化學劑在有熱
源的狀況時,會被點燃或是造成金屬零件侵蝕的狀況。
不要使用烤爐烹煮油脂豐厚的肉品,或是其他會造成突發火
焰的食品。
切勿在未受保護的可燃結構物下方操作烤爐。僅能於通風良
好處使用本產品。切勿於建築物內、車庫、棚架、穿堂或是
其他封閉的區域使用。
烤爐四周圍需遠離可燃材料,包括液體、落葉以及諸如汽油
或木炭液體燃料的揮發氣。切勿阻礙燃燒及通風氣流的流通。
烤爐四周圍需遠離可燃材料,包括液體、落葉以及諸如汽油
或木炭液體燃料的揮發氣。切勿阻礙燃燒及通風氣流的流通。
本裝置切勿安裝不合規範的瓦斯供給管線。
使用產品所提供的調節器/軟管組合件。
本烤爐需安裝液化丙烷裝置。除非烤爐經重新裝配,否則
不可與天然瓦斯供給管線連接使用。本不鏽鋼瓦斯烤爐在
所有燃燒器設定在 的情況下,總瓦斯消耗量(每小時)分別
為:
主烤爐 6 x 9,000 BTU/hr.
紅外線邊爐 15,000 BTU/hr.
后烤爐 13,000 BTU/hr.
總計 82,000 BTU/hr.
安裝瓦斯
瓦斯桶要求
凹陷、生鏽的瓦斯桶有發生危險之虞,應由瓦斯供應商檢查。
切勿使用閥門已損壞的瓦斯桶。 瓦斯桶供給系統必須具有揮
發氣回收的設計安排。使用的瓦斯桶必須要安裝護圈,以保護
閥門。 歧管壓力:27.94公分(11英寸)水柱(W.C.)。
安裝瓦斯
確認瓦斯桶閥門上的黑色塑膠絕緣環已安裝就位,而軟管並未
與集油盤或是烤爐前端相接。
連接
不鏽鋼烤爐配備瓦斯供應噴嘴,僅限輸送液化丙烷氣。產品
同時配有高容量軟管/調節器組合件,做為與標準的9公斤
(20磅)容量的瓦斯桶(高45.6公分(18.5英寸)、直徑
32.0公分(12英寸))連接使用。 與瓦斯桶連接時,請遵照
以下步驟:
1. 確認瓦斯桶的閥門完全鎖緊關閉(順時針轉到底)。
2. 檢查以確認瓦斯桶的閥門為正確可外接的外螺紋。
ページが読み込まれています...
ページが読み込まれています...
ページが読み込まれています...
ページが読み込まれています...
ページが読み込まれています...
ページが読み込まれています...
ページが読み込まれています...
ページが読み込まれています...
ページが読み込まれています...
ページが読み込まれています...
ページが読み込まれています...
ページが読み込まれています...
ページが読み込まれています...
ページが読み込まれています...
ページが読み込まれています...
ページが読み込まれています...
-
 1
1
-
 2
2
-
 3
3
-
 4
4
-
 5
5
-
 6
6
-
 7
7
-
 8
8
-
 9
9
-
 10
10
-
 11
11
-
 12
12
-
 13
13
-
 14
14
-
 15
15
-
 16
16
-
 17
17
-
 18
18
-
 19
19
-
 20
20
-
 21
21
-
 22
22
-
 23
23
-
 24
24
-
 25
25
-
 26
26
-
 27
27
-
 28
28
-
 29
29
-
 30
30
-
 31
31
-
 32
32
-
 33
33
-
 34
34
-
 35
35
-
 36
36


