
HD4917

2

3
HD4917 control panel
2
31 4 5 7 8
A
B
C
F
H
E
D
6
1

4

HD4917
ENGLISH 6
BAHASA MELAYU 16
ภาษาไทย 26
34
繁體中文 43
简体中文 51

6
Introduction
Congratulations on your purchase and welcome to Philips! To fully benet from the support that
Philips offers, register your product at www.philips.com/welcome.
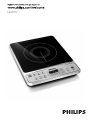
The induction cooker works on the basis of an electromagnet that creates a powerful, high-
frequency electromagnetic eld. When cookware consisting of magnetic material (e.g. iron) is placed
on the induction cooker, the electromagnetic eld transfers energy to the bottom of the cookware,
which causes the cookware and the food inside it to become hot. The amount of heat generated in
the cookware is controlled by varying the strength of the electromagnetic eld. When the strength
of the electromagnetic eld is changed, the temperature of the cookware changes instantly.
Advantages of the induction cooker:
- Safe: the induction cooker does not make use of an open ame or re. It also has a number of
safety features, which allow you to enjoy cooking with your family whenever you want.
- Fast: in induction cooking, the cookware serves as the heat source. This results in much faster
and more even heat transfer, shortening the cooking time by more than 1/3 compared to
conventional cooking.
- Versatile: the induction cooker has 7 preset cooking modes, each with its own optimal heating
pattern. These modes allow you to prepare a great variety of nutritious meals.
- Very user friendly: the simple and interactive control panel and display allow you to easily adjust
the settings at the touch of a button.
- Comfortable: the induction cooking process is smoke-free and produces less grease. Moreover,
the cooker and the surrounding area stay cool. This allows you to cook in a cool
and comfortable environment.
- Portable: the induction cooker has a compact design and the cooking plate stays cool. This
means the appliance is always safe to use and allows you to cook anywhere in your home.
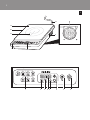
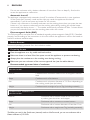
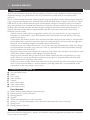
General description (Fig. 1)
A Crystalite cooking plate
B Body
C Cooking zone
D Control panel
E Display
F Air outlet
G Air inlet
H Mains cord
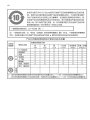
Control panel
1 Preset cooking modes with indicator lights
2 Hr:Min button (cooking time)
3 Timer button
4 Display
5 Power level/cooking temperature indication
6 +/- buttons (for setting cooking time, power level and cooking temperature)
7 Start button
8 Power on/off button
Important
Read this user manual carefully before you use the appliance and save it for future reference.
Danger
- Never immerse the appliance in water or rinse it under the tap.
ENGLISH

Warning
- Check if the voltage indicated on the appliance corresponds to the local mains voltage before
you connect the appliance.
- Only connect the appliance to an earthed wall socket. Always make sure the plug is inserted
rmly into the socket.
- Do not use the appliance if the plug, the mains cord or the appliance itself is damaged.
- If the mains cord is damaged, you must have it replaced by Philips, a service centre authorised by
Philips or similarly qualied persons in order to avoid a hazard.
- This appliance is not intended for use by persons (including children) with reduced physical,
sensory or mental capabilities, or lack of experience and knowledge, unless they have been given
supervision or instruction concerning use of the appliance by a person responsible for their
safety.
- Children should be supervised to ensure that they do not play with the appliance.
- Keep the mains cord out of the reach of children. Do not let the mains cord hang over the edge
of the table or worktop on which the appliance stands.
- Make sure the cooking plate is clean and dry before you switch on the appliance.
- Do not cover the air vent while the induction cooker is operating.
- Do not plug in the appliance or operate the control panel with wet hands.
- Do not touch the cooking plate after cooking, as it retains heat from the cookware.
- Metallic objects such as knives, forks, spoons and lids should not be placed on the cooking plate
since they can get hot.
- Do not cover any part of the cooking plate with aluminium to prevent the risk of electric
shock, short circuiting or re.
- If the surface of the cooking plate is cracked, switch off the appliance and do not use it anymore
to prevent the risk of electric shock, short circuiting or re.
Caution
- Never use any accessories or parts from other manufacturers or that Philips does
not specically recommend. If you use such accessories or parts, your guarantee becomes
invalid.
- Do not expose the induction cooker to high temperatures, hot gas, steam or damp heat. Do
not place the induction cooker on or near an operating or still hot stove or cooker.
- Always switch off the appliance before you unplug it.
- Always unplug the appliance and let it cool down before you clean it.
- This appliance is intended for household use only. If the appliance is used improperly or for
professional or semi-professional purposes or if it is not used according to the instructions in
the user manual, the guarantee becomes invalid and Philips will not accept liability for any
damage caused.
- Place the induction cooker on a stable, horizontal and level surface and make sure there is at
least 10cm free space around it to prevent overheating.
- Do not place anything between the cookware and the cooking plate.
- The maximum weight that can be put on the induction cooker is 7kg.
- Beware of hot steam that comes out of the cookware during cooking or when you remove the
lid.
- Do not lift and move the induction cooker while it is operating.
- Never put empty cookware on the switched-on induction cooker, as this could cause the
cookware to become distorted or the heating coil to become damaged.
- Do not store ammable materials and liquids near or on the induction cooker.
- Avoid hard contact between the cookware or other objects and the crystalite cooking plate.
- Always place the cookware on the cooking zone during cooking.
- Never connect this appliance to a timer switch or remote control system in order to avoid a
hazardous situation.
ENGLISH 7

- Do not use cookware with a bottom diameter of more than 16cm to deep-fry food, as this
causes the appliance to malfunction.
Automatic shut-off
The appliance is equipped with automatic shut-off. It switches off automatically in two situations:
- In the Quick start (manual) mode and the Hot pot mode, the appliance switches off
automatically if you do not press any button for 60 minutes.
- If there is no cookware or unsuitable cookware on the cooking place when you press the start
button or if you remove cookware from the cooking plate during cooking, the cooker beeps
continuously, the display shows ‘----’. The cooker automatically switches off after 1 minute unless
you put the cookware back onto the cooking plate within this minute.
Electromagnetic elds (EMF)
This Philips appliance complies with all standards regarding electromagnetic elds (EMF). If handled
properly and according to the instructions in this user manual, the appliance is safe to use based on
scientic evidence available today.
Before rst use
Remove all packaging material from the induction cooker.
Preparing for use
1 Place the appliance on a dry, stable and level surface.
2 Make sure there is at least 10cm free space around the appliance to prevent overheating.
3 Always place the cookware on the cooking zone during cooking.
4 Make sure you use cookware of the correct type and size (see the tables below).
Recommended types and sizes of cookware
Suitable cookware for the
induction cooker
Material Cookware with a bottom made of iron or magnetic stainless
steel
Shape Cookware with a at bottom
Size Cookware with a bottom diameter of 12-22cm, depending on
the cooking mode (see tips below)
Weight Cookware with a weight of up to 7kg (including contents)
Cookware NOT suitable for the
induction cooker
Material Cookware with a bottom made of non-iron metal,
crystalite, glass, aluminium and copper
Shape Cookware with a concave or convex bottom
Size Cookware with a bottom diameter of less than 11cm
Weight Cookware with a weight over 7kg (including contents)
Tip: When you cook in the Quick start (manual) mode or Hot Pot mode, you can use cookware with a
bottom diameter of 12-25cm.
ENGLISH8

Tip: To deep-fry food, we advise you to use cookware with a bottom diameter of 12-16cm.
Using the appliance
Only use cookware that is suitable for induction cooking (see chapter ‘Preparing for use’).
Note: Always place and use the appliance on a dry, stable and level surface.
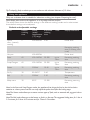
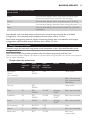
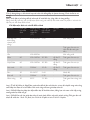
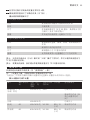
The tables below shows the default settings in the different cooking modes and to what extent
these default settings can be adjusted.
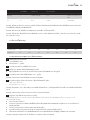
Default and adjustable settings
Mode Default
cooking
time
Power
(watt)/
temperature
(°C) range
Adjustable
cooking
time
Timer Display indications
Quick
start (manual)
cooking
5 400-2000W 5-60 - Power level
Remaining cooking
time (if cooking time
is set)
Hot pot - 400-2000W - - Power level
Stew 60 400-1400W 30-180 up to
12hrs
Remaining cooking
time
Soup/Congee 60 400-1400W 30-180 up to
12hrs
Remaining cooking
time
Steam 15 2000W 10-40 up to
12hrs
Remaining cooking
time
Stir fry 30 80-240°C 5-60 - Temperature
Boil 9 2000W 5-30 - Remaining cooking
time
Keep warm 30 80°C 15-180 - Remaining warming
time
Note: In the Stew and Soup/Congee modes, the appliance rst brings the food to the boil and then
switches to a lower power level. You can only adjust the power level after the boiling stage.
Note: The Steam mode allows you to steam various types of food, such as steamed rolls, egg, pork ribs or
chicken.
Note: The Boil mode allows you to boil water or food in a fast way. The suggested boiling time for 1 litre is
3-5 minutes, for 2 litres 6-10 minutes and for 3 litres 9-14 minutes.
ENGLISH 9

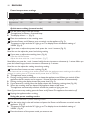
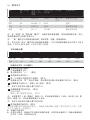
Power/temperature settings
Low Mid High
Wattage (W) 400 800 1200 1400 1600 1800 2000
Temperature
(°C)
80 120 160 180 200 220 240
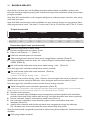
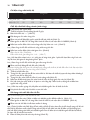
Quick start cooking (manual mode)
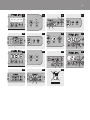
1 Put the mains plug in the wall socket.
, The appliance produces a 2-second beep.
, The display shows ‘----’ (Fig. 2).
2 Place the cookware on the cooking zone.
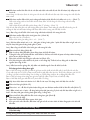
3 Press the Power on/off button once to switch on the appliance (Fig. 3).
, The power-on light and the ‘W’ light go on. The display shows the default setting of
1400W (Fig. 4).
4 If you want to adjust the power level, press the + and - buttons (Fig. 5).
Note: You can also adjust the power level during cooking.
5 If you want to adjust the cooking time: (Fig. 6)
- Press the Hr:Min button.
- Adjust the time with the + and - buttons. (Fig. 7)
Note: When you press the + and - buttons briey, the time increases or decreases by 1 minute. When you
press the buttons longer, the time increases or decreases by 5 minutes.
Note: You can also adjust the cooking time during cooking.
6 Press the Start button to start cooking (Fig. 8).
If you have not set a cooking time and/or power level, the appliance starts cooking at the default
settings (a cooking time of 5 minutes and a power level of 1400W).
, The appliance starts cooking.
, During cooking, the fan switches on to keep the appliance cool. When you switch off the
appliance, the fan remains on for approx. 1 minute and then switches off automatically.
, During cooking, the display shows the power level (Fig. 9).
, If you have set a cooking time, the display shows the remaining cooking time (Fig. 10).
, When the cooking time has elapsed, the appliance beeps a few times.
The appliance automatically switches off and the power-on light goes out.
Note: If you want to stop cooking, press the Power on/off button. The appliance then switches off.
7 Unplug the appliance after cooking.
Using the preset cooking modes
You can choose between 7 preset cooking modes.
1 Put the mains plug in the wall socket and press the Power on/off button to switch on the
appliance. (Fig. 11)
, The power-on light and the ‘W’ light go on. The display shows the default setting of
1400W. (Fig. 4)
2 Press the button of the preset mode you want to use.
ENGLISH10

Note: Before you press the Start button to conrm the selected mode, you can still switch to any other
preset mode. If you want to switch to a different preset mode after you have pressed the start button,
you have to switch off the appliance by pressing the Power on/off button. Then press the Power on/off
button again to switch the appliance back on and select the desired preset mode.
, The indicator light above the button goes on (Fig. 12).
3 If you want to start cooking at the default setting of the selected preset mode, continue with
step 6.
See the default settings and cooking time table above for the default settings in the different cooking
modes.
4 If you want to adjust the power level or cooking temperature, press the + and -
buttons. (Fig. 7)
- If the power level is adjustable, ‘W’ light goes on and the power level ashes. (Fig. 9)
- If the temperature is adjustable, ‘C’ light goes on. (Fig. 13)
Certain settings cannot be adjusted. See the table above for information about the settings that can
or cannot be adjusted in the preset modes.
Note: You can also adjust the power level or cooking temperature during cooking.
5 If you want to adjust the cooking time: (Fig. 14)
- Press the Hr:Min button.
- Adjust the time with the + and - buttons. (Fig. 7)
Note: When you press the + and - buttons briey, the time increases or decreases by 1 minute. When you
press the buttons longer, the time increases or decreases by 5 minutes.
Note: You can also adjust the cooking time during cooking.
6 Press the Start button (Fig. 8).
, The induction cooker automatically starts operating according to the selected mode.
, During cooking, the fan switches on to keep the appliance cool. When you switch off the
appliance, the fan remains on for approx. 1 minute and then switches off automatically.
, The display shows the remaining cooking time (Fig. 10).
, When the cooking time has elapsed, the appliance beeps a few times.
The appliance automatically switches off and the power-on light goes out.
Note: If you want to stop cooking, press the Power on/off button. The appliance then switches off.
Using the timer
You can use the Timer button to set the time at which you want the appliance to start cooking at a
preset cooking mode.
For example: if it is 14:00 hours and you want the appliance to start cooking at 18:00 hours, set the
timer to 4.00 (4 hours) and press the Start button. After 4 hours, at 18:00 hours, the appliance
automatically starts cooking.
You can use the timer function for the Stew, Soup/Congee, Steam modes.
You can set a start time of 5 minutes to 12 hours.
1 Follow steps 1 to 5 of section ‘Using the preset cooking modes’.
2 Press the Timer button (Fig. 15).
3 Press the + and - buttons to set the number of minutes or hours after which you want the
appliance to start cooking (Fig. 7).
Note: Press the + or - button briey to increase or decrease the time in steps of 5 minutes. When you
press the + or - button longer, the time increases or decreases in steps of 1 hour.
4 Press the Start button to start the timer (Fig. 8).
, The timer light goes on.
ENGLISH 11

, The display starts to count down the time.
, When the cooking process starts, the timer light goes out and the display shows that the
cooking process has started.
Cleaning and maintenance
Cleaning
Never immerse the appliance in water nor rinse it under the tap.
Never use scouring pads, abrasive cleaning agents or aggressive liquids such as petrol or acetone
to clean the appliance.
Do not put vinegar on the crystalite cooking plate.
1 Unplug the appliance and let it cool down.
2 Clean the appliance with a damp cloth and if necessary, with some mild cleaning agent.
Maintenance
Improper use can lead to scratches on the cooking plate. To avoid discolouring and scratches, use
the appliance according to the instructions in this user manual and always clean the appliance and
cookware properly after use.
Storage
Do not place heavy objects on the crystalite cooking plate as it is breakable.
Do not store the appliance in a hot place, for example near a cooker.
If you are not going to use the appliance for a longer period of time, we advise you to store the
appliance in a dry and safe place.
Environment
- Do not throw away the appliance with the normal household waste at the end of its life, but
hand it in at an ofcial collection point for recycling. By doing this, you help to preserve the
environment (Fig. 16).
Guarantee and service
If you need service or information or if you have a problem, please visit the Philips website at
www.philips.com or contact the Philips Consumer Care Centre in your country (you nd its phone
number in the worldwide guarantee leaet). If there is no Consumer Care Centre in your country,
go to your local Philips dealer.
ENGLISH12

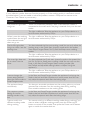
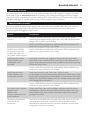
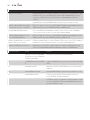
Troubleshooting
If your induction cooker does not function properly or if the cooking quality is insufcient, consult
the table below. If you are unable to solve the problem, contact a Philips service centre or the
Customer Care Centre in your country.
Problem Solution
The power-on light does
not go on.
There is a connection problem. Check if the induction cooker is
connected to the mains and if the plug is inserted rmly into the wall
socket
The light is defective. Take the appliance to your Philips dealer or a
service centre authorised by Philips.
When I press the cooking
mode button, the on-light
of the selected mode
does not go on.
The light is defective. Take the appliance to your Philips dealer or a
service centre authorised by Philips.
The Hr:Min light does
not go on when I set the
cooking time.
You have selected the Hot pot cooking mode. You can only adjust the
cooking time in the Quick start (manual) mode and in the preset
Stew, Soup/Congee, Steam, Stir fry, Boil and Keep warm cooking
modes.
The light is defective. Take the appliance to your Philips dealer or a
service centre authorised by Philips.
The timer light does not
go on when I set the
timer.
You have selected the Quick start (manual) mode or the preset Hot
pot, Stir fry, Boil or Keep warm cooking mode. You can only use the
timer in the Stew, Soup/Congee, Steam cooking modes (see
the ‘Default and adjustable settings’ table in chapter ‘Using the
appliance’).
The light is defective. Take the appliance to your Philips dealer or a
service centre authorised by Philips.
I cannot change the
power setting before I
select the Stew mode or
Soup/Congee mode.
In the Stew and Soup/Congee modes, the appliance rst brings the
food to the boil and then switches to a lower power level. You can
only adjust the power level after the boiling stage.
The appliance beeps
continuously.
You have put unsuitable cookware on the cooking plate or you have
removed the cookware from the cooking plate during cooking.
Place suitable cookware on the cooking plate.
The maximum power
setting for certain
cooking modes is very
low.
In the Stew and Soup/Congee modes, the appliance rst brings the
food to the boil and then switches to a lower power level. You can
only adjust the power level after the boiling stage.
I cannot switch to a
different cooking mode
during cooking.
You cannot switch to a different cooking mode during cooking. If you
want to select a different cooking mode, press the Power on/off
button to switch off the cooker. Then press the Power on/off button
again to switch the cooker back on.
ENGLISH 13

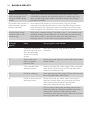
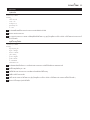
Problem Solution
The fan works but the
appliance has not started
cooking.
You have to press the Start button within 1 minute after you press
the Power on/off button.If you do not press the Start button within 1
minute, the induction cooker switches off and the fan continues to
work for 1 minute to cool down the appliance.
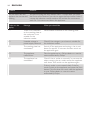
Codes on the
display
Message What you should do
---- There is no cookware
on the cooking plate or
the cookware is not
suitable for the
induction cooker.
Place suitable cookware on the cooking plate.
E1 Unstable voltage in
power supply network
Check if the voltage in your home is suitable for
the induction cooker.
E2 The cooking plate has
overheated.
Switch off the appliance and unplug it. Let it cool
down for approx. 10 minutes and then switch on
the appliance again.
E3 The appliance
malfunctions
Take the appliance to a Philips dealer or a service
centre authorised by Philips.
E4 The appliance has
overheated
Check if the air outlet is covered. If so, remove the
object covering the air outlet and let the appliance
cool down. Then switch on the appliance again.
If the air outlet is not covered, check if the fan
works. Switch on the appliance and press the Start
button. If the fan does not work, take the appliance
to your Philips dealer or a service centre
authorised by Philips.
ENGLISH14

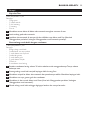
Recipes
Chinese-style soup
Preparation time: 3 hours
Ingredients:
- 300g chicken
- 1 carrot
- 2 potatoes
- 1 onion
- 2ltr water
1 Put all ingredients in the cookware in the same order as described above.
2 Put the lid on the cookware.
3 Place the cookware on the cooker and boil the soup in the Soup mode (see chapter ‘Using
the appliance’, section ‘Using the preset cooking modes’.
Pork rib stew with mushrooms
Preparation time: 1 hour
Ingredients:
- 800g pork ribs
- 1tbsp dark soy sauce
- 1tbsp light soy sauce
- 1tsp salt
- 2tbsp sugar
- 2tbsp oil
- 500ml water
- 8 chinese dried mushrooms
1 Soak the dried mushrooms for 30 minutes before you use them. Set them aside to drain for a
few seconds.
2 Cut the pork ribs into pieces of about 5cm.
3 Put the oil in the cookware and heat it slightly. Add the pork pieces.
4 Add soy sauce, salt, sugar and mushrooms.
5 Add the water and cook in the Stew mode (see chapter ‘Using the appliance’, section ‘Using
the preset cooking modes’).
6 Cook the pork ribs until the meat is tender and the sauce is glazed.
ENGLISH 15

16
Pengenalan
Tahniah atas pembelian anda dan selamat datang ke Philips! Untuk mendapat manfaat sepenuhnya
daripada sokongan yang ditawarkan oleh Philips, daftarkan produk anda di www.philips.com/
welcome.
Periuk aruhan berfungi atas dasar elektromagnet yang menghasilkan medan elektromagnet frekuensi
tinggi yang berkuasa. Apabila alat memasak yang terdiri daripada bahan magnet (cthnya. besi) diletak
pada periuk aruhan, medan elektromagnet memindahkan tenaga ke bahagian bawah alat tersebut,
yang menyebabkan alat memasak dan makanan di dalamnya menjadi panas. Jumlah haba yang dijana
di dalam alat memasak tersebut di kawal dengan mengubah kekuatan medan elektromagnet itu.
Apabila kekuatan medan elektromagnet ditukar, suhu alat memasak itu bertukar serta merta.
Kelebihan periuk aruhan:
- Selamat: periuk aruhan tidak menggunakan nyalaan atau api yang terbuka. Ia juga mempunyai
beberapa ciri keselamatan, yang membolehkan anda berseronok memasak bersama keluarga
pada bila-bila masa.
- Cepat: dalam pemasakan aruhan, alat memasak bertindak sebagai sumber haba. Ini menghasilkan
pemindahan haba yang lebih cepat dan lebih rata, mengurangkan masa memasak sehingga lebih
daripada 1/3 berbanding dengan pemasakan secara konvensional.
- Serba boleh: periuk aruhan mempunyai 7 mod memasak yang dipratetapkan, setiap satu dengan
corak pemanasan tersendiri yang optimum. Mod ini membenarkan anda menyediakan pelbagai
pilihan makanan yang berkhasiat.
- Kegunaan yang mesra: panel kawalan dan paparan yang mudah dan interaktif membolehkan anda
melaraskan tetapan dengan mudah dengan sentuhan butang.
- Selesa: proses memasak dengan periuk aruhan adalah bebas asap dan menghasilkan gris yang
sedikit. Selain itu, periuk dan kawasan sekitarnya tetap sejuk. Ini membolehkan anda memasak
dalam persekitaran yang dingin dan selesa.
- Mudah alih: periuk aruhan mempunyai reka bentuk yang kompak dan plat memasaknya sentiasa
sejuk. Ini bermakna perkakas ini sentiasa selamat untuk digunakan dan ia membolehkan anda
memasak di mana-mana dalam rumah anda.
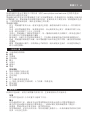
Perihalan umum (Gamb. 1)
A Plat memasak kristalit
B Badan
C Zon masak
D Panel kawalan
E Paparan
F Salur keluar udara
G Salur masuk udara
H Kord sesalur kuasa
Panel kawalan
1 Mod masak pratetap dengan lampu penunjuk
2 Butang Jam:Min (masa memasak)
3 Butang pemasa
4 Paparan
5 Tahap memasak/penunjuk suhu memasak
6 butang +/- (untuk menetapkan masa memasak, tahap kuasa dan suhu memasak)
7 Butang mula
8 Butang kuasa hidup/mati
Penting
Baca buku panduan pengguna ini dengan teliti sebelum anda menggunakan perkakas dan simpannya
untuk rujukan masa depan.
BAHASA MELAYU

Bahaya
- Jangan sesekali tenggelamkan perkakas ke dalam air atau membilasnya di bawah air paip.
Amaran
- Periksa sama ada voltan yang ditunjukkan pada perkakas sepadan dengan voltan sesalur kuasa
setempat sebelum anda menyambungkan perkakas.
- Sambungkan perkakas hanya kepada soket dinding terbumi. Sentiasa pastikan plag dimasukkan
dengan rapi ke dalam soket.
- Jangan gunakan perkakas jika plag, kord sesalur kuasa atau perkakas itu sendiri rosak.
- Jika kord sesalur rosak, ia mesti digantikan oleh Philips, pusat servis yang dibenarkan oleh Philips
atau pihak yang telah diluluskan bagi mengelakkan bahaya.
- Perkakas ini bukan dimaksudkan untuk digunakan oleh orang (termasuk kanak-kanak) yang
kurang upaya dari segi zikal, deria atau mental, atau kurang berpengalaman dan pengetahuan,
kecuali mereka diawasi atau diberi arahan berkenaan penggunaan perkakas ini oleh orang yang
bertanggungjawab atas keselamatan mereka.
- Kanak-kanak kecil harus diawasi untuk memastikan mereka tidak bermain dengan perkakas itu.
- Jauhkan kord sesalur kuasa dari capaian anak-anak. Jangan biarkan kord sesalur kuasa tergantung
melepasi pinggir meja atau permukaan tempat kerja di mana perkakas berada.
- Pastikan plat memasak bersih dan kering sebelum anda menghidupkan perkakas .
- Jangan tutup bolong stim semasa periuk aruhan sedang beroperasi.
- Jangan pasang plag perkakas atau mengendalikan panel kawalan dengan tangan yang basah.
- Jangan sentuh plat memasak selepas memasak, kerana ia mengekalkan haba daripada alat
memasak.
- Objek logam seperti pisau, garfu, sudu dan penutup periuk tidak harus diletakkan pada plat
memasak kerana ia boleh menjadi panas.
- Jangan tutup mana-mana bahagian plat memasak dengan aluminium untuk mencegah
risiko kejutan elektrik, litar pintas atau kebakaran.
- Jika permukaan plat memasak retak, matikan perkakas dan jangan gunakannya lagi untuk
mencegah risiko kejutan elektrik, litar pintas atau kebakaran.
Awas
- Jangan sekali-kali menggunakan sebarang aksesori atau bahagian dari pengilang lain atau yang
tidak disarankan secara khusus oleh Philips. Jika anda menggunakan aksesori atau bahagian yang
sedemikian, jaminan anda akan dibatalkan.
- Jangan dedahkan periuk aruhan kepada suhu yang tinggi, gas panas, stim atau haba yang lembap.
Jangan letakkan periuk aruhan di atas atau berhampiran dengan dapur yang sedang
digunakan atau yang masih panas.
- Sentiasa matikan perkakas sebelum anda mencabut plagnya.
- Sentiasa cabutkan plag perkakas dan biarkan sehingga sejuk sebelum anda membersihkannya.
- Perkakas ini bertujuan untuk kegunaan dalam rumah sahaja. Jika perkakas ini disalahgunakan atau
untuk tujuan profesional atau semiprofesional atau jika ia digunakan tidak mengikut arahan yang
terdapat dalam manual pengguna, jaminan menjadi tidak sah dan Philips tidak menerima
tanggungjawab bagi apa-apa kerosakan yang berlaku.
- Letakkan periuk aruhan di atas permukaan yang stabil, mendatar dan rata serta pastikan terdapat
sekurang-kurangnya 10cm ruang kosong di sekelilingnya untuk mengelakkan daripada pemanasan
melampau.
- Jangan letak apa-apa di antara alat memasak dan plat memasak.
- Berat maksimum yang boleh diletakkan di atas periuk aruhan ialah 7kg.
- Berwaspadalah terhadap stim panas yang keluar daripada alat memasak semasa memasak atau
apabila anda membuka penutupnya.
- Jangan angkat atau pindahkan periuk aruhan semasa ia sedang beroperasi.
- Jangan letak alat memasak yang kosong di atas periuk aruhan yang telah dihidupkan, kerana ini
boleh menyebabkan alat memasak tersebut menjadi herot benyot atau gegelung pemanasan
menjadi rosak.
BAHASA MELAYU 17

- Jangan simpan bahan dan cecair mudah terbakar berhampiran atau di atas periuk aruhan.
- Elakkan sentuhan yang kuat antara alat memasak atau objek lain dengan plat memasak kristalit.
- Sentiasa letakkan alat memasak pada zon memasak apabila memasak.
- Jangan sambungkan perkakas ini dengan suis pemasa atau sistem kawalan jauh untuk
mengelakkan situasi yang berbahaya.
- Jangan guna alat memasak yang mempunyai diameter dasar periuk lebih daripada 16cm untuk
menggoreng makanan (dengan minyak yang banyak), kerana ini menyebabkan perkakas ini
malfungsi.
Pematian automatik
Perkakas ini dilengkapi dengan pematian automatik. Ia akan mati secara automatik dalam dua
keadaan:
- Dalam mod Quick start (manual) dan mod Hot pot, perkakas ini akan mati secara automatik jika
anda tidak menekan sebarang butang selama 60 minit.
- Jika tiada alat memasak di atas plat memasak atau jika alat memasak itu tidak sesuai apabila anda
menekan butang mula atau jika anda mengalihkan alat memasak daripada plat memasak apabila
anda sedang memasak, periuk akan mengeluarkan bunyi bip secara berterusan, paparan
menunjukkan ‘----’. Periuk ini akan mati secara automatik setelah 1 minit melainkan anda
meletakkan alat memasak kembali pada plat memasak dalam masa satu minit ini.
Medan Elektro Magnet (EMF)
Perkakas Philips ini mematuhi semua piawai yang berhubung dengan medan elektromagnet (EMF).
Jika dikendalikan dengan betul dan mematuhi arahan dalam manual pengguna ini, perkakas selamat
untuk digunakan menurut bukti saintik yang boleh didapati pada masa ini.
Sebelum penggunaan pertama
Keluarkan semua bahan pembungkusan daripada periuk aruhan.
Bersedia untuk menggunakannya
1 Letak perkakas di atas permukaan yang kering, stabil dan rata.
2 Pastikan terdapat sekurang-kurangnya 10cm ruang kosong di sekeliling perkakas untuk
mengelakkan daripada pemanasan melampau.
3 Sentiasa letakkan alat memasak pada zon memasak apabila memasak.
4 Pastikan anda menggunakan alat memasak dari jenis dan saiz yang betul (lihat jadual di bawah).
Jenis dan saiz alat memasak yang disarankan
Alat memasak yang sesuai untuk
periuk aruhan
Bahan Alat memasak dengan dasar yang dibuat daripada besi
atau keluli tahan karat magnetik
Bentuk Alat memasak dengan dasar yang leper
Saiz Alat memasak dengan diameter dasar selebar 12-22cm,
bergantung kepada mod memasak (liihat petua di bawah)
Berat Alat memasak dengan berat sehingga 7kg (termasuk
kandungan)
BAHASA MELAYU18

Alat memasak TIDAk sesuai untuk
periuk aruhan
Bahan Alat memasak dengan dasar yang dibuat daripada logam
bukan besi, kristalit, kaca, aluminium dan tembaga
Bentuk Alat memasak dengan dasar yang cekung atau cembung
Saiz Alat memasak dengan diameter dasar kurang daripada 11cm
Berat Alat memasak dengan berat lebih daripada 7kg (termasuk
kandungan)
Petua: Apabila anda memasak dalam mod Quick start (manual) atau mod Hot Pot, anda boleh
menggunakan alat memasak yang mempunyai diameter dasar selebar 12-25cm.
Petua: Untuk menggoreng makanan dengan minyak yang banyak, kami menasihatkan anda supaya
menggunakan alat memasak dengan diameter dasar selebar 12-16cm.
Menggunakan perkakas
Gunakan hanya alat memasak yang sesuai untuk pemasakan aruhan (lihat bab ‘Bersedia untuk
menggunakannya’).
Nota: Sentiasa letak dan gunakan perkakas pada permukaan yang kering, stabil, dan rata.
Jadual ini menunjukkan tetapan lalai dalam mod pemasakan yang berlainan dan sejauh mana tetapan
lalai ini boleh dilaraskan.
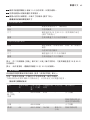
Tetapan lalai dan boleh laras
Mod Masa
memasak
lalai
Kuasa
(watt)/ julat
suhu (°C)
Masa
memasak
boleh laras
Pemasa Penunjuk paparan
Pemasakan
Quick
start (manual)
5 400-
2000W
5-60 - Tahap kuasa
Baki masa memasak
(jika masa memasak
ditetapkan)
Hot pot - 400-
2000W
- - Tahap kuasa
Stew 60 400-
1400W
30-180 sehingga
12jam
Baki masa memasak
Sup/Bubur 60 400-
1400W
30-180 sehingga
12jam
Baki masa memasak
Kukus 15 2000W 10-40 sehingga
12jam
Baki masa memasak
Kacau goreng 30 80-240°C 5-60 - Suhu
Rebus 9 2000W 5-30 - Baki masa memasak
Keep warm 30 80°C 15-180 - Baki masa
memanaskan
BAHASA MELAYU 19

Nota: Dalam mod Stew dan mod Sup/Bubur, perkakas terlebih dahulu mendidihkan makanan dan
kemudian beralih ke tahap kuasa yang lebih rendah. Anda hanya boleh melaraskan tahap kuasa selepas
peringkat mendidih.
Nota: Mod Stim membenarkan anda mengukus pelbagai jenis makanan, seperti roti kukus, telur, tulang
rusuk babi atau ayam.
Nota: Mod Didih membenarkan anda mendidihkan air atau makanan dengan cara yang pantas. Masa
didih yang disarankan untuk 1 liter ialah 3-5 minit, untuk 2 liter 6-10 minit dan untuk 3 liter 9-14 minit.
Tetapan kuasa/suhu
Rendah Pertengahan Tinggi
Wattan (W) 400 800 1200 1400 1600 1800 2000
Suhu (°C) 80 120 160 180 200 220 240
Pemasakan Quick start (mod manual)
1 Masukkan plag utama ke dalam soket.
, Perkakas mengeluarkan bip selama 2-saat.
, Paparan menunjukkan ‘----’ (Gamb. 2).
2 Letak alat memasak pada zon memasak.
3 Tekan butang Kuasa hidup/mati sekali untuk menghidupkan perkakas (Gamb. 3).
, Lampu penghidup kuasa dan lampu ‘W’ menyala. Paparan menunjukkan tetapan lalai
1400W (Gamb. 4).
4 Jika anda hendak melaraskan tahap kuasa, tekan butang + dan - (Gamb. 5).
Nota: Anda juga boleh melaraskan tahap kuasa semasa memasak.
5 Jika anda hendak melaraskan masa memasak: (Gamb. 6)
- Tekan butang Jam:Min.
- Laraskan masa dengan butang + dan - . (Gamb. 7)
Nota: Apabila anda menekan butang + dan - sebentar, masa meningkat atau menurun sebanyak 1 minit.
Apabila anda menekan butang itu lebih lama, masa meningkat atau menurun selama 5 minit.
Nota: Anda juga boleh melaraskan masa memasak semasa sedang memasak.
6 Tekan butang Mula untuk memulakan pemasakan (Gamb. 8).
Jika anda belum menetapkan masa memasak dan/atau tahap kuasa, perkakas akan mula memasak
pada tetapan lalai (masa memasak selama 5 minit dan tahap kuasa 1400W).
, Perkakas mula memasak.
, Semasa memasak, kipas dihidupkan untuk menyejukkan perkakas. Apabila anda mematikan
perkakas, kipas tetap hidup selama lebih kurang1 minit dan kemudian mati secara automatik.
, Semasa memasak, paparan menunjukkan tahap kuasa (Gamb. 9).
, Jika anda telah menetapkan masa memasak, paparan akan menunjukkan baki masa
memasak (Gamb. 10).
, Apabila masa memasak telah berlalu, perkakas akan mengeluarkan bunyi bip beberapa
kali. Perkakas mati secara automatik dan lampu kuasa hidup akan padam.
Nota: Jika anda hendak menghentikan pemasakan, tekan butang Kuasa hidup/mati . Perkakas kemudian
dimatikan.
7 Cabut plag selepas memasak.
BAHASA MELAYU20
ページが読み込まれています...
ページが読み込まれています...
ページが読み込まれています...
ページが読み込まれています...
ページが読み込まれています...
ページが読み込まれています...
ページが読み込まれています...
ページが読み込まれています...
ページが読み込まれています...
ページが読み込まれています...
ページが読み込まれています...
ページが読み込まれています...
ページが読み込まれています...
ページが読み込まれています...
ページが読み込まれています...
ページが読み込まれています...
ページが読み込まれています...
ページが読み込まれています...
ページが読み込まれています...
ページが読み込まれています...
ページが読み込まれています...
ページが読み込まれています...
ページが読み込まれています...
ページが読み込まれています...
ページが読み込まれています...
ページが読み込まれています...
ページが読み込まれています...
ページが読み込まれています...
ページが読み込まれています...
ページが読み込まれています...
ページが読み込まれています...
ページが読み込まれています...
ページが読み込まれています...
ページが読み込まれています...
ページが読み込まれています...
ページが読み込まれています...
ページが読み込まれています...
ページが読み込まれています...
ページが読み込まれています...
ページが読み込まれています...
ページが読み込まれています...
ページが読み込まれています...
ページが読み込まれています...
ページが読み込まれています...
-
 1
1
-
 2
2
-
 3
3
-
 4
4
-
 5
5
-
 6
6
-
 7
7
-
 8
8
-
 9
9
-
 10
10
-
 11
11
-
 12
12
-
 13
13
-
 14
14
-
 15
15
-
 16
16
-
 17
17
-
 18
18
-
 19
19
-
 20
20
-
 21
21
-
 22
22
-
 23
23
-
 24
24
-
 25
25
-
 26
26
-
 27
27
-
 28
28
-
 29
29
-
 30
30
-
 31
31
-
 32
32
-
 33
33
-
 34
34
-
 35
35
-
 36
36
-
 37
37
-
 38
38
-
 39
39
-
 40
40
-
 41
41
-
 42
42
-
 43
43
-
 44
44
-
 45
45
-
 46
46
-
 47
47
-
 48
48
-
 49
49
-
 50
50
-
 51
51
-
 52
52
-
 53
53
-
 54
54
-
 55
55
-
 56
56
-
 57
57
-
 58
58
-
 59
59
-
 60
60
-
 61
61
-
 62
62
-
 63
63
-
 64
64


