Korg opsix SE Platinum クイックスタートガイド

タイプ
クイックスタートガイド

このマニュアルも適しています

入门指南
ッ ク・ ー ト・
Guía de inicio rápido
Quick Start Guide
Guide de prise en main
Blitzstart
0505 ETH
www.korg.com
Published 05/2023
Printed in Japan
2023
EFGSCJ 2
EFGSCJ 2
Table of Contents
Precautions ................................................................................2
Introduction ...............................................................................3
About the opsix SE manuals ......................................................... 3
Main Features ................................................................................. 3
About the sound generator of the opsix SE ................................ 3
Panel description and functions ..............................................4
Block Diagram............................................................................5
Rear panel connections ............................................................. 5
Connecting the AC adapter .......................................................... 5
Other connections .......................................................................... 5
Turning the power on/o..........................................................5
Turning the opsix SE On............................................................... 5
Turning the opsix SE O .............................................................. 5
Auto Power-O .............................................................................. 5
Playing the opsix SE ..................................................................6
Playing a program .......................................................................... 6
Using the analyzer .......................................................................... 6
Performing with the arpeggiator.................................................. 6
Editing the programs ................................................................6
Editing with the operator mixer ................................................... 6
Easy program editing ..................................................................... 6
Randomized editing ....................................................................... 6
Detailed editing .............................................................................. 6
Saving a program ........................................................................... 7
Using the step sequencer..........................................................7
Playback and recording on the step sequencer .......................... 7
Step recording ................................................................................. 7
Other functions .......................................................................... 7
Restoring the opsix SE to factory-set default settings ............... 7
Specications ............................................................................. 7
Operator modes .........................................................................8
Quick Start Guide
Precautions
Location
Using the unit in the following locations can result in a malfunction.
In direct sunlight
Locations of extreme temperature or humidity
Excessively dusty or dirty locations
Locations of excessive vibration
Close to magnetic elds
Power supply
Please connect the designated AC adapter to an AC outlet of the correct
voltage. Do not connect it to an AC outlet of voltage other than that for
which your unit is intended.
Interference with other electrical devices
Radios and televisions placed nearby may experience reception interference.
Operate this unit at a suitable distance from radios and televisions.
Handling
To avoid breakage, do not apply excessive force to the switches or controls.
Care
If the exterior becomes dirty, wipe it with a clean, dry cloth. Do not use
liquid cleaners such as benzene or thinner, or cleaning compounds or
ammable polishes.
Keep this manual
Aer reading this manual, please keep it for later reference.
Keeping foreign matter out of your equipment
Never set any container with liquid in it near this equipment. If liquid gets into the
equipment, it could cause a breakdown, re, or electrical shock.
Be careful not to let metal objects get into the equipment. If something does slip into the
equipment, unplug the AC adapter from the wall outlet. en contact your nearest Korg
dealer or the store where the equipment was purchased.
THE FCC REGULATION WARNING
(for USA)
NOTE: is equipment has been tested and found to comply with the limits for a
Class B digital device, pursuant to Part 15 of the FCC Rules. ese limits are
designed to provide reasonable protection against harmful interference in a
residential installation. is equipment generates, uses, and can radiate radio
frequency energy and, if not installed and used in accordance with the instructions,
may cause harmful interference to radio communications. However, there is no
guarantee that interference will not occur in a particular installation. If this
equipment does cause harmful interference to radio or television reception, which
can be determined by turning the equipment o and on, the user is encouraged to
try to correct the interference by one or more of the following measures:
Reorient or relocate the receiving antenna.
Increase the separation between the equipment and receiver.
Connect the equipment into an outlet on a circuit dierent from that to
which the receiver is connected.
Consult the dealer or an experienced radio/TV technician for help.
If items such as cables are included with this equipment, you must use
those included items.
Unauthorized changes or modication to this system can void the user’s
authority to operate this equipment.
SUPPLIER’S DECLARATION OF CONFORMITY (for USA)
Responsible Party: KORG USA INC.
Address:
316 SOUTH SERVICE ROAD, MELVILLE, NY
Telephone:
1-631-390-6500
Equipment Type:
ALTERED FM SYNTHESIZER
Model:
opsix SE
is device complies with Part 15 of FCC Rules. Operation is subject to the
following two conditions:
(1) is device may not cause harmful interference, and (2) this device
must accept any interference received, including interference that may
cause undesired operation.
En-3
Notice regarding disposal (EU only)
When this “crossed-out wheeled bin” symbol is displayed on the
product, owner’s manual, battery, or battery package, it signies that
when you wish to dispose of this product, manual, package or battery
you must do so in an approved manner. Do not discard this product,
manual, package or battery along with ordinary household waste.
Disposing in the correct manner will prevent harm to human health and
potential damage to the environment. Since the correct method of
disposal will depend on the applicable laws and regulations in your
locality, please contact your local administrative body for details. If the battery
contains heavy metals in excess of the regulated amount, a chemical symbol is
displayed below the “crossed-out wheeled bin” symbol on the battery or battery
package
.
Data handling
Incorrect operation or malfunction may cause the contents of memory to be
lost, so we recommend that you save important data on USB storage devices
or other media. Please be aware that Korg will accept no responsibility for
any damages which may result from loss of data.
COPYRIGHT WARNING
is professional device is intended only for use with works for which
you yourself own the copyright, for which you have received permission
from the copyright holder to publicly perform, record, broadcast, sell,
and duplicate, or in connection with activities which constitute “fair use”
under copyright law.
If you are not the copyright holder, have not received permission from
the copyright holder, or have not engaged in fair use of the works, you
may be violating copyright law, and may be liable for damages and
penalties.
KORG TAKES NO RESPONSIBILITY FOR ANY INFRINGEMENT
COMMITTED THROUGH USE OF KORG PRODUCTS.
e content that is built into this product or included with it may not be
extracted, recorded, or stored in a form similar to its original state, and
distributed or made publicly available on the internet.
e content of this product (such as sound programs, style data,
accompaniment patterns, MIDI data, PCM sample data, audio data,
operating system etc.) is the copyrighted property of KORG Inc. or is
copyrighted material used by KORG Inc. under license from a third
party.
You do not need permission from KORG Inc. to use the above content to
produce or perform musical works, or to record and distribute such
works.
* All product names and company names are the trademarks or registered
trademarks of their respective owners.
Introduction
Thank you for purchasing the Korg opsix SE altered FM synthesizer. To help
you get the most out of your new instrument, please read this manual carefully.
About the opsix SE manuals
The documentation for this product consists of the following:
• Quick Start Guide (what you’re reading)
• Owner’s Manual (PDF download from the Korg website: www.korg.com)
Main Features
• The opsix SE features an FM sound generator that produces complex
harmonics by rapidly modulating the basic waveforms of its oscillators
using other oscillators.
• In addition to FM synthesis, the opsix SE also features various operator
modes such as a ring modulator, wavefolder, effect and so on. The six
operators can be combined to create a wide variety of sounds.
• You can use the operator mixer (with sliders and knobs) to directly
control the parameters of each operator. This is useful for intuitive editing
and making dynamic sound changes when you are performing.
• The opsix SE includes a rich selection of filters including Polysix and
MS-20 models, which covers the bases for making sounds like those
generated with subtractive synthesis.
• Three high-definition multi-effects are available, and you can select from
30 types for each.
• 500 programs can be called up and saved in an instant.
• Powerful 16-step polyphonic sequencer.
• A spectrum analyzer and an oscilloscope that let you visualize your sound.
• The opsix SE features a 61-key keyboard with aftertouch. Aftertouch is an
effect that’s applied when you play a key and then press into the keyboard
further while holding the key down. The more you press into the key, the
stronger the effect. Aftertouch is generally used to control the volume, the
sound (cutoff frequency) and the LFO sensitivity.
About the sound generator of the opsix SE
The principles of FM sound generation
were discovered and established by Dr.
John Chowning at Stanford University in
the 1970s, when he was experimenting
with vibrato. FM sound generation was
later packaged into an LSI chip and put
into practical use by Yamaha Corpora-
tion. From the beginning of the 1980s, FM
tone generation was used as an internal
sound source on the Yamaha DX series,
personal computers, game machines and
cellphones.
• Operator (modulator, carrier)
The FM (Frequency Modulation) sound
generator is based on synthesis elements
called “operators.” Operators are
modulated using simple input waveforms
such as sine waves, outputting sounds
with complex harmonics. Operators can
act as either a modulator or a carrier. The
output sound from a modulator feeds into
another operator and modifies that
operator’s output. Carriers receive the
output sound from modulators and
output the modulated result as audio.
• Algorithms
In the FM sound generator, the
combination of the roles and connections
of the operators is called an “algorithm.”
Selecting an algorithm is a good starting
point for creating sound. The opsix SE
sound generator includes six operators,
and 40 preset algorithms are provided.
You can use the user algorithm function to create new combinations as well.
• Operator modes
Although the basis of the opsix SE is the FM sound generator, you can change
the operator mode to perform different kinds of modulation besides FM. The
combination of ring modulator, filter, wavefolder and effect makes it possible
to create new kinds of sounds that surpass the range of typical FM sounds.
2
1 3
4
5
6
Audio Ouptut
What happens when
modulators modulate
the carriers
Algorithm example
(preset algorithm 1)
Modulator output
Basic carrier waveform
Carrier output
Carriers
Modulators
En-4
Panel description and functions
12 3,4 6
9
51213141516
17 18
78
10
11
19 20 21 22 23 2524 26
16. SHIFT button
This button lets you access extended functions for the knobs and
buttons. Also, the current value of each parameter shown will be
indicated on the display for a while after SHIFT is pressed. Double-click
the SHIFT button to hold the SHIFT state. Press SHIFT again to cancel
the hold.
17. PITCH wheel
Controls the pitch of the sound.
18. MODULATION wheel
This wheel is generally used to control the cutoff frequency or vibrato
depth. You can also change which parameters are controlled by the
wheel.
19. OCTAVE buttons
These shift the range of notes assigned to the keyboard up or down in
one-octave steps over a range of ±4 octaves.
20. ARPEGGIATOR button
Switches the arpeggiator on/off. Hold this down to turn the arpeggiator
latch function on/off.
21. SEQUENCER/FAVORITES button
Selects the function that will be used by the STEP 1–16 buttons. When
SEQUENCER is selected, the buttons will act as step buttons for the step
sequencer. When FAVORITE is selected, you can assign the programs
you like to the STEP 1–16 buttons and recall them instantly.
22. PLAY button
This starts and stops playback of the step sequencer. When switching to
playback, the sequencer will always be reset to the first step. While
holding down the SHIFT button, press the PLAY button to set key
trigger mode. To set key trigger to latch, long-press the PLAY button
while holding down the SHIFT button.
23. REC button
Enters step sequencer recording mode. When the sequencer is stopped,
this will begin step recording; and when the sequencer is playing back,
this will begin real-time recording.
24. CLEAR button
When the step sequencer is playing back, the sequence will be muted
while this button is pressed. Pressing the button in real-time recording
will delete the notes that play during that time. At any other time, you
can hold down this button and press a step that you want to delete using
the STEP 1–16 buttons.
25. DUP. button
To copy a selected step to another step, hold down this button and press
the copy source and destination steps using the STEP 1–16 buttons.
26. STEP 1–16 buttons
If you press the SEQUENCER/FAVORITES button while SEQUENCER
is selected, you can turn steps on/off in the step sequencer, edit the
sequence data or select the steps displayed.
If FAVORITES is selected, you can use the STEP 1–16 buttons to recall
the programs you registered.
1. VOLUME knob
This adjusts the volume of the AUDIO OUTPUT jacks (L/MONO, R)
and headphone jack.
2. TAP TEMPO button
During playback, you can enter a tempo manually by lightly tapping this
button a few times at the desired tempo (Tap Tempo).
3. RATIO OP 1–6 knobs
These knobs change the pitch of each Operator. Operate the knobs
while holding down the SHIFT button to change the Operator
modes.
4. LEVEL OP 1–6 sliders
These sliders change the output level of each Operator. Operate the
sliders while holding down the SHIFT button to change the oscillator
waveforms.
5. Display
This shows various information such as program data and parameter
values.
6. PROGRAM knob
Selects the program.
7. PAGE < and > buttons
Use the < and > buttons to switch between edit pages.
These are enabled when the page guide is shown in the display.
8. OP SELECT +/− buttons and YES/NO buttons
Use these buttons to select the Operator to edit. These are also used to
select (YES) or cancel (NO) items in a list or when saving programs.
9. ANALYZER button
Switches the display to the spectrum analyzer and oscilloscope.
10. (ALGO) button
Displays the HOME/ALGO page.
11. Operator select LEDs
The selected Operator will light up when the Operator edit page
(MODE, PITCH, LEVEL) is displayed.
12. DATA ENTRY A–F knobs
These knobs change the parameter values shown in the display. Hold
down the SHIFT button while turning a knob to make fine-tune
changes to the value.
13. EDIT SELECT button
These buttons change the edit page shown on the display. Press while
holding the SHIFT button down to display the page shown below the
buttons.
14. (Randomize) button
This begins randomized editing. Hold down the SHIFT button while
pressing this button to initialize the program.
15. WRITE button
Saves the settings for the edited program. Hold down SHIFT while
pressing this button to revert the settings of the program you are editing
to the saved state.
En-5
Block Diagram
Operator
Operator
Operator
Operator
Operator
Operator Filter
EG2
EG1
Algorithm
LFO 1
Pitch Level EG
Key Track
LFO 2
Operator 1...6 FX1 FX2 FX3
LFO 3
EG3
Motion
Sequencer
Arpeggiator
Note
Sequencer
Note
Keyboard
OUTPUT
Master
Volume
Virtual Patch
Rear panel connections
MIDI IN, OUT connectors OUTPUT
L/MONO,
R jacks
Headphones
Input L
Input R
Mixer, Monitors,
Audio Interface, etc.
Damper pedal,
Pedal switch, etc.
DAMPER jack
Cord hook
(Headphones) jack
(Power) buttton (USB B) port
AC adapter
(included)
USB
Computer
USB cable
MIDI keyboard,
DAW MIDI interface, etc.
MIDI OUT
Sound module,
DAW MIDI interface, etc.
MIDI cable
MIDI IN
MIDI cable
DC 12V jack
MIDI IN, OUT connectors: Use these connectors to connect the opsix SE to
an external MIDI device for exchanging MIDI messages. Make sure that the
MIDI channels are set appropriately.
USB B port: Connect this to a computer to exchange MIDI messages and
data.
Turning the power on/off
Turning the opsix SE On
Make sure that both the opsix SE and any amplification devices such as
powered monitor speakers are turned off, and turn the volume of all devices
all the way down.
1.
Hold down the rear-panel (power) button. Once the “opsix” logo
appears in the display, release the (power) button.
2.
Turn on any amplification devices such as powered monitor speakers,
and then adjust their volume. Adjust the opsix SE’s volume using the
VOLUME knob.
Turning the opsix SE Off
1.
Lower the volume of your powered monitors or other amplification
devices, and turn them off.
2.
Hold down the opsix SE (power) button until the display shows
“Shutting down,” and then release the (power) button.
Auto Power-Off
By default, the opsix SE will automatically turn off after about four hours
have elapsed without use of the front panel, keyboard, or MIDI input. See
the Owner’s Manual (PDF) for details on how to disable this function.
Connecting the AC adapter
1.
Connect the DC plug of the included AC adapter to the DC 12V jack
on the rear panel of the opsix SE.
Be sure to use only the included AC adapter. Using any other AC
adapter may cause malfunctions.
2.
After connecting the DC plug, loop the AC adapter cord onto the Cord
Hook.
Do not use excessive force when pulling the cord off the hook.
Doing so may damage the plug.
3.
Connect the plug of the AC adapter to an AC outlet.
Be sure to use an AC outlet of the correct voltage for your AC
adapter.
Other connections
Connect the opsix SE as appropriate for your audio system.
Be sure that the power on all of your devices is turned off before you
make connections. Leaving the power on when you make connections
may cause malfunctions, or damage your speaker system and other
components.
For the following terminals, use a cable of 3 m or less to prevent
malfunction.
(Headphones) jack, DAMPER jack, USB-B port
OUTPUT L/MONO, R jacks:
Connect these TRS jacks to a mixer, audio
interface, monitor system, etc. Adjust the volume level using the VOLUME knob.
(Headphones) jack: Connect the headphones here. This carries the same
signal as that of OUTPUT L/MONO and R.
DAMPER jack: Connect a Korg DS-1H damper pedal or a PS-1/PS-3 pedal
switch (sold separately) to control the damper function. Pedal polarity is
detected automatically; to allow this, make sure that the pedal is not held
down when connected, or while turning on power.
En-6
Easy program editing
You can edit the main parameters besides those of the operators in the
HOME/ALGO page.
1.
Press the ALGO button [10]
to display the HOME/ALGO
page.
2.
Use the DATA ENTRY A–F
knobs [12] to change the values
for the parameters shown on
the display.
ALGO: Select the algorithm
that determines the structure
for operators 1–6 from the
presets and user algorithm.
ATK: Sets the attack time (how quickly the note starts) for all operators.
DECAY: Sets the decay/release time (how quickly the note fades out)
for all operators.
FX1–3: Although the way this works depends on the effect type that is
set, this mainly changes the depth of the effect.
Randomized editing
This sets the current program’s parameters in the selected scope to random
values. Use this to find new inspiration when you are creating sounds.
1.
Press the button [14] to display the Randomize page.
2.
Select the scope of parameters to randomize. Change the SCOPE
parameter with the DATA ENTRY A knob. PROGRAM is selected by
default, meaning all of the program parameters will be randomized.
3.
Press the YES button [8] to show a confirmation message.
4.
Press the YES button [8] again to randomize.
Detailed editing
You can make detailed edits as follows.
1.
Press the desired PAGE SELECT button [13] between the MODE and
EFFECT buttons to display the corresponding page. To display one of
the secondary pages as shown below the buttons, hold the SHIFT button
[16] down and select the desired page.
2.
Sometimes the left side of the screen will indicate that multiple subpages
are available. You can use the PAGE < and > buttons [7] to cycle
through them.
3.
You can edit the parameters for each operator on the MODE, PITCH
and LEVEL pages. Use the OP SELECT + and − buttons [8] to select the
operator to edit.
4.
Use the DATA ENTRY A–F knobs [12] to change the parameters.
Each page’s editable parameters are shown below:
MODE: Change the operator mode and output waveforms for OP 1–6.
PITCH: Change the pitch of OP 1–6, as well as the pitch modulation
from the LFO/EG.
LEVEL/EG: Set the output levels, EG and key tracking for OP 1–6.
MOD: Configure LFO 1–3 and EG 1–3.
FILTER: Set the overall filter used for OP 1–6.
EFFECT: Used for selecting effect types or making detailed edits to the
effects.
ARP: Configure the arpeggiator.
SEQ: Used for setting how the sequencer operates, and for making
detailed edits to the sequence data.
VOICE: Set whether a sound plays in mono, poly or unison mode.
V.PATCH: Specify the destination and depth of the effect produced by
the LFO, EG and other modulation sources.
MISC: Used for changing other program parameters. You can copy
operators on the OP UTIL page.
GLOBAL: Used for configuring the overall instrument. The settings you
make in this mode are not saved to a program, but instead apply to all
programs. Any changes you make will be saved automatically.
Currently
selected
algorithm
D knob E knob F knob
A knob B knob C knob
Playing the opsix SE
Playing a program
1.
Turn the PROGRAM knob [6] to select a program.
Selected
program name
2.
Play the keyboard to check the sound.
3.
To confirm that this is the program you want to select, press the YES
button [8].
To cancel the selection and return to the previous program, press the
NO button [8].
4.
To change the tonal range of the keyboard, press the OCTAVE button
[7]. This changes the tonal range of the keyboard in one-octave
increments.
5.
Use the PITCH wheel [17] to change the pitch. The MOD wheel [18]
modifies whatever parameter is has been assigned to. It is often used to
change the cutoff frequency or vibrato depth. You can also change
which parameters are controlled by the MOD wheel [18].
Using the analyzer
You can show realtime analysis of the synthesizer’s audio output on the
display [5] by pressing the ANALYZER button [9]. This button switches
between a spectrum analyzer, oscilloscope, and the previously displayed page.
Performing with the arpeggiator
1.
Press the ARPEGGIATOR button [20]. “Arpeggiator Run=On” will
appear in the display.
2.
The pattern set in the program will be used when you play the keyboard.
3.
Press the ARPEGGIATOR button [20] once more to turn off the
arpeggiator. “Arpeggiator Run=Off” will appear on the display.
4.
When you hold down the ARPEGGIATOR button [20], “Arpeggiator
Run=Latch” will appear in the display and the latch function will be
enabled.
The arpeggiator will keep playing, even if you take your hand off the
keyboard.
Hold down the ARPEGGIATOR button [20] once more to disable the
latch function.
Editing the programs
Editing with the operator mixer
In the OPERATOR MIXER section, you can use the RATIO OP 1–6 knobs
[3] to edit the pitch parameters for each operator, and the LEVEL OP 1–6
sliders [4] to edit the output levels.
1.
Turn the PROGRAM knob [6] to select a program to edit.
2.
Move the RATIO OP 1–6 knobs [3] and the LEVEL OP 1–6 sliders [4]
of the OPERATOR MIXER.
The effect will change depending on whether the operator you are
editing is a carrier (the RATIO knob LED will light up red) or a
modulator (the RATIO knob LED will light up blue).
RATIO knob [3]: Changes the pitch of each operator. Mainly the pitch
changes for carriers, and the brightness of the sound or the position of
harmonics changes for the modulators. Raising the pitch of a modulator
will emphasize the sparkling harmonics that are characteristic of FM
tone generators.
LEVEL slider [4]: Change the output level of each operator. The volume
changes for carriers, and the brightness of the sound or the strength of
the harmonics changes for the modulators. When the carrier is in FM
mode and the output level of the modulator is brought way up, you can
get a heavily distorted sound that’s something like a distorted guitar.
En-7
Tip: For details on each parameter and for more information on the
effect parameters, see the Owner’s Manual (PDF).
Saving a program
Save any programs to the opsix SE that you have edited.
Any edits you make will be lost if you turn off the power of the opsix SE or
select a different program before saving the data.
1.
Press the WRITE button [15].
The opsix SE will enter program save standby mode, and the YES and
NO buttons will blink.
2.
Change the program name as necessary.
PROGRAM knob [5]: Changes the character at the cursor position.
SHIFT button [16]: Changes the type of character to input.
PAGE < and > buttons [7]: Moves the cursor. Hold down the SHIFT
button while pressing the PAGE < button to delete the character at the
cursor position. Hold down the SHIFT button while pressing the PAGE
> button to insert a blank space at the cursor position.
DATA ENTRY A–F knob [12]: Turning this knob left or right is the
same as pressing the PAGE < and > buttons in succession.
3.
Press the YES button to confirm the program name.
4.
Turn the PROGRAM knob to select the program location to which will
save your edited sound.
Select a different program if you wish to keep the original program.
Tip: Press the NO button to cancel.
5.
Press the YES button to save the program.
The program will be saved, and the message “Write Completed” will be
shown in the display.
Never turn off the power while a program is being saved. Doing so
may corrupt the internal data.
Using the step sequencer
The opsix SE has a polyphonic sequencer that features up to 16 steps.
Sequence data for the step sequencer can be saved in each program. In
addition to note data, you can also record and play back motion sequences
(these are changes made to the sound using the knobs or sliders on the opsix
SE).
Playback and recording on the step sequencer
Here we will play back the sequence data recorded for each program.
1.
Press the PLAY button [22].
The sequence data recorded for the currently selected program will play.
2.
Press the REC button when you want to record what you play on the
keyboard.
The REC button [23] will light up, and all notes that you play afterwards
will be recorded as sequence data. Press the REC button again to finish
recording.
3.
To stop sequence data playback, press the PLAY button again.
NOTE: Any data you record will be lost if you turn off the power on the
opsix SE or select a different program before saving the data. →
“Saving a program”
Step recording
1.
Press the SEQ STEPS/FAVORITE MODE button [21] to select SEQ
STEPS.
2.
Select a program, and then press the REC button.
The STEP 1 button will blink.
3.
Use the STEP 1–16 buttons [26] to select the steps to input.
The STEP buttons that you select will blink.
4.
Press one or more keys on the keyboard at the same time to record one
or more notes at the current step.
Press one of the STEP 1–16 buttons while holding down a key to record
a tie. The tie will connect the note to the step you pressed.
5.
When the set number of steps have finished recording, step recording
will automatically end (the REC button will go dark).
Press the REC button during recording to stop recording midway.
6.
After you have finished recording, save the program.
If you select another program before saving your edited program, the
sequence data in the newly selected program will be recalled, and the
sequence data you recorded will be lost.
Saving a program will overwrite the sequence data at that program
location.
Other functions
Restoring the opsix SE to factory-set default
settings
To restore the opsix SE to its factory default state, turn on the power while
holding down the SHIFT and WRITE/RECALL buttons. See the Owner’s
Manual (PDF) for details.
Never turn off the power while data is being loaded. Doing so may
corrupt the internal data.
Specifications
Keyboard: 61 keys, Natural Touch keyboard (velocity and release-velocity
sensitive, with aftertouch)
Maximum Polyphony: 80 voices (the maximum number of voices depends
on the settings)
Sound generating system: Altered FM sound generator
Number of programs: 500
Inputs/outputs: Headphone (6.3 mm stereo phone jack), OUTPUT L/
MONO and R (impedance-balanced 6.3 mm TRS phone jacks), DAMPER
(6.3 mm phone jack, half-damper not supported), MIDI IN and OUT
connectors, USB B port
Power supply: AC adapter (DC12V, )
Power consumption: 5 W
Dimensions (W × D × H): 1014 × 344 × 108 mm/39.92" × 13.54" × 4.25"
Weight: 8.6 kg/18.96 lbs.
Included items: AC adapter, Quick Start Guide
Accessories (sold separately): DS-1H damper pedal, PS-1 pedal switch, PS-3
pedal switch
* Specifications and appearance are subject to change without notice for
improvement.
En-8
Operator modes
FM
The pitch of an oscillator can be modulated up and down rapidly using
the audio signal from the modulator to change the tonal character.
RING MOD
The input from the modulator is multiplied with the oscillator signal to
make rapid changes to the oscillator’s volume, which changes the tonal
character.
FILTER
This is a filter with a key tracking function. The signals from the
oscillator and modulator are input into the filter.
FILTER FM
This creates an ultra high-speed wah effect. The cutoff frequency is
modulated using the input from the modulator, and the oscillator signal
is used as audio input for the filter.
WAVE FOLDER
The wave folder circuit generates harmonics by folding the waveform
back after it crosses a fixed threshold. This mode will mix the modulator
and carrier signals together.
EFFECT
In this mode, the operator functions as an effect like delay, comb filter
or distortion. The signal from the oscillator and the input signal from
the modulator are inputted into the effect.
Fr-9
Sommaire
Précautions ................................................................................9
Introduction .............................................................................10
A propos des manuels opsix SE .................................................10
Principales fonctions ...................................................................10
À propos du générateur de son du opsix SE.............................10
Présentation et fonctions des panneaux ...............................11
Schéma de principe .................................................................12
Connexions en face arrière .....................................................12
Connexion de l’adaptateur secteur ............................................ 12
Autres connexions .......................................................................12
Mise sous/hors tension ...........................................................12
Mise sous tension du opsix SE ...................................................12
Mise hors tension du opsix SE ...................................................12
Mise hors tension automatique ..................................................12
Jeu sur le opsix SE ....................................................................13
Jeu d’un programme ....................................................................13
Utilisation de l’analyseur .............................................................13
Jeu avec l’arpégiateur ...................................................................13
Édition des programmes .........................................................13
Édition avec le mélangeur d’opérateurs ....................................13
Facilité d’édition des programmes .............................................13
Édition aléatoire ........................................................................... 13
Édition précise ..............................................................................13
Sauvegarde d’un programme......................................................14
Utilisation du séquenceur pas à pas ......................................14
Lecture et enregistrement avec le séquenceur pas à pas ......... 14
Enregistrement pas à pas .............................................................14
Autres fonctions ......................................................................14
Initialisation des réglages d’usine du opsix SE .........................14
Fiche technique .......................................................................14
Modes d’opérateurs ................................................................15
Guide de prise en main
Précautions
Emplacement
Lutilisation de cet instrument dans les endroits suivants peut en entraîner le
mauvais fonctionnement.
En plein soleil
Endroits très chauds ou très humides
Endroits sales ou fort poussiéreux
Endroits soumis à de fortes vibrations
A proximité de champs magnétiques
Alimentation
Branchez ladaptateur secteur mentionné à une priSEcteur de tension appropriée.
Evitez de brancher ladaptateur à une prise de courant dont la tension ne
correspond pas à celle pour laquelle l’appareil est conçu.
Interférences avec d’autres appareils électriques
Les postes de radio et de télévision situés à proximité peuvent par conséquent
sourir d’interférences à la réception. Veuillez dès lors faire fonctionner cet
appareil à une distance raisonnable de postes de radio et de télévision.
Maniement
Pour éviter de les endommager, manipulez les commandes et les boutons de cet
instrument avec soin.
Entretien
Lorsque l’instrument se salit, nettoyez-le avec un chion propre et sec. Ne vous
servez pas dagents de nettoyage liquides tels que du benzène ou du diluant, voire
des produits inammables.
Conservez ce manuel
Après avoir lu ce manuel, veuillez le conserver soigneusement pour toute
référence ultérieure.
Evitez toute intrusion d’objets ou de liquide
Ne placez jamais de récipient contenant du liquide près de l’instrument. Si le
liquide se renverse ou coule, il risque de provoquer des dommages, un
court-circuit ou une électrocution.
Veillez à ne pas laisser tomber des objets métalliques dans le boîtier (trombones,
par ex.). Si cela se produit, débranchez l’alimentation de la prise de courant et
contactez votre revendeur korg le plus proche ou la surface où vous avez acheté
l’instrument.
Note concernant les dispositions (Seulement EU)
Quand un symbole avec une poubelle barrée d’une croix apparait sur
le produit, le mode d’emploi, les piles ou le pack de piles, cela signie
que ce produit, manuel ou piles doit être déposé chez un
représentant compétent, et non pas dans une poubelle ou toute autre
déchetterie conventionnelle. Disposer de cette manière, de prévenir
les dommages pour la santé humaine et les dommages potentiels
pour l’environnement. La bonne méthode d’élimination dépendra
des lois et règlements applicables dans votre localité, s’il vous plaît,
contactez votre organisme administratif pour plus de détails. Si la pile contient
des métaux lourds au-delà du seuil réglementé, un symbole chimique est
aché en dessous du symbole de la poubelle barrée d’une croix sur la pile ou
le pack de piles.
Fr-10
Gestion des données
Une procédure incorrecte ou un mauvais fonctionnement peut entraîner la perte
du contenu de la mémoire, aussi nous vous recommandons de sauvegarder vos
données importantes sur support de stockage USB ou un autre type de support.
Korg décline toute responsabilité pour tout dommage résultant de la perte de
données.
AVERTISSEMENT DE COPYRIGHT
• Cet appareil professionnel est destiné à lenregistrement de morceaux dont
vous êtes layant droit ou pour lesquels vous avez obtenu la permission de
l’ayant droit. Sachez qu’une telle permission est requise pour tout morceau
que vous comptez utiliser en public, à la radio, à des fins commerciales ou
toute autre activité à but lucratif. L’utilisation de morceaux dont vous ne
détenez pas les droits d’auteur et pour lesquels vous navez reçu aucune
permission de l’ayant droit vous expose à des poursuites judiciaires. Si vous
nêtes pas sûr de vos droits sur une oeuvre, veuillez consulter un avocat
spécialisé.
KORG DECLINE TOUTE RESPONSABILITE POUR QUELQUE
INFRACTION QUE CE SOIT, MEME SI ELLE A ETE COMMISE AVEC
UN PRODUIT KORG.
Les données contenues dans ou accompagnant ce produit ne peuvent pas être
extraites, enregistrées ni sauvegardées sous quelque forme similaire à leur état
original, ni distribuées ou rendues accessibles au public sur internet.
Le contenu de ce produit (comme par exemple les programmes sonores,
données de style, motifs daccompagnement, données MIDI, données
d’échantillon PCM, données audio, système d’exploitation, etc.) sont la
propriété intellectuelle de KORG Inc. ou du matériel soumis au droit dauteur
et utilisé par KORG Inc. sous licence de tiers.
Lutilisation du contenu mentionné ci-dessus afin de produire ou de jouer des
œuvres musicales, ou d’enregistrer et de distribuer de telles œuvres, ne
nécessite pas lautorisation de KORG Inc.
* Tous les noms de produits et de sociétés sont des marques commerciales ou
déposées de leur détenteur respectif.
Introduction
Merci d’avoir choisi le synthétiseur FM modifié opsix SE de Korg. Afin de pouvoir
exploiter au mieux toutes les possibilités offertes par l’instrument, veuillez lire
attentivement ce manuel.
A propos des manuels opsix SE
La documentation pour ce produit comprend ce qui suit:
Guide de prise en main (ce que vous lisez)
Mode d’emploi (fichier PDF téléchargé du site web Korg: www.korg.com)
Principales fonctions
Le synthétiseur opsix SE est doté d’un générateur de son FM produisant des
harmoniques complexes via une modulation rapide des formes d’onde
élémentaires de ses oscillateurs au moyen d’autres oscillateurs.
Outre la synthèse FM, le opsix SE offre aussi plusieurs modes dopérateurs tels
qu’un modulateur en anneau, un plieur d’onde, un effet, etc. Les six opérateurs
peuvent être combinés pour produire un large éventail de sons.
Le mélangeur dopérateurs (doté de curseurs et de commandes) permet de
contrôler directement les paramètres de chaque opérateur. Cet outil utile
permet d’éditer de manière intuitive et dopérer des changements dynamiques
de sons tout en jouant.
Le opsix SE inclut une vaste collection de filtres, notamment les modèles
Polysix et MS-20, soit les outils requis pour produire des sons tels que ceux
générés via la synthèse soustractive.
Trois multi-effets haute définition permettent de choisir chacun parmi 30
types d’effets.
500 programmes peuvent être rappelés et sauvegardés instantanément.
Intègre un puissant séquenceur polyphonique à 16 pas.
Le opsix SE est équipé d’un analyseur de spectre et d’un oscilloscope qui
permettent de visualiser le son.
Le opsix SESE est doté d’un clavier de 61 touches avec aftertouch. La fonction
aftertouch est un effet appliqué quand vous exercez une pression sur une
touche après son enfoncement. Plus la pression est forte, plus l’effet est marqué.
Laftertouch est généralement utilisé pour contrôler le volume, le timbre
(fréquence de coupure) et la sensibilité du LFO.
À propos du générateur de son du opsix SE
Les principes de la synthèse FM ont été
découverts et établis par John Chowning,
professeur à la Stanford University dans les
années 1970, au cours d’expériences sur le
vibrato. La génération de son FM est plus tard
intégrée à une puce LSI et exploitée par Yamaha
Corporation. Dès le début des années 1980, la
synthèse FM est le moteur sonore interne de la
série de synthétiseurs DX de Yamaha, des
ordinateurs de toutes marques, des jeux électro-
niques et des téléphones portables.
• Opérateur (modulateur, porteur)
La génération de son FM (‘Frequency
Modulation’ ou modulation de fréquence)
repose sur des éléments de synthèse appelés
opérateurs. Les opérateurs sont modulés au
moyen de simples formes d’onde d’entrée telles
que des sinusoïdes et produisent des sons aux
harmoniques complexes. Les opérateurs
peuvent faire office de modulateur ou de
porteur. Le signal produit par un modulateur
alimente un autre opérateur et est utilisé pour
la modulation. Les porteurs reçoivent le signal
de sortie de modulateurs et produisent un
résultat modulé sous forme de son.
• Algorithmes
Dans le générateur de son FM, la combinaison
des rôles et des connexions d’un opérateur est
ce quon appelle un “algorithme. Le choix d’un
algorithme est fondamental pour la création
d’un son. Le générateur de son du opsix SE
intègre six opérateurs et une sélection de 40
algorithmes préprogrammés. Vous pouvez en outre mettre la fonction
d’algorithme utilisateur à profit pour créer de nouvelles combinaisons.
• Modes d’opérateur
Bien que le générateur de son FM soit le fondement du opsix SE, vous pouvez
changer de mode d’opérateur pour produire des types de modulations autres que
FM. La combinaison du modulateur en anneau, du filtre, du plieur d’onde
(‘wavefolder’) et de l’effet permet de générer de nouveaux types de sons se
démarquant de léventail de sons FM typiques.
2
1 3
4
5
6
Signal audio produit
Eet de la modulation
des modulateurs sur
les porteurs
Exemple d’algorithme
(algorithme d’usine 1)
Signal du modulateur
Forme d’onde
élémentaire du porteur
Signal du porteur
Porteurs
Modulateurs
Fr-11
Présentation et fonctions des panneaux
9
78
10
11
16. Bouton SHIFT
Ce bouton offre laccès à des fonctions supplémentaires des commandes et
boutons. En outre, la valeur courante de chaque paramètre à l’écran s’affiche
brièvement quand vous enfoncez SHIFT. Appuyez deux fois sur le bouton
SHIFT pour maintenir active la fonction SHIFT. Appuyez à nouveau sur
SHIFT pour annuler le maintien.
17. Molette PITCH
Contrôle la hauteur du son.
18. Molette MODULATION
Cette molette est typiquement utilisée pour contrôler la fréquence de
coupure ou l’intensité du vibrato. Vous pouvez aussi déterminer vous-même
les paramètres contrôlés avec la molette.
19. Boutons OCTAVE
Ces boutons transposent la plage de hauteur assignée au clavier par pas
d’une octave sur une plage de +/−4 octaves.
20. Bouton ARPEGGIATOR
Active/désactive larpégiateur. Maintenez ce bouton enfoncé pour activer/
désactiver la fonction de verrouillage (Latch) de larpégiateur.
21. Bouton SEQUENCER/FAVORITES
Permet de sélectionner la fonction assignée aux boutons STEP 1–16. Quand
SEQUENCER est sélectionné, les boutons font office de boutons de pas pour
le séquenceur pas à pas. Quand FAVORITE est sélectionné, vous pouvez
assigner les programmes qui vous plaisent aux boutons STEP 1–16 et les
rappeler instantanément.
22. Bouton PLAY
Ce bouton lance et arrête la lecture du séquenceur pas à pas. Quand vous
activez la lecture, le séquenceur est toujours initialisé et retourne au premier
pas. Tout en maintenant enfoncé le bouton SHIFT, appuyez sur le bouton
PLAY pour activer le mode de déclenchement via le clavier (‘Key Trigger’).
Pour activer la fonction “Latch” du mode de déclenchement via le clavier,
appliquez une longue pression sur le bouton PLAY tout en enfonçant le
bouton SHIFT.
23. Bouton REC
Active le mode denregistrement du séquenceur pas à pas. Si le séquenceur
est à l’arrêt, ce bouton active lenregistrement pas à pas ; si le séquenceur est
en cours de lecture, il lance l’enregistrement en temps réel.
24. Bouton CLEAR
Quand le séquenceur pas à pas est en cours de lecture et que vous enfoncez
ce bouton, la séquence est étouffée. Pendant un enregistrement en temps
réel, une pression sur ce bouton efface les notes jouées à ce moment. À tout
autre moment, vous pouvez maintenir ce bouton enfoncé et choisir le pas à
effacer avec les boutons STEP 1–16.
25. Bouton DUP.
Pour copier un pas sélectionné dans un autre pas, maintenez ce bouton
enfoncé et sélectionnez le pas de source et le pas de destination pour la copie
avec les boutons STEP 1–16.
26. Boutons STEP 1–16
Si vous enfoncez le bouton SEQUENCER/FAVORITES quand SEQUENCER
est sélectionné, vous pouvez activer/désactiver les pas du séquenceur pas à
pas, éditer la séquence ou choisir les pas affichés.
Quand FAVORITES est sélectionné, les boutons STEP 1–16 permettent de
rappeler les programmes favoris que vous avez mémorisés.
1. Commande VOLUME
Règle le niveau du signal transmis aux prises AUDIO OUTPUT (L/MONO,
R) et à la prise casque.
2. Bouton TAP TEMPO
Pendant la lecture, vous pouvez régler manuellement le tempo en appliquant
plusieurs ‘tapes’ légères et successives à ce bouton au tempo voulu (fonction
‘Tap Tempo’).
3. Commandes RATIO OP 1–6
Ces commandes changent la hauteur de chaque opérateur. Manipulez ces
commandes en maintenant le bouton SHIFT enfoncé pour changer de mode
d’opérateurs.
4. Curseurs LEVEL OP 1–6
Ces curseurs règlent le niveau de sortie de chaque opérateur. Manipulez ces
curseurs en maintenant le bouton SHIFT enfoncé pour changer les formes
d’onde des oscillateurs.
5. Écran
Il affiche diverses informations telles que les données du programme et les
valeurs des paramètres.
6. Commande PROGRAM
Sélectionne le programme.
7. Boutons PAGE < et >
Naviguez dans les pages dédition avec les boutons < et >.
Ces boutons sont actifs quand le guide de page est affiché à l’écran.
8. Boutons OP SELECT +/− et boutons YES/NO
Utilisez ces boutons pour sélectionner loscillateur à éditer. Ils servent aussi à
sélectionner (YES) ou annuler la sélection (NO) des éléments d’une liste, ou
lors de la sauvegarde des programmes.
9. Bouton ANALYZER
Affiche l’analyseur de spectre et l’oscilloscope à l’écran.
10. Bouton (ALGO)
Affiche la page HOME/ALGO.
11. Diodes de sélection d’opérateur
Lopérateur sélectionné sallume quand la page dédition dopérateur (MODE,
PITCH, LEVEL) est affichée.
12. Commandes DATA ENTRY A–F
Ces commandes changent la valeur des paramètres affichés à l’écran. Mainte-
nez enfoncé le bouton SHIFT en tournant une commande pour effectuer un
réglage plus précis de la valeur.
13. Bouton EDIT SELECT
Ces boutons changent la page d’édition affichée à l’écran. Appuyez sur ces
boutons en maintenant enfoncé le bouton SHIFT pour afficher la page
indiquée en dessous des boutons.
14. Bouton (randomisation)
Ce bouton active lédition aléatoire. Maintenez enfoncé le bouton SHIFT en
appuyant sur ce bouton pour initialiser le programme.
15. Bouton WRITE
Sauvegarde les paramètres du programme édité. Maintenez enfoncé le
bouton SHIFT en appuyant sur ce bouton pour restaurer les paramètres
sauvegardés du programme en cours d’édition.
Fr-12
Schéma de principe
Operator
Operator
Operator
Operator
Operator
Operator Filter
EG2
EG1
Algorithm
LFO 1
Pitch Level EG
Key Track
LFO 2
Operator 1...6 FX1 FX2 FX3
LFO 3
EG3
Motion
Sequencer
Arpeggiator
Note
Sequencer
Note
Keyboard
OUTPUT
Master
Volume
Virtual Patch
Connexions en face arrière
MIDI IN, OUT connectors OUTPUT
L/MONO,
R jacks
Headphones
Input L
Input R
Mixer, Monitors,
Audio Interface, etc.
Damper pedal,
Pedal switch, etc.
DAMPER jack
Cord hook
(Headphones) jack
(Power) buttton (USB B) port
AC adapter
(included)
USB
Computer
USB cable
MIDI keyboard,
DAW MIDI interface, etc.
MIDI OUT
Sound module,
DAW MIDI interface, etc.
MIDI cable
MIDI IN
MIDI cable
DC 12V jack
Connexion de ladaptateur secteur
1.
Branchez la fiche CC de ladaptateur secteur fourni à la prise DC 12V en
face arrière du opsix SE.
Utilisez exclusivement ladaptateur secteur fourni. L’utilisation de tout
autre adaptateur peut provoquer des dysfonctionnements.
2.
Après avoir branché la fiche CC, faites une boucle avec le câble de
l’adaptateur secteur autour du crochet.
N’utilisez pas de force excessive lorsque vous décrochez le câble du
crochet. Cela risque de d’endommager la fiche.
3.
Branchez la fiche de ladaptateur à une priSEcteur.
Choisissez une priSEcteur de tension appropriée pour ladaptateur.
Autres connexions
Branchez le opsix SE à votre installation audio.
Veillez à couper lalimentation de tous les dispositifs concernés avant
d’effectuer les connexions. Si lalimentation nest pas coupée lorsque vous
effectuez des connexions, cela risque dendommager les haut-parleurs et
d’autres composants.
Pour les bornes suivantes, utilisez un câble de 3 m maximum afin d‘éviter les
dysfonctionnements.
Prise (casque), prise DAMPER, port USB-B
Prises OUTPUT L/MONO, R: Reliez ces prises TRS à une console de mixage,
une interface audio, un système d’écoute etc. Réglez le volume avec la commande
VOLUME.
Prise (casque): Vous pouvez y brancher un casque. Le signal présent est
identique à celui des prises OUTPUT L/MONO et R.
Prise DAMPER: Branchez une pédale forte Korg DS-1H ou une pédale
commutateur PS-1/PS-3 (vendue séparément) pour piloter la fonction “Damper”.
La polarité de la pédale est détectée automatiquement. Pour cela, veillez à ce que
la pédale ne soit pas enfoncée lors de la connexion ou de la mise sous tension.
Prises MIDI IN, OUT: Utilisez ces prises pour brancher le opsix SE à un
dispositif MIDI externe afin déchanger des messages MIDI. Vérifiez que les
canaux MIDI sont bien réglés.
Prise USB B: Branchez-la à un ordinateur pour échanger des messages MIDI et
des données.
Mise sous/hors tension
Mise sous tension du opsix SE
Vérifiez que le opsix SE et tout dispositif externe d’amplification tel que des
enceintes actives sont hors tension et réglez le volume de tous les appareils sur le
minimum.
1.
Maintenez le bouton dalimentation ( ) situé en face arrière enfoncé.
Quand le logo “opsix SE” apparaît à lécran, relâchez le bouton dalimentation
().
2.
Mettez ensuite les dispositifs d’amplification tels que des enceintes actives
sous tension et réglez leur volume. Réglez le volume du opsix SE avec la
commande VOLUME.
Mise hors tension du opsix SE
1.
Réglez le volume des enceintes actives ou de tout autre dispositif
d’amplification au minimum puis coupez-en l’alimentation.
2.
Maintenez le bouton dalimentation ( ) du opsix SE enfoncé jusqu’à ce que
l’écran affiche “Shutting down” et relâchez le bouton.
Mise hors tension automatique
Par défaut, le opsix SE séteint automatiquement après quatre heures d’inactivité
en façade, sur le clavier et à lentrée MIDI. Pour savoir comment désactiver cette
fonction, voyez le manuel d’utilisation (PDF).
Fr-13
Facilité d’édition des programmes
Vous pouvez éditer les principaux paramètres en plus de ceux des opérateurs à la
page HOME/ALGO.
1.
Appuyez sur le bouton
ALGO [10] pour afficher la
page HOME/ALGO.
2.
Utilisez les commandes DATA
ENTRY A–F [12] pour changer
les valeurs des paramètres
affichés sur l’écran.
ALGO: Sélectionne l’algorithme
déterminant la structure des
opérateurs 1–6 parmi les
algorithmes préprogrammés ou
utilisateur.
ATK: Règle le temps d’attaque (la vitesse à laquelle la note démarre) pour
tous les opérateurs.
DECAY: Règle le temps de chute/d’extinction (la vitesse à laquelle le son de
la note disparaît) pour tous les opérateurs.
FX1–3 : Bien que laction de ces commandes varie selon le type d’effet choisi,
elles changent surtout l’intensité de l’effet.
Édition aléatoire
Cette fonction assigne des valeurs aléatoires à une série de paramètres donnés du
programme actuel. Utilisez cette fonction comme une source d’inspiration neuve
lors de la création de sons.
1.
Appuyez sur le bouton [14] pour afficher la page Randomize.
2.
Sélectionnez la série de paramètres à laquelle l’édition aléatoire est appliquée.
Changez le paramètre SCOPE avec la commande DATA ENTRY A.
PROGRAM est sélectionné par défaut, indiquant que tous les programmes
subissent une édition aléatoire.
3.
Appuyez sur le bouton YES [8] pour afficher un message de confirmation.
4.
Appuyez à nouveau sur le bouton YES [8] pour produire une édition
aléatoire.
Édition précise
Vous pouvez effectuer des changements précis comme suit.
1.
Appuyez sur le bouton PAGE SELECT voulu [13] entre les boutons MODE
et EFFECT pour afficher la page correspondante. Pour afficher une des
pages secondaires comme indiqué en dessous des boutons, maintenez
enfoncé le bouton SHIFT [16] et sélectionnez la page voulue.
2.
Le côté gauche de l’écran indique parfois que plusieurs sous-pages sont
disponibles. Utilisez les boutons PAGE < et > [7] pour passer les pages en
revue.
3.
Vous pouvez modifier les paramètres de chaque opérateur aux pages MODE,
PITCH et LEVEL. Sélectionnez l’opérateur à éditer avec les boutons OP
SELECT + et − [8].
Sélec
tionnez
l’
opérateur à éditer
avec les boutons OP
SELEC
T + et −
4.
Modifiez les paramètres avec les commandes DATA ENTRY A–F [12].
Les paramètres éditables de chaque page sont affichés ci-dessous:
MODE: Change le mode d’opérateur et les formes donde de sortie pour les
opérateurs OP 1–6.
PITCH: Change la hauteur des opérateurs OP 1–6, ainsi que la modulation
de hauteur de l’oscillateur basse fréquence/de l’enveloppe.
LEVEL/EG: Règle les niveaux de sortie, lenveloppe et la fonction de
pondération du clavier pour les opérateurs OP 1–6.
MOD: Configure les oscillateurs basse fréquence LFO 1–3 et lenveloppe EG
1–3.
FILTER: Règle le filtre global utilisé pour les opérateurs OP 1–6.
EFFECT: Permet de sélectionner des types deffets ou deffectuer une édition
détaillée des effets.
ARP: Configure l’arpégiateur.
SEQ: Sert à déterminer le fonctionnement du séquenceur et à éditer en
profondeur les données de la séquence.
VOICE: Détermine si le son est joué en mode mono, poly ou unisson.
V.PATCH: Détermine la destination et l’intensité de leffet produit par le
LFO, l’enveloppe et d’autres sources de modulation.
MISC: Permet de modifier dautres paramètres de programmes. Vous
Algorithme
actuellement
sélectionné Commande D
Commande E
Commande
F
Commande A
Commande B
Commande
C
Jeu sur le opsix SE
Jeu d’un programme
1.
Sélectionnez un programme avec la commande PROGRAM [6].
Nom du
programme
sélec
tionné
2.
Jouez sur le clavier et testez le son du programme.
3.
Pour sélectionner effectivement le programme, appuyez sur le bouton YES
[8].
Pour annuler la sélection et retrouver le programme précédent, appuyez sur
le bouton NO [8].
4.
Pour modifier la plage de hauteur du clavier, appuyez sur le bouton
OCTAVE [7]. Cela permet de changer la tessiture (plage de hauteur) du
clavier par pas d’une octave.
5.
Changez la hauteur avec la molette PITCH [17]. La molette MODULATION
[18] modifie tout paramètre qui lui a été assigné. Elle est typiquement utilisée
pour varier la fréquence de coupure ou l’intensité du vibrato. Vous pouvez
aussi déterminer vous-même les paramètres contrôlés avec la molette
MODULATION [18].
Utilisation de l’analyseur
Vous pouvez afficher une analyse en temps réel du signal audio du synthétiseur
sur l’écran [5] en appuyant sur le bouton ANALYZER [9]. Ce bouton permet
d’alterner entre lanalyseur de spectre, loscilloscope et la page d’écran affichée
précédemment.
Jeu avec l’arpégiateur
1.
Appuyez sur le bouton ARPEGGIATOR [20]. “Arpeggiator Run=On
saffiche sur lécran.
2.
Le motif d’arpège défini dans le programme est produit quand vous jouez sur
le clavier.
3.
Appuyez à nouveau sur le bouton ARPEGGIATOR [20] pour désactiver
l’arpégiateur. “Arpeggiator Run=Off” s’affiche sur l’écran.
4.
Quand vous maintenez enfoncé le bouton ARPEGGIATOR [20],
Arpeggiator Run=
Latch” s’affiche sur l’écran et la fonction de verrouillage (‘Latch’) est alors
active.
Le jeu de l’arpégiateur continue même après le relâchement des touches du
clavier.
Maintenez à nouveau le bouton ARPEGGIATOR [20] enfoncé pour
désactiver la fonction Latch.
Édition des programmes
Édition avec le mélangeur dopérateurs
Dans la section OPERATOR MIXER, les commandes RATIO OP 1–6 [3] servent
à éditer les paramètres de hauteur (RATIO) pour chaque opérateur, et les
curseurs LEVEL OP 1–6 [4] à éditer les niveaux de sortie.
1.
Sélectionnez un programme à éditer avec la commande PROGRAM [6].
2.
Manipulez les commandes RATIO OP 1–6 [3] et les curseurs LEVEL OP
1–6 [4] de la section OPERATOR MIXER.
Leffet de vos manipulations varie selon que lopérateur édité est un porteur
(la diode de la commande RATIO sallume en rouge) ou un modulateur (la
diode de la commande RATIO sallume en bleu).
Commande RATIO [3]: Change la hauteur de chaque opérateur. C’est
surtout la hauteur qui varie pour les porteurs, tandis que dans le cas des
modulateurs, cest la brillance du son ou la position des harmoniques. En
augmentant la hauteur d’un modulateur, vous accentuez les harmoniques
scintillantes typiques des générateurs de son FM.
Curseur LEVEL [4]: Règle le niveau de sortie de chaque opérateur. Le
volume varie pour les porteurs, tandis que dans le cas des modulateurs, cest
la brillance du son ou l’intensité des harmoniques. Quand le porteur est en
mode FM et que le niveau de sortie du modulateur est généreusement relevé,
cela permet d’obtenir un son fortement saturé qui rappelle le son d’une
guitare saturée.
Fr-14
pouvez copier les opérateurs à la page OP UTIL.
GLOBAL: Sert à configurer le fonctionnement général de l’instrument. Les
réglages effectués dans ce mode ne sont pas mémorisés dans un programme,
mais sappliquent à tous les programmes. Tout changement que vous
effectuez est automatiquement sauvegardé.
Astuce: Pour des détails sur chaque paramètre et plus d’informations sur les
paramètres deffet, voyez le manuel d’utilisation (PDF).
Sauvegarde d’un programme
Sauvegarde dans la mémoire du opsix SE tout programme que vous avez édité.
Tous les changements que vous effectuez sont perdus si vous mettez le opsix SE
hors tension ou choisissez un autre programme sans sauvegarder au préalable les
données.
1.
Appuyez sur le bouton WRITE [15].
Le opsix SE active son mode prêt à sauvegarder et ses boutons YES et NO se
mettent à clignoter.
2.
Changez le nom du programme comme bon vous semble.
Commande PROGRAM [5]: Permet de changer le caractère à lemplace-
ment du curseur.
Bouton SHIFT [16]: Permet de changer le type de caractère à saisir.
Boutons PAGE < et > [7]: Déplacent le curseur. Maintenez le bouton SHIFT
enfoncé tout en appuyant sur le bouton PAGE < pour effacer le caractère à
l’emplacement du curseur. Maintenez le bouton SHIFT enfoncé tout en
appuyant sur le bouton PAGE > pour insérer un espace à lemplacement du
curseur.
Commande DATA ENTRY A–F [12]: Tourner cette commande à gauche ou
à droite revient à enfoncer plusieurs fois successivement les boutons PAGE <
et >.
3.
Appuyez sur le bouton YES pour confirmer le nom du programme.
4.
Choisissez la mémoire de programme où sauvegarder de votre son
perso(édité) avec la commande PROGRAM.
Sélectionnez un programme différent si vous souhaitez conserver le
programme original.
Astuce: Appuyez sur le bouton NO pour annuler.
5.
Appuyez sur le bouton YES pour sauvegarder le programme.
Le programme est sauvegardé et le message “Write Completed” saffiche sur
l’écran.
Ne mettez jamais l’instrument hors tension pendant la sauvegarde d’un
programme. Cela risquerait de rendre les données internes inutilisables.
Utilisation du séquenceur pas à pas
Le opsix SE est doté d’un séquenceur polyphonique comprenant jusqu’à 16 pas.
Les données de séquence du séquenceur pas à pas sont sauvegardées dans chaque
programme. Outre les données de note, vous pouvez enregistrer et lire des
séquences de manipulations (ce que nous appelons ‘Motion Sequence, à savoir
les changements sonores produits avec les commandes et curseurs du opsix SE).
Lecture et enregistrement avec le séquenceur
pas à pas
Voyons comment lire les données de la séquence enregistrée sous chaque
programme.
1.
Appuyez sur le bouton PLAY [22].
Les données de séquence enregistrées sous le programme actuellement
sélectionné sont reproduites.
2.
Appuyez sur le bouton REC pour enregistrer votre jeu sur le clavier.
Le bouton REC [23] sallume et toutes les notes que vous jouez à partir de cet
instant sont enregistrées sous forme de données de séquence. Appuyez à
nouveau sur le bouton REC pour terminer lenregistrement.
3.
Pour arrêter la lecture des donnés de la séquence, appuyez à nouveau sur le
bouton PLAY.
REMARQUE: Toutes les données enregistrées sont perdues si vous mettez
le opsix SE hors tension ou choisissez un autre programme
sans sauvegarder au préalable les données.→ “Sauvegarde
d’un programme”
Enregistrement pas à pas
1.
Appuyez sur le bouton SEQUENCER/FAVORITES MODE [21] pour
sélectionner SEQUENCER.
2.
Sélectionnez un programme puis appuyez sur le bouton REC.
Le bouton STEP 1 clignote alors.
3.
Sélectionnez les pas à entrer avec les boutons STEP 1–16 [26].
Les boutons STEP enfoncés clignotent alors.
4.
Enfoncez alors une ou plusieurs touches du clavier pour enregistrer une ou
plusieurs notes sous le pas courant.
Appuyez sur un des boutons STEP 1–16 tout en maintenant une touche
enfoncée pour enregistrer une liaison. La liaison relie la note au pas
correspondant au bouton enfoncé.
5.
Quand l’enregistrement du nombre défini de pas est terminé, lenregistre-
ment pas à pas est automatiquement désactivé (le bouton REC séteint).
Appuyez sur le bouton REC pendant l’enregistrement pour arrêter
l’enregistrement.
6.
Quand l’enregistrement est terminé, sauvegardez le programme.
Si vous sélectionnez un autre programme avant davoir sauvegardé le
programme en cours d’édition, les données de séquence du programme
fraîchement sélectionné sont rappelées et vous perdez alors les données de
séquence enregistrées.
La sauvegarde d’un programme écrase les données de séquence
contenues dans la mémoire du programme en question.
Autres fonctions
Initialisation des réglages d’usine du opsix SE
Pour rétablir les réglages d’usine du opsix SE, mettez l’instrument sous tension
maintenant les boutons SHIFT et WRITE/RECALL enfoncés. Pour des détails,
voyez le manuel d’utilisation (PDF).
Ne mettez jamais l’instrument hors tension pendant le chargement de
données. Cela risquerait de rendre les données internes inutilisables.
Fiche technique
Clavier: 61 touches, toucher naturel (sensible à la dynamique de jeu et à celle du
relâchement des touches, avec aftertouch)
Polyphonie maximum: 80 voix (le nombre limite de voix varie en fonction des
réglages)
Système de génération de son: Altered FM sound generator
Nombre de programmes: 500
Entrées et sorties
: Casque (prise jack stéréo 6,3 mm), OUTPUT L/MONO et R
(prises symétriques TRS 6,3 mm), DAMPER (prise jack 6,3 mm, pédale
progressive pas prise en charge), Prises MIDI IN et OUT, Prise USB B
Alimentation: Adaptateur secteur (DC12V, )
Consommation électrique: 5 W
Dimensions (L × P × H): 1014 × 344 × 108 mm
Poids: 8,6 kg
Accessoires fournis: Adaptateur secteur, Guide de prise en main
Accessoires (vendue séparément): Pédale forte (Damper) DS-1H, Pédale
commutateur PS-1, Pédale commutateur PS-3
* Les caractéristiques et laspect du produit sont susceptibles dêtre modifiés sans
avis préalable.
Fr-15
Modes d’opérateurs
FM
La hauteur d’un oscillateur peut être rapidement modulée vers le haut et vers
le bas via le signal audio du modulateur pour changer le caractère du son.
RING MOD (modulateur en anneau)
Le signal du modulateur est multiplié avec le signal de l’oscillateur pour
produire des changements rapides au volume de loscillateur et ainsi changer
le timbre.
FILTER (Filtre)
Il sagit d’un filtre équipé d’une fonction de pondération du clavier (‘key
track’). Les signaux de loscillateur et du modulateur sont transmis au filtre.
FILTER FM (filtre FM)
Cela génère un effet wah ultra-rapide. La fréquence de coupure est modulée
via le signal reçu du modulateur et le signal de loscillateur sert de signal
audio alimentant le filtre.
WAVE FOLDER (plieur d’onde)
Le circuit de plieur donde produit des harmoniques en inversant la forme
d’onde du signal de l’oscillateur à un seuil fixe.
EFFECT
Dans ce mode, lopérateur fait office d’effet, comme par exemple delay, filtre
en peigne ou distorsion. Le signal de l’oscillateur et le signal dentrée du
modulateur sont transmis à leffet.
De-16
Inhalt
Vorsichtsmaßnahmen .............................................................16
Vorweg .....................................................................................17
Über die opsix SE-Anleitungen ..................................................17
Die wichtigsten Funktionen .......................................................17
Über den Klangerzeuger des opsix SE .......................................17
Bedienfeld: Beschreibung und Funktionen ..........................18
Blockschaltbild ........................................................................19
Anschlüsse auf Rückseite ........................................................19
Anschließen des Netzteils ........................................................... 19
Andere Anschlüsse.......................................................................19
Ein-/Ausschalten ......................................................................19
Einschalten des opsix SE ............................................................. 19
Ausschalten des opsix SE ............................................................ 19
Energiesparfunktion .................................................................... 19
Spielen auf dem opsix SE ........................................................20
Ein Programm abspielen .............................................................20
Verwendung des Analyzers ........................................................ 20
Mit dem Arpeggiator spielen ......................................................20
Die Programme bearbeiten ....................................................20
Bearbeiten mit dem Operator-Mixer ........................................ 20
Einfache Programmbearbeitung ................................................20
Randomisierte Bearbeitung ........................................................ 20
Detaillierte Bearbeitung ..............................................................20
Speichern eines Programms ....................................................... 21
Verwenden des Schrittsequenzers ........................................21
Wiedergabe und Aufnahme mit dem Schrittsequenzer ......... 21
Schrittaufnahme ...........................................................................21
Weitere Funktionen.................................................................21
Rücksetzen des opsix SE auf die Werkseinstellungen .............21
Technische Daten ....................................................................21
Operator-Modi .........................................................................22
Blitzstart
Vorsichtsmaßnahmen
Aufstellungsort
Vermeiden Sie das Aufstellen des Geräts an Orten, an denen.
es direkter Sonneneinstrahlung ausgesetzt ist;
hohe Feuchtigkeit oder Extremtemperaturen aureten können;
Staub oder Schmutz in großen Mengen vorhanden sind;
das Gerät Erschütterungen ausgesetzt sein kann.
in der Nähe eines Magnetfeldes.
Stromversorgung
Schließen Sie das optionale Netzteil nur an eine geeignete Steckdose an.
Verbinden Sie es niemals mit einer Steckdose einer anderen Spannung.
Störeinflüsse auf andere Elektrogeräte
Dieser kann bei in der Nähe aufgestellten Rundfunkempfänger oder
Fernsehgeräten Empfangsstörungen hervorrufen. Betreiben Sie solche Geräte
nur in einem geeigneten Abstand von diesem Erzeugnis.
Bedienung
Vermeiden Sie bei der Bedienung von Schaltern und Reglern unangemessenen
Kraaufwand.
Reinigung
Bei auretender Verschmutzung können Sie das Gehäuse mit einem trockenen,
sauberen Tuch abwischen. Verwenden Sie keinerlei Flüssigreiniger wie
beispielsweise Reinigungsbenzin, Verdünner oder Spülmittel. Verwenden Sie
niemals brennbare Reiniger.
Bedienungsanleitung
Bewahren Sie diese Bedienungsanleitung gut auf, falls Sie sie später noch einmal
benötigen.
Flüssigkeiten und Fremdkörper
Stellen Sie niemals Behältnisse mit Flüssigkeiten in der Nähe des Geräts auf.
Wenn Flüssigkeit in das Gerät gelangt, können Beschädigung des Geräts, Feuer
oder ein elektrischer Schlag die Folge sein.
Beachten Sie, dass keinerlei Fremdkörper in das Gerät gelangen. Sollte ein
Fremdkörper in das Gerät gelangt sein, so trennen Sie es sofort vom Netz.
Wenden Sie sich dann an Ihren Korg-Fachhändler.
Hinweis zur Entsorgung (Nur EU)
Wenn Sie das Symbol mit der „durchgekreuzten Mülltonne“ auf Ihrem
Produkt, der dazugehörigen Bedienungsanleitung, der Batterie oder
dem Batteriefach sehen, müssen Sie das Produkt in der vorgeschriebe-
nen Art und Weise entsorgen. Dies bedeutet, dass dieses Produkt mit
elektrischen und elektronischen Komponenten nicht mit dem norma-
len Hausmüll entsorgt werden darf. Für Produkte dieser Art existiert
ein separates, gesetzlich festgelegtes Entsorgungssystem. Gebrauchte
elektrische und elektronische Geräte müssen separat entsorgt werden,
um ein umweltgerechtes Recycling sicherzustellen. Diese Produkte müssen bei
benannten Sammelstellen abgegeben werden. Die Entsorgung ist für den End-
verbraucher kostenfrei! Bitte erkundigen sie sich bei ihrer zuständigen Behörde,
wo sie diese Produkte zur fachgerechten Entsorgung abgeben können. Falls ihr
Produkt mit Batterien oder Akkumulatoren ausgerüstet ist, müssen sie diese vor
Abgabe des Produktes entfernen und separat entsorgen (siehe oben). Die Abgabe
dieses Produktes bei einer zuständigen Stelle hil ihnen, dass das Produkt umwelt-
gerecht entsorgt wird. Damit leisten sie persönlich einen nicht unerheblichen
Beitrag zum Schutz der Umwelt und der menschlichen Gesundheit vor möglichen
negativen Eekten durch unsachgemäße Entsorgung von Müll. Batterien oder
Akkus, die Schadstoe enthalten, sind auch mit dem Symbol einer durchgekreuz-
ten Mülltonne gekennzeichnet. In der Nähe zum Mülltonnensymbol bendet
sich die chemische Bezeichnung des Schadstoes.
Cd oder NiCd steht für Cadmium, Pb für Blei und Hg für Quecksilber.
De-17
Handhabung von Daten
Bei falschen oder unsachgemäßen Bedienvorgängen könnte der interne
Speicherinhalt gelöscht werden. Daher raten wir, wichtige Daten auch immer
auf einem USB-Datenträger o.ä. Datenträger zu archivieren. Korg haet nicht
für Schäden, die sich aus dem Verlust irgendwelcher Daten ergeben.
COPYRIGHT-HINWEIS
Dieses professionelle Gerät ist ausschließlich für die Verund Bearbeitung
von Werken gedacht, deren Urheberrecht bei Ihnen liegt bzw. wofür Sie
eine Genehmigung beim Rechteinhaber eingeholt haben. Das gilt für die
öentliche Auührung, Aufnahme, Ausstrahlungen, den Verkauf, die
Duplizierung sowie alle Handlungen, die nicht als „gebilligte Verwen-
dung“ gelten. Wenn Sie nicht der Urheber sind, keine Verwendungsge-
nehmigung haben und ein Werk trotzdem für kommerzielle Zwecke
nutzen, machen Sie sich straar. Wenden Sie sich im Zweifelsfall an
einen Fachanwalt für Urheberrecht.
KORG HAFTET NICHT FÜR URHEBERRECHTSVERLETZUNGEN,
DIE AUF DER VERWENDUNG VON KORG-GERÄTEN BERUHEN.
Die in diesem Produkt enthaltenen oder mitgelieferten Inhalte dürfen
weder kopiert, noch aufgezeichnet oder in einer dem Originalzustand
ähnlichen Form gespeichert und an Dritte weitergegeben bzw. im
Internet öentlich zugänglich gemacht werden.
Die Inhalte dieses Produkts (wie Sound-Programme, Stil-Daten,
Rhythmusbegleitungsmuster, MIDI-Daten, PCM-Sampledaten,
Audiodaten, Betriebssystem usw.) sind urheberrechtlich geschütztes
Eigentum von KORG Inc. oder urheberrechtlich geschütztes Material
Dritter, für das KORG Inc. eine Lizenz erworben hat.
Sie benötigen keine Erlaubnis von KORG Inc., mithilfe der oben
genannten Inhalte Werke zu produzieren, aufzuführen, aufzunehmen
oder zu vertreiben.
* Alle Firmen- und Produktnamen usw. sind Warenzeichen oder
eingetragene Warenzeichen der betreenden Eigentümer.
Vorweg
Vielen Dank, dass Sie sich für einen Korg opsix SE altered FM synthesizer
entschieden haben. Bitte lesen Sie sich diese Anleitung vollständig durch, um bei
der Bedienung alles richtig zu machen.
Über die opsix SE-Anleitungen
Die Dokumentation für dieses Produkt umfasst folgende Dinge:
Blitzstart (dieses Dokument)
Bedienungsanleitung (PDF, das von der Korg-Website heruntergeladen
werden kann: www.korg.com)
Die wichtigsten Funktionen
Der opsix SE verfügt über einen FM-Klangerzeuger, der durch rapide
Modulation der gundlegenden Wellenformen seiner Oszillatoren mithilfe
anderer Oszillatoren komplexe Obertöne erzeugt.
Neben der FM-Synthese bietet der opsix SE auch verschiedene Operatoren-
Modi wie einen Ringmodulator, ein Wellenfaltungsmodul (Wave Folder),
diverse Effekte usw. Die sechs Operatoren können kombiniert werden, um
eine große Vielfalt an Sounds zu erzeugen.
Sie können den Operator-Mixer (mit Schiebereglern und Reglern) verwenden,
um die Parameter jedes der Operatoren direkt zu steuern. Dies ist nützlich für
die intuitive Bearbeitung und das Vornehmen dynamischer Klangänderungen
während des Spielens.
Der opsix SE enthält eine umfangreiche Auswahl an Filtern, darunter
Polysix- und MS-20-Modelle, die die Grundlagen für die Erzeugung von
Klängen abdecken, wie sie durch subtraktive Synthese erzeugt werden.
Es stehen drei hochauflösende Multi-Effekte zur Verfügung und für jeden von
diesen können Sie aus 30 verschiedenen Typen auswählen.
500 Programme können sofort aufgerufen und gespeichert werden.
Leistungsstarker 16-stufiger polyphoner Sequenzer.
Der opsix SE verfügt über einen Spektrumanalysator und ein Oszilloskop, mit
dem Sie Ihren Sound visualisieren können.
Der opsix SE hat eine 61-Tasten-Tastatur mit Aftertouch. Mit Aftertouch wird
der Effekt bezeichnet, der auf den Druck reagiert, den Sie beim Spielen auf
eine Taste der Tastatur ausüben. Je fester Sie die Taste drücken, desto stärker
der Effekt. Aftertouch dient üblicherweise zur Kontrolle der Lautstärke, des
Klangs (Cutoff-Frequenz) und der Empfindlichkeit des LFO.
Über den Klangerzeuger des opsix SE
Die Prinzipien der FM-Klangerzeugung wurden
in den 1970er Jahren von Dr. John Chowning
an der Stanford University entdeckt und
etabliert, als er mit Vibrato experimentierte. Die
FM-Klangerzeugung wurde später in einen
LSI-Chip verpackt und von Yamaha
Corporation in die Praxis umgesetzt. Ab Anfang
der 1980er Jahre wurde die FM-Tonerzeugung
als interne Tonquelle für die Yamaha DX-Serie
verwendet, sowie für Computer aller Hersteller,
für Spielautomaten und Mobiltelefone.
• Operator (Modulator, Träger)
Der FM-Klangerzeuger (Frequency Modulation)
basiert auf Syntheseelementen, die als
„Operatoren“ bezeichnet werden. Operatoren
werden mithilfe einfacher Eingangswellenfor-
men wie Sinuswellen moduliert, und geben
Klänge mit komplexen Obertöne aus.
Operatoren können entweder als Modulatoren
oder als Träger fungieren. Der von einem Modu-
lator ausgegebene Ton wird in einen anderen
Operator eingespeist und zur Modulation
verwendet. Träger empfangen den Ausgangston
von Modulatoren und geben das modulierte
Ergebnis als Audio aus.
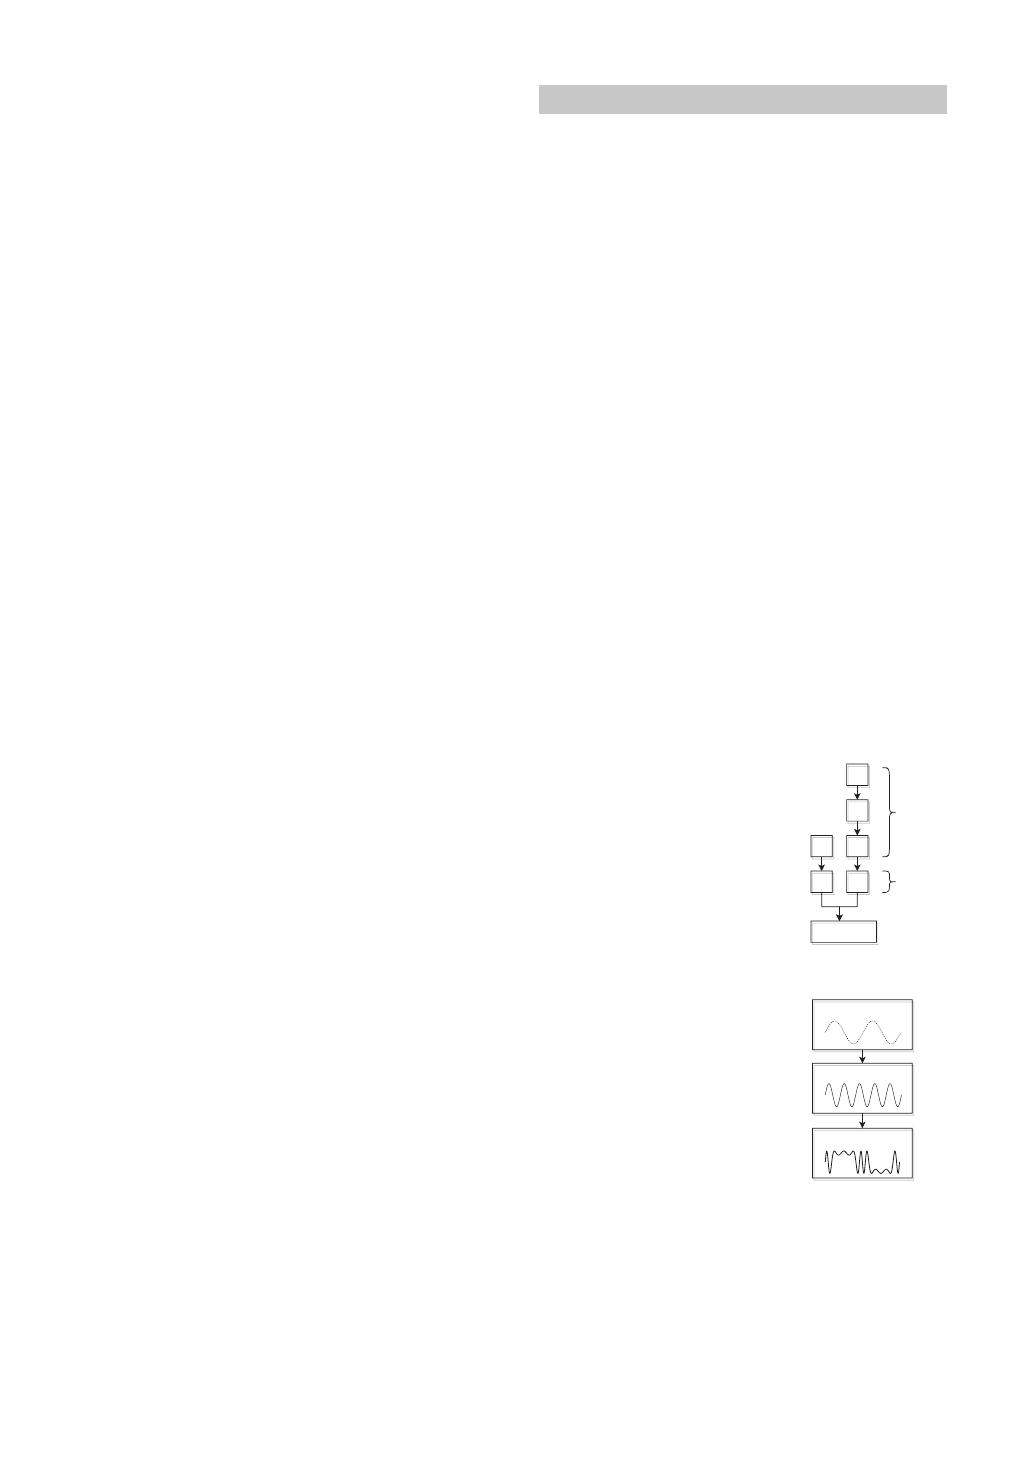
• Algorithmen
Im FM-Soundgenerator wird die Kombination
der Rollen und Verbindungen eines Operators
als “Algorithmus” bezeichnet. Die Auswahl
eines Algorithmus ist die Grundlage für die Erstellung eines Sounds. Der opsix
SE-Soundgenerator enthält sechs Operatoren und stellt 40 voreingestellte
Algorithmen zur Verfügung. Mit der Benutzeralgorithmusfunktion können Sie
auch neue Kombinationen erstellen.
• Operatoren-Modi
Obwohl die Basis des opsix SE der FM-Soundgenerator ist, können Sie den
Operatoren-Modus ändern, um neben FM auch andere Modulationsarten
durchzuführen. Die Kombination aus Ringmodulator, Filter, Wellenfaltungsmo-
dul und Effekten ermöglicht es, neue Arten von Sounds zu erstellen, die über das
Spektrum typischer FM-Sounds hinausgehen.
2
1 3
4
5
6
Audio-Ausgang
Was geschieht,
wenn Modulatoren die
Träger moduliere
Beispiel für einen Algorithmus
(voreingestellter Algorithmus 1)
Modulator-Ausgang
Grundlegende Form
des Trägersignals
Träger-Ausgang
Träger
Modulatoren
De-18
Bedienfeld: Beschreibung und Funktionen
12 3,4 6
9
51213141516
17 18
78
10
11
19 20 21 22 23 2524 26
16. SHIFT-Taste
Diese Taste ruft die Zusatzfunktionen von Reglern und Tasten auf.
Außerdem wird nach Drücken von SHIFT kurzzeitig der aktuelle Wert
jedes Parameters im Display angezeigt. Mit einem Doppelklick auf die
SHIFT-Taste wird der SHIFT-Zustand beibehalten. Durch erneutes
Drücken der SHIFT-Taste beenden Sie diesen Zustand wieder.
17. PITCH-Rad
Steuert die Tonhöhe des Klangs.
18. MODULATION-Rad
Das Modulationsrad wird hauptsächlich zur Steuerung von Cutoff-Fre-
quenz oder Vibratotiefe verwendet. Sie können auch ändern, welche
Parameter mit dem Rad gesteuert werden.
19. OCTAVE-Tasten
Zum Verschieben des der Tastatur zugewiesenen Tonumfangs in
Oktavschritten nach oben oder unten über einen Bereich von vier Oktaven.
20. ARPEGGIATOR-Taste
Schaltet den Arpeggiator ein/aus. Halten Sie die Taste gedrückt, um die
Latch-Funktion des Arpeggiators ein-/auszuschalten.
21. SEQUENCER/FAVORITES-Taste
Zur Auswahl der den STEP-Tasten 1–16 zugewiesenen Funktion. Ist
SEQUENCER ausgewählt, dienen diese Tasten als Schritt-Tasten für den
Schrittsequenzer. Ist FAVORITE ausgewählt, können Sie den STEP-Tasten
1–16 beliebige Programme zum Sofortaufruf zuweisen.
22. PLAY-Taste
Diese Taste startet und stoppt die Wiedergabe des Schrittsequenzers. Beim
Umschalten auf Wiedergabe wird der Sequenzer immer auf den ersten
Schritt zurückgesetzt. Drücken Sie bei gedrückter SHIFT-Taste die
PLAY-Taste, um den Key-Trigger-Modus aufzurufen. Um den Key-Trig-
ger-Modus auf „latch“ zu setzen, halten Sie die SHIFT-Taste gedrückt und
drücken Sie die PLAY-Taste länger.
23. REC-Taste
Ruft den Aufnahmemodus des Schrittsequenzers auf. Bei gestopptem
Sequenzer beginnt damit die Schrittaufnahme, bei der Sequenzerwiedergabe
die Echtzeitaufnahme.
24. CLEAR-Taste
Während der Schrittsequenzerwiedergabe wird die Sequenz stummgeschal-
tet, solange diese Taste gedrückt wird. Drücken Sie diese Taste während der
Echtzeitaufnahme, werden die in dieser Zeit wiedergegebenen Noten
gelöscht. Ansonsten können Sie jederzeit diese Taste gedrückt halten und
mit den STEP-Tasten 1–16 einen Schritt löschen.
25. DUP.-Taste
Um einen gewählten Schritt in einen anderen Schritt zu kopieren, halten Sie
diese Taste gedrückt und wählen Sie mit den STEP-Tasten 1–16 Quell- und
Zielschritt aus.
26. STEP-Tasten 1–16
Ist SEQUENCER ausgewählt, können Sie mit der SEQUENCER/
FAVORITES-Taste Schritte im Schrittsequenzer ein-/ausschalten,
Sequenzdaten bearbeiten oder die angezeigten Schritte auswählen.
Ist FAVORITES ausgewählt, können Sie mit den STEP-Tasten 1–16 die
zuvor registrierten Programme aufrufen.
1. VOLUME-Regler
Regelt die Lautstärke der AUDIO OUTPUT-Buchsen (L/MONO, R) und
der Kopfhörerbuchse.
2. TAP TEMPO-Taste
Während der Wiedergabe können Sie manuell ein Tempo eingeben, indem
Sie diese Taste einige Male im gewünschten Tempo (Tao-Tempo) antippen.
3. RATIO OP 1–6 Regler
Diese Regler ändern die Tonhöhe des jeweiligen Operators. Um die
Operator-Modi zu ändern, bedienen Sie diese Regler bei gedrückter
SHIFT-Taste.
4. LEVEL OP 1–6 Schieberegler
Diese Schieberegler ändern den Ausgangspegel des jeweiligen Operators.
Um die Operator-Modi zu ändern, bedienen Sie diese Schieberegler bei
gedrückter SHIFT-Taste.
5. Display
Zeigt diverse Informationen wie Programmdaten und Parameterwerte an.
6. PROGRAM-Regler
Zur Auswahl eines Programms.
7. PAGE-Tasten < und >
Mit den Tasten < und > schalten Sie zwischen Bearbeitungsseiten um.
Diese sind aktiviert, wenn im Display die Seitenübersicht erscheint.
8. OP SELECT-Tasten +/− und YES/NO
Mit diesen Tastern wählen Sie den Oszillator den Sie bearbeiten möchten.
Sie dienen auch zur Bestätigung (YES) oder zum Abbruch (NO) bei der
Auswahl von Punkten einer Liste oder beim Speichern von Programmen.
9. ANALYZER-Taste
Schaltet das Display auf den Spektrumanalysator und das Oszilloskop um.
10. (ALGO)-Taste
Ruft die Seite HOME/ALGO auf.
11. Operator Select-LEDs
Bei aufgerufener Seite zur Bearbeitung der Operatoren (MODE, PITCH,
LEVEL) leuchtet die LED des gewählten Operators.
12. DATA ENTRY-Regler A–F
Diese Regler ändern die im Display angezeigten Parameterwerte. Wenn Sie
beim Drehen eines Reglers die SHIFT-Taste gedrückt halten, können Sie
den Wert feiner einstellen.
13. EDIT SELECT-Tasten
Diese Tasten rufen die ihnen zugewiesene Bearbeitungsseite im Display auf.
Halten Sie gleichzeitig die SHIFT-Taste gedrückt, wird die unterhalb der
Tasten genannte Seite aufgerufen.
14. (Randomize)-Taste
Hiermit beginnt die zufällige Bearbeitung. Halten Sie beim Drücken dieser
Taste die SHIFT-Taste gedrückt, um das Programm zurückzusetzen.
15. WRITE-Taste
Speichert die Einstellungen des bearbeiteten Programms. Halten Sie beim
Drücken dieser Taste die SHIFT-Taste gedrückt, um die Einstellungen des
bearbeiteten Programms auf den zuletzt gespeicherten Zustand
zurückzusetzen.
De-19
Blockschaltbild
Operator
Operator
Operator
Operator
Operator
Operator Filter
EG2
EG1
Algorithm
LFO 1
Pitch Level EG
Key Track
LFO 2
Operator 1...6 FX1 FX2 FX3
LFO 3
EG3
Motion
Sequencer
Arpeggiator
Note
Sequencer
Note
Keyboard
OUTPUT
Master
Volume
Virtual Patch
Anschlüsse auf Rückseite
MIDI IN, OUT connectors OUTPUT
L/MONO,
R jacks
Headphones
Input L
Input R
Mixer, Monitors,
Audio Interface, etc.
Damper pedal,
Pedal switch, etc.
DAMPER jack
Cord hook
(Headphones) jack
(Power) buttton (USB B) port
AC adapter
(included)
USB
Computer
USB cable
MIDI keyboard,
DAW MIDI interface, etc.
MIDI OUT
Sound module,
DAW MIDI interface, etc.
MIDI cable
MIDI IN
MIDI cable
DC 12V jack
Anschließen des Netzteils
1.
Schließen Sie den kleinen Stecker des AC-Netzteils an die DC 12V-Buchse
auf der Rückseite des opsix SE an.
Verwenden Sie unbedingt das beiliegende AC-Netzteil. Die
Verwendung anderer Netzteile könnte zu Schäden führen.
2.
Wickeln Sie das Netzteilkabel nach Anschließen des Steckers um den Kabel-
haken.
Ziehen Sie das Kabel nie mit Gewalt vom Haken.
Sonst könnte der Stecker beschädigt werden.
3.
Verbinden Sie das Netzteil mit einer Steckdose.
Wählen Sie immer eine Steckdose mit einer für das Netzteil geeigneten
Spannung.
Andere Anschlüsse
Schließen Sie den opsix SE an die geeigneten Buchsen des Verstärkersystems an.
Schalten Sie alle Geräte aus, bevor Sie die Verbindungen herstellen. Das
Anschließen von eingeschalteten Geräten kann zu Funktionsstörungen und
Schäden an den Lautsprechern oder anderen Komponenten führen.
Verwenden Sie für folgende Anschlüsse Kabel bis maximal 3 m Länge, sonst
kann es zu Fehlfunktionen kommen.
(Kopfhörer)-Buchse, DAMPER-Buchse, USB-B-Port
OUTPUT L/MONO-, R-Buchsen: Verbinden Sie diese TRS-Buchsen mit einem
Mischpult, einer Audioschnittstelle, einem Abhörsystem usw. Stellen Sie die
Lautstärke mit dem VOLUME-Regler ein.
(Kopfhörer)-Buchse: Hier kann ein Kopfhörer angeschlossen werden. Das
hier anliegende Signal ist mit dem von OUTPUT L/MONO und R identisch.
DAMPER-Buchse: Schließen Sie ein Korg DS-1H Dämpferpedal oder einen
PS-1/PS-3 Fußtaster (Sonderzubehör) an, um die Dämpferfunktion anzusteuern.
Die Polarität des Pedals wird automatisch erkannt. Das funktioniert aber nur,
wenn das Pedal beim Anschließen oder Einschalten des Instruments nicht
gedrückt ist.
MIDI IN-, OUT-Buchse: Über diese Buchsen sendet bzw. empfängt der opsix
SE MIDI-Befehle zu/von externen MIDI-Geräten. Denken Sie daran, die
richtigen Kanalnummern zu wählen.
USB B-Port: Verbinden Sie ihn mit Ihrem Computer, um MIDI-Befehle und
Daten auszutauschen.
Ein-/Ausschalten
Einschalten des opsix SE
Überzeugen Sie sich davon, dass sowohl der opsix SE als auch das Verstärkungs-
system ausgeschaltet sind und stellen die Lautstärke aller Geräte auf den
Mindestwert.
1.
Halten Sie (Einschalttaste) auf der Rückseite gedrückt. Geben Sie
(Einschalttaste) frei, sobald das „opsix SE“-Logo angezeigt wird.
2.
Schalten Sie das Verstärkungssystem (z.B. die Aktivboxen) ein und stellen
Sie die Lautstärke auf den gewünschten Wert. Stellen Sie die Lautstärke des
opsix SE mit seinem VOLUME-Regler ein.
Ausschalten des opsix SE
1.
Stellen Sie die Lautstärke der Aktivboxen bzw. des externen Verstärkers auf
den Mindestwert und schalten Sie sie/ihn aus.
2.
Halten Sie (Einschalttaste) des opsix SE gedrückt, bis die Meldung
„Shutting down“ angezeigt wird. Geben Sie ihn anschließend frei.
Energiesparfunktion
Laut Vorgabe schaltet sich der opsix SE automatisch aus, wenn man länger als
vier Stunden weder die Bedienelemente noch die Tastatur verwendet und wenn
so lange keine MIDI-Befehle empfangen werden. Informationen zum
Deaktivieren dieser Funktion finden Sie in der Bedienungsanleitung (PDF).
De-20
Einfache Programmbearbeitung
Neben den Parametern der Operatoren können Sie auf der Seite HOME/ALGO
auch die Hauptparameter bearbeiten.
1.
Betätigen Sie die
ALGO-Taste [10], um die Seite
HOME/ALGO anzuzeigen.
2.
Verwenden Sie die Regler
DATA ENTRY A - F [12], um
die Werte für die auf dem
Display angezeigten Parameter
zu ändern.
ALGO: Wählen Sie aus den
voreingestellten oder
benutzerdefinierten
Algorithmen denjenigen aus,
der die Struktur für die Operatoren 1–6 bestimmt.
ATK: Legt die Attack-Zeit (wie schnell eine Note anschwillt) für alle
Operatoren fest.
DECAY: Legt die Decay/Release-Zeit (wie schnell eine Note ausklingt) für
alle Operatoren fest.
FX1–3: Obwohl die Funktionsweise hier vom eingestellten Effekttyp
abhängt, wird hauptsächlich die Tiefe des Effekts verändert.
Randomisierte Bearbeitung
Die Parameter des aktuellen Programms im ausgewählten Bereich werden auf
zufällige Werte gesetzt. Verwenden Sie diese Option, wenn Sie beim Erzeugen
von Sounds nach neuer Inspiration suchen.
1.
Betätigen Sie die -Taste [14], um die Seite Randomize anzuzeigen.
2.
Wählen Sie den Umfang der zu randomisierenden Parameter aus. Ändern
Sie den Parameter SCOPE mit dem Regler DATA ENTRY A. PROGRAM
ist standardmäßig ausgewählt; das bedeutet, alle Programmparameter
werden zufällig ausgewählt.
3.
Betätigen Sie die YES-Taste [8], um eine Bestätigungsmeldung anzuzeigen.
4.
Betätigen Sie die YES-Taste [8] erneut zum Randomisieren.
Detaillierte Bearbeitung
Sie können detaillierte Änderungen wie folgt vornehmen.
1.
Drücken Sie die gewünschte PAGE SELECT-Taste [13] zwischen der
MODE- und EFFECT-Taste, um die entsprechende Seite anzuzeigen. Um
eine der sekundären Seiten, wie unter den Schaltflächen dargestellt,
anzuzeigen, halten Sie die SHIFT-Taste [16] gedrückt und wählen Sie die
gewünschte Seite aus.
2.
Manchmal wird auf der linken Seite des Bildschirms darauf hingewiesen,
dass mehrere Unterseiten verfügbar sind. Sie können die PAGE < und >
Tasten [7] verwenden, um diese durchzublättern.
3.
Für jeden der Operatoren können Sie die Parameter auf den Seiten MODE,
PITCH und LEVEL bearbeiten. Verwenden Sie die OP SELECT + und -
Tasten [8], um den zu bearbeitenden Operator auszuwählen.
W
ählen Sie den zu
bearbeitenden
Operator mit Hilf
e der
OP SELEC
T + und −
T
asten
4.
Verwenden Sie die DATA ENTRY A - F-Regler [12], um die Parameter zu
ändern.
Die bearbeitbaren Parameter jeder Seite werden unten angezeigt:
MODE: Ändert den Operator-Modus und die Ausgangswellenformen für
OP 1–6.
PITCH: Ändert die Tonhöhe von OP 1–6 sowie die Tonhöhenmodulation
vom LFO/EG.
LEVEL/EG: Legt die Ausgangspegel, EG und Tastenverfolgung für OP 1–6
fest.
MOD: Konfiguriert LFO 1–3 und EG 1–3.
FILTER: Legt den Gesamtfilter für OP 1–6 fest.
EFFECT: Dient zum Auswählen von Effekttypen oder zum detaillierten
Bearbeiten der Effekte.
ARP: Konfiguriert den Arpeggiator.
SEQ: Dient zum Einstellen der Funktionsweise des Sequenzers und zum
detaillierten Bearbeiten der Sequenzdaten.
VOICE: Legt fest, ob ein Sound im Mono-, Poly- oder Unison-Modus
abgespielt wird.
V.PATCH: Gibt das Ziel und die Tiefe des Effekts an, der von LFO, EG und
anderen Modulationsquellen erzeugt wird.
MISC: Wird zum Ändern anderer Programmparameter verwendet. Sie
Aktuell
ausgewählter
Algorithmus
Regler DRegler ERegler
F
Regler ARegler BRegler C
Spielen auf dem opsix SE
Ein Programm abspielen
1.
Wählen Sie mit dem PROGRAM-Regler [6] ein Programm.
Gewählter
Pr
ogrammname
2.
Spielen Sie die Tastatur, um den Sound zu überprüfen.
3.
Um zu bestätigen, dass dies das Programm ist, das Sie auswählen möchten,
betätigen Sie die YES-Taste [8].
Um die Auswahl abzubrechen und zum vorherigen Programm zurückzu-
kehren, betätigen Sie die NO-Taste [8].
4.
Um den Tonwertumfang der Tastatur zu ändern, betätigen Sie die
OCTAVE-Taste [7]. Dies ändert den Tonumfang der Tastatur in Schritten
von einer Oktave.
5.
Verwenden Sie das PITCH-Rad [17], um die Tonhöhe zu ändern. Das
MODULATION-Rad [18] steuert jeden ihm zugewiesenen Parameter. Es
wird hauptsächlich zum Ändern der Cutoff-Frequenz und der Vibratotiefe
verwendet. Sie können auch ändern, welche Parameter vom MODULA-
TION-Rad gesteuert werden [18].
Verwendung des Analyzers
Sie können eine Echtzeitanalyse der Audioausgabe des Synthesizers auf dem
Display [5] anzeigen, indem Sie die ANALYZER-Taste [9] betätigen. Diese Taste
wechselt zwischen einem Spectrum-Analyzer, einem Oszilloskop und der zuvor
angezeigten Seite.
Mit dem Arpeggiator spielen
1.
Betätigen Sie die ARPEGGIATOR-Taste [20]. Im Display erscheint
„Arpeggiator Run = On“.
2.
Das im Programm festgelegte Muster wird beim Spielen der Tastatur
verwendet.
3.
Betätigen Sie die ARPEGGIATOR-Taste [20] erneut, um den Arpeggiator
auszuschalten. Im Display erscheint „Arpeggiator Run = Off“.
4.
Wenn Sie die ARPEGGIATOR-Taste [20] gedrückt halten, wird im Display
„Arpeggiator Run = Latch“ angezeigt und die Latch-Funktion aktiviert.
Der Arpeggiator spielt weiter, auch nach Loslassen der Tasten.
Halten Sie die ARPEGGIATOR-Taste [20] erneut gedrückt. um die
Latch-Funktion zu deaktivieren.
Die Programme bearbeiten
Bearbeiten mit dem Operator-Mixer
In der Sektion OPERATOR MIXER können Sie mit den Reglern RATIO OP 1–6
[3] die Tonhöhenparameter (RATIO) für jeden Operator und mit den
Schiebereglern LEVEL OP 1–6 [4] die Ausgangspegel bearbeiten.
1.
Betätigen Sie den PROGRAM-Regler [6], um ein Programm zur
Bearbeitung auszuwählen.
2.
Betätigen Sie die Regler RATIO OP 1–6 [3] und die Schieberegler LEVEL
OP 1–6 [4] des OPERATOR MIXERS.
Der Effekt ändert sich abhängig davon, ob der Operator, den Sie bearbeiten,
ein Träger (die RATIO-Regler-LED leuchtet rot) oder ein Modulator (die
RATIO-Regler-LED leuchtet blau) ist.
RATIO-Regler [3]: Ändert die Tonhöhe des entsprechenden Operators. In
der Hauptsache ändert sich bei Trägern die Tonhöhe und bei Modulatoren
die Helligkeit des Klangs oder die Position der Obertöne. Durch Erhöhen
der Tonhöhe eines Modulators werden die brillanten Obertöne
hervorgehoben, die für FM-Tonerzeuger charakteristisch sind.
LEVEL-Schieberegler [4]: Ändern Sie den Ausgangspegel jedes der
Operatoren. Die Lautstärke ändert sich für die Träger, während die
Helligkeit des Klangs und die Stärke der Obertöne ändert sich für die
Modulatoren. Wenn sich der Träger im FM-Modus befindet und der
Ausgangspegel des Modulators stark erhöht ist, können Sie einen stark
verzerrten Klang erzielen, der einer verzerrten Gitarre ähnelt.
  • Page 1 1
  • Page 2 2
  • Page 3 3
  • Page 4 4
  • Page 5 5
  • Page 6 6
  • Page 7 7
  • Page 8 8
  • Page 9 9
  • Page 10 10
  • Page 11 11
  • Page 12 12
  • Page 13 13
  • Page 14 14
  • Page 15 15
  • Page 16 16
  • Page 17 17
  • Page 18 18
  • Page 19 19
  • Page 20 20
  • Page 21 21
  • Page 22 22
  • Page 23 23
  • Page 24 24
  • Page 25 25
  • Page 26 26
  • Page 27 27
  • Page 28 28
  • Page 29 29
  • Page 30 30
  • Page 31 31
  • Page 32 32
  • Page 33 33
  • Page 34 34
  • Page 35 35
  • Page 36 36
  • Page 37 37
  • Page 38 38
  • Page 39 39
  • Page 40 40
  • Page 41 41
  • Page 42 42
  • Page 43 43
  • Page 44 44

Korg opsix SE Platinum クイックスタートガイド

タイプ
クイックスタートガイド
このマニュアルも適しています