
Register your
new device on
MyBosch now and
get free benefits:
bosch-home.com/
welcome
MCM3..GB
MultiTalent 3
Compact food processor
[en] Instruction manual
[ms] Arahan pengendalian
[zf] 使用說明書
[zh] 使用说明书
[ar]
Compact food processor 9
Pemproses makanan kompak 18
多功能食物處理器 29
小型食物處理器 37
55


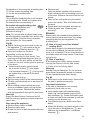
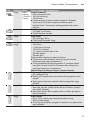
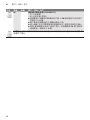
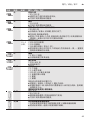
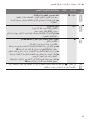
(1-3) x
1 s
5-15 s
40-60 s
40-60 s
40-60 s
15 s
(2-5) x
1 s
M
M
M
M
(2-5) x
1 s
(4-10) x
1 s


9
en
Intended use
Intended use
This appliance is intended for domestic use and the household
environment only. Use the appliance only for processing normal
amounts of food and for normal amounts of time in domestic use.
The appliance is suitable for mixing, kneading, beating, cutting and
shredding food. The appliance must not be used for processing other
substances or objects. Additional applications are possible if other
accessories approved by the manufacturer are used. Only use the
appliance with approved genuine parts and accessories. Never use
the accessory parts for other appliances.
Only use the appliance indoors at room temperature and up to
2000 m above sea level.
Important safety notices
Read and follow the instruction manual carefully and keep for later
reference! Enclose these instructions when you give the appliance to
someone else. If the instructions for correct use of the appliance are
not observed, the manufacturer’s liability for any resulting damage will
be excluded.
This appliance can be used by persons with reduced physical,
sensory or mental capabilities or lack of experience and / or
knowledge if they are given supervision or instruction concerning use
of the appliance in a safe way and if they understand the hazards
involved. Keep children away from the appliance and connecting
cable and do not allow them to use the appliance. Do not let children
play with the appliance. Cleaning and user maintenance must not be
performed by children.
Connect and operate the appliance only in accordance with the
specifications on the rating plate. Do not use the appliance if the
power cord and/or appliance are damaged.
Before replacing accessories or additional parts, which move during
operation, switch off the appliance and disconnect from the power
supply. Always disconnect the appliance from the supply if it is left
unattended and before assembling, disassembling or cleaning.
Do not place the power cord over sharp edges or hot surfaces.
To prevent injury, a damaged power cord must be replaced by the
manufacturer or his customer service or a similarly qualified person.
Only our customer service may repair the appliance.

10
en Important safety notices
Safety instructions for this appliance
W Risk of injury
W Risk of electric shock
If the power is interrupted, the appliance remains switched on and
restarts when the power is restored.
Never immerse the base unit in liquids or place under running water
and do not clean in the dishwasher.
Before rectifying a fault, pull out the mains plug.
W Risk of injury from the rotating tools!
While the appliance is operating, never place fingers in the mixing
bowl. Always use the pusher for adding ingredients.
After switching off, the drive continues running for a short time.
Change tools only when the drive is at a standstill.
W Risk of injury from sharp blades/rotating drive!
Never reach into the attached blender jug!
Do not remove/attach the blender jug until the drive has stopped. Do
not remove/attach the universal cutter jug until the drive has stopped.
W Risk of injury from sharp blades!
Do not touch blades of the universal blade with bare hands. When
not in use, always store the universal blade in the blade guard. Clean
them with a brush.
Do not grip the sharp blades or edges of the cutting discs. Grip the
discs by the plastic part in the centre only!
Do not place fingers in the feed tube. Only use the pusher when
adding more ingredients. Do not touch blades of the blade insert with
bare hands. Clean them with a brush.
W Risk of scalding!
If processing hot liquids, steam escapes through the funnel in the lid.
Add a max. 0,4 litres of hot or frothing liquid.
W Risk of injury!
Never assemble accessories on the base unit.
W Important!
It is essential to clean the appliance thoroughly after each use or
after it has not been used for an extended period. X “Cleaning and
servicing” see page 14

11
en
Important safety notices
Congratulations on the purchase of
your new Bosch appliance. You can find
further information about our products
on our website.
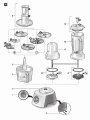
6 Tools*
a Universal blade with blade guard
b Kneading hook
c Beating disc
7 Cutting discs*
a Slicing reversible disc – thick/thin
b Shredding reversible disc –
coarse/fine
c Reversible slicing/shredding disc
8 Lid
a Filler opening
b Pusher
Accessories*
9 Blade insert with blender/cutting
blade and seal
10 Blade insert with grinding blade and
seal
11 Universal cutter jug
12 Blender jug
13 Lid for blender
a Filler opening
b Funnel-shaped stopper
* for some models
If the universal cutter is not included, it can
be ordered from customer service (order
no. 12005833).
Operation
Before operating the appliance and
accessories for the first time, clean
thoroughly; see “Cleaning and servicing”.
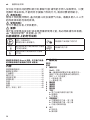
Contents
Intended use ................................................ 9
Important safety notices ............................... 9
Overview .....................................................11
Operation ....................................................11
Cleaning and servicing ............................... 14
Troubleshooting ......................................... 15
Storage ....................................................... 15
Disposal...................................................... 15
Guarantee .................................................. 15
Recipes / Ingredients / Processing ........... 16
Explanation of the symbols on the appliance or accessory
W
Caution! Rotating tools.
Do not place fingers in the feed tube.
o
Lock blade insert in the blender or universal cutter jug.
n
Remove blade insert from the blender or universal cutter jug.
p
Blade insert with blender/cutting blade
q
Blade insert with grinding blade
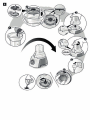
Overview
Fig. A
Base unit
1 Rotary switch
P = Stop
M = Instantaneous switching at
maximum speed, hold switch for required
blending duration.
Settings 1–2, Operating speed:
1 = low speed – slow,
2 = high speed – fast.
2 Drive
3 Cord store
4 Bowl
5 Tool holder

12
en Operation
Preparation
■ Place the base unit on a smooth, clean
surface.
■ Pull cable out of the base unit to the
required length.
Important information
– Use only the rotary switch to switch the
appliance on or off.
– Never switch the appliance off by rotating
the bowl, the blender or a tool.
– Do not switch the appliance on unless
tools or accessories have been completely
attached.
Bowl with accessories/tools
W Risk of injury from the rotating tools!
While the appliance is operating, never place
fingers in the mixing bowl. Always use the
pusher for adding ingredients. After switching
off, the drive continues running for a short
time. Change tools only when the drive is at
a standstill.
Warning!
When working with the bowl, the appliance
cannot be switched on until the bowl has
been attached and the lid has been attached
and screwed on tight.
Universal blade
for cutting, mincing, mixing.
W Risk of injury from sharp blades!
Do not touch blades of the universal blade
with bare hands. When not in use, always
store the universal blade in the blade guard.
Grip the universal blade by the edge of the
plastic handle only.
Kneading hook
for kneading dough and mixing-in
ingredients that ought not be cut (e.g. raisins
and chocolate chips).
Beating disc
for cream, egg white and
mayonnaise.
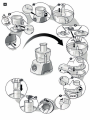
Fig. B
■ Attach the bowl (arrow on bowl on dot on
the appliance .) and rotate as far as
possible in a clockwise direction (,).
■ Insert tool holder into the bowl.
■ Insert universal blade, whisking disc or
kneading hook into the tool holder and
release.
Note position of the tools when
inserting them! Press tools all the way
down.
Warning!
Do not add ingredients until the tools have
been inserted.
■ Add ingredients.
■ Attach lid with pusher (match arrow on
lid on dot on bowl .) and rotate in
a clockwise direction (,). Lid lug must be
located fully in the slot in the bowl handle.
■ Insert the mains plug.
■ Set the rotary switch to the desired setting.
■ To add more ingredients, set the rotary
switch to P.
■ Remove the pusher and add ingredients
through the feed tube. Pusher can be used
as a measuring cup.
Cutting discs
W Risk of injury from sharp blades!
Do not grip the sharp blades or edges of the
cutting discs. Grip the discs by the plastic
part in the centre only! Do not place fingers
in the feed tube. Only use the pusher when
adding more ingredients.
Slicing reversible disc –
thick/thin
for slicing fruit and vegetables.
Process at setting 1.
Identification on the reversible slicing disc:
“grob” for the thick cutting side,
“fein” for the thin cutting side
Warning!
The reversible slicing disc is not suitable for
slicing hard cheese, bread, rolls or
chocolate. Slice boiled, waxy potatoes only
when they are cold.
Shredding reversible disc –
coarse/fine
for shredding vegetables, fruit
and cheese, except for hard cheese
(e.g. Parmesan).
Process at setting 1.

13
en
Operation
Designation on the reversible shredding disc:
“2” for the coarse shredding side
“4” for the fine shredding side
Warning!
The reversible shredding disc is not suitable
for shredding nuts. Shred soft cheese with
the coarse side only at setting 2.
Reversible slicing/shredding disc
for slicing and shredding fruit,
vegetables and cheese.
Process at setting 2.
Note: Do not process any hard foods using
the slicing/grating reversible disc as this may
blunt the blade. Use the slicing reversible
disc (thick/thin) for this purpose.
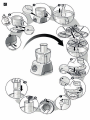
Fig. C
■ Attach the bowl (arrow on bowl on dot on
the appliance .) and rotate as far as
possible in a clockwise direction (,).
■ Insert tool holder into the bowl.
Depending on the required use:
■ Place cutting disc on tool holder. Turn
required slicing/shredding side face up.
Place disc on the disc holder so that the
drivers on the tool holder grip the opening
in the discs.
■ Attach lid with pusher (match arrow
on lid on dot on bowl .) and rotate
in a clockwise direction (,). Lid lug must
be located fully in the slot in the bowl
handle.
■ Insert the mains plug.
■ Set the rotary switch to the desired setting.
■ Fill with contents which are to be sliced or
shredded.
■ When adding contents which are to be
sliced or shredded, apply only light pres-
sure to the pusher. Remove the pusher
and add ingredients through the feed tube.
Warning!
Empty the bowl before it becomes so full
that the cutting or grating contents reach the
carrier disc.
After using the appliance
■ Set the rotary switch to P.
■ Remove mains plug.
■ Rotate the lid in an anti-clockwise direction
and remove.
■ Remove tool:
Take tool holder together with universal
blade, whisking disc or kneading hook out
of the bowl. Remove the tools from the tool
holder.
■ Take out the cutting discs by the plastic
stud in the centre. Take tool holder out of
the bowl.
■ Rotate bowl anti-clockwise and remove.
■ Clean all parts, see “Cleaning and
servicing”.
Blender
Blade insert with blender/cutting blade for
mixing liquid or semi-solid food, for cutting/
chopping raw fruit and vegetables, for
puréeing food.
W Risk of injury from sharp blades /
rotating drive!
Never place fingers in the attached blender!
Do not remove/attach the blender until the
drive is at a standstill. Do not touch blades of
the blade insert with bare hands. Clean them
with a brush.
W Risk of scalding!
If processing hot liquids, steam escapes
through the funnel in the lid. Add a max.
0,4 litres of hot or frothing liquid.
Warning!
Blender may be damaged. Do not process
deep-frozen ingredients (except ice cubes).
Do not operate blender when empty.
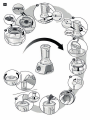
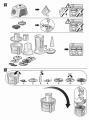
Fig. D
■ Place seal on the blade insert. Ensure that
the seal is positioned correctly.
Important information
If the seal is damaged or not correctly
positioned, liquid may run out.
■ Insert blade insert with blender/cutting
blade p into the blender jug and lock
anti-clockwise (m). Rotate the blade insert
at least until the arrow matches up with the
marking on the blender jug.
■ Turn blender jug over (blade insert face
down).
■ Attach the blender jug (match arrow on the
jug to the dot on the appliance .) and
rotate as far as possible in a clockwise
direction (,).

14
en Cleaning and servicing
■ Add ingredients.
Maximum capacity, liquid = 1.0 litres
(frothing or hot liquids max. 0.4 litres).
Optimal processing capacity –
solids = 80 g.
■ Attach lid and press firmly. Hold lid while
working.
■ Insert the mains plug.
■ Set the rotary switch to the desired setting.
■ To add more ingredients, set the rotary
switch to P.
■ Remove the lid and add ingredients
or
■ remove the funnel and gradually add solid
ingredients through the refill opening
or
■ pour liquid ingredients through the funnel.
After using the appliance
■ Set the rotary switch to P.
■ Remove mains plug.
■ Rotate the blender in an anti-clockwise
direction and remove.
■ Remove lid.
■ Loosen blade insert clockwise (l) and
remove from the blender jug.
■ Clean all parts, see “Cleaning and
servicing”.
Universal cutter
Use (depending on model):
– With the blade insert with blender/cutting
blade p for cutting and chopping meat,
hard cheese, onions, herbs, garlic, fruit,
vegetables.
– With the blade insert with grinding blade
q for grinding and cutting fairly small
quantities of spices (e.g. pepper, cumin,
juniper, cinnamon, dried anise, saffron),
grain (e.g. wheat, millet, linseeds), coffee
and sugar. It is not intended for grinding
very dry, solid foods larger than coffee
beans such as nutmeg, dry ginger … .
W Risk of injury from sharp blades /
rotating drive!
Do not remove/attach the universal cutter
until the drive has stopped.
Do not touch blades of the blade insert with
bare hands.
Fig. F shows guide values for the maximum
quantities and processing times when
working with the universal cutter.
Fig. E
■ Put down universal cutter jug with the
opening face up.
■ Add food, which is to be cut, in the jug.
Note MAX mark on the jug!
■ Place seal on the blade insert. Ensure that
the seal is positioned correctly.
Important information
If the seal is damaged or not correctly
positioned, liquid may run out.
■ Insert blade insert (p/q) into the
universal cutter jug and lock anti-
clockwise (m). Rotate the blade insert at
least until the arrow matches up with the
marking on the universal cutter jug.
■ Turn universal cutter over (blade insert
face down).
■ Attach the universal cutter (arrow on jug
on dot on the appliance .) and rotate all
the way clockwise (,).
■ Insert the mains plug.
■ Set the rotary switch to the desired setting.
Note: The longer the appliance remains
switched on, the finer the ingredients are cut.
Recommendations on using the accessories
can be found in the section “Recipes/
Ingredients/Processing”.
After using the appliance
■ Set the rotary switch to P.
■ Remove mains plug.
■ Rotate universal cutter anti-clockwise and
remove.
■ Turn universal cutter over (blade insert
face up).
■ Loosen blade insert clockwise (l) and
remove from the universal cutter jug.
■ Empty jug.
■ Clean all parts, see “Cleaning and
servicing”.
Cleaning and servicing
The appliance requires no maintenance.
Thorough cleaning protects the appliance
from damage and keeps it functional.
An overview of cleaning the individual parts
can be found in Fig. G.

15
en
Troubleshooting
W Risk of electric shock
Never immerse the base unit in water or
place under running water.
Warning!
Surfaces may be damaged. Do not use
abrasive cleaning agents.
Note: If processing e.g. carrots and red
cabbage, the plastic parts will become
discoloured by a red film which can be
removed with a few drops of cooking oil.
Cleaning the base unit
■ Remove mains plug.
■ Wipe the base unit with a damp cloth.
If required, use a little detergent.
■ Then dry the base unit.
Cleaning the bowl and
accessories
W Risk of injury from sharp blades!
Do not touch blades of the universal blade
with bare hands. When not in use, always
store the universal blade in the blade guard.
Clean them with a brush. Do not grip the
sharp blades or edges of the cutting discs.
Grip the discs by the plastic part in the centre
only!
All parts are dishwasher-proof. Do not
wedge plastic parts in the dishwasher as
they could warp.
Cleaning the blender /
universal cutter
W Risk of injury from sharp blades!
Do not touch blades of the blade insert with
bare hands. Clean them with a brush.
The blender jug (without blade insert), lid
and funnel are dishwasher-proof.
Do not clean the blade insert in the dish-
washer, but under running water (do not
soak in water). Remove seal for cleaning.
Troubleshooting
W Risk of injury!
Before rectifying a fault, pull out the
mains plug.
Fault:
Appliance does not start or appliance
switches off during operation.
Possible cause:
Bowl or lid or the accessory has not been
attached correctly or has become detached.
Remedial action:
■ Set the rotary switch to P.
■ Correctly attach bowl/lid or accessory and
screw on all the way.
■ Switch the appliance on again.
Important information
If the fault cannot be eliminated, please
contact customer service (see customer
service addresses at the end of this booklet).
Storage
Fig. H
The tools can be stored in the bowl to save
space.
Disposal
J
Dispose of packaging in an environ-
mentally-friendly manner. This
appliance is labelled in accordance
with European Directive 2012/19/EU
concerning used electrical and
electronic appliances (waste electrical
and electronic equipment – WEEE).
The guideline determines the frame-
work for the return and recycling
of used appliances as applicable
throughout the EU. Please ask your
specialist retailer about current
disposal facilities.
Guarantee
The guarantee conditions for this appliance
are as dened by our representative in the
country in which it is sold. Details regarding
these conditions can be obtained from
the dealer from whom the appliance was
purchased. The bill of sale or receipt must
be produced when making any claim under
the terms of this guarantee.
Changes reserved.

16
en Recipes / Ingredients / Processing
Recipes / Ingredients / Processing
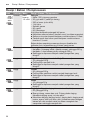
Tool Speed Time Recipes / Ingredients / Processing
or
low approx.
1-2 min
Yeast dough
– Max. 500 g flour
– 25 g yeast or 1 packet of dried yeast
– 220 ml milk (room temperature)
– 1 egg
– 1 pinch of salt
– 80 g sugar
– 60 g butter
– Graded rind of half a lemon
■ Add all ingredients (except the milk) to the bowl.
■ Set rotary switch to a low speed for 10 seconds.
■ Add milk and stir at low speed for about 1½ minutes.
Ingredients should be at the same temperature. When the dough
has a smooth appearance, place in a warm location.
M Onions, garlic
– from 1 onion, quartered, up to 300 g
– from 1 clove of garlic up to 300 g
■ Process until it has been chopped to the required size.
high Hard cheese (e.g. parmesan)
– 10 g to 200 g
■ Cut the cheese into cubes.
■ Process until it has been chopped to the required size.
high Chocolate
– 50 g to 200 g
■ Cut or break the chocolate into pieces.
■ Process until it has been chopped to the required size.
high Parsley
– 10 g to 50 g
■ Process until it has been chopped to the required size.
high Meat, liver (for mince, steak tartare, etc.)
– 50 g to 500 g
■ Remove bones, gristle and sinews. Dice the meat.
Making sausage meat, stuffing and pâté:
■ Put meat (beef, pork, veal, poultry, or even fish, etc.) together
with other ingredients and spices into the bowl and mix into a
dough.
high approx.
1.5-2
min
Strawberry sorbet
– 250 g frozen strawberries
– 100 g icing sugar
– 180 ml cream
■ Put all ingredients in the bowl. Switch on immediately, otherwise
the mixture will go lumpy. Mix until a creamy sorbet forms.
low Beaten egg white
– 2 to 6 egg whites
■ Beat at a low speed.

17
en
Recipes / Ingredients / Processing
Tool Speed Time Recipes / Ingredients / Processing
high Whipped cream
– 200 g to 400 g
■ Whisk at high speed.
low/
high
Mayonnaise
– 1 egg
– 1 tsp. mustard
– 150-200 ml oil
– 1 tbs. lemon juice or vinegar
– 1 pinch of salt
– 1 pinch of sugar
Ingredients should be at the same temperature.
■ Mix all ingredients (except oil) for several seconds at setting 1.
■ Switch appliance to setting 2, slowly pour oil through the feed
tube and mix until the mixture emulsifies.
Eat the mayonnaise immediately, do not store.
high/M Nuts, almonds
– 50 g to 200 g
■ Remove shells completely, otherwise the blender blade will be
blunted.
■ Process until it has been chopped to the required size.
high/M Puréeing fruit or vegetables
– Apple sauce, spinach, carrot and tomato purée; raw or cooked
■ Put ingredients and spices into the blender and purée.
high Chocolate-milk
– 80 g–100 g cooled chocolate
– approx. 400 ml hot milk
■ Chop up the chocolate in the blender, add the hot milk and mix
briefly.
M Honey and hazel nut spread (CNCM12C)
– 20 g hazelnuts
– 80 g blossom honey (room temperature)
■ Put the nuts in the universal cutter jug and cut with the blender/
cutting blade for 5 seconds on setting M.
■ Remove the universal cutter jug, turn it over and take out the
blade insert.
■ Add the honey. Close the universal cutter jug again with the
blade and put on the base unit.
■ Wait until all the honey has run down over the blade. Then mix
everything for 5 seconds on setting M.
Fig. F shows guide values for the maximum quantities and processing times when
working with the universal cutter jug and the blade inserts.

18
ms Pengendalian mengikut peraturan
Pengendalian mengikut peraturan
Perkakas ini hanya sesuai untuk pengunaan di dalam rumah atau
persekitaran sepertinya. Gunakan peranti hanya untuk kuantiti dan
masa pemprosesan domestik.
Perkakas ini sesuai untuk mengadun, menguli, memukul, memotong
dan memarut makanan. Perkakas ini tidak boleh digunakan untuk
memproses objek atau bahan yang lain. Aplikasi tambahan boleh
digunakan, apabila menggunakan aksesori lain yang diluluskan oleh
pengilang. Gunakan alat hanya dengan bahagian dan aksesori asli
yang diluluskan. Jangan gunakan pemasangan ini untuk peranti
lain. Gunakan perkakas ini hanya di dalam bangunan pada suhu
bilik dan ketinggian sehingga 2000 m di atas paras laut.
Arahan keselamatan penting
Baca arahan pengendalian dengan teliti, patuhinya dan simpan!
Jika perkakas diberikan kepada pihak yang lain, sertakan bersama
manual ini. Ketidakpatuhan terhadap arahan bagi penggunaan
perkakas dengan betul akan mengecualikan pengeluar dari liabiliti
kerosakan yang berlaku.
Perkakas ini boleh digunakan oleh orang dengan kekurangan
keupayaan zikal, deria atau metal, atau kekurangan pengalaman
dan / atau pengetahuan dibawah selian atau telah dilatih mengikut
keselamatan pengendalian peralatan ini dan memahami kesan
bahayanya. Kanak-kanak hendaklah dijauhkan daripada perkakas
dan kabel penyambungan serta tidak dibenarkan mengendalikan
perkakas ini. Kanak-kanak tidak dibenarkan bermain dengan
perkakas ini. Kanak-kanak tidak dibenarkan untuk mencuci atau
menyelenggara perkakas ini.
Sambung dan kendalikan perkakas hanya mengikut spesikasi
pada plat kadaran. Jangan menggunakan perkakas jika kord kuasa
dan/atau perkakas telah rosak. Sebelum menggantikan aksesori
atau alat ganti tambahan, yang bergerak semasa operasi, matikan
perkakas dan putuskan sambungan bekalan kuasa. Sentiasa cabut
palam perkakas dari bekalan jika ia ditinggalkan tanpa dijaga dan
sebelum memasang, menyahpasang atau membersihkannya.
Jangan meletakkan kord kuasa pada pinggir yang tajam atau
permukaan yang panas.
Untuk mengelakkan kecederaan, kord kuasa yang rosak mestilah
digantikan oleh pengeluar atau perkhidmatan pelanggannya atau
orang yang sama kelayakannya. Hanya perkhidmatan pelanggan
kami boleh membaiki perkakas.

19
ms
Arahan keselamatan penting
Arahan keselamatan untuk perkakas ini
W Risiko kecederaan
W Risiko kejutan elektrik
Jika bekalan kuasa terganggu, perkakas masih hidup dan
dimulakan semula apabila bekalan pulih. Jangan merendamkan unit
tapak dalam cecair atau meletakkannya di bawah air yang mengalir
dan jangan membasuhnya dalam pembasuh pinggan mangkuk.
Sebelum membaiki kerosakan, tarik keluar palam sesalur.
W Risiko kecederaan daripada alat yang berputar!
Semasa perkakas sedang dikendalikan, jauhi jari dari mangkuk
adun. Sentiasa gunakan penolak untuk menambah bahan.
Selepas dimatikan, pemacu akan terus berputar untuk masa
yang singkat. Tukar alat hanya apabila pemacu telah berhenti
sepenuhnya.
W Risiko kecederaan daripada bilah tajam/pemacu berputar!
Jangan sekali-kali mencapai tangan ke dalam jag pengadun yang
terpasang! Jangan menanggalkan/memasang jag pengadun
sehingga pemacu telah berhenti.
Jangan menanggalkan/memasang jag pemotong universal
sehingga pemacu telah berhenti.
W Risiko kecederaan daripada bilah tajam!
Jangan menyentuh mata bilah pemotong universal dengan tangan
terdedah. Apabila tidak digunakan, sentiasa simpan bilah universal
dalam adang bilah. Bersihkannya dengan berus.
Jangan menggenggam bilah tajam atau pinggir cakera pemotong.
Genggam cakera pada bahagian plastik di tengah-tengah sahaja!
Jangan meletakkan jari dalam tiub suapan. Hanya gunakan penolak
apabila menambah lebih banyak bahan. Jangan menyentuh mata
sisipan bilah dengan tangan terdedah. Bersihkannya dengan berus.
W Risiko melecur!
Apabila memproses cecair panas, stim keluar melalui corong
pada tudung. Masukkan 0,4 liter maksimum cecair panas atau
menggelegak.
W Risiko kecederaan!
Jangan sekali-kali memasang aksesori pada unit asas.
W Penting!
Perkakas mestilah dibasuh dengan teliti selepas setiap penggunaan
atau selepas tidak menggunakannya untuk jangka waktu yang
panjang. X “Pembersihan dan servis” lihat halaman 24

20
ms Arahan keselamatan penting
Penjelasan tentang simbol pada perkakas atau aksesori
W
Peringatan! Alat berputar.
Jangan meletakkan jari dalam tiub suapan.
o
Kunci sisipan bilah dalam pengadun atau jag pemotong universal.
n
Tanggalkan sisipan bilah dari pengadun atau jag pemotong universal.
p
Pemegang bilah dengan bilah pengadun/pemotong
q
Pemegang bilah dengan bilah pengisar
6 Alat*
a Bilah universal dalam adang bilah
b Cangkuk uli
c Cakera pukul putar (pukul)
7 Cakera pemotong*
a Cakera hiris boleh terbalik –
tebal/nipis
b Cakera mayang boleh terbalik –
kasar/halus
c Cakera hiris/mayang boleh terbalik
8 Tudung
a Bukaan pengisi
b Penolak
Aksesori*
9 Sisipan bilah dengan bilah pengadun/
pemotong dan pengedap
10 Sisipan bilah dengan bilah pengisar dan
pengedap
11 Jag pemotong universal
12 Jag pengadun
13 Tudung untuk pengadun
a Bukaan pengisi
b Penahan berbentuk corong
* sesetengah model:
Jika pemotong universal tidak disertakan
dengan pengadun tangan, ia boleh
ditempah dari khidmat pelanggan
(no. pesanan 12005833).
Tahniah kerana membeli peralatan
Bosch baru anda. Anda boleh
mendapatkan maklumat lanjut tentang
produk kami di halaman web kami.
Kandungan
Pengendalian mengikut peraturan............18
Arahan keselamatan penting .................... 18
Gambaran Keseluruhan ..........................20
Pengendalian............................................21
Pembersihan dan servis ..........................24
Penyelesaian masalah .............................25
Penyimpanan............................................25
Arahan tentang pelupusan .......................25
Syarat-syarat waranti................................25
Resipi / Bahan / Pemprosesan .................26
Gambaran Keseluruhan
Rajah A
Unit asas
1 Suis putar
f = Henti
M = Penukaran seketika pada kelajuan
maksimum, tahan suis untuk tempoh
adunan yang dikehendaki.
Pengesetan 1–2,
Kelajuan pengendalian:
1 = kelajuan rendah – perlahan,
2 = kelajuan tinggi – laju.
2 Pemacu
3 Storan kord
4 Mangkuk
5 Pemegang alat
ページが読み込まれています...
ページが読み込まれています...
ページが読み込まれています...
ページが読み込まれています...
ページが読み込まれています...
ページが読み込まれています...
ページが読み込まれています...
ページが読み込まれています...
ページが読み込まれています...
ページが読み込まれています...
ページが読み込まれています...
ページが読み込まれています...
ページが読み込まれています...
ページが読み込まれています...
ページが読み込まれています...
ページが読み込まれています...
ページが読み込まれています...
ページが読み込まれています...
ページが読み込まれています...
ページが読み込まれています...
ページが読み込まれています...
ページが読み込まれています...
ページが読み込まれています...
ページが読み込まれています...
ページが読み込まれています...
ページが読み込まれています...
ページが読み込まれています...
ページが読み込まれています...
ページが読み込まれています...
ページが読み込まれています...
ページが読み込まれています...
ページが読み込まれています...
ページが読み込まれています...
ページが読み込まれています...
ページが読み込まれています...
ページが読み込まれています...
ページが読み込まれています...
ページが読み込まれています...
ページが読み込まれています...
ページが読み込まれています...
-
 1
1
-
 2
2
-
 3
3
-
 4
4
-
 5
5
-
 6
6
-
 7
7
-
 8
8
-
 9
9
-
 10
10
-
 11
11
-
 12
12
-
 13
13
-
 14
14
-
 15
15
-
 16
16
-
 17
17
-
 18
18
-
 19
19
-
 20
20
-
 21
21
-
 22
22
-
 23
23
-
 24
24
-
 25
25
-
 26
26
-
 27
27
-
 28
28
-
 29
29
-
 30
30
-
 31
31
-
 32
32
-
 33
33
-
 34
34
-
 35
35
-
 36
36
-
 37
37
-
 38
38
-
 39
39
-
 40
40
-
 41
41
-
 42
42
-
 43
43
-
 44
44
-
 45
45
-
 46
46
-
 47
47
-
 48
48
-
 49
49
-
 50
50
-
 51
51
-
 52
52
-
 53
53
-
 54
54
-
 55
55
-
 56
56
-
 57
57
-
 58
58
-
 59
59
-
 60
60


