
Register your
new device on
MyBosch now and
get free benefits:
bosch-home.com/
welcome
MUM5..TW
萬用廚師機
[zf] 使用說明書
[en] Instruction manual
萬用廚師機 3
Universal kitchen machine 13


3
zf 用途
用途
本電器僅供家用。僅限將本電器在家用正常時間內供處理家庭正
常的食物量。請勿超過允許的最大量(請參閱X“應用範例”參見
第9頁)。
本電器適用於攪拌、揉捏和攪打食物。本電器不得用於處理其他物體
或物質。其他應用僅限使用製造商所許可的配件。僅限將經許可的原
廠零件和配件搭配本電器一同使用。切勿將配件用於其他電器。
本電器僅限於海拔2000公尺以下在室溫環境的室內使用。
重要安全須知
請仔細閱讀並遵循本使用說明書,以備日後查閱!將此電器交給其他
人時,應將這些說明書一併轉交。若未遵守正確使用本產品的說明,
製造商對任何由此所造成的損壞概不承擔任何責任。
身體、感官或智力有缺陷的人士以及缺乏相關經驗和知識的人士,必
須在負責其安全人員的監督下且了解電器安全及相關危險的人員指導
下才可使用本電器。請讓孩童遠離本電器及電源線,且不要任其使用
本電器。請勿讓兒童玩耍本電器。除非在監督下,否則不得由孩童進
行清潔及維護的工作。
W 觸電和發生火災的危險!
■ 僅限依照規格銘板上的規格連接和操作本電器。電源線和╱或本電
器損壞時,請勿使用本電器。僅限由我們的客戶服務維修本電器,
例如更換損壞的電源線,以避免發生危險。
■ 僅限使用旋轉開關開啟或關閉本電器。切勿將電器連接到定時開關
或可遠端遙控的插座。當電源打開時,請勿讓本電器離開您的視
線!
■ 請勿將本電器放置於爐具這類的熱源上方或附近。請勿將電源連接
線接觸任何熱源或是與尖銳物品磨擦。
■ 請勿將底座浸泡在水中或放入洗碗機清洗。請勿使用蒸汽清潔機清
潔本電器。切勿在雙手潮濕的情況下操作本電器。
■ 請在以下情況下,務必將電器與電源斷開:每次使用後、無人看管
本電器時、組裝前、拆卸前、清潔前以及出現故障時。
W 受傷危險!
■ 更換配件或電器在操作期間要移動其他零件前,應關閉本電器的電
源並斷開供電。關閉後,傳動器仍會短暫運作片刻。請等到傳動器
完全靜止為止。
■ 本電器電源開啟時,請勿調整旋轉臂。
■ 只有在插入攪拌碗、已蓋上蓋子且傳動器保護蓋已到位的情況下才
能使用工具!使用配件時,請按照說明書所述安裝攪拌碗、蓋子和
傳動器保護蓋!
■ 操作本電器時,切勿將手伸入攪拌碗或食材投入口內。請勿將任何
物體(例如木勺)放入攪拌碗或食材投入口內。避免雙手、頭髮、
衣服和其他器具靠近旋轉中的零件。

4
zf 重要安全須知
恭喜您購買了博世家用系列的新產品,您已經
選擇了一款新潮而一流的家用電器。如需更多
關於產品的詳細資訊,請瀏覽本公司網站。
內容
用途 ������������������������������������������������������� 3
重要安全須知 ������������������������������������������ 3
安全系統 ������������������������������������������������ 5
總覽 ������������������������������������������������������� 5
操作位置 ������������������������������������������������ 6
操作事項 ������������������������������������������������ 6
清潔和保養 ��������������������������������������������� 8
存放 ������������������������������������������������������� 8
故障排除 ������������������������������������������������ 9
應用範例 ������������������������������������������������ 9
棄置 ����������������������������������������������������� 10
保固 ����������������������������������������������������� 10
選配產品 ���������������������������������������������� 11
■ 切勿同時使用工具和配件或2個配件。使用配件時,請遵照各個
隨附的操作說明。
■ 使用前必須完全組裝好配件。切勿在本體底座上組裝配件。配件僅
限用於預期的操作位置。
■ 請勿握住切割刀盤的銳利處或邊緣。僅限握住切割刀盤的邊緣處。
■ 處理鋒利的切割刀片、清空容器和清潔時應格外小心。
W 燙傷危險!
處理高溫液體時,蒸氣將從蓋子上的漏斗逸散。最多可添加0.5公升
的高溫或冒泡的液體。
W 窒息危險!
請勿讓孩童將包材當做玩具玩耍。
W 小心!
我們建議本電器的開啟時間不要超過處理食材所需的時間。請勿空機
操作本電器。
W 重要!
每次使用完後或長時間未使用重新使用時,必須徹底清潔本電器
(X“清潔和保養”參見第8頁)。
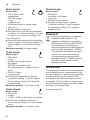
W 本電器或配件上的符號說明
i
請遵照操作說明上的指示。
Y
小心!旋轉中的刀片。
W
小心!旋轉中的工具。
切勿將手指伸到食材投入口中。

5
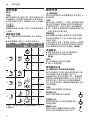
zf 安全系統
安全系統
啟動安全鎖
請參閱「操作位置」表。
僅限在位置1和3上開啟本電器:
■ 應在攪拌碗(11)已插入且轉到鎖定位置
時。
重新啟動安全鎖
若電源中斷,本電器電源仍保持開啟,但馬達
在電源恢復時不會再重新開始運轉。若要重新
開啟本電器的電源,請將旋轉開關轉到P,
然後開啟電源。
過載保護
若在使用本電器時,馬達自動關閉,表示超載
保護功能已啟動。可能原因是一次處理太多
食物。
若已啟動安全系統,請參閱「故障排除」章節。
本電器無需進行維護。
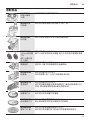
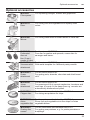
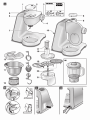
總覽
圖 A:
本體底座
1 釋放鈕
2 旋轉臂
「臂易升」功能支撐旋轉臂的向上移動(請
參閱「工作位置」章節)。
3 旋轉開關
當本電器電源關閉時(位置P),本電器
會自動運轉到更換工具的最佳位置。
MUM52..:
P=停止
M=以最高速瞬時切換,在所需的攪拌時
間內按住開關。
1-4段,操作速度:
1=低速–慢,
4=高速–快。
MUM54../MUM58..:
P=停止
M=以最高速瞬時切換,在所需的攪拌時
間內按住開關。
1-7段,操作速度:
1=低速–慢,
7=高速–快。
4 開╱關顯示螢幕(MUM54../MUM58..)
本電器進行操作時將亮起(旋轉開關在M
或1-7)。若本電器操作不當、電子保險絲
已跳閘或本電器故障,則會閃爍–請參閱
「故障排除」章節。
5 傳動器保護蓋
如要取下傳動器保護蓋,請按下後側區域,
然後取下保護蓋。
6 傳動器適用於
–多功能食物處理器和
–柑橘水果榨汁器(選配*)
在未使用時,應蓋上傳動器保護蓋。
7 工具的傳動器(攪拌槳、打蛋器或麵團勾)
和絞肉器(選配*)
8 攪拌器皿傳動器保護蓋
9 攪拌器皿傳動器(選配*)
在未使用時,應蓋上專業蔬果調理機傳動
器保護蓋。
10 電源線收納處
請於收納處收納電源線
附配件的攪拌碗
11 不鏽鋼攪拌碗
12 蓋子
工具
13 攪拌槳
14 打蛋器
15 麵團勾
16 配件包
用於存放工具和切割刀片。
多功能食物處理器
17 推料棒
18 附食材送入管的防噴濺上蓋
19 刨切刀盤
a 雙面切片刀盤–厚╱薄
b 雙面切絲刀盤–粗╱細
c 切碎盤–中細
20 刀片固定裝置
21 附食材排出口的外殼
22 玻璃攪拌器皿 MUZ45MX1
(單獨的使用說明書)
*若產品包裝中不含配件,可向經銷商或客戶
服務購買。

6
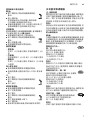
zf 操作位置
操作位置
圖 B:
注意!
操作本電器之前,請將工具╱配件安裝到正確
的傳動器上,且放置位置應妥當,然後再根據
此表放在操作位置上。旋轉臂必須卡入每個操
作位置中。
注意事項
旋轉臂配備有「臂易升」功能,可支撐旋轉臂向
上移動。
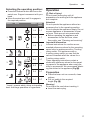
選擇操作位置:
■ 按下釋放按鈕並移動旋轉臂。用手支撐移
動。
■ 移動旋轉臂,直到卡入所需的位置為止。
位置 傳動器 工具╱
配件
MUM
52..
MUM
54/58..
1
7
1-4 1-7
1-4 1-7
1-2 1-3
2
7 * – –
3
6
2-4 3-7
2-3 3-5
4
9 3-4 5-7
7
3-4 5-7
*插入╱取出攪拌槳、打蛋器或麵團勾。加入
大量食材。
操作方法
W 受傷危險!
未完成本電器的所有準備事項前,請勿插入主
電源插頭。
注意!
操作位置上沒有配件╱工具時,請勿操作本電
器。請勿空機操作本電器。請勿將本電器或配
件暴露在熱源下。零件不得放入微波爐微波。
■ 第一次操作本電器和配件前應徹底清潔,請
參閱「清潔和保養」章節。
重要資訊
這些建議的參考操作速度是有7段速的電器。
有4段速的電器,可以在7段速參考值之後的
括號中找到。
本操作說明內含有一張貼紙,該貼紙上註明關
於本電器在使用工具或配件時的操作速度參
考值。建議將此貼紙貼在本電器上(圖C)。
準備事項
■ 將本體底座放在平坦、乾淨的表面上。
■ 將電源線拉出至所需的長度(
圖D)。
警告!
插入電源線時,請勿將其扭轉。
■ 插上主電源插頭。
攪拌碗和工具
W 旋轉中的工具導致受傷的危險!
操作本電器時,切勿將手指伸到攪拌碗中。操
作本電器前,請蓋上防噴濺上蓋(12)!
傳動器未靜止前,切勿更換工具–本電器電
源關閉時,傳動器會持續運行片刻,並停在工
具更換位置。工具靜止前,請勿移動旋轉臂。
為了安全起見,務必以傳動器保護蓋蓋住未使
用的傳動器。
注意!
僅限使用本電器隨附的攪拌碗。
攪拌槳 (13)
適用於攪拌麵團,例如蛋糕糊
打蛋器 (14)
適用於攪拌蛋白、奶油和輕麵團,例如
海綿蛋糕糊
麵團勾 (15)
適用於揉捏大麵團與攪拌無法切割
的食材(例如葡萄乾和巧克力碎片)

7
zf 操作方法
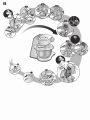
攪拌碗和工具的使用
圖 E:
■ 按下釋放鈕,然後將旋轉臂轉到位
置2。
■ 插入攪拌碗:
將攪拌碗傾斜,然後放置。朝逆時鐘
方向旋轉,直到鎖定到位為止。
■ 根據所要處理的工作,分別插入攪拌槳、打
蛋器或麵團勾,直到鎖定到位為止。
注意事項:
若使用麵團勾,請旋轉麵團護蓋,直到麵團勾
可以鎖定到位為止(圖 E-4b)。
■ 將要處理的食材放入攪拌碗內。
■ 按下釋放鈕,然後將旋轉臂轉到位
置1。
■ 蓋上防噴濺上蓋。
■ 將旋轉開關設到所需的設定。
我們的建議:
– 攪拌槳:
先用1(1)段進行攪拌,然後再選擇7(4)
段
– 打蛋器:
將設定調到7(4)段,用1(1)段進行攪拌
– 麵團勾:
先用1(1)段進行攪拌,然後用3(2)段進
行揉捏
加入更多食材
■ 使用旋轉開關關閉本電器的電源。
■ 透過防噴濺上蓋的食材投入口加入更多食
材。
或
■ 取下蓋子。
■ 按下釋放鈕,然後將旋轉臂轉到位
置2。
■ 加入食材。
使用本電器後
■ 使用旋轉開關關閉本電器的電源。
■ 拔下主電源插頭。
■ 取下蓋子。
■ 按下釋放鈕,然後將旋轉臂轉到位
置2。
■ 將工具從傳動器上取下。
■ 取下攪拌碗。
■ 請參閱「清潔和保養」章節清潔所有零件。
多功能食物處理器
W 受傷危險
請勿握住切割刀盤的銳利處或邊緣。僅限握住
切割刀盤的邊緣處。請等到傳動器靜止後,才
裝上╱取下多功能食物處理器,然後拉出主電
源插頭。切勿將手伸到食材送入管內。
警告!
使用前必須完全組裝好多功能食物處理器。切
勿在本體底座上組裝多功能食物處理器。僅限
在指定的操作位置上操作多功能食物處理器。
防止斷裂設計
圖 F:
內置的預斷點可以保護本電器的驅動器。若發
生超載的情況,多功能食物處理器的傳動軸會
斷裂。但更換傳動軸的方法很簡單。可向客戶
服務購買附傳動軸的新刀片固定裝置。
雙面切片刀片 –
厚╱薄
用於將水果和蔬菜切片。
用5(3)段進行處理。
雙面切片刀片的標記:
「1」為厚切片刀片面片
「3」為薄切片刀片片
警告!
雙面切片刀片不適用於將硬乳酪、麵包、麵包
卷或巧克力切片。僅限煮熟、蠟質的馬鈴薯在
冷卻後將其切片。
雙面切絲刀片 – 粗╱細
用於將蔬菜、水果和乳酪切絲,但硬乳
酪除外(例如帕瑪森乳酪)。
用3(2)或4(3)段進行處理。
雙面切絲刀片的標記:
「2」為粗切絲刀片面
「4」為細切絲刀片面
警告!
雙面切絲刀盤不適用於將堅果切絲。僅限在設
定7(4)上使用粗刀盤面將軟乳酪切絲。
切碎刀盤 – 中細
將生馬鈴薯、硬乳酪(例如帕瑪森起
士)、冰過的巧克力和堅果切碎。
用7(4)段進行處理。
警告!
切碎刀盤不適用於將軟乳酪和乳酪片切碎。

8
zf 清潔和保養
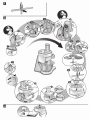
多功能食物處理器的使用
圖 G:
■ 按下釋放鈕,然後將旋轉臂轉到位
置2。
■ 插入攪拌碗:
將攪拌碗傾斜,然後放置。朝逆時鐘
方向旋轉,直到鎖定到位。
■ 按下釋放鈕,然後將旋轉臂轉到位
置3。
■ 從多功能食物處理器的傳動器上取
下傳動器保護蓋(圖G-5a)。
■ 握住刀片固定裝置的下端,確保兩側尖端
朝上。
■ 小心將所需的切片或切絲刀片放置到刀片
固定裝置的尖端(圖 G-6a)。
若使用雙面刀片,請確保所需刀面朝上。
■ 握住刀片固定裝置的頂端,然後插入外殼中
(圖 G-6b)。
■ 蓋上防噴濺上蓋(注意標記),然後朝順時鐘
方向轉到底。
■ 將多功能食物處理器放置在傳動器上,然後
朝順時鐘方向轉到底,如圖 G-8所示。
■ 將旋轉開關轉到建議的設定。
■ 將要處理的食材放入食材投入口中,然後用
推料棒壓下。
警告!
防止切過的食材堆積在排出口。
提示:若要確保切割效果平均,請成束處理食
材。
注意事項:若要處理的食材黏在多功能食物
處理器中,請等到傳動器停止,然後從多功能
食物處理器上取下防噴濺上蓋並清空食材投
入口。
使用本電器後
■ 使用旋轉開關關閉本電器的電源。
■ 朝逆時針方向旋轉多功能食物處理器,然後
將其取下。
■ 朝逆時針方向旋轉蓋子,然後將其取下。
■ 取下刀片固定裝置與刀片。為此,請將手指
從下方頂住傳動軸(圖 H)。
■ 清潔零件。
清潔和保養
建議在每次使用後立刻徹底清潔使用過的附
件和配件。
注意!
請勿使用具腐蝕性的清潔劑。表面可能會損
壞。
清潔本體底座
W 觸電危險!
切勿將本體底座浸泡在水中或放在水龍頭下
沖洗。請勿使用蒸汽清潔機。
■ 拔下主電源插頭。
■ 用濕布擦拭本體底座和傳動器保護蓋。必要
時使用些許洗滌劑。
■ 然後將本體底座晾乾。
清潔攪拌碗和工具
可將攪拌碗和工具放入洗碗機清洗。請勿將塑
膠零件放入洗碗機清洗,因為在清洗過程期間
可能會永久變形!
清潔多功能食物處理器
W 銳利刀片有導致受傷的風險!
請勿握住切割刀盤的銳利處或邊緣。用刷子
清潔刀片。
多功能食物處理器的所有零件均可放入洗碗
機清洗。
提示:若要在處理紅蘿葡後取出紅色薄片,請
倒入一點食用油在布上,然後搓揉多功能食物
處理器(非切割刀片)。然後用清水沖洗多功能
食物處理器。
重要資訊
必要時請清潔配件包。遵照配件包中的保養
說明。
存放
W 受傷危險!
不使用本電器時,請拔下電源插頭。
圖 J:
■ 將工具和刀片放在配件包中。
■ 將配件包存放在攪拌碗內。

9
zf 故障排除
故障排除
W 受傷危險!
排除故障前,請拔下主電源插頭。
MUM54../MUM58
重要須知。
若本電器操作不當、電子保險絲已跳閘或本電
器故障,則操作指示燈會閃爍。
旋轉臂必須卡入每個操作位置中。
請先利用以下資訊嘗試處理已發生的問題。
故障
本電器無法啟動。
排除方式
■ 檢查電源供應。
■ 檢查主電源插頭。
■ 檢查旋轉臂。位置是否正確?是否卡入?
■ 儘可能鎖緊玻璃攪拌器皿或攪拌碗。
■ 儘可能蓋上專業蔬果調理機蓋和鎖緊。
■ 將傳動器保護蓋裝在未使用的傳動器上。
■ 安全鎖已啟用。將本電器切換到P,然 後
返回至所需的段位。
故障
使用期間本電器電源關閉。超載保護裝置功能
已啟動。一次處理太多食物。
排除方式
■ 關閉本電器的電源。
■ 減少處理量。
■ 請勿超過所允許的最大量(請參閱「應用範
例 」 章 節 )。
故障
傳動器運作時,意外按下釋放鈕。旋轉臂向上
移動。傳動器電源關閉,但未停在工具更換位
置。
排除方式
■ 將旋轉開關設為P。
■ 將旋轉臂移動到位置1。
■ 開啟本電器電源(1段)。
■ 重新關閉本電器電源。
工具停在工具更換的位置上。
重要資訊
若無法排除故障,請聯絡客戶服務。
應用範例
鮮奶油
– 100公克-600公克
■ 在7(4)段上使用打蛋器打發鮮奶
油1½到4分鐘,此將視奶油的數
量和性質而定。
蛋白
– 1到8個蛋白
■ 在7(4)段上使用打蛋器攪打蛋白
4到6分鐘。
海綿蛋糕糊
基本食譜
– 2個雞蛋
– 2-3湯匙熱水
– 100公克糖
– 1包香草糖
– 70公克麵粉
– 70公克玉米粉
– 視需要使用泡打粉
■ 在7(4)段上使用打蛋器攪打食材(麵粉和
玉米粉除外)約4-6分鐘,直到起泡為止。
■ 將旋轉開關調至1(1)段,然後在約½到
1分鐘內舀一湯匙篩過的麵粉和玉米粉。
最大量:2x基本食譜
蛋糕糊
基本食譜
– 3-4個雞蛋
– 200-250公克糖
– 1撮鹽
– 1包香草糖或½個檸檬皮
– 200-250公克牛油或人造牛油(室溫)
– 500公克麵粉
– 1包泡打粉
– 125毫升牛奶
■ 在1(1)段上使用攪拌槳將雞蛋、糖、鹽和
香草糖或檸檬皮攪拌約10秒。
■ 將設定調至5(3)段,處理約120秒。
■ 加入牛油,用3(2)段處理約60秒。
■ 加入麵粉和泡打粉,將用1(1)段處理約
2分鐘。
■ 將設定調至3(2)段,並在2分鐘內逐步
加入牛奶。
最大量:1.5x基本食譜

10
zf 棄置
餅皮
基本食譜
– 125公克牛油(室溫)
– 100-125公克糖
– 1個雞蛋
– 1撮鹽
– 少許檸檬皮或香草糖
– 250公克麵粉
– 視需要使用泡打粉
■ 在1(1)段上使用攪拌槳處理所有食材約
½分鐘,然後用6(3)段處理約2-3分鐘。
從500公克麵粉起:
■ 在1(1)段上使用麵團勾揉捏食材約½分
鐘,然後用3(2)段處理約3-4分鐘。
最大量:2x基本食譜
酵母麵團
基本食譜
– 500公克麵粉
– 1個雞蛋
– 80公克油脂(室溫)
– 80公克糖
– 200-250毫升微溫牛奶
– 25公克新鮮酵母或1包乾酵母
– ½個檸檬皮
– 1撮鹽
■ 在1段上使用麵團勾處理所有食材約
½分鐘,然後用3(2)段處理約3-6分鐘。
最大量:1.5x基本食譜
麵食麵團
基本食譜
– 300公克麵粉
– 3個雞蛋
– 視需要使用1-2湯匙(10-20公克)冷水
■ 用3(2)段處理所有食材約3-5分鐘,直到
麵團成形為止。
最大量:1.5x基本食譜
麵包麵團
基本食譜
– 750公克麵粉
– 2包乾酵母
– 2茶匙鹽
– 450-500毫升溫水
■ 在1段上使用麵團勾處理所有食材約
½分鐘,然後用3(2)段處理約4-5分鐘。
棄置
J
以環保方式處理包裝。此電器包含歐
盟關於使用過的電器及電子產品的指
令2012/19/EU(廢棄的電器及電子產
品 - WEEE)相關標籤。該指令包含歐
盟境內舊電 器退還及回收的規範。請
諮詢本地販售機構以瞭解棄置管道。
根據歐盟指令 2006/66/EC,有瑕疵
或沒電電池/可充電式電池必須使用環
保的方式分開進行回收。
保固
本電器的保修條款由銷售所在國家的代表機
構來制定。填寫並寄回隨電器附帶的保卡紙本
或至下方官網登錄註冊商品,即可享有2年保
固,保固條件請參照本公司公開資訊。
本公司保留隨時修改這些條款的權利。
www.bosch-home.com.tw/mybosch

11
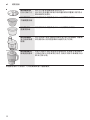
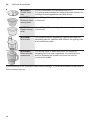
zf 選配產品
選配產品
MUZ5ZP1
柑橘水果榨
汁器
用於將柳橙、檸檬和葡萄榨汁。
MUZ5CC2
切粒器
用於將水果和蔬菜切成同樣大小的丁狀。
MUZ5FW1
絞肉器
用於切製作韃靼牛排或牛塊的新鮮肉品。
MUZ45LS1
3/6mm絞肉器
刀片
細(3公釐)、粗
(6公釐)
用於絞肉器MUZ5FW1。
細刀片用於製作餅皮和果醬,粗刀片用於製作香腸和培根。
MUZ45SV1
餅模配件
用於絞肉器MUZ5FW1。
提供有4種不同糕點模型的金屬模板。
MUZ45RV1
研磨器
用於絞肉器MUZ5FW1。
用於將堅果、杏仁、巧克力和乾麵包卷切碎。
MUZ45FV1
果漿配件
用於絞肉器MUZ5FW1。
用於將各種漿果壓成果漿(除覆盆子、番茄和玫瑰果之外)。
同時,例如黑醋栗等則會自動去除莖和籽。
MUZ45PS1
粗薯條刀片
用於多功能食物處理器MUZ5VL1。
用於將生的馬鈴薯切成薯條。
MUZ45AG1
亞洲蔬菜刀片
用於多功能食物處理器MUZ5VL1。
將水果和蔬菜切成亞洲蔬菜菜式的細條。
MUZ45RS1
磨碎刀片-粗
用於多功能食物處理器MUZ5VL1。
用於將生馬鈴薯切碎,例如製作馬鈴薯煎餅或餃子。

12
zf 選配產品
MUZ45KP1
切片切絲刀片
用於多功能食物處理器MUZ5VL1。
用於將生馬鈴薯切碎製作馬鈴薯煎餅和炸薯餅,用於將水
果和蔬菜切成厚片。
MUZ5ER2
不鏽鋼攪拌碗
可在攪拌碗中處理高達750公克的麵粉和食材。
MUZ5KR1
塑膠攪拌碗
可在攪拌碗中處理高達750公克的麵粉和食材。
MUZ5MM1
多功能食物處
理器
用於將香草、蔬菜、蘋果和肉類切碎,用於將胡蘿蔔、白蘿蔔
和乳酪切絲,用於將堅果和冰過的巧克力切碎。
MUZ45MX1
玻璃攪拌器皿
本配件適用於攪拌液體或半固體食物、將新鮮水果和蔬菜
切塊或切碎以及將食物打成泥,並用於切碎冷凍食物(如水
果)或打碎冰塊。
若產品包裝中不含配件,可向經銷商或客戶服務購買。

13
en
Intended use
Intended use
This appliance is intended for domestic use only. Use the appliance
only for processing normal amounts of food and for normal amounts
of time for domestic use. Do not exceed permitted maximum
quantities (X “Application examples” see page 21).
The appliance is suitable for mixing, kneading and beating food.
The appliance must not be used for processing other substances
or objects. Additional applications are possible if the accessories
approved by the manufacturer are used. Only use the appliance
with approved genuine parts and accessories. Never use the
accessory parts for other appliances.
Only use the appliance indoors at room temperature and up to
2000 m above sea level.
Important safety information
Read and follow the instruction manual carefully and keep for later
reference! Enclose these instructions when you give this appliance
to someone else. If the instructions for correct use of the appliance
are not observed, the manufacturer’s liability for any resulting
damage will be excluded.
This appliance can be used by persons with reduced physical,
sensory or mental capabilities or lack of experience and/or
knowledge if they have been given supervision or instruction
concerning use of the appliance in a safe way and if they
understand the hazards involved. Keep children away from the
appliance and connecting cable and do not allow them to use the
appliance. Do not let children play with the appliance. Cleaning and
user maintenance must not be performed by children.
W Risk of electric shock and re!
■ Connect and operate the appliance only in accordance with the
specications on the rating plate. Do not use the appliance if the
power cord and/or appliance are damaged. Only our customer
service may repair the appliance, e.g. by replacing a damaged
power cord, in order to avoid hazards.
■ Use only the rotary switch to switch the appliance on or o. Never
connect the appliance to timer switches or remote- controllable
sockets. Never leave the appliance unattended while it is
switched on!
■ Do not place the appliance on or near hot surfaces, e.g. hobs.
The power cord must not come into contact with hot parts or be
pulled across sharp edges.

14
en Important safety information
■ Never immerse the base unit in water or place it in the
dishwasher. Do not steam-clean the appliance. Do not use the
appliance with damp hands.
■ After each use, whenever the appliance is unsupervised, prior to
assembly, prior to disassembly, prior to cleaning and in the event
of an error, the appliance must always be disconnected from the
mains.
W Risk of injury!
■ Before replacing accessories or additional parts which move
during operation, the appliance must be switched o and dis
connected from the power supply. After switching o, the drive
continues running for a short time. Wait until the drive has come
to a standstill.
■ Do not adjust the swivel arm while the appliance is switched on.
■ Only use tools when the bowl is inserted, the lid is tted and the
protective drive covers are in place! When using accessories, t
the bowl, lid and drive covers according to the instructions!
■ While operating the appliance, never reach into the bowl or lling
shaft with your hands. Do not insert any objects (e.g. wooden
spoon) into the bowl or lling shaft. Keep hands, hair, clothing
and other utensils away from rotating parts.
■ Never use tools and accessories or 2 accessories at the same
time. When using the accessories, follow the individual operating
instructions enclosed.
■ The accessory must be completely assembled before use. Never
assemble the accessory on the base unit. The accessory should
only be used in the intended operating position.
■ Do not grip the sharp blades or edges of the cutting discs. Take
hold of cutting discs by the edge only.
■ Care shall be taken when handling the sharp cutting blades,
emptying the container and during cleaning.
W Risk of scalding!
If processing hot liquids, steam escapes through the funnel in the
lid. Add a max. 0.5 litres of hot or frothing liquid.
W Risk of suocation!
Do not allow children to play with packaging material.
W Caution!
We recommend that the appliance is never switched on for longer
than is necessary to process the ingredients. Do not operate
at no-load.

15
en
Important safety information
Safety systems
Start lock-out
See “Operating positions” table.
The appliance can be switched on in
pos. 1 and 3 only:
■ when the bowl (11) has been inserted
and turned until it locks into place.
Restart lock-out
If the power is interrupted, the appliance
remains switched on but the motor does
not start running again when the power
is restored. To switch the appliance on
again, turn the rotary switch to P,
then switch on.
Overload protection
If the motor switches itself o while the
appliance is being used, the overload
protection feature has been activated.
A possible cause may be that too much
food was processed at one time.
If a safety system is activated, see
“Troubleshooting”.
The appliance requires no maintenance.
Congratulations on the purchase of your
new Bosch appliance.
You can nd further information about
our products on our web page.
Contents
Intended use ............................................. 13
Important safety information .....................13
Safety systems .........................................15
Overview...................................................16
Operating positions...................................16
Operation .................................................. 17
Cleaning and servicing .............................20
Storage .....................................................20
Troubleshooting ........................................ 20
Application examples................................21
Disposal .................................................... 22
Guarantee.................................................22
Optional accessories ................................23
W Important!
It is essential to clean the appliance thoroughly after each use or
after it has not been used for an extended period (X “Cleaning and
servicing” see page 20).
W Explanation of the symbols on the appliance or accessory
i
Follow the instructions in the operating instructions.
Y
Caution! Rotating blades.
W
Caution! Rotating tools.
Do not place ngers in the feed tube.

16
en Overview
Overview
Fig. A:
Base unit
1 Release button
2 Swivel arm
“Easy Armlift” function to support the
upward movement of the arm (see
“Work positions”).
3 Rotary switch
When the appliance has been switched
o (position P), the appliance runs
automatically to the optimum position for
changing the tools.
MUM52..:
P = Stop
M = Instantaneous switching at
maximum speed, hold switch for
required blending duration.
Settings 1-4, Operating speed:
1 = low speed – slow,
4 = high speed – fast.
MUM54../MUM58..:
P = Stop
M = Instantaneous switching at
maximum speed, hold switch for
required blending duration.
Settings 1-7, Operating speed:
1 = low speed – slow,
7 = high speed – fast.
4 On/O display (MUM54../MUM58..)
Is lit while the appliance is operating
(rotary switch on M or 1-7). Flashes
if the appliance has been operated
incorrectly, the electronic fuse has
tripped or the appliance is defective –
see section “Troubleshooting”.
5 Drive cover
To remove the drive cover, press on
the rear area and remove cover.
6 Drive for
– Continuous-feed shredder and
– Citrus press (optional accessory*)
When not in use, attach the drive cover.
7 Drive for tools (stirrer, whisk, kneading
hook) and mincer (optional accessory*)
8 Blender drive cover
9 Drive for blender (optional accessory*)
When not in use, attach the blender
drive cover.
10 Cord store
Stow the cord in the cord store
Bowl with accessories
11 Stainless steel stirring bowl
12 Lid
Tools
13 Stirrer
14 Whisk
15 Kneading hook with dough deector
16 Accessories bag
For storage of the tools and cutting
discs.
Continuous-feed shredder
17 Pusher
18 Cover with lling shaft
19 Cutting discs
a Reversible slicing disc – thick / thin
b Reversible shredding disc –
coarse / ne
c Grating disc – mediumne
20 Disc holder
21 Housing with outlet opening
22 Glass blender MUZ45MX1
(separate instruction manual)
* If an accessory is not included in the
product package, it can be purchased via
the trade or customer service.
Operating positions
Fig. B:
Attention!
Before operating the appliance, attach the
tool / accessory to the correct drive and
in the correct position and place in the
operating position according to this table.
The swivel arm must be engaged in every
operating position.
Note
The swivel arm features an “Easy Armlift”
function which supports the upwards
movement of the swivel arm.

17
en
Operation
Selecting the operating position:
■ Press the Release button and move the
swivel arm. Support movement with your
hand.
■ Move the swivel arm until it engages in
the required position.
Position Drive MUM52.. MUM
54/58..
1
7
1-4 1-7
1-4 1-7
1-2 1-3
2
7 * – –
3
6
2-4 3-7
2-3 3-5
4
9 3-4 5-7
7
3-4 5-7
* Insert / remove whisk, stirrer or kneading
hook. Add large quantities of ingredients.
Operation
W Risk of injury!
Do not insert mains plug until all
preparations for working with the appliance
are complete.
Attention!
Do not operate the appliance without an
accessory/tool in the operating position.
Do not operate the appliance empty. Do not
expose appliance or accessories to heat
sources. Parts are not microwave-safe.
■ Before operating the appliance and
accessories for the rst time, clean
thoroughly; see “Cleaning and servicing”.
Important information
In these instructions for use the recom-
mended reference values for the operating
speed refer to appliances with a 7-setting
rotary switch. For appliances with a
4setting rotary switch you can nd the
values in brackets after the values for a
7-setting rotary switch.
These operating instructions contain a
sticker with reference values for the operat-
ing speed of the appliance when using the
tools or accessories. We recommend attach-
ing this sticker to the appliance (Fig. C).
Preparation
■ Place the base unit on a smooth, clean
surface.
■ Pull out cable to the required
length (Fig. D).
Warning!
Do not twist the cord when inserting it.
■ Insert the mains plug.

18
en Operation
Bowl and tools
W Risk of injury from the rotating tools
While the appliance is operating, never
place ngers in the mixing bowl. Attach the
cover (12) before operating the appliance!
Do not change tools until the drive has
come to a standstill – when the appliance
is switched o, the drive continues running
briey and stops in the tool change position.
Do not move the swivel arm until the tool
has come to a standstill.
Always secure unused drives with
protective drive covers.
Attention!
Use bowl with this appliance only.
Stirrer (13)
for stirring dough, e.g. cake mixture
Whisk (14)
for whisking egg whites, cream and
light dough, e.g. sponge mixture
Kneading hook (15)
for kneading heavy dough and
mixingin ingredients that ought not
be cut (e.g. raisins and chocolate
chips)
Working with the bowl and the tools
Fig. E:
■ Press the Release button and
move the swivel arm to
position 2.
■ Insert the bowl:
Tilt the bowl forwards and then set it
down. Turn anti-clockwise until it locks
into place.
■ Depending on the processing task, insert
the stirrer, whisk or kneading hook until it
locks into position.
Note:
If using the kneading hook, rotate the dough
deector until the kneading hook can lock
into position (Fig. E-4b).
■ Put the ingredients to be processed into
the bowl.
■ Press the Release button and
move the swivel arm to
position 1.
■ Attach the cover.
■ Set the rotary switch to the desired
setting.
Our recommendation:
– Stirrer:
rst stir in at setting 1 (1), then select
setting 7 (4)
– Whisk:
setting 7 (4), mix in at setting 1 (1)
– Kneading hook:
rst stir in at setting 1 (1), knead at
setting 3 (2)
Adding more ingredients
■ Switch o the appliance with the rotary
switch.
■ Add more ingredients through the feed
tube in the cover.
or
■ Remove lid.
■ Press the Release button and
move the swivel arm to
position 2.
■ Add ingredients.
After using the appliance
■ Switch o the appliance with the rotary
switch.
■ Remove mains plug.
■ Remove lid.
■ Press the Release button and
move the swivel arm to
position 2.
■ Take the tool out of the drive.
■ Remove the bowl.
■ Clean all parts, see “Cleaning and
servicing”.
Continuous-feed shredder
W Risk of injury
Do not grip the sharp blades or edges of the
cutting discs. Take hold of cutting discs by
the edge only. Before attaching / removing
the continuous-feed shredder, wait until the
drive has come to a standstill and pull out
the mains plug. Do not reach into the feed
tube.

19
en
Operation
Warning!
The continuous-feed shredder must be
completely assembled before use. Never
assemble the continuous-feed shredder on
the base unit. Operate the continuous-feed
shredder in the indicated operating position
only.
Predetermined breaking point
Fig. F:
The built-in predetermined breaking point
protects the drive of the appliance. If an
overload occurs, the drive shaft of the
continuous-feed shredder breaks. However,
the drive shaft can easily be replaced. A
new disc holder with drive shaft is available
from customer service.
Reversible slicing disc –
thick / thin
for slicing fruit and vegetables.
Process at setting 5 (3).
Designation on the reversible slicing disc:
“1” for the thick slicing side
“3” for the thin slicing side
Warning!
The reversible slicing disc is not suitable
for slicing hard cheese, bread, rolls or
chocolate. Slice boiled, waxy potatoes only
when they are cold.
Reversible shredding disc –
coarse / ne
for shredding vegetables, fruit and cheese,
except for hard cheese (e.g. Parmesan).
Processing at setting 3 (2) or 4 (3).
Designation on the reversible shredding
disc:
“2” for the coarse shredding side
“4” for the ne shredding side
Warning!
The reversible shredding disc is not suitable
for shredding nuts. Shred soft cheese with
the coarse side only at setting 7 (4).
Grating disc – medium-ne
for grating raw potatoes, hard
cheese (e.g. Parmesan), cooled chocolate
and nuts.
Process at setting 7 (4).
Warning!
The grating disc is not suitable for grating
soft cheese and cheese slices.
Working with the continuous-feed
shredder
Fig. G:
■ Press the Release button and
move the swivel arm to
position 2.
■ Insert the bowl:
Tilt the bowl forwards and then set it
down. Turn anti-clockwise until it locks
into place.
■ Press the Release button and
move the swivel arm to
position 3.
■ Remove drive cover from the
drive of the continuous-feed shredder
(Fig. G-5a).
■ Hold disc holder at the lower end,
ensuring that the two tips are face up.
■ Carefully place the required slicing or
shredding disc onto the tips of the disc
holder (Fig. G-6a).
In the case of reversible discs, ensure
that the required side is face up.
■ Grip disc holder at the upper end and
insert into the housing (Fig. G-6b).
■ Attach the cover (note mark) and turn all
the way in a clockwise direction.
■ Place continuous-feed shredder on the
drive and rotate all the way in a clockwise
direction, as illustrated in Fig. G-8.
■ Turn rotary switch to recommended
setting.
■ Put food to be processed in the feed tube
and push down with the pusher.
Warning!
Prevent the cut ingredients from building up
in the outlet opening.
Tip: To ensure even cutting results, process
thin ingredients in bunches.

20
en Cleaning and servicing
Note: If the food to be processed sticks in
the continuous-feed shredder, switch food
processor o, pull out mains plug, wait until
the drive comes to a standstill, remove
cover from the continuous-feed shredder
and empty feed tube.
After using the appliance
■ Switch o the appliance with the rotary
switch.
■ Rotate the continuous-feed shredder in
an anti-clockwise direction and remove.
■ Rotate the lid in an anti-clockwise
direction and remove.
■ Remove disc holder with disc. To do this,
press nger from below against the drive
shaft (Fig. H).
■ Clean parts.
Cleaning and servicing
The attachments and accessories used
must be thoroughly cleaned after each use.
Attention!
Do not use abrasive cleaning agents.
Surfaces may be damaged.
Cleaning the base unit
W Danger of electric shock!
Never immerse the base unit in water or
place under running water. Do not use a
steam cleaner.
■ Remove mains plug.
■ Wipe the base unit and drive cover with
a damp cloth. If required, use a little
detergent.
■ Then dry the base unit.
Cleaning the bowl and tools
The bowl and tools are dishwasher-
proof. Do not wedge plastic parts in the
dishwasher, as they could be permanently
deformed during the washing process!
Cleaning the continuous-feed
shredder
W Risk of injury from sharp blades!
Do not grip the sharp blades or edges of the
cutting discs. Clean them with a brush.
All parts of the continuous-feed shredder
are dishwasher-proof.
Tip: To remove the red lm after processing
e.g. carrots, pour a little cooking oil on a
cloth and rub the lm o the continuous
feed shredder (not the cutting discs). Then
rinse the continuous-feed shredder.
Important information
If required, clean accessories bag. Follow
care instructions in the bag.
Storage
W Risk of injury!
When the appliance is not in use, pull out
the mains plug.
Fig. J:
■ Store tools and cutting discs in the
accessories bag.
■ Keep accessories bag in the bowl.
Troubleshooting
W Risk of injury!
Before eliminating a fault, pull out the mains
plug.
Important information for
MUM54../MUM58..
The Operating indicator ashes if the
appliance has been operated incorrectly
or the electronic fuse has tripped or the
appliance is defective.
The swivel arm must be engaged in
every operating position.
Initially try to eliminate the problem which
has occurred with the help of the following
information.
Fault
Appliance does not start.
Remedial action
■ Check the power supply.
■ Check the mains plug.
■ Check swivel arm. Correct position?
Engaged?
■ Screw on blender or bowl as far as
possible.
ページが読み込まれています...
ページが読み込まれています...
ページが読み込まれています...
ページが読み込まれています...
ページが読み込まれています...
ページが読み込まれています...
ページが読み込まれています...
ページが読み込まれています...
ページが読み込まれています...
ページが読み込まれています...
ページが読み込まれています...
ページが読み込まれています...
ページが読み込まれています...
ページが読み込まれています...
ページが読み込まれています...
ページが読み込まれています...
-
 1
1
-
 2
2
-
 3
3
-
 4
4
-
 5
5
-
 6
6
-
 7
7
-
 8
8
-
 9
9
-
 10
10
-
 11
11
-
 12
12
-
 13
13
-
 14
14
-
 15
15
-
 16
16
-
 17
17
-
 18
18
-
 19
19
-
 20
20
-
 21
21
-
 22
22
-
 23
23
-
 24
24
-
 25
25
-
 26
26
-
 27
27
-
 28
28
-
 29
29
-
 30
30
-
 31
31
-
 32
32
-
 33
33
-
 34
34
-
 35
35
-
 36
36


