

A B C D E F
1
1
2
3
4
5
6
7
8
9
10
11
12
13
2

3 4
5 6
7 8
9 10

11 12
13 14
15 16
17 18

19 20
21

22

en
7
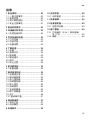
Table of contents
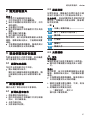
1 Safety ............................................8
1.1 General information....................8
1.2 Intended use...............................8
1.3 Restriction on user group...........9
1.4 Safety instructions ......................9
2 Avoiding material damage.........12
3 Environmental protection and
saving energy.............................12
3.1 Disposing of packaging ...........12
4 Unpacking and checking ...........12
4.1 Unpacking the appliance
and parts ..................................12
4.2 Contents of package................12
4.3 Setting up appliance ................13
5 Familiarising yourself with
your appliance............................13
5.1 Appliance .................................13
5.2 Rotary switch............................13
5.3 Swivel arm ................................13
5.4 Drives .......................................14
5.5 Tools.........................................14
5.6 Parked position ........................14
6 Before using for the first time ...15
6.1 Preparing the appliance ...........15
7 Basic operation ..........................15
7.1 Cable length .............................15
7.2 Moving the swivel arm .............15
7.3 Inserting bowl ...........................15
7.4 Removing bowl.........................15
7.5 Inserting tools...........................15
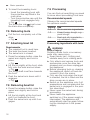
7.6 Removing tools ........................16
7.7 Attaching bowl lid.....................16
7.8 Removing bowl lid....................16
7.9 Processing................................16
7.10 Drive cover .............................17
8 Cleaning and servicing ..............17
8.1 Cleaning products ....................17
8.2 Overview of cleaning................18
9 Special accessories ...................18
10 Application examples ..............18
10.1 Sample recipe ........................18
11 Troubleshooting.......................20
12 Disposal....................................21
12.1 Disposing of old appliance ....21
13 Customer Service.....................21
13.1 Product number (E-Nr.) and
production number (FD).........21
13.2 Warranty conditions................21

en Safety
8
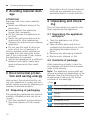
1 Safety
Please read the safety information to ensure that you use the ap-
pliance safely.
1.1 General information
¡ Read this instruction manual carefully. Only this will ensure you
use the appliance safely and efficiently.
¡ Please note the additional instructions when using supplied or
optionally available accessories.
¡ Keep the instruction manual and the product information safe
for future reference or for the next owner.
¡ Check the appliance after unpacking it. Do not connect the ap-
pliance if it has been damaged in transit.
1.2 Intended use
Please read the information on intended use to ensure that you
use the appliance correctly and safely.
Only use this appliance:
¡ With genuine parts and accessories.
¡ For additional applications described in the instructions for ac-
cessories that are optional or come with the appliance.
¡ For mixing, kneading and beating food.
¡ Under supervision.
¡ In private households and in enclosed spaces in a domestic en-
vironment at room temperature.
¡ for normal processing quantities and for normal processing
times for domestic use.
¡ Up to an altitude of max. 2000m above sea level.
Disconnect the appliance from the power supply when:
¡ are not using the appliance.
¡ the appliance is unattended.
¡ assembling the appliance.
¡ taking the appliance apart.
¡ cleaning the appliance.

Safety en
9
¡ approaching rotating parts.
¡ Change tools.
¡ confronted with a fault.
1.3 Restriction on user group
Avoid risks to children and vulnerable persons.
This appliance can be used by persons with reduced physical,
sensory or mental capabilities or a lack of experience and/or
knowledge if they have been given supervision or instruction con-
cerning use of the appliance in a safe way and if they understand
the hazards involved.
Children must not play with the appliance.
Cleaning and user maintenance must not be performed by chil-
dren.
The appliance must not be used by children. Keep children away
from the appliance and power cable.
1.4 Safety instructions
Observe the safety instructions.
WARNING‒Risk of electric shock!
If the appliance or the power cord is damaged, this is dangerous.
▶
Never operate a damaged appliance.
▶
Never operate an appliance with a cracked or fractured surface.
▶
Never pull on the power cord to unplug the appliance. Always
unplug the appliance at the mains.
▶
If the appliance or the power cord is damaged, immediately un-
plug the power cord or switch off the fuse in the fuse box.
▶
Call Customer Service. →Page21
▶
Repairs to the appliance should only be carried out by trained
specialist staff.
Improper installation is dangerous.
▶
Connect and operate the appliance only in accordance with the
specifications on the rating plate.
Incorrect repairs are dangerous.
▶
Repairs to the appliance should only be carried out by trained
specialist staff.

en Safety
10
▶
Only use genuine spare parts when repairing the appliance.
▶
If the power cord of this appliance is damaged, it must be re-
placed by the manufacturer, the manufacturer's Customer Ser-
vice or a similarly qualified person in order to prevent any risk.
An ingress of moisture can cause an electric shock.
▶
Never immerse the appliance or the power cord in water or
clean in the dishwasher.
▶
Only use the appliance in enclosed spaces.
▶
Never expose the appliance to intense heat or humidity.
▶
Do not use steam- or high-pressure cleaners to clean the appli-
ance.
If the insulation of the power cord is damaged, this is dangerous.
▶
Never let the power cord come into contact with hot appliance
parts or heat sources.
▶
Never let the power cord come into contact with sharp points or
edges.
▶
Never kink, crush or modify the power cord.
WARNING‒Risk of fire!
Intense heat may cause the appliance and tools to catch fire.
▶
Never place the appliance on or near hot surfaces.
WARNING‒Risk of injury!
Rotating drives, tools or accessory parts may cause injury.
▶
Keep hands, hair, clothing and utensils away from rotating parts.
▶
Only attach and remove tools and accessories once the drive
has stopped and you have unplugged the appliance.
▶
Before changing tools or cleaning the appliance, switch off and
disconnect it from the mains.
▶
Only use the tools when the bowl is inserted, the lid is fitted and
the drive covers are in place.
▶
Switch on the appliance only if all preparations are complete
and the swivel arm is engaged in the position described.
▶
Never open the swivel arm during processing.
▶
Never leave the appliance switched on if the power supply is in-
terrupted. The appliance will automatically start up again follow-
ing the interruption in the power supply.

Safety en
11
Operating the appliance with damaged parts may result in injury.
▶
Parts which show cracks or other damage or do not fit correctly
must be replaced with genuine spare parts.
WARNING‒Risk of crushing!
Your hands and fingers could get caught.
▶
Do not reach into the bowl when lowering the swivel arm.
WARNING‒Risk of suffocation!
Children may put packaging material over their heads or wrap
themselves up in it and suffocate.
▶
Keep packaging material away from children.
▶
Do not let children play with packaging material.
Children may breathe in or swallow small parts, causing them to
suffocate.
▶
Keep small parts away from children.
▶
Do not let children play with small parts.
WARNING‒Risk of harm to health!
Soiling on surfaces may be harmful to health.
▶
Follow the cleaning instructions.
▶
Clean surfaces which come in contact with food before each
use.

en Avoiding material damage
12
Avoiding material damage
2 Avoiding material dam-
age
Avoiding material damage
ATTENTION!
Improper use may cause material
damage.
▶
Never use different drives at the
same time.
▶
Never operate the appliance
longer than necessary.
▶
Do not operate the appliance at
no-load.
▶
Never use genuine parts and ac-
cessories for other appliances.
▶
Observe the maximum processing
quantities.
▶
Do not use the bowl to store ob-
jects which do not belong to it.
During operation warm exhaust air
escapes from the vent grille at the
rear. If this is blocked, it may cause
the appliance to overheat.
▶
Set up the appliance at a sufficient
distance from walls, easily dam-
aged surfaces and other appli-
ances.
Environmental protection and saving energy
3 Environmental protec-
tion and saving energy
Environmental protection and saving energy
Help protect the environment by us-
ing your appliance in a way that con-
serves resources and by disposing of
reusable materials properly.
3.1 Disposing of packaging
The packaging materials are environ-
mentally compatible and can be re-
cycled.
▶
Sort the individual components by
type and dispose of them separ-
ately.
Information about current disposal
methods are available from your
specialist dealer or local authority.
Unpacking and checking
4 Unpacking and check-
ing
Unpacking and checking
Find out here what you need to note
when unpacking the appliance.
4.1 Unpacking the appliance
and parts
1. Take the appliance out of the
packaging.
2. Take all other parts and the ac-
companying documents out of the
packaging and place them to
hand.
3. Remove any packaging material.
4. Remove any stickers or film.
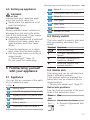
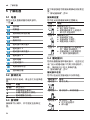
4.2 Contents of package
After unpacking all parts, check for
any damage in transit and complete-
ness of the delivery.
Note:The appliance comes with ad-
ditional accessories depending on its
features. See the instructions for the
accessories to discover the further
contents of the package.
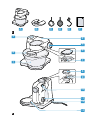
→Fig.
1
A
Base unit with mixing bowl
B
Lid with integrated filling shaft
C
Stirrer
D
Whisk
E
Kneading hook
F
Accompanying documents

Familiarising yourself with your appliance en
13
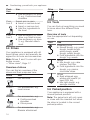
4.3 Setting up appliance
WARNING
Risk of fire!
Intense heat may cause the appli-
ance and tools to catch fire.
▶
Never place the appliance on or
near hot surfaces.
ATTENTION!
During operation warm exhaust air
escapes from the vent grille at the
rear. If this is blocked, it may cause
the appliance to overheat.
▶
Set up the appliance at a sufficient
distance from walls, easily dam-
aged surfaces and other appli-
ances.
1. Place the appliance on a stable,
level, clean and flat work surface.
2. Pull the power cable out to the re-
quired length.
→"Cable length", Page15
Do not insert the mains plug.
Familiarising yourself with your appliance
5 Familiarising yourself
with your appliance
Familiarising yourself with your appliance
5.1 Appliance
You can find an overview of the parts
of your appliance here.
→Fig.
2
1
Mixing bowl
2
Lid with integrated filling shaft
3
Release button for swivel arm
4
Swivel arm
5
Rotary switch
6
Protective cover for drive 2
7
Drive 2
8
Protective cover for drive 3
9
Drive 3
10
Vent grille
11
Main drive
12
Cord store
13
Recess for bowl
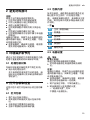
5.2 Rotary switch
The rotary switch is used to start and
stop processing and select the
speed.
Symbol Function
Stop processing.
Process ingredients at low
speed.
Process ingredients at
maximum speed.
Move the drive to the
parked position.
5.3 Swivel arm
The swivel arm can be adjusted and
fixed in different positions.
If the release button is pressed, the
swivel arm can be moved to the re-
quired position.
→"Moving the swivel arm", Page15
Swivel arm positions
You can find an overview of the posi-
tions of the swivel arm here.
Posi-
tion
Use
Posi-
tion1
Swivel arm is closed.
¡ Process ingredients with
tools.

en Familiarising yourself with your appliance
14
Posi-
tion
Use
¡ Use accessory on drive
2, e.g. Continuous-feed
shredder
Posi-
tion2
Swivel arm is open.
¡ Insert or remove bowl.
¡ Insert or remove tool.
¡ Add the ingredients to
the bowl.
Posi-
tion3
¡ Use accessory on main
drive, e.g. Meat mincer.
¡ Use accessory on drive
3, e.g. Blender attach-
ment.
5.4 Drives
Your appliance is equipped with dif-
ferent drives, which are specially de-
signed for its tools and accessories.
Note:Drives 2 and 3 come with pro-
tective covers.
→"Drive cover", Page17
Overview of drives
You can find an overview of the
drives and their purposes here.
Drive Use
Drive1 For the tools.
Drive1 For accessories, e.g.
meat mincer
Drive2 For accessories, e.g.
¡ Continuous-feed
shredder
¡ Citrus press
Drive3 For accessories, e.g.
Blender attachment
Drive Use
5.5 Tools
You can find out everything you need
to know about the different tools
here.
Overview of tools
Use the appropriate tool depending
on use.
Tool Use
Kneading hook
¡ Knead dough, e.g. yeast
dough, bread dough,
pizza dough, pasta
dough, pastry dough.
¡ Fold ingredients into the
dough, e.g. seeds.
Stirrer
¡ Mix dough, e.g. cake
mixture, fruit flan.
¡ Fold ingredients into the
dough, e.g. raisins,
chocolate chips.
Whisk
¡ Beat whipped egg
whites and cream (at
least 30% fat).
¡ Mix light dough, e.g.
sponge mixture.
5.6 Parked position
Your appliance is equipped with a
manual parked position.
Note:The swivel arm will only open
or close with the inserted tool when
the drive is located in the correct
parked position.

Before using for the first time en
15
Moving the drive to the parked
position
Requirement:The rotary switch is
set to .
▶
Set the rotary switch to and hold.
a The drive slowly moves until the
correct parked position is reached.
Note:If the drive does not move, the
correct parked position has already
been reached.
Before using for the first time
6 Before using for the
first time
Before using for the first time
Prepare the appliance for use.
6.1 Preparing the appliance
1. Press the release button and raise
the swivel arm until it engages.
→"Moving the swivel arm",
Page15
2. Lift and remove the bowl.
→"Removing bowl", Page15
3. Clean all parts that come into con-
tact with food before using for the
first time.
→"Cleaning and servicing",
Page17
4. Put the cleaned and dried parts
out ready for use.
Basic operation
7 Basic operation
Basic operation
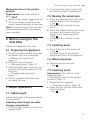
7.1 Cable length
Adjust the length of the power cable
to your needs.
Adjusting cable length via cable
storage compartment
1. Pull the power cable out to the re-
quired length.
2. To shorten the cable, push it into
the cable storage compartment.
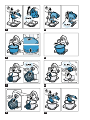
7.2 Moving the swivel arm
1. Press the release button and raise
the swivel arm until it engages.
→Fig.
3
a The swivel arm is fixed in posi-
tion2.
2. Press the release button and move
the swivel arm down until it en-
gages in the vertical position.
→Fig.
4
a The swivel arm is fixed in posi-
tion3.
7.3 Inserting bowl
▶
Place the bowl in the base unit.
→Fig.
5
The bowl must be positioned
straight and firm on the base unit.
7.4 Removing bowl
▶
Lift and remove the bowl.
→Fig.
6
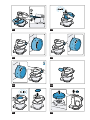
7.5 Inserting tools
Requirement:The drive is in the
parked position.
→"Moving the drive to the parked
position", Page15
1. Select the tool required.
→"Overview of tools", Page14
2. Press the tool into the main drive
until it engages.
→Fig.
7

en Basic operation
16
3. To insert the kneading hook:
‒ Insert the kneading hook with
the protective cap fitted in the
main drive.
‒ Turn the protective cap until the
kneading hook engages fully.
→Fig.
8
The protective cap must cover
the main drive completely.
7.6 Removing tools
▶
Pull the tool completely out of the
drive.
→Fig.
9
7.7 Attaching bowl lid
Requirements
¡ The required tool is used here.
¡ The bowl has been inserted.
¡ The swivel arm is closed.
1. Press the release button, raise the
swivel arm slightly and hold in
place.
→Fig.
10
2. Lift the lid slightly at the front, slide
fully onto the bowl and set down.
→Fig.
11
The filling shaft must face towards
the front.
3. Push the swivel arm down until it
engages.
→Fig.
12
7.8 Removing bowl lid
1. Press the release button, raise the
swivel arm slightly and hold in
place.
2. Lift the lid slightly at the front and
pull it out towards the front.
3. Push the swivel arm up until it en-
gages.
7.9 Processing
You can find out everything you need
to know about processing food here.
Recommended speeds
Observe the recommended speeds
for optimum results.
Setting Use
1-2 Stir in and mix ingredients.
1-2 Knead heavy dough, e.g.
yeast dough.
3-4 Beat and stir ingredients,
e.g. whipped cream.
Processing ingredients with tools
WARNING
Risk of injury!
Rotating drives, tools or accessory
parts may cause injury.
▶
Keep hands, hair, clothing and
utensils away from rotating parts.
▶
Only attach and remove tools and
accessories once the drive has
stopped and you have unplugged
the appliance.
▶
Before changing tools or cleaning
the appliance, switch off and dis-
connect it from the mains.
▶
Only use the tools when the bowl
is inserted, the lid is fitted and the
drive covers are in place.
▶
Switch on the appliance only if all
preparations are complete and the
swivel arm is engaged in the posi-
tion described.
▶
Never open the swivel arm during
processing.
▶
Never leave the appliance
switched on if the power supply is
interrupted. The appliance will
automatically start up again follow-
ing the interruption in the power
supply.

Cleaning and servicing en
17
Requirements
¡ The bowl has been inserted.
¡ The required tool is inserted.
1. Add the ingredients to the bowl.
2. Press the release button and push
the swivel arm down until it en-
gages.
3. Insert the mains plug.
4. Set the rotary switch to the re-
quired speed.
→Fig.
13
5. Process the ingredients until you
achieve the required result.
6. Set the rotary switch to .
→Fig.
14
Wait until the appliance stops.
7. Set the rotary switch to and hold.
→Fig.
15
a The drive slowly moves until the
correct parked position is reached.
8. Unplug the mains plug.
Tips
¡ You can change the speed at any
time during processing or interrupt
processing.
¡ Clean all parts immediately after
use so that residues do not dry on.
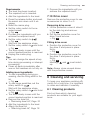
Adding more ingredients
1. To add ingredients during pro-
cessing, use the filling shaft in the
lid.
→Fig.
16
2. To add large quantities, set the
rotary switch to .
Wait until the appliance stops.
3. Set the rotary switch to and hold.
→Fig.
15
a The drive slowly moves until the
correct parked position is reached.
4. Remove the bowl lid.
→"Removing bowl lid", Page16
5. Add the ingredients to the bowl.
6. Attach the bowl lid.
→"Attaching bowl lid", Page16
7. Process the ingredients until you
achieve the required result.
7.10 Drive cover
Remove the protective cover to use
accessories on drive 2 or 3.
Removing drive cover
1. Lift the protective cover of drive 2
by the side lug and remove.
→Fig.
17
2. Pull up the protective cover for
drive3 and remove.
→Fig.
18
Fitting drive cover
1. Position the protective cover for
the drive2 and press in place
firmly.
→Fig.
19
2. Position the protective cover for
the drive3 and press in place
firmly.
→Fig.
20
Markings and must match
up.
Note:Always close unused drives
with the protective covers.
Cleaning and servicing
8 Cleaning and servicing
Cleaning and servicing
To keep your appliance working effi-
ciently for a long time, it is important
to clean and maintain it carefully.
8.1 Cleaning products
Find out here which cleaning
products are suitable for your appli-
ance.

en Special accessories
18
ATTENTION!
Using unsuitable cleaning agents or
incorrect cleaning may damage the
appliance.
▶
Do not use cleaning agents con-
taining alcohol or spirits.
▶
Do not use sharp, pointed or metal
objects.
▶
Do not use abrasive cloths or
cleaning agents.
▶
Only clean the transparent bowl
made of Tritan with a detergent
solution and a soft cloth or
sponge.
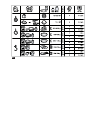
8.2 Overview of cleaning
You can find an overview of how to
best clean the appliance and the
other parts here.
→Fig.
21
Tip:When processing food such as
carrots, plastic parts may become
discoloured. Remove discolouration
with a soft cloth and a few drops of
cooking oil.
Special accessories
9 Special accessories
Special accessories
You can buy accessories from the
after-sales service, from specialist re-
tailers or online. Only use genuine
accessories as these have been spe-
cifically designed for your appliance.
Accessories vary from one appliance
to another. When purchasing ac-
cessories, always quote the exact
product number (E no.) of your appli-
ance. →Page21
You can find out which accessories
are available for your appliance in
our catalogue, in the online shop or
from our after-sales service.
www.bosch-home.com
Application examples
10 Application examples
Application examples
Observe the comments and figures
in the table.
→Fig.
22
Tip:You can find more application
examples and recipes for your home
appliance online. www.bosch-
home.com
Select your country site under the
menu item "Find your local website"
and search for your model using the
search field. It is best to enter the E-
Nr. (model type number) of your ap-
pliance. This can be found on the rat-
ing plate. After you have selected
your model from the results list, your
digital manual will be displayed under
"Manuals and Documents" together
with additional content.
10.1 Sample recipe
You can find a sample recipe that has been specially developed for your appli-
ance here.
Recipe Ingredients Processing
Heavy fruit cake ¡ 3eggs
¡ 135g sugar
¡ 135g margarine
¡ 255g flour
¡ 10g baking powder
¡ 150g currants
¡ Insert stirring whisk.
¡ Add all ingredients ex-
cept the dried fruit.
¡ Process for
30seconds at set-
ting1.

Application examples en
19
Recipe Ingredients Processing
¡ 150g mixed dried
fruit
Note:Process max. 2
times the quantity at the
same time.
¡ Then process for
3-5minutes at set-
ting3.
¡ Select setting1.
¡ Add the dried fruit
within the next
30-60seconds.

en Troubleshooting
20
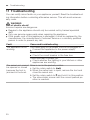
Troubleshooting
11 Troubleshooting
Troubleshooting
You can rectify minor faults on your appliance yourself. Read the troubleshoot-
ing information before contacting after-sales service. This will avoid unneces-
sary costs.
WARNING
Risk of electric shock!
Incorrect repairs are dangerous.
▶
Repairs to the appliance should only be carried out by trained specialist
staff.
▶
Only use genuine spare parts when repairing the appliance.
▶
If the power cord of this appliance is damaged, it must be replaced by the
manufacturer, the manufacturer's Customer Service or a similarly qualified
person in order to prevent any risk.
Fault Cause and troubleshooting
The appliance is not
working.
The mains plug of the power cord is not plugged in.
▶
Connect the appliance to the power supply.
The circuit breaker is faulty.
▶
Check the circuit breaker in the fuse box.
There has been a power cut.
▶
Check whether the lighting in your kitchen or other
appliances are working.
The swivel arm cannot
be opened or closed
because the tool is
jammed in the bowl.
Drive is not in the parked position.
1. Set the rotary switch to .
2. When the swivel arm is open, remove the tool and
close the swivel arm.
3. Set the rotary switch to and hold it in this position.
a The drive slowly moves until the correct parked po-
sition is reached.
ページが読み込まれています...
ページが読み込まれています...
ページが読み込まれています...
ページが読み込まれています...
ページが読み込まれています...
ページが読み込まれています...
ページが読み込まれています...
ページが読み込まれています...
ページが読み込まれています...
ページが読み込まれています...
ページが読み込まれています...
ページが読み込まれています...
ページが読み込まれています...
ページが読み込まれています...
ページが読み込まれています...
ページが読み込まれています...
ページが読み込まれています...
ページが読み込まれています...
ページが読み込まれています...
ページが読み込まれています...
ページが読み込まれています...
ページが読み込まれています...
ページが読み込まれています...
ページが読み込まれています...
ページが読み込まれています...
ページが読み込まれています...
ページが読み込まれています...
ページが読み込まれています...
ページが読み込まれています...
ページが読み込まれています...
ページが読み込まれています...
ページが読み込まれています...
ページが読み込まれています...
ページが読み込まれています...
ページが読み込まれています...
ページが読み込まれています...
ページが読み込まれています...
ページが読み込まれています...
ページが読み込まれています...
ページが読み込まれています...
ページが読み込まれています...
ページが読み込まれています...
ページが読み込まれています...
ページが読み込まれています...
ページが読み込まれています...
ページが読み込まれています...
ページが読み込まれています...
ページが読み込まれています...
ページが読み込まれています...
ページが読み込まれています...
ページが読み込まれています...
ページが読み込まれています...
ページが読み込まれています...
ページが読み込まれています...
ページが読み込まれています...
ページが読み込まれています...
ページが読み込まれています...
ページが読み込まれています...
ページが読み込まれています...
ページが読み込まれています...
-
 1
1
-
 2
2
-
 3
3
-
 4
4
-
 5
5
-
 6
6
-
 7
7
-
 8
8
-
 9
9
-
 10
10
-
 11
11
-
 12
12
-
 13
13
-
 14
14
-
 15
15
-
 16
16
-
 17
17
-
 18
18
-
 19
19
-
 20
20
-
 21
21
-
 22
22
-
 23
23
-
 24
24
-
 25
25
-
 26
26
-
 27
27
-
 28
28
-
 29
29
-
 30
30
-
 31
31
-
 32
32
-
 33
33
-
 34
34
-
 35
35
-
 36
36
-
 37
37
-
 38
38
-
 39
39
-
 40
40
-
 41
41
-
 42
42
-
 43
43
-
 44
44
-
 45
45
-
 46
46
-
 47
47
-
 48
48
-
 49
49
-
 50
50
-
 51
51
-
 52
52
-
 53
53
-
 54
54
-
 55
55
-
 56
56
-
 57
57
-
 58
58
-
 59
59
-
 60
60
-
 61
61
-
 62
62
-
 63
63
-
 64
64
-
 65
65
-
 66
66
-
 67
67
-
 68
68
-
 69
69
-
 70
70
-
 71
71
-
 72
72
-
 73
73
-
 74
74
-
 75
75
-
 76
76
-
 77
77
-
 78
78
-
 79
79
-
 80
80


Bosch MUMS2EW00G 取扱説明書
- タイプ
- 取扱説明書
- このマニュアルも適しています