
CD Receiver
User Manual
NQ811B
www.nakamichicaraudio.com


1 EN
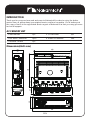
INTRODUCTION
Thank you for your purchase,and welcome to Nakamichi! In order to enjoy the better
service from us, please keep your original invoice well and complete. You’d better post
the copy of back to the appointed service agent of Nakamichi so that you may get more
technical support.
ACCESSORY LIST
1. User Manual
3. ISO Male Connector
5. Remote Control
1pc
2pcs
1pc
2. CD Receiver
4. Metal Accessories
1pc
1set
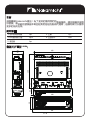
Dimensions(Unit: mm)
188
182
178
33 50
169
50
53
58
188
58

2 EN
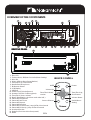
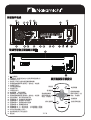
OVERVIEW OF THE COMPONENTS
REMOVE PANEL
REMOTE CONTROL
MUTE
Power
Source Selector
Volume Up
Tune/Track Up,
fast forward
Tune/Track Down,
reverse
Volume Down
Audio/Menu
Setting
REMOVE PANEL
1. Eject CD
2. Volume knob, SEL(Push for Audio/Menu Setting)
3. Disc Slot
4. Mute, AS(Auto Store Preset Station)
5. Tune/Track Up, fast forward
6. Hands-free Microphone
7. IR Remote Sensor
8. LCD Display
9. USB Port
10. Power on/off, Mode(Source)
11. Answer Call, End Call(Long press)
12. Tune/Track down, reverse
13. Band, Disp(Display clock time and other info.)
14. Preset #1, Play/Pause
15. Preset #2, Intro Scan
16. Preset #3, Repeat
17. Preset #4, Random
18. Preset #5, Folder Down, Jump 10 Track backward
19. Preset #6, Folder Up, Jump 10 Track forward
20. Aux Input Socket
21. Release (For detach the front panel)
22. Reset

3 EN
Power On/Off
• Press the any button to turn the unit on.
• Press and hold the /MODE button to turn the unit off.
Removing The Front Panel
Press the RELEASE button to detach the front panel.
Volume Up And Down
Rotate the Volume knob to adjust the volume level.
Mute On/Off
Briefly press the button to toggle mute on or off.
Changing The Modes
Press the /MODE to select between Radio, Disc, USB(with USB device
inserted), AUX-IN(auxiliary input) and BT(Bluetooth) modes.
Setting The Audio/Menu
• Press Volume(SEL) button momentarily to select between the audio/
menu functions: BASS, TREBLE, BALANCE, FADER, EQ USER/FLAT/
CLASSIC/ROCK/POP, LOUD OFF/ON, BEEP OFF/ON, CLOCK 24/12,
CLOCK SETTING, BT MENU/AUTO, DISTANT/LOCAL, STEREO/MONO,
AREA EU/US/AS/RU.
• Rotate the Volume knob to adjust or activate your desired function
/audio.
Display
• With the unit on, press and hold DISP to display clock time.
• Press and hold DISP to toggle display between various displayed
information.
Auxiliary Input Jack
Using a 3.5mm cable to connect a external device such as MP3
players, CD players etc. to the auxiliary input jack on front panel.
Then you can hear the sound of other playback devices such as
MP3 players, CD players etc. through your car speakers.
Reset
Push the RESET button(behind the front panel) with a thin
object with a pointed end to reset the unit back to the
factory default settings.
GENERAL OPERATION

RADIO OPERATION
4 EN
Switch Between Europe /USA/Asian/Russian Frequency
In radio mode, press the Volume button momentarily to choose
the “AREA EU/US/AS/RU” item, then rotate it to switch between
EU(europe),US(USA), AS(Asian), RU(Russian) frequency.
The system will change the frequency setting in about 3 seconds.
Change Bands
In radio mode, shortly press the BAND/DISP to select between the
FM1, FM2, FM3 and AM1(MW1), AM2(MW2) bands.
To Store / Recall Preset Stations
The radio can be stored 6 preset stations for each band (FM1, FM2,
FM3, AM1 and AM2) for a total of 30 preset stations.
- To memorize a station:
Press and hold the desired preset buttons (1-6) to save a radio station.
- To recall a preset station:
Briefly press the respective station button (1-6) to recall the
corresponding preset station.
Manual Tuning
In the radio mode:
Briefly press the or button to search the next or previous
frequency step by step.
Seek Tuning
In radio mode:
Press and hold the or button to seek to next or previous strong
station.
Automatic Store Preset Station
Press and hold AS for more than 2 seconds to store 18 FM stations
and 12 AM(MW) stations automatically.

5 EN
CD/USB OPERATION
Insert CD
With the label facing up, insert a standard size CD into the CD slot.
Playback will begin automatically.
Eject CD
Press (Eject button) to eject the CD.
USB Connection
If you would like to playback files contained in a USB stick, please
insert the stick into the USB port. The MP3/WMA and other music files
will be played automatically.
Note: The USB port of this car radio is also designed for charging for
iPhone/andriod mobile phone. The charging current consumption is 1
ampere.
Select Next Track Or Previous Track
In the CD/USB mode, briefly press the or button to play the
next or previou track.
Fast Forward/Reverse
Press and hold the or button to fast forward or reverse a track.
Play / Pause
Press the button to interrupt the CD/USB playback (pause function).
Press this button again to continue the playback.
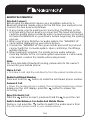
Introduction Scan
Press INT to plays first 10 seconds of each track on CD/USB.
Press again to cancel the INT function.
•
•
Repeating The Track
Press RPT
•
•
•
Playing All Tracks In Random
Press RDM to play songs in random order, press again to cancel
the RDM function.

CD/USB OPERATION
6 EN
• RDM ON - Plays all tracks in random order.
• RDM OFF - Cancels the RDM function.
Folder/Track Navigation
• Press the or button to select the previous or the next folder.
Folder access is only available on devices with more than one folder.
• Press and hold the or buttons to jump 10 tracks backward
or forward. It is required that over 10 tracks be available on the
storage medium.

BLUETOOTH OPERATION
7 EN
Pair And Connect
Before using the Bluetooth device as a handsfree system for a
Bluetooth enabled mobile phone for the first time, you must pair and
connect the two devices as follows:
1. In any mode, prior to pairing and connecting, the BT logo on the
LCD indicating that no device is connected. The head unit broad-
casts the pairing signal constantly when no devices are connected.
Activate the Bluetooth on your device before beginning the pairing
process.
2. When your phone finds the car audio system, the “NAKAMICHI”
name will be displayed on your phone screen.
3. Choose the “NAKAMICHI” from your mobile phone list to pair and
connect with the car audio system. Upon confirming, the BT logo
will stop flashing.
4. When pairing is complete, the mobile phone audio will auto-
matically transfer to the car audio system whenever a call is made
or received, or when the mobile phone plays music.
Note:
For more deatails of bluetooth pairing, please refer to the owner’s
manual for your mobile phone.
Make A Call
• To make a call, dial the call directly from the paired mobile phone.
Redial Last Dialed Number
Press and hold the button to redial the last dialed phone number.
Answer A Call
• When the mobile phone is called, the incoming telephone number
displays on the LCD display, press the button to answer the
incoming call.
Reject Or End A Call
Press the button to reject, press and hold the to end the call.
Switch Audio Between Car Audio And Mobile Phone
During a call, press the button to switch the audio source from
the car audio system back to your mobile phone.

BLUETOOTH OPERATION
8 EN
Adjust Call Volume
• Volume knob or VOL+/VOL- button to adjust the
call volume level.
• MUTE button to mute sound.
Audio Streaming (A2DP)
The head unit supports A2DP wireless streaming audio from a
Bluetooth mobile device directly to your head unit.
The following functions can be used to control the music:
•
•
• button to toggle between play and pause during
music playback.
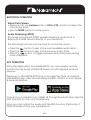
APP OPERATION
Using the application from NAKAMICHI, you can wireless remote
control the car audio of NQ811B head unit with Apple & Android
devices.
Please go to the APPLE APP Store or Google Play Store and search
NAKAMICHI app, after downloading the APP, install it on your Apple
& Android devices.
Connect your smartphone to NQ811B through bluetooth,then tap the
APP and turn on it on your smartphone.
Now you can control the audio and the RDS function (Optional) of
NQ811B head unit by your smartphone.

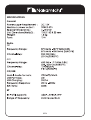
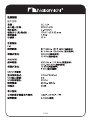
SPECIFICATIONS
9 EN
General
FM
AM
CD/USB
Radio
BT


1 CN
引言
感謝購買Nakamichi產品!為了更好的獲得我們的售後服務,請認填寫并保留
好發票。最好能把發票副本寄回給我們指定的服務代理商,這樣你就可以獲得
更多的技術支持。
附件清單
1. 用戶使用說明書
3. ISO連接器 公插
5. 遙控器
2. 主機
4. 五金附件
1pc
1set
1pc
2pcs
1pc
產品尺寸(
單位
: mm)
188
182
178
33 50
169
50
53
58
188
58

2 CN
面板組件概述
取掉面板後主機前端示意圖
遙控器按鍵功能描述
1. (出碟鈕)
2. 音量旋鈕, SEL鈕(短按進入音頻/菜單設置模式)
3. CD碟片出入口
4. 靜音鈕, AS鈕(自動存儲預置廣播電臺)
5. 遞增調諧電臺頻率/選擇后一首歌曲,快進鍵
6. 內置藍牙麥孔
7. 紅外遙控接收器
8. 液晶顯示屏
9. USB閃存接口
10. 電源開關, 模式選擇鈕
11. 接聽電話, 終止通話(長按)
12. 遞減調諧電臺頻率/選擇前一首歌曲,快退鍵
13. 波段選擇鈕,顯示屏信息顯示鈕
14. 預置電臺 #1, 音樂播放/暫停播放
15. 預置電臺 #2, 歌曲前10秒預覽
16. 預置電臺 #3, 重複播放模式選擇
17. 預置電臺 #4, 隨機播放歌曲
18. 預置電臺 #5, 上一個文件夾,上10首歌曲(長按)
19. 預置電臺 #6, 下一個文件夾,下10首歌曲(長按)
20. AUX外接音頻輸入接口
21. 面板釋放鈕(用于取出面板)
22. 復位鈕
靜音鈕
電源開關
模式選擇鈕
音量遞增
遞減調諧電臺
頻率/選擇前一首
歌曲,快退鍵
音量遞減
音頻/菜單設置
遞增調諧電臺
頻率/選擇后一首
歌曲,快進鍵

3 CN
開啟/關閉主機電源
• 短按面板任意按鈕(面板釋放鈕除外)開啟主機電源。
• 長按面板 /MODE鈕關閉主機電源
取下主機面板
短按面板釋放鈕,彈出面板,可將面板從主機上取出妥善保管。
音量調節
旋轉音量鈕調節主機音量大小。
靜音開關
短按面板上的 鈕開啟用或停用靜音功能。
模式轉換
短按 /MODE鈕選擇收音廣播, CD光碟,USB閃存(USB閃存設備已插入),
AUX-IN(外接音頻輸入)和藍牙模式(藍牙免提或藍牙音樂模式)
音頻/菜單設置
• 反復短按音量鈕選擇可按以下順序選擇設置本機音頻/菜單功能:
低音(BAS), 高音(TRE), 左右聲道平衡(BAL), 前后聲道衰減(FAD)均衡器音效
預設用戶自定義(USER)/平音(FLAT)/古典(CLASSIC)/搖滾(ROCK)/流行(POP),
等響度開關(LOUD OFF/ON), 按鍵蜂鳴聲開關(BEEP OFF/ON), 24/12小時
制式(CLOCK 24/12), 小時分鐘設置, 藍牙免提電話手動接聽自動接聽(BT
MENU/AUTO), 收聽遠程廣播電臺/收聽本地廣播電臺(DISTANT/LOCAL),
立體聲/單聲道模式(STEREO/MONO), 收聽歐洲/美國/亞洲/俄羅斯地區的
廣播電臺(AREA EU/US/AS/RU)
• 旋轉音量鈕可調節或設置當前選擇的音頻/功能。
顯示屏信息顯示
• 開機后,長按DISP鈕在顯示屏上顯示小時和分鐘
• 長按DISP鈕轉換顯示屏上的顯示信息(電臺頻率,時間,音樂播放等信息)。
AUX外接音頻輸入接口
使用一根3.5mm音頻轉接線,可將我們常用的MP3播放器,CD播放樂連接
到主機面板的AUX外接音頻輸入接口。這樣,我們就能通過本機和車載喇叭
來聽外接的MP3播放器,CD播放器音樂。
復位鈕
取下面板後,用帶尖頭的細小物體按主機基座上RESET鈕將機子恢復到出廠
初始設置
基本功能操作

收聽廣播電臺
4 CN
預設收聽歐洲/美國/亞洲/俄羅斯地區的廣播電臺
在收音廣播模式,短按音量鈕選擇收聽歐洲(AREA EU),美國(AREA US),
亞洲(AREA AS)或者俄羅斯(AREA RU)地區的廣播電臺。
選中某一地區后,3秒鐘內,本收音系統將轉換到相應地區的電臺頻率。
廣播電臺波段選擇
在收音廣播模式,短按BAND/DISP鈕選擇以下任一廣播波段:FM1, FM2,
FM3 和 AM1(MW1), AM2(MW2)
手動存儲/調用預置的廣播電臺
此收音系統每個波段可存儲6個預置電臺,FM1, FM2, FM3, AM1(MW1),
AM2(MW2)總計可存儲30個預置廣播電臺。
- 手動存儲預置廣播電臺:
長按想要存儲的預置電臺數字鍵 (1~6),可將當前頻率存儲在相應單元中。
- 調用預置廣播電臺:
短按相應的預置電臺數字鍵(1~6),可收聽預存在此單元的廣播電臺。
手動調諧電臺頻率
在收音廣播模式,短按 或 鈕可步進遞增或遞減搜索電臺頻率。
自動調諧電臺頻率
在收音廣播模式,長按 或 鈕可遞增或遞減搜索強信號電臺頻率。
自動存儲預置廣播電臺
在收音廣播模式,長按AS鈕2秒以上,收音系統將自動存儲18個FM廣播電臺
和12個AM(MW)廣播電臺。

播放CD光碟和USB閃存設備內的音樂
5 CN
插入CD光碟
將CD光碟(標準尺寸:直徑12cm)標籤面朝上插入主機碟倉。機子將自動播放
插入CD光碟上的音樂 。
退出CD光碟
短按主機面板上的出碟鈕( ), CD光碟將從主機碟倉彈出。
USB閃存接口
想要播放USB閃存設備內的音樂,請將USB閃存插入本機面板的USB接口。
閃存設備插入后,MP3/WMA或其他音樂文件將能自動播放。
注意:
此USB接口可為蘋果和安卓智能手機充電,充電電流為1A。
選擇播放下一首或上一首歌曲
在CD光碟或USB閃存播放模式, 短按 或 鈕選擇播放下一首歌曲或
上一首歌曲。
歌曲快進或歌曲快退
在CD光碟或USB閃存播放模式, 長按 或 鈕實現快進或快退功能。
音樂播放/暫停播放
在CD光碟或USB閃存播放模式, 短按 鈕暫停播放音樂。再次短按此鈕
繼續播放。
歌曲前10秒預覽
在CD光碟或USB閃存播放模式, 短按INT鈕預覽每首歌曲的前10秒。
再次短按此鈕取消歌曲10秒預覽功能。
• INT ON - 預覽每首歌曲的前10秒
• INT OFF - 取消歌曲10秒預覽功能
重復播放模式選擇
在CD光碟或USB閃存播放模式, 短按RPT鈕選擇重復播放當前文件夾內所有
歌曲, 重復播放USB閃存內所有歌曲, 或重復播放當前歌曲。
• RPT FLD - 反復播放當前文件夾內所有歌曲。
• RPT ALL - 播放USB閃存內所有歌曲。
• RPT ONE - 反復播放當前選中的歌曲。
隨機播放歌曲
在CD光碟或USB閃存播放模式, 短按RDM鈕以隨機順序播放USB閃存內所有
歌曲, 再次短按此鈕取消隨機播放歌曲模式。

播放CD光碟和USB閃存設備內的音樂
6 CN
• RDM ON - 以隨機順序播放USB閃存內所有歌曲
• RDM OFF - 取消隨機播放模式。
選擇上一個或下一個文件夾/選擇上10首或下10首歌曲
• 在光碟或USB閃存播放模式, 短按 或 鈕選擇上一個或下一個
文件夾。只有當光碟USB閃存內有多個文件夾, 才可進行此功能操作。
• 在光碟或USB閃存播放模式, 長按 或 鈕選擇上10首歌曲或下
10首歌曲。只有當光碟或USB閃存內有超過10首歌曲, 才可進行此功能操作。

藍牙免提操作
7 CN
藍牙配對和藍牙連接
首次使用此本機作為手機的藍牙免提系統前,用戶必須將按以下步驟將本機
和手機進行藍牙配對和連接:
1. 在任意模式下,在藍牙配對和連接之前,本機顯示屏上的藍牙字符“BT”
會一不停地閃爍,提醒用戶本機藍牙免提系統未與藍牙手機連接。本藍牙
系統會持續向圍發送藍牙配對信號,直到與周圍的藍牙設備配對連接成功。
在藍牙配對之前,用戶需要將手機上的藍牙功能開啟。
2. 當藍牙手機搜索并檢測到本藍牙免提系統時,用戶可在手機屏幕的藍牙
設備列表中發現“NAKAMICHI”。
3. 用戶點按設備列表中的“NAKAMICHI”可將藍牙手機與本機的藍牙免提
系統進行配對連接。連接成功后,本機顯示屏上的藍牙字符“BT”會停止
閃爍,持續點亮。
4. 配對連接完成后,手機的來電呼叫提示聲,通話語音,藍牙音樂都會自動
轉移到本機藍牙免提系統上。
注意事項:有關更多詳細的藍牙配對操作,請參考藍牙手機的使用說明書。
撥打電話
需要撥打電話時,可直接通過配對連接的藍牙手機撥號并往外撥打。
重撥最後撥打過的電話號碼
長按面板上的 鈕重播最後撥打過(或最後接聽過)的電話號碼。
接聽來電
當有電話打進來時,來電號碼會滾動出現在本機顯示屏上,短按面板上的
鈕接通電話。
拒絕接聽來電
當有電話打進來不想接聽時,短按面板上的 鈕掛斷來電。
終止通話
通話過程中,長按面板上的 鈕終止通話。
選擇手機通話或藍牙免提通話
在通話過程中,短按面板上的 鈕可將通話語音在藍牙免提系統和藍牙
手機之間相互切換。
ページが読み込まれています...
ページが読み込まれています...
ページが読み込まれています...
ページが読み込まれています...
-
 1
1
-
 2
2
-
 3
3
-
 4
4
-
 5
5
-
 6
6
-
 7
7
-
 8
8
-
 9
9
-
 10
10
-
 11
11
-
 12
12
-
 13
13
-
 14
14
-
 15
15
-
 16
16
-
 17
17
-
 18
18
-
 19
19
-
 20
20
-
 21
21
-
 22
22
-
 23
23
-
 24
24


