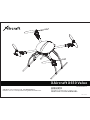
Aircraft Modelers Research XAircraft X650 Value ユーザーマニュアル
- タイプ
- ユーザーマニュアル

XAircraft X650 Value
安装说明书
INSTRUCTION MANUAL
在使用XAircraft X650 Value之前,请仔细阅读此说明书。
Read the manual carefully before using XAircraft X650 Value.
2011-11 V1.6
Model: X650 V-4

目录
产品安装须知 1
飞行须知 2
产品特性 4
产品售后服务 5
机身臂安装 7
机架安装 8
起落架安装 9
飞控与AHRS安装 10
电路接线示意图 11
常见接收机接线示意图 12
机身盖安装 13
电池挂载架安装 13
遥控模式示意图 14
无桨通电测试 15
螺旋桨安装 15
地面摇杆测试 16
姿态传感器工作状态测试 17
零部件清单 18
Content
Notice for Assembly 1
After-Sale Service 6
Before Flight 3
Features 4
Frame Arm Assembly 7
Frame Assembly 8
Landing Gear Assembly 9
Flight Controller and AHRS Assembly 10
Circuit Wiring 11
Common Receiver Wiring 12
Frame Cover Assembly 13
Battery Mounting Assembly 13
RC Mode Illustration 14
Power-on Test without Propellers 15
Propeller Assembly 15
Stick Function Test On Ground 16
AHRS Function Test 17
Part List 18
www.xaircraft.com

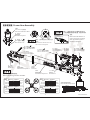
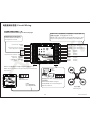
产品安装须知 Notice for Assembly
遥控器 (4通以上)
Transmitter (4-channel or more)
接收机 (4通以上)
Receiver (4-channel or more)
11.1V 3S 2200~5500mAh 锂电池(瞬时放电能力>20C)
11.1V 3S 2200~5500mAh
Li-Po Battery (Instant discharge capacity>20C)
自备遥控及电子设备
Radio transmitter and electronic equipment required for assembly
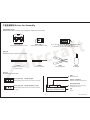
标志含义
The Meaning Of Symbols
六角螺丝刀
Hexagon Screw Driver
1.5mm/2.0mm
十字螺丝刀
Cross Screw Driver
尖嘴钳
Sharp nose pliers
螺丝胶
Screw Glue
自备工具
Additional tools required for assembly
M - M2001 ×2
M2×6mm 杯头内六角螺丝
M2×6mm Socket Screw
袋编号
Packet Number
物品编号 与 所需数量
Product Number and Quantity
建议使用螺丝胶加固
Suggested to use screw glue
for higher intensity
名称
Name
疏忽这些操作说明,可能导致设备损坏。
Mishandling instructions may result in damage.
疏忽这些操作说明,可能导致设备损坏或人员受伤。
Mishandling instructions may result in damage
or injury.
1
www.xaircraft.com

2
www.xaircraft.com
免责声明
1. 请在当地法律法规允许的范围内使用本产品,XAircraft不承担因任何非
法使用导致的法律责任。
2. 本产品属于遥控航模,请严格遵守航模产品的安全操作规范,
XAircraft不承担因任何操作和使用控制上导致的任何性能、安全与法律
责任。
3. 航模不是玩具,请在专业人员指导下飞行,并按本说明书安装和使用本产
品,XAircraft不对因用户安装、配置、操作等导致的航模事故负责。
安全注意事项
X650 Value在给您带来快乐飞行体验的同时也潜藏着一定的危险。X650
Value在飞行时具有一定的飞行速度,且螺旋桨转速高达4000RPM以上,具有极
大的破坏力。无论您是初学者还是经验丰富的玩家,安全意识都应该铭记于心!
1. 熟悉飞行环境,远离障碍物及人群,并确认是否存在不安全因素,如高压
线、汽车、人群等。
2. 勿疲劳、酒后或精神不佳时飞行,以免发生意外。
3. 远离潮湿环境,切勿大风天气或雨天飞行,否则将造成电子设备故障发生
危险。
4. 远离热源,以免造成电子设备或其它部件的损坏。
5. 初学阶段不要独自飞行。建议飞行之前先向有经验的飞行员获取帮助。
6. 准备救援工具,如手机、对讲机。
7. 请在安全起飞重量下飞行,切勿过载运行机器,以免发生危险。
8. 飞行前必须检查设备是否正常,是否存在同频干扰。
9. 远离运转中的机器,切勿用身体接触旋转中的电机或螺旋桨,更不要用手
抓。飞行时切勿穿宽松衣服以免与遥控器或螺旋桨发生牵扯造成意外。
10. 在飞行前始终把遥控器油门杆保持在最低点。
11. 建议在无桨状态下试运行X650 Value,检查遥控设备和电机的工作是否
正常,一切正常之后再安装螺旋桨,以免造成安全事故。
12. 请使用XAircraft提供的零件,用户使用其它来源的零件或改装本产品需
独立承担相应的飞行责任。
4. 检查接收机是否扎紧。
5. 检查天线是否安装稳固。
6. 检查无刷电机与无刷电机调速器连接线是否稳固。
另外,如果接收机的安装或电调(ESC)与飞行控制器的连接方式不是
XAircraft出厂默认的方式或更改过遥控器设置和飞行模式,请检查遥控器的各个
通道的操作和电机的反应是否一致。
飞行控制说明
1. 启动:把遥控器油门杆拉到最低后打开遥控器电源开关,然后接通X650
Value的电源。轻微推杆以启动所有电机。
2. 停止:油门杆收到最低,约1秒后四旋翼电机停止工作。断开X650
Value电源后,再关闭遥控器电源开关。
3. 起飞或降落时一旦发生紧急情况,请立即把遥控器油门杆拉到最低,确保
安全。
4. 前后左右与旋转等飞行控制与常规直升机等航模控制类似,但这些飞行动
作是由各个相应通道独立控制的,请勿将遥控器设置为混控模式。
开始飞行
开关机程序:开机时必须先打开遥控器电源开关并将油门杆拉到最低,再接通
飞行器电源;关机时必须先断开飞行器电源,再关闭遥控器电源。不正确的开关机
顺序可能造成飞行器失控而发生危险。
1. 将油门杆拉到最低,打开摇控器电源开关。
2. 接通X650 Value的电源。
3. 轻推油门(切忌将油门杆瞬间推到很大),当所有电机都正常低速运转
后,轻推各操控杆以检查飞行器的动作和方向是否与您的操作一致。
4. 如果发现飞行器在飞行过程中向一边倾侧无法纠正,请将X650 Value连
接到PC,使用调参软件对AHRS模块进行校准。
飞行前检查
在飞行前请务必检查各零部件是否完好,如发现部件老化或磨损,请勿飞行;
务必检查各个部件的安装情况,特别是以下部件的安装失误容易造成意外:
1. 检查螺旋桨是否安装正确和稳固。
2. 检查接收机连线是否稳固。
3. 检查电池扎带是否扎紧;检查电池电量是否充足。
飞行须知

Before Flight
DISCLAIMER OF LIABILITY INSPECTIONS BEFORE FLIGHT
1. Using XAirctaft products within the limits permitted by local laws and PLEASE PAY ATTENTION TO THE AGING AND WORN PARTS, AND FLY WHEN THEY ALL
regulations. XAircraft is not responsible for any illegal activities. WORK WELL. PLEASE DO CHECK EVERY ASSEMBLY CAREFULLY BEFORE FLIGHT,
2. The X650 Value is an aeromodelling product only. Please strictly follow the especially lapses in these parts will easily cause DANGER.
aeromodelling safe function rules, XAircraft does not hold responsible for 1. Check that the propellers are secured properly.
any control over its operation or usage. 2. Check that the receiver is receiving a stable signal.
3. Model aircraft are not toys! Fly under professional guidance and strictly 3. Check that the battery is secured tightly and the battery is fully charged.
follow instruction rules in this document. XAircraft is not responsible for 4. Check that the receiver is attached correctly.
consequences caused by improper install, wrong setting or operation. 5. Check the antenna is assembled tightly enough.
6. Check that the brushless motor and brushless ESC are secured to the
SAFETY CAUTIONS airframe.
X650 Value gives users an enjoyable fly experience but is potentially dangerous at the Before flight, please assemble receiver or connect ESC to FC as XAircraft factor y
same time. The blades rotate up to 4000RPM which can cause serious injuries or defaults, if not, please DO CHECK the operations of Remote Control channels and
property damage. Safety awareness should be firmly followed by all users regardless consistence of motor reactions.
of flying experience.
1. Familiarize yourself with fly environment and any obstacles. Identify any FLIGHT CONTROL INSTRUCTION
potential hazards such as power lines, cars, people, etc. 1. Start: Set the throttle stick to the lowest then turn on the transmitter.
2. Do not fly the aircraft when fatigued, drunk or your mental state has been Connect the flight battery then slowly apply the throttle until all motors
compromised which may cause an accident. begin to run.
3. Stay away from wet areas. Do not fly in the rain or wet environments which 2. Stop: Move the throttle stick to the minimum. All motors should stop to
can cause device failure and probably lead to danger. Do not fly at night or work in about one second. First cut off the X650 Value then the RC powers
in windy conditions. off.
4. Stay away from any fire resulting in damage of the electronic parts or others 3. Any emergency occurs when taking off or landing, please move the throttle
such as the flight battery. stick to the lowest position immediately to keep safe.
5. Do not fly alone during your preliminary flights. If you need help, please 4. Flight control to the front, back, left and right is similar to the traditional RC
enlist the aid of an experienced pilot before flying for the first time. helicopters but each motion is controlled by a separate channel. Do not use
6. Prepare rescue tools such as cell phones or other communication devices any channel mixing in your RC transmitter such as v-tail or swashplate
which should you need to call for help. mixing etc.
7. Please fly under safe take-off weight, do not overload the aircraft which can
lead to danger. START TO FLY
8. Ensure all the equipment operates correctly before flight and that there is Power ON/OFF Operations: Before plugging in the quad you have to turn on the RC
no transmitter interference or conflicts. and set the throttle stick to the lowest position. When powering off, you have to cut
9. Do not touch any moving or powered parts. Do not try to catch the off the aircraft first then the RC powers off. Disorder in the on and off procedure will
quadcopter which has rotating motors or blades for example. Keep loose cause an accident.
clothing away from moving parts as they may get caught and could cause 1. Place the aircraft on the ground. Put the throttle stick to the lowest position
physical harm. then turn on the transmitter.
10. Always throttle down to minimum before fly. 2. Connect the battery to the ESC board.
11. Remove the propellers when testing the remote device or motors operation. 3. Start the Quad by applying power slowly with the throttle stick. When all the
Attach the propellers after you have tested that everything is working good motors rotate at a slow speed you can move the stick to check the X650
to prevent an accident. Value actions according to your operation.
12. Assemble the aircraft with accessories XAircraft provides. XAircraft is not 4. If you can not calibrate the tilt on one side during your flight, please
responsible for any consequence resulted from assembly with other connect X650 Value to the PC and use XAircraft configuration software to do
accessories or modifications. the calibration.
3
www.xaircraft.com

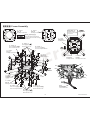
产品特性 Features
空机重量: 80
载重重量:720克 。
最大安全起飞重量:1600克。请勿超过安全起飞重量飞行,以免发生危险!
留空时间:大于10分钟(在起飞重量为1200克时使用3S 3300mAh的电池)。
电池要求:11.1V 3S 2200mAh ~ 5500mAh的锂电池(T插),瞬时放电能力>20C。
输入:最多可支持12通道的接收机,兼容所有航模遥控设备。飞行至少需要4个通道,建议使用6通道以上
的遥控设备以便扩展。
输出:最多支持12路输出,支持XAircraft UltraPWM高速电调与普通电调。支持单轴和双轴增稳云台,兼
容普通舵机与数码舵机。
扩展性:配合GPS模块(选购)、电子指南针(选购)可实现定点、定高、定向悬停,实现一键返回
(Return to Home)功能。
8 克(不含接收机和电池)。
Empty Frame Weight: 880
Payload Capability: 720g
Maximum Gross Take-Off Weight: 1600g. DO NOT OVERLOAD ON X650 Value WHICH CAN
LEAD TO DANGER.
Airborne period: >10mins (with 3S 3300mAh battery , take-off weight under 1200g)
Cell Chemistry: 11.1V 3S 2200mAh ~ 5500mAh Lithium Polymer, and instant discharge
capacity>20C.
Input: Support a 12-CH receiver at most. Compatible with all the RC devices. It needs at least 4
channels to fly your aircraft. We recommend you to use RC device with 6 channels or more for
expansion.
Output: Support 12-CH outputs at most. Compatible with XAircraft UltraPWM Hi-Speed ESC
and normal ESC. Support Tilt or Pan/Tilt Camera Mount compatible with both normal and Hi-
Speed digital servo.
Expansibility: Utilize GPS Module(optional) together with Compass(optional) that can realize
position hold, height lock, heading lock and Return to Home.
g (receiver and battery not included)
550mm
270mm
157mm
4
www.xaircraft.com

产品售后服务
1. 保修条例 2) XAircraft或销售商根据售后服务条款确认服务范围。
1) 在正常使用状态下因产品质量引起性能故障时,XAircraft对X650 Value的 3) 产品送修后,根据产品损坏情况,如产生费用的,XAircraft或销售商将联
电子电路部分承诺有限的质量保证(下文简称“质保”),质保对象不包括 系您确认费用,当您确认费用后再进行维修。对于严重损坏无法维修的:质
X650 Value的机身及其机械部件、电子设备外壳、电路连接线等部分。 保范围之内的按条款进行更换;质保范围之外的只能进行退还处理。
2) 自购 买XAircraft产 品之日 起 (以购 买 凭证为 准 ,下同 ) 的三个 月 为质保
期。 5. 运费
3) 在质保期内,且产品在质保范围内时,XAircraft提供免费的更换或维修服 1) 对于中国大陆的用户:产品在质保范围内的,用户需承担送修运费;产品在
务。 质保范围外的,用户需承担往返运费。
2) 对于中国大陆以外区域的用户,请联系当地经销商集中维修处理,以节省昂
2. 以下情形不在质保范围内 贵的物流费用。
1) 未按照XAircraft官方说明书的指示进行安装或操作。
2) 因磨损、滥用、不当操作或化学试剂而引起的性能故障。
3) 因与非XAircraft提供的X650 Value部件一起使用而引起的性能故障。
4) 因进行改装而引起的性能故障。
5) 因液体滴入引起的电子设备的性能故障。
6) 因电子干扰而引起的性能故障。
7) 使用了劣质电源或连接不合理电压的电源导致XAircraft电子产品性能故
障。
8) 意外或人为因素引起的性能故障(如搬运、碰撞、操作失误、输入不合适电
压等)。
9) 不可抗拒力因素(包括但不限于火灾、地震、雷电等)引起的性能故障。
10) 在邮寄过程中造成配件损坏或丢失(遇到此类情况请向相关物流公司咨
询)。
3. 有偿服务。当产品性能故障超出质保范围的,您可以选择有偿服务:
1) 自购买产品之日起一年内,有偿服务不收取除工本和运输之外的费用。
2) 超过一年的,有偿服务将收取检测、材料、维修和运输费用。
4. 服务流程
1) 当产品发生性能故障时,请您第一时间联系向您直接销售的销售商以便确认
故障情况、服务范围和服务方式,或Email咨询service@xaircraft.com。
您需要提供:
a) 产品购买凭证。
b) 产品的SN,您可以在产品的外包装或本手册封底上找到它。
c) 尽可能详细的故障描述,如当时的环境(天气等)、操作和产品的表现
等。
d) 您的联系方式。
5
www.xaircraft.com

6
1. Warranty Items have to pay for the cost of check, repairs, material and shipping.
1) XAircraft provides a manufacturer's warranty on X650 Value
electronic parts caused by non-accident error or no human error.
It doesn't include the frame and its parts, cover on electronic 4. Procedure of Service
parts and circuit lines and so on. 1) When performance failure happens to your X650 Value or extra
2) The warranty period takes effect from the purchasing day(the purchasing parts, please contact distributor/seller immediately in
date is subject to the time on your Proof of Purchase) to the 90th order to confirm the failure, the range and way of service. You can
day. alternatively email us: ser vice@xaircraft.com. At the same time,
3) Among the warrant period, XAircraft provides repairments for you have to offer some evidence and details:
free under circumstance within the warranty scope. a) Proof-of-Purchase of XAircraft X650 Value.
b) Product SN, you can find it on the package.
2. Situations below are NOT INCLUDED in the warranty c) Description in details such as the weather, environment,
1) Users disobey the XAircraft X650 Value manual while installing or operation and aircraft motion.
operating your XAircraft products. d) Your contact information.
2) Performance failure caused by worn-out, misuse, improper 2) XAircraft or global distributor/seller strictly follows the warranty
operation or chemical reagent. items to confirm the scope of service.
3) Performance failure caused by intermixed with non-X650 Value 3) Users may have to pay for the repairment necessarily according to
parts. damage assessment which XAircraft or global distributor/seller will
4) Performance failure caused by modifications with non-X650 contact you to confirm whether it's satisfied for you. For the
Value parts. unrepairable parts you can choose to replace under the range of
5) Performance failure on electronic device caused by liquid drop-in. warranty scope otherwise we have to declare as a disabled product
6) Performance failure caused by electronic interference. while beyond the warranty range.
7) Performance failure on electronic parts caused by using battery
low in quality or choosing an unreasonable voltage source. 5. Shipping Fee
8) Performance failure caused by incidents or human error such as 1) Users in China Mainland have to pay for the shipping-out fee if
transportation, collision, improper operation or connecting to a XAircraft X650 Value has a performance failure among the warranty
wrong voltage source. items. Beyond the warranty items users have to pay for the
9) Performance failure caused by irresistible force including but not shipping fee out and back.
limited by fire, earthquake, lightning and so on. 2) Users outside the China Mainland have to contact the local
10) Damage or lose happens during the post. Please consult to the distributor/seller for centralized treatment case by case in order to
relevant logistics corporation. save shipping cost.
3. Paid-Service. You can choose paid service when performance
failure occurs out of the warranty range.
1) From the time you purchase XAircraft X650 Value within a year, you
only have to pay for the cost of material and shipping.
2) From the time you purchase XAircraft X650 Value over a year, you
After-Sale Service
www.xaircraft.com

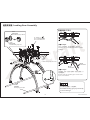
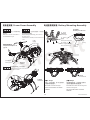
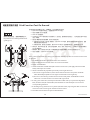
机身臂安装 Frame Arm Assembly
P3001
XAircraft 2215 无刷电机
XAircraft 2215 Brushless Motor
F1 - F3006C
电机固定板
Motor Mounting Plate
M - M3003
M3×6 Socket Screw
×2
M3×6 圆帽内六角螺丝
16mm
19mm
16mm
19mm
安装时,注意电机固定板与无刷电机的安
装孔距。
Notice the hole distance of motor
and motor mounting plate.
注意电机线与电调的配合。
Notice the wiring of motor and ESC.
电调与电机线路示意图
Motor and ESC wiring diagram.
E3 - E3007
10A
10A UltraPWM ESC
高速无刷电调
F2 - F3009
机身杆夹头
Arm Mount
F2 - F3008
电机夹头
Motor Mount
M - M3010
M2.5×22
×
杯头内六角螺丝
M2.5 22 Socket Screw
M - M3005
6 2.5 0.5mm 垫片
6×2.5×0.5mm Washer
× ×
F2 - F3013
ESC 电调盖
ESC Cover
M - M3001
M2.5×6 圆头内六角螺丝
M2.5×6 Socket Screw
×3
M - M3002
M2.5×20
× Socket Screw
杯头内六角螺丝
M2.5 20
F3014C
机身管
Frame Arm
F3016
机身管支撑件2
Frame Arm Strengthener 2
F3015
机身管支撑件1
Frame Arm Strengthener 1
7
安装时,注意电机固定板与无刷电机的安装孔
距,通过调整固定板的安装位置,使安装样式如
右图。
Notice the hole distance of
motor and motor mounting
plate. Assembled style as
shown in right figure.
MOS管朝上
MOSFET Side Up
红 Red
黑 Black
黄 Yellow
Red
Black 黑
Yellow 黄
红
电机 Motor
电调 ESC
M1
黄 Yellow
黑 Black
红 Red
Red
Black 黑
Yellow 黄
红
电机 Motor
电调 ESC
M2
红 Red
黑 Black
黄 Yellow
Red
Black 黑
Yellow 黄
红
电机 Motor
电调 ESC
M3
黄 Yellow
黑 Black
红 Red
Red
Black 黑
Yellow 黄
红
电机 Motor
电调 ESC
M4
www.xaircraft.com

机架安装 Frame Assembly
8
www.xaircraft.com
F1 - F3001C
机身上板
Fuselage Upper Plate
F1 - F3002C
机身下板
Fuselage Lower Plate
注意机身上板和下板的区别。
Notice the distinction between
Fuselage Upper Plate and Fuselage
Lower Plate.
俯视图
Top View
该图不含机身上板。
Fuselage Lower
Plate is not included
in Top View.
前方
Front
M - M3001 ×8
M2.5×6 圆头内六角螺丝
M2.5×6 Socket Screw
M - M3004
M3 8 圆头内六角螺丝
M3×8 Socket Screw
×4
×
F1 - F3001C
机身上板
Fuselage Upper Plate
F1 - F3002C
机身下板
Fuselage Lower Plate
F2 - F3011
机身固定件1
Fuselage Strut 1
F2 - F3012
机身固定件2
Fuselage Strut 2
M - M3001 ×8
M2.5×6 圆头内六角螺丝
M2.5×6 Socket Screw
M - M3008 ×4
6×3×1.5mm 尼龙垫片
6×3×1.5mm Nylon Wahser
M - M3004
M3 8 圆头内六角螺丝
M3×8 Socket Screw
×4
×
M - M3008 ×4
6×3×1.5mm 尼龙垫片
6×3×1.5mm Nylon Wahser
M1
M2
M3
M4
F2 - F3012
机身固定件2
Fuselage Strut 2
F2 - F3011
机身固定件1
Fuselage Strut 1
F1 - F3002C
机身下板
Fuselage Lower Plate
M3M4
M1 M2
前方
Front
注意字朝外。
Notice face.
E3008
1转5电源转接线
1-to-5 Power Wire

施力点
Force Point
施力点
Force Point
安装步骤 STEPS
压入横杆时注意用力,以免损坏。
Assemble landing gear pipe carefully
to avoid damage.
起落架安装 Landing Gear Assembly
M - M3001 ×8
M2.5×6 圆头内六角螺丝
M2.5×6 Socket Screw
9
步骤1 Step1
先扣入一边的挂载杆,扣入时注意用力,避免损坏。
Assemble one side. DO NOT OVER-EXERT TO AVOID
DAMAGE.
步骤2 Step2
免损坏起落架。
Bend the other side of landing gear as shown in the
figure, and assemble it.
弯曲起落架,将另一边也扣入挂载杆。弯曲时注意用力,以
L3002C
挂载杆
Load Mounting Pipe(with Cork)
L3001C
起落架横杆
Landing Gear Skid Pipe
www.xaircraft.com
L3003
挂载杆固定件
Load Mounting Pipe Mount
L3004
挂载杆固定胶
Load Mounting Pipe Fixer

飞控与AHRS安装 Flight Controller and AHRS Assembly
10
www.xaircraft.com
前方
Front
E1 - E1001
XAircraft FC1212 飞行控制器
XAircraft FC1212 Flight Controller
E1 - E1003
减震海绵(10 35 mm)
Shock Absorber Sponge
(10x30x0.5mm)
x x0.5
E2 - E1004
XAircraft AHRS-S V2 姿态传感器
XAircraft AHRS-S V2 Attitude and
Heading Reference System
E2 - E1005
减震海绵(30 mm)
Shock Absorber Sponge
(30x30x2mm)
x30x2
M - M3007
尼龙支柱
M3x12 Nylon Pillar
×4
M3x12
F1 - F3004C
AHRS固定板
AHRS Mounting Plate
M - M3006
M3×8 尼龙螺丝
M3×8 Nylon Screw
×4
M - M3009
尼龙螺母
M3 Nylon Nut
×4
M3
前方
Front
E1 - E1003
减震海绵(10 35 mm)
Shock Absorber Sponge
(10x30x0.5mm)
x x0.5
注意安装位置
Note the installation location
前方
Front

电路接线示意图 Circuit Wiring
11
电调 (M8)
电调 (M7)
电调 (M6)
电调 (M5)
ESC (M8)
ESC (M7)
ESC (M6)
ESC (M5)
方向舵(旋转)
副翼(滚转)
升降舵(俯仰)
油门
RUDD (Yaw)
AILE (Roll)
ELEV (Pitch)
THRO
电调 (M4)
电调 (M3)
电调 (M2)
电调 (M1)
ESC (M4)
ESC (M3)
ESC (M2)
ESC (M1)
指示器
云台快门舵机
云台滚转舵机
云台俯仰舵机
Pilot Lamp
Camera Mount Shutter Servo
Camera Mount Roll Servo
Camera Mount Pitch Ser vo
AUX3
AUX2
AUX1
飞行模式开关
Flight Mode Switch (GEAR)
E1006
6-pin 信号连接线
6-pin Signal Cable
注意方向
Notice Direction
AHRS-S V2
AHRS can be connected to any port among Port A and Port E
on FC1212-S.
可插接到FC1212的PortA至PortE中的任何一个。
黑 Black
红 Red
白 White
信号连接线(E1002)不正确连接会造成电
子设备烧毁。
Incorrect installation of signal
cables(E1002) can cause damage on
electronic devices.
常见接收机接线示意图在下一页
Common receiver wiring is in the next page.
电机示意图
Motor Figure
电源管理
S.Bus
云台快门
云台俯仰
Power Monitor
Camera Mount Shutter
Camera Mount Pitch
电调(M5~M8)、云台俯仰舵机,云台横滚舵机、云台快门舵机,指
示器均为自选配件,并不包含在X650 Value中。
ESC(M5~M8), Camera Mount Pitch/Yaw/Shutter Servo, Pilot
Lamp are the option parts, not including in the X650 Value.
根据 扩展自由设置对应功能。
Set the function according to
the expansion module.
模块
www.xaircraft.com

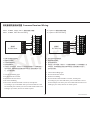
常见接收机接线示意图 Common Receiver Wiring
1 选择飞机类型为固定翼。
2 通道均设为反舵。
3 关闭所有混控模式。
4 摇杆的微调归中。
5 关闭油门与EXP曲线,等试飞1-2个起落后再根据个人习惯调整油门
与EXP曲线。如果您的遥控设备没有EXP和油门曲线设置也不必担
心,这不是必须的。
1 Choose Fixed Wing type.
2 Set all channels reversed.
3 Shut down mixed control.
4 Stick trim middling.
5 Shut down Throttle and EXP curve first, and adjust it
according to your own habit after your several flies. It is not
an essential part so when you have no EXP and Throttle curve
setting in your radio, there is no need to panic.
HITEC,FUTABA,天地飞(WFLY)接收机接线示意图
HITEC,FUTABA,WFLY Receiver Wiring
JR,Spektrum 接收机接线示意图
JR,Spektrum Receiver Wiring
1 选择飞机类型为固定翼。
2 关闭所有混控模式。
3 摇杆的微调归中。
4 关闭油门与EXP曲线,等试飞1-2个起落后再根据个人习惯调整油门与
EXP曲线。如果您的遥控设备没有EXP和油门曲线设置也不必担心,
这不是必须的。
1 Choose Fixed Wing type.
2 Shut down mixed control.
3 Stick trim middling.
4 Shut down Throttle and EXP curve first, and adjust it
according to your own habit after your several flies. It is not
an essential part so when you have no EXP and Throttle curve
setting in your radio, there is no need to panic.
12
RUDD
ELEV
AILE
THRO
接收机
R/C Receiver
GEAR
4
3
2
1
接收机
R/C Receiver
5
www.xaircraft.com

折叠状态
Unfolded
展开状态
Folded
F2 - F3010
挂载固定件
Load Hanger
F1 - F3005C
电池板
Battery Mounting Plate
电池
Batter y
F1 - L1010
扎带
Fastener
步骤1 Step1
先扣入一边的挂载杆,扣入时注意用力,
以免损坏挂载固定件。
Assemble one side of hanger.
DO NOT OVER-EXERT TO AVOID
DAMAGE.
步骤2 Step2
使挂载固定件形变,并将其压入挂载杆。
注意用力避免损坏挂载固定件。
Assemble the other side of hanger as
shown in the figure.
DO NOT OVER-EXERT TO AVOID
DAMAGE.
机身盖安装 Frame Cover Assembly 电池挂载架安装 AssemblyBattery Mounting
13
折叠或展开机架时,应先将机身盖取下,待折叠或
展开后再将机身盖装回。
Before folding or unfolding, please unload
the frame cover.
After folded or unfolded, assemble the frame
cover.
飞行时必须安装机身盖,以防机身杆移位
发生危险。
Frame cover must be assembled to
avoid DAMAGE in flight.
施力点
Force Point
M - M3001 ×8
M2.5×6 圆头内六角螺丝
M2.5×6 Socket Screw
F3007
机身盖
Frame Cover
电池安装
Battery Installation
方向识别贴纸
Heading Paster
前方两条机身臂贴上方向识别贴纸。
Stick the heading paster on two frame
arms which is front.
螺旋桨安装在第15页
Propeller Assembly is in the
page 15.
www.xaircraft.com

Mode 1 Mode 2 Mode 3 Mode 4
俯仰
ELEV
(Pitch)
横滚
AILE
(Roll)
旋转
RUDD
(Yaw)
油门
THRO
遥控器模式示意图 RC Mode Illustration
14
www.xaircraft.com

P3002-A
螺旋桨正桨
Clockwise Blade
P3002-B
螺旋桨反桨
Counter-Clockwise Blade
螺旋桨必须贴紧电机,以保证四个螺旋桨的
高度一致性。
Close to motor to make
sure 4 blades in the same height.
Motor Blade
用螺
丝刀穿过桨夹上的孔来拧紧桨夹。
We recommend you use the driver to poke through the hole on
the locker for better tighten in case of any loose of the screw
during your flight.
桨夹必须拧紧,以免飞行时脱桨造成危险。建议
螺丝刀
Screw Driver
电路安装完成后,请勿安装螺旋桨,进行X650 Value无桨通电测
试。
1 将遥控器油门收到最小后打开遥控器开关。
2 X650 Value接通电源。
3 轻推油门。
4 观察四个电机启动是否顺畅,旋转方向是否正确。
a) 如果电机没有启动或启动不畅,则将油门收到最小,断开
X650 Value的电源,检查电路和电机后重新测试,直到正
常。
b) 如果旋转方向不正确,则将油门收到最小,断开X650
Value电源,对调任意两条电机线,直到电机旋转方向都正
确。
5 推动各操纵杆,观察电机的转速是否有变化。
6 测试完成,将油门收到最小,断开X650 Value的电源。
无桨通电测试 Power-on Test without Propellers
After electronic parts installation, DO NOT install the
propellers and follow in steps.
1 Lowest the RC throttle then turn on the transmitter.
2 Power on X650 Value.
3 Apply the throttle slowly.
4 Note if four motors rotate smoothly
a) If motor does not rotate or not smoothly enough,
please throttle down to the lowest then unplug X650
Value. Check on electronic circuit and motors to
retest until it works fine.
b) If not in the right direction, lower the throttle to
minimum and power off X650 Value. Swap any motor
wire of three connecting to the holes until it works in
the right way.
5 Poke all control sticks to observe motor rotation speed
changes or not.
6 Throttle back to lowest and power off X650 Value.
15
螺旋桨印有XAircraft标志面朝
上,并确保螺旋桨旋转时方向正
确。
Make sure the XAircraft Logo
side up, and check the
rotation of blades.
螺旋桨安装 Propeller Assembly
P3002-B
螺旋桨反桨
Counter-Clockwise Blade
P3002-A
螺旋桨正桨
Clockwise Blade
P3002-B
螺旋桨反桨
Counter-Clockwise Blade
P3002-A
螺旋桨正桨
Clockwise Blade
www.xaircraft.com
M1
M3
M2
M4

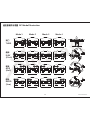
地面摇杆操作测试 Stick Function Test On Ground
首次通电测试完成并确认正常后,安装螺旋桨,进行地面摇杆操作测试。
1 将 X650 Value X650 Value 边。
2 将油门收到最小后打开遥控器。
3 X650 Value接通电源。
4 左手按住X650 Value的机身抵抗飞行器的升力(注意安全,避免螺旋桨伤到自己),右手轻推油门到20%的油
门量,并保持。
5 观察四个螺旋桨的启动是否顺畅,旋转方向是否正确。
a) 如果旋转方向不正确,则将油门收到最小,断开X650 Value电源,重新安装螺旋桨后再次进行测试,直到
螺旋桨的旋转方向都正确。
b) 如果旋转不畅,则将油门收到最小,断开X650 Value电源,检查电路和电机后,重新测试直至正常。
6 如果正常,保持20%的油门量,尝试分别轻推俯仰、横滚、旋转(杆量为30%),左手感觉飞行器是否有朝相
应方向运动的趋势。
7 如果俯仰、横滚、旋转的方向不正确,则调整接收机信号线的连接顺序,再次进行测试直至正常。
8 将油门收到最小,断开X650 Value的电源。
放到水平地面上,遥控器放到 旁
测试时请注意安全, 避免被螺旋桨击中。
Pay attention to rotating blades from
getting hurt.
After power-on test and everything goes fine then install propellers to do stick function test
on ground.
1 Put X650 Value level in ground, beside it is transmitter.
2 First throttle down to lowest then turn on the transmitter.
3 Power on X650 Value.
4 Hold back the lift of X650 Value(Be careful not to be hurt) and apply Throttle to 20%
slowly and keep it for a while.
5 Observe whether all propellers spin freely to the right direction.
a) If not in the right direction, lower the throttle to minimum and power off X650
Value.Reinstall propellers to test again until it works in the right way.
b) If not in a smooth way, throttle down to lowest and power off X650 Value.Check
electronic circuit and motors to retest until it goes well.
6 If every part works fine, and keep the throttle at 20% and try to push stick slightly in
Pitch, Roll and Yaw(stick value 30%).Feel whether aircraft attempts to move to the
corresponding direction.
7 If showing wrong direction to any of Pitch, Roll and Yaw, adjust signal cable connection
order of receiver to test again until it becomes normal.
8 Throttle back to lowest and power off X650 Value.
16
www.xaircraft.com
M1
M3
M2
M4

地面摇杆操作测试后,进行传感器工作状态测试。
1 拔出飞行模式选择通道 的连接线。
2 将遥控器油门收到最小后打开遥控器开关。
3 X650 Value接通电源。
4 半蹲姿势,左手抓紧X650 Value的底部,举到前上方,高度高于头顶。
5 右手轻推油门至20%的杆量。
6 尝试使用左手使飞行器前、后、左、右倾斜,感觉飞行器是否阻止您使飞行器倾斜。
7 如果飞行器没有阻止您使它倾斜,则将油门收到最小,断开X650 Value电源,重新检查电路安装(如AHRS的安装方向是否正确,连接线
是否接好)后再次测试。
8 如果飞行器的反应正确,将油门推最小,断开X650 Value的电源,就可以进行首次试飞了。
(默认为Input5)
姿态传感器工作状态测试 AHRS Function Test
After X650 Value stick function test on ground now it goes sensor test.
1 Unplug Flight Mode channel signal cable (default Input 5).
2 Throttle down to lowest then turn on the transmitter.
3 Power on X650 Value.
4 Squat and grasp the bottom side of X650 Value to lift it higher than your head.
5 Apply throttle slowly to 20%.
6 Try to bank the aircraft forwards, backwards, left side and right side and feel it whether aircraft has stopped your moving.
7 If no resistance, throttle down to lowest and power off X650 Value.Check if electronic parts installs properly. (Like AHRS
installation orientation or good connection).Then test again.
8 If aircraft reacts perfect, throttle down to lowest and power off X650 Value.Now you can start your first fly and enjoy it.
测试时请注意安全, 避免被螺旋桨击中。
Pay attention to rotating blades from getting hurt.
17
www.xaircraft.com

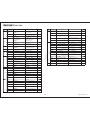
袋编号
Packet
物料编号
Product Code
名称 Name
数量
Amount
E1
E1001
XAircraft FC1212
飞行控制器
XAircraft FC 1212
Flight Controller
1
E1002 3-pin 信号线
3-pin Signal Cable
6
E1003
减震海绵
(10×35×0.5mm)
Shock Absorber Sponge
(10×30×0.5mm)
1
E2
E1004
XAircrft AHRS-S V2
姿态传感器
XAircraft AHRS-S V2
Attitude and Heading
Reference System
1
E1005
减震海绵
(30×30×2mm)
Shock Absorber Sponge
(30×30×2mm)
1
E1006 6-pin 信号线 6-pin Signal Cable
1
E3007
XAircrft BLC-10A
高速无刷电调
XAircraft BLC-10A
UltraPWM Brushless ESC
4
E3008 1转5电源转接线 1-to-5 Power Wire
1
E4
E1009 XAircraft USB-Link
XAircraft USB-Link
1
E1010 USB线 USB Cable
1
E1011 4-pin 信号线 4-pin Signal Cable
1
F1
F3001C 机身上板 Fuselage Upper Plate
1
F3002C 机身下板 Fuselage Lower Plate
1
F3004C AHRS固定板 AHRS Mounting Plate
1
F3005C 电池板 Batter y Mounting Plate
1
F3006C 电机固定板 Motor Mounting Plate 4
L1010 扎带 Fastener
2
F3007 机身盖 Frame Cover
1
F2
F3008 电机夹头 Motor Mount
4
F3009 机身杆夹头 Arm Mount
4
F3010 挂载固定件 Load Hanger
2
F3011 机身固定件1 Fuselage Strut 1
2
F3012 机身固定件2 Fuselage Strut 2
2
F3013 ESC电调盖 ESC Cover
4
F3014C 机身管 Frame Arm
4
F3015 机身管支撑件1 Frame Arm Strengthener 1
4
F3016 机身管支撑件2 Frame Arm Strengthener 2 4
L3001C 起落架横杆
Landing Gear Skid Pipe
2
L3002C 挂载杆(含管塞)
Load Mounting Pipe(with
Cork)
2
L3003 挂载杆固定件 Load Mounting Pipe Mount
4
L3004 挂载杆固定胶 Load Mounting Pipe Fixer
4
L3005 起落架 Landing Gear
2
P3001 XAircraft 2215 无刷电机 XAircraft 2215 Brushless Motor
4
P3002-A XAircraft 10寸螺旋桨(正)
XAircraft 10inch Clockwise
Blade
2
P3002-B XAircraft 10寸螺旋桨(反)
XAircraft 10inch Counter
Clockwise Blade
2
P3003 桨夹
Blade Locker
4
M
M3001 M2.5×6 圆头内六角螺丝 M2.5×6 Socket Screw
40
M3002 M2.5×20 杯头内六角螺丝 M2.5×20 Socket Screw
4
M3003 M3×6 圆头内六角螺丝 M3×6 Socket Screw
8
M3004 M3×8 圆头内六角螺丝 M3×8 Socket Screw
8
M3005 6×2.5×0.5mm垫片 6×2.5×0.5mm Washer
8
M3006 M3×8 尼龙螺丝 M3×8 Nylon Screw
4
M3007 M3×12 尼龙支柱 M3×12 Nylon Pillar
12
M3008 6×3×1.5mm尼龙垫片 6×3×1.5mm Nylon Wahser
8
M3009 M3 尼龙螺母 M3 Nylon Nut
4
M3010 M2.5×22 杯头内六角螺丝 M2.5×22 Socket Screw 4
附赠包1 附赠包1 Steel Screw Pack
1
附赠包2 附赠包2 Nylon Screw Pack
1
赠送 方向识别贴纸 Heading Paster
1
袋编号
Packet
物料编号
Product Code
名称 Name
数量
Amount
零部件清单 Parts List
18
www.xaircraft.com
ページが読み込まれています...
-
 1
1
-
 2
2
-
 3
3
-
 4
4
-
 5
5
-
 6
6
-
 7
7
-
 8
8
-
 9
9
-
 10
10
-
 11
11
-
 12
12
-
 13
13
-
 14
14
-
 15
15
-
 16
16
-
 17
17
-
 18
18
-
 19
19
-
 20
20
-
 21
21


Aircraft Modelers Research XAircraft X650 Value ユーザーマニュアル
- タイプ
- ユーザーマニュアル
他の言語で
その他のドキュメント
-
JUNG 533VEUPANIC 取扱説明書
-
 FMS Models 1280mm Easy Trainer V2 取扱説明書
-
Samsung ET-YC200 ユーザーマニュアル
-
FMS Models FMM133PX 取扱説明書
-
Kyosho MINIUM WARBIRD A6M5 ZERO 取扱説明書
-
Radiomaster T8 ユーザーマニュアル
-
-
-
dji Inspire 2 ユーザーガイド
-
