HP Photosmart C4600 All-in-One Printer series 取扱説明書
- カテゴリー
- 印刷
- タイプ
- 取扱説明書

Basics Guide
基本指南
HP Photosmart C4600 All-in-One series

Hewlett-Packard Company notices
The information contained in this document is subject to change without notice.
All rights reserved. Reproduction, adaptation, or translation of this material is prohibited without prior written permission
of Hewlett-Packard, except as allowed under copyright laws. The only warranties for HP products and services are set forth
in the express warranty statements accompanying such products and services. Nothing herein should be construed as
constituting an additional warranty. HP shall not be liable for technical or editorial errors or omissions contained herein.
© 2009 Hewlett-Packard Development Company, L.P.
Windows, Windows 2000, and Windows XP are U.S. registered trademarks of Microsoft Corporation.
Windows Vista is either a registered trademark or trademark of Microsoft Corporation in the United States and/or other
countries.
Intel and Pentium are trademarks or registered trademarks of Intel Corporation or its subsidiaries in the United States and
other countries.
㍯㣽⏻⚇抩⛙
㦻㠖ↅ₼▔⚺䤓彖岙Ⱁ㦘帙㦃᧨㋤ₜ♵嫛抩䩴ᇭ
䓗㶙㓏㦘᧨劊◿㉔䴅ᇭ棳䓗㶙㽤⏐峀⃚⮥᧨㦹倢㍯㣽ℚ⏗㦇槱峀♾᧨ₜ㈦⺜㦻㓚␙拁嫛宖完ᇬ㟈偷㒥劊巾ᇭ+3䞱❐♙㦜╨椷棓䤓≬⦉㢾㷳櫭䞱
❐♙㦜╨䤓➾㢝䯉≬⦉ᇭₜ㑘⺖㷳壤䤓↊⇤彖岙尥䍉棓┯≬⦉ᇭ+3⺜㦻㓚␙㓏▔⚺䤓↊⇤㔏嫢㒥偷憾斾崳㒥按䆞ₜ弯↊⇤弻↊ᇭ
囦⇫㶙k+HZOHWW3DFNDUG'HYHORSPHQW&RPSDQ\/3ᇭ
WindowsޔWindows 2000 Windows XP ᤚ Microsoft Corporation ⟤⊛⸼ౠᮡޕ
Windows Vista ᤚ Microsoft Corporation ⟤/ᚗઁኅ/ඟ⊛⸼ౠᮡᚗᮡޕ
Intel Pentium ᤚ Intel Corporation ᚗሶม⟤ઁኅ/ඟ⊛ᮡᚗ⸼ౠᮡޕ
การแจ้งเตือนโดยบริษัทฮิวเล็ตต์-แพคการ์ด
ข้อมูลที่มีอยู่ในเอกสารนี้อาจมีการเปลี่ยนแปลงโดยไม่มีการแจ้งให้ทราบ
สงวนสิทธิ์ทั้งหมด ห้ามทำซ้ำ, แก้ไขปรับปรุง หรือแปลวัสดุเหล่านี้โดยไม่ได้รับการอนุญาตเป็นลายลักษณ์อักษรจากบริษัทฮิวเล็ตต์-แพคการ์ด
ยกเว้นว่าได้รับอนุญาตภายใต้กฎหมายลิขสิทธิ์ เฉพาะการรับประกันสำหรับผลิตภัณฑ์และบริการของ HP
ที่กำหนดไว้อย่างชัดเจนในเอกสารการรับประกันที่เกี่ยวข้องกับผลิตภัณฑ์หรือบริการดังกล่าวเท่านั้น หากไม่มีการระบุไว้ในที่นี้
ให้ถือว่าจะต้องดำเนินการขอรับประกันเพิ่มเติม HP จะไม่รับผิดชอบสำหรับข้อผิดพลาดทางเทคนิ
คหรือบทความ หรือการตกหล่นที่มีอยู่ในที่นี้
© 2009 Hewlett-Packard Development Company, L.P.
Windows, Windows 2000, และ Windows XP เป็นเครื่องหมายการค้าจดทะเบียนแห่งสหรัฐอเมริกาของไมโครซอฟท์ คอร์ปอเรชั่น
Windows Vista เป็นเครื่องหมายการค้าจดทะเบียน หรือเครื่องหมายการค้าของไมโครซอฟท์ คอร์ปอเรชั่นในสหรัฐอเมริกา และ/หรือประเทศอื่นๆ
Intel และ Pentium เป็นเครื่องหมายการค้า หรือเครื่องหมายการค้าจดทะเบียนของอินเทล คอร์ปอเรชั่น หรือบริษัทในเครือในสหรัฐอเมริกา และประเทศอื่นๆ

HP Photosmart C4600 series
Basics Guide
English

English

Contents
1 HP Photosmart overview
The HP Photosmart at a glance.................................................................................................2
Control panel buttons.................................................................................................................3
Find more information.................................................................................................................4
Load originals and load paper....................................................................................................4
Avoid paper jams........................................................................................................................7
Print 10 x 15 cm (4 x 6 inch) photos...........................................................................................7
Scan an image............................................................................................................................8
Make a copy...............................................................................................................................9
Replace the print cartridges........................................................................................................9
Clean the HP Photosmart.........................................................................................................12
2 Troubleshooting and support
Uninstall and reinstall the software...........................................................................................14
Hardware setup troubleshooting...............................................................................................15
Clear paper jams......................................................................................................................17
Print cartridge troubleshooting..................................................................................................18
Support process.......................................................................................................................18
3 Technical information
System requirements................................................................................................................19
Product specifications...............................................................................................................19
Regulatory notices....................................................................................................................19
Warranty...................................................................................................................................20
1
English

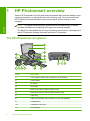
1 HP Photosmart overview
Use the HP Photosmart to quickly and easily accomplish tasks such as making a copy,
scanning documents, or printing photos from a memory card. You can access many
HP Photosmart functions directly from the control panel, without turning on your
computer.
NOTE: This guide introduces basic operations and troubleshooting, as well as
provides information for contacting HP support and ordering supplies.
The Electronic Help details the full range of features and functions, including use of
the HP Photosmart Software that came with the HP Photosmart.
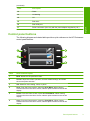
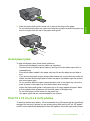
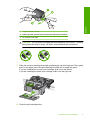
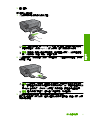
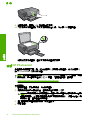
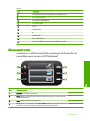
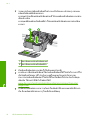
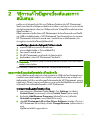
The HP Photosmart at a glance
Label Description
1 Color graphics display (also referred to as the display)
2 Control panel
3 On button
4 Photo light
5 Memory card slot for Memory Stick cards
6 Memory card slot for Secure Digital and xD cards
7 Paper tray
8 Paper tray extender (also referred to as the tray extender)
9 Cartridge door
10 Cartridge access area
11 Print carriage
2 HP Photosmart C4600 series
English

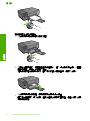
Label Description
12 Glass
13 Lid-backing
14 Lid
15 Rear door
16 Rear USB port
17 Power connection (Use only with the power adapter supplied by HP.)
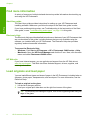
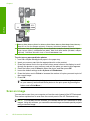
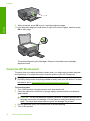
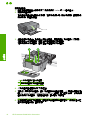
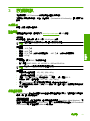
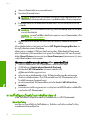
Control panel buttons
The following diagram and related table provide a quick reference to the HP Photosmart
control panel features.
2.
Label Name and Description
1 Back: Returns to the previous screen.
2 Cancel: Stops the current operation, restores default settings, and clears
the current photo selection.
3 OK: Selects a menu setting, value, or photo.
4 Scan: From the Home screen, opens the Scan Menu. When viewing
screens other than the Home screen, selects options related to the current
display.
5 Photo: From the Home screen, opens the Photo Menu. When viewing
screens other than the Home screen, selects options related to the current
display.
6 Copy: From the Home screen, opens the Copy Menu. When viewing
screens other than the Home screen, selects options related to the current
display.
(continued)
Control panel buttons 3
English

Find more information
A variety of resources, both printed and electronic provide information about setting up
and using the HP Photosmart.
Start Here guide
The Start Here guide provides instructions for setting up your HP Photosmart and
installing software. Make sure you follow the steps in the Start Here guide in order.
If you have problems during setup, see Troubleshooting in the last section of the Start
Here guide, or see “
Troubleshooting and support” on page 14 in this guide.
Electronic Help
The Electronic Help provides detailed instructions on features of your HP Photosmart that
are not described in this guide, including features that are only available using the
software you installed with your HP Photosmart. The Electronic Help also provides
regulatory and environmental information.
To access the Electronic Help
• Windows: Click Start > All Programs > HP > Photosmart C4600 series > Help.
• Macintosh: Open the HP Device Manager and click the ? icon. Next, click the main
menu and select Photosmart C4600 series.
HP Web site
If you have Internet access, you can get help and support from the HP Web site at
www.hp.com/support. This Web site offers technical support, drivers, supplies, and
ordering information.
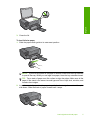
Load originals and load paper
You can load different types and sizes of paper in the HP Photosmart, including letter or
A4 paper, photo paper, transparencies, and envelopes. For more information, see the
Electronic Help.
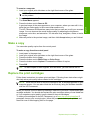
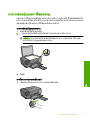
To load an original on the glass
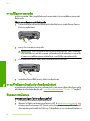
1. Lift the lid to the open position.
2. Load your original print side down on the right front corner of the glass.
TIP: For more help on loading an original, refer to the engraved guides along the
edge of the glass.
Chapter 1
4 HP Photosmart C4600 series
English

3. Close the lid.
To load full-size paper
1. Slide the paper-width guide to its outermost position.
NOTE: If you are using letter or A4 paper or smaller, make sure the tray extender
is open all the way. When you use legal-size paper, leave the tray extender closed.
TIP: Tap a stack of paper on a flat surface to align the edges. Make sure all the
paper in the stack is the same size and type and free of rips, dust, wrinkles, and
curled or bent edges.
2. Insert the stack of paper into the paper tray with the short edge forward and the print
side down. Slide the stack of paper forward until it stops.
Load originals and load paper 5
English

CAUTION: Make sure that the product is idle and silent when you load paper
into the paper tray. If the product is servicing the print cartridges or otherwise
engaged in a task, the paper stop inside the product might not be in place. You
could push the paper too far forward, causing the product to eject blank pages.
TIP: If you are using letterhead, insert the top of the page first with the print side
down.
3. Slide the paper-width guide inward until it stops at the edge of the paper.
Do not overload the paper tray; make sure the stack of paper fits within the paper tray
and is no higher than the top of the paper-width guide.
To load small-size photo paper in the paper tray
1. Slide the paper-width guide to its outermost position.
2. Insert the stack of photo paper into the far-right side of the paper tray with the short
edge forward and the print side down. Slide the stack of photo paper forward until it
stops.
If the photo paper you are using has perforated tabs, load the photo paper so that the
tabs are closest to you.
Chapter 1
6 HP Photosmart C4600 series
English

3. Slide the paper-width guide inward until it stops at the edge of the paper.
Do not overload the paper tray; make sure the stack of paper fits within the paper tray
and is no higher than the top of the paper-width guide.
Avoid paper jams
To help avoid paper jams, follow these guidelines.
• Remove printed papers from the paper tray frequently.
• Prevent curled or wrinkled photo paper by storing all unused photo paper flat in a
resealable bag.
• Ensure that paper loaded in the paper tray lays flat and the edges are not bent or
torn.
• If you are printing labels, ensure that the label sheets are no more than two years old.
Labels on older sheets might peel off when the paper is pulled through the product,
and cause paper jams.
• Do not combine different paper types and paper sizes in the paper tray; the entire
stack of paper in the paper tray must be the same size and type.
• Adjust the paper-width guide in the paper tray to fit snugly against all paper. Make
sure the paper-width guide does not bend the paper in the paper tray.
• Do not force paper too far forward in the paper tray.
• Use paper types that are recommended for the product.
Print 10 x 15 cm (4 x 6 inch) photos
To achieve the best print quality, HP recommends using HP papers that are specifically
designed for the type of project you are printing along with genuine HP ink. HP papers
and HP ink are specifically designed to work well together to provide high-quality output.
Print 10 x 15 cm (4 x 6 inch) photos 7
English

1 Memory Stick, Memory Stick Pro, Memory Stick Select, Memory Stick Magic Gate, Memory
Stick Duo or Duo Pro (adapter optional), or Memory Stick Micro (adapter required)
2 xD-Picture Card, Secure Digital (SD), Secure Digital Mini (adapter required), Secure Digital
High Capacity (SDHC), MultiMediaCard (MMC), MMC Plus, MMC Mobile (RS-MMC; adapter
required), TransFlash MicroSD Card, or Secure MultiMedia Card
To print one or more small-size photos
1. Load 10 x 15 (4 x 6 inch) photo paper in the paper tray.
2. Insert your memory card into the appropriate slot on the product.
3. Press the buttons next to the up arrow or down arrow icons on the display to scroll
through the photos on your memory card until the photo you want to print appears.
4. Press the button next to Select to select the photo, and then press OK.
5. Leave the default settings as 4 x 6 photo and Borderless.
6. Press the button next to Prints to increase the number of copies you want to print of
the current image.
7. Press OK.
TIP: While the photo is printing, you can continue to scroll through the photos
on your memory card and add more photos to the print queue by pressing the
button next to Print More....
Scan an image
You can start a scan from your computer or from the control panel of the HP Photosmart.
This section explains how to scan from the control panel of the HP Photosmart only.
NOTE: You can also use the software you installed with the HP Photosmart to scan
images. Using this software, you can edit a scanned image and create special projects
using a scanned image.
Chapter 1
8 HP Photosmart C4600 series
English

To scan to a computer
1. Load your original print side down on the right front corner of the glass.
NOTE: Ensure that there are no memory cards inserted in the memory card slots
on the product.
2. Press the button next to Scan.
The Scan Menu appears.
3. Press the button next to Scan to PC.
A preview image of the scan appears on your computer, where you can edit it. Any
edits that you make apply to the current scan session only.
The HP Photosmart Software has many tools that you can use to edit your scanned
image. You can improve the overall image quality by adjusting the brightness,
sharpness, color tone, and saturation. You can also crop, straighten, rotate, or resize
the image.
4. Make any edits to the preview image, and then click Accept when you are finished.
Make a copy
You can make quality copies from the control panel.
To make a copy from the control panel
1. Load paper in the paper tray.
2. Load your original print side down on the right front corner of the glass.
3. Press the button next to Copy.
4. Press the button next to Black Copy or Color Copy.
5. Press the button next to Copies to increase the number of copies.
6. Press OK.
TIP: To make copies of thick originals, such as books, you can remove the lid.
Replace the print cartridges
Follow these instructions to replace print cartridges. Following these instructions might
also help solve print quality issues related to the cartridges.
NOTE: When the ink level for the print cartridge is low, a message appears on your
computer screen. You can also check the ink levels by using the software installed
with the HP Photosmart.
When you receive a low-ink warning message, make sure you have a replacement print
cartridge available. You should also replace the print cartridges when you see faded text
or if you experience print quality issues related to the print cartridges.
To order print cartridges for the HP Photosmart, go to
www.hp.com/buy/supplies. If
prompted, choose your country/region, follow the prompts to select your product, and
then click one of the shopping links on the page.
Replace the print cartridges 9
English

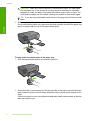
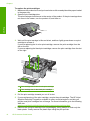
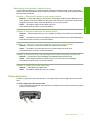
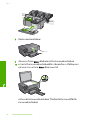
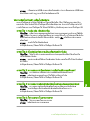
To replace the print cartridges
1. Make sure the product is on and you have letter or A4 unused plain white paper loaded
in the paper tray.
2. Open the print cartridge door.
The print carriage should move to the center of the product. If the print carriage does
not move to the center, turn the product off, and then on.
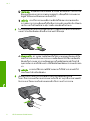
3. Wait until the print carriage is idle and silent, and then lightly press down on a print
cartridge to release it.
If you are replacing the tri-color print cartridge, remove the print cartridge from the
slot on the left.
If you are replacing the black print cartridge, remove the print cartridge from the slot
on the right.
1 Print cartridge slot for the tri-color print cartridge
2 Print cartridge slot for the black print cartridge
4. Pull the print cartridge towards you out of its slot.
5. If you are disposing of the print cartridge, recycle the print cartridge. The HP Inkjet
Supplies Recycling Program is available in many countries/regions, and lets you
recycle used print cartridges free of charge. For more information, go to the following
Web site:
www.hp.com/hpinfo/globalcitizenship/environment/recycle/inkjet.html
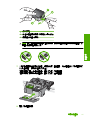
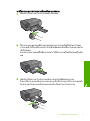
6. Remove the new print cartridge from its packaging, being careful to touch only the
black plastic. Gently remove the plastic tape using the pink pull tab.
Chapter 1
10 HP Photosmart C4600 series
English

1 Copper-colored contacts
2 Plastic tape with pink pull tab (must be removed before installing)
3 Ink nozzles under tape
CAUTION: Do not touch the copper-colored contacts or ink nozzles. Touching
these parts can result in clogs, ink failure, and bad electrical connections.
7. Slide the new print cartridge at a slight upward angle into the empty slot. Then gently
push on the upper part of the print cartridge forward until it snaps into place.
If you are installing the tri-color print cartridge, slide it into the left slot.
If you are installing the black print cartridge, slide it into the right slot.
8. Close the print cartridge door.
Replace the print cartridges 11
English

9. When prompted, press OK to print a cartridge alignment page.
10. Load alignment page print side down on right front corner of glass, and then press
OK to scan page.
The product aligns the print cartridges. Recycle or discard the print cartridge
alignment sheet.
Clean the HP Photosmart
To ensure that your copies and scans remain clear, you might need to clean the glass
and lid backing. You might also want to dust the exterior of the HP Photosmart.
TIP: You can purchase an HP Cleaning Kit for Inkjet Printers and All-in-Ones
(Q6260A) that provides everything needed to safely clean your HP device. For more
information, go to:
www.shopping.hp.com/accessories-store/printer.
To clean the glass
1. Turn off the product, unplug the power cord, and raise the lid.
2. Clean the glass with a soft cloth or sponge slightly moistened with a nonabrasive
glass cleaner.
CAUTION: Do not use abrasives, acetone, benzene, or carbon tetrachloride on
the glass, since they can damage it. Do not place or spray liquid directly on the
glass. The liquid might seep under the glass and damage the product.
3. Dry the glass with a dry, soft, lint-free cloth to prevent spotting.
4. Turn on the product.
Chapter 1
12 HP Photosmart C4600 series
English

To clean the lid backing
1. Turn off the product, unplug the power cord, and raise the lid.
2. Clean the white document backing with a soft cloth or sponge slightly moistened with
a mild soap and warm water.
Wash the backing gently to loosen debris. Do not scrub the backing.
3. Dry the backing with a dry, soft, lint-free cloth.
CAUTION: Do not use paper-based wipes, as these might scratch the backing.
4. If further cleaning is needed, repeat the previous steps using isopropyl (rubbing)
alcohol, and wipe the backing thoroughly with a damp cloth to remove any residual
alcohol.
CAUTION: Be careful not to spill alcohol on the glass or exterior of the product,
as this might damage it.
5. Plug in the power cord, and then turn on the product.
TIP: You can remove the lid for an easy cleaning experience.
Clean the HP Photosmart 13
English

2 Troubleshooting and support
This chapter contains troubleshooting information for the HP Photosmart. Specific information is
provided for installation and configuration issues, and some operational topics. For more
troubleshooting information, see the Electronic Help that came with your software.
Many issues are caused when the HP Photosmart is connected to the computer using a USB cable
before the HP Photosmart software is installed on the computer. If you connected the HP Photosmart
to your computer before the software installation screen prompts you to do so, you must follow these
steps:
Troubleshooting common setup issues
1. Disconnect the USB cable from the computer.
2. Uninstall the software (if you have already installed it).
3. Restart your computer.
4. Turn off the HP Photosmart, wait one minute, then restart it.
5. Reinstall the HP Photosmart software.
CAUTION: Do not connect the USB cable to the computer until prompted by the software
installation screen.
For support contact information, see the inside back cover of this guide.
Uninstall and reinstall the software
If your installation is incomplete, or if you connected the USB cable to the computer before prompted
by the software installation screen, you might need to uninstall and then reinstall the software. Do
not simply delete the HP Photosmart application files from your computer. Make sure to remove
them properly using the uninstall utility provided when you installed the software that came with the
HP Photosmart.
To uninstall and reinstall the software
1. On the Windows taskbar, click Start, Settings, Control Panel (or just Control Panel).
2. Double-click Add/Remove Programs (or click Uninstall a program).
3. Select HP Photosmart All-in-One Driver Software, and then click Change/Remove.
Follow the onscreen instructions.
4. Disconnect the product from your computer.
5. Restart your computer.
NOTE: It is important that you disconnect the product before restarting your computer. Do
not connect the product to your computer until after you have reinstalled the software.
6. Insert the product CD-ROM into your computer’s CD-ROM drive and then start the Setup
program.
NOTE: If the Setup program does not appear, locate the setup.exe file on the CD-ROM
drive and double-click it.
NOTE: If you no longer have the installation CD, you can download the software from
www.hp.com/support.
7. Follow the onscreen instructions and the instructions provided in the Setup Guide that came
with the product.
When the software installation is complete, the HP Digital Imaging Monitor icon appears in the
Windows system tray.
14 HP Photosmart C4600 series
English

To verify that the software is properly installed, double-click the HP Solution Center icon on the
desktop. If the HP Solution Center shows the essential icons (Scan Picture and Scan
Document), the software has been properly installed.
To uninstall from a Mac and then reinstall
1. Disconnect the HP Photosmart from your Mac.
2. Open the Applications:Hewlett-Packard folder.
3. Double-click HP Uninstaller.
Follow the onscreen instructions.
4. After the software is uninstalled, restart your computer.
5. To reinstall the software, insert the HP Photosmart CD-ROM into your computer’s CD-ROM
drive.
6. On the desktop, open the CD-ROM and then double-click HP All-in-One Installer.
7. Follow the onscreen instructions and the instructions provided in the Setup Guide that came
with the HP Photosmart.
Hardware setup troubleshooting
Use this section to solve any problems you might encounter while setting up the HP Photosmart
hardware.
The product will not turn on
Try the following solutions if there are no light indications, no noise, and no movement from the
product when you turn it on.
Solution 1: Make sure you use the power cord that came with the product
Solution
• Make sure the power cord is firmly connected to both the product and the power adapter.
Plug the power cord into a power outlet, surge protector, or power strip.
• If you are using a power strip, make sure the power strip is turned on. Or, try plugging the
product directly into a power outlet.
• Test the power outlet to make sure it is working. Plug in an appliance that you know works,
and see if the appliance has power. If not, then there might be a problem with the power
outlet.
• If you plugged the product into a switched outlet, make sure the outlet is switched on. If it
is switched to on but still does not work, then there might be a problem with the power outlet.
Cause: The product was not being used with the power cord provided.
If this did not solve the issue, try the next solution.
Solution 2: Reset the product
Solution: Turn off the product, and then unplug the power cord. Plug the power cord back in,
and then press the On button to turn on the product.
Cause: The product experienced an error.
If this did not solve the issue, try the next solution.
Solution 3: Press the On button more slowly
Solution: The product might not respond if you press the On button too quickly. Press the
On button once. It might take a few minutes for the product to turn on. If you press the On button
again during this time, you might turn the product off.
Cause: You pressed the On button too quickly.
If this did not solve the issue, try the next solution.
Hardware setup troubleshooting 15
English

Solution 4: Contact HP to replace the power supply
Solution: Contact HP support to request a power supply for the product.
Go to:
www.hp.com/support.
If prompted, choose your country/region, and then click Contact HP for information on calling
for technical support.
Cause: The power supply was not intended for use with this product or it had a mechanical
failure.
If this did not solve the issue, try the next solution.
Solution 5: Contact HP support for service
Solution: If you have completed all of the steps provided in the previous solutions and are still
having a problem, contact HP support for service.
Go to:
www.hp.com/support.
If prompted, choose your country/region, and then click Contact HP for technical support.
Cause: You might need assistance to enable the product or software to function properly.
The display shows the wrong language
Solution: Change the language setting.
To set your language and country/region
1. Press the button next to Copy on the Home screen.
The Copy Menu appears.
2. Press the top-right, middle-left, and bottom-left buttons in sequence.
The Basic Settings menu appears.
3. Press the button next to Set Language.
4. Press the buttons next to the up arrow or down arrow icons on the display to scroll through
the languages. When the language you want to use is highlighted, press the button next to
OK.
5. When prompted, press the button next to Yes for confirmation.
The Basic Settings menu reappears.
6. Press the button next to Set Region.
7. Press the buttons next to the up arrow or down arrow icons on the display to scroll through
the countries/regions. When the country/region you want to use is highlighted, press the
button next to OK.
8. When prompted, press the button next to Yes for confirmation.
Cause: You might have selected the incorrect language when setting up the product.
I connected the USB cable, but I am having problems using the product with my
computer
Solution: You must first install the software that came with the product before connecting the
USB cable. During installation, do not plug in the USB cable until prompted by the onscreen
instructions.
Once you have installed the software, plug one end of the USB cable into the back of your
computer and the other into the back of the product. You can connect to any USB port on the
back of your computer.
For more information on installing the software and connecting the USB cable, see the Setup
Guide that came with the product.
Cause: The USB cable was connected before the software was installed. Connecting the USB
cable before you are prompted can cause errors.
Chapter 2
16 HP Photosmart C4600 series
English
ページが読み込まれています...
ページが読み込まれています...
ページが読み込まれています...
ページが読み込まれています...
ページが読み込まれています...
ページが読み込まれています...
ページが読み込まれています...
ページが読み込まれています...
ページが読み込まれています...
ページが読み込まれています...
ページが読み込まれています...
ページが読み込まれています...
ページが読み込まれています...
ページが読み込まれています...
ページが読み込まれています...
ページが読み込まれています...
ページが読み込まれています...
ページが読み込まれています...
ページが読み込まれています...
ページが読み込まれています...
ページが読み込まれています...
ページが読み込まれています...
ページが読み込まれています...
ページが読み込まれています...
ページが読み込まれています...
ページが読み込まれています...
ページが読み込まれています...
ページが読み込まれています...
ページが読み込まれています...
ページが読み込まれています...
ページが読み込まれています...
ページが読み込まれています...
ページが読み込まれています...
ページが読み込まれています...
ページが読み込まれています...
ページが読み込まれています...
ページが読み込まれています...
ページが読み込まれています...
ページが読み込まれています...
ページが読み込まれています...
ページが読み込まれています...
ページが読み込まれています...
ページが読み込まれています...
ページが読み込まれています...
ページが読み込まれています...
ページが読み込まれています...
ページが読み込まれています...
ページが読み込まれています...
ページが読み込まれています...
ページが読み込まれています...
ページが読み込まれています...
ページが読み込まれています...
ページが読み込まれています...
ページが読み込まれています...
ページが読み込まれています...
-
 1
1
-
 2
2
-
 3
3
-
 4
4
-
 5
5
-
 6
6
-
 7
7
-
 8
8
-
 9
9
-
 10
10
-
 11
11
-
 12
12
-
 13
13
-
 14
14
-
 15
15
-
 16
16
-
 17
17
-
 18
18
-
 19
19
-
 20
20
-
 21
21
-
 22
22
-
 23
23
-
 24
24
-
 25
25
-
 26
26
-
 27
27
-
 28
28
-
 29
29
-
 30
30
-
 31
31
-
 32
32
-
 33
33
-
 34
34
-
 35
35
-
 36
36
-
 37
37
-
 38
38
-
 39
39
-
 40
40
-
 41
41
-
 42
42
-
 43
43
-
 44
44
-
 45
45
-
 46
46
-
 47
47
-
 48
48
-
 49
49
-
 50
50
-
 51
51
-
 52
52
-
 53
53
-
 54
54
-
 55
55
-
 56
56
-
 57
57
-
 58
58
-
 59
59
-
 60
60
-
 61
61
-
 62
62
-
 63
63
-
 64
64
-
 65
65
-
 66
66
-
 67
67
-
 68
68
-
 69
69
-
 70
70
-
 71
71
-
 72
72
-
 73
73
-
 74
74
-
 75
75


HP Photosmart C4600 All-in-One Printer series 取扱説明書
- カテゴリー
- 印刷
- タイプ
- 取扱説明書
他の言語で
関連論文
-
HP Photosmart D6100 Printer series クイックスタートガイド
-
HP Photosmart Pro B8800 Printer series ユーザーガイド
-
HP Photosmart Premium Fax e-All-in-One Printer series - C410 リファレンスガイド
-
HP Photosmart 330 Printer series ユーザーガイド
-
-
-
-
-
HP Scanjet N6350 Networked Document Flatbed Scanner Getting Started
-
HP OFFICEJET PRO ユーザーガイド