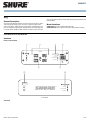
Shure ANI4OUT は、単一のネットワークケーブルでオーディオと電力を受信するオーディオネットワークインターフェイスです。4 チャンネルの Dante デジタルオーディオを個別のアナログ信号に変換します。アナログ接続を備えたプロセッシングデバイス(オーディオプロセッサー、ビデオコーデック、ラウドスピーカーシステムなど)に接続して、ネットワークオーディオとアナログ機器を単一のシステムに完全に統合します。
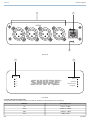
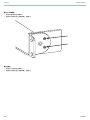
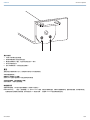
XLR バージョンとブロックコネクタバージョンの 2 種類があり、それぞれに 4 つの出力を備えています。ブロックコネクタモデルにはマイクロホンシールド線のシャーシグランドへの接続オプションがあります。フロントパネルには、各チャンネルのオーディオ信号レベルを示す 3 色の LED があります。Web アプリケーションでレベルを調整してクリッピングを回避できます。リアパネルには、Dante ネットワークポート、リセットボタン、LED インジケーターがあります。
Shure ANI4OUT は、Dante ネットワークを介
Shure ANI4OUT は、単一のネットワークケーブルでオーディオと電力を受信するオーディオネットワークインターフェイスです。4 チャンネルの Dante デジタルオーディオを個別のアナログ信号に変換します。アナログ接続を備えたプロセッシングデバイス(オーディオプロセッサー、ビデオコーデック、ラウドスピーカーシステムなど)に接続して、ネットワークオーディオとアナログ機器を単一のシステムに完全に統合します。
XLR バージョンとブロックコネクタバージョンの 2 種類があり、それぞれに 4 つの出力を備えています。ブロックコネクタモデルにはマイクロホンシールド線のシャーシグランドへの接続オプションがあります。フロントパネルには、各チャンネルのオーディオ信号レベルを示す 3 色の LED があります。Web アプリケーションでレベルを調整してクリッピングを回避できます。リアパネルには、Dante ネットワークポート、リセットボタン、LED インジケーターがあります。
Shure ANI4OUT は、Dante ネットワークを介


-
 1
1
-
 2
2
-
 3
3
-
 4
4
-
 5
5
-
 6
6
-
 7
7
-
 8
8
-
 9
9
-
 10
10
-
 11
11
-
 12
12
-
 13
13
-
 14
14
-
 15
15
-
 16
16
-
 17
17
-
 18
18
-
 19
19
-
 20
20
-
 21
21
-
 22
22
-
 23
23
-
 24
24
-
 25
25
-
 26
26
-
 27
27
-
 28
28


Shure ANI4OUT は、単一のネットワークケーブルでオーディオと電力を受信するオーディオネットワークインターフェイスです。4 チャンネルの Dante デジタルオーディオを個別のアナログ信号に変換します。アナログ接続を備えたプロセッシングデバイス(オーディオプロセッサー、ビデオコーデック、ラウドスピーカーシステムなど)に接続して、ネットワークオーディオとアナログ機器を単一のシステムに完全に統合します。
XLR バージョンとブロックコネクタバージョンの 2 種類があり、それぞれに 4 つの出力を備えています。ブロックコネクタモデルにはマイクロホンシールド線のシャーシグランドへの接続オプションがあります。フロントパネルには、各チャンネルのオーディオ信号レベルを示す 3 色の LED があります。Web アプリケーションでレベルを調整してクリッピングを回避できます。リアパネルには、Dante ネットワークポート、リセットボタン、LED インジケーターがあります。
Shure ANI4OUT は、Dante ネットワークを介
他の言語で
- English: Shure ANI4OUT User guide