
MXA910
天花板矩阵话筒
Shure MXA910 ceiling array microphone user guide. Includes mounting instructions, specifications, command strings, best practices, and
microphone configuration details.
Version: 6 (2019-G)

Shure Incorporated
2/57
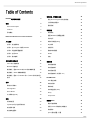
Table of Contents
MXA910天花板矩阵话筒 4
概述 4
General Description 4
Features 5
系统概述 6
Differences Between 3.x and 4.x Firmware 7
入门指南 8
步骤 1:连接到网络 8
步骤 2:在 Designer 中发现 MXA910 8
步骤 3:调整话筒覆盖范围 9
步骤 4:应用 DSP 10
步骤 5:路由音频 11
系统规划和连接要求 11
Shure 会议设备概述 12
MXA910 设备组合 13
使用情况:配有 ANIUSB 或 P300 的软编解码器 14
使用情况:ANI22 和硬编解码器 15
使用情况:配有 2 个 MXA910 和一个 P300 的中等或大型
房间 16
硬件 16
网络以太网端口 16
LED Light Bar 17
Reset Button 18
以太网供电 (PoE) 19
安装 19
话筒的放置 20
FyreWrap® 防火包装系统安装 21
安装矩阵话筒 23
安装接线盒配件 29
软件安装、管理和安全性 32
通过 Shure Designer 软件控制设备 32
访问网络应用程序 33
固件更新 33
话筒配置 34
软件概述 34
配置 MXA910 话筒覆盖范围 35
调节电平 37
参数式均衡器 (PEQ) 37
EQ 效果 40
定制预设 40
静音和渐减器组 40
AES67 40
加密 41
自动混音 41
自动混音通道 41
自动混音模式 42
自动混音设置 42
自动混音模式(仅固件 <4.x) 43
IntelliMix DSP 43
DSP 最佳实践 44
声回波消除 44
噪声降低 44
自动增益控制 (AGC) 45
Delay 45
Compressor 45
网络和 Dante 45
数字式音频网络 45
适用于 Dante 网络的交换机建议 46
缆线要求 46
QoS(服务质量)设置 46


Shure Incorporated
4/57
MXA910
天花板矩阵话筒
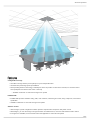
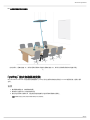
概述
General Description
The Microflex Advance Ceiling Array is a premium networked array microphone for AV conferencing environments, including
boardrooms, huddle rooms, and multi-purpose spaces. The ceiling array uses Shure's Steerable Coverage with Autofocus
technology: 8 highly directional pickup lobes capture participant audio from overhead, continually fine-tuning the position of
each lobe in real time as participants lean back in their chairs or stand up .
The microphone also includes the IntelliMix DSP suite, which includes AEC, noise reduction, automatic mixing, and more.
Control the microphone with Shure Designer software, or a browser-based web application. The microphone integrates
seamlessly with Dante digital networked audio, AES67, and third-party preset controllers, including Crestron and AMX, to
deliver a high-quality AV conferencing experience that appeals equally to integrators, consultants, and meeting participants.
®
™
™ ™
®
™

Shure Incorporated
5/57
•
•
•
◦
•
•
•
•
•
Features
Configurable Coverage
Steerable Coverage delivers precise pickup for up to 8 independent lobes
Automatic lobe positioning speeds up installation
Patent-pending Autofocus technology continually fine-tunes the position of each lobe in real time, for consistent sound
when participants lean back in their chairs or stand up
Available on firmware 4.x and newer through a free update
IntelliMix DSP
IntelliMix DSP provides automatic mixing, AEC, noise reduction, automatic gain control, delay, compressor, and channel
equalization
Available on firmware 4.x and newer through a free update
Software Control
Shure Designer system configuration software provides comprehensive microphone and pattern control
With Designer, you can also design coverage with online and offline devices, and route audio between Shure devices
If Designer isn't available, use the browser-based web application to control the microphone

Shure Incorporated
6/57
•
•
•
•
•
•
•
Compatible with Shure SystemOn audio asset management software for remote monitoring and real-time alerts about
critical issues
Network Connectivity
Discrete audio channels for each lobe and an automix channel are delivered over a single network cable
Dante digital audio coexists safely on the same network as IT and control data, or can be configured to use a dedicated
network
Control strings available for third-party preset controllers including Crestron and AMX
Professional Design
Sleek industrial design blends with contemporary board rooms and meeting spaces
Versatile mounting options for ceilings, pole mounts, suspension cables, and more
Available in white, black, and aluminum finishes (detachable grille can be custom painted)
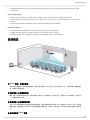
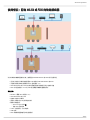
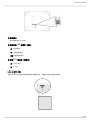
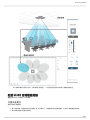
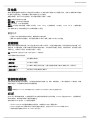
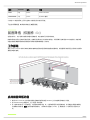
系统概述
① Dante 音频、电源和控制
每个矩阵话筒都通过一根网线连接到网络,网线可用来传输 Dante 音频,进行以太网供电 (PoE),并控制信息以调整覆盖区
域、音频电平和处理过程。
② 模拟音频(从话筒到网络)
模拟设备(如无线话筒系统或平台上的鹅颈话筒)通过 Shure 网络接口(ANI4IN 型号)连接到 Dante 音频网络,从而形成
一个完全连网的会议系统。
③ 远端音频(从网络到扬声器)
支持 Dante 的扬声器和放大器直接连接到网络交换机。模拟扬声器和放大器通过 Shure 网络接口(ANI4OUT 型号)连接到
网路交换机,该网络接口可以将 Dante 音频通道转换为模拟信号,并通过 4 个独立的 XLR 或块状接头输出传输这些模拟信
号。
④ 设备控制和 Dante 音频

Shure Incorporated
7/57
•
◦
•
◦
◦
◦
◦
◦
•
•
•
•
•
•
•
◦
•
控制:连接到网络的计算机通过 Shure Designer 软件控制话筒。您可以远程调节覆盖范围、静音、LED 行为、波瓣设置、增
益和网络设置。
音频:通过 Dante Controller 或 Shure Designer 软件路由音频。Dante Virtual Soundcard 支持直接在计算机上进行音频监
听和录制。
Differences Between 3.x and 4.x Firmware
When you update an MXA910 from 3.x to 4.x firmware, you'll be able to use IntelliMix DSP features optimized for MXA.
Here's what changes with 4.x firmware:
IntelliMix DSP Added
You can now use AGC, AEC, noise reduction, compressor, and delay.
These DSP features don’t affect individual channel outputs—they only apply to the Automix Out channel
If you’re currently using the Automix Out channel on a 3.x device and you update it to 4.x, the following settings will be
applied automatically:
AGC: enabled
AEC: enabled
Noise reduction: enabled
Compressor: disabled
Delay: disabled
New Automixer Added
The 4.x automixer has different mix modes than the 3.x automixer.
Here's how mix mode settings will change:
3.x Automixer Setting New 4.x Automixer Setting
Classic Gating
Smooth Gain Sharing
Manual Manual
Custom Gating
New Autofocus Feature Added for All Lobes
Patent-pending Autofocus technology continually fine-tunes the position of each lobe in real time.
Lobes move automatically for consistent sound when participants lean back in their chairs or stand up.
Echo Reduction Removed
The microphone now has AEC, so there's no need for echo reduction.
The Echo Reduction Reference In channel's name in Dante Controller is now the "AEC Reference In" channel. Any
existing Dante route to that channel will persist.
Other Changes
Template 1's lobe positions have changed.
If you're using Template 1 with the default lobe positions, updating to 4.x will change your lobe positions.
After updating, all custom lobe positions and Dante routes will stay the same.
™
™

Shure Incorporated
8/57
•
•
•
•
•
•
1.
2.
1.
2.
3.
入门指南
若要控制 MXA910,请使用 Shure Designer 软件调整话筒覆盖范围、应用 DSP 并在 Shure 设备之间适当路由音频。完成该基
本设置程序后,您应能够:
在 Designer 中访问和控制 MXA910
将 DSP 应用于话筒信号
将音频从话筒路由到其他设备
在开始之前,您将需要:
Cat5e(或更好的)以太网电缆
提供以太网供电 (PoE) 的网络开关
安装在计算机上的 Shure Designer 软件。在 www.shure.com 下载。
注意:如果
Designer
不可用,您可以使用
Web
应用程序来控制
MXA910
和
Dante Controller
以路由音频。下载
Shure Web Device Discovery
应用程序
以访问设备的
Web
应用程序。
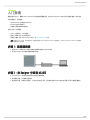
步骤 1:连接到网络
使用 Cat5e(或更好的)电缆将话筒连接到网络交换机上的 PoE 端口。
将运行 Designer 的计算机连接到网络交换机。
步骤 2:在 Designer 中发现 MXA910
打开 Designer,在设置中检查是否已连接到正确的网络。
单击联机设备。显示联机设备列表。
若要识别设备,请单击产品图标,让设备上的指示灯闪烁。在列表中选择 MXA910 并单击 配置 以打开设备的配置窗口。

Shure Incorporated
9/57
1.
2.
3.
◦
4.
5.
◦
◦
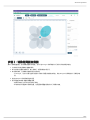
步骤 3:调整话筒覆盖范围
要设计话筒覆盖范围,您将需要创建项目和位置。您可以在 Designer 的帮助部分中了解关于两者的更多信息。
从我的项目中选择新增以创建新项目。
单击 新增 将位置添加到项目。输入名称后,位置的新窗口将打开。
单击现场模式。任何联机设备都将显示在列表中。
在 Designer,您还可以通过虚拟设备设计系统并将设置发送到真实设备。请在 Designer 的帮助部分中了解更多信
息。
拖放 MXA910 以将其添加到您的位置。
选择 覆盖区域映射 调整话筒覆盖范围。
使用 自动定位 让软件为您定位每个通道。
单击并拖动以调整每个通道的位置。在“配置话筒覆盖范围”部分中了解更多信息。

Shure Incorporated
10/57
1.
◦
◦
2.
3.
4.
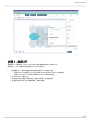
步骤 4:应用 DSP
搭配固件 4.x 及更高版本,MXA910 包含可应用于自动混音通道输出的 IntelliMix DSP。
默认情况下,AEC、降噪和自动增益控制 (AGC) 处于启用状态。
若要使用 AEC,请将远端的参考信号路由到话筒的 AEC 参考输入通道。
使用 Designer 以路由源于 Shure 设备(例如 ANIUSB-MATRIX 或 P300)的参考信号。
使用 Dante Controller 以路由源于其他第三方 Dante 设备的参考信号。
选择 IntelliMix,并单击 AEC。
验证参考电平表上是否出现远端信号。如果未出现信号,检查路由情况。
若要应用其他任何的 DSP 块或编辑设置,请单击块图标。

Shure Incorporated
11/57
1.
2.
3.
4.
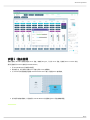
步骤 5:路由音频
若要将音频从 MXA910 路由到其他的 Shure 设备,请使用 Designer。对于非 Shure 设备,则使用 Dante Controller 软件。
我们将把音频从 MXA910 路由到 ANIUSB-MATRIX。
将 ANIUSB-MATRIX 添加到您的位置。
转到信号流。此页面用于创建 Shure 设备之间的 Dante 音频路由。
从 MXA910 自动混音输出拖放到 ANIUSB-MATRIX Dante 输入以创建 Dante 音频路由。
测试您系统的音频路由,并把音频从 ANIUSB-MATRIX 发送到其他 Dante 设备或编解码器。

Shure Incorporated
12/57
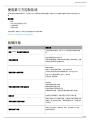
系统规划和连接要求
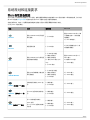
Shure 会议设备概述
Shure 提供一系列的会议连接选项。MXA 话筒、音频处理器和网络接口全都使用 Dante 通过标准的 IT 网络发送音频。您可以使
用 Shure 的免费 Designer 软件以控制大部分的 Shure 设备并在这些设备间路由音频。
您在规划系统时,考虑一下您需要连接到哪些其他设备以及您以后是否需要额外的输入/输出。
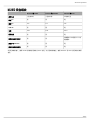
以下是 Shure 设备的概览:
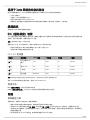
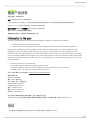
设备 用途 物理连接 Dante I/O
MXA910
配有 IntelliMix DSP 的天花板
阵列话筒
1 个 PoE 端口
配有 IntelliMix DSP 的 8 个单
个通道输出或 1 个自动混音
通道输出
1 个 AEC 参考输入
MXA310
桌面矩阵话筒 1 个 PoE 端口
4 个单个通道输出或 1 个自
动混音通道输出
P300
配有 IntelliMix DSP 与阵列混
音器的音频处理器
1 个 USB 输入/输出
2 个模拟方块输入
2 个模拟方块输出
1个 移动 TRRS 端口 (3.5
mm)
1 个 PoE+ 端口
配有 IntelliMix DSP 的 8 个
Dante 输入
2 个辅助 Dante 输入
2 个 Dante 输出
ANIUSB-MATRIX
配有 USB 和模拟输入/输出的
阵列混音器
1 个 USB 输入/输出
1 个模拟方块输入
1 个模拟方块输出
1 个 PoE 端口
4 个 Dante 输入
2 个 Dante 输出
ANI4IN(块状或 XLR 接头)
将模拟信号转换为 Dante 信
号
4 个模拟输入
1 个 PoE 端口
4 个 Dante 输入
ANI4OUT(块状或 XLR 接
头)
将 Dante 信号转换为模拟信
号
4 个模拟输出
1 个 PoE 端口
4 个 Dante 输出
ANI22(块状或 XLR 接头)
将 2 个模拟信号转换为
Dante 信号
将 2 个 Dante 信号转换为模
拟信号
2 个模拟输入
2 个模拟输出
1 个 PoE 端口
2 个 Dante 输入
2 个 Dante 输出

Shure Incorporated
13/57
MXA910 设备组合
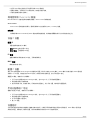
MXA910 和 ANI22 MXA910 和 ANIUSB MXA910 和 P300
房间大小 小型或中等 小型或中等 中等或大型
移动 I/O 否 否 是
模拟 I/O 2x2 1x1 2x2
USB I/O 否 是 是
电源 PoE PoE PoE+
逻辑控制 否 否 是
软编解码器静音同步 否 否
的确配有 P300 固件 3.1.5 或
更高版本
适合多个 MXA910 否 否 是
适合其他的模拟话筒 否 否 是
对于更多模拟输入,使用 ANI4IN 将模拟信号转换为 Dante 信号。对于更多模拟输出,使用 ANI4OUT 将 Dante 信号转换为模拟
信号。

Shure Incorporated
14/57
•
•
•
•
•
•
•
•
•
◦
◦
•
•
•
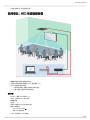
使用情况:配有 ANIUSB 或 P300 的软编解码器
对于简单的软编解码器解决方案,使用配有 ANIUSB-MATRIX 或 P300 的天花板阵列。
运行会议软件的计算机连接到配有 USB 电缆的 ANIUSB-MATRIX 或 P300
天花板阵列提供声回波消除和 DSP(配有固件 >4.x)
ANIUSB-MATRIX 或 P300 中的阵列混音器把信号路由到任何已连接的设备
P300 针对配有固件 >3.1.5 的 USB 连接具备软编解码器静音同步
设备列表:
MXA910(需要 AEC 的固件 >4.x)
ANIUSB-MATRIX 或 P300
装有会议软件的计算机
提供以太网供电 (PoE) 的网络交换机
联网计算机配有:
Shure Designer 软件或
设备 Web 应用程序
Cat5e(或更好的)以太网电缆
USB 电缆
P300 软编解码器静音同步的控制面板

Shure Incorporated
15/57
•
•
•
•
◦
◦
•
•
•
•
•
•
◦
◦
•
任何其他扬声器、放大器或显示屏
使用情况:ANI22 和硬编解码器
硬编解码器将房间连接到远端呼叫方
天花板阵列提供声回波消除和 DSP(配有固件 >4.x)
ANI22 连接模拟和数字组件
2 个线路/话筒输入把模拟信号转换为数字信号
2 个输出把数字信号转换为模拟信号
设备列表:
MXA910(需要 AEC 的固件 >4.x)
ANI22(有块状或 XLR 接头型号)
硬编解码器
显示屏
提供以太网供电 (PoE) 的网络交换机
联网计算机配有:
Shure Designer 软件或
设备 Web 应用程序
Cat5e(或更好的)以太网电缆

Shure Incorporated
16/57
•
•
•
•
•
•
•
•
•
◦
◦
•
•
模拟方块或 XLR 电缆将组件连接到 ANI22
任何其他扬声器或放大器
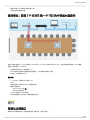
使用情况:配有 2 个 MXA910 和一个 P300 的中等或大型房间
在更大型的安装情况中,您可以使用多个 MXA910 和一个 P300 以采用分配式 DSP 方法,这种方法使安装更简单。为了获得最
佳结果,最多使用 3 个 MXA910。
天花板阵列手柄 DSP(配有固件 >4.x)
P300 提供移动设备阵列混音器和连接选配件、USB 和模拟方块输入/输出
Designer 控制话筒和 P300
设备列表:
2 个 MXA910(需要 AEC 的固件 >4.x)
P300
提供增强型以太网供电 (PoE+) 的网络交换机
联网计算机配有:
Shure Designer 软件或
设备 Web 应用程序
Cat5e(或更好的)以太网电缆
任何其他扬声器、移动设备、编解码器或显示屏
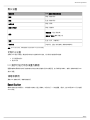
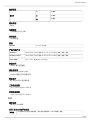
硬件
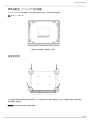
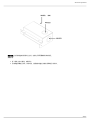
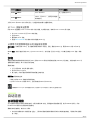
网络以太网端口
网络端口可传输所有音频、电能和控制数据。如图所示,其位于后板上。

Shure Incorporated
17/57
① 网络端口
用于网络连接的 RJ-45 端口。
② 网络状态 LED 指示灯(绿色)
灭 = 无网络连接
亮 = 已建立网络连接
闪烁= 网络连接已激活
③ 网速 LED 指示灯(琥珀色)
灭 = 10/100 Mbps
亮 = 1 Gbps
LED Light Bar
话筒上的 LED 指示灯指示话筒是有源状态还是静音状态、识别硬件以及确认固件是否更新。

Shure Incorporated
18/57
1.
2.
默认设置
话筒状态 LED 指示灯运行状态/颜色
激活 绿色(稳定闪烁)
静音 红色(稳定闪烁)
硬件识别 绿色(闪烁)
固件正在更新 绿色(进度条)
复位
网络复位:红色(进度条)
恢复出厂设置:触发设备上电
错误 红色(分开,交替闪烁)
设备通电 多色闪光,蓝色(在进度条上快速地来回移动)
注意:当
LED
指示灯灭后,如果设备通电以及出现错误
LED
指示灯仍然亮起。
定制灯光设置
定制的 LED 指示灯亮度、颜色和运转状态可在控制软件中指定。还可通过外部控制系统控制:
打开“配置”选项卡
选择 灯条
LED 指示灯运行状态设置为静音
配置静音和有源话筒状态的灯光使其能与会议室中其他设备的运行状态相匹配。在“灯条属性”菜单中,使用下拉菜单来选择 LED
指示灯设置。
调暗和禁用
要使 LED 变暗或关闭,请使用亮度推子。
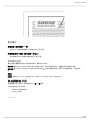
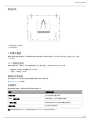
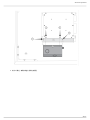
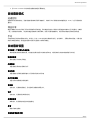
Reset Button
硬件复位按钮位于格栅孔中,可用曲别针或其它小型工具推动。该孔标注了一个灰色圆圈。通过从上往下第四行第二个孔中查看
Shure 商标。

Shure Incorporated
19/57
•
•
复位模式
网络复位(按下按钮 4-8 秒)
将所有 Shure 控制和音频网络 IP 设置复位为出厂默认设置。
完全恢复为出厂设置(按下按钮 8 秒以上)
将所有网络和 Web 应用程序设置恢复为出厂默认设置。
软件复位选项
要在没有完全重置硬件的情况下简单地恢复设置,请使用以下选项之一:
重启设备(Settings > Factory
Reset):像从网络上断开一样实现设备循环加电。设备重启后所有设置仍将保留。
默认设置(Presets > Load
Preset > Default
Settings):将音频设置恢复为出厂配置(不包括设备名称、IP 设置和密
码)。
如果要使用
Shure Designer
软件来配置您的系统,请查看
Designer
帮助部分以了解关于此主题的更多信息。
以太网供电 (PoE)
该设备需要 PoE 才能工作。其同时兼容 PoE 0级 和 3级 电源。
以太网供电通过以下方式实现:
一个提供 PoE 的网络交换机
一个 PoE 注入设备

Shure Incorporated
20/57
•
•
•
•
•
•
•
•
•
•
安装
话筒的放置
房间变量
最佳的话筒布置取决于座次安排和房间结构。 使用本指南达到最佳潜在效果:
在家具布置灵活或有多个矩阵话筒的房间里,应使用 Web 应用程序或 Shure Designer 软件中的话筒配置工具,以确保可覆
盖到所有座位。
波瓣朝向每一位发言者正面。视频会议时,发言者可能会面对屏幕,所以要仔细考虑话筒的布置。
避免直接将话筒布置在不需要的声源附近,比如通风口或噪杂的投影机处。
如果房间内回音太大,应考虑安装噪音消减设备,以提高语音清晰度。
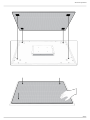
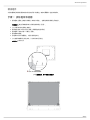
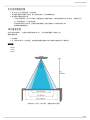
安装高度
可设置的最大安装高度为 9.14 米(30 英尺)。在典型的声学环境 中,根据 STIPA (扩声系统语言传输指数体系)国际标准,
当话筒距离发言者达 16 英尺时,话筒仍维持在“A”级。在更好的声学环境中,STIPA "A" 等级可超过 16 英尺。
确定话筒安装高度时应考虑以下事宜:
天花板矩阵话筒的拾音模式比短枪式话筒的更为狭窄,因此与其它话筒相比,可以布置的更远离声源。尽管 Web 应用程序
显示了每个通道理想的覆盖区域,但仍需牢记,在音频降解和断开之间并没有特定的界限。在产品规格中可查到每个设定宽
度的波瓣灵敏度数据。
和所有话筒一样,音调随着与声源的距离的增大而改变。
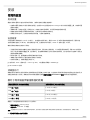
清晰度尺度可帮助预先了解话筒在给定高度下的效能。
在较远的距离上,波瓣的覆盖区域会扩大。
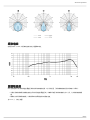
[1]
房间条件:
RT60
(混响时间)
= 500 ms @ 1kHz
,
A
权重的房间噪音
= 40dBSPL(A)
[2] IEC-602682-16
标准
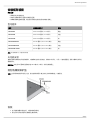
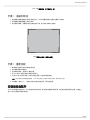
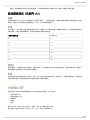
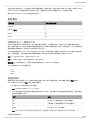
清晰度标尺
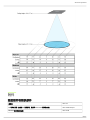
清晰度标尺会客观对比矩阵话筒和心形鹅颈话筒在不同距离上的声学性能。这些信息对预测矩阵话筒在特定距离上的性能以及决
定最佳安装高度十分有用。清晰度标尺表中的数据是通过按照语言传输指数 IEC-602682-16 标准对话筒进行测量得到的。
相对于等效语言传输指数值的距离
天花板矩阵话筒(与发言者的距离) 心形鹅颈话筒(与发言者的距离)
1.83 米(6 英尺) 1.14 米(3.75 英尺)
2.44 米(8 英尺) 1.52 米(5 英尺)
3.05 米(10 英尺) 1.91 米(6.25 英尺)
3.66 米(12 英尺) 2.29 米(7.5 英尺)
数据在一个典型的拥挤房间内通过以下方法采集:
混响衰减时间:500 ms @ 1kHz
本底噪声:40 dB SPL(A-权重)
注意:这些数据只针对上述房间。在控制良好的声音环境中,矩阵话筒可在更远的距离下表现出等效的语言传输指数。在高回音的房间内,效果低于预期。
A = 矩阵话筒和发言者之间的距离
1 2
ページが読み込まれています...
ページが読み込まれています...
ページが読み込まれています...
ページが読み込まれています...
ページが読み込まれています...
ページが読み込まれています...
ページが読み込まれています...
ページが読み込まれています...
ページが読み込まれています...
ページが読み込まれています...
ページが読み込まれています...
ページが読み込まれています...
ページが読み込まれています...
ページが読み込まれています...
ページが読み込まれています...
ページが読み込まれています...
ページが読み込まれています...
ページが読み込まれています...
ページが読み込まれています...
ページが読み込まれています...
ページが読み込まれています...
ページが読み込まれています...
ページが読み込まれています...
ページが読み込まれています...
ページが読み込まれています...
ページが読み込まれています...
ページが読み込まれています...
ページが読み込まれています...
ページが読み込まれています...
ページが読み込まれています...
ページが読み込まれています...
ページが読み込まれています...
ページが読み込まれています...
ページが読み込まれています...
ページが読み込まれています...
ページが読み込まれています...
ページが読み込まれています...
-
 1
1
-
 2
2
-
 3
3
-
 4
4
-
 5
5
-
 6
6
-
 7
7
-
 8
8
-
 9
9
-
 10
10
-
 11
11
-
 12
12
-
 13
13
-
 14
14
-
 15
15
-
 16
16
-
 17
17
-
 18
18
-
 19
19
-
 20
20
-
 21
21
-
 22
22
-
 23
23
-
 24
24
-
 25
25
-
 26
26
-
 27
27
-
 28
28
-
 29
29
-
 30
30
-
 31
31
-
 32
32
-
 33
33
-
 34
34
-
 35
35
-
 36
36
-
 37
37
-
 38
38
-
 39
39
-
 40
40
-
 41
41
-
 42
42
-
 43
43
-
 44
44
-
 45
45
-
 46
46
-
 47
47
-
 48
48
-
 49
49
-
 50
50
-
 51
51
-
 52
52
-
 53
53
-
 54
54
-
 55
55
-
 56
56
-
 57
57


