
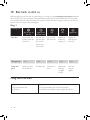
HR3865, HR3866
HR3868
© 2017 Koninklijke Philips N.V.
All rights reserved.
4240 002 02336
发布日期
:
2017-03-13
保留备用
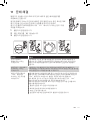
1
a
b
c
d
f
e
g
m
i
jkl
HR3868
h
EN User manual 7
KO 사용 설명서 16
MS Manual pengguna 24
VI Hướng dẫn sử dụng 34
ZH-S 用户手册 42
ZH-T 使用手冊 49
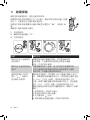
ӝ φ伔⎜ᯏ⨼ᵰ
ශਭ φ HR3865, HR3868
仓ᇐ⭫ু φ 220V Њ
仓ᇐ仇⦽ φ 50 Hz
仓ᇐ䗉ޛࣕ⦽ φ 2000 W
⭕ӝᰛᵕ φ䈭㿷ӝᓋ䜞
ӝ൦ φѣളᒵђ൩
伔⎜δѣളεᣋ䍺ᴿ䲆ޢਮ
ޞള亴ᇘᵃࣗ✣㓵 : 4008 800 008
ᵢӝṯᦤളḽ GB4706.1-2005,
GB4706.30-2008 䙖
р⎭ᐸཟⴤ㾵䐥 218 ਭ 1602-1605
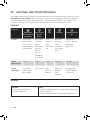
产品中有害物质的名称及含量
部件
名称
有害物质
铅
(
Pb
)
汞
(
Hg
)
镉
(
Cd
)
六价铬
Cr(VI)
多溴联苯
(
PBB
)
多溴二苯醚
(
PBDE
)
主机
x O x O O O
本表格依据
SJ/T 11364
的规定编制。
○
:
表示该有害物质在该部件所有均质材料中的含量均在
GB/T 26572
规定的限量要求以下。
×
:
表示该有害物质至少在该部件的某一均质材料中的含量超出
GB/T 26572
规定的限量要求。
4
6
7
8
2
9
10
2
1
3
5

5
4
5 6
1
2 3
7
8
3
4
7
6
1
4
21
3
8
3
5
2
HR3868
6
2
3
1
4
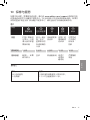
4
(MAX)
(MAX)
2 L
2 L
1.8 L
1.7 L
1.7 L
14 x
2 L 1 min.
1 min.
1 min.
1 min.
30 sec
4 min.
1.7
L2
min.
30 sec x3
600 g 30 sec
600
g3
min.
4 min.
7
200 g MIN
300 g MAX

7EN
English
• Do not immerse the
appliance in water or any
other liquid.
• Check if the voltage
indicated on the
appliance corresponds to
the local mains voltage
before you connect the
appliance.
• Do not use the appliance
if the plug or the mains
cord is damaged or has
visible cracks. If the mains
cord is damaged, you
must have it replaced by
Philips, a service centre
authorized by Philips or
similarly qualied persons
in order to avoid a hazard.
• Make sure the lid and
measuring cup are
properly assembled to
the blender jar before you
use the appliance.
• This appliance shall not
be used by children. Keep
the appliance and its cord
out of reach of children.
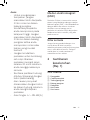
1 Welcome
Congratulations on your purchase and
welcome to Philips! To fully benet
from the support that Philips oers,
register your product at
www.philips.com/welcome.
Read this user manual carefully before
you use the appliance and save it for
future reference.
Warning
• Do not touch the
sharp blades when the
appliance is plugged in.
If the blades get stuck,
unplug the appliance
before you remove the
ingredients. Be careful
when handling the sharp
cutting blades, emptying
the bowl and during
cleaning.
• Switch o and unplug the
appliance from the power
supply before:
- Removing it from
the stand, changing
accessories or
approaching parts that
move in use.
- Assembling,
disassembling or
cleaning it.
- It is left unattended.

8 EN
switching device, such as
a timer, or connected to
a circuit that is regularly
switched on and o by
the utility.
• Do not put the jar on the
main unit if the motor
coupling is still running.
• Do not take out the jar
from the main unit if
the blade is not totally
stopped.
• The blender can not be
used without load or
with a minimum quantity
of ingredient or liquid
(250 ml). Putting too less
ingredients or liquid can
cause damage to the
blender.
• The blender must be
operated with the rubber
pad. Do not remove the
rubber pad on top of the
motor unit.
Caution
• Never use any
accessories or parts from
other manufacturers or
that Philips does not
specically recommend. If
• This appliance can be
used by persons with
reduced physical, sensory
or mental capabilities or
lack of experience and
knowledge if they have
been given supervision
or instruction concerning
use of the appliance in
a safe way and if they
understand the hazards
involved.
• Children should be
supervised to ensure that
they do not play with the
appliance.
• Never assemble or
disassemble the blender
jar to the motor base
while the power is on.
• This appliance is
intended for household
use only.
• Read the cleaning
procedure from “User
Manual” before use.
• In order to avoid a hazard
due to inadvertent
resetting of the thermal
cut-out, this appliance
must not be supplied
through an external

9EN
English
• If the blade unit gets
stuck, unplug the
appliance before you
remove the ingredients
that block the blades.
Caution
• To prevent spillage, do
not put more than 2 litres
of liquid in the blender
jar, especially when you
process at a high speed.
Do not put more than
2 litres in the blender jar
when you process liquids
or ingredients that tend to
foam.
• Do not operate the
appliance for multiple
batches of recipes. Let
the appliance to cool
down for 30 minutes
before you continue
operating again.
• Always make sure the
lid is properly closed/
assembled on the jar
and the measuring cup is
inserted properly in the
lid before you switch on
the appliance.
• Noise level: Lc = 89 dB [A]
you use such accessories
or parts, your guarantee
becomes invalid.
• Do not exceed the
maximum indication on
the blender jar.
• Do not exceed the
maximum quantities
and processing times
indicated in the relevant
table (Fig. 7).
• If food sticks to the wall of
the blender jar, switch o
the appliance and unplug
it. Then use a spatula to
remove the food from the
wall.
• Never ll the blender jar
with ingredients hotter
than 40 °C.
• The appliance can only
be switched on if the
blender jar is assembled
on the motor unit
correctly.
Blender
Warning
• Never reach into the
blender jar with your
ngers or an object while
the appliance is running.

10 EN
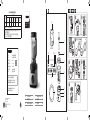
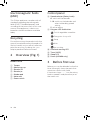
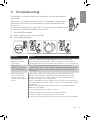
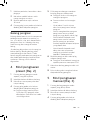
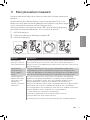
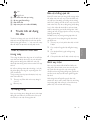
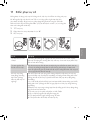
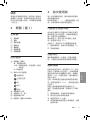
Control panel
h Speed selector (Rotary knob)
0: switch o the blender
1-10: switch on the blender and
select a blending speed
setting
P: pulse setting
i Program LED and button
Fruit & vegetable smoothie
Five grains & soy milk
Soup
Nuts
Ice crushing
j Overheat warning LED
k Timer (M:SS)
l Sleep LED
m Dome (HR3868 only)
3 Before first use
Before you use the blender for the rst
time, thoroughly clean the parts that
come into contact with food.
If the timer shows “---”, turn the rotary
knob to speed 0 and place the jar on
the motor unit.
Electromagnetic elds
(EMF)
This Philips appliance complies with all
standards regarding electromagnetic
elds (EMF). If handled properly and
according to the instructions in this user
manual, the appliance is safe to use
based on scientic evidence available
today.
Recycling
Do not throw away the product with the
normal household waste at the end of its
life, but hand it in at an ocial collection
point for recycling. By doing this, you
help to preserve the environment.
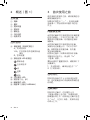
2 Overview (Fig. 1)
Main unit
a Tamper
b Measuring cup
c Blender lid
d Blender jar
e Rubber pad
f Motor unit
g Power switch

11EN
English
Note: if the temperature of the
appliance is too high or the appliance
is overused, the message “Hot” displays
directly and the blender will also stop
working.
To reset your blender in case of
overload and auto stop protection,
follow the steps below:
1
Switch o the blender and then
unplug it.
2
Remove some of the ingredients to
reduce the load.
3
Allow the appliance to cool down
for 30 minutes.
4
Connect the power plug to the wall
outlet and switch on the blender.
Blender jar
The jar is designed for processing
various recipes like smoothie, juice,
sauce, grain milk, soup, puree, frozen
dessert, ice crushing, nut butter,
chopping or grinding dry ingredients.
If the jar is used for grinding dry
ingredients, the jar wall will be
scratched and become cloudy. There
is no negative impact on the blending
performance and no food safety
concern. It is still safe to use.
Built-in safety lock
This feature ensures that you can only
switch on the appliance if you have put
the blender jar correctly on the motor
unit. If the blender jar is put correctly,
the built-in safety lock is unlocked.
When the blender jar is not placing well
on the motor unit during blending, the
message “Err” displays.
To reset your blender in this case, follow
the steps below:
1
Switch o the blender. Make sure
the rotary knob is at “0”.
2
Switch on the blender.
Auto stop
Your blender will be automatically
turned o after 4 minutes of continuous
operation. This can avoid potential
problems due to prolonged usage.
Overload protection
The overheat warning LED
(thermometer icon) ashes when the
blender is overloaded. If the blender
continues working with heavy load,
the message “Hot” displays when it
is fully overloaded. The blender will
automatically stop working.

12 EN
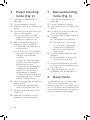
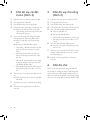
5 Manual blending
mode (Fig. 3)
1
Assemble your blender jar as
indicated.
2
Put the ingredients in the jar.
3
Insert the measuring cup and close
the lid.
4
Put the plug in the wall outlet and
switch on the blender.
5
Turn the knob to a speed setting as
needed.
» The blender starts blending.
» The timer starts counting up.
• To switch to pulse blending
mode during the blending
process, turn the knob to P
several times.
6
Turn the knob to speed 0 to stop
blending.
» Let the blender cool down for
5 minutes after blending.
7
Switch o the blender and unplug
it. Then remove the blender jar from
the motor unit.
8
Open the lid and pour out the
ingredients from the blender jar.
6 Sleep mode
Your blender will go into sleep mode
after 3 minutes when there is no
operation and sleep LED (power LED) is
on. You can wake up the appliance and
start manual blending by turning rotary
knob to a speed setting needed.
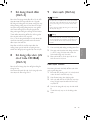
4 Preset blending
mode (Fig. 2)
1
Assemble your blender jar as
indicated.
2
Put the ingredients in the jar.
3
Insert the measuring cup and close
the lid.
4
Put the plug in the wall outlet and
switch on the blender.
» The timer shows 0:00 and
program LEDs turn on. The
appliance is ready to use.
5
Select a program by pressing a
program button on the panel.
» The blender starts blending as
programmed.
» The timer starts counting down.
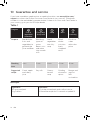
• See table 1 for purposes and
blending time of dierent
programs.
• To stop the current blending
program, press the selected
program button again.
• To switch to manual blending
mode during the blending
process, turn the knob to a
speed setting as needed.
• To switch to pulse mode during
the blending process, turn the
knob to P several times.
6
Switch o the blender and unplug it
after blending.
» The blender stops blending
when the timer reaches 0:00.
7
Remove the blender jar from the
motor unit.
8
Open the lid and pour out the
ingredients from the blender jar.

13EN
English
9 Cleaning (Fig. 6)
Warning
• Before you clean the appliance, unplug it.
• Refer to Fig. 6 for information on cleaning the
parts with water, dishwashing machine and/or
moist cloth.
• Do not remove the rubber pad on top of the
motor unit.
Caution
• Make sure that the cutting edges of the blades
do not come into contact with hard objects.
This may cause the blade to get blunt.
• The cutting edges are sharp. Be careful when
you clean the blade units.
1
Clean the motor unit with a moist
cloth.
2
Clean the other parts in hot water
(< 60°C) with some washing-up
liquid or in a dishwasher.
3
Store the appliance and accessories
in a dry place after cleaning.
Quick cleaning
Follow the steps below to clean the
blender jar easier.
1
Pour lukewarm water (not more
than 1 liters) and a few drops of
washing-up liquid into the blender
jar.
2
Insert the measuring cup and close
the lid.
3
Turn the knob to speed 10. Let the
blender run for 30 seconds or until
the blender jar is clean.
4
After use, switch o the blender and
then unplug the appliance.
5
Remove the blender jar and rinse it
with clean water.
7 Use the tamper
(Fig. 4)
You can use the tamper to process
very thick mixtures or recipes with less
liquid which cannot be processed well
in a normal blender, e.g. nut butters,
frozen dessert or puree vegetables. The
tamper helps circulation by preventing
air formed.
The tamper is used to stir and push
ingredients into the blades when the
blender is on.
Note: Use the tamper only when the lid
is assembled correctly to the jar to avoid
tamper hitting the blades.
Tips: You can move the tamper up and
down, turn around or push it toward
the side or corner of the jar to help
ingredients circulate.
8 Use the dome
(HR3868 only)
(Fig. 5)
You can use the dome to reduce the
noise during blending.
Follow the steps to assemble and use
the dome as indicated in g. 5.

14 EN
10 Guarantee and service
If you have a problem, need service, or need information, see www.philips.com/
support or contact the Philips Consumer Care Center in your country. The phone
number is in the worldwide guarantee leaet. If there is no Consumer Care Center in
your country, go to your local Philips dealer.
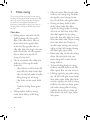
Table 1
Program
Fruit &
vegetable
Smoothie
Five grains
& soy milk
Soup
Nuts
Ice
crushing
Purpose Blend whole
fruits and
vegetables to
get both the
juice and ber
Blend any
types of
grains,
beans, nuts
and water
into smooth
milk
Blend
vegetables
into silky
soup
Grind
whole
nuts into
nely
chopped
result
Crush ice
cubes
within few
pulse
Blending
time
1 min 2 min 4 min 30 sec 30 sec
Suggested
recipe
Carrot, apple
and celery
juice
Soy milk Creamy
tomato
soup
Grinding
almond or
spices
Mango and
yoghurt
with
crushed ice
Recipe:
Ingredients:
950 g minced pork
20 g scallion
Procedure:
1. Put the minced pork and scallion into jar.
2. Blend the recipe for 10 seconds at speed 10.

15EN
English
11 Troubleshooting
Problem Solution
Why does the jar
become scratched
and cloudy?
If the jar is used for grinding dry ingredients, the jar wall will be
scratched and become cloudy. There is no negative impact on the
blending performance and no food safety concern. It is still safe to use.
Why do the
ingredients become
warm after blending?
This is a high speed blender so processing time is faster than a
normal blender. You can use the preset blending mode or shorten the
blending time under manual blending mode to avoid over blending
and warming.
When the blender
stops working and
the message “Hot”
displays, what does it
mean?
The overheat warning LED (thermometer icon) ashes when the
blender is overloaded. If the blender continues working with heavy
load, the message “Hot” displays when it is fully overloaded. The
blender will automatically stop working.
Note: if the temperature of the appliance is too high or the appliance is
overused, the message “Hot” displays directly and the blender will also
stop working.
To reset your blender in case of overload and auto stop protection,
follow the steps below:
1
Switch o the blender and then unplug it.
2
Remove some of the ingredients to reduce the load.
3
Allow the appliance to cool down for 30 minutes.
4
Connect the power plug to the wall outlet and switch on the blender.
The blender cannot be used without load which can cause damage to
the blender.
When the jar is lled with less than 250 ml of ingredients, please press
and hold the jar lid rmly (as indicated) to stabilize the blender while
processing.
In the event that display will show “Err” message due to jar wobbling out
of its position, please follow below instructions:
1
Switch OFF the blender.
2
Make sure the rotary knob is set at “0”.
3
Switch ON the blender.
1
3
2

16
KO
• 제품을 전원에 연결하기
전에 제품에 표시된 전압과
사용 지역의 전압이
일치하는지 확인하십시오.
• 플러그나 전원 코드가
손상되었거나 금이 간 경우
제품을 사용하지 마십시오.
전원 코드가 손상된 경우
안전을 위해 필립스나
필립스 공인 서비스 센터
또는 전문 기술자에
의뢰하여 교체하십시오.
• 제품을 사용하기 전에
뚜껑과 계량컵이 블렌더
용기에 올바르게 조립되어
있는지 확인하십시오.
• 이 제품은 어린이가
사용해서는 안됩니다.
제품과 전원 코드는
어린이의 손이 닿지 않는
곳에 보관하십시오.
• 신체적, 감각적 또는
정신적인 능력이
부족하거나 경험과 지식이
없는 사람이 이 제품을
사용하려면 제품의 안전한
사용과 관련된 감독과
지시를 받고, 생할 수 있는
위험에 대해 충분히 이해한
상태여야 합니다.
• 어린이가 제품을 가지고
놀지 않도록 보호자의
감독이 필요합니다.
1 소개
필립스 제품을 구입해 주셔서 감사합니다!
필립스에서 제공하는 지원 혜택을
받으시려면 www.philips.com/welcome
에서 제품을 등록해 주십시오.
제품을 사용하기 전에는 본 사용 설명서를
주의 깊게 읽고 나중에 참조할 수 있도록 잘
보관하십시오.
경고
• 제품이 전원에 연결되어
있을 때는 날카로운 칼날을
만지지 마십시오. 칼날에
음식물이 끼어 움직이지
않을 경우, 먼저 전원
코드를 뽑은 다음 음식물을
빼내십시오. 날카로운
칼날을 다루거나 용기를
비울 때 혹은 세척할 때는
주의를 기울여 주십시오.
• 다음 동작을 하기 전에
제품의 전원을 끄고 전원
코드를 뽑으십시오.
- 충전대를 제품에서
분리하거나 액세서리를
교체하거나 작동 중인
부품을 만질 경우
- 제품을 조립하거나
분리하거나 세척하는
경우
- 제품을 사용하지 않고
자리를 비울 경우
• 제품을 물 등의 액체에
담그지 마십시오.

17
KO
한국어
• 블렌더는 고무 패드와 함께
사용해야 합니다. 본체 위에
있는 고무 패드를 제거하지
마십시오.
주의
• 다른 제조업체에서
만들었거나 필립스에서
권장하지 않은 액세서리
또는 부품은 절대
사용하지 마십시오.
이러한 액세서리나 부품을
사용했을 경우에는 품질
보증이 무효화됩니다.
• 블렌더 용기의 최대
표시선을 초과하지
마십시오.
• 관련 표에 기재된 최대량
및 작동 시간을 초과하지
마십시오(그림 7).
• 음식이 블렌더 용기의
벽면에 붙으면 제품의
전원을 끄고 전원 코드를
뽑으십시오. 그런 다음
주걱을 사용하여 벽면에
붙은 음식을 떼어내십시오.
• 블렌더 용기에 40 °C 이상
되는 재료를 절대 넣지
마십시오.
• 블렌더 용기가 본체에
올바르게 장착된 경우에만
제품이 작동합니다.
• 전원이 켜져 있는 동안에는
블렌더 용기를 절대 본체에
조립하거나 분리하지
마십시오.
• 본 제품은 가정용입니다.
• 사용 전“사용 설명서”
의 세척 절차를
읽으십시오.
• 열 차단 장치가 의도치 않게
재설정되어 위험한 상황이
발생하는 것을 막기 위해,
타이머와 같은 외부 전원
장치를 통해 제품에 전력을
공급하거나 설비 시설에
의해 정기적으로 전원이
꺼졌다 켜지는 회로에
제품을 연결하지 마십시오.
• 모터 커플링이 계속 작동
중인 경우에는 용기를
본체에 올리지 마십시오.
• 칼날이 완전이 멈추지 않은
경우 본체에서 용기를
분리하지 마십시오.
• 블렌더에 아무 것도 넣지
않았거나 재료 또는 액체를
최소 분량(250ml)으로
넣었을 경우에는 블렌더를
사용할 수 없습니다.
재료나 액체를 너무 적게
넣으면 블렌더가 손상될 수
있습니다.

18
KO
EMF(전자기장)
이 필립스 제품은 EMF(전자기장)와
관련된 모든 기준을 준수합니다. 이 사용
설명서의 지침에 따라 적절하게 취급할
경우 이 제품은 안전하게 사용할 수 있으며
이는 현재까지의 과학적 증거에 근거하고
있습니다.
재활용
수명이 다 된 제품은 일반 가정용 쓰레기와
함께 버리지 마시고 지정된 재활용품 수거
장소에 버리십시오. 이를 통해 환경 보호에
동참하실 수 있습니다.
2 개요(그림 1)
본체
a 탬퍼
b 계량컵
c 블렌더 뚜껑
d 블렌더 용기
e 고무 패드
f 본체
g 전원 스위치
제어판
h 속도 조절기(회전 조절기)
0: 블렌더 끄기
1-10: 블렌더를 켜고 블렌딩 속도 설정
선택
P: 순간작동 설정
i 프로그램 LED 및 버튼
과채 스무디
오곡 두유
수프
블렌더
경고
• 제품이 작동 중일 때는
블렌더 용기 내부에
손가락이나 다른 물건을
절대 넣지 마십시오.
• 칼날부에 음식물이 끼어
움직이지 않으면 먼저
전원 코드를 뽑은 다음,
칼날의 움직임을 방해하는
음식물을 제거하십시오.
주의
• 특히 고속으로 작동할 경우,
내용물이 흘러 나오지
않도록 블렌더 용기에
액체를 2리터 이상 넣지
마십시오. 거품이 나는
액체 또는 재료인 경우에는
블렌더 용기에 2리터 이상
넣지 마십시오.
• 한 번에 많은 분량의
재료를 넣고 제품을
작동시키지 마십시오.
제품이 식을 때까지 30
분 정도 기다렸다가 다시
사용하십시오.
• 제품의 전원을 켜기 전에
용기의 뚜껑이 제대로 닫혀서
조립되어 있고 계량컵이
올바르게 삽입되었는지 항상
확인하십시오.
• 소음 수준: Lc = 89dB [A]

19
KO
한국어
과부하 방지 기능
블렌더에 과부하가 발생하면 과열 경고
LED(온도계 아이콘)가 깜박입니다.
블렌더가 많은 양의 재료로 계속 작동되어
완전히 과부하 상태에 이를 경우 “Hot”
메시지가 표시됩니다. 블렌더 작동이
자동으로 멈춥니다.
참고: 제품의 온도가 너무 높거나 제품이
과도하게 사용된 경우, “Hot” 메시지가
바로 표시되고 블렌더의 작동도 멈추게
됩니다.
과부하가 발생하여 자동 정지 보호 기능이
작동한 경우 다음 단계를 따라 블렌더를
재설정하십시오.
1
블렌더 전원을 끄고 전원 코드를
뽑습니다.
2
재료의 일부를 제거하여 부하를
낮춥니다.
3
30분 간 열기를 식힙니다.
4
전원 플러그를 벽면 콘센트에 꽂고
블렌더의 전원을 켭니다.
블렌더 용기
이 용기는 스무디, 주스, 소스, 곡물로 만든
우유, 수프, 퓨레, 프로즌 디저트, 견과류
버터 등을 만들거나 얼음을 분쇄하고 마른
재료를 다지거나 가는 등 다양한 용도에
활용할 수 있도록 만들어졌습니다.
마른 재료를 가는 데 용기를 사용할 경우
용기 벽이 긁혀서 뿌옇게 될 수 있습니다.
이는 블렌딩 성능에 부정적인 영향을
미치지 않고 식품 안전과 관련된 우려
사항도 발생시키지 않으므로 계속해서
안전하게 사용할 수 있습니다.
견과류
얼음 갈기
j
과열 경고 LED
k 타이머(M:SS)
l 슬립 LED
m 돔(HR3868 모델만 해당)
3 처음 사용하기 전에
블렌더를 처음 사용하기 전에 음식과 닿는
부품은 깨끗이 세척하십시오.
타이머에 “---”가 표시되면 회전
조절기를 속도 0으로 돌린 후 용기를 본체
위에 두십시오.
내장된 안전 잠금 기능
이 기능은 블렌더 용기가 본체에 올바르게
놓인 경우에만 작동합니다. 블렌더 용기가
올바르게 놓이면 내장된 안전 잠금이
해제됩니다.
블렌딩 중에 블렌더 용기가 본체에
제대로 놓이지 않으면“Err”메시지가
표시됩니다.
이 경우에는 다음 단계를 따라 블렌더를
재설정하십시오.
1
블렌더를 끕니다. 회전 조절기를 “0”
에 놓습니다.
2
블렌더를 켭니다.
자동 정지
블렌더를 4분 이상 연속으로 작동하면
전원이 자동으로 꺼집니다. 이를 통해
장시간 사용으로 인해 발생할 수 있는
문제를 예방할 수 있습니다.

20
KO
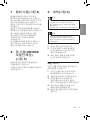
5 수동 블렌딩 모드
(그림 3)
1
그림과 같이 블렌더 용기를
조립합니다.
2
용기 안에 재료를 넣습니다.
3
계량컵을 장착하고 뚜껑을 닫습니다.
4
플러그를 벽면 콘센트에 꽂고
블렌더의 전원을 켭니다.
5
조절기 속도를 필요한 설정에
맞춥니다.
» 블렌더의 블렌딩이 시작됩니다.
» 타이머가 카운트 업을 시작합니다.
• 블렌딩 작업 중 순간 작동 블렌딩
모드로 전환하려면 조절기를 P로
여러 차례 돌리십시오.
6
조절기를 속도 0에 맞춰 블렌딩을
멈춥니다.
» 블렌딩 후에는 블렌더를 5분간
식히십시오.
7
블렌더 전원을 끄고 전원 코드를
뽑습니다. 그런 다음, 본체에서 블렌더
용기를 분리합니다.
8
뚜껑을 열고 블렌더 용기에 담긴
재료를 따라냅니다.
6 슬립 모드
블렌더가 작동하지 않으면 3분 후 슬립
모드로 전환되고 슬립 LED(전원 LED)
가 켜집니다. 회전 조절기를 필요한
속도 설정에 맞추면 제품의 슬립 모드가
해제되고 수동 블렌딩을 시작할 수
있습니다.
4 프리셋 블렌딩 모드
(그림 2)
1
그림과 같이 블렌더 용기를
조립합니다.
2
용기 안에 재료를 넣습니다.
3
계량컵을 장착하고 뚜껑을 닫습니다.
4
플러그를 벽면 콘센트에 꽂고
블렌더의 전원을 켭니다.
» 타이머에 0:00이 표시되고
프로그램 LED가 켜집니다. 제품을
사용할 준비가 되었습니다.
5
패널의 프로그램 버튼을 눌러
프로그램을 선택합니다.
» 블렌더가 프로그래밍된 대로
블렌딩을 시작합니다.
» 타이머의 카운트 다운이
시작됩니다.
• 다양한 프로그램의 목적과 블렌딩
시간은 표 1을 참조하십시오.
• 사용 중인 블렌딩 프로그램을
정지하려면 선택한 프로그램
버튼을 다시 누르십시오.
• 블렌딩 작업 도중 수동 블렌딩
모드로 전환하려면 조절기를
필요한 속도 설정에 맞추십시오.
• 블렌딩 작업 도중 순간 작동 모드로
전환하려면 조절기를 P로 여러
차례 돌리십시오.
6
블렌딩이 끝나면 블렌더 전원을 끄고
전원 코드를 뽑습니다.
» 타이머가 0:00이 되면 블렌더의
블렌딩이 멈춥니다.
7
본체에서 블렌더 용기를 분리합니다.
8
뚜껑을 열고 블렌더 용기에 담긴
재료를 따라냅니다.

21
KO
한국어
9 세척(그림 6)
경고
• 제품을 세척하기 전에 전원 코드를 뽑으십시오.
• 그림 6에서 물, 식기 세척기 및/또는 젖은
천으로 부품을 세척하는 방법에 대한 내용을
참조하십시오.
• 본체 위에 있는 고무 패드를 제거하지 마십시오.
주의
• 칼날이 단단한 물건에 부딪히지 않도록
주의하십시오. 칼날이 무뎌질 수 있습니다.
• 칼날은 날카롭습니다. 칼날부를 세척할 때는
주의하십시오.
1
본체는 젖은 천으로 닦습니다.
2
그 외의 부품은 소량의 세제를 푼
따뜻한 물(60ºC 미만) 또는 식기
세척기로 세척합니다.
3
세척 후에는 제품 및 액세서리를
건조한 장소에 보관합니다.
빠른 세척
다음 단계를 따르면 블렌더 용기를 보다
쉽게 세척할 수 있습니다.
1
미지근한 물(1리터 이하)과 소량의
세제를 블렌더 용기에 넣습니다.
2
계량컵을 장착하고 뚜껑을 닫습니다.
3
조절기를 속도 10에 맞춥니다.
블렌더를 30초 이상 또는 블렌더
용기가 깨끗해질 때까지 작동시킵니다.
4
사용 후에는 블렌더 전원을 끄고
제품의 플러그를 뽑습니다.
5
블렌더 용기를 분리하고 깨끗한 물로
헹굽니다.
7 탬퍼 사용(그림 4)
탬퍼를 사용하면 수분이 적고 매우
뻑뻑하여 일반 블렌더로는 잘 가공할 수
없는 음식(예: 견과류 버터, 프로즌 디저트
또는 야채 퓨레)을 만들 수 있습니다.
탬퍼는 기포가 생기지 않도록 하여 순환을
도와줍니다.
블렌더가 켜져 있을 때 탬퍼를 사용하여
재료를 섞은 다음 칼날에 밀어 넣어줍니다.
참고: 탬퍼가 칼날에 부딪치는 것을
방지하려면 뚜껑이 용기에 제대로
조립되어 있는 경우에만 탬퍼를
사용하십시오.
팁: 탬퍼를 위아래로 움직이고 돌리거나
용기 측면 또는 모서리 쪽으로 밀어서
재료의 순환을 도울 수 있습니다.
8 돔 사용(HR3868
모델만 해당)
(그림 5)
돔을 사용하면 블렌딩 도중 발생하는
소음을 줄일 수 있습니다.
그림에 표시된 단계에 따라 돔을 조립하여
사용하십시오. 5.

22
KO
10 보증 및 서비스
서비스 또는 정보가 필요하거나 문제가 있으면 www.philips.com/support를 참조하거나
현지 필립스 고객 상담실로 문의하십시오. 전국 서비스 센터 안내는 제품 보증서를
참조하십시오. 거주 지역에 서비스 센터가 없는 경우 필립스 대리점에 문의하십시오.
표 1
프로그램
과채 스무디 오곡 두유 수프 견과류 얼음 갈기
용도 과즙과 섬유소를
맛있게 즐기기
위해 과일과
야채를 통째로
블렌딩
어떤 종류의
곡식, 콩,
견과류도
물과 함께
섞어
부드러운
우유로
블렌딩
채소를
수프로
블렌딩
통견과 잘게
다지기
몇 번의 순간
작동으로 얼
음 갈기
블렌딩 시간 1분 2분 4분 30초 30초
권장 레시피 당근, 사과,
셀러리 주스
두유 크리미한
토마토 수프
아몬드 또는
향신료 분쇄
얼음과 함께
간 망고
요거트
레시피:
재료:
다진 돼지고기 950g
골파 20g
절차:
1. 다진 돼지고기와 골파를 용기에 넣습니다.
2. 재료를 속도 10으로 10초간 블렌딩합니다.

23
KO
한국어
11 문제 해결
문제점 해결책
용기가 긁혀서
뿌옇게 되는 이유는
무엇입니까?
마른 재료를 가는 데 용기를 사용할 경우 용기 벽이 긁혀서 뿌옇게 될 수
있습니다. 이는 블렌딩 성능에 부정적인 영향을 미치지 않고 식품 안전과
관련된 우려 사항도 발생시키지 않으므로 계속해서 안전하게 사용할 수
있습니다.
블렌딩하고 나면 재료가
뜨거워지는 이유는
무엇입니까?
이 블렌더는 고속 블렌더로, 일반 블렌더보다 블렌딩 속도가 빠릅니다.
프리셋 블렌딩 모드를 사용하거나 수동 블렌딩 모드로 블렌딩 시간을 줄이면
과도한 블렌딩이나 과열을 방지할 수 있습니다.
블렌더 작동이 멈추고
“Hot” 메시지가
표시되는 것은 무엇을
의미합니까?
블렌더에 과부하가 발생하면 과열 경고 LED(온도계 아이콘)가 깜박입니다.
블렌더가 많은 양의 재료로 계속 작동되어 완전히 과부하 상태에 이를 경우
“Hot” 메시지가 표시됩니다. 블렌더 작동이 자동으로 멈춥니다.
참고: 제품의 온도가 너무 높거나 제품이 과도하게 사용된 경우, “Hot”
메시지가 바로 표시되고 블렌더의 작동도 멈추게 됩니다.
과부하가 발생하여 자동 정지 보호 기능이 작동한 경우 다음 단계를 따라
블렌더를 재설정하십시오.
1
블렌더 전원을 끄고 전원 코드를 뽑습니다.
2
재료의 일부를 제거하여 부하를 낮춥니다.
3
30분 간 열기를 식힙니다.
4
전원 플러그를 벽면 콘센트에 꽂고 블렌더의 전원을 켭니다.
블렌더가 손상될 수 있으므로 아무 것도 채우지 않은 채로 블렌더를
사용해서는 안됩니다.
용기에 재료가 250ml 미만으로 채워진 경우 블렌딩 하는 동안 표시된 대로
용기 뚜껑을 단단히 잡아 안정적인 상태를 유지시켜 주십시오.
용기가 흔들리고 제자리를 벗어나서 “Err” 메시지가 나타난 경우, 다음
지침을 따르십시오.
1
블렌더의 전원을 끕니다.
2
회전 조절기를 “0”에 놓습니다.
3
블렌더의 전원을 켭니다.
1
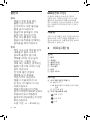
3
2

24
MS
- Memasang,
membuka atau
membersihkannya.
- Ia dibiarkan tanpa
pengawasan.
• Jangan sekali-kali
menenggelamkan
perkakas di dalam air
atau sebarang cecair lain.
• Pastikan bahawa voltan
yang dinyatakan pada
perkakas sepadan
dengan voltan sesalur
tempatan anda.
• Jangan gunakan
perkakas jika plag atau
kord sesalur rosak atau
kelihatan retak. Jika kord
sesalur kuasa rosak,
anda hendaklah pastikan
bahawa ia digantikan
oleh Philips, pusat servis
yang disahkan oleh
Philips ataupun orang
seumpamanya yang
layak bagi mengelakkan
bahaya.
• Pastikan tudung dan
cawan penyukat
dipasang dengan
betul pada balang
pengisar sebelum anda
menggunakan perkakas.
1 Selamat Datang
Tahniah atas pembelian anda dan
selamat menggunakan Philips! Untuk
mendapat manfaat sepenuhnya
daripada sokongan yang ditawarkan
oleh Philips, daftarkan produk anda di
www.philips.com/welcome.
Baca manual pengguna ini dengan teliti
sebelum anda menggunakan perkakas
dan simpan ia untuk rujukan masa
depan.
Amaran
• Jangan sentuh mata
pisau tajam apabila
plag perkakas dipasang.
Jika mata pisau
tersekat, cabut plag
perkakas sebelum
anda mengeluarkan
bahan-bahan yang
menyekatnya.
Berhati-hati semasa
mengendalikan
pisau pemotong,
mengosongkan
mangkuk dan semasa
pembersihan.
• Matikan dan cabut
plag perkakas daripada
bekalan kuasa sebelum:
- Mengeluarkannya
daripada dirian,
menukar aksesori atau
mendekati bahagian
yang sedang bergerak.
ページが読み込まれています...
ページが読み込まれています...
ページが読み込まれています...
ページが読み込まれています...
ページが読み込まれています...
ページが読み込まれています...
ページが読み込まれています...
ページが読み込まれています...
ページが読み込まれています...
ページが読み込まれています...
ページが読み込まれています...
ページが読み込まれています...
ページが読み込まれています...
ページが読み込まれています...
ページが読み込まれています...
ページが読み込まれています...
ページが読み込まれています...
ページが読み込まれています...
ページが読み込まれています...
ページが読み込まれています...
ページが読み込まれています...
ページが読み込まれています...
ページが読み込まれています...
ページが読み込まれています...
ページが読み込まれています...
ページが読み込まれています...
ページが読み込まれています...
ページが読み込まれています...
ページが読み込まれています...
ページが読み込まれています...
ページが読み込まれています...
ページが読み込まれています...
ページが読み込まれています...
ページが読み込まれています...
-
 1
1
-
 2
2
-
 3
3
-
 4
4
-
 5
5
-
 6
6
-
 7
7
-
 8
8
-
 9
9
-
 10
10
-
 11
11
-
 12
12
-
 13
13
-
 14
14
-
 15
15
-
 16
16
-
 17
17
-
 18
18
-
 19
19
-
 20
20
-
 21
21
-
 22
22
-
 23
23
-
 24
24
-
 25
25
-
 26
26
-
 27
27
-
 28
28
-
 29
29
-
 30
30
-
 31
31
-
 32
32
-
 33
33
-
 34
34
-
 35
35
-
 36
36
-
 37
37
-
 38
38
-
 39
39
-
 40
40
-
 41
41
-
 42
42
-
 43
43
-
 44
44
-
 45
45
-
 46
46
-
 47
47
-
 48
48
-
 49
49
-
 50
50
-
 51
51
-
 52
52
-
 53
53
-
 54
54


