
WARNING
To reduce the risk of fire or electric shock, do
not expose this apparatus to rain or moisture.
To reduce the risk of fire, do not cover the ventilation
of the apparatus with newspapers, tablecloths,
curtains, etc. And do not place lighted candles on the
apparatus.
To reduce the risk of fire or electric shock, do not expose
this apparatus to dripping or splashing, and do not
place objects filled with liquids, such as vases, on the
apparatus.
As the main plug is used to disconnect the unit from
the mains, connect the unit to an easily accessible AC
outlet. Should you notice an abnormality in the unit,
disconnect the main plug from the AC outlet
immediately.
The unit is not disconnected from the AC power source
(mains) as long as it is connected to the wall outlet,
even if the unit itself has been turned off.
Do not install the appliance in a confined space, such
as a bookcase or built-in cabinet.
Do not expose the batteries (battery pack or batteries
installed) to excessive heat such as sunshine, fire or the
like for a long time.
The nameplate and important information concerning
safety are located on the bottom exterior.
Note on DualDiscs
A DualDisc is a two sided disc product which mates
DVD recorded material on one side with digital audio
material on the other side. However, since the audio
material side does not conform to the Compact Disc
(CD) standard, playback on this product is not
guaranteed.
Music discs encoded with copyright
protection technologies
This product is designed to playback discs that
conform to the Compact Disc (CD) standard. Recently,
various music discs encoded with copyright protection
technologies are marketed by some record companies.
Please be aware that among those discs, there are
some that do not conform to the CD standard and may
not be playable by this product.
MPEG Layer-3 audio coding technology and patents
licensed from Fraunhofer IIS and Thomson.
Power sources Specifications
CD player section
System
Compact disc digital audio system
Laser diode properties
Emission duration: Continuous
Laser output: Less than 44.6 µW
(This output is the value measured at a distance of
about 200 mm from the objective lens surface on the
optical pick-up block with 7 mm aperture.)
Number of channels
2
Frequency response
20 Hz - 20,000 Hz +1/–2 dB
Wow and flutter
Below measurable limit
Radio section
Frequency range
FM: 87.5 MHz - 108 MHz (50 kHz/100 kHz step)
AM: 531 kHz - 1,602 kHz (9 kHz step)
530 kHz - 1,610 kHz (10 kHz step)
Antennas
FM: Telescopic antenna
AM: Built-in ferrite bar antenna
USB section
Supported bit rate
MP3 (MPEG 1 Audio Layer-3):
32 kbps - 320 kbps, VBR
Sampling frequencies
MP3 (MPEG 1 Audio Layer-3):
32/44.1/48 kHz
(USB) port
USB-A (Full Speed)
General
Speaker
Full range: 8 cm dia., 8 Ω, cone type (2)
Outputs
Headphones jack (stereo minijack):
For 16 Ω - 32 Ω impedance headphones
Input
AUDIO IN jack (stereo minijack)
(USB) port: Type A, maximum current 500 mA
Power output
1.0 W + 1.0 W (at 8 Ω, 10% harmonic distortion)
Power requirements
For CD radio:
230 V AC - 240 V AC, 50 Hz
9 V DC, 6 R14 (size C) batteries
Power consumption
AC 11 W
Battery life*
For CD radio:
FM reception
R14P: approx. 7 h
Sony alkaline LR14: approx. 30 h
CD playback
R14P: approx. 1.5 h
Sony alkaline LR14: approx. 13 h
Dimensions
Approx. 299 mm × 126 mm × 210 mm (w/h/d)
(incl. projecting parts)
Mass
Approx. 2.4 kg (incl. batteries)
Supplied accessories
AC power cord (1)
* Battery life is subject to changes in surrounding temperature, usage
conditions, manufacture and battery type.
Design and specifications are subject to change without notice.
Optional accessory
Sony MDR headphones series
操作本系统之前,请仔细阅读本手册并妥善保管
以备将来参考。
警告
为防⽌⽕灾或触电,请不要让本机淋⾬或
受潮。
为了降低着⽕的危险,请不要⽤报纸、桌布、窗
帘等覆盖本机的通风孔。不要在本机上放置点燃
的蜡烛。
为了减⼩⽕灾或触电的危险,不要将此装置放置
于液体滴漏或飞溅的环境,也不要在其上放置盛
有液体的容器,⽐如花瓶等。
由于主插头⽤于将本机与主电源插座断开连接,
请将本机连接到易于插拔的交流电源插座上。如
果您注意到任何本机的异常,请⽴即将主插头从
交流电源插座上断开连接。
即使本机已关闭电源,只要其电源插头仍插在电
源插座中,本机就未与交流电源断开连接。
请勿把本机安装在书橱或嵌⼊墙壁的机架等狭
窄空间内。
请勿使电池(装上的电池组或电池)在过热环境
如阳光、⽕或类似条件下放置较长时间。
铭牌和安全注意事项位于本机底壳上。
有关 DualDisc 的注意事项
DualDisc 是⼀种双⾯光盘产品,它⼀⾯含有符
合录制 DVD 的素材,另⼀⾯为数字⾳频素材。
但是,由于⾳频素材⼀⾯不符合 Compact Disc
(CD)标准,⽆法保证在本产品上播放。
⽤版权保护技术编码的⾳乐光盘
本产品被设计⽤于播放符合 Compact Disc(CD)
标准的光盘。近来,⼀些唱⽚公司在出售各种⽤
版权保护技术编码的⾳乐光盘。请注意,这些光
盘中有⼀些光盘不符合 CD 标准⽽可能⽆法⽤
本产品播放。
MPEG Layer-3 ⾳频编码技术和专利由
Fraunhofer IIS 和 Thomson 授权。
电源 规格
CD 播放机部分
系统
光盘数字⾳频系统
激光⼆极管属性
发射持续时间:连续
激光输出:低于 44.6
µ
W
(此输出是在距离光学拾取组件上的物镜表⾯
约 200 mm 处、光圈为 7 mm 的测量值。)
声道数量
2
频率响应
20 Hz - 20000 Hz +1/-2 dB
抖晃率
低于可测量限制
收⾳机部分
频率范围
FM: 87.5 MHz - 108 MHz(50 kHz/100 kHz
递增)
AM: 531 kHz - 1602 kHz(9 kHz 递增)
530 kHz - 1610 kHz(10 kHz 递增)
天线
FM: 伸缩天线
AM: 内置铁素体棒天线
USB 部分
支持的⽐特率
MP3(MPEG 1 Audio Layer-3):
32 kbps - 320 kbps,VBR
采样频率
MP3(MPEG 1 Audio Layer-3):
32/44.1/48 kHz
(USB)端口
USB-A(全速)
⼀般
扬声器
全范围:直径 8 cm,8
,圆锥形(2)
输出
⽿机插孔(⽴体声迷你插孔):
适合 16
- 32
阻抗⽿机
输⼊
AUDIO IN 插孔(⽴体声迷你插孔)
(USB)端口:类型 A,最大电流 500 mA
功率输出
1.0 W + 1.0 W(8
时 10% 谐波失真)
电源要求
对于 CD 收录机:
230 V AC - 240 V AC,50 Hz
9 V DC,6 R14(C 型)电池
功率消耗
AC 11 W
电池使⽤时间
对于 CD 收录机:
FM 接收
R14P:约 7 ⼩时
Sony 碱性 LR14:约 30 ⼩时
CD 播放
R14P:约 1.5 ⼩时
Sony 碱性 LR14:约 13 ⼩时
尺⼨
约 299 mm × 126 mm × 210 mm(宽 / ⾼ / 深)
(包括突出部位)
质量
约 2.4 kg(包括电池)
随机附件
交流电源线(1)
*
电池使⽤时间随环境温度、使⽤情况、生产商
和电池类型改变。
设计及规格若有变更,恕不另⾏通知。
选购附件
Sony MDR ⽿机系列
基本操作
使⽤本机前
打开 / 关闭电源
按 POWER
。
注
打开电源时,按住 POWER
直至 OPR/BATT
指示灯
点亮。
调节⾳量
按 VOL +,-
。
⽤耳机聆听
将⽿机连接至本机背后的
(⽿机)插孔
。
播放 CD/MP3 光盘
1
按 POWER
。
2
按 CD
。
3
按 PUSH OPEN/CLOSE (
)
,然后将光盘
以标签⾯朝上放在 CD 舱内。
若要关闭 CD 舱,按 PUSH OPEN/CLOSE (
)
。
标签面朝上
4
按
。
本机⼀次播放所有曲目 /MP3 文件。
播放 MP3 光盘时,在本机读取了文件信息后,
MP3 指示灯亮起。
⾳频 CD
曲目编号 播放时间
MP3 光盘
MP3 文件
编号
在显示文件夹名称
*
1
和歌
曲标题
*
2
后,将会出现播
放时间
*
3
。
*
1
如果没有文件夹,显示屏中会出现“ROOT”。
*
2
如果 ID3 标签信息中没有歌曲标题,会显示
“NO TITLE”。
*
3
如果播放时间超过 100 分钟,显示屏中会出
现“--:--”。
若要 按
暂停播放
。若要恢复播放,再按
⼀次。
停止播放
。
进到下⼀曲目 /
MP3 文件
。
返回上⼀曲目 /
MP3 文件
。
选择 MP3 光盘
中⼀个文件夹
本机上的 /TUNE +
前
进, /TUNE -
后退。
听歌曲时找到
某⼀点
在播放过程中按住
(向前)
或
(向后)
,直至找
到该点。
看着显示屏找
到某⼀点
在暂停中按住
(向前)或
(向后)
,直至找到该点,
然后按
。
取出 CD 本机上的 PUSH OPEN/CLOSE
(
)
。
提示
播放将从最后停止播放的曲目 /MP3 文件开始
(续播)。处于停止播放时,将显示要播放的曲
目 /MP3 文件编号。
若要取消续播(从第⼀首曲目 /MP3 文件的开
头播放),请在 CD 停止时按
。当您打开
CD 舱时,续播将被取消。如果在连接了交流
电源线时关闭本机,续播不会取消。
文件夹结构示例和播放顺序
文件夹和文件的播放顺序如下所示:
文件夹
MP3 文件
MP3 光盘注意事项
插⼊光盘时,本机读取光盘中的所有文件。此
时,显示“READING”。如果光盘中有许多文件
夹或非 MP3 文件,则可能需要很长时间才能
开始播放或开始播放下⼀个 MP3 文件。
建议您不要将不需要的文件夹或非 MP3 文件
保存在⽤于进⾏ MP3 聆听的光盘中。
跳过不含 MP3 文件的文件夹。
文件最大数量:511
文件夹最大数量:256 (包括根文件夹)
文件夹和文件最大数量:512
最大目录层级:8
包括引号在内,最多可以显示 64 个字符的文
件夹名和文件名。
本机可显示字符 A - Z,0 - 9 和 _。字符 a
- z 显示为 A - Z(大写)。其他字符显示为
“_”。
连接交流电源线
将交流电源线连接到本机(
)和电源插座(
)。
连接至电源插座(
)
连接至 AC IN(
)
准备电池
将六节 R14(尺⼨ C)电池(未附送)插⼊电池舱中。
底部
注
当 OPR/BATT 指示灯
暗淡时,或本机停止工作时,请更换电池。
请全部换成新电池。更换电池前,必须取出本机中的 CD。
若要本机使⽤电池,请断开本机交流电源线连接。
本机支持 ID3 标签格式版本 1.0,1.1,2.2,
2.3 和 2.4。文件有 ID3 标签信息时,可能
会显示歌曲标题、艺术家姓名和专辑名称。如
果文件没有 ID3 标签信息,则会出现“NO
TITLE”⽽不是歌曲标题,出现“NO ARTIST”
⽽不是艺术家姓名,出现“NO ALBUM”⽽不是
专辑名称。最多可以显示 30 个字符的 ID3
标签信息。
命名时,务必将文件扩展名“mp3”添加到文
件名中。
如果将扩展名“mp3”添加到非 MP3 文件,本
机⽆法正确识别文件,并且将会产生可能损坏
您扬声器的噪声。
文件名不对应 ID3 标签。
听收⾳机
1
按 POWER
。
2
反复按 RADIO BAND
。
每按⼀次此按钮,收⾳机波段将在 AM 和 FM
之间切换。
3
按住 /TUNE + 或 -
,直至显示屏中的
频率数字开始变化。
本机自动扫描电台频率,当找到⼀个清晰电
台时停止扫描。
如果⽆法调⼊电台,反复按
/TUNE + 或 -
逐级改变频率。
提示
如果 FM 广播嘈杂,⼀般可以将当前状态改为
单声道即可减少噪⾳。
1
按 MODE
。
出现“STEREO”或“MONO”。
2
显示“STEREO”时,按 MODE
显示
“MONO”。
更改 FM/AM 调谐间隔
如果需要更改 FM/AM 调谐间隔,则继续以下操
作:
1
按 POWER
。
2
按 RADIO BAND
选择想要的波段。
3
按 MANUAL PRESET
进⼊ FM/AM 手动预设
模式。
4
按住 MODE
2 秒钟,直至显示屏中预设编
号闪烁。出现当前步幅。
5
按 PRESET + 或 -
选择“FM 50K”作为
50 kHz 或选择“FM 100K”作为 100 kHz 间隔,
选择“AM 9K”作为 9 kHz 或选择“AM 10K”
作为 10 kHz 间隔。
6
按 DISPLAY/ENTER
。
更改调谐间隔后,需要重新设定预设电台。
聆听 USB 设备上的⾳乐
您可聆听储存在 USB 设备(数字⾳乐播放器或
USB 存储媒体)上的⾳乐。
MP3 格式
*
1
的⾳乐文件可在本机上播放。
1
按 POWER
。
2
按 USB
。
3
将 USB 设备连接至
(USB)端口
。
4
按
。
本机开始播放。
文件编号 在显示文件夹名称和歌曲标题
后,将会出现文件编号和播放
时间
*
2
。
*
1
带有版权保护(数字版权管理)的文件⽆法
在本机上播放。
*
2
如果播放时间超过 100 分钟,则显示屏上会
显示为“--:--”。
©2012 Sony Corporation Printed in China
4-415-335-71(1)
Personal Audio System
Operating Instructions
ZS-PS30CP
使⽤说明书
4-415-335-71(1)
Personal Audio System
ZS-PS30CP
使⽤说明书
©2012
索尼公司 中国印刷
Sony Corporation Printed in China
其它操作
若要 按
暂停播放
。若要续播,请重新按
此按钮
*
3
。
停止播放
。
选择文件夹 /TUNE + 或 –
。
选择文件
或
。
找到文件中的⼀
个位置
在播放时按住
或
,并在需要的位置处松开按
钮。
*
3
当播放 VBR MP3 文件时,本机可能会从不同位
置续播。
选择⽤于播放 / 查看信息的存储器
如果 USB 设备具有⼀个以上的存储器(例如,内
部存储器和存储卡),可以选择要播放的存储器。
1
将 USB 设备连接至
(USB)端口
。
2
按本机上的 USB
。
3
在停止模式中,按 MEMORY SELECT
。
如果存在另⼀个存储器,会显示存储器中总
曲目 / 文件夹数。
提示
从上次停止播放的 MP3 文件开始播放(续播)。
若要取消续播(从第⼀个 MP3 文件的开头开始
播放),则按
。
若要改变播放模式
当 USB 设备未在播放或暂停时,请反复按 MODE
。您可选择正常播放(“ ”表示 USB 设备上
文件夹中的所有文件)、重复播放(“ 1”或
“ ”)、随机播放(“SHUF”)或程序播放(“PGM”
或“PGM ”)(请参阅封底的“选择各种播放模
式”)。
USB 设备的注意事项
某些 USB 设备可能与本机不兼容。
当 USB 设备正在播放或暂停时,⽆法改变播放
模式。
以下情况下,在开始播放前可能需要较长时间:
– 文件夹结构复杂。
– USB 设备接近容量。
当连接了 USB 设备时,本机读取设备上的所有
文件。如果设备上有许多文件夹或文件,本机
可能需要很长时间才能完成读取。
请勿通过 USB 集线器将 USB 设备连接至本机。
对于某些 USB 设备,当在 USB 设备上进⾏操作
时,在本机上执⾏前可能会有延迟。
本机可能不支持所连 USB 设备上提供的所有功
能。
本机上的播放顺序可能会与所连 USB 设备上的
播放顺序不同。
请勿将非 MP3 文件或不需要的文件夹保存在包
含 MP3 文件的 USB 设备中。
在播放过程中,会跳过不包含 MP3 文件的文件
夹。
本机只能播放具有“.mp3”文件扩展名的 MP3
文件。
如果 USB 设备上包含具有“.mp3”文件扩展名
的文件,但这些文件并非 MP3 文件,则本机可
能会产生噪⾳或故障。
⼀个 USB 设备最多能包含 999 个 MP3 文件和
128 个文件夹。⼀个文件夹内最多能包含 128
个文件。MP3 文件和文件夹的最大数目可能因
文件和文件夹结构⽽异。
目录等级的最大数目为 9。
不保证与所有 MP3 编 / 写软件、录制设备和录
制媒体兼容。如果使⽤不兼容的 USB 设备,可
能会导致跳⾳或噪⾳,或设备可能根本⽆法播
放。
从⾳乐下载网站下载的文件可能⽆法播放。
不保证与 USB 读卡器 / 刻录器兼容。
To connect the AC power cord
Connect the AC power cord to the unit () and the wall outlet ().
to a wall outlet ()
to AC IN ()
To prepare the batteries
Insert six R14 (size C) batteries (not supplied) into the battery compartment.
Bottom
Notes
Replace the batteries when the OPR/BATT indicator dims, or when the unit stops operating.
Replace all the batteries with new ones. Before you replace the batteries, be sure to take out the CD from the unit.
To use the unit on batteries, disconnect the AC power cord from the unit.
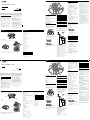
Basic Operations
Before using the unit
To turn on/off the power
Press POWER
.
Note
When turning on the power, hold down POWER
until OPR/BATT indicator
lights up.
To adjust the volume
Press VOL +, –
.
To listen through headphones
Connect the headphones to the (headphones) jack
on the back of the unit.
Playing a CD/MP3 disc
1 Press POWER
.
2 Press CD
.
3 Press PUSH OPEN/CLOSE ()
, and place a disc
with the label side up on the CD compartment.
To close the CD compartment, press PUSH OPEN/
CLOSE ()
.
Label side facing up
4 Press
.
The unit plays all the tracks/MP3 files once.
When you play an MP3 disc, the MP3 indicator lights
up after the unit has read the file information.
Audio CD
Track
number
Playing
time
MP3 disc
MP3 file
number
After the folder name*
1
and song title*
2
are
displayed, the playing time*
3
will appear.
*
1
If there is no folder, “ROOT” appears in the display.
*
2
If there is no song title in ID3 tag information “NO TITLE” will be
displayed.
*
3
If the playing time is more than 100 minutes, “--:--” appears in
the display.
To Press
Pause playback
. To resume play, press it
again.
Stop playback
.
Go to the next
track/MP3 file
.
Go back to the
previous track/
MP3 file
.
Select a folder on
an MP3 disc
/TUNE +
to go forward and
/TUNE –
to go backward.
Locate a point
while listening to
the sound
(forward) or
(backward)
during playback and hold it
until you find the point.
Locate a point
while observing
the display
(forward) or
(backward)
in pause and hold it until you
find the point then press
.
Remove the CD PUSH OPEN/CLOSE (
)
.
Tips
Playback starts from the track/MP3 file you last stopped playing
(Resume play). During stop, the track/MP3 file number to be
played is displayed.
To cancel the resume play (to start play from the beginning of the
first track/MP3 file), press
while the CD is stopped. When
you open the CD compartment, resume play is cancelled. If the
unit is turned off while the AC power cord is connected, resume
play will not be cancelled.
Example of folder structure and playing order
The playing order of the folders and files is as follows:
Folder
MP3 file
Notes on MP3 discs
When the disc is inserted, the unit reads all the files on that disc.
During this time, “READING” is displayed. If there are many
folders or non-MP3 files on the disc, it may take a long time for
play to begin or for the next MP3 file to start to play.
We recommend that you do not save unnecessary folders or files
other than MP3 ones in the disc to be used for MP3 listening.
A folder that does not include an MP3 file is skipped.
Maximum number of files: 511
Maximum number of folders: 256 (including the root folder)
Maximum number of folders and files in total: 512
Maximum directory levels: 8
Folder names and file names can be displayed with up to 64
characters including quotation marks.
The characters A - Z, 0 - 9 and _ can be displayed on this unit.
Characters a - z are displayed as A - Z (capitalized). Other
characters are displayed as “_”.
This unit conforms to Version 1.0, 1.1, 2.2, 2.3 and 2.4 of the ID3
tag format. When the file has the ID3 tag information, song title,
artist name and album name can be displayed. If the file does not
have ID3 tag information, “NO TITLE” appears instead of song
title, “NO ARTIST” appears instead of artist name, and “NO
ALBUM” appears instead of album name. The ID3 tag information
can be displayed with up to
30 characters.
When naming, be sure to add the file extension “.mp3” to the file
name.
If you put the extension “.mp3” to a file other than an MP3 file,
the unit cannot recognize the file properly and will generate
random noise that could damage your speakers.
The file name does not correspond to the ID3 tag.
Listening to the radio
1 Press POWER
.
2 Press RADIO BAND
repeatedly.
Each time you press the button, the radio band
toggles between AM and FM.
3 Hold down /TUNE + or –
until the frequency
digits begin to change in the display.
The unit automatically scans the radio frequencies
and stops when it finds a clear station.
If you cannot tune in a station, press /TUNE + or –
repeatedly to change the frequency step by step.
Tip
If an FM broadcast is noisy, setting the current status to monaural
usually reduces the noise.
1 Press MODE
.
“STEREO” or “MONO” appears.
2 While
“STEREO” is displayed, press MODE
to display “MONO.”
Changing the FM/AM tuning interval
If you need to change the FM/AM tuning interval,
proceed as follows:
1 Press POWER .
2 Press RADIO BAND to select the desired band.
3 Press MANUAL PRESET to enter FM/AM manual
preset mode.
4 Hold down MODE for 2 seconds until the preset
number flashes in the display.
The current step appears.
5 Press PRESET + or – to select “FM 50K” for 50 kHz
or “FM 100K” for 100 kHz interval, and “AM 9K” for 9
kHz or “AM 10K” for 10 kHz interval.
6 Press DISPLAY/ENTER .
After changing the tuning interval, you need to reset
your preset radio stations.
Listening to music on a USB device
You can listen to music stored on a USB device (a
digital music player or USB storage media).
Music files in MP3 format*
1
can be played on this unit.
1 Press POWER
.
2 Press USB
.
3 Connect the USB device to the
(USB) port
.
4 Press
.
The unit starts playing.
File number After the folder name and song title are
displayed, the file number and playing
time*
2
will appear.
*
1
Files with copyright protection (Digital Rights
Management) cannot be played on this unit.
*
2
If the playing time is more than 100 minutes, it appears
as “--:--” in the display.
Other operations
To Press
Pause playback
. To resume play, press the
button again*
3
.
Stop playback
.
Select a folder /TUNE + or – .
Select a file
or
.
Find a point in a
file
Hold down
or
during
playback, and release the button
at the desired point.
*
3
When playing a VBR MP3 file, the unit may resume
playback from a different point.
To select a memory for playback/information
If a USB device has more than one memory (for
example, internal memory and a memory card), you
can select which memory to play.
1 Connect the USB device to the
(USB) port
.
2 Press USB
on the unit.
3 Press MEMORY SELECT
, in stop mode.
If another memory exists, the total track/folder
number in the memory is displayed.
Tips
Playback starts from the MP3 file you last stopped playing
(Resume play).
To cancel resume play (start play from the beginning of the first
MP3 file), press
.
To change the play mode
Press MODE
repeatedly while the USB device is not
playing or paused. You can select Normal Play (“ ” for
all files in folder on USB device), Repeat Play
(“ 1” or “ ”), Shuffle Play (“SHUF”) or Program Play
(“PGM” or “PGM ”) (see “Selecting the various
modes of playback” on the back page).
Notes on the USB device
Some USB devices may not be compatible with this
unit.
You cannot change the play mode while the USB
device is playing or paused.
It may take a long time before playback starts when:
– the folder structure is complex.
– the USB device is close to capacity.
When a USB device is connected, the unit reads all
the files on the device. If there are many folders or
files on the device, it may take a long time for the
unit to finish reading them.
Do not connect a USB device to the unit through a
USB hub.
In the case of some USB devices, when an operation
is performed on the USB device, there may be a
delay before it is carried out on this unit.
This unit may not support all the functions provided
on a connected USB device.
The playback order on this unit may differ from the
playback order on a connected USB device.
Do not save non-MP3 files or unnecessary folders to
a USB device that contains MP3 files.
During playback, folders that contain no MP3 files
are skipped.
This unit can play only MP3 files that have the “.mp3”
file extension.
If there are files on the USB device that have the
“.mp3” file extension, but are not MP3 files, the unit
may produce noise or malfunction.
A maximum of 999 MP3 files and 128 folders can be
contained on a single USB device. A maximum of 128
files can be contained in a single folder.
The maximum number of MP3 files and folders may
vary, depending on the file and folder structure.
The maximum number of directory level is 9.
Compatibility with all MP3 encoding/writing
software, recording devices, and recording media
cannot be guaranteed. If you use an incompatible
USB device, sound skipping or noise may be result,
or the device may not play at all.
Files downloaded from a music download website
may not be playable.
Compatibility with USB Reader/Writer cannot be
guaranteed.
*
* VOL +
and
have a tactile dot.
*
*
*
VOL +
和
有⼀个触觉点。
*

使⽤显示屏
可以使⽤显示屏查看 CD 的信息。
查看⾳频 CD 的信息
查看 CD 的总曲目数和播放时间
在读取 CD 后,会出现总曲目数和总播放时间,
或按两次
取消续播。
总曲目数 总播放时间
查看 MP3 光盘的信息
查看 CD 上的总文件夹数和总文件数
在读取文件 / 文件夹信息后,会出现总文件夹数
和总文件数,或按两次
取消续播。
总文件数
总文件夹数
查看 USB 设备的信息
查看 USB 设备上的总文件夹数
在播放时按两次
,或在选择文件时按⼀次
。
当有多个文件夹时,不会显示总文件数。
USB 设备
(例如:当连接 USB 设备时)
总文件数 总文件夹数
提示
如果 CD 为空,则显示屏上会出现“noDISC”。
如果 USB 设备上没有 MP3 文件,则显示屏上会
出现“NO FILE”。
查看文件信息
播放 MP3 光盘或 USB 设备时按本机上的
DISPLAY/ENTER
。显示屏改变如下:
歌曲标题 ( )
*
1
艺术家姓名 ( )
*
1
专辑名称 ( )
*
1
当前文件编号和播放时间
*
2
*
1
如果文件不具有相应的 ID3 信息,则“NO
TITLE”、“NO ARTIST”和“NO ALBUM”会分别
滚动显示,⽽不显示歌曲标题、艺术家姓名和
专辑名称。
*
2
歌曲标题、艺术家姓名或专辑名称会在数秒钟
后改变如此。
选择各种播放模式
当光盘 /USB 设备停止时,可设定为重复或随机
播放曲目。
按 MODE
。
每按⼀次会如下改变播放模式:
正常播放(⽆)
单曲重复( 1)
全部重复( )
所选文件夹播放( )
*
所选文件夹重复播放( , )
*
随机播放(SHUF)
程序播放(PGM)
程序重复播放( , PGM)
*
当使⽤ CD-DA 时,不会应⽤这些功能。
其他操作
重复播放曲目 /MP3 文件
(重复播放)
可以以正常和程序播放模式反复播放曲目 /MP3
文件或 USB 设备。
1
按 POWER
。
2
按 CD
或 USB
。
3
当不播放 CD/MP3 光盘或 USB 设备时,按如下
方式操作。
若要重复
播放
操作
单首曲目
/MP3 文件
1
按本机上的 MODE
(在播放过
程中按
,然后按 MODE
),
直至出现“ 1”。
2
按
或
选择想要重
复播放的曲目 /MP3 文件。
3
按
。
所有曲目
/MP3 文件
1
按本机上的 MODE
(在播放过
程中按
,然后按 MODE
),
直至出现“ ”。
2
按
。
所选文件
夹(MP3
光盘或
USB 设备)
1
按本机上的 MODE
(在播放过
程中按
,然后按 MODE
),
直至出现“ ”和 “ ”。
2
按本机上的
/TUNE + 或 -
选择文件夹。
3
按
。
编⼊的曲
目 /MP3
文件
1
编程曲目 /MP3 文件(请参阅“建
⽴自己的程序”)。
2
按本机上的 MODE
(在播放过
程中按
,然后按 MODE
),
直至出现“PGM”和“ ”。
3
按
。
注意
当曲目 /MP3 文件正在播放或暂停时,⽆法改
变播放模式。
在播放过程中按 MODE
时,显示屏上会出
现“PUSH STOP”。
取消重复播放
按本机上的 MODE
(在播放过程中按
,
然后按 MODE
),直至“ ”从显示屏中消失。
随机播放曲目 /MP3 文件
(随机播放)
可以以任意顺序播放曲目 /MP3 文件或 USB 设备。
1
按 POWER
。
2
按 CD
或 USB
。
3
按 MODE
(在播放过程中按
,然后
按 MODE
),直至显示屏中出现
“SHUF”。
4
按
开始随机播放。
取消随机播放
首先停止播放。然后按本机上的 MODE
(在
播放过程中按
,然后按 MODE
),直至
“SHUF”从显示屏中消失。
注意
当曲目 /MP3 文件正在播放或暂停时,⽆法改
变播放模式。
在播放过程中按 MODE
时,显示屏上会出
现“PUSH STOP”。
提示
在随机播放过程中,⽆法按
来选择
前⼀首曲目 /MP3 文件。
在随机播放过程中,续播功能⽆效。
建立自己的程序
(程序播放)
最多可以排列 CD/USB 设备上 20 个曲目 /MP3 文
件的播放顺序。
1
按 POWER
。
2
按 CD
或 USB
。
3
按 MODE
(在播放过程中按
,然后
按 MODE
),直至显示屏中出现“PGM”。
4
按
或
选择曲目。
对于 MP3 文件,首先按 /TUNE + 或 –
,
然后按
或
。
在显示屏中曲目(文件)编号会闪烁。
⾳频 CD
MP3 光盘
USB 设备
5
按 DISPLAY/ENTER
。
“STEP xx”会出现在显示屏中。
⾳频 CD
MP3 光盘
USB 设备
6
若要程序播放其它歌曲,请重复步骤 4 和 5。
7
按
开始程序播放。
取消程序播放
首先停止播放。然后按本机上的 MODE
,直
至“PGM”从显示屏中消失。
查看曲目 /MP3 文件的顺序
按本机上的 DISPLAY/ENTER
(在播放过程中
按
,然后按 DISPLAY/ENTER
)。显示
屏中显示最后⼀个编排的步骤编号。数秒后,显
示屏中将显示最后⼀个编排的曲目 / 文件夹编
号。
更改当前程序
如果 CD 处于停止状态,按⼀次
,如果
CD 正在播放,则按两次。当前程序将被删除。
然后按照编程操作步骤建⽴新的程序。
提示
如果试图编⼊超过 21 首曲目 /MP3 文件,显
示屏中将会出现“FULL”。
程序将保存到打开 CD 舱为止,因此可以再次
播放同⼀个程序。
在程序播放过程中,续播功能⽆效。
预设广播电台
电台可以储存在本机的内存中。最多可以任何顺
序预设 30 个电台,20 个 FM 电台,10 个 AM
电台。
1
按 POWER
。
2
按 RADIO BAND
选择波段。
3
按住 AUTO PRESET
2 秒钟,直至显示屏
中“AUTO”闪烁。
4
按 DISPLAY/ENTER
。
电台按从低到⾼的频率顺序储存在内存中。
如果无法自动预设某⼀电台
需要手动预设信号较弱的电台。
1
按 POWER
。
2
按 RADIO BAND
选择波段。
3
使⽤ /TUNE + 或 -
调⼊想要的电台。
4
按 MANUAL PRESET
。
所选波段(“FM-xx”或“AM-xx”)会出现在
显示屏中。
5
按 PRESET + 或 -
,直至显示屏中想要电
台的预设号码闪烁。
6
按 DISPLAY/ENTER
。
新的电台将替换原有的电台。
提示
即使拔掉交流电源线或取出了电池,预设电台
也将保留在内存中。
播放预设广播电台
1
按 POWER
。
2
按 RADIO BAND
选择波段。
3
按 PRESET + 或 -
调⼊所储存的电台。
连接选购装置
通过本机的扬声器,可以欣赏到来自便携式数字
⾳乐播放器等选购装置的⾳乐。连接前必须先关
闭每个装置的电源。详细说明,请参阅要连接装
置的使⽤说明书。
1
使⽤⾳频连接线(不附带)将 AUDIO IN 插
孔
连接至便携式数字⾳乐播放器或其他
装置的线路输出插孔。
2
按 POWER
打开本机。
3
打开所连接的装置。
4
按本机上的 AUDIO IN
,在所连接的装置
上开始播放。
来自所连接装置的声⾳从本机的扬声器输出。
若要将本机连接至电视机或录像机,请使⽤
⼀端是⽴体声迷你插孔、另⼀端是两个⾳频
插头的延长线(不附带)。
本机可以播放的光盘
⾳频 CD
CD-R/CD-RW(CD-DA
*
/MP3 文件)
*
CD-DA 是 Compact Disc Digital Audio 的缩
写。这是适合⾳频 CD 的录制标准。
本机无法播放的光盘
以符合 ISO9660 Level 1/Level 2 或 Joliet
⾳乐 CD 格式或 MP3 格式以外录制的 CD-R/
CD-RW
录制质量很差的 CD-R/CD-RW,有刮痕或弄脏
的 CD-R/CD-RW,⽤不兼容的录制设备录制的
CD-R/CD-RW
未正确最终化的 CD-R/CD-RW
光盘注意事项
播放前,请⽤清洁的布清洁
CD。从 CD 的中⼼向外擦拭。
如果 CD 上有刮痕、弄脏或
手指印,则可能发生读轨错
误。
切勿使⽤汽油、稀释剂、市售的清洁剂或⽤于
树脂密纹唱⽚的防静电喷雾剂等溶剂。
切勿将 CD 暴露在直射阳光或热⽓管道等热源
下,也不要将其遗留在停在直射阳光下的车内,
因为车内温度会很⾼。
切勿将纸张或贴纸粘贴在 CD 上,也不要刮伤
CD 的表⾯。
播放后,请将 CD 存放在盒⼦内。
关于安全
由于 CD 播放机内使⽤的激光束对眼睛有伤
害,因此切勿拆下外壳。只能由专业⼈员进⾏
维修。
⼀旦有任何固体物或液体进⼊本机,请拔掉本
机电源插头,并由专业⼈员检查后方可继续使
⽤。
本机不能播放非标准形状的光盘(例如⼼形、
正方形、星形)。否则可能会损坏本机。切勿
使⽤此类光盘。
关于电源
对于交流电源操作,请使⽤附带的交流电源线;
切勿使⽤任何其他类型的电源线。
本机如果准备长期不使⽤,请从电源插座中拔
掉本机的电源插头。
电池不使⽤时,请取出电池,以免电池漏液或
腐蚀⽽造成损坏。
关于放置
切勿将本机放在热源附近、受阳光直射的地方、
灰尘很大或受到机械振动的地方、或受到太阳
直射的车内。
切勿将本机放置在倾斜或不稳定的地方。
切勿将任何物品放置在外壳侧⾯ 10 mm 范围
内。本机的通风孔必须通畅才能正常操作,并
能延长组件的使⽤寿命。
由于扬声器使⽤了强磁铁,因此请将使⽤磁性
编码的个⼈信⽤卡或弹簧发条手表远离本机放
置,以防止因磁铁⽽损坏。
关于操作
如果将本机从寒冷的地方直接带到温暖的场
所,或将其放置在非常潮湿的室内,则 CD 播
放机部分的内部镜头上可能会造成湿⽓凝结。
⼀旦发生此情况,本机将⽆法正常操作。在此
情况下,请取出 CD 并等待约 1 ⼩时使湿⽓
挥发。
清洁外壳
将软布⽤中性清洁剂稍稍沾湿清洁外壳、⾯板
和控制键。切勿使⽤任何类型的研磨垫、洗涤
粉或酒精、汽油等溶剂。
如果您对本机有任何问题,请与附近的 Sony 经
销商联系。
⼀般
电源无法打开。
将交流电源线牢固连接至电源插座。
确认电池安装正确。
如果电池电量不⾜,请更换所有电池。
没有声⾳。
⽤扬声器听⾳乐时请拔掉⽿机插头。
听到噪⾳。
有⼈正在本机旁使⽤手提电话或其他会发出电
波的设备。
将手提电话等设备远离本机。
CD/MP3 播放机
即使放⼊了 CD,CD 也不播放或显示“noDISC”。
将 CD 以标签⾯向上放⼊。
清洁 CD。
取出 CD,并将 CD 舱保持打开约 1 ⼩时,使
其内部⼲燥。
CD-R/CD-RW 是空⽩的。
CD-R/CD-RW、录制设备或应⽤软件有质量问题。
如果电池电量不⾜,请更换所有电池。
有掉⾳。
降低⾳量。
清洁 CD,如果 CD 损坏严重,请换⼀张。
将本机放置在没有振动的地方。
⽤市售的吹⽓工具清洁镜头。
使⽤质量低劣的 CD-R/CD-RW、或录制设备、
应⽤软件有问题,则可能发生掉⾳或听到噪⾳。
比平常花费更长时间才能开始播放。
下列光盘需要很长时间才能开始播放。
- 以复杂树形结构录制的光盘。
- 未最终化的光盘(可以添加数据的光盘)。
- 有许多文件夹或非 MP3 文件的光盘。
收⾳机
接收不良。
重新调整天线
方向,提⾼ FM
接收质量。
重新调整本机
自⾝方向,提
⾼ AM 接收质
量。
声⾳微弱或⾳质差。
如果电池电量不⾜,请更换所有电池。
将本机远离电视机。
收听 AM 收⾳机过程中,如果使⽤遥控器,则
可能会听见噪⾳。
电视机图像不稳定。
如果在使⽤室内天线的电视机旁收听 FM 节
目,请将本机远离电视机放置。
USB 设备
USB 设备无法正常工作。
如果出现以下任何⼀种问题,请使⽤其他 USB
设备。
- USB 设备未识别。
- 文件或文件夹名称未显示在本机上。
- ⽆法播放。
- 出现跳⾳。
- 出现噪⾳。
- 声⾳输出失真。
出现“OVER CURRENT”。
从
(USB) 端口
的电流中检测到异常电
平。关闭本机,并从
(USB) 端口
上移
除 USB 设备。确保 USB 设备没有任何问题。如
果信息仍然存在,请联系附近的 Sony 经销商。
没有声⾳。
USB 设备未正确连接。关闭本机并重新连接
USB 设备。然后打开本机。
有噪⾳、跳⾳或声⾳失真。
关闭本机并重新连接 USB 设备。然后重新打开
本机。
⾳乐数据本⾝带有噪⾳,或声⾳失真。在录制
过程中可能会有噪⾳输⼊。删除文件并重试录
制。
USB 设备无法连接至
(USB) 端口
。
当进⾏连接时,USB 设备或 USB 电缆上的接口
方向不正确。使 USB 设备或 USB 电缆上的接口
方向正确。
“READING”显示时间过长,或在开始播放前花费
了很长时间。
在以下情况下,读取过程会花费很长时间:
- USB 设备上有很多文件夹或文件。
- 文件结构复杂。
- 内存几乎已满。
- 内存出现碎⽚。
为避免上述问题出现,建议您遵守以下规则:
- 保持 USB 设备上的文件夹总数为 100 或以下。
- 保持每个文件夹的文件总数为 100 或以下。
出错显示
USB 设备上储存的数据可能损坏。重新将⾳乐
数据发送至 USB 设备。
本机只能显示数字和字母表的字母。其它字符
⽆法正确显示。
USB 设备未识别。
关闭本机并重新连接 USB 设备,然后打开本机。
USB 设备工作不正常。有关如何处理此问题的
详情,请参阅 USB 设备的使⽤说明书。如果问
题仍然存在,请联系附近的 Sony 经销商。
播放无法开始。
关闭本机并重新连接 USB 设备。
播放未从第⼀个文件开始。
将播放模式设定为正常播放。
无法播放 MP3 文件。
MP3 文件没有“.mp3”扩展名。
数据没有保存为 MP3 格式。
USB 存储设备使⽤非 FAT16 或 FAT32 的文件系
统。
*
最多只能播放 9 个目录等级。
文件夹的数量超过 128。
文件的数量超过 999。
⼀个文件夹内最多能包含 128 个文件。
文件被加密或受密码保护。
*
本机支持 FAT16 和 FAT32,但是某些 USB 存储
媒体可能不支持这两种文件系统。有关详情,
请参阅有疑问的 USB 存储设备的使⽤说明书或
联系生产商。
尝试解决方法后如果问题仍然存在,请拔掉交流
电源线插头或取出所有电池。显示屏中所有指示
消失后,重新插⼊交流电源线插头或插⼊电池。
如果问题仍然存在,请联络附近的 Sony 经销商。
注意事项 故障检修
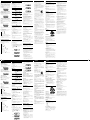
Using the display
You can check information about the CD using the
display.
Checking the information of an audio CD
To check the total track number and playing
time of the CD
After reading the CD, the total track number and the
total playing time will appear, or press
twice to
cancel Resume play.
Total track number
Total playing time
Checking the information of an MP3 disc
To check the total folder/file number and total
file number on the CD
After reading the file/folder information, the total
folder number and the total file number will appear, or
press
twice to cancel Resume play.
Total file number
Total folder number
Checking the information of a USB device
To check the total folder/file number on a USB
device
Press
twice during playback, or press
once
while selecting the file.
When there are multiple folders, the total file number
is not displayed.
USB device
(Example: When you connect a USB device)
Total file number
Total folder number
Tips
If the CD is blank, “noDISC” appears in the display.
If there are no MP3 files on the USB device, “NO FILE” appears in
the display.
To check file information
Press DISPLAY/ENTER
while playing an MP3 disc or
USB device. The display changes as follows:
The song title ( )*
1
The artist name ( )*
1
The album name ( )*
1
The current file number and playing time*
2
*
1
If the file does not have corresponding ID3 information,
“NO TITLE”, “NO ARTIST”, and “NO ALBUM” scroll instead
of the song title, artist name, and album name,
respectively.
*
2
Song title, artist name or album name will change to this
in a few seconds.
Selecting the various modes of
playback
You can set to play tracks repeatedly or in random
order, while a disc/USB device is stopped.
Press MODE
.
Each press changes the play mode as follows:
Normal play (None)
Single repeat ( 1)
All repeat ( )
Selected folder play ( )*
Selected folder repeat play ( , )*
Shuffle play (SHUF)
Program play (PGM)
Program repeat play ( , PGM)
* These functions do not apply when using a CD-DA.
Other Operations
Playing tracks/MP3 files repeatedly
(Repeat Play)
You can play tracks/MP3 files or a USB device
repeatedly in normal and program play modes.
1 Press POWER
.
2 Press CD
or USB
.
3 Proceed as follows, while the CD/MP3 disc or USB
device is not playing.
To repeat Do this
A single
track/MP3
file
1 Press MODE
(press
, then
press MODE
during playback) until
“ 1” appears.
2 Press
or
to select the
track/MP3 file that you want to repeat.
3 Press
.
All tracks/
MP3 files
1 Press MODE
(press
, then
press MODE
during playback) until
“ ” appears.
2 Press
.
A selected
folder (MP3
disc or USB
device)
1 Press MODE
(press
, then
press MODE
during playback) until
“ ” and “ ” appear.
2 Select the folder by pressing
/TUNE
+ or –
.
3 Press
.
Programmed
tracks/MP3
files
1 Program tracks/MP3 files (see
“Creating your own program”).
2 Press MODE
(press
, then
press MODE
during playback) until
“PGM” and “ ” appear.
3 Press
.
Note
You cannot change the play mode while track/MP3 file is playing
or paused.
When you press MODE
during playback, “PUSH STOP”
appears in the display.
To cancel Repeat Play
Press MODE
(press
, then press MODE
during playback) until “ ” disappears from the
display.
Playing tracks/MP3 files in random
order (Shuffle Play)
You can play tracks/MP3 files or a USB device in
random order.
1 Press POWER
.
2 Press CD
or USB
.
3 Press MODE
(press
, then press MODE
during playback) until “SHUF” appears in the
display.
4 Press
to start Shuffle Play.
To cancel Shuffle Play
Stop playing first. Then press MODE
(press
,
then press MODE
during playback) until “SHUF”
disappears from the display.
Note
You cannot change the play mode while track/MP3 file is playing
or paused.
When you press MODE
during playback, “PUSH STOP”
appears in the display.
Tips
During Shuffle Play, you cannot select the previous track/MP3 file
by pressing
.
The resume function does not work during Shuffle Play.
Creating your own program (Program
Play)
You can arrange the playing order of up to 20 tracks/
MP3 files on a CD/USB device.
1 Press POWER
.
2 Press CD
or USB
.
3 Press MODE
(press
, then press MODE
during playback) until “PGM” appears in the display.
4 Press
or
to select the track.
For MP3 files, press /TUNE + or – first and then
press
or
.
Track (File) number flashes in the display.
Audio CD
MP3 disc
USB device
5 Press DISPLAY/ENTER
.
“STEP xx” appears in the display.
Audio CD
MP3 disc
USB device
6 To program another song, repeat steps 4 and 5.
7 Press
to start Program Play.
To cancel Program Play
Stop playback first. Then press MODE
until “PGM”
disappears from the display.
To check the order of tracks/MP3 files
Press DISPLAY/ENTER
(press
, then press
DISPLAY/ENTER
during playback).
The last programmed step number appears in the
display. After a few seconds, the last programmed
track/folder number appears in the display.
To change the current program
Press
once if the CD is stopped and twice if the
CD is playing. The current program will be erased. Then
create a new program following the programming
procedure.
Tips
If you try to program 21 tracks/MP3 files or more, “FULL” will
appear in the display.
You can play the same program again, since the program is saved
until you open the CD compartment.
The resume function does not work during Program Play.
Presetting radio stations
You can store radio stations into the unit’s memory.
You can preset up to 30 radio stations, 20 for FM and
10 for AM in any order.
1 Press POWER
.
2 Press RADIO BAND
to select the band.
3 Hold down AUTO PRESET
for 2 seconds until
“AUTO” flashes in the display.
4 Press DISPLAY/ENTER
.
The stations are stored in memory from the lower
frequencies to the higher ones.
If a station cannot be preset automatically
You need to preset a station with a weak signal
manually.
1 Press POWER
.
2 Press RADIO BAND
to select the band.
3 Tune in a station you want using /TUNE + or –
.
4 Press MANUAL PRESET
.
The band selected (“FM-xx” or “AM-xx”) appears in
the display.
5 Press PRESET + or –
until the preset number you
want for the station flashes in the display.
6 Press DISPLAY/ENTER
.
The new station replaces the old one.
Tip
The preset radio stations remain in memory even if you unplug the
AC power cord or remove the batteries.
Playing preset radio stations
1 Press POWER
.
2 Press RADIO BAND
to select the band.
3 Press PRESET + or –
to tune in the stored station.
Connecting optional components
You can enjoy the sound from an optional component
such as a portable digital music player through the
speakers of this unit. Be sure to turn off the power of
each component before making any connections. For
details, refer to the instruction manual of the
component to be connected.
1 Connect the AUDIO IN jack
to the line output
jack of the portable digital music player or other
components using an audio connecting cable (not
supplied).
2 Press POWER
to turn the unit on.
3 Turn the connected component on.
4 Press AUDIO IN
, and start playback on the
connected component.
The sound from the connected component is
output from the speakers of this unit.
To connect the unit to a TV or VCR, use an extension
cable (not supplied) with a stereo-mini jack on one
end and two phono plugs on the other end.
Discs that this unit CAN play
Audio CD
CD-R/CD-RW (CD-DA*/MP3 files)
* CD-DA is the abbreviation for Compact Disc Digital Audio. It is a
recording standard used for Audio CDs.
Discs that this unit CANNOT play
CD-R/CD-RW other than those recorded in music CD
format or MP3 format conforming to ISO9660 Level
1/Level 2 or Joliet
CD-R/CD-RW of poor recording quality, CD-R/CD-RW
that has scratches or is dirty, or CD-R/CD-RW
recorded with an incompatible recording device
CD-R/CD-RW which is finalized incorrectly
Notes on discs
Before playing, clean the CD
with a cleaning cloth. Wipe the
CD from the center out. If there
is a scratch, dirt or fingerprints
on the CD, it may cause tracking
error.
Do not use solvents such as benzine, thinner,
commercially available cleaners or anti-static spray
intended for vinyl LPs.
Do not expose the CD to direct sunlight or heat
sources such as hot air ducts, or leave it in a car
parked in direct sunlight as there can be a
considerable rise in temperature inside the car.
Do not stick paper or a sticker on the CD, or scratch
the surface of the CD.
After playing, store the CD in its case.
On safety
As the laser beam used in the CD player section is
harmful to the eyes, do not attempt to disassemble
the casing. Refer servicing to qualified personnel
only.
Should any solid object or liquid fall into the unit,
unplug the unit, and have it checked by qualified
personnel before operating it any further.
Discs with non-standard shapes (e.g., heart, square,
star) cannot be played on this unit. Attempting to do
so may damage the unit. Do not use such discs.
On power sources
For AC operation, use the supplied AC power cord;
do not use any other type.
Unplug the unit from the wall outlet when it is not
be used for an extended period of time.
If the batteries are not to be used, remove them to
avoid damage that can be caused by battery leakage
or corrosion.
On placement
Do not leave the unit in a location near heat sources,
in a place subject to direct sunlight, excessive dust or
mechanical shock, or in a car subject to the direct
rays of the sun.
Do not place the unit on an inclined or unstable
place.
Do not place anything within 10 mm of the side of
the cabinet. The ventilation holes must be
unobstructed for the unit to operate properly and
prolong the life of its components.
Since a strong magnet is used for the speakers, keep
personal credit cards using magnetic coding or
spring-wound watches away from the unit to
prevent possible damage from the magnet.
On operation
If the unit is brought directly from a cold to a warm
location, or is placed in a very damp room, moisture
may condense on the lens inside the CD player
section. Should this occur, the unit will not operate
properly. In this case, remove the CD and wait about
an hour for the moisture to evaporate.
Cleaning the cabinet
Clean the cabinet, panel and controls with a soft
cloth slightly moistened with a mild detergent
solution. Do not use any type of abrasive pad,
scouring powder, or solvent, such as alcohol or
benzine.
If you have any questions or problems concerning your
unit, please consult your nearest Sony dealer.
General
The power does not turn on.
Connect the AC power cord to the wall outlet
securely.
Make sure the batteries are inserted correctly.
Replace all the batteries with new ones if they are
weak.
There is no audio.
Unplug the headphones when listening through
speakers.
Noise is heard.
Someone is using a portable telephone or other
equipment that emits radio waves near the unit.
Move the portable telephone, etc., away from the
unit.
CD/MP3 player
The CD does not play or “noDISC” is displayed
even when a CD is in place.
Place the CD with the label surface up.
Clean the CD.
Take out the CD and leave the CD compartment
open for about an hour to dry moisture
condensation.
The CD-R/CD-RW is blank.
There is a problem with the quality of the CD-R/
CD-RW, recording device or application software.
Replace all the batteries with new ones if they are
weak.
The sound drops out.
Reduce the volume.
Clean the CD, or replace it if the CD is badly
damaged.
Place the unit in a location free from vibration.
Clean the lens with a commercially available blower.
The sound may drop out or noise may be heard
when using a poor quality CD-R/CD-RW or if there is
a problem with the recording device or application
software.
Starting playback takes more time than usual.
The following discs take a longer time to start
playback.
– a disc recorded with a complicated tree structure.
– a disc that has not been finalized (a disc to which
data can be added).
– a disc that has many folders or non-MP3 files.
Radio
Reception is poor.
Reorient the
antenna to
improve FM
reception.
Reorient the unit
itself to improve
AM reception.
The audio is weak or is poor quality.
Replace all the batteries with new ones if they are
weak.
Move the unit away from the TV.
If you are using the remote while listening to AM
radio, noise may be heard.
The TV picture becomes unstable.
If you are listening to an FM program near the TV
with an indoor antenna, move the unit away from
the TV.
USB device
The USB device does not function properly.
If any of the following problems occur, use a different
USB device.
– The USB device is not recognized.
– File or folder names are not displayed on this unit.
– Playback is not possible.
– The sound skips.
– There is noise.
– The sound output is distorted.
“OVER CURRENT” appears.
An abnormal level has been detected in the
electrical current from the
(USB) port
. Turn off
the unit and remove the USB device from the
(USB) port
. Make sure there is no problem with
the USB device. If this message persists, contact your
nearest Sony dealer.
There is no sound.
The USB device is not connected correctly. Turn off
the unit and reconnect the USB device. Then turn on
the unit.
There is noise, skipping, or distorted sound.
Turn off the unit and reconnect the USB device. Then
turn on the unit again.
The music data itself contains noise, or the sound is
distorted. Noise may have entered during the
recording process. Delete the file and try recording it
again.
Troubleshooting
The USB device cannot be connected to the
(USB) port
.
The connector on the USB device or USB cable was
not correctly oriented when the connection was
attempted. Orient the connector on the USB device
or USB cable correctly.
“READING” is displayed for an extended time,
or it takes a long time before playback starts.
The reading process can take a long time in the
following cases:
– There are many folders or files on the USB device.
– The file structure is complex.
– The memory is almost full.
– The internal memory is fragmented.
To avoid the above problems, we recommend that
you adhere to the following guidelines:
– Keep the total number of folders on a USB device to
100 or less.
– Keep the total number of files per folder to 100 or
less.
Erroneous display
The data stored on the USB device may be corrupted.
Send the music data to the USB device again.
This unit can display only numbers and letters of the
alphabet. Other characters will not be displayed
correctly.
The USB device is not recognized.
Turn off the unit and reconnect the USB device, then
turn on the unit.
The USB device is not functioning properly. Refer to
the USB device operation manual for details on how
to deal with this problem. If the problem persists,
contact your nearest Sony dealer.
Play does not start.
Turn off the unit and reconnect the USB device.
Play does not start from the first file.
Set the play mode to Normal Play.
MP3 files cannot be played back.
The MP3 files do not have the “.mp3” extension.
The data was not stored in the MP3 format.
The USB storage device uses a file system other than
FAT16 or FAT32.*
Playback is possible up to 9 directory levels.
The number of folders exceeds 128.
The number of files exceeds 999.
A maximum of 128 files can be contained in a single
folder.
The files are encrypted or protected by passwords.
* This unit supports FAT16 and FAT32, but some USB storage
media may not support both file systems.
For details, refer to the operation manual of the USB
storage device in question or contact the manufacturer.
After trying the remedies, if you still have problems,
unplug the AC power cord or remove all the batteries.
After all the indications in the display disappear, plug
the AC power cord back in, or insert the batteries
again. If the problem persists, please consult your
nearest Sony dealer.
Precautions
-
 1
1
-
 2
2

