4-174-567-91(1)
Operating Instructions
US
CFD-S05
使用說明書
CT
©2010 Sony Corporation Printed in China
CD Radio Cassette-Corder
WARNING
To reduce the risk of fire or electric shock, do
not expose this apparatus to rain or moisture.
To reduce the risk of fire, do not cover the ventilation of
the apparatus with newspapers, tablecloths, curtains,
etc. And do not place lighted candles on the apparatus.
To reduce the risk of fire or electric shock, do not expose
this apparatus to dripping or splashing, and do not
place objects filled with liquids, such as vases, on the
apparatus.
As the main plug is used to disconnect the unit from
the mains, connect the unit to an easily accessible
AC outlet. Should you notice an abnormality in the
unit, disconnect the main plug from the AC outlet
immediately.
The unit is not disconnected from the AC power source
(mains) as long as it is connected to the wall outlet,
even if the unit itself has been turned off.
Do not install the appliance in a confined space, such
as a bookcase or built-in cabinet.
Do not expose the batteries (battery pack or batteries
installed) to excessive heat such as sunshine, fire or the
like for a long time.
The nameplate and important information concerning
safety are located on the bottom exterior.
Note on DualDiscs
A DualDisc is a two sided disc product which mates
DVD recorded material on one side with digital audio
material on the other side. However, since the audio
material side does not conform to the Compact
Disc (CD) standard, playback on this product is not
guaranteed.
Music discs encoded with copyright
protection technologies
This product is designed to playback discs that
conform to the Compact Disc (CD) standard. Recently,
various music discs encoded with copyright protection
technologies are marketed by some record companies.
Please be aware that among those discs, there are
some that do not conform to the CD standard and
may not be playable by this product.
Discs that this unit CAN play
Audio CD
CD-R/CD-RW (CD-DA*)
* CD-DA is the abbreviation for Compact Disc Digital Audio. It is a
recording standard used for Audio CDs.
Discs that this unit CANNOT play
CD-R/CD-RW other than those recorded in music CD format
CD-R/CD-RW of poor recording quality, CD-R/CD-RW that
has scratches or are dirty, or CD-R/CD-RW recorded with an
incompatible recording device
CD-R/CD-RW which is finalized incorrectly
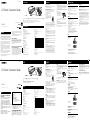
Notes on discs
Before playing, clean the CD with a
cleaning cloth. Wipe the CD from the
center out. If there is a scratch, dirt or
fingerprints on the CD, it may cause
tracking error.
Do not use solvents such as benzine, thinner, commercially
available cleaners or anti-static spray intended for vinyl LPs.
Do not expose the CD to direct sunlight or heat sources such as
hot air ducts, nor leave it in a car parked in direct sunlight as there
can be a considerable rise in temperature inside the car.
Do not stick paper or sticker on the CD, nor scratch the surface of
the CD.
After playing, store the CD in its case.
On safety
As the laser beam used in the CD player section is harmful to the
eyes, do not attempt to disassemble the casing. Refer servicing to
qualified personnel only.
Should any solid object or liquid fall into the unit, unplug the unit,
and have it checked by qualified personnel before operating it
any further.
Discs with non-standard shapes (e.g., heart, square, star) cannot
be played on this unit. Attempting to do so may damage the unit.
Do not use such discs.
On power sources
For AC operation, use the supplied AC power cord; do not use any
other type.
Unplug the unit from the wall outlet when it is not be used for an
extended period of time.
When the batteries are not to be used, remove them to avoid
damage that can be caused by battery leakage or corrosion.
On placement
Do not leave the unit in a location near heat sources, in a place
subject to direct sunlight, excessive dust or mechanical shock or
in a car subject to the direct rays of the sun.
Do not place the unit on an inclined or unstable place.
Do not place anything within 10 mm of the side of the cabinet.
The ventilation holes must be unobstructed for the unit to
operate properly and prolong the life of its components.
Since a strong magnet is used for the speakers, keep personal
credit cards using magnetic coding or spring-wound watches
away from the unit to prevent possible damage from the magnet.
Precautions
On operation
If the unit is brought directly from a cold to a warm location, or is
placed in a very damp room, moisture may condense on the lens
inside the CD player section. Should this occur, the unit will not
operate properly. In this case, remove the CD and wait about an
hour for the moisture to evaporate.
If the unit has not been used for a long time, set it in the playback
mode to warm it up for a few minutes before inserting a cassette.
Notes on cassettes
Break off the cassette tab from
side A or B to prevent accidental
recording. If you want to reuse
the tape for recording, cover the
broken tab with adhesive tape.
Tab for side B
Side A
Tab for side A
The use of a cassette with more than 90 minutes of play time
is not recommended except for long, continuous recording or
playback.
Cleaning the cabinet
Clean the cabinet, panel and controls with a soft cloth slightly
moistened with a mild detergent solution. Do not use any type
of abrasive pad, scouring powder, or solvent, such as alcohol or
benzine.
If you have any questions or problems concerning your unit, please
consult your nearest Sony dealer.
Specifications
CD player section
System
Compact disc digital audio system
Laser diode properties
Emission duration: Continuous
Laser output: Less than 44.6 µW
(This output is the value measured at a distance of
about 200 mm from the objective lens surface on the
optical pick-up block with 7 mm aperture.)
Number of channels
2
Frequency response
20 Hz - 20,000 Hz +1/–2 dB
Wow and flutter
Below measurable limit
Radio section
Frequency range
FM: 87.5 MHz - 108 MHz
AM: 531 kHz - 1,602 kHz
Antennas
FM: Telescopic antenna
AM: Built-in ferrite bar antenna
Cassette-corder section
Recording system
4-track 2 channel stereo
Fast winding time
Approx. 150 s (sec.) with Sony cassette C-60
Frequency response
TYPE I (normal): 80 Hz - 10,000 Hz
General
Speaker
Full range: 8 cm dia., 4 , cone type (2)
Outputs
Headphones jack (stereo minijack):
For 16 - 32 impedance headphones
Input
AUDIO IN jack (stereo minijack)
Power output
1.7 W + 1.7 W (at 4 , 10% harmonic distortion)
Power requirements
For CD radio cassette-corder:
120 V AC, 60 Hz
9 V DC, 6 R14 (size C) batteries
Power consumption
AC 13 W
Battery life
For CD radio cassette-corder:
FM recording
Sony R14P: approx. 4.5 h
Sony alkaline LR14: approx. 19 h
Tape playback
Sony R14P: approx. 2.5 h
Sony alkaline LR14: approx. 13 h
CD playback
Sony R14P: approx. 1 h
Sony alkaline LR14: approx. 8 h
Dimensions
Approx. 365 mm × 134 mm × 230 mm (w/h/d)
(incl. projecting parts)
Mass
Approx. 2.7 kg (incl. batteries)
Supplied accessory
AC power cord (1)
Design and specifications are subject to change without notice.
Optional accessory
Sony MDR headphones series
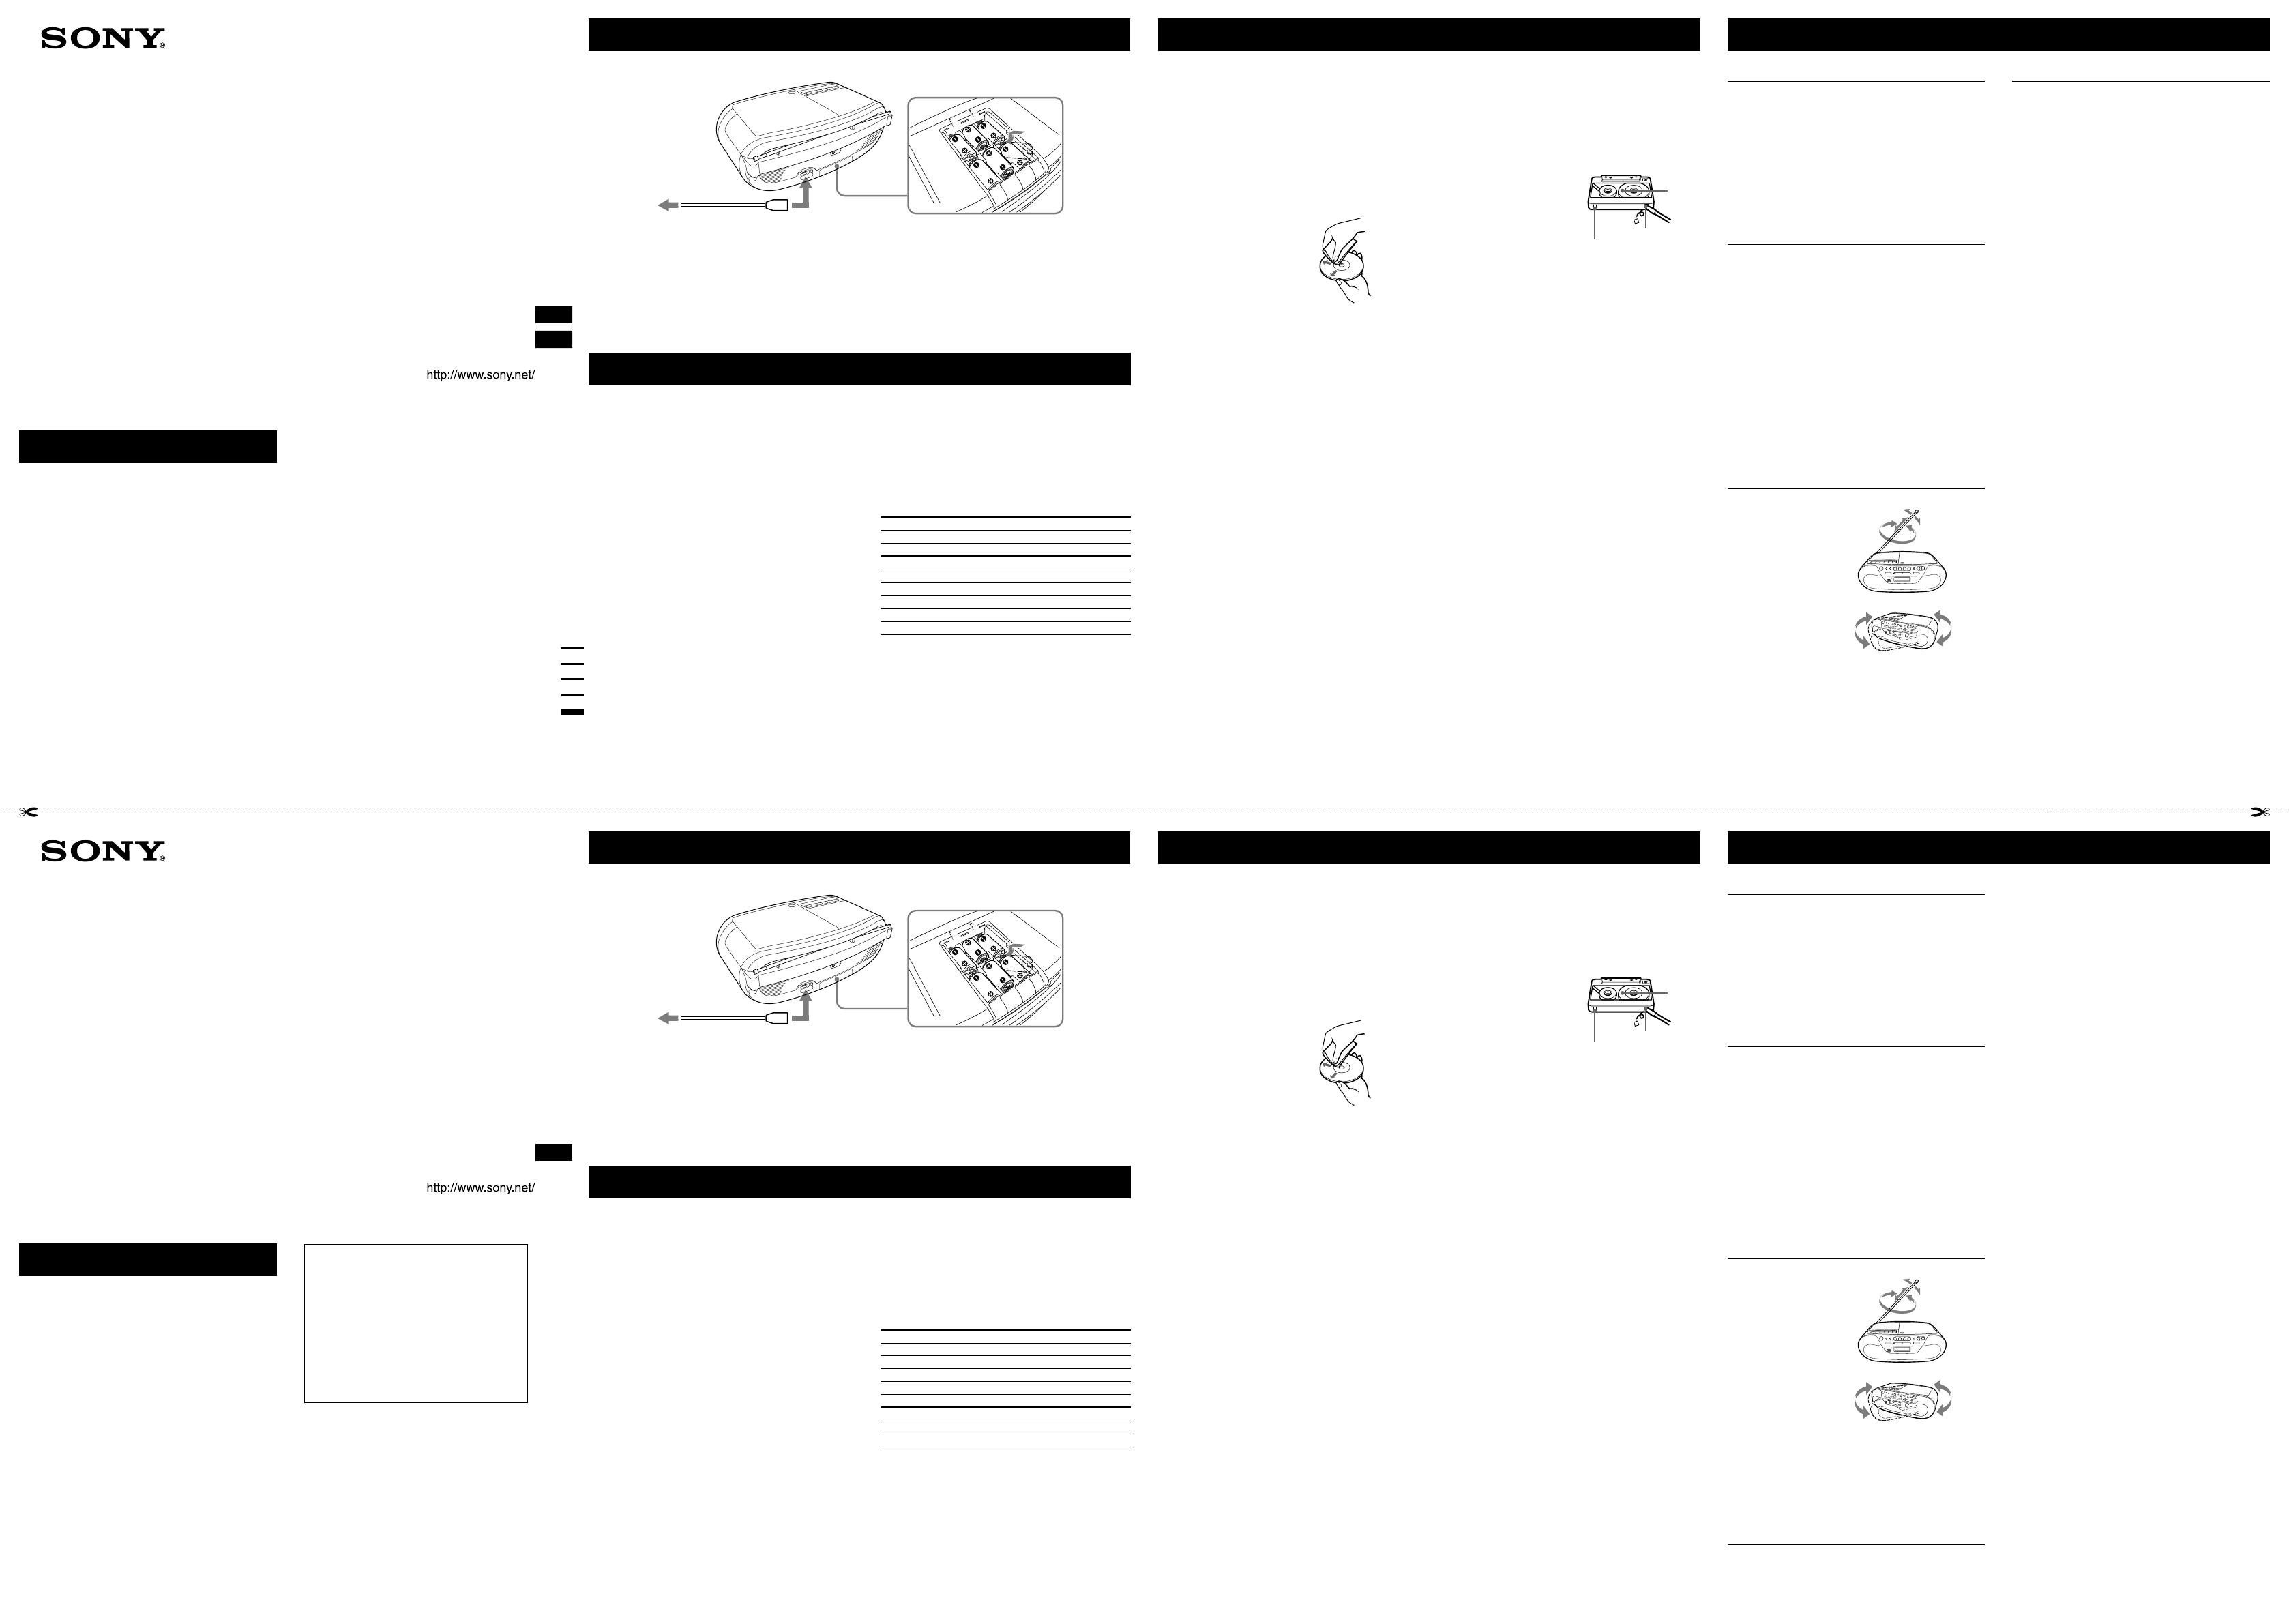
2 to a wall outlet 1 to AC IN
Power sources
Connect the AC power cord or insert six R14 (size C) batteries (not supplied) into the battery compartment .
Notes
Replace the batteries when the OPR/BATT indicator
dims or when the unit stops operating.
Replace all the batteries with new ones. Before you replace the batteries, be sure to take out the CD from the unit.
To use the unit on batteries, disconnect the AC power cord from the unit.
General
The power is not on.
Connect the AC power cord to the wall outlet securely.
Make sure the batteries are inserted correctly.
Replace all the batteries with new ones if they are weak.
There is no audio.
Unplug the headphones when listening through speakers.
Noise is heard.
Someone is using a portable telephone or other equipment that
emits radio waves near the unit.
Move the portable telephone, etc., away from the unit.
CD player
The CD does not play or “Cd - -” is displayed even when a
CD is in place.
Place the CD with the label surface up.
Clean the CD.
Take out the CD and leave the CD compartment open for about
an hour to dry moisture condensation.
The CD-R/CD-RW is blank.
There is a problem with the quality of the CD-R/CD-RW, recording
device or application software.
Replace all the batteries with new ones if they are weak.
The sound drops out.
Reduce the volume.
Clean the CD, or replace it if the CD is badly damaged.
Place the unit in a location free from vibration.
Clean the lens with a commercially available blower.
The sound may drop out or noise may be heard when using
a poor quality CD-R/CD-RW or if there is a problem with the
recording device or application software.
Radio
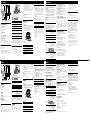
Reception is poor.
Reorient the antenna
to improve FM
reception.
Reorient the unit
itself to improve AM
reception.
The audio is weak or has poor quality.
Replace all the batteries with new ones if they are weak.
Move the unit away from the TV.
The picture of your TV becomes unstable.
If you are listening to an FM program near the TV with an indoor
antenna, move the unit away from the TV.
Troubleshooting
警告
為防火災或觸電危險,切勿讓機器暴露於
雨中或潮濕處。
為防止火災,請勿讓報紙、桌布、窗簾等蓋住裝置
的通風孔。也不可把點燃的蠟燭放在裝置上。
為防火災或觸電危險,不可讓本機被滴濕或濺濕,
並且不可在裝置上擺飾花瓶等裝滿液體的物體。
因為電源插頭用於斷開本機與總電源的連接,所以
請將本機連接至容易插拔的交流電源插座。如果發
現本機發生異常,請立即將電源插頭從交流電源插
座上拔下。
即使已經關閉播放機本身的電源,只要 AC 電源線
仍連接至牆上供電插座,播放機並未中斷 AC 的電
源(總電源)。
別把機器安裝在諸如書櫥等密閉處。
請勿讓電池(安裝的電池組或電池)長時間暴露在
過熱的環境中,例如:陽光、火源等。
銘牌和重要安全資訊位於外殼底部。
產品名稱:⼿提 CD 收錄放⾳機
型 式:CFD-S05
額定電壓:120 V
額定頻率:60 Hz
消耗功率:13 W
機器號碼:如機體上標⽰
產 地:中國大陸
製造廠商:索尼公司
進 口 商:台灣索尼股份有限公司
地 址:104 台北市長春路 145 號 5 樓
電 話:(02) 4499111
有關 DuaIDisc 的注意事項
DualDisc 為雙面光碟產品,一面錄製 DVD 資料,
另一面錄製數位⾳訊資料。然而,由於 DualDisc
的⾳訊資料錄製面不符合 Compact Disc (CD) 標
準,因此不保證能在本產品上播放。
採用版權保證技術編碼的音樂光碟
本產品設計用於播放符合 Compact Disc (CD) 標
準的光碟。近來,許多唱片公司都推出各種採用版
權保護技術編碼的⾳樂光碟。請注意:這些光碟中
可能會不符合 CD 標準,且可能無法使用本產品作
播放。
4-174-567-91(1)
CFD-S05
使用說明書
CT
©2010 Sony Corporation Printed in China
CD Radio Cassette-Corder
本播放機可播放的光碟
⾳訊 CD
CD-R/CD-RW(CD-DA*)
* CD-DA 是 Compact Disc Digital Audio 的縮寫。此爲⾳訊
CD 的錄⾳標準。
本播放機無法播放的光碟
不是以⾳樂 CD 格式錄製的 CD-R/CD-RW
錄⾳品質差的 CD-R/CD-RW、有刮痕或髒污的 CD-R/CD-RW,或以
不相容錄⾳裝置錄製的 CD-R/CD-RW
以不正確方式最終化的 CD-R/CD-RW
光碟須知
播放前,請用清潔布清潔 CD。請從中
央向外擦拭 CD。如果 CD 上有刮痕、
灰塵或指紋,可能會造成讀軌錯誤。
請勿使用例如汽油、稀釋劑、市面販售的清潔劑或用在黑膠唱
盤上的抗靜電噴霧劑等溶劑。
請勿將 CD 直接曝曬在陽光下或暴露在導熱管等熱源下,也不
要將 CD 留在陽光直曬的車內,因爲車內溫度可能會相當高。
請勿在 CD 上貼上紙或貼紙,也不要刮傷 CD 表面。
播放結束後,請將 CD 存放在 CD 盒內。
關於安全
由於 CD 播放機部分所使用的雷射光對眼睛有害,請勿試圖拆
解機殼。請務必交付合格的人員進行維修。
如果本機內掉入任何堅硬物體或液體,請拔除本機插頭,停止
任何進一步的操作並交由合格的人員進行檢查。
本機無法播放不合乎標準形狀的光碟(例如:心型、方塊、星
型)。如果仍試圖播放可能會損壞本機。請勿使用類似的光
碟。
關於電源
用 AC 電源操作時,請使用隨附的 AC 電源線;請勿使用其他
類型的電源線。
長時間不使用本機時,請從牆上的供電插座拔除本機的電源。
不使用電池時,請將電池取出以避免因電池漏液或腐蝕所造成
的損壞。
關於放置
請勿將本機放置在靠近熱源,或可直接照射到太陽、特別多塵
或會受到機械撞擊的地方,或放在陽光直曬的車內。
請勿將本機放在傾斜或不穩定的地方。
請勿將任何東西堆放在距離機側 10 mm 以內的地方。本機的
通風口需保持不阻塞以便能操作正常並延長機器的使用壽命。
因爲揚聲器部分採用有強力的磁鐵,故凡使用有磁碼的個人信
用卡,或發條⼿錶,都請遠離本機以免可能受磁力影響而受
損。
注意事項
關於操作
如果將本機從寒冷的地方直接移至溫暖的地方,或放在極潮濕
的房間裡,則 CD 播放機裡的透鏡上會產生水份冷凝。發生此
種現象時,本機將不能正常操作。此時,請取出 CD 並放置機
器大約一小時,等冷凝的水份蒸發乾。
如果本機長時間放置沒有使用,則請把它設定於播放模式預熱
數分鐘之後才裝進卡帶。
卡帶須知
拆除卡帶 A 面或 B 面的小翼
以防意外錄⾳。您如果要再度
使用該磁帶錄⾳,可以用膠帶
把除去了小翼留下的凹孔蓋
住。
B 面的小翼
A 面
A 面的小翼
除非要做長時間連續的錄⾳或播放,否則最好還是不要採用
90 分鐘以上長度的卡帶。
清潔機殼
請用軟布輕蘸濕溫和的洗滌劑溶液擦拭機殼、面板和控制器。
請勿使用任何類型的砂紙、去污粉,或如酒精或汽油等溶液。
如果您有任何有關本機的疑問或問題,請洽詢附近的 Sony 銷
售店。
規格
CD 播放機部分
系統
光碟數位⾳訊系統
雷射二極管特性
發射期間:連續
雷射輸出:小於 44.6 µW
(此輸出值是在距離具有 7 mm 光圈的光學拾⾳元件上
的物鏡表面大約 200 mm 處測得的。)
聲道數
2
頻率響應
20 Hz - 20000 Hz +1/-2 dB
頻率顫動
可測限度以下
收音機部分
頻率範圍
FM: 87.5 MHz
- 108 MHz
AM: 531 kHz
- 1602 kHz
天線
FM: 套筒式天線
AM: 內裝鐵氧體棒狀天線
卡帶錄音機部分
錄⾳系統
4 軌道 2 聲道立體聲
快繞時間
大約 150 s(秒),使用 Sony C-60 卡帶
頻率響應
TYPE I(標準型):80 Hz - 10000 Hz
共通
揚聲器
全⾳頻範圍:8 cm 直徑,4
,錐形(2)
輸出
耳機插孔(立體聲小型插孔):
用於 16 - 32 阻抗耳機
輸入
AUDIO IN 插孔(立體聲小型插孔)
功率輸出
1.7 W + 1.7 W(4 ,諧波失真 10% 時)
電源要求
CD 收⾳機卡帶錄⾳機:
120 V AC,60 Hz
9 V DC,6 R14(C 型)電池
電力消耗
AC 13 W
電池使用時間
CD 收⾳機卡帶錄⾳機:
FM 錄音
Sony R14P:大約 4.5 小時
Sony 鹼性電池 LR14:大約 19 小時
播放磁帶
Sony R14P:大約 2.5 小時
Sony 鹼性電池 LR14:大約 13 小時
CD 播放
Sony R14P:大約 1 小時
Sony 鹼性電池 LR14:大約 8 小時
尺寸
大約 365 mm × 134 mm × 230 mm(寬/高/深)
(含突出部分)
質量
大約 2.7 kg(含電池)
隨機附件
AC 電源線(1)
設計和規格有所變更時,恕不另行奉告。
選購附件
Sony MDR 耳機系列
2 至牆上供電插座 1 至 AC IN
電源
連接 AC 電源線 或安插六個 R14(C 型)電池(未隨附)到電池室 。
註
當 OPR/BATT 指⽰燈
變暗或本機停止運作時,請更換電池。
將所有電池更換成新的。更換電池前,請確定先將 CD 從本機中取出。
要使用電池操作本機,請拔除本機的 AC 電源線。
共通
打不開電源。
請將 AC 電源線牢固地連接至牆上供電插座。
請確認電池有沒有裝插正確。
如果電池變弱了,請將所有電池更換成新的。
沒有聲音。
用揚聲器聽時,一定要拔下耳機。
可聽到噪聲。
有人在本機附近使用行動電話或其他會發射無線電波的裝置。
請把行動電話等移離本機。
CD 播放機
即使裝著 CD 也不能播放 CD 或在顯示器中顯示“Cd - -”。
必須讓貼標籤面朝上裝入 CD。
清潔 CD。
取出 CD,讓 CD 光碟室開著大約一個小時,等冷凝水份蒸發
乾。
CD-R/CD-RW 爲空白片。
CD-R/CD-RW、錄⾳裝置或應用軟體有問題。
如果電池變弱了,請將所有電池更換成新的。
聲音斷斷續續。
請減小⾳量。
清潔 CD,或如果 CD 損傷嚴重,請更換別的 CD。
請將本機放置在不會震動的地方。
利用市售的吹風機清潔透鏡。
如果使用的 CD-R/CD-RW 品質差,或錄⾳裝置或應用軟體有問
題,聲⾳可能會斷斷續續或有噪聲。
收音機
接收狀況差。
請調整天線方位以改
善 FM 收⾳。
請調整本機方位以改
善 AM 收⾳。
音訊微弱或音質差。
如果電池變弱了,請將所有電池更換成新的。
請把本機移離電視機。
電視機的影像變得不穩定。
您如果是靠近使用室內天線的電視機收聽 FM 廣播節目,請把
本機移離電視機。
磁帶播放機
按了操作按鈕時,磁帶並不動。
請確實關好卡帶室。
按鈕
不起作用或磁帶不播放或不錄音。
請確認卡帶上的安全小翼是否完好。
故障排除
播放、錄音或清除的品質差或失真。
開始重要的錄⾳前或播放舊的磁帶後,請在每使用 10 小時後
用乾或濕的清潔卡帶(另購)清潔磁頭。未能清潔磁頭可能會
導致聲⾳品質降低或本機無法進行錄⾳或播放磁帶。更多詳細
內容,請參考清潔卡帶的說明書。
使用的是 TYPE II(高位)或 TYPE IV(金屬)型磁帶。限使
用 TYPE I(標準型)磁帶。
利用市售的磁頭消磁器給磁頭消磁。
如果電池變弱了,請將所有電池更換成新的。
試過以上改善工作後,如果仍然不能解決問題,請拔下 AC 電源
線並取出所有電池。在顯⽰器中的所有指⽰都消失之後,再重新
插上 AC 電源線或裝上電池。如果問題仍然存在,請洽詢附近的
Sony 銷售店。
Tape player
The tape does not move when you press an operation
button.
Close the cassette compartment securely.
The button
does not function or the tape does not
play or record.
Make sure the safety tab on the cassette is in place.
Poor or distorted playback, recording or erasing quality.
Clean the heads by using dry- or wet-type cleaning cassette
(available separately) after every 10 hours of use, before you start
an important recording, or after playing an old tape. Failure to
clean the tape heads can cause degraded sound quality or an
inability of the unit to record or play tapes. For details, refer to the
instructions of the cleaning cassette.
The TYPE II (high position) or TYPE IV (metal) tape is being used.
Use TYPE I (normal) tape only.
Demagnetize the heads using a commercially available tape head
demagnetizer.
Replace all the batteries with new ones if they are weak.
After trying the remedies, if you still have problems, unplug the AC
power cord or remove all the batteries. After all the indications in
the display disappear, plug the AC power cord or insert the batteries
again. If the problem persists, please consult your nearest Sony
dealer.


 1
1
 2
2

