使⽤显示屏
可以使⽤显示屏查看 CD 的信息。
查看⾳频 CD 的信息
查看 CD 的总曲目数和播放时间
在读取 CD 后,会出现总曲目数和总播放时间,
或按两次
取消续播。
总播放时间
查看 MP3 光盘的信息
查看 CD 上的总文件夹数和总文件数
在读取文件 / 文件夹信息后,会出现总文件夹
数和总文件数,或按两次
取消续播。
总文件数 总文件夹数
重复播放曲目 /MP3 文件
(重复播放)
可以以正常和程序播放模式来重复播放曲目 /
MP3 文件。
1
按 POWER
。
2
按 CD
。
3
当不播放 CD/MP3 光盘时,按如下方式操作。
若要重复
播放
操作
单首曲目
/MP3 文件
1
按 MODE
(在播放过程中按
,然后按 MODE
),直至出
现“ 1”。
2
按
或
选择想要重
复播放的曲目 /MP3 文件。
3
按
。
CD 上的所
有曲目 /
MP3 文件
1
按 MODE
(在播放过程中按
,然后按 MODE
),直至出
现“ ”。
2
按
。
所选文件
夹(仅
MP3 光盘)
1
按 MODE
(在播放过程中按
,然后按 MODE
),直至出
现“ ”和 “ ”。
2
按
/TUNE + 或 -
选择文件
夹。
3
按
。
编⼊的曲
目 /MP3
文件
1
编程曲目 /MP3 文件(请参阅“建
⽴自己的程序”)。
2
按 MODE
(在播放过程中按
,然后按 MODE
),直至出
现“PGM”和“ ”。
3
按
。
注意
当曲目 /MP3 文件正在播放或暂停时,⽆法改
变播放模式。
在播放过程中按 MODE
时,显示屏上会出
现“PUSH STOP”。
取消重复播放
按 MODE
(在播放过程中按
,然后按
MODE
),直至“ ”从显示屏中消失。
其他操作
随机播放曲目 /MP3 文件
(随机播放)
可以随机播放曲目 /MP3 文件。
1
按 POWER
。
2
按 CD
。
3
按 MODE
(在播放过程中按
,然后
按 MODE
),直至显示屏中出现
“SHUF”。
4
按
开始随机播放。
取消随机播放
首先停止播放。然后按 MODE
(在播放过程
中按
,然后按 MODE
),直至“SHUF”
从显示屏中消失。
注意
当曲目 /MP3 文件正在播放或暂停时,⽆法改
变播放模式。
在播放过程中按 MODE
时,显示屏上会出
现“PUSH STOP”。
提示
在随机播放过程中,⽆法按
来选择
前⼀首曲目 /MP3 文件。
在随机播放过程中,续播功能⽆效。
建立自己的程序
(程序播放)
最多可以对 CD 上的 20 首曲目 /MP3 文件编排
播放顺序。
1
按 POWER
。
2
按 CD
。
3
按 MODE
(在播放过程中按
,然后
按 MODE
),直至显示屏中出现“PGM”。
4
按
或
选择曲目。
对于 MP3 文件,首先按 /TUNE + 或 –
,
然后按
或
。
在显示屏中曲目(文件)编号会闪烁。
⾳频 CD
MP3 光盘
5
按 DISPLAY/ENTER
。
“STEP xx”会出现在显示屏中。
⾳频 CD
MP3 光盘
6
若要程序播放其它歌曲,请重复步骤 4 和 5。
7
按
开始程序播放。
取消程序播放
首先停止播放。然后按 MODE
,直至“PGM”
从显示屏中消失。
查看曲目 /MP3 文件的顺序
按 DISPLAY/ENTER
(在播放过程中按
,
然后按 DISPLAY/ENTER
)。
显示屏中显示最后⼀个编排的步骤编号。数秒
后,显示屏中将显示最后⼀个编排的曲目 / 文
件夹编号。
更改当前程序
如果 CD 处于停止状态,按⼀次
,如果
CD 正在播放,则按两次。当前程序将被删除。
然后按照编程操作步骤建⽴新的程序。
提示
如果试图编⼊超过 21 首曲目 /MP3 文件,显
示屏中将会出现“FULL”。
程序将保存到打开 CD 舱为止,因此可以再次
播放同⼀个程序。
在程序播放过程中,续播功能⽆效。
预设广播电台
电台可以储存在本机的内存中。最多可以任何
顺序预设 30 个电台,20 个 FM 电台,10 个
AM 电台。
1
按 POWER
。
2
按 RADIO BAND
选择波段。
3
按住 AUTO PRESET
2 秒钟,直至显示屏
中“AUTO”闪烁。
4
按 DISPLAY/ENTER
。
电台按从低到⾼的频率顺序储存在内存中。
如果无法自动预设某⼀电台
需要手动预设信号较弱的电台。
1
按 POWER
。
2
按 RADIO BAND
选择波段。
3
使⽤ /TUNE + 或 -
调⼊想要的电台。
4
按 MANUAL PRESET
。
所选波段(“FM-xx”或“AM-xx”)会出现在
显示屏中。
5
按 PRESET + 或 -
,直至显示屏中想要电
台的预设号码闪烁。
6
按 DISPLAY/ENTER
。
新的电台将替换原有的电台。
提示
即使拔掉交流电源线或取出了电池,预设电台
也将保留在内存中。
播放预设广播电台
1
按 POWER
。
2
按 RADIO BAND
选择波段。
3
按 PRESET + 或 -
调⼊所储存的电台。
连接选购装置
通过本机的扬声器,可以欣赏到来自便携式数
字⾳乐播放器等选购装置的⾳乐。连接前必须
先关闭每个装置的电源。详细说明,请参阅要
连接装置的使⽤说明书。
1
使⽤⾳频连接线(不附带)将 AUDIO IN 插
孔
连接至便携式数字⾳乐播放器或其他
装置的线路输出插孔。
2
按 POWER
打开本机。
3
打开所连接的装置。
4
按 AUDIO IN
,在所连接的装置上开始播放。
来自所连接装置的声⾳从本机的扬声器输出。
若要将本机连接至电视机或录像机,请使⽤
⼀端是⽴体声迷你插孔、另⼀端是两个⾳频
插头的延长线(不附带)。
⼀般
电源无法打开。
将交流电源线牢固连接至电源插座。
确认电池安装正确。
如果电池电量不⾜,请更换所有电池。
没有声⾳。
⽤扬声器听⾳乐时请拔掉⽿机插头。
听到噪⾳。
有⼈正在本机旁使⽤手提电话或其他会发出电
波的设备。
将手提电话等设备远离本机。
CD/MP3 播放机
即使放⼊了 CD,CD 也不播放或显示“noDISC”。
将 CD 以标签⾯向上放⼊。
清洁 CD。
取出 CD,并将 CD 舱保持打开约 1 ⼩时,使
其内部⼲燥。
CD-R/CD-RW 是空⽩的。
CD-R/CD-RW、录制设备或应⽤软件有质量问题。
如果电池电量不⾜,请更换所有电池。
有掉⾳。
降低⾳量。
清洁 CD,如果 CD 损坏严重,请换⼀张。
将本机放置在没有振动的地方。
⽤市售的吹⽓工具清洁镜头。
使⽤质量低劣的 CD-R/CD-RW、或录制设备、
应⽤软件有问题,则可能发生掉⾳或听到噪⾳。
比平常花费更长时间才能开始播放。
下列光盘需要很长时间才能开始播放。
- 以复杂树形结构录制的光盘。
- 未最终化的光盘(可以添加数据的光盘)。
- 有许多文件夹或非 MP3 文件的光盘。
收⾳机
接收不良。
重新调整天线
方向,提⾼ FM
接收质量。
重新调整本机
自⾝方向,提
⾼ AM 接收质
量。
声⾳微弱或⾳质差。
如果电池电量不⾜,请更换所有电池。
将本机远离电视机。
收听 AM 收⾳机过程中,如果使⽤遥控器,则
可能会听见噪⾳。
电视机图像不稳定。
如果在使⽤室内天线的电视机旁收听 FM 节
目,请将本机远离电视机放置。
尝试解决方法后如果问题仍然存在,请拔掉交
流电源线插头或取出所有电池。显示屏中所有
指示消失后,重新插⼊交流电源线插头或插⼊
电池。如果问题仍然存在,请联络附近的 Sony
经销商。
注意事项 故障检修
Using the display
You can check information about the CD using the
display.
Checking the information of an audio CD
To check the total track number and playing
time of the CD
After reading the CD, the total playing time will appear,
or press
twice to cancel Resume play.
Total playing time
Checking the information of an MP3 disc
To check the total folder/file number and total
file number on the CD
After reading the folder/file information, the total
folder number and the file number will appear, or press
twice to cancel Resume play.
Total file
number
Total folder
number
Playing tracks/MP3 files repeatedly
(Repeat Play)
You can play tracks/MP3 files repeatedly in normal and
program play modes.
1 Press POWER
.
2 Press CD
.
3 Proceed as follows, while CD/MP3 disc is not
playing.
To repeat Do this
A single
track/MP3
file
1 Press MODE
(press
, then
press MODE
during playback) until
“ 1” appears.
2 Press
or
to select the
track/MP3 file that you want to repeat.
3 Press
.
All tracks/
MP3 files
on the CD
1 Press MODE
(press
, then
press MODE
during playback) until
“ ” appears.
2 Press
.
A selected
folder (MP3
disc only)
1 Press MODE
(press
, then
press MODE
during playback) until
“ ” and “ ” appear.
2 Select the folder by pressing
/TUNE
+ or –
.
3 Press
.
Programmed
tracks/MP3
files
1 Program tracks/MP3 files (see
“Creating your own program”).
2 Press MODE
(press
, then
press MODE
during playback) until
“PGM” and “ ” appear.
3 Press
.
Note
You cannot change the play mode while a track/MP3 file is
playing or paused.
When you press MODE
during playback, “PUSH STOP”
appears in the display.
To cancel Repeat Play
Press MODE
(press
, then press MODE
during playback) until “ ” disappears from the
display.
Other Operations
Playing tracks/MP3 files in random
order (Shuffle Play)
You can play tracks/MP3 files in random order.
1 Press POWER
.
2 Press CD
.
3 Press MODE
(press
, then press MODE
during playback) until “SHUF” appears in the
display.
4 Press
to start Shuffle Play.
To cancel Shuffle Play
Stop playing first. Then press MODE
(press
,
then press MODE
during playback) until “SHUF”
disappears from the display.
Note
You cannot change the play mode while a track/MP3 file is
playing or paused.
When you press MODE
during playback, “PUSH STOP”
appears in the display.
Tips
During Shuffle Play, you cannot select the previous track/MP3 file
by pressing
.
The resume function does not work during Shuffle Play.
Creating your own program (Program
Play)
You can arrange the playing order of up to 20 tracks/
MP3 files on a CD.
1 Press POWER
.
2 Press CD
.
3 Press MODE
(press
, then press MODE
during playback) until “PGM” appears in the display.
4 Press
or
to select the track.
For MP3 files, press /TUNE + or –
first and then
press
or
.
Track (File) number flashes in the display.
Audio CD
MP3 disc
5 Press DISPLAY/ENTER
.
“P-xx” appears in the display.
Audio CD
MP3 disc
6 To program another song, repeat steps 4 and 5.
7 Press
to start Program Play.
To cancel Program Play
Stop playback first. Then press MODE
until “PGM”
disappears from the display.
To check the order of tracks/MP3 files
Press DISPLAY/ENTER
(press
, then press
DISPLAY/ENTER
during playback).
The last programmed step number appears in the
display. After a few seconds, the last programmed
track/folder number appears in the display.
To change the current program
Press
once if the CD is stopped and twice if the
CD is playing. The current program will be erased. Then
create a new program following the programming
procedure.
Tips
If you try to program 21 tracks/MP3 files or more, “FULL” will
appear in the display.
You can play the same program again, since the program is saved
until you open the CD compartment.
The resume function does not work during Program Play.
Presetting radio stations
You can store radio stations into the unit’s memory.
You can preset up to 30 radio stations, 20 for FM and
10 for AM in any order.
1 Press POWER
.
2 Press RADIO BAND
to select the band.
3 Hold down AUTO PRESET
for 2 seconds until
“AUTO” flashes in the display.
4 Press DISPLAY/ENTER
.
The stations are stored in memory from the lower
frequencies to the higher ones.
If a station cannot be preset automatically
You need to preset a station with a weak signal
manually.
1 Press POWER
.
2 Press RADIO BAND
to select the band.
3 Tune in a station you want using /TUNE + or –
.
4 Press MANUAL PRESET
.
The band selected (“FM-xx” or “AM-xx”) appears in
the display.
5 Press PRESET + or –
until the preset number you
want for the station flashes in the display.
6 Press DISPLAY/ENTER
.
The new station replaces the old one.
Tip
The preset radio stations remain in memory even if you unplug the
AC power cord or remove the batteries.
Playing preset radio stations
1 Press POWER
.
2 Press RADIO BAND
to select the band.
3 Press PRESET + or –
to tune in the stored station.
Connecting optional components
You can enjoy the sound from an optional component
such as a portable digital music player through the
speakers of this unit. Be sure to turn off the power of
each component before making any connections. For
details, refer to the instruction manual of the
component to be connected.
1 Connect the AUDIO IN jack
to the line output
jack of the portable digital music player or other
components using an audio connecting cable (not
supplied).
2 Press POWER
to turn the unit on.
3 Turn the connected component on.
4 Press AUDIO IN
, and start playback on the
connected component.
The sound from the connected component is
output from the speakers of this unit.
To connect the unit to a TV or VCR, use an extension
cable (not supplied) with a stereo-mini jack on one
end and two phono plugs on the other end.
Discs that this unit CAN play
Audio CD
CD-R/CD-RW (CD-DA*/MP3 files)
* CD-DA is the abbreviation for Compact Disc Digital Audio. It is a
recording standard used for Audio CDs.
Discs that this unit CANNOT play
CD-R/CD-RW other than those recorded in music CD
format or MP3 format conforming to ISO9660 Level
1/Level 2 or Joliet
CD-R/CD-RW of poor recording quality, CD-R/CD-RW
that has scratches or is dirty, or CD-R/CD-RW
recorded with an incompatible recording device
CD-R/CD-RW which is finalized incorrectly
Notes on discs
Before playing, clean the CD
with a cleaning cloth. Wipe the
CD from the center out. If there
is a scratch, dirt or fingerprints
on the CD, it may cause tracking
error.
Do not use solvents such as benzine, thinner,
commercially available cleaners or anti-static spray
intended for vinyl LPs.
Do not expose the CD to direct sunlight or heat
sources such as hot air ducts, or leave it in a car
parked in direct sunlight as there can be a
considerable rise in temperature inside the car.
Do not stick paper or a sticker on the CD, or scratch
the surface of the CD.
After playing, store the CD in its case.
On safety
As the laser beam used in the CD player section is
harmful to the eyes, do not attempt to disassemble
the casing. Refer servicing to qualified personnel
only.
Should any solid object or liquid fall into the unit,
unplug the unit, and have it checked by qualified
personnel before operating it any further.
Discs with non-standard shapes (e.g., heart, square,
star) cannot be played on this unit. Attempting to do
so may damage the unit. Do not use such discs.
On power sources
For AC operation, use the supplied AC power cord;
do not use any other type.
Unplug the unit from the wall outlet when it is not
be used for an extended period of time.
If the batteries are not to be used, remove them to
avoid damage that can be caused by battery leakage
or corrosion.
On placement
Do not leave the unit in a location near heat sources,
in a place subject to direct sunlight, excessive dust or
mechanical shock, or in a car subject to the direct
rays of the sun.
Do not place the unit on an inclined or unstable
place.
Do not place anything within 10 mm of the side of
the cabinet. The ventilation holes must be
unobstructed for the unit to operate properly and
prolong the life of its components.
Since a strong magnet is used for the speakers, keep
personal credit cards using magnetic coding or
spring-wound watches away from the unit to
prevent possible damage from the magnet.
On operation
If the unit is brought directly from a cold to a warm
location, or is placed in a very damp room, moisture
may condense on the lens inside the CD player
section. Should this occur, the unit will not operate
properly. In this case, remove the CD and wait about
an hour for the moisture to evaporate.
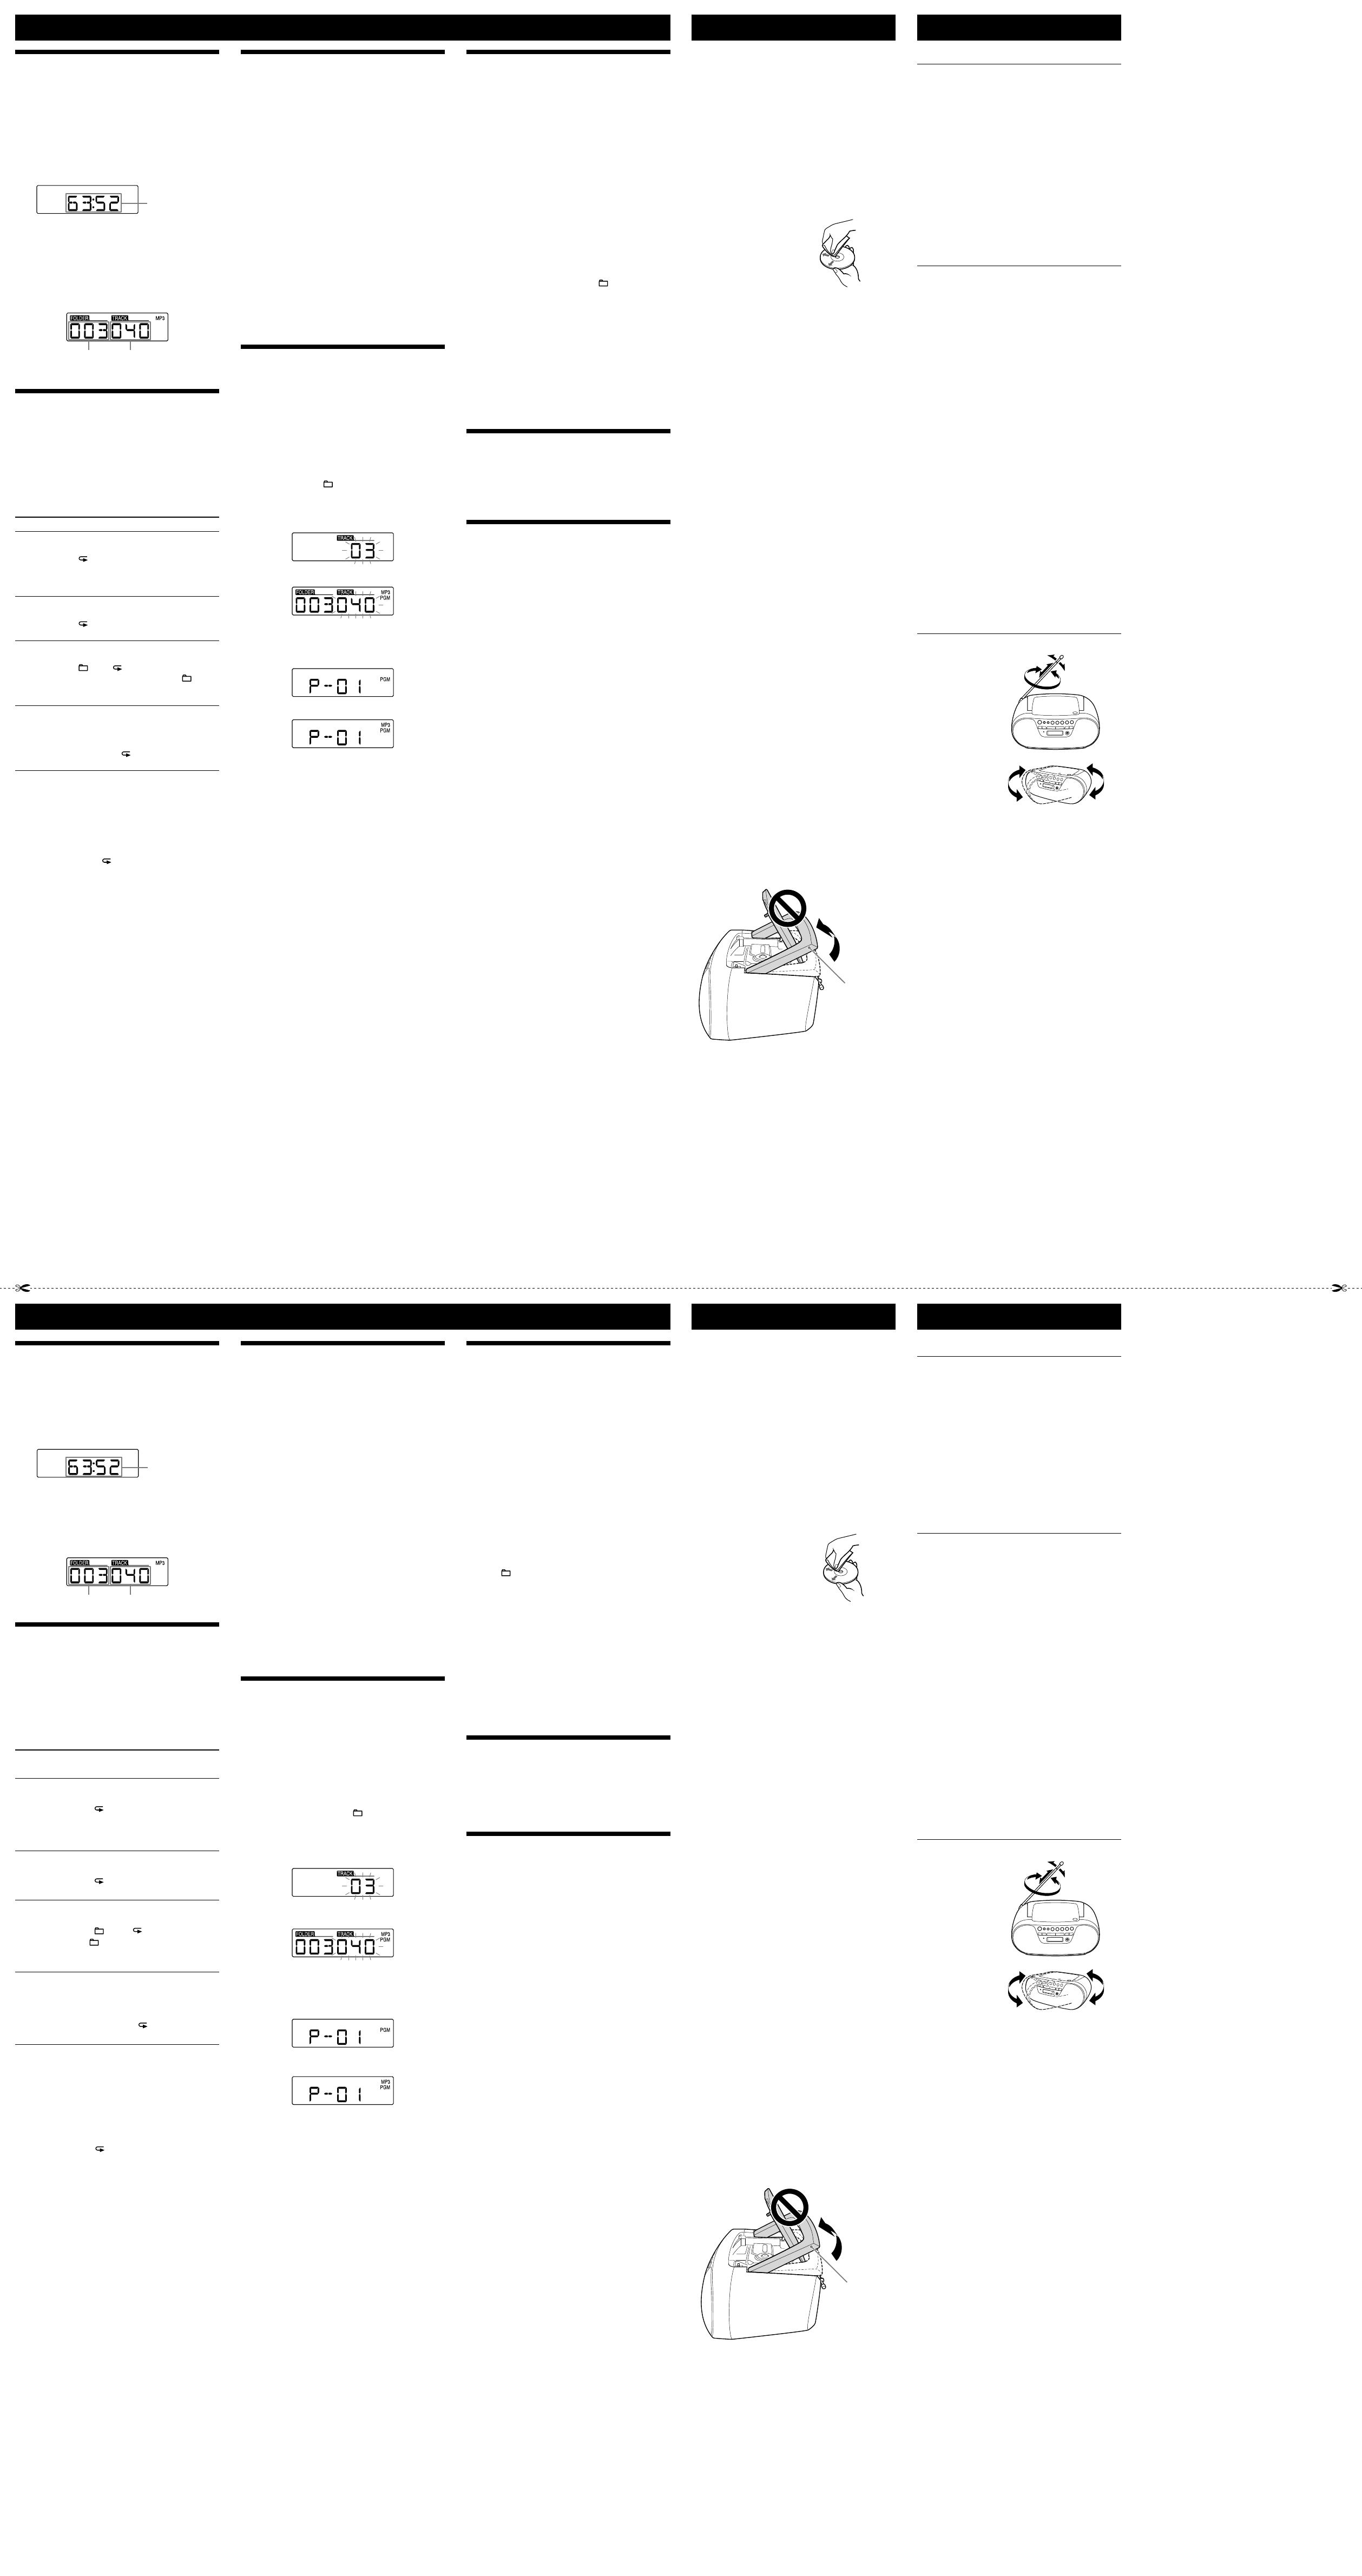
The design of the carrying handle prohibits you from
lifting it forcibly while the CD compartment is open.
Carrying handle
Cleaning the cabinet
Clean the cabinet, panel and controls with a soft
cloth slightly moistened with a mild detergent
solution. Do not use any type of abrasive pad,
scouring powder, or solvent, such as alcohol or
benzine.
If you have any questions or problems concerning your
unit, please consult your nearest Sony dealer.
General
The power does not turn on.
Connect the AC power cord to the wall outlet
securely.
Make sure the batteries are inserted correctly.
Replace all the batteries with new ones if they are
weak.
There is no audio.
Unplug the headphones when listening through
speakers.
Noise is heard.
Someone is using a portable telephone or other
equipment that emits radio waves near the unit.
Move the portable telephone, etc., away from the
unit.
CD/MP3 player
The CD does not play or “noDISC” is displayed
even when a CD is in place.
Place the CD with the label surface up.
Clean the CD.
Take out the CD and leave the CD compartment
open for about an hour to dry moisture
condensation.
The CD-R/CD-RW is blank.
There is a problem with the quality of the CD-R/
CD-RW, recording device or application software.
Replace all the batteries with new ones if they are
weak.
The sound drops out.
Reduce the volume.
Clean the CD, or replace it if the CD is badly
damaged.
Place the unit in a location free from vibration.
Clean the lens with a commercially available blower.
The sound may drop out or noise may be heard
when using a poor quality CD-R/CD-RW or if there is
a problem with the recording device or application
software.
Starting playback takes more time than usual.
The following discs take a longer time to start
playback.
– a disc recorded with a complicated tree structure.
– a disc that has not been finalized (a disc to which
data can be added).
– a disc that has many folders or non-MP3 files.
Radio
Reception is poor.
Reorient the
antenna to
improve FM
reception.
Reorient the unit
itself to improve
AM reception.
The audio is weak or is poor quality.
Replace all the batteries with new ones if they are
weak.
Move the unit away from the TV.
If you are using the remote while listening to AM
radio, noise may be heard.
The TV picture becomes unstable.
If you are listening to an FM program near the TV
with an indoor antenna, move the unit away from
the TV.
After trying the remedies, if you still have problems,
unplug the AC power cord or remove all the batteries.
After all the indications in the display disappear, plug
the AC power cord back in, or insert the batteries
again. If the problem persists, please consult your
nearest Sony dealer.
TroubleshootingPrecautions
本机可以播放的光盘
⾳频 CD
CD-R/CD-RW(CD-DA
*
/MP3 文件)
*
CD-DA 是 Compact Disc Digital Audio 的缩
写。这是适合⾳频 CD 的录制标准。
本机无法播放的光盘
以符合 ISO9660 Level 1/Level 2 或 Joliet
⾳乐 CD 格式或 MP3 格式以外录制的 CD-R/
CD-RW
录制质量很差的 CD-R/CD-RW,有刮痕或弄脏
的 CD-R/CD-RW,⽤不兼容的录制设备录制的
CD-R/CD-RW
未正确最终化的 CD-R/CD-RW
光盘注意事项
播放前,请⽤清洁的布清洁
CD。从 CD 的中⼼向外擦拭。
如果 CD 上有刮痕、弄脏或
手指印,则可能发生读轨错
误。
切勿使⽤汽油、稀释剂、市售的清洁剂或⽤于
树脂密纹唱⽚的防静电喷雾剂等溶剂。
切勿将 CD 暴露在直射阳光或热⽓管道等热源
下,也不要将其遗留在停在直射阳光下的车内,
因为车内温度会很⾼。
切勿将纸张或贴纸粘贴在 CD 上,也不要刮伤
CD 的表⾯。
播放后,请将 CD 存放在盒⼦内。
关于安全
由于 CD 播放机内使⽤的激光束对眼睛有伤
害,因此切勿拆下外壳。只能由专业⼈员进⾏
维修。
⼀旦有任何固体物或液体进⼊本机,请拔掉本
机电源插头,并由专业⼈员检查后方可继续使
⽤。
本机不能播放非标准形状的光盘(例如⼼形、
正方形、星形)。否则可能会损坏本机。切勿
使⽤此类光盘。
关于电源
对于交流电源操作,请使⽤附带的交流电源线;
切勿使⽤任何其他类型的电源线。
本机如果准备长期不使⽤,请从电源插座中拔
掉本机的电源插头。
电池不使⽤时,请取出电池,以免电池漏液或
腐蚀⽽造成损坏。
关于放置
切勿将本机放在热源附近、受阳光直射的地方、
灰尘很大或受到机械振动的地方、或受到太阳
直射的车内。
切勿将本机放置在倾斜或不稳定的地方。
切勿将任何物品放置在外壳侧⾯ 10 mm 范围
内。本机的通风孔必须通畅才能正常操作,并
能延长组件的使⽤寿命。
由于扬声器使⽤了强磁铁,因此请将使⽤磁性
编码的个⼈信⽤卡或弹簧发条手表远离本机放
置,以防止因磁铁⽽损坏。
关于操作
如果将本机从寒冷的地方直接带到温暖的场
所,或将其放置在非常潮湿的室内,则 CD 播
放机部分的内部镜头上可能会造成湿⽓凝结。
⼀旦发生此情况,本机将⽆法正常操作。在此
情况下,请取出 CD 并等待约 1 ⼩时使湿⽓
挥发。
当 CD 舱处于打开状态时,手提把手的设计可
防止强⾏将其抬起。
手提把手
清洁外壳
将软布⽤中性清洁剂稍稍沾湿清洁外壳、⾯板
和控制键。切勿使⽤任何类型的研磨垫、洗涤
粉或酒精、汽油等溶剂。
如果您对本机有任何问题,请与附近的 Sony 经
销商联系。


 1
1
 2
2

