
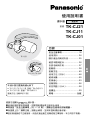
English
TK-CJ21
TK-CJ11/TK-CJ01
Instruction Manual
Water Purier
Household Use
TK-CJ21
TK-CJ11
TK-CJ01
Model No.
Thank you very much for purchasing this Panasonic product.
n Please read through this instruction manual carefully before using the product to ensure
proper operation.
n
Be sure to read the “Safety precautions” (pages 2 and 3) before using the product.
n Check that the purchase date has been entered on the warranty, and keep the warranty
in a safe place together with the instruction manual.
n Bear in mind that Panasonic will not be liable for any product malfunctioning or
accidents which result from the failure to install or operate the product properly.
Replacement cartridges for this water purifier:
●
For TK-CJ21/TK-CJ11 : Model No. TK-CJ21C1
● For TK-CJ01 :
Model No. TK-CJ01C1
How to Replace the Cartridge (P.25)
Contents
Safety precautions ......................... 2
Tips to ensure proper operation ... 4
Product composition ..................... 5
Checking the main unit and
accessories ................................. 6
Names and functions of the parts
... 7
Steps to take before
installing the product ................. 8
Installation procedure ................. 10
Operation (How to run water) ......18
Maintenance ..................................20
Cartridge replacement ..................23
Troubleshooting ............................26
Frequently Asked Questions (Q&A) ...
28
Optional accessories ....................29
Specifications ................................30

2
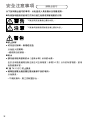
Safety precautions
These must be observed
Please be sure to observe these precautions to prevent injury to people or
damage to property.
■ The following precautions are classified according to the extent of
possible harm or damage resulting from misuse of the product.
WARNING
If not observed, may result in death or serious injury.
CAUTION
If not observed, may result in minor injury or property
damage.
WARNING
nDo not disassemble
● Do not attempt to disassemble, repair or alter this product.
Doing so may result in fire or electric shock.
• Please consult with your dealer about the repair of the product.
nWater used
● This product does not have sterilizing capability and cannot remove harmful
substances other than those indicated (See page 24), so drinking unfit (non-
potable) water may cause health problems.
n[TK-CJ21 only] Prevention of accidental ingestion
● Keep coin type lithium batteries out of the reach of babies and small children.
The battery may be accidentally swallowed.
•If a battery is swallowed, consult a physician immediately.

3
English
CAUTION
nUse / Storage of purified water
● Do not use purified water to raise fish.
The environment may deteriorate, possibly causing the fish to die.
● Dispose the water inside the purifier before use.
● Every day before using the product for the first time, allow about 0.7 liter of water to
pass through it (This will take about 20 seconds).
● If the product has not been used for two or more days, allow about 6 liters of water to
pass through it (This will take about 3 minutes).
If this is not observed, the health condition may deteriorate.
● When storing purified water, store it in clean airtight containers at most for a day
at room temperature and at most for two days in a refrigerator.
If not observed, the water quality may deteriorate and cause health problems since
disinfectants (such as chlorine) have been removed from the water.
nHandling / Prevention of accidental ingestion
● Do not block the purified water outlet.
Doing so may result in water leakage or malfunction.
● Do not connect a hose or other appliance to the purified water outlet.
Doing so may result in malfunctioning of the hot-water supply system.
● Do not connect the product to a hot-water supply system which does not have a
non-return valve (a valve for preventing the backflow of water).
Doing so may result in malfunctioning of the water heater.
● Do not connect the product to a mains stop type of water heater (with a structure
that makes it impossible to shut off the water at the hot water outlet such as an
instantaneous water heater).
● Keep the accessories out of the reach of babies and small children.
The accessory may be accidentally swallowed.
● If an accessory is swallowed, consult a physician immediately.
n[TK-CJ21 only] Use of the battery
● Do not expose the coin type lithium battery to flame or to excessive heat.
The battery may explode and cause an accident.
● Be sure to insert the coin type lithium battery correctly by matching the “+” and “–
” markings.
If the “+” and “– ” are not correctly oriented, the battery may explode or leak and cause
an accident. (See page 16)
● Do not wet the coin type lithium battery or the battery compartment interior.
The battery may explode or leak and cause an accident.

4
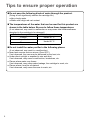
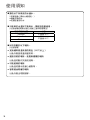
Tips to ensure proper operation
n Do not pass the following kinds of water through the product.
(Doing so will significantly shorten the cartridge life.)
● Very cloudy water
● Water with a high red rust content
n The temperatures of the water that can be used for this product are
shown in the table below. Be sure to follow these temperatures.
(If not observed, may result in malfunction or may cause total trihalomethanes
absorbed in the cartridge to be released.)
Selector lever position Water temperature
Purified Under 35 °C
Unpurified
Under 80 °C
Shower
n Do not install the water purifier in the following places.
(If not observed, may result in a malfunction)
● Near heat sources such as stoves (Over 60°C)
If not observed, the case may be deformed by the heat, etc.
● Under direct sunlight or exposed to rain and wind
If not observed, may cause a malfunction, breakdown, etc.
● Places where water may freeze
If not observed, may cause water leakage, the cartridge to crack, etc.
● Places where it may be oil-stained
If not observed, may cause the case to crack, etc.

5
English
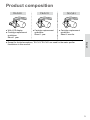
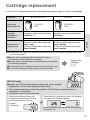
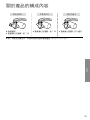
● With LCD display
● Cartridge replacement
guidelines:
About 1 year
● Cartridge replacement
guidelines:
About 1 year
● Cartridge replacement
guidelines:
About 6 months
● Except for limited exceptions, TK-CJ11/TK-CJ01 are used for the water purifier
illustrations in this manual.
TK-CJ21 TK-CJ11
TK-CJ01
Product composition

6
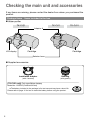
Installation Adaptor
(with 4 screws)
Bushing
(with gasket)
[TK-CJ21 only] Coin type lithium battery
Model No.: CR2032 (Commercial item)
● The battery included in the package is for test use and may have a short life.
Please refer to page 16 for how to insert the battery before using the product.
TK-CJ21 TK-CJ11 TK-CJ01
Selector lever
Adaptor A
Cartridge
LCD display
Cartridge
If any items are missing, please contact the dealer from whom you purchased the
product.
Package items Items included in the box
n Water purifier
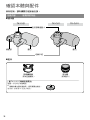
Checking the main unit and accessories
n Supplied accessories

7
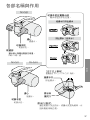
English
[View from below]
The illustrations show examples for TK-CJ11/TK-CJ01.
LCD display
Displays remaining cartridge and
battery levels.
(P16, 18, 23)
Selector lever
For selecting the type of water.
Cartridge
Filters the water.
Selector lever
For selecting the type
of water.
Cartridge
Filters the water.
Purified
water outlet
Purified water is
discharged.
Unpurified
Water Shower
hoses
Unpurified Water Outlet (straight)
The water may look white because air is taken in
discharging water to moderate the water flow.
Selector lever position indicator
Displays the current lever position.
Purified water is discharged from
the purified water outlet.
Unpurified water (tap water) is
discharged.
TK-CJ21
TK-CJ11 TK-CJ01
Names and functions of the parts

8
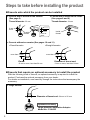
Steps to take before installing the product
n Faucets onto which the product can be installed
● Faucets with a thread on the outside
(See page 6)
Thread diameter:
22 mm
Outside
thread
6 mm or
more
6 mm or
more
●
Faucets with a thread on the inside
(See pages 8 and 9)
Thread diameter:
24 mm
Inside
thread
● Faucets without an aerator (See pages 10 and 11)
<Flared faucets> <Straight faucets>
Flared:
13 mm or more, less than 24 mm
more than 10 mm
Diameter of faucet end:
13 mm or more, less than 24 mm
more than 10 mm
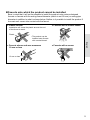
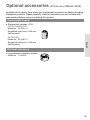
n Faucets that require an optional accessory to install the product
With the following kinds of faucets, an optional accessory is required to install the
product. Purchase the optional accessory from your dealer.
For details on installation, read carefully through the instructions that accompany the
accessory.
● Large faucets
Optional accessory
Large-diameter Installation Adaptor
Model No.: P-06JRC
Diameter of faucet end:
24 mm to 32 mm

9
English
n Faucets onto which the product cannot be installed
Bear in mind that it will not be possible to install the product onto custom designed
faucets or faucets with the wrong thread diameter (which is not 22 mm) or wrong pipe
diameter in addition to what is shown below. Neither is it possible to install the product if
the main unit comes into contact with the faucet.
● Plastic faucets
Installation will cause the plastic area at the end
of the faucet to crack.
Plastic
• The product can be
installed onto faucets
with a metal thread.
● Faucets with a shower nozzle
● Faucets whose end area measures
10 mm or less
10 mm or less
● Faucets with a sensor

10
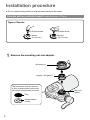
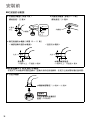
Installation procedure
● Do not connect the product to a faucet used solely for hot water.
Faucets with an outside thread (thread diameter: 22 mm)
Types of faucets
Outside thread Outside thread
Aerator
(Do not use.)
Aerator
(Do not use.)
1
Remove the mounting nut and adaptor.
The parts below must be returned
to their original positions when they
have been unintentionally removed.
Filter
Gasket washer
(metal)
Adaptor (with gasket)
Mounting nut
Main unit
gasket

11
English
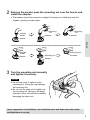
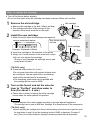
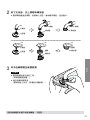
2
Remove the aerator, pass the mounting nut over the faucet, and
install the adaptor.
● The adaptor should be screwed on straight. Screwing it on tilted may strip the
threads, resulting in water leaks.
Mounting
nut
Mounting
nut
Adaptor Adaptor
Aerator
Aerator
Outside
thread
Outside
thread
Mounting nut
Mounting nut
Adaptor
Adaptor
3
Turn the mounting nut manually,
and tighten it securely.
Important
● Do not use a tool to tighten up the
mounting nut. (Doing so may damage
the mounting nut.)
● Do not turn the main unit to tighten up
the mounting nut. (Doing so will apply
a powerful force to the thread, possibly
damaging the main unit.)
Upon completion of installation, check that the main unit does not easily rotate
and that there is no play.

12
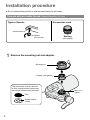
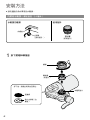
Installation procedure
1
Remove the mounting nut and adaptor.
The parts below must be returned
to their original positions when they
have been unintentionally removed.
Filter
Gasket washer
(metal)
Adaptor (with gasket)
Mounting nut
Main unit
gasket
● Do not connect the product to a faucet used solely for hot water.
Faucets with an inside thread (thread diameter: 24 mm)
Types of faucets Accessories used
Inside thread
Aerator
(Do not use.)
Bushing
(with gasket)

13
English
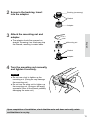
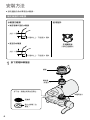
2
Screw in the bushing. Insert
into the adaptor.
Adaptor
Gasket
Bushing (accessory)
3
Attach the mounting nut and
adaptor.
● The adaptor should be screwed on
straight. Screwing it on tilted may strip
the threads, resulting in water leaks.
Adaptor
Gasket
Mounting nut
4
Turn the mounting nut manually,
and tighten it securely.
Important
● Do not use a tool to tighten up the
mounting nut. (Doing so may damage
the mounting nut.)
● Do not turn the main unit to tighten up
the mounting nut. (Doing so will apply
a powerful force to the thread, possibly
damaging the main unit.)
Upon completion of installation, check that the main unit does not easily rotate
and that there is no play.

14
Installation procedure
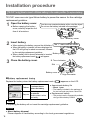
1
Remove the mounting nut and adaptor.
The parts below must be returned
to their original positions when they
have been unintentionally removed.
Filter
Gasket washer
(metal)
Adaptor (with gasket)
Mounting nut
Main unit
gasket
● Do not connect the product to a faucet used solely for hot water.
Faucets without an aerator
Types of faucets Accessories used
● Flared faucets
more than 10 mm
13 mm or more,
less than 24 mm
Installation Adaptor
(with 4 screws)
● Straight faucets
more than 10 mm
13 mm or more,
less than 24 mm

15
English
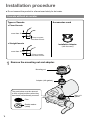
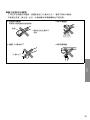
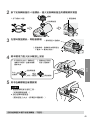
2
Remove the four screws of the installation adaptor, install the
installation adaptor, and tighten it using the mounting nut.
1. Remove the four
screws.
2.
Tighten the installation
adaptor using the
mounting nut.
Installation adaptor
Mounting nut
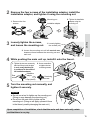
3
Loosely tighten the screws,
and loosen the mounting nut.
1. Loosely tighten
the screws (x4).
2. Loosen the mounting nut until a 3 mm to 4 mm
clearance forms between the mounting nut and
main unit.
4
While pushing the main unit up, install it onto the faucet.
1.
Tighten the two rear screws by
hand until they touch the pipe
in such a way that the pipe
is positioned in the center of
the installation adaptor.
2.
Use a screwdriver
to tighten the two
remaining screws.
Pipe (faucet)
Rear
screws
Installation
adaptor
Remaining
screws
5
Turn the mounting nut manually, and
tighten it securely.
Important
●
Do not use a tool to tighten up the mounting nut.
(Doing so may damage the mounting nut.)
●
Do not turn the main unit to tighten up the
mounting nut. (Doing so will apply a powerful force
to the thread, possibly damaging the main unit.)
Upon completion of installation, check that the main unit does not easily rotate
and that there is no play.

16
Installation procedure
[TK-CJ21 only] How to insert a lithium battery in the water purifier (To replace battery)
TK-CJ21 uses one coin type lithium battery to power the sensor for the cartridge
replacement guideline.
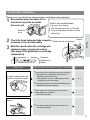
1
Open the battery cover.
● Before opening the battery
cover, carefully wipe the unit
free of all moisture.
Battery cover
Slot
Turn the cover counterclockwise with a coin-like object.
(Do not use the battery included in the package)
2
Insert battery.
● When replacing the battery, remove the old battery.
● When the battery is inserted, all items displayed on
the LCD will light up for about one second, followed
by the cartridge replacement guideline.
●
When a battery that is almost exhausted is inserted,
the battery replacement mark (
) will appear.
Battery
The “+” mark must be visible
3
Close the battery cover.
Battery cover
Slot
2. Turn clockwise
1. Align the marks
n Battery replacement timing
Replace the battery when the battery replacement mark ( ) appears on the LCD.
Flashes
It is almost time to
replace the battery.
●
Approximate battery life
• About 1 year
• The battery included in the package is
for test use and may have a short life.
●
Replacement battery
•
This product uses the commercially available,
coin type lithium battery CR2032.
Stays on
The battery needs to
be replaced.
Please replace it with a
new battery.
Note
●
Replacing the battery will not reset the cartridge replacement guideline.
Important
●
About battery disposal
Please dispose of used battery according to the local government regulations.

17
English
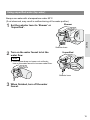
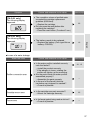
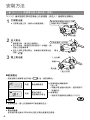
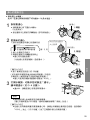
Checks after installation
Please carry out checks to ensure proper installation and operation.
1
Run purified water for about 3 to 4
minutes to expel the air inside
the main unit.
How to run puried water
(See page 18 for details)
1. Set the selector lever to ‘Purified’
2. Turn on the water faucet to let the
water flow
2
Check the items below and take respective
measures in case of abnormality.
Water purifier connection
Faucet
3
Mark the month when the cartridge was
replaced using a permanent marker.
(See page 23 for guidelines on cartridge
replacement)
Example:
Replaced in
March
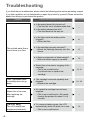
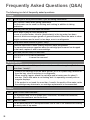
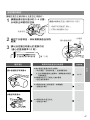
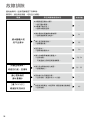
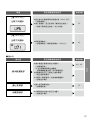
Check items
Inspection points and measures in case of abnormality
Reference page
Is water leaking from the
purifier connection area?
Is the water purifier installed securely onto the faucet?
●
→ Reconfirm the ‘Installation Procedures’ to
install the product securely.
* If the adaptor is loose, rotating the purifier
will tighten up the mounting.
Are the parts inside the water purifier assembled properly?
●
→Assemble the parts properly.
10-15
Is the end of the faucet (such as insulation
●
cap) chipped or cracked?
→Consult a plumber.
─
Is water leaking from the
faucet?
Is the faucet gasket being used an old one?
●
→Consult a plumber.
─
Selector
lever

18
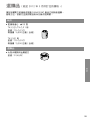
Operation (How to run water)
Using purified water
Always use water with a temperature under 35°C.
(If not observed, may result in cartridge malfunction.)
●
If water above 35°C is accidentally used, allow water to flow to the purified side for about
20 seconds.
1
Set the selector lever to ‘Purified’.
Selector lever
2
Turn on the water faucet to let the
water flow.
3
When finished, turn off the water
faucet.
During use For 10 seconds after
turning off the faucet
10 seconds after turning
off the faucet
(Animation display)
Displays the timing for cartridge
replacement with a remaining
volume that can be purified. (P.23)
To conserve battery power, the
LCD will shut off about 10 seconds
after turning off the faucet.
(Turns back on when water
passes again)
●
When the water flow is 0.6 liter/minute or less, the water is considered to have been
turned off and the remaining volume that can be purified is displayed.
LCD
display

19
English
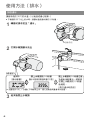
Using unpurified water (tap water)
Always use water with a temperature under 80°C.
(If not observed, may result in malfunctioning of the water purier.)
1
Set the selector lever to ‘Shower’ or
‘Unpurified’.
Shower
Selector lever
2
Turn on the water faucet to let the
water flow.
Note
●
If the shower does not come out uniformly,
turn on the water faucet to increase water ow.
Unpurified
Selector lever
3
When finished, turn off the water
faucet.

20
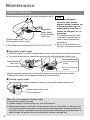
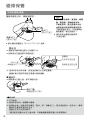
Maintenance
Regular maintenance
Moisten and wring a soft cloth, and clean the product with it.
Unpurified
water outlet
(Unpurified water
outlet cover)
Purified water outlet
(Purified water outlet cover)
●
The illustration is an example for TK-CJ11/TK-CJ01.
Note
● Do not use detergents,
cleansers, paint thinners,
benzine, alcohol, kerosene, etc.
If used by accident, wipe the
product with a damp cloth to
remove the detergent, etc. on
the surface.
(The detergent may get mixed
in the water, cause the resin to
crack or lead to discoloration/
deformation)
● Do not use a metal brush, etc.
(Doing so may cause scratches)
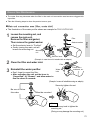
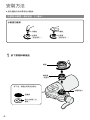
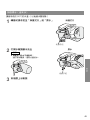
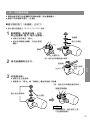
n Unpurified water outlet
●
Clean the stains(*) on the unpurified water outlet using a brush such as a toothbrush.
● The inside areas can be cleaned by removing the unpurified water outlet cover.
2
Unpurified water
outlet cover
(Turn to remove)
To mount the cover
1. Align the mounting
marks
2. Turn it to the fixed
position
*Washings splash remaining on the product may cause stains and mold growth.
Cleaning after each use or regular cleaning is recommended.
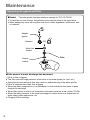
n Purified water outlet
●
The inside areas can be cleaned by removing the purified water outlet cover.
Purified water outlet cover
(Turn to remove)
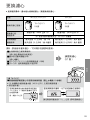
n In case of a suspension of water supply
● The product cannot be used.
● If water supply is cut off during use, turn off the faucet.
● When water supply is resumed, set the selector lever to ‘Unpurified’ or ‘Shower’ and
run unpurified water (tap water) to expel the air and turbid water inside the main unit.
Once this is done, the product can be used normally. (Allowing air and turbid water to
pass through the purified side will significantly shorten cartridge life)
ページが読み込まれています...
ページが読み込まれています...
ページが読み込まれています...
ページが読み込まれています...
ページが読み込まれています...
ページが読み込まれています...
ページが読み込まれています...
ページが読み込まれています...
ページが読み込まれています...
ページが読み込まれています...
ページが読み込まれています...
ページが読み込まれています...
ページが読み込まれています...
ページが読み込まれています...
ページが読み込まれています...
ページが読み込まれています...
ページが読み込まれています...
ページが読み込まれています...
ページが読み込まれています...
ページが読み込まれています...
ページが読み込まれています...
ページが読み込まれています...
ページが読み込まれています...
ページが読み込まれています...
ページが読み込まれています...
ページが読み込まれています...
ページが読み込まれています...
ページが読み込まれています...
ページが読み込まれています...
ページが読み込まれています...
ページが読み込まれています...
ページが読み込まれています...
ページが読み込まれています...
ページが読み込まれています...
ページが読み込まれています...
ページが読み込まれています...
ページが読み込まれています...
ページが読み込まれています...
ページが読み込まれています...
ページが読み込まれています...
-
 1
1
-
 2
2
-
 3
3
-
 4
4
-
 5
5
-
 6
6
-
 7
7
-
 8
8
-
 9
9
-
 10
10
-
 11
11
-
 12
12
-
 13
13
-
 14
14
-
 15
15
-
 16
16
-
 17
17
-
 18
18
-
 19
19
-
 20
20
-
 21
21
-
 22
22
-
 23
23
-
 24
24
-
 25
25
-
 26
26
-
 27
27
-
 28
28
-
 29
29
-
 30
30
-
 31
31
-
 32
32
-
 33
33
-
 34
34
-
 35
35
-
 36
36
-
 37
37
-
 38
38
-
 39
39
-
 40
40
-
 41
41
-
 42
42
-
 43
43
-
 44
44
-
 45
45
-
 46
46
-
 47
47
-
 48
48
-
 49
49
-
 50
50
-
 51
51
-
 52
52
-
 53
53
-
 54
54
-
 55
55
-
 56
56
-
 57
57
-
 58
58
-
 59
59
-
 60
60


