AM-45
www.amcorgroup.com
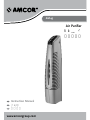
空氣淨化機
Air Purier
SC
TC
GB
Instruction Manual
說明書

GB
Thank You!
Thank you for choosing this innovative Amcor air Purier. We suggest that you
keep this manual in a safe place for future reference. It describes the many benets
and advanced features this unique product has to offer. Before you use your new
air Purier you should carefully read these instructions to maximise this product’s
performance.
For over 50 years Amcor has specialised in complete indoor environmental control,
manufacturing and marketing dehumidiers, portable air conditioners, coolers, air
puriers, ionisers and aroma therapy scent diffusers. These world class products
incorporate the latest technological developments.
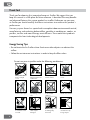
Energy Saving Tips
• Do not locate the Air Purier where furniture or other objects can obstruct the
airow.
• Follow the maintenance instructions in order to keep the lters clean.
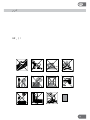
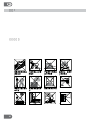
If the power cable
wires are frayed
or cut
When small
children may be left
unattended
On a slope or
uneven surface
Close to a heat
source
This product is not
made for DIY repair
If there is a risk of
liquid falling on the
unit
Inside unit exposed
to the weather
outdoors
In a permanent very
humid environment
If an extension cord
is needed to reach
an outlet
Where the power
cable may be
damaged
Where it may
be damaged by
chemicals
Where there is a risk
of interference by
foreign objects
Do not use your air purier under the following conditioners:

GB
Thank You! A Word About the AM-45
This manual has been prepared to acquaint you with the proper installation,
operation and maintenance of your AM-45 Air Purier. We urge you to read this
publication carefully and to follow the recommendations to help assure the most
enjoyable and trouble free operation of your Amcor unit. When it comes to service,
remember that Amcor knows its product best. Please do not attempt to open,
repair and/or clean any of the internal parts of the AM-45 Air Purier yourself. This
could result in loss of the warranty. We would like to take this opportunity to thank
you for choosing an Amcor product, and to assure you of our continuing interest
in your comfort, pleasure and health.
Safety
• The AM-45 Air Purier is safe. It is TUV certied product and it has been designed
with special attention to safety. However, as with other electrical appliances, use it
with care.
• Do not clean the AM-45 Air Purier by spraying it or immersing it in water.
• Do not insert any object into the openings of the AM-45 Air Purier.
• Disconnect the product from the electrical outlet before cleaning the unit or any of
its components.
• Do not connect the AM-45 Air Purier to an electric outlet using an extension cord.
If there is no accessible outlet, a licensed electrician should install one.
• WHEN NOT IN USE, STORE OUT OF REACH OF CHILDREN!
• The unit is not intended for use by persons (including children) with reduced
physical, sensory or mental capabilities, or lack of experience and knowledge,
unless they have been given supervision or instruction concerning use of the
appliance by a person responsible for their safety.
Warning
• Any service, other than regular cleaning or lter replacement should be
performed by an authorized service representative. Failure to do so could result
in loss of warranty.
• To reduce the risk of electric shock,if the plug does not t fully in the outlet,
contact qualied personnel to install the proper outlet. Do not alter the plug in
any way.
• If the supply cord becomes damaged, it must be replaced by the manufacturer or
its service agent or similarly qualied person in order to avoid a hazard.

GB
4
Features and Benets
• High performance air purier/ioniser for large areas and extended use.
• Electronic Control
• Three Speeds
• A timer that allows the user to operate the unit continuously, or at 1, 2, 4 or 8 hour
increments
• Quiet Operation
• Mesh pre-lter
• Electrostatic lter captures even the smallest airborne particles
• Granulated Active Carbon Filter
• PCO (Photo Catalytic Oxidation) lter working in conjunction with a UVA lamp to
kill bacteria, viruses and reduce odors.
• Negative air ioniser
Placement of the AM-45 Air Purier
Attention: Before deciding on a location for your AM-45 Air Purier, carefully read all
the operating instructions as well as all the following information.
1. Do not place this unit in close proximity to electronic devices that are sensitive to
electrical elds.
2. Do not place this unit on metal shelving or on any electrical device. The AM-45
Air Purier may be placed on the oor, nightstand, table or desk with its air outlet
facing the user in order to allow proper air ow.
. In order to prevent dirt build-up it is recommended to keep the unit at least 1.5
ft.(45cm) from any non-washable surface.
The principle upon which the ioniser works is Ionization. The process of ionizing
accelerates the fallout of pollutants from the air. These pollutants may adhere to
surrounding surfaces, causing a dark smudge. Therefore placement of the unit away
from all non-washable surfaces is a must!
How the Air Purier Works

GB
5
Features and Benets How the Air Purier Works
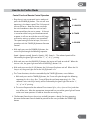
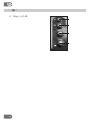
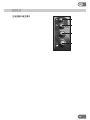
Control Panel and Remote Control Operation
1. Plug the unit into a 220-240V mains outlet and
press the POWER (A) button. The unit will start
operating in the lowest speed. The UV lamp and
Ioniser will be on. Note that these are always
the initial conditions when the unit has been
disconnected from the mains power. If the unit
is turned on while having remained connected
to power, it will turn on with the same UV lamp
and Ioniser settings as when it was turned off.
The speed setting will also be kept, if the unit is
turned on with the TIMER (B) button or Remote
Control.
2. With each press on the POWER (A) button, the
unit will cycle through the following sequence:
Speed 1 (Lowest speed), Speed 2, Speed 3, Off, Speed 1… The selected speed will be
indicated by the green light next to the “1”, “2”, or “3” printing.
3. With each press on the IONISER (C) button, the Ioniser will cycle on and off. When the
Ioniser is on, the green light next to the IONISER (C) button is lit.
4. With each press on the UV (D) button, the UV lamp will cycle on and off. When the UV
lamp is on, the green light next to the UV (D) button is lit.
5. The Timer functions, which are controlled by the TIMER (B) button, are as follows:
a. With each press on the TIMER (B) button, the Timer will cycle through the following
sequence:1hr, 2hrs, 4hrs, 8hrs, Timer off (but the unit keeps operating), 1hr…The
selected Timer interval (in hours) will be indicated by the green light next to the “1”,
“2”, “4” or “8” printing.
b. The unit will operate for the selected Time interval (1 hr, 2 hrs, 4 hrs or 8 hrs) and then
turn off the unit. After the appropriate time period has passed the green light will move
to the next lower position in order to show the remaining time.
6. The Remote Control turns the unit on and off (see point 1 above). For long operating
distance the Remote Control should be pointed at the area just below the POWER (A)
button.
D: UV
C: IONISER
B: TIMER
A: POWER

GB
Cleaning and Maintenance
Always disconnect the unit from the electrical outlet prior to cleaning or servicing
the unit!
Note that the servicing intervals mentioned in this section are based on air purier use of 12
hours per day in a normal household environment. If your use of the air purier differs from
that described above, then you can adjust the servicing intervals accordingly.
1. Clean the outside of the AM-45 and the area around the air purier with a soft damp cloth
once every 2 weeks. If you are not using the Ionizer, then this interval can be increased to
once a month.
2. Access to the AM-45 lters and serviceable components is by removing the rear cover. To
remove the rear cover, push the button above the rear cover while pulling back on the rear
cover. The rear cover will pivot away from the main unit and then it can be lifted up and
away.
The rear cover is reinstalled by tting the projection at the bottom of the rear cover into the
slot at the back of the main unit and then closing the top of the rear cover until it snaps
into place.
3. The Pre-Filter is removed from the rear cover, by sliding it out the upper edge of the rear
cover. The Pre-Filter is reinstalled by sliding it back in the slot from where it was removed.
The Pre-Filter should be washed in warm soapy water or with a water spray once a month.
Make sure that the Pre-Filter is completely dry before reinstalling it.
4. Inside the rear cover facing the front of the unit are 6 ionizing needles that work together
with the Aluminum Mesh Filter to make the Electrostatic Filter. The needles are inside
protective cylinders and the needles should be cleaned with a brush once a month.
5. The Aluminum Mesh Filter is visible looking at the open back side of the main unit. The
Aluminum Mesh Filter frame holds both the Aluminum Mesh Filter and the Granulated
Active Carbon Filter. Remove the Aluminum Mesh Filter frame by lifting the tab above the
lter and then by pulling backwards towards the user on the upper part of the lter. The
Granulated Active Carbon Filter is removed from the Aluminum Mesh Filter frame, by
sliding it out the upper edge of the Aluminum Mesh Filter frame. Note that this needs to
be done before washing the Aluminum Mesh Filter. The Granulated Active Carbon Filter is
reinstalled by sliding it back in the slot from where it was removed. The Aluminum Mesh
Filter frame is reinstalled by tting the bottom of the lter frame into its place at the back of
the main unit and then closing the top of the lter frame until it snaps into place.
a. The Aluminum Mesh Filter should be washed in warm soapy water once a month.
Make sure that the Aluminum Mesh Filter is completely dry before sliding the
Granulated Active Carbon Filter into its place in the Aluminum Mesh Filter frame and
reinstalling the lter pair into its place at the back of the main unit.
b. The Granulated Active Carbon Filter should be replaced once a year.
If the Granulated Active Carbon Filter is dusty, it can be cleaned gently with a vacuum
cleaner.

GB
Cleaning and Maintenance
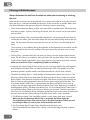
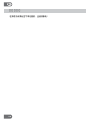
g. 1 g.
c. While the Aluminum Mesh Filter frame is out of the unit, the interior of the unit should
be wiped with a soft dry cloth.
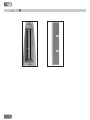
6. The UV lamp (g. 1) is visible looking at the open back side of the main unit after the
Aluminum Mesh Filter has been removed. The UV lamp is removed by rotating it 1/4 turn
and then sliding it out of the top and bottom lamp sockets.
The UV lamp is reinstalled by sliding it into the top and bottom lamp sockets and rotating
it 1/4 turn. The UV lamp should be replaced once a year.
7. The PCO lter (g. 2) is accessible, when the Aluminum Mesh Filter and UV lamp are out
of the unit. The PCO lter is removed by lifting the tab above the lter and then by pulling
backwards towards the user on the fabric strip at the upper part of the lter. The PCO lter
is reinstalled by tting the bottom of the lter into its place at the back of the main unit and
then closing the top of the lter until it snaps into place.
The PCO lter should be washed in warm soapy water when replacing the UV lamp.
Make sure that the PCO lter is completely dry before reinstalling it.
8. The Carbon Cord which is the negative ion emitting element is accessible at the front grill
of the unit. The Carbon Cord should be wiped lightly with a soft piece of paper tissue once
every 6 months. The paper tissue should be thrown away after using it.

GB
Specications
Nominal Ionization Output: -5.5KV
Total negative ions: 2.5 x 10
12
= 2.5 trillion negative ions per second.
Safety:
The AM-45 Air Purier is an TUV certicated product.
Ozone:
The ozone level is much lower than permissible by CE safety standards.
• For the most updated specications please refer to the rating label on your machine.
Model Number AM-45
Power consumption w 25
UV-lamp, manufactured by Philips Actinic BL ,15W
Power supply 230V / 50Hz
Fan speeds 3
Timer hr 1, 2, 4 or 8
Recommended room size m
2
50
Weight kg 4.1
Dimensions (W x H x D) mm 195 x 710 x 235

TC
Specications
謝謝!
感謝您購買本創新Amcor空氣淨化機。建議您妥善保存本說明書,以備將來
參考之用。本說明書中說明了這產品的眾多優點及先進特性。在使用本產品之
前,請仔細閱讀這些說明,以便充分發揮產品的優越性能。
在過往的50多年裹,Amcor致力發展專業的、全面的的室内環境控制技術,生
產与銷售抽濕機、移動式冷氣機、冷風機、空气淨化機、离子發生器以及有芳
香療法的香芬機。結合了最先進的技術发展,提供世界級水平的產品。
節能小貼士
•不要把空氣淨化機放置在阻礙氣流的傢俱或其他物體附近。
•為了讓過濾網保持乾淨,請遵守清潔及保養指示。

TC
10
本說明書旨在讓用戶熟悉AM-45空氣淨化機的安裝、操作以及維修。建議用戶
認真閱讀本說明書,並依照指示,以最大程度地減少您操作中的不便,從而盡
情享受Amcor產品所帶來的愉悅。
關於本產品的維修,Amcor對其產品是最瞭解的。請不要擅自嘗試開啟、維修
或清洗AM-45空氣淨化機的任何內部零件。否則會失掉保修服務。
感謝您選擇了Amcor產品,Amcor會繼續關注您的舒適、愉快和健康。
安全手則
警告
•AM-45空氣淨化機是安全的。因為該產品獲TUV認證,並具有特別的安全設
計。然而,在和其他電器一樣,必須小心使用。
•不要以灑水或浸入水中的方式清洗AM-45空氣淨化機。
•不要把物件插入AM-45空氣淨化機的開口中。
•在清潔機體或零件之前,應首先切斷電源。
•不可以用延長線把AM-45空氣淨化機連接到插座中。如果沒有適合的插座,
應由專業電工幫助安裝。
•不使用時,把產品放置在小孩觸摸不到的地方。
•這產品不適合小孩、有傷殘以致反應或智力有缺憾的人操作,除非有負責他
們安全的人在場,及給予正確使用指導。
•除了定期的清理或更換過濾網之外,其他維修工作應由被授權的服務代理提
供。否則會失去保修服務。
•為了減少觸電的危險,如果插頭插不進插座,可以聯繫專業電工安裝合適
的。不應以任何方式改變插頭。
•如果電源線已經損壞,為了避免產生危險,必須由生產商或其服務代理或相
關專業人員進行更換。
特點和優點有關AM-45

TC
11
• 空氣淨化機/離子發生器性能好、覆蓋面積廣,且可以長時間使用。
• 電子式控制
• 三種速度可供選擇
• 計時器允許連續使用產品,或者選擇每次運作時間為 1、2、 4或8小時。
• 無噪音
• 首層網狀過濾網
• 靜電過濾網可以捕捉最小的大氣懸浮粒子
• 粗粒活性炭過濾網
• PCO (光觸媒)濾網和紫外光燈一起殺菌、殺毒並消除異味。
• 負離子發生器
特點和優點有關AM-45
注意:在安放AM-45空氣淨化機之前,仔細閱讀操作說明及以下內容。
1. 不要把產品安放在對電磁場敏感的電器附近。
2. 不要把產品放在金屬框架或電器上。AM-45空氣淨化機可以放在地板、床頭
櫃、桌子或辦公桌上。為了讓確保空氣流通,出風口應朝向用戶。
3. 為了避免弄髒,建議把產品放在距離不可洗物體至少1.5英尺處(45釐米)。
離子發生器的工作原理為電離。電離過程加速了空氣污染物的沉降速度。這
些污染物可能會粘附在周圍表面,從而形成污跡。因此,不應把產品放置在
不可清洗表面的物件附近!
放置AM-45

TC
1
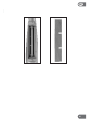
控制面板和遙控操作
1. 將產品連接220-240V電源,按動電源開
關POWER(A)按鍵。機器開始以預設
的低風速運作。紫外光燈和離子發生器亦
將開動。請注意,這只是在產品連接電源
並開機的初始狀態。
如果在持續通電時重新開動產品,紫外
線燈和離子發生器會處於關掉機器時的
設定。
如果以計時器TIMER(B)按鍵或遙控器
開機,則速度亦會保留在上一次的設定。
2. 每次按動電源開關POWER(A)按鍵的時
候,機器則按以下順序循環選擇:
速度1(最低風速)、速度2、速度3、關
閉、速度1…… 選擇的速度會由按鍵旁的“1”、 “2”、或 “3”的綠燈顯
示。
3. 按動離子發生器IONISER(C)按鍵,離子發生器會啟動或關閉。當離子發
生器打開時,離子發生器IONISER(C)按鍵旁邊的綠燈會亮起。
4. 按動紫外線UV(D)按鍵,開啟或關閉紫外線功能。當紫外線燈打開時,靠
近紫外線按鈕的綠燈則會亮起。
5. 計時器的功能由計時器TIMER(B)按鍵進行控制,操作如下:
a) 每次按動按計時器TIMER(B)按鍵,計時器按以下次序循環選擇:1小
時、2小時、4小時、8小時、關閉(產品仍然在運作)、1小時……選定的時
間(小時)由靠近“1”, “2”, “4” 或 “8”附近的綠燈進行提示。
b) 機器會按照設定的時間(1小時、2小時、4小時或8小時)運作,然後自動
關機。在經過一個時段後,綠燈將跳至下一個位置以便顯示所剩時間。
6. 遙控器控制開啟和關閉(見以上第一點)
當使用遙控器時,應對準電源開關POWER(A)按鍵以下的位置操作。
D: 紫外光
按鍵
C: 離子發生
器按鍵
B: 計時器
按鍵
A: 電源開關
按鍵
工作原理

TC
1
工作原理
在清潔及保養此空氣淨化機前,應先將插頭從插座撥出!
本部分所建議的清潔時間,是在一般家庭環境中空氣淨化機每天使用12個小時
為基礎。如果您使用空氣淨化機的時間有所不同,可以相應地調整清潔時間。
1. 每隔兩周用軟濕布清潔空氣淨化機的外縠及周圍環境。如果不使用離子發
生器,清潔的時間可以延長到每個月一次。
2. 移開產品的後蓋,便可接觸到AM-45過濾網和其他應用零件。一邊按著後
蓋上面的按鈕,一邊順著底部支點滑動往後拉後蓋,然後提起及移開。
要重新安裝後蓋,把後蓋底部的凸出部分放進機體背部的凹位中,固定後
再扣上後蓋頂部就完成。
3. 首層網狀過濾網在後蓋上,慢慢滑動即可從後蓋拉出。將過濾網順著狹槽
向前推,便可將過濾網重新裝上。
每月一次用溫皂水清洗或噴洗網狀過濾網。
在重新安裝之前,要保證過濾網已乾燥。
4. 在後蓋內側朝向機體前部有6顆電離針,這些電離針和鋁網過濾網一起構成
了靜電過濾器。電離針在保護細管中,需每月一次定期用刷子清潔。
5. 移走後蓋後,首先可以看到鋁過濾網。網架裝有鋁過濾網和粗粒活性炭過
濾網。拉著過濾網頂部的凸出位,然後朝使用者的方向往後拉,便可取出
網架。從網架的上邊滑出粗粒活性炭過濾網。注意,上述操作應在在清洗
鋁過濾網之前進行。順著由拉出的狹槽滑動,可以將粗粒活性炭濾網重新
裝上。把網架的底部安裝在機體的背部,再扣上網架頂部,即可完成鋁過
濾網的安裝。
a. 每月一次用溫皂水清洗鋁過濾網。
在把粗粒活性炭過濾網裝進鋁過濾網架,及安裝網架到機體之前,確保
過濾網是乾燥的。
b. 粗粒活性炭過濾網每年應更換一次。
如果粗粒活性炭過濾網已滿佈灰塵,請用吸塵器輕輕清潔。
c. 當移走鋁過濾網後,應以柔軟的乾布清潔機體的內部。
清潔及保養

TC
14
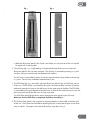
清潔及保養
6. 移去鋁過濾網之後,機體的內部可以看到紫外光燈(見圖1)。把紫外光燈
旋轉1/4圈,然後慢慢地把它從燈座的上下兩端取出來。
相反,可以將紫外光燈慢慢放入燈座的上下兩端,然後將其旋轉1/4圈,重
新安裝。建議一年更換一次紫外光燈。
7. 將鋁過濾網和紫外光燈拆下後,便可觸到PCO(光觸媒)濾網(見圖2)。拉
著PCO過濾網的拉環,然後朝使用者向後拉,就可以拆下過濾網了。要重
新安裝到機體的背部,先把濾網的底部固定好,扣上濾網頂部便可。
在裝上紫外光燈之前,應將PCO過濾網放在溫皂水中進行清洗。在重新安
裝之前,應確保PCO過濾網已乾燥。
8. 在機體前部網格上,可以見到負離子發生器-碳絲纖維。每隔六個月,應該
用一塊軟紙巾輕輕拭擦碳絲纖維,並扔掉使用過後的紙巾。
圖1. 圖2.

TC
15
清潔及保養 規格
額定電離輸出:-5.5KV
陰離子總數:2.5 x 10
12
= 2.5 萬億個負離子/秒
安全性:
AM-45空氣淨化機符合歐洲(TUV)安全標準。
臭氧:
臭氧水平遠低於CE安全標準允許的範圍。
•最新的資料,請參考產品上的電源標簽。
型號
AM-45
功率消耗 瓦
25
電源
230V / 50Hz
紫外光燈,Philips 製造
15 瓦光化BL燈
風扇速度
3
計時器 小時
1, 2, 4 or 8
建議使用房間大小 平方米
50
重量 公斤
4.1
尺寸 (長 x 高 x 深) 釐米
195 x 710 x 235

SC
1
感谢您购买本创新Amcor空气净化器。建议您妥善保存本手册,以备将来参考使
用。本手册中说明了这一独特产品许多优点与先进特性。在使用本空气净化器
之前,请仔细阅读这些说明,以便充分发挥本产品性能。
在以往的50多年,Amcor致力发展专业的、全面的室内环境控制技术,生产及
营销除湿器、便携式空调、冷风器、空气净化器、离子发生器以及有芳香疗法
的芳香器。结合了最先进的技术发展,提供世界级水平的产品。
●
不要把空气净化器放置在阻碍气流的家具或其他物体附近。
●
为了让过滤网保持干净,请遵守清洁及保养指导。

SC
1
本手册旨在让用户熟悉AM-45空气净化器的安装、操作以及维修。建议用户认
真阅读本手册,并跟随说明,减少您操作中的不便,从而尽情享受Amcor产品所
带来的愉悦。
关于本产品的维修,请记住Amcor对其产品是最了解的。请不要擅自尝试开启、
维修和/或清洗AM-45空气净化器的任何内部零件。否则会导致保修无效。
感谢您选择了Amcor产品,Amcor会继续关注您的舒适、愉快和健康。
安全手冊
●
AM-45空气净化器是安全的。因为该产品得到TUV忍证,并具有特别的安
全设计。然而和其他电器一样,必须小心使用。
●
不要通过洒水或水浸的方式清洗AM-45空气净化器。
●
不要把异物插入AM-45空气净化器的开口中。
●
在清洗机体或零部件之前,应首先断开电源。
●
不可以用延长线把AM-45空气净化器连接到插座中。如果没有适合插座, 应
由专业电工帮助安装。
●
不使用时,把产品放置在小孩触摸不到的地方。
●
这产品不适合小孩、有伤残以致反应或智力有缺憾的人操作,除非有负责他
们安全的人在场,及给予正确使用指导。
●
除了定期的清理或更换滤网之外,其他服务项目应由被授权的服务代表提
供。否则Amcor不负责保修。
●
为了减少电击的危险,如果插头插不进插座,可以联系专业电工来安装合适
的插座。不应以任何方式改变插头。
●
如果电源线已经损坏,为了避免产生危险,必须由生产商或其服务代理或相
关专业人员进行更换。
有關AM-45

SC
1
●
空气净化器/离子发生器性能好、覆盖面积广,且可以长时间使用。
●
电子控制
●
三种风速可供选择
●
定时器允许用户连续使用产品,或者将每次工作时间设定为1, 2, 4或8个小
时。
●
无噪音
●
首层网状滤器
●
静电过滤网可以捕捉最小的大气悬浮粒子
●
粗粒活性炭滤网
●
PCO (光触媒)滤网和紫外光灯一起杀菌、杀毒并消除异味。
●
负离子发生器
注意:在对AM-45空气净化器进行安放之前,仔细阅读操作说明及以下内容。
1. 不要把产品安放在电磁场敏感的电器附近。
2. 不要把产品放在金属框架或电器上。AM-45空气净化器可以放在地板、
床头柜、桌子或办公桌上。为了让确保空气流通,出风口应朝向用户。
3. 为了避免弄脏,建议把产品放在距离不可洗物体至少1.5英尺处。(45厘
米)
离子发生器的工作原理为电离。电离过程加速了空气污染物的沉降速度。这些
污染物可能会粘附在周围表面,从而形成污渍。因此,必须把产品放置远离不
可洗物体表面处!

SC
1
控制面板和遥控操作
1. 将产品接通220-240V电源,按动电源开
关POWER(A)按钮。机器开始低风速
运转。紫外光灯和离子发生器也同时打
开。注意:这是当机器从电源断开後重新
打开时的初始状态。
如果在持续通电时打开机器,紫外线灯和
离子发生器会处关掉机器时的设定。
如果以定时器TIMER(B)按钮或遥控打
开机器,则速度也保留在关机时的设定。
2. 每次按动电源POWER(A)按钮的,机
器则按以下顺序循环选择:速度1 (最
低风速)、速度2、速度3、关闭、速度
1…… 选定的速度由数字“1”、 “2”、
或 “3”旁边的绿灯提示。
3. 按动离子发生器IONISER(C)按钮的时候,离子发生器则以开启或关闭。
当离子发生器打开时,靠近离子发生器IONISER(C)按钮的绿灯则会亮
起。
4. 按动紫外线UV(D)按钮的时候,紫外线灯则以开启或关闭的状态循环运
转。当紫外线灯打开时,靠近紫外线按钮的绿灯则会亮起。
5. 定时器的功能由定时器TIMER(B)按钮进行控制,具体如下:
a) 每次按动按定时器TIMER(B)按钮的时候,依以下循环选择:1小时、
2小时、4小时、8小时、关闭(产品继续运作)、1小时……选定的时间(
小时)由靠近“1”, “2”, “4” 或 “8”数字附近的绿灯进行提示。
b) 机器会按照设定的时间间隔(1小时、2小时、4小时或8小时)运行,然后
自动关掉机器。在经过适当的时段后,绿灯将跳至下一个位置以便显示所
剩时间。
6. 遥控控制机器的开启和关闭(见以上第一点)
当选择遥控器操作时,应指向在电源开关POWER(A)按钮下面的位置。
D: 紫外光
按钮
C: 离子发生
器按钮
B: 定时器
按钮
A: 电源开关
按钮

SC
0
在清理与保养此空气净化器前,应使其断电!
注意:本部分所述维修间隔,是在正常家庭环境中空气净化器每天使用12个小
时为基准。如果您使用空气净化器的时间不同于上述,可以相应地调整清理间
隔。
1. 每隔两周用软湿布清洗AM-45空气净化器的外壳及周围区域。如果不使用
离子发生器,清洗的间隔可以延长到每个月一次。
2. 移开产品的后盖,便可看到到AM-45过滤网和其他应用部件。一边按著后
盖上面的按钮,一边顺着底部支点滑动往後拉后盖,然後提起或拿开。
要重新安装后盖,把后盖底部的凸出部分装进机体背部的凹位中,固定后
盖底部後,再把顶部扣上就完成。
3.
首层网状过滤器在后盖上,慢慢滑动即可从后盖上拉出。将过滤器顺着夹
槽向前推,即可将其重新装上。
每月一次用肥皂水清洗或冲洗
首层网状过滤器。
在重新安装之前,要保过滤器已乾燥。
4. 在后盖内侧朝向机体前部有6颗电离针,这些电离针和铝网过滤网一起构成
了静电滤器。电离针在保护管中,需每月一次定期用刷子清洁。
5. 移走后盖后,首先可以看到铝过滤网。铝过滤网架装有铝过滤网和粗粒活
性炭过滤网。拉著铝过滤网部的凸出位,然後朝使用者的方向拉,便可移
去铝过滤网架。网架的上滑出粗粒活性炭过滤网。注意,上述操作应在在
清洗铝过滤网之前进行。顺著由拉出的狭槽滑进,可以将粗粒活性炭过滤
网重新安装。把网架的底端安装在机体的背部,固定好,扣上网架顶部,
即可完成铝过滤网的安装。
a. 每月一次用肥皂水清洗铝过滤网。
在把粗粒活性炭过滤网装进铝过滤网架,及安装过滤网至机体之前,确
保过滤网已乾燥的。
b. 粗粒活性炭过滤网每年应更换一次。
如果粗粒活性炭过滤网已肮脏,请用吸尘器轻轻清洁。
c. 当移走铝过滤网后,以柔软的乾布清洁机体的内部。
ページが読み込まれています...
ページが読み込まれています...
ページが読み込まれています...
ページが読み込まれています...
-
 1
1
-
 2
2
-
 3
3
-
 4
4
-
 5
5
-
 6
6
-
 7
7
-
 8
8
-
 9
9
-
 10
10
-
 11
11
-
 12
12
-
 13
13
-
 14
14
-
 15
15
-
 16
16
-
 17
17
-
 18
18
-
 19
19
-
 20
20
-
 21
21
-
 22
22
-
 23
23
-
 24
24