
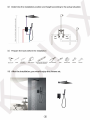
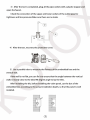
Installation instructions
SHOWER
SYETEM

Importance
Please read the following instructions carefully before installing the shower system.
If you have questions after receiving the goods, please send us an email on Amazon.
To ensure the installation process is safe and fast, it
’s better if you
hi
『
e
an
experien
臼
d
plumber to complete the installation.
CATALOGUE
ABOUTUS
................................................................................ 1
UPC CERT/FICA TION
..
……………………………………………………
7
INSTALLATION PROCESS.
……………………………………………
.. 2
WARRANTY ............................................................................
10
CLEANING
AND
MAINTENANCE.
…………………………………..
11

About us
KOJOX
isa
b
『
and
dedicated to concealed showers established
in
2012.We advocates
the coexistence
of
pragmatism and decorativeism
in
modern
sanita
『
y
ware products,
decorating exquisite life with exquisite products and
C
『
eating
the concept
of
“ideal
bathroom"
in
the
tutu
『
e
to be dedicated to the Lohas people who are striving for the
pe
厅
ection
of
details!
Our factory has many years
of
sales experience in Europe and America, and is
equipped with professional
product
『
esearch
and development
depa
叫
ment,
manufacturing and production system, as well as quality
cont
『ol
and after-sales service
system. The products cover the In-wall Shower, faucet, In-wall Shower in constant
temperature, and sanitary ware, which have been favored and recognized by
consume
『
S
since launched.
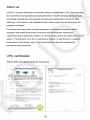
UPC certification
Please check the attached page for hd pictures.
空!⑩
[Il
>
N
1
t
T
U
nu
pr
N
o
”
T
R
C
E
E
FL
D M
nr
A
Nj
IAPMO
RESEARCH
AND
TESTING, INC.
~'""………,,,刷………钊一呵
问叫臼
盯
I
F
I
CATE
OF
LISTING
c
、'-.../
® :::..-::-..::.::::.:.::
..
-叫嗣曰“阳”…·-叩胸脯
.阳
”…四-·-四帽
-
,,_刷出~,国
GU2TD
,,_
阳,田”阳刚
2
”………..阳.,,~…
“跚跚°'旧”。
2
日
CL020D
tfl17GJ
DK12TDD!.O
臼酬阳
!H U“
To
llainYo£ntupr
iou
“
OM
”。”
2
Tlen'!'UngU
h
叫
Gravley
IA•。...
:“
ntlfi~nlon
t•ch
flt<
坷一…..
,,………
··…
……
...
m1fac«,e
u
Th
lo
町
民
间
血
a
lbeche
E
叫
叫
"
叫
础。
r01:1,u
"°"
融
'"明”“
enti!yth
o
...
nuhcturu
.
Thep,-o<l..et
o
h
•
ll
山~
...
,,。,
..
,
"
"'嘲呵
uiredbyt
,..o
t
o n
“曹d
h
皿
"'啕
血
H
IH,o
ppl1
“.....
. o
...
v
!o
!bl
oa
ft
o
r
…………。“…坷山
u
山…
z
山
eU
~
e or
tHleotion
叫“咱川………
.,
...
,
o,u
阳
,
OU
阳
.。”
.
.
,,“胁”)
,
JLOlGJCHJ401
,叫胁”),
JLOlB,J
J
叫
Jion
。
”四川
loHor>(lloP<
..
,u
,…....町
T»b•ShowuSot
=
..
协阳’””,,.
1
••
,
a
吨巾.
…
uio
tio
o
,………
… … M … od l n
……"'"'""
刷
刷!
actu
...,
川
in
o
tNetion
oo
nd
阳
呵
""田" "
“阶
o l
a
t
eo 也
·
刷刷。
2
阳
’军呻
ct
o
U
o
t"4
。由叫
”
<tl!leoto
...,,,..b
,,-
n
叫“
w
•
四川捕时
"叩
Ind
u
叩叫
M
r
叫“川
阳
”“
g
rant
“
boH
dUpont
he
B
咖山川。。’
li
o ne o
toth
o
applie
协
..
叩“
…
o
oll$0
/
IECl702S
阳山也
o
u
o
in
叫
lianc
o
旨
ith<helollovir,g
o t
山
.-d
(o 》
A$H&AIU,
lt
. l
4011/CSA8)15
. l
aε
否延§.翠~革日否存荔芫庐’宙
飞应:
3
至
4
绍:严乙
飞
z
钱?
4···

Installation process
1,
Beto
『
e
the installation
(
1)
Check the package
In
order to finish the installation smoothly, please check the
pa
叫
s
acco
『
ding
to the
following contents. If there is any
t
『
anspo
『
tation
damage, missing accessories,
or
other
p
『
oblems,
please contact the seller through Amazon within 15 days, we will solve it
in
time. After opening the package, please save all the accessories
in
the package.
⑧⑨
⑤
01
Shower
arm
1
DC
喃喃
Metal washer
4ocs
02
Shower head
1
DC
咽
’
3
Screws
4ocs
03
Hand sh
ower
head
1
DC
"
H
ex
a
口
on
screw
2o
cs
04
Shower h
olde
r 1
pc
"
Plastic small cover
2ocs
OS
Shower hose 1
pc
"
Hexaaon screw
tool
locs
06
Shower valve
kn
。
b
1
pc
’ c
。
lastic
stoooer
2ocs
07
Shower valve handle
1
pc
08
Shower valve panel
1
pc
09
Shower valve
b。
d
y
1
pc
10
Plastic screw sleeve
4pcs
(2)

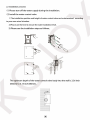
(2) Determine the installation position and height
acco
『
ding
to the actual situation.
c:
伊
c::s~
扩
(3)
p
『
epare
the tools
befo
『
e
the installation
/
S
冈山
l
evel
w
ith
hocl
,。
ntal
and vertocal
lndlcat
。
"
'
~"
Tape measo,e
γ
/
o
扩
(4) After
the
installation, you
would
enjoy
the
shower set.
~
’
(3)

2, Installation process
(1) Please
turn
off
the
water
supply
during
the
installation.
(2) Install
the
water
control
valve
1)
The
installation position
and
height
of
water control valve
can
be
determined according
to your own actual situation.
2)
Please
use
the
level
to
ensure
the valve installation level.
3)
Please see
the
installation
steps
as
follows,
脏
’
、
The
optimum
depth
of
the
water
control
valve
body
into
the
wall is 2.36 inch
(60mm)
to
3.15
inch
(80mm).
(4)

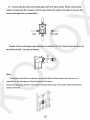
(3) Connecting
the
inlet
and
outlet
pipe
with
the
valve body; Please
notice
that
before
connecting
the
shower
control
valve, flush
the
water
inlet
pipe
to
ensure
the
water
inlet
pipe
has no
impurities;
th
Depth
of
the
outlet
pipe:
pipe
bracket is installed 0.2
inch
(Smm)
from
the
front
of
the
finished wall (as
picture
below)
Note:
Install
pipes
and
other components
as
needed
(Note:
Please
ensure
that there
are
no
impurities in the inlet pipe to block the pipe
all
the time.)
Create
enough
space
for the outlet
of
the
recessed
water pipe, the shower wall
and
the lower
nozzle
connector.
(5)

Tempo
『
a
『
y
nipples can be installed
on
the elbows
of
the shower tube as needed
and fixed with a wrench
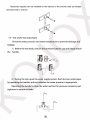
(4) Test work( Very Important)
4
、
杰、
Check the water pressure and water temperature to prevent blockage and
leakage.
1)
Before
the
test work, remove the protective plastic cap and simply install
the handle.
I
店沁
岛电
2)
During the test, open
the
water supply system, flush
the
two
outlet
pipes
by operating the handle, and test whether the water pressure
is
appropriate.
Operating the handle
to
close the water and test for pressure resistance and
tightness
to
ensure no leaks.
(6)

3)
After
the test
is
completed, plug
all
the pipe outlets with a plastic stopper and
open the faucet.
Check
the connection of the upper and lower outlets of the outlet pipe
for
tightness and
line
pressure.Make sure there are
no
leaks.
\
⑨
\
⑨
4)
After
the test, recovery the protective cover.
·~~
5)
Use
a parallel ruler to measure the flatness of the embedded
box
and the
vertical
wall.
If
the
wall
is
not flat,
you
can
fix
it
to ensure that the angle between the vertical
walls
is
mostly close to the ideal
90
degree angle to
lay
the tiles.
After
installing the tile, before installing the valve panel, cut the
box
of the
embedded
box
according to the actual installation depth,
so
that the panel
is
well
installed.
(7)

6) Install the valve panel, knob and handle.
7) Install the panel, handle, knob, and shower arm in sequence.
8)
Install the handheld shower holder.
[J
日
9) Install the shower head and hand shower head.
10) Finished.
(8)

Please
note during the installation process:
before
filling
the
wall
1)
All
inlet
and
outlet
pipes must
be
flushed
to
prevent obstruction
of
pipes
2)
Check
the
pipe connection
to
ensure no leakage
3)
Test
the
pressure
and
tightness of
the
water
pipe
4)
If
it
is
not
the
bathroom
renovation,
the
shower system
is
directly installed
to
the
existing pipe, please
test
whether
the
fitting length
is
suitable for your existing pipe.
If
it does
not
match, please contact us
through
Amazon Seller Service,
we
can
re-customize fitting for you
..
SYMPTOM
1,
No
flow
or
low
flow
(1)
The
water
pressure
in
the
water
supply
system
is
too
low - increase
the
water
supply pressure, or install a
booster
pump
(2) Inlet
pipes,
outlet
pipes,
or
other
pipes
are
blocked,
resulting
in low
water
flow - please flush
the
pipes or contact
the
plumber for disposal (please follow
the
installation steps
above
to
clean
the
pipes
in
advance).
(3)
Shower
head,
hose,
thermostatic
valve
inlet/outlet
blockage,
resulting
in
low
water
flow - regular cleaning
to
prevent impurities from clogging
(4)
The
filter
inlet
is partially
blocked
. - Clean or repaint and flush
the
tubing
before reinstalling.
(5) Correctly
use
the
handle
to
adjust
the
water
temperature,
the
water
is
too
cold
or
too
hot
- check
the
water
pressure
of
the
water
supply system, increase
the
water
flow or pressure
through
the
booster
pump,
if
the
water
heater
fails, you
need
to
contact
the
water
heater
manufacturer
to
solve.
(7)
The
distance
ofthe
water
jet
is
too
short
- you need
to
increase
the
water
pressure (check and adjust
the
water
pressure
in
the
water
supply system, or install a
booster pump), or pick up
the
hand shower.
(9)

(8)
No
hot
or cold
water
reaches
the
shower valve. -
Check
the cold water
and
hot water inlet pipes (if the hot or cold supply fails, the valve will
close).
(9) Incorrect installation, resulting in
improper
inlet
pressure - please refer to
the Installation Requirements section (step
5)
to ensure that the inlet pressure
maintained
is
normal/balanced
and
sufficient.
2,
Water
temperature
change
The
water
temperature suddenly becomes high or
low
during
the
shower. - A
large amount
of
cold water or hot water
is
taken from other places, causing the water
pressure to change.
Do
not
use
other water outlets during the shower or check
if
the
water heater
is
working properly;
3,
Shower
head
dripping
(1) The
dripping
water is normal
if
in short time.-
You
would try to change the
angle
of
the shower head which may solve this problem.
(2)
If
it
is a long period
of
dripping,
that
may be
the
shower control valve has
not
been completely closed. -
Remove
the shower control valve assembly and check
if
the shower valve
is
blocked.
(3) The
flow
control valve seal is damaged. -
Check
the status
of
the flow control
valve
and
replace
as
needed.
Guarantee
Please remember
that:
Whether you encounter any problems
during
use, we
can solve
them
for
you, you don
not
need
to
dismantle
the
device. What you
need
to
do is contact
us.
Any
quality
problem occurs, please contact
us
through
kojox [email protected],
we
can
provide you
with
a
lifetime
warranty service.
(10)

Maintenance Guide
Please
follow
the
cleaning
material
manufacturer'
s
instructions.
In
addition,
pay
attention
to
the
following
points:
1.
Regular cleaning
can
prevent mineral build up on shower head and hand held
shower.
2.
Use
a mild detergent such
as
liquid dishwashing soap and warm water for cleaning.
3.
Do
not
use
abrasive I harsh chemical when cleaning
the
fixture
as
they will damage
and dull the finish.
3.
Carefully read the cleaner product label
to
ensure
the
cleaner
is
safe for
use
on the
material.
4.
Test the cleaner on a small
area
before using on
the
entire surface.
5.
Do
not
leave
the
cleaner on
the
fixture longer than necessary.
6.
When using spray cleaners, spray first onto a soft cloth or sponge. Never spray
directly
onto
the faucet
as
droplets
can
enter openings and gaps and
cause
damage.
7.
After cleaning, rinse thoroughly
with
clean water
to
remove any cleaner residue.
....
4···

Attached page 1
IAPMO
RESEARCH
AND
TESTING,
INC.
5001
East
Phi
l
adelphia
St
reet
,
Ontari
。,
Ca
l
if
,。
rnia
9176
1·
2816
- USA •
909
·
472
-
4100
,
909
472-4244
,
www.iapm
。叫,。咱
程》
&80,\EC
,,
侃
5
”
曲创
e
~
”。
.
咽
V
剧
”
'
J
CERTIFICATE
OF
LISTING
IAPMO
阳
earchandT
es
阳岛
Inc.
is a
product
cenlflcatlon
b
od
y
W
恤
h
te
s
ts
and
In
s
阳
ct
ss
amp
陆时
enfromthe
s
u
阳
liers
s
tockorfrom
阳
market
or
a
c
。
mblnall
。
nofboth
t
。
,oc;r
y
c
。
mpllao"
t
。'"'"'""
m
'""。,'"'"""'""
'"'
,u
,由
ed
s
Th"'"''"'Y
阳
,
o,pl.a
w
l<hp
•
川。
die
s u
rv
eillance
。,'"'
supplier
s
fa
c
toryandwarehouse
s
asw
e
lla
s
theasse
s
sment
。
f
th
e s
upailler
s
Quality
As~urance
Sy
s
tem
.
Thi
s
li
s
ting
恼'"叫'"
t
。
th
e
conditi
。”
s
set
forth
In
thecharacteri
s
tic
s
bel
。w
and
is
n。
t
lobe
c
。
n
s
truedasan
y
rec
。
mmendati
。矶
as
s
urance
。
r
guaran1ee
by
IA
PMO
Re
s
earch
andτe
创
'"'
·
'"'·。
f
the
produc
t
""'"""
by
Aotho<lti,s
H
a,
mg
'"""'"'•"
The
m
。
st
updated
inf
。
rmati
。丑。
a
this
Certificate
。
f
L,sting
is
ava>lable
。
nline
at
pld
iapm
。。
rg
Effective
Date
,
March
2018
-Rev
.
5/17/2018-
v
。
id
Af
ter
,
March
2019
Pr
。
duct
Plumbing
Fixture
Fittings
c
。
np 。
nents
File
N
。
MC
8435
Issued
T
。
Hain
y
。
Enterprises
c
。,
Ltd
N
。
102,
Tien
Tung
Rd
. ,
H
。
mei
Gravity,
IA
50848
Identif
icat
l
。
n
E
ach
f 主
tting
c
。
mp 。
nen
巳
shall
bear
permanent
legible
mar
k
ings
t
。
identify
the
manufacturer
This
marking
shall
be
the
trade
name,
trademark
,。
r 。
ther
mark
kn
。
wn
t
。
identify
the
manufacturer.
The
pr
。
duct
shall
als
。
bear
all
other
markings
required
by
the
standard
The
marking
shall
be
applied
s
。
as
t
。
be
visible
after
ins
℃
allati
。
n.
The
pr
。
duct
。
r
packaging
shall
als
。
bear
the
cUPC®
certificati
。
n
mark
al
。
ng
with
the
term
"
COMPONENT
”
ab
。
ve
Characteristics
Plumbing
fixture
fitting
c
。
mp
。
nents
t
。
be
installed
in
accordance
with
巳he
manufacturer
' s
instruct
i
。
ns
and
the
requirements
。
f
the
latest
editi
。n 。
f
the
Unif
。
rm
Plumbing
c
。
de
Pr
。
ducts
listed
。
n
this
certificate
have
been
tested
by
an
IAPMO
R&T
rec。 gni
z
ed
lab
。
rat
。
ry
.
This
rec
。
gniti
。n
has
been
granted
based
up
。
n
the
lab
。
rat
。
ry
’
s
c
。
mpliance
t
。
the
applicable
requirements
。
f
ISO/IEC
17025
Pr
。
ducts
are
in
c
。
mpliance
with
the
f
。
11
。
wing
standard(s}
ASME
All2
18
1-2012/CSA
8125
1-12
飞岛

Attached page 2
COMPONENT
IAPMO RESEARCH AND TESTING, INC.
CERTIFICATE OF LISTING
快段才
C
巳"'-../
'
- R
ev
.
5/
17
/2018-
v。
id
A
fte
r
Ma
r c h
2019
P
r
。
d
uct,
P
lumbing
Fi
x
ture
Fittings
c。
mp
。 n
e
n
ts
I
ssue
d
T。
Hain
y。
Enterprises
c
。,
L
td
M:'.:lDF.LS
Cer;:;imi c
C;;irt:ri
dσe foγFaucet:
气
25mm :
GL02GJ
,
GH02GJ
,
GL12TD
35mm : FH02BD,
FH02GJ,
FL02BD
,
FL02GJ
,
FH12TD,
FL19GJ
,
FH16GJ
,
FH17GJ
,
FL12TD
40mm · DH02BD,
DH02GJ
,
CL02BD,
DH17GJ,
DH12TD
DL02GJ,
DH16GJ
Cartridσe
Valve
for
Bathtub
Fauret
45mm . MH04TD
nivi=,rt.ρr
fnr
R
司
t".h/Showρr
F;inr:F>t"c; •
33mm :
KL18GJ
35mm :
FL18GJ
Mi
,,
ρr+ni
vργγρr
l.::iγAγt
A
仔
ρ
俨 nr
R.::irh/.<=;hnwργ
,,
,,
户
ργs
.
40mm :
DH19GJ
,
DL19GJ
Pγe•
毛
SUγe
R.=il.=i
n 「
e
V.=ilvi=>
for
R;:it_h/Show
,=,
γF'.=iur:,::,1
「电
40mm :
JH01GJ{HK
40)
,
JL01GJ{HJ
40)
,
JH02BJ{HL-40}
,
JL02BJ
,
JH02BD
,
JH04BD
EH12TD
Single
Handle
Pressure
Balancing
Tub
&
Sh
。
wer
Set
JL04BD
Pressure
balancing
valve
Pag
e
2
。
f
2
F
ile
N
。
M
C
8435
-
 1
1
-
 2
2
-
 3
3
-
 4
4
-
 5
5
-
 6
6
-
 7
7
-
 8
8
-
 9
9
-
 10
10
-
 11
11
-
 12
12
-
 13
13
-
 14
14
-
 15
15


他の言語で
- English: KOJOX KJ1201 Installation guide
その他のドキュメント
-
Samsung WA17M8100GV ユーザーマニュアル
-
Kohler R77364T-CP インストールガイド
-
The Home Depot S6920221103 ユーザーマニュアル
-
Haier ES15V-P1 ユーザーマニュアル
-
Toto TBV03429B インストールガイド
-
Philips AWP1705/90 ユーザーマニュアル
-
-
German pool GPI-M5 Operating Instructions Manual
-
Fortress Technologies FT-18EC15 ユーザーマニュアル
-
Panasonic TK-CJ01 ユーザーマニュアル