
0000049 2019.8

67
A 12.580.5
0
-6
G1/2
150
150±20
TBV03427B
TBV03429B
TBV03431B
A
170

4
2
1
3
1

3
4
2
150
+
í
20
36
0
-6
150
G1/2


2
1
1
2
A
BC
A
B
4
2

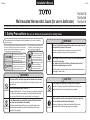
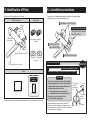
1. Safety Precautions (Be sure to follow all precautions for safety sake.)
Mandatory
Disassembly
Prohibited
WARNING
CAUTION
WARNING
WARNING
CAUTION
Prohibited
High-temperature hot water may run and scald you and property may
be damaged if water leaks.
When ready to clean the filter, surely close the water shutoff
valve or the main valve.
Also, make sure that the left side of the main unit and hot
water side mounting legs are not hot.
Under some conditions of use, water may not come out at the
temperature shown on the scale and may scald you.
Be sure to control the temperature so that water comes out at
the temperature shown on the scale.
Otherwise, the water may scald or injure you and the product may
break and leak water that may wet household articles and cause
damage to your property.
Do not disassemble or remodel the product with other items
than what are described in this manual.
Otherwise, the product may break and leak water that may wet
household articles and cause damage to your property.
Do not subject the product to strong force or impact.
Even if you try to turn on the cold water, the hot water comes out and
may scald you.
Do not connect the cold water pipe and the hot water pipe reversely.
If the water hotter than 85 °C is used, the water may scald you and the
life of the faucet may shorten causing it to break and leak water that
may wet household articles and cause damage to your property.
Do not use the water hotter than 85 °C.
Otherwise, the parts may break and leak water that may wet
household articles and cause damage to your property.
If the product is used in a place where freezing is expected,
wrap insulation material around the pipes.
This indication means that if the
content in the column of this indication
is ignored or handled wrongly, death
or serious injury may occur.
This indication means that if the
content in the column of this indication
is ignored or handled wrongly, injury
or property damage may occur.
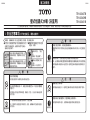
Wall-mounted thermostatic faucet (for use in bathroom)
Install the product according to this Installation Manual so that the product fulfills its function. When the installation is over, fully explain how to use the single handle faucet to the customer.
0000049 2019.8
Installation Manual
TBV03427B
TBV03429B
TBV03431B
Please read these Safety Precautions before installation work in order to install the
product properly.
Indicates things that you
must not do as “Prohibited”.
The left figure indicates that
“Disassembly is Prohibited”.
Indicates things that you must
do without fail as “Mandatory”.
The left figure indicates to
“Execute it without fail”.
Prohibited
Mandatory
Ɣ
This manual employs various indications in order to install
the product properly and to prevent harm to the customer
and other people, as well as damage to their properties.
The indications and meanings are as follows.
Ɣ7KHFRQWHQWV\RXPXVWREVHUYHDUH
classified into the following symbols;
their meanings are explained.

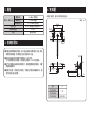
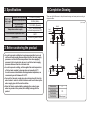
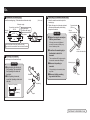
Minimum water pressure
Wall
surface
Wall
surface
67
A 12.580.5
0
-6
G1/2
150
150±20
Ɣ,QRUGHUWRSUHYHQWVFDOGLQJGXHWRHUURQHRXVRSHUDWLRQEHVXUHWR
VHWWKHFROGZDWHUVXSSO\SUHVVXUHKLJKHUWKDQWKHKRWZDWHUVXSSO\
SUHVVXUHRUVHWWKHPWRWKHVDPHSUHVVXUH(YHQZKHQDSSO\LQJ
SUHVVXUHWRWKHKRWZDWHUVLGHEHVXUHWRVHWWKHKRWZDWHUVXSSO\
SUHVVXUHVLGHORZHUWKDQWKHFROGZDWHUVLGH
Ɣ,QRUGHUWRSUHYHQWVFDOGLQJVHWWKHVXSSOLHGKRWZDWHUWHPSHUDWXUH
RIWKHKRWZDWHUVXSSOLHUWRDWHPSHUDWXUHQRWH[FHHGLQJ&
,QRUGHUWRDVVXUHDFRPIRUWDEOHGLVFKDUJHGZDWHUWHPSHUDWXUHZH
UHFRPPHQG\RXVHWLWEHWZHHQ&
Ɣ&RQQHFWWKHKRWZDWHUVXSSO\SLSHDWDPLQLPXPOHQJWKIURPWKH
ZDWHUKHDWHULQRUGHUWRUHGXFHUHVLVWDQFHDQGEHVXUHWRZUDSWKH
ZDWHUVXSSO\SLSHZLWKWKHUPDOLQVXODWLRQ
Ɣ6LQFHWKHIORZLVH[DPLQHGEHIRUHSDFNDJLQJWKHSURGXFWVRPH
ZDWHUPD\UHPDLQLQWKHSURGXFWEXWQRWKLQJLVZURQJZLWKWKH
SURGXFW
6SHFLILFDWLRQV &RPSOHWLRQ'UDZLQJ
%HIRUHDQFKRULQJWKHSURGXFW
*There are slight differences in shape between drawings and some parts according to
the part number.
TBV03427B
TBV03429B
TBV03431B
Part number A
170
Without spout
(Unit : mm)
&ROG+RW
ZDWHUVXSSO\
pressure
0.05 MPa (Dynamic)
1.0 MPa (Static)
0.1-0.5 MPa (Dynamic)
1-40°C
4-90°C. Recommended
hot water temperature 60°C
7HPSHUDWXUHZDWHUVXSSO\
(QYLURQPHQWDOWHPSHUDWXUHXVHG
For bidet in general house
$SSOLFDWLRQ
5HFRPPHQGHG
water pressure
0D[LPXPZDWHUSUHVVXUH

CAUTION
Commercially
available
flexible hose,
etc.
Commercially
available
pipe joint,
etc.
(Open/Close) changeover handle
Temperature
control handle
Mounting legs (with filters)
(2 pieces)
Packing
Flange (x2)
Spout
(The shower faucet has no spout.)
Installation Manual
Instruction Manual
Check to see if the following parts are included
Water faucet body
Others
Mounting leg
*There are slight differences in shape between drawings and some parts according to the part number.
*The descriptions of installation procedure are inserted as the representative
installation procedure of shower bath water faucet.
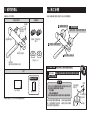
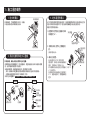
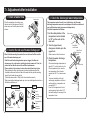
5. Identification of Parts
6-1. Installation procedures
4
Anchoring of the
water faucet body
2
Installation of mounting leg
1
Before anchoring the product
Cleaning of the insides of cold water
pipe and hot water pipe.
3
Mounting of the spout
Shower
elbow
1
Before anchoring the product
Cleaning of the insides of cold water pipe and hot water pipe.
Hand it over to
customer.
If you do not clean the inside of the cold/hot
water supply pipes, dust and sand inside the
cold/hot water supply clog the filter and the
following phenomenon occurs.
1. Discharged water volume is small.
2. Temperature cannot be controlled well.
Be sure to clean the insides of the
cold-/hot-water supply pipes.
Prepare a flexible hose and a bucket, connect the
flexible hose to the mounting legs, and open the main
valve slowly to flush out the dust and sand accumulated
in the cold/hot water supply pipes.
IMPORTANT
Before mounting the product, be sure to completely flush dust
and sand from the pipes of the cold/hot water supplier.
Bucket
Piping

CAUTION
CAUTION
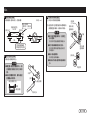
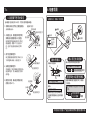
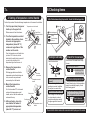
3
Mounting of the spout
Continues to backside cover.
Mount the spout on the main unit body.
Pay attention to the direction of
the U-packing. The open side of
the U-packing is the main unit
body side.
If the U-packing is removed,
mount the U-packing on the main
unit side.
Direction of U-packing
U-packing
Main unit
6-2.
4
Anchoring of the water faucet body
U-packing
Main unit
Spout
Mount it
Crescent wrench
(200 mm)
Tighten
Cap nut
on the cold water side
Cap nut
on the hot water side
2
Installation of mounting leg
Mount the mounting legs. (Cold water side and hot water side)
The end surfaces of the right and left mounting
legs should be horizontal and flush with the wall surface.
Perpendicular to wall surface
Cold water supply
36
0
-6
150
Wall surface
Wrap sealing tape
(Cold/Hot water supply)
Hot water
supply
(Unit : mm)
Mounting leg
Filter
G1/2
1. Mount the water faucet main body to the
mounting leg.
2. Tighten the cap nuts on hot water side and
cold water side alternately while holding
the product horizontal.
Tighten the cap nuts securely so
that they are not loose.
If the cap nuts are not tightened
securely, the main unit body may
lean or water may leak.
Do not turn the mounting leg in
the direction in which it is
loosened.
The connection with the pipe may be
loosen and cause water leakage.
Make sure the packing is
mounted.
Make sure that the mounting
legs contain the filters.
If the packing is not mounted, water
may leak.
150
+
í
20

7-1. Adjustment after installation
1. Check of water flow
3.
Check the discharged water temperature
2.
Clean the filter and cap of the water discharge port.
Spout side
Shower side
"40"
Temperature
control handle
Safety button
Upper (Shower side)
(Open/Close)
changeover
handle
About 40 °C
Mounting leg
Spout
Flat-head
screwdriver
Loosen
Water
discharge
port
Packing
Spout
Cap of discharged
water port
Round-plate-like
object
Water faucet body
Filter
Mounting leg
After the completion of mounting, open
the main valve of the pipes and check if
water comes out from the spout and the
shower.
If the filter and the discharged water cap are clogged, the flow rate
decreases or only cold water or scalding hot water comes out. Thus, the
product will not be able to exert the sufficient performance.
Please explain to the customer to clean the product from time to time.
*When cleaning the filter, close the main valve surely and dismount the filter.
In addition, make sure that the left side of the main unit body and the mounting
legs of the hot water side are not hot.
(For details, please refer to "Daily Care" in the instruction manual.)
*When removing the discharged water cap, do not use a thin-tipped tool such as a
flat-blade screwdriver, etc.
The temperature control handle is set at the factory, but the water
discharge temperature may not be as displayed due to the conditions of
use (cold/hot water supply pressure and temperature).
Check the temperature as follows.
1. Set the safety button of the
temperature control handle
to “40” on the scale of the
main unit.
2. Turn the (open/close)
changeover handle up to the
upper limit.
Water comes out from the shower.
3. Check the water discharge
temperature.
If the water discharge temperature is
about 40 °C, use the product as it is.
If the temperature is low, raise the
set temperature of the hot water
supplier until 40 °C hot water comes
out.
To prevent scalding, set the hot
water supply temperature of the hot
water supplier to a temperature not
exceeding 60 °C
Even if the temperature of the hot
water supplier at higher than 50 °C,
the handle setting is necessary if the
temperature is low.
When finished mounting the product, be sure to clean the filter and the
cap of the water discharge port.

Water discharge port
2
Cap nut
1
Packing
Cap of discharged
water port
Check of flow rate and discharged water temperature
Checking for water leakage
4. Setting of temperature control handle
"40"
After finished mounting the product, check the following points.
Is the cap nut loose?
1
2
A
BC
Case when water leaks from
A and C
Case when water leaks from B
7-2. 8. Checking items
Check for looseness
Ref.
7-1.
2.
Clean the filter and cap
of the water discharge port.
Anchoring of the
water faucet body
Ref.
4
í
6-2.
Safety
button
Safety button
Temperature control handle
Upper (Shower side)
(Open/Close)
changeover handle
Cold water
Hot water
Cap
Small screw
Temperature control
handle
Precision
screwdriver
Temperature control
handle
Filter
Perform this procedure if the water discharge temperature is not the same as the indication.
*Be sure to hand the instruction manual and other accessories included in the package over to the customer.
1.
Turn the (open/close) changeover
handle up to the upper limit.
Water comes out from the shower.
2. Turn the temperature control
handle to the position where
hot water of appropriate
temperature (about 40 °C)
comes out regardless of the
number on the scale.
Since the temperature control handle locks
just above "40" on the scale, turn the
handle while the safety button is pressed if
you want to let a hot water of the
temperature higher than this come out.
3. Remove the temperature
control handle.
While paying attention so that the
temperature control handle does not
turn, remove the cap and small
screw and pull out the handle.
5. After anchoring, check to
see whether hot water of
appropriated temperature
(about 40 °C) comes out.
4. Mount the temperature
control handle.
Set it to the number "40" on the scale
and insert the temperature control
handle, anchor it with the small screw
and mount the cap.
After confirming that the
packing is mounted, retighten
the cap nut one more time.
After making sure that the pipe
is not corroded or cracked,
wrap the sealing tape around
the pipe again and remount it.
Check if water leaks.
Check to see if the water faucet body
is loose.
If water flows slowly or the temperature
cannot be controlled properly, check
the following points.
Are the water discharge port and
filter clogged with dust and dirt?
2
-
 1
1
-
 2
2
-
 3
3
-
 4
4
-
 5
5
-
 6
6
-
 7
7
-
 8
8
-
 9
9
-
 10
10
-
 11
11
-
 12
12


