
WP3870

2

3
AA
D
B C
E
F
J
I
K
L
M N O
H
G
P
4
3
2
1
1

4

6
ภาษาไทย 22
繁體中文 34
简体中文 47

6
Congratulations on your purchase and welcome to Philips! To fully benet
from the support that Philips offers, register your product at www.philips.
com/welcome.
You have made an excellent choice. The Philips Ultra Pure is an advanced,
top performance water purier that removes viruses, bacteria and cysts
from your water. It also improves the taste of your drinking and cooking
water by removing chlorine and other impurities. Pure water guaranteed,
by Philips.
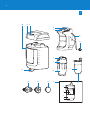
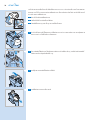
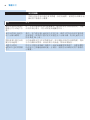
Pure water reservoir
Water reservoir cover
Lock lever of water reservoir cover
Water reservoir tap
Wall holder
Filter holder release lever
Hose
Swivel nut
Decompression button
Filter holder cap
Filter holder
Filter
Water supply connector
Adapter ring
Cap
Cross-section of lter
Pre-lter
Granular Activated Carbon (GAC)
Ultra Filtration (UF) membranes
Filter stop
Read this user manual carefully before you use the water purier and
save it for future reference. This user manual contains very important
information on hygiene/cleaning and lter replacement. Keep it available at
all times.
The Philips water purier offers you clean, safe and great-tasting drinking
water you can trust. For optimal performance of the water purier it
is important to handle it hygienically. If the appliance is cleaned in the
wrong way, microbes could recontaminate the puried water, which could
cause the person who drinks the water to become ill.
- Always be aware of hygiene when you clean or touch surfaces that
are in contact with puried water, especially the inside of the water
reservoir, the connection between the water reservoir and the wall
holder, and the water reservoir tap.
- Do not use a kitchen sponge or cloth to clean or dry the inside of
the water reservoir because they are likely to contain bacteria. To clean
the water reservoir in a hygienic way, follow the cleaning instructions in
chapter ‘Cleaning and maintenance’.

- Always use clean, disinfected cloths and cleaning equipment to clean
the connection between the water reservoir and the wall holder and
the water reservoir tap.
- Always disinfect cloths and cleaning equipment either by boiling them
or by using a disinfectant to clean them. We advise you to soak a cloth
or sponge for one minute in a solution of 10ml of household bleach
(5% solution of sodium hypochlorite) added to 1 liter of water.
- Always clean surfaces that are frequently touched by hands hygienically
with a cleaner or a disinfectant. For more details, see chapter ‘Cleaning
and maintenance’.
- Always wash your hands after handling cloths, sponges or other
cleaning equipment.
- The water purier is not intended for use by persons (including
children) with reduced physical, sensory or mental capabilities, or lack
of experience and knowledge, unless they have been given supervision
or instruction concerning use of the water purier by a person
responsible for their safety.
- Children should be supervised to ensure that they do not play with the
water purier.
- Only use the water purier to purify water that is delivered to your
house by the local water company, as this water is pretreated and
meets the drinking water standards
- This water purier is only intended for household use.
- Make sure you mount the water purier properly according to the
instructions in this user manual.
- Make sure the wall holder is mounted in a stable and level way.
- Make sure you install the water purier according to state and local
regulations.
- Do not mount the water purier in a place exposed to direct sunlight
or in a hot location, e.g. close to a stove or over the cooker.
- Always use original Philips replacement lters (WP3970).
- Replace the lter according to the instructions in this user manual.
- Do not open the main water valve if the lter holder is not in place.
- Fully drain the water reservoir if the water purier has not been used
for 2 days or more and throw away the water.
- Do not connect the water purier to an electrical faucet.
- Do not connect the water purier to a hot water outlet.
- Do not connect ordinary tubes or hoses to the tap of the water
reservoir to redirect the ow of puried water.
- Do not place anything on top of the water purier.
- Do not hang anything on the tube of the water purier.
- Do not use any other chemicals than the ones mentioned in chapter
‘Cleaning and maintenance’ to clean the inside of the water reservoir.
- Do not clean any plastic parts in a dishwasher nor use boiling water to
clean them.
- Do not tamper with the water purier.
- Keep heat sources away from the water purier to prevent distortion
or breakage.
- This water purier does not soften water.
7

- Do not install the water purier in a place where the temperature
drops below 0°C.
- Do not clean the lter with any type of detergent or hot water, as this
damages the lter.
Only connect this water purier to wall-mounted cold water kitchen
faucets or secondary water outlets. Do not connect this water purier
to sink-mounted faucets.
Make sure that there are no electric cables or water pipes inside the wall
at the location where you want to mount the water purier.
Make sure that there is no electric outlet under the water purier.
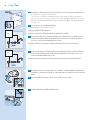
1 Close the main water valve before you install the water purier.
2 Determine the location where you want to mount the water purier
to the wall. This depends on the location of the water outlet and the
available hose length.
3 Remove the drilling template from the box and use it to mark the
points on the wall where to drill the holes.
- Make sure the two top holes are level.
- The recommended distance between the countertop and the lower
mounting hole of the wall holder is 35cm. If you want to be able to ll
high bottles, i.e. 1.5 or 2 liter soft drink or mineral water bottles, drill
the lower hole at 50cm for your convenience. Also make sure that you
leave a free space of at least 15cm above the upper two mounting
holes of the wall holder when you place the water purier under a
kitchen cupboard or shelf.
4 Drill the holes with a 6mm drill and put the xing plugs in the holes.
- The xing plugs and screws are supplied with the water purier
Note: In case of a wooden wall, skip this step.
Note: In case of a hollow wall, use special hollow wall xing plugs (not
supplied).
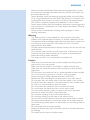
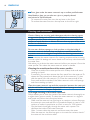
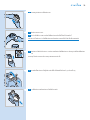
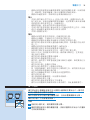
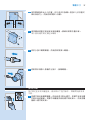
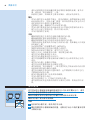
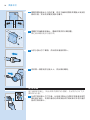
5 If the water outlet has 1/2” thread, screw the water supply
connector onto the water outlet rst. Then attach the adapter ring
and nally screw the original kitchen faucet onto the adapter ring.
Wind Teon tape round all threaded parts to prevent leakage.
Note: If the water outlet is a secondary water outlet, screw the cap onto the
open end of the adapter ring.
6mm
1/ 2
“
8

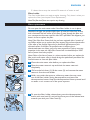
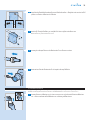
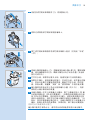
6 If the water outlet has 3/4” thread, screw the adapter ring onto the
water outlet rst. Then attach the water supply connector and nally
screw the original kitchen faucet onto the water supply connector.
Wind Teon tape round all threaded parts to prevent leakage.
Note: If the water outlet is a secondary water outlet, screw the cap onto the
open end of the water supply connector.
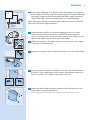
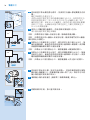
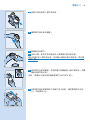
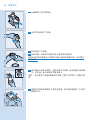
7 Take the water purier out of its packaging and put it on a at
surface. Then pull the lock lever to unlock the water reservoir
cover (1) and remove it from the water reservoir (2). Now you can
remove the water reservoir from the wall holder.
8 Clean the outside of the water reservoir and its cover (see chapter
‘Cleaning and maintenance’).
9 Swing the transport lock to the left and push it into the wall holder.
10 Turn the elbow connector located on the rear of the wall holder to
the left or right, depending on the location of the water outlet you
want to connect it to and push the hose in its slot.
11 Attach the wall holder with the screws to the wall. Make sure the
hose remains properly positioned.
- The xing plugs and screws are supplied with the water purier.
3/4
“
1
2
9

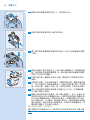
12 Unscrew the swivel nut from the water supply connector and slide it
on the hose.
13 Push the end of the hose onto the water supply connector and
tighten the swivel nut.
Now that the wall holder is attached to the wall, proceed as follows to
prepare the water purier for rst use.
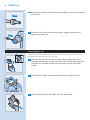
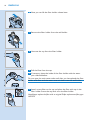
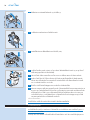
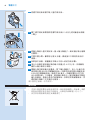
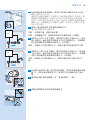
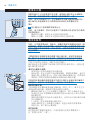
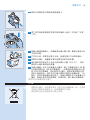
1 Unscrew the cap from the lter holder. Take the lter out of its
packaging and attach it to the cap of the lter holder. Place the lter
with cap into the lter holder and screw the cap onto the lter
holder.
2 Pull the lter holder release lever forward (1) and lift it up (2).
3 Place the lter holder with lter into the wall holder.
1
2
10

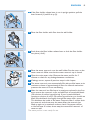
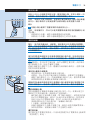
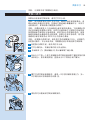
4 Push down the lter holder release lever to lock the lter holder
into place (‘click’).
5 Place the water reservoir onto the wall holder (1). Put the
cover on the water reservoir (2). To lock the cover, push the
lock lever towards the wall (3). Make sure that the water reservoir
tap is in closed position (turned all the way to the left or right).
6 Open the main water valve. Observe the water purier for 5
minutes to check for any leakage between connections.
7 If leakage occurs, locate the connection that leaks. Turn off the main
water valve. Loosen the connection that leaks and fasten it again
in the proper manner. Reopen the main water valve. Check again.
Repeat all steps in ‘Installation’ and ‘Preparing for use’, if necessary.
8 The water reservoir now automatically lls with puried water to its
maximum volume of approximately 4 liters. An internal mechanism
prevents the reservoir from overowing.
9 After the reservoir has lled up to its maximum volume for the rst
time, remove the reservoir cover and add 30ml of household bleach
(5% solution of sodium hypochlorite). If your household bleach
contains a solution of only 2.5% sodium hypochlorite, you should use
60ml. Mix the bleach thoroughly through the water with a spoon.
This disinfects the inside of the water reservoir. After 1 minute, drain
the reservoir and throw away the water. After the reservoir has
lled up again to its maximum volume, check if the water still has
a chlorine taste. If it does, throw away the second full reservoir of
water as well.
The water purier is now ready for use.
The water reservoir is only intended to contain puried water. Do not
put ice or any other ingredients in the water reservoir.
If you have not used the water purier for 2 days or more, drain the
water reservoir completely and throw away the water. If necessary, clean
the water reservoir. See chapter ‘Cleaning and maintenance’.
Note: Keep the main water valve always open. This ensures that the pure water
reservoir rells automatically. The lling speed of the water reservoir depends
on the state of the lter and the quality and pressure of the input water.
1
2
3
11

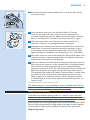
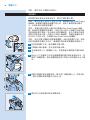
1 Put a glass under the water reservoir tap to collect puried water.
Note: Besides a glass, you can also use a jar or a properly cleaned
used mineral or soft drink bottle.
- To increase the water ow, turn the tap lever to the front.
- To reduce the water ow, turn the tap lever to the left or right.
Caution: Never use scouring pads, detergents, abrasive cleaning agents
or aggressive uids such as thinner, alcohol, petrol or acetone to clean
the water purier. These substances may cause the material of the water
purier to crack, discolor or distort. Do not clean any part of the water
purier in a dishwasher.
Do not use a kitchen sponge or cloth to clean or dry the inside of
the water reservoir because they are likely to contain bacteria. To clean
the water reservoir in a hygienic way, follow the cleaning instructions
below.
You can remove the water reservoir for cleaning purposes without closing
the main valve. No leakage will occur thanks to a one-way valve that blocks
the water ow.
We advise you to drain the water reservoir before you remove it from the
water purier. This makes the water reservoir easier to handle.
- Clean the outside of the water purier with a damp cloth and some
washing-up liquid.
- If necessary, you can also remove the front panel from the reservoir. To
release the front panel push down the tab on the reservoir (1), then
slide the panel from the reservoir (2). Clean the reverse side of the
front panel and the outside of the water reservoir with a soft sponge
and some washing-up liquid.
Clean the water reservoir tap and the connection between the reservoir
and the wall holder only with a properly disinfected sponge or cloth. See
‘Hygiene awareness’ in chapter ‘Important’.
Philips advises you to clean the inside of the water reservoir thoroughly on
a regular basis (once a month). To clean the water reservoir in a hygienic
and simple way, follow the instructions below.
- Make sure the reservoir has lled up to its maximum volume. Remove
the reservoir cover and add 30ml of household bleach in case of a 5%
solution of sodium hypochlorite, or 60ml in case of a 2.5% solution.
- Mix the bleach thoroughly through the water with a spoon. This
disinfects the inside of the water reservoir.
- After 1 minute, drain the reservoir and throw away the water.
- After the reservoir has lled up again to its maximum volume, check if
the water still has a chlorine taste.
2
1
12

- If it does, throw away the second full reservoir of water as well.
The lter holder does not require regular cleaning. Only clean it when you
replace the lter (see chapter ‘Filter replacement’).
Note: The lter itself does not require any cleaning.
Do not open the main water valve if the lter holder is not in place.
Note: After the lter has puried 2000 liters of water, the Ultra Pure Protect
lock is activated. This lock closes off the ow of water through the lter and
as a consequence the water reservoir does NOT rell. When this happens, you
know it is time to replace the lter.
Note: If the Ultra Pure Protect lock has not been activated after 6 months of
use, Philips advises you to replace the lter anyway. This prevents deterioration
of the taste of the puried water due to diminished effectiveness of the
activated carbon in the lter. The puried water is still pure, but a
deteriorated taste can reduce your pure water experience. If there are many
impurities in the water, the Ultra Pure Protect lock is activated before 2000
liters of water have been puried.
Note: Collect a few liters of water in a clean container before you replace the
lter, as the main water valve is closed during the replacement procedure. You
need this water to clean the lter holder.
1 Close the main water valve before you replace the lter.
2 Open the water reservoir tap and drain the water reservoir
completely.
3 Pull out the lock lever (1), lift the cover (2) and remove the water
reservoir from the wall holder.
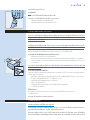
4 Hold a cup under the spout to collect any water that may come
out of the lter holder during decompression and press the
decompression button. Keep the decompression button pressed until
no water or air comes out of the spout anymore.
5 To open the lter holder release lever, press the decompression
button with one hand (1) and pull the front part of the release lever
towards you with your other hand (2) .
1
2
1
2
13

6 Now you can lift the lter holder release lever.
7 Remove the lter holder from the wall holder.
8 Unscrew the cap from the lter holder.
9 Pull the lter from the cap.
10 If necessary, clean the inside of the lter holder with the water
you collected before.
Do not open the main water valve until after you have placed the lter
holder with lter and the water reservoir back onto the wall holder.
11 Attach a new lter to the cap and place the lter with cap in the
lter holder. Screw the cap back onto the lter holder.
Note: Always replace the lter with an original Philips replacement lter, type
WP3970.
14

12 If the lter holder release lever is not in upright position, pull the
lever forward (1) and lift it up (2).
13 Place the lter holder with lter into the wall holder.
14 Push down the lter holder release lever to lock the lter holder
into place (‘click’).
15 Place the water reservoir onto the wall holder. Put the cover on the
water reservoir. Make sure that the water reservoir tap is closed.
16 Open the main water valve. Observe the water purier for 5
minutes to check for any leakage between connections.
17 If leakage occurs, repeat all previous steps in this chapter.
18 The water reservoir now automatically lls with puried water to its
maximum volume of approximately 4 liters. An internal mechanism
prevents the reservoir from overowing.
19 After the reservoir has lled up to its maximum volume for the rst
time, remove the reservoir cover and add 30ml of household bleach
(5% solution of sodium hypochlorite). If your household bleach
contains a solution of only 2.5% sodium hypochlorite, you should use
60ml. Mix the bleach thoroughly through the water with a spoon.
This disinfects the inside of the water reservoir. After 1 minute drain
the reservoir and throw away the water. After the reservoir has
lled up again to its maximum volume, check if the water still has
a chlorine taste. If it does, throw away the second full reservoir of
water as well.
The water purier is now ready for use.
1
2
1
2
3
15

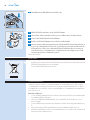
- Do not throw away the water purier with the normal household
waste at the end of its life, but hand it in at an ofcial collection point
for recycling. By doing this, you help to preserve the environment.
- Throw away used lters with the normal household waste.
If you need service or information or if you have a problem, please visit
the Philips website at www.philips.com or contact the Philips Consumer
Care Center in your country (you nd its phone number in the worldwide
guarantee leaet). If there is no Consumer Care Center in your country, go
to your local Philips dealer.
1 The guarantee does not cover the water purier parts that are subject
to wear and tear, that can be considered as consumable parts by their
nature.
2 The lter is a consumable and is therefore not covered by the two year
worldwide guarantee. However, a 90-day guarantee on manufacturing
defaults does apply.
3 This guarantee does not extend to accessories (hose, clamps, adapter,
sealings etc.), supplied with the water purier.
4 Philips or its authorized service personnel are entitled to retain all
defective parts replaced under guarantee.
5 All expenses incurred due to reinstallation, collection and delivery
as part of the service provided regarding the water purier by an
authorized Philips service center or dealer are for the account of the
customer.
6 The warranty/guarantee policy is only valid for those products that
have not been tampered with and on which repairs/modications have
only been provided by authorized Philips service centers.
7 The guarantee becomes invalid when the water purier is not used
and/or not maintained properly or when it is damaged by dropping.
8 The guarantee becomes invalid if the water purier is used for
commercial purposes.
16

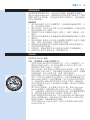
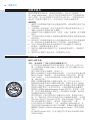
Note: See gure 1 for a cross-sectional drawing (P) of the lter.
- This Philips water purier uses lter cartridge type WP3970, which
contains (1) a pre-lter, (2) Granular Activated Carbon (GAC), (3)
Ultra Filtration (UF) membranes, and (4) a lter stop.
- The pre-lter removes big particles, e.g. sand.
- GAC is generally known to remove many kinds of unwanted dissolved
chemicals such as chlorine, volatile organic compounds (VOCs),
chlorination by-products (CBPs), pesticides and medicine residues, and
in this way improves the quality, taste, color and odor of the water.
-
- The UF membranes act like a sieve with extremely small pores
(approximate size 10-15 nanometers) capable of removing all particles
and microorganisms that are bigger in size. The triple gold seal
certicate granted by the Water Quality Association (WQA) implies
that this water purier supplies you with microbiologically safe drinking
water as tested according to the USEPA Microbiological Guide. More
specically this water purier effectively removes at least 99.9999% of
bacteria, 99.99% viruses and 99.9% of cysts.
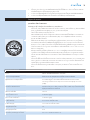
- The lter cartridge has an integrated mechanism to count the amount
of water that is puried by the lter, called Ultra Pure Protect lock.
To guarantee that the puried drinking water remains safe and retains
its high quality, this mechanism shuts down the lter after it has
puried 2000 liters of water. When the mechanism shuts down the
lter it is time to replace the lter. See chapter ‘Filter replacement’.
- This water purier conforms to NSF/ANSI 42 for particulates removal
(class I) and esthetic chlorine removal, NSF/ANSI 53 for turbidity
removal and USEPA Microbiological Guide for bacteria, virus and cyst
removal, as veried and substantiated by test data.
- This water purier also complies with the Brazilian standard ABNT-
NBR 14908 (2004) as tested by Falcão Bauer.
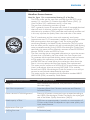
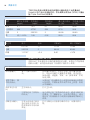
Product name and type number Water purier WP3870
Category Wall-mounted, non-electrical, with permanent connection to
the water supply
Major lter components Polyethersulfone Ultra Filtration membrane and Granular
Activated Carbon
Proven removal of microorganisms* Removal of bacteria, viruses and cysts, as tested according to
the USEPA Microbiological Guide. Certied by the triple gold
seal of the Water Quality Association (WQA).
Rated capacity of lter 2000 liters, or approximately 6 months, at a consumption of
10 liters a day. Actual life depends on input water quality and
input water pressure.
Replacement lter type WP3970
Purifying ow rate 0.4 ltrs/min (max)
17

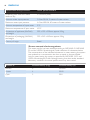
Product name and type number Water purier WP3870
Dispensing ow rate from water
reservoir tap
2.5 ltrs/min (max)
Minimum water input pressure 0.2 bar, 20 kPa, 2 meters of water column
Maximum water input pressure 4.0 bar, 400 kPa, 40 meters of water column
Minimum temperature of input water 5°C
Maximum temperature of input water 40°C
Dimensions of appliance (WxDxH)
and weight
295 x 195 x 330mm, approx. 2.2kg
Dimensions of packaging (WxDxH)
and weight
355 x 245 x 445mm, approx. 3.0kg
Country of origin Brazil
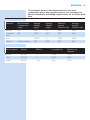
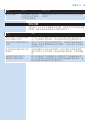
This water purier has been tested according to NSF/ANSI 42, NSF/ANSI
53 and the USEPA Microbiological Guide reduction of substances below.
The concentration of the indicated substances in water entering the system
was reduced to a concentration less than or equal to the permissible
limit for water leaving the system, as specied by NSF/ANSI 42, 53 and
USEPA Microbiological Guide. Although testing was done under standard
laboratory conditions, the actual performance may have varied.
Removal of Removal efcacy (Log) Removal efcacy (%)
Bacteria 6 99.9999
Viruses 4 99.99
Cysts 3 99.9
18

Substance Max. allowable
concentration
(mg/L)
Average
inuent
(mg/L)
Average
efuent
(mg/L)
Minimum
percent
reduction (%)
Average
percent
reduction (%)
Turbidity 0.1 10.0 0.1 98.9 99.01
Particulate
class I
989 47701 529 97.9 98.9
Cysts 2 255125 2 99.99 99.99
Chlorine >50% reduction 1.89 0.02 98.9 98.9
Micro-organism Inuent Efuent Log reduction Minimum log
reduction
Bacteria 6.2*107 <1 >7.62 >5.94
Cysts 255125 2 99.99 99.99
Viruses 1.0*107 <3.4 6.46 >3.79
19

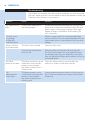
This chapter summarizes the most common problems you may encounter
with your water purier. If you are unable to solve the problem, contact the
Consumer Care Center in your country.
Problem Cause Solution
The water purier
leaks.
One of the connections is
not tted properly.
Locate the connection that leaks. Turn off the main
water valve. Loosen the connection that leaks and
fasten it again in the proper manner. Check again.
Repeat all steps in ‘Installation’ and ‘Preparing for
use’, if necessary.
The hose is not
long enough
to reach the
installation point.
Obtain a longer hose from an authorized Philips
service center or from an authorized dealer. Do not
interconnect two or more hoses, as this may cause
leakage.
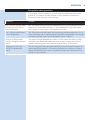
There is no ow
of puried water.
The main valve is closed. Open the main valve.
The lter has reached the
end of its life.
When the lter has reached the end of its life,
the Ultra Pure Protect lock is activated. The ow
immediately stops for your safety. Buy a new lter
from an authorized Philips service center or from an
authorized dealer.
The water
reservoir tap leaks.
The valves inside the tap are
soiled with small particles
present in non-puried
tap water or bres from a
cleaning cloth.
Open the water reservoir tap and drain the
reservoir in order to ush away the dirt.
The
decompression
button leaks.
The decompression valve
is soiled with small particles
present in non-puried
tap water or bres from a
cleaning cloth.
Press the decompression button to ush away the
dirt. Collect the water that comes out of the lter
holder cap.
20
ページが読み込まれています...
ページが読み込まれています...
ページが読み込まれています...
ページが読み込まれています...
ページが読み込まれています...
ページが読み込まれています...
ページが読み込まれています...
ページが読み込まれています...
ページが読み込まれています...
ページが読み込まれています...
ページが読み込まれています...
ページが読み込まれています...
ページが読み込まれています...
ページが読み込まれています...
ページが読み込まれています...
ページが読み込まれています...
ページが読み込まれています...
ページが読み込まれています...
ページが読み込まれています...
ページが読み込まれています...
ページが読み込まれています...
ページが読み込まれています...
ページが読み込まれています...
ページが読み込まれています...
ページが読み込まれています...
ページが読み込まれています...
ページが読み込まれています...
ページが読み込まれています...
ページが読み込まれています...
ページが読み込まれています...
ページが読み込まれています...
ページが読み込まれています...
ページが読み込まれています...
ページが読み込まれています...
ページが読み込まれています...
ページが読み込まれています...
ページが読み込まれています...
ページが読み込まれています...
ページが読み込まれています...
ページが読み込まれています...
ページが読み込まれています...
ページが読み込まれています...
-
 1
1
-
 2
2
-
 3
3
-
 4
4
-
 5
5
-
 6
6
-
 7
7
-
 8
8
-
 9
9
-
 10
10
-
 11
11
-
 12
12
-
 13
13
-
 14
14
-
 15
15
-
 16
16
-
 17
17
-
 18
18
-
 19
19
-
 20
20
-
 21
21
-
 22
22
-
 23
23
-
 24
24
-
 25
25
-
 26
26
-
 27
27
-
 28
28
-
 29
29
-
 30
30
-
 31
31
-
 32
32
-
 33
33
-
 34
34
-
 35
35
-
 36
36
-
 37
37
-
 38
38
-
 39
39
-
 40
40
-
 41
41
-
 42
42
-
 43
43
-
 44
44
-
 45
45
-
 46
46
-
 47
47
-
 48
48
-
 49
49
-
 50
50
-
 51
51
-
 52
52
-
 53
53
-
 54
54
-
 55
55
-
 56
56
-
 57
57
-
 58
58
-
 59
59
-
 60
60
-
 61
61
-
 62
62


