


2


6
Introduction
Congratulations on your purchase and welcome to Philips!
To fully benet from the support that Philips offers, register your product at
www.philips.com/welcome.
The Philips PureGuard barrel purier is equipped with the unique multiguard
control system that reduces bacteria, chlorine, taste and odour, ensuring you
of deliciously purer water.
The washable rust & sediment pre-lter prevents dirt and insects from
entering the system. Water ows into the clean water tank through the
Long-life lter. Inside the Long-life lter, the Japanese HF micro-ltration
membrane removes 99.9999%* of bacteria and as well as more than
99.95% of cysts**, and the activated carbon reduces industrial pollutants,
pesticides and volatile organic chemicals (VOCs) of which the effects are
possibly linked to cancer risk***. The Long-life lter lasts up to 1000 litres
(approximately 6 months****) without the hassle of washing and
maintenance.
WP3864 only: The Soft water booster uses ion exchange (IEX) technology
to decrease water hardness, giving water with a superior purer taste***.
If regenerated regularly, the Soft water booster lasts up to 6 months.
On the top front of the water tank, the Pure protect alert display gives
clear feedback on the lifetime of the lter. Advanced electronics automatically
warn you when the lter is almost full and when replacement is required.
The water purier is equipped with an integrated dirt-block system to
guard against secondary contamination. Silver sieves in the water spouts
provide extra safety at the last point before dispensing your ltered water.
The fast and simple cleaning procedure allows you to reach all hard-to-
reach areas and cleans the whole water purier in one go.
* Results regarding bacteria obtained by independent test laboratory
(BioVir Laboratories, Inc, USA, accredited laboratory of WQA).
** Results regarding cysts obtained from tests by WQA.
*** According to publications of World Health Organization, industrial
pollutants, pesticides and VOCs of which the effects are possibly linked to
cancer risk. VOC reduction and softening performance tested at and
internal laboratory.
**** Calculation based on a 4-person family with a daily water consumption
of 4-6 litres and using municipal and pretreated tap water that complies
with GB5749-2006. The ltration capacity of the Long-life lter is up to
1000 litres.
- WQA Tested and Certied to NSF/ANSI 42/53 for the reduction of
chlorine, taste and odour, Particulate Class I (>/= 0.5µm to < 1µm),
cysts, and turbidity as veried and substantiated by test data. Tested
to the US EPA Standard for Bacteria Reduction only.
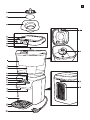
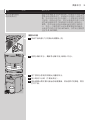
General description (Fig. 2)
A Rust & sediment pre-lter lock
B Rust & sediment pre-lter
C Rust & sediment pre-lter holder
D Top cover lid
E Lid release area
F Top cover
G Pure protect alert display
H Display activation/reset button
ENGLISH

I Raw water tank
J Clean water tank
K Long-life lter
L Continuous ow lock
M Power-on light (green)
N Heating-up light (red)
O Child lock
P Hot water lever
Q Ambient water lever
R Hot water spout with silver sieve
S Ambient water spout with silver sieve
T Dispensing unit
U Drip tray cover
V Drip tray
W Mains cord with plug
X Ventilation grille
Y Power-on button
Z Soft water booster (WP3864 only)
[ Battery compartment (for one 3-volt CR2032 Lithium battery) with
removable cover
Important
Read this user manual carefully before you use the appliance and save it for
future reference.
Danger
- Never immerse the appliance in water or any other liquid, nor rinse it
under the tap.
Warning
- Check if the voltage indicated on the bottom of the water purier
corresponds to the local mains voltage before you connect the appliance.
- Do not use the appliance if the plug, the mains cord or the appliance
itself is damaged.
- If the mains cord is damaged, you must have it replaced by Philips, a
service centre authorised by Philips or similarly qualied persons in
order to avoid a hazard.
- This appliance is not intended for use by persons (including children)
with reduced physical, sensory or mental capabilities, or lack of experience
and knowledge, unless they have been given supervision or instruction
concerning use of the appliance by a person responsible for their safety.
- Children should be supervised to ensure that they do not play with
the appliance.
- Only use the water purier to lter water that comes out of a tap in
your house, as this is municipal pretreated water.
- Do not use the water purier in combination with water that is
microbiologically unsafe or of unknown quality without adequate
disinfection before or after ltration.
- Always handle the lters very carefully, because they have delicate
membranes. Do not modify the lters or drop them. Replace a lter if
it has been modied, if the outside is damaged or if you have dropped it.
- This appliance is intended for household use only.
ENGLISH 7

Caution
- Make sure you install the water purier according to the instructions in
this user manual and local regulations.
- Only connect the appliance to an earthed wall socket.
- Place the appliance on a stable, level and horizontal surface.
- Do not connect the appliance to an external switching device such as
a timer and do not connect it to a circuit that is regularly switched on
and off by the utility. This prevents a hazard that could be caused by
inadvertent resetting of the thermal cut-out.
- Do not ll the water purier with water hotter than 40°C to prevent
damage to the water tanks and lters.
- This water purier is suitable for an environmental temperature of
5-38°C. Do not place the water purier in a place exposed to direct
sunlight, in a hot location (e.g. close to a cooker) or in a frosty location.
- Do not put any substance in the appliance other than water and the
cleaning agent supplied.
- Always remove the lters when you clean the appliance.
- When you have lled the raw water tank with water, the air inside
the Long-life lter rst has to escape before the water starts to ow
through it. Therefore it takes some time before ltered water starts to
ow into the clean water tank. This is normal.
- Always use original Philips replacement lters.
- Replace the lters according to the instructions in this user manual. See
chapter ‘Replacement’.
- Fully drain the clean water tank if the water purier has not been used
for 2 days or more and throw away this ltered water.
- Do not place anything on top of the appliance.
- Do not use any chemicals other than the ones mentioned in chapter
‘Cleaning and maintenance’ to clean the inside of the clean water tank
and the outside of the raw water tank.
- Only the drip tray cover can be cleaned in the dishwasher or with
boiling water. Do not clean any other parts in the dishwasher or with
boiling water.
- Do not tamper with the water purier.
- Do not switch on the appliance with the power-on button at the back
before the clean water tank is completely lled with water.
- Keep hot objects away from the water purier to prevent damage.
- Do not lift or remove the clean water tank when there is water in it.
Otherwise all water ows out of the tank.
- Always return the appliance to a service centre authorised by Philips
for examination or repair. Do not attempt to repair the appliance
yourself, otherwise the guarantee becomes invalid.
- Philips strongly advises you to clean this appliance every 3 months. If
the appliance is not cleaned in time and according to the procedure
described in chapter ‘Cleaning and maintenance’, this may lead to
technical failures.
- Never use a descaling agent based on mineral acids such as sulphuric
acid, hydrochloric acid, sulphamic acid and acetic acid (e.g. vinegar).
These descaling agents may damage your water purier.
- Systems certied for cyst reduction may be used on disinfected water
that may contain lterable cysts.
ENGLISH8

Hygiene
This Philips water purier gives you clean, safe drinking water that you can
trust. However, if the water purier is not used hygienically, it may pose
a risk of disease to users because it could cause microbes to end up in the
ltered water.
- Always wash your hands before you clean the water tanks.
- Always be aware of hygiene when you clean or touch surfaces that are
in contact with either the unltered or the ltered water, such as the
inside of the clean water tank and the lling opening of the raw
water tank.
- Do not use a kitchen cloth or sponge to clean or dry the inside of
the raw water tank and the clean water tank, as they are likely to
contain bacteria. To clean the water tanks in a hygienic way, follow the
cleaning instructions in chapter ‘Cleaning and maintenance’.
- Always use clean, disinfected cloths and cleaning equipment to
clean the inside of the clean water tank and the outside of the raw
water tank.
- Always disinfect cloths and cleaning equipment either by boiling them
or by using a disinfectant to clean them. We advise you to soak a cloth
or sponge for one minute in a solution of 10ml of household bleach
(5% solution of sodium hypochlorite) added to 1 litre of water.
- Always wash your hands after handling cloths, sponges or other
cleaning equipment.
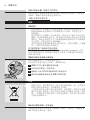
Electromagnetic elds (EMF)
This Philips appliance complies with all standards regarding electromagnetic
elds (EMF). If handled properly and according to the instructions in this
user manual, the appliance is safe to use based on scientic evidence
available today.
Before rst use
1 Removeallpackagingmaterialfromtheapplianceandthelters.
2 Cleantherawwatertankandthecleanwatertankwithhotwater.
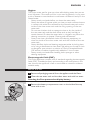
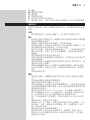
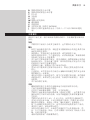
Inserting the Pure protect alert display battery
1 Removethebatterycompartmentcoverontheinsideofthetop
coverwithacoin.
ENGLISH 9

2 Putthe3-voltCR2032Lithiumbatterysuppliedinthebattery
compartment.Youndthisbatteryintheaccessorybag.
Note: The Pure protect alert display works on this battery, not on mains power.
3 Put the cover back onto the battery compartment and tighten it
withacoin.
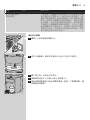
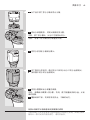
Installation
1 Placeandusetheapplianceonastable,levelandhorizontalsurface.
2 Placethecleanwatertankontopofthewaterdispensingunit.
3 RemovetheprotectioncapfromtheLong-lifelter.
Note: Be careful not to detach the sealing ring of the Long-life lter.
Note: Some carbon particles may come out of the Long-life lter and end up in
the raw water tank. This is normal and does not pose any health risks. You can
simply clean the raw water tank to remove the carbon particles.
4 InsertthetopoftheLong-lifelterintothebottomoftheraw
watertank(1)andturnittotherighttoxit(2).
5 WP3864only:PushtheSoftwaterboosterintotherawwatertank
(‘click’).
Note: The Soft water booster is moist when you unpack it. This is normal
because the Soft water booster must be kept moist to ensure its effectiveness.
Note: The inside of the Soft water booster changes colour when it becomes wet.
This is normal.
6 Placetherawwatertankonthecleanwatertank.
Always make sure the Soft water booster (WP3864 only) and the Long-life
lter are attached to the raw water tank.
7 Putthetopcoverontherawwatertank.
Note: The rust & sediment pre-lter, its lock and its holder are already present
in the top cover when you unpack the appliance.
CR2032
3V
CR2032
3V
1
2
ENGLISH10

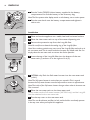
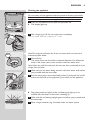
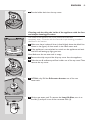
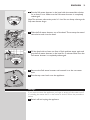
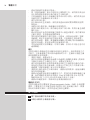
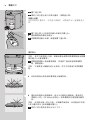
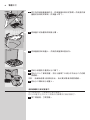
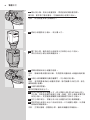
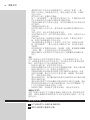
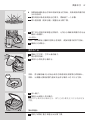
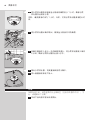
Flushing the appliance
Donotswitchontheappliancewiththepower-onbuttonattheback
beforetheboilerinsidethewaterdispenseriscompletelylledwith
water,i.e.whenyouseewaterbeingstoredinthecleanwatertank.
1 Pressthelidreleaseareatoopenthetopcoverlid.
, Thedisplaylightsup.
2 Usealargejugtolltherawwatertankcompletely.
The raw water tank has a capacity of 7 litres.
Note: The maximum indication line for the raw water tank is on the rust &
sediment pre-lter holder.
3 Closethelid.
, Thewaterowsintotheboilerinsidethedispenserrst.Whenthe
boilerisfull,waterstartstobestoredinthecleanwatertank.
Note: Unlock the child lock and press the hot water lever occasionally to let air
escape from the boiler.
4 Waituntilyouseewaterbeingstoredinthecleanwatertankbefore
youproceedwiththenextsteps.
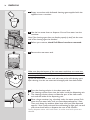
5 Putthemainspluginanearthedwallsocket(1)andpresstheon/off
buttononthebackoftheappliance(2)toswitchontheappliance.
, The green power-on light and the red heating-up light go on to
indicatethatthewaterintheboilerisheatingup.
6 Waituntiltheredheating-uplightgoesoutbeforeyouproceedwith
thenextsteps.
7 Placealargecontainer(e.g.abucket)underthewaterspouts.
MAX
2
1
ENGLISH 11

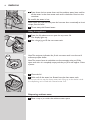
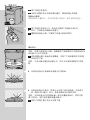
8 Pressdownthehotwaterleverandtheambientwaterleverandlet
allthewaterinthecleanwatertankandintheboilerowintothe
container.
Becareful,thewaterishot.
Note: Unlock the child lock and press the hot water lever occasionally to let air
escape from the boiler.
9 Throwawaythislteredwater.
Using the appliance
1 Pressthelidreleaseareatoopenthetopcoverlid.
, Thedisplaylightsup.
2 Usealargejugtolltherawwatertank.
Note: The maximum indication line for the raw water tank is on the rust &
sediment pre-lter holder.
Note: The counter bases its calculation on the assumption that you ll the
water tank when it is completely empty and that you ll it with approx. 5 litres
of water.
3 Closethelid.
4 Waituntilallthewaterhasowedintothecleanwatertank.
At rst you do not see the clean water tank lling up, as the boiler inside
the dispensing unit is lled with ltered water rst.
Dispensing ambient water
1 Placeacuporjarundertheambientwaterspout.
MAX
ENGLISH12

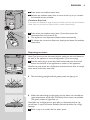
2 Pressdowntheambientwaterlever.
3 Releasetheambientwaterleverassoonasthecuporjarcontains
thedesiredamountofwater.
Continous ow lock
If you want to dispense a large amount of water, you can lock the ambient
water lever so you do not have to push it down continuously.
1 Pressdowntheambientwaterlever(1)andthenpressthe
continuousowlockinwards(2).
, Theappliancenowdispensesambientwatercontinuously.
2 Toreleasethecontinuousowlock,simplypressdowntheambient
waterlever.
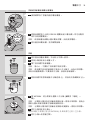
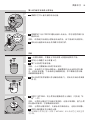
Dispensing hot water
Note: If you do not use the hot water function, make sure the on/of button at
the back of the appliance is set to the off-position (O) to save energy.
1 Putthemainspluginanearthedwallsocketandpresstheon/off
buttononthebackoftheappliancetoswitchontheappliance.
Note: You can only switch the on/off button at the back when there is enough
water stored in the clean water tank.
, Theredheating-uplightandthegreenpower-onlightgoon.
, Whentheredheating-uplightgoesout,thewaterhasreachedthe
righttemperatureand4cups(of200ml)ofhotwaterareavailable.
Thegreenpower-onlightstayson.
Note: When the red light goes on again after you dispensed the rst cup,
you still have 3 cups of hot water available (because the boiler has a large
capacity).
2 Placeacuporjarunderthehotwaterspout.
1
2
ENGLISH 13

3 Unlockthechildlock.Todoso,pushthechildlockinwardsand,at
thesametime,pressdownthehotwaterlever.
Note: The child lock prevents small children from being able to dispense hot
water, as hot water could cause scalding.
4 Releasethehotwaterleverassoonasthecuporjarcontainsthe
desiredamountofwater.
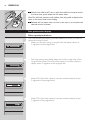
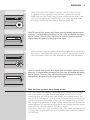
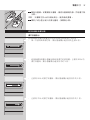
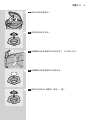
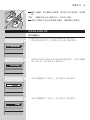
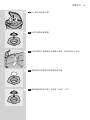
Pure protect alert display
Filter capacity indications
The Pure protect alert display provides feedback on when you have to
replace the Long-life lter.
- When you rst start using a Long-life lter, the display shows all
4 segments of the progress bar.
- The Pure protect alert display keeps track of the usage level of the
Long-life lter. When 25% of the lter capacity has been used, the
display shows 3 segments of the progress bar.
- When 50% of the lter capacity has been used, the display shows
2 segments of the progress bar.
- When 75% of the lter capacity has been used, the display shows
1 segment of the progress bar.
1
2
ENGLISH14

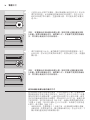
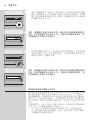
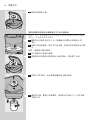
- When 90% of the lter capacity has been used, the display shows
1 segment of the progress bar and the lter replacement symbol.
Make sure you have a new Long-life lter available at this time. If you
want, you can replace the Long-life lter with a new one and reset
the display so that the lter capacity does not reach 0%.
Note: To reset the Pure protect alert display, press the display activation/reset
button for 3 seconds. When the display has been reset successfully, the display
ashes 3 times. Then the lter replacement symbol disappears and the
display shows all segments of the progress bar again.
- When the lter capacity reaches 0%, the lter replacement symbol and
two arrows ash. When this happens, you MUST replace the Long-life
lter immediately. After you have replaced this lter, reset the display.
Note: To reset the Pure protect alert display, press the display activation/reset
button for 3 seconds. When the display has been reset successfully, the display
ashes 3 times. Then the lter replacement symbol disappears and the
display shows all segments of the progress bar again.
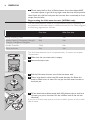
How the Pure protect alert display works
The Pure protect alert display is equipped with a counter that calculates
how much water you lter. The counter bases its calculation on the
assumption that you ll the water tank when it is completely empty and
that you ll it with approx. 5 litres of water. For extra health protection, the
counter also counts the number of days you have used the Long-life lter.
The progress bar decreases in length as time passes. The lter replacement
symbol appears 163 days after the rst day of use. It ashes with two arrows
when the lter has been used for 182 days in total*.
*Calculation based on a 4-person family with a daily water consumption of
4-6 litres. The Long-life lter lasts up to 6 months with a maximum lifetime
of 1000 litres.
ENGLISH 15

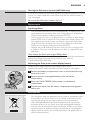
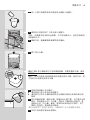
- To save energy, the Pure protect alert display automatically goes out
1 minute after you have closed the lid. It lights up automatically when
you open the lid. Alternatively, you can also press the display activation/
reset button once to activate the display.
- When the battery of the Pure protect alert display is almost empty,
the battery symbol ashes on the display.
- When the display shows the battery symbol, you have to replace the
old battery with a new 3-volt CR2032 Lithium battery. See section
‘Replacing the battery of the Pure protect alert display’ in chapter
‘Replacement’.
Cleaning and maintenance
Only the outside of the appliance and the rust & sediment pre-lter can
be cleaned with hot water. The Long-life lter cannot be cleaned but
has to be replaced (see chapter ‘Replacement’). The Soft water booster
(WP3864 only) cannot be cleaned but has to be regenerated (see section
‘Regenerating the Soft water booster (WP3864 only)’ in this chapter) and
ultimately replaced.
Neverusescouringpads,detergents,abrasivecleaningagentsoraggressive
uidssuchasthinner,alcohol,petroloracetonetocleantheoutsideof
thewaterpurier.Thesesubstancesmaycausethematerialofthewater
puriertocrack,discolourordistort.Donotcleananypartofthewater
purier(exceptthedriptraycover)inadishwasherorwithboilingwater.
Donotuseakitchenspongeorclothtocleanordrytheinsideof
thewatertanksbecausetheyarelikelytocontainbacteria.Tocleanthe
watertanksinahygienicway,followthecleaninginstructionsbelow.
Donotimmersethetopcoverinwateroranyotherliquidtoprevent
damagetothePureprotectalertsystem.
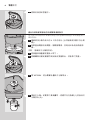
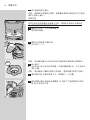
Cleaning the outside of the appliance
1 Presstheon/offbuttononthebackoftheappliancetoswitchoff
theappliance(1)andremovethemainsplugfromtheearthedwall
socket(2).
2 Wipetheoutsideoftheappliancewithamoistcloth.
3 Pullthedriptrayoutoftheappliance.
1
2
ENGLISH16

4 Putyourngerthroughtheholeintheedgeofthedriptraytopush
thedriptraycoveroffthexingpegs.Thengrabtherearsideofthe
driptraycoverandliftitoffthedriptray.
5 Emptythedriptrayintothesink.
6 Putthedriptraycoverbackontothedriptrayandslidethedriptray
backintotheappliance.
7 Unscrewthespoutsfromthedispensingunit.
8 Turnthespoutsupsidedownandrinsethesilversievesinthe
spoutsunderthetap.
Note: Regular cleaning of the silver sieves is necessary to ensure a good ow of
ltered water.
9 Screwthespoutsbackintothedispensingunit.
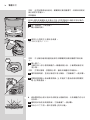
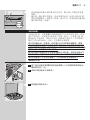
Cleaning the rust & sediment pre-lter
Clean the rust & sediment pre-lter every 2 weeks.
You can nd 1 spare rust & sediment pre-lter in the accessory bag.
1 Pressthelidreleaseareatoopenthetopcoverlid.
ENGLISH 17

2 Taketheholderoutofthetopcover.
3 Removethelockfromtheholder.
4 Removetherust&sedimentpre-lterfromtheholderandrinseit
withhotwater.
5 Puttherust&sedimentpre-lterbackintotheholder.
6 Putthelockbackintotheholder(‘click).
ENGLISH18

7 Puttheholderbackintothetopcover.
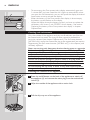
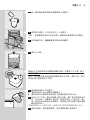
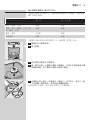
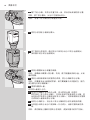
Cleaning and descaling the inside of the appliance with the fast
and simple cleaning procedure
The inside of the appliance has to be cleaned and descaled
completely every 3 months with the fast and simple cleaning procedure
described in this section.
1 Makesurethereisabout4litres(alevelslightlyabovetheblackline
showninthegure)ofcleanwaterinthecleanwatertank.
2 Iftheapplianceisnotswitchedon,switchontheapplianceandwait
untiltheredheating-uplightgoesout.
Note: Make sure the raw water tank is empty.
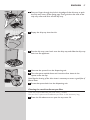
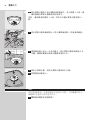
3 Removethedriptrayandthedriptraycoverfromtheappliance.
4 Taketherust&sedimentpre-lterholderoutofthetopcover.Then
removethetopcover.
5 WP3864 only: Pull the Soft water booster out of the raw
watertank.
6 Lifttherawwatertank.ToremovetheLong-life lter,turnitto
theleft(1)andpullitoutoftherawwatertank(2).
2
1
ENGLISH 19

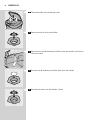
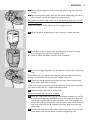
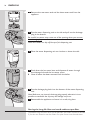
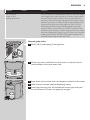
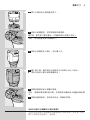
7 Emptyonesachetwithdedicatedcleaningagentsuppliedwiththe
applianceintoacontainer.
8 Usethehotwaterlevertodispense1litreofhotwaterintothe
container.
Note: If the cleaning agent does not dissolve properly by itself, stir the water
until all the cleaning agent has dissolved.
9 Beforeyoucontinue,check if all lters have been removed.
10 Removetherawwatertank.
Makesurethatthebottomoftherawwatertankdoesnotcomeinto
contactwithdirtysurfaces.Ifyouwanttoputdowntherawwatertank,
placeitupsidedown.
Tip: You can clean the raw water tank with water and a mild cleaning agent.
After cleaning, rinse the raw water tank thoroughly with clean boiled water.
11 Pourthecleaningsolutioninthecleanwatertank.
, Thecleaningsolutionowsintotheboilerinsidethedispensingunit.
, Thecleaningsolutioncleansanddescalespartofthecleanwater
tankandtheinsideofthedispensingunit.
12 Placealargecontainer(e.g.abucket)underthewaterspouts.Push
downthehotwaterleveruntilyouhavedispensedapprox.1litre.
Thenpushdowntheambientwaterleveruntilyouhavedispensed
approx.1litre.Finally,waituntiltheredheating-uplightgoesoutand
pushdownbothleverstodispensetherestofthesolution.
Always dispense water with both levers, to make sure both spouts are
cleaned.
1 l
!
ENGLISH20
ページが読み込まれています...
ページが読み込まれています...
ページが読み込まれています...
ページが読み込まれています...
ページが読み込まれています...
ページが読み込まれています...
ページが読み込まれています...
ページが読み込まれています...
ページが読み込まれています...
ページが読み込まれています...
ページが読み込まれています...
ページが読み込まれています...
ページが読み込まれています...
ページが読み込まれています...
ページが読み込まれています...
ページが読み込まれています...
ページが読み込まれています...
ページが読み込まれています...
ページが読み込まれています...
ページが読み込まれています...
ページが読み込まれています...
ページが読み込まれています...
ページが読み込まれています...
ページが読み込まれています...
ページが読み込まれています...
ページが読み込まれています...
ページが読み込まれています...
ページが読み込まれています...
ページが読み込まれています...
ページが読み込まれています...
ページが読み込まれています...
ページが読み込まれています...
ページが読み込まれています...
ページが読み込まれています...
ページが読み込まれています...
ページが読み込まれています...
ページが読み込まれています...
ページが読み込まれています...
ページが読み込まれています...
ページが読み込まれています...
ページが読み込まれています...
ページが読み込まれています...
ページが読み込まれています...
ページが読み込まれています...
ページが読み込まれています...
ページが読み込まれています...
ページが読み込まれています...
ページが読み込まれています...
ページが読み込まれています...
ページが読み込まれています...
ページが読み込まれています...
ページが読み込まれています...
ページが読み込まれています...
ページが読み込まれています...
ページが読み込まれています...
ページが読み込まれています...
ページが読み込まれています...
ページが読み込まれています...
-
 1
1
-
 2
2
-
 3
3
-
 4
4
-
 5
5
-
 6
6
-
 7
7
-
 8
8
-
 9
9
-
 10
10
-
 11
11
-
 12
12
-
 13
13
-
 14
14
-
 15
15
-
 16
16
-
 17
17
-
 18
18
-
 19
19
-
 20
20
-
 21
21
-
 22
22
-
 23
23
-
 24
24
-
 25
25
-
 26
26
-
 27
27
-
 28
28
-
 29
29
-
 30
30
-
 31
31
-
 32
32
-
 33
33
-
 34
34
-
 35
35
-
 36
36
-
 37
37
-
 38
38
-
 39
39
-
 40
40
-
 41
41
-
 42
42
-
 43
43
-
 44
44
-
 45
45
-
 46
46
-
 47
47
-
 48
48
-
 49
49
-
 50
50
-
 51
51
-
 52
52
-
 53
53
-
 54
54
-
 55
55
-
 56
56
-
 57
57
-
 58
58
-
 59
59
-
 60
60
-
 61
61
-
 62
62
-
 63
63
-
 64
64
-
 65
65
-
 66
66
-
 67
67
-
 68
68
-
 69
69
-
 70
70
-
 71
71
-
 72
72
-
 73
73
-
 74
74
-
 75
75
-
 76
76
-
 77
77
-
 78
78


Philips WP3862/00 ユーザーマニュアル
- タイプ
- ユーザーマニュアル
他の言語で
- English: Philips WP3862/00 User manual
関連論文
-
Philips WP3852 ユーザーマニュアル
-
-
-
-
-
-
-
Philips WP3962/00 Product Datasheet
-
-