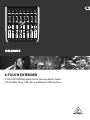
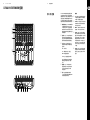
14 X-TOUCH EXTENDER
快速启动向导
15
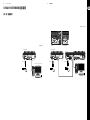
Using the X-TOUCH EXTENDER with RTP MIDI
The X-TOUCH EXTENDER can be used as an RTP MIDI
device over a Network connection. This is useful in
systems where long USB cables would otherwise
be required.
The following instructions show the ge
neral
preparation of the X-TOUCH EXTENDER for RTP MIDI
operation, and then further details for use with an
OS X* network, and a Windows* network.
Preparing the X-TOUCH EXTENDER for RTP
MIDI operation
1. On the X-TOUCH EXTENDER, press and hold the
SELECT button of CH1 during power up, to enter
the Settings menu. Observe t he text in the
scribble-strip displays.
2. Turn the 2nd encoder to select NETWORK .
3. The 3rd encoder allows you to select either
MODE or DHCP:
• MODE selects between using the
X-TOUCH EXTENDER as an RTP SLAVE or an RTP
MASTER. In SLAVE mode, you need to enter the
IP address of the X-TOUCH EXTENDER into your
computer’s RTP MIDI settings. In MASTER mode
you can enter the IP address of the computer by
turning the 3rd encoder one tick to the right,
and use encoders 4-7 to enter the sets of 3-digits
that make up the address. You may use Port 5004
in both cases, as this is the standard port for
RTP MIDI.
• DHCP can be set to ON or OFF. When DHCP is set to
ON, the X-TOUCH EXTENDER will get its IP address
automatica lly within the connected network
from the DHCP server. When DHCP is set to O FF,
the IP, Subnet mask, and Gateway have to be
entered manually by turning the 3rd encoder to
the right and accessing the following pages: my
IP, my Mask, and my Gway. You can enter the IP
addresses using encoders 4-7.
4. Exit the X-TOUCH EXTENDER setup by pressing
the SELECT button of CH1 again. You will see the
following in the display: IP: 000.000.000.000
Wait…
5. The IP will rst switch to an internal IPbefore
it shows the actual IP (for example IP:
010.100.001.029) within the network when
DHCP is used. When the X-TOUCH EXTENDER is
connected to the computer via the network,
the Wait mess age will disappear.
Using X-TOUCH EXTENDER as an RTP MIDI
device within OS X
For OS X systems, no external driver is required for
RTP MIDI operation .
Slave
1. Make sure your computer and the
X-TOUCH EXTENDER are within the
same network.
2. Open AUDIO/MIDI-Settings on the computer.
3. Open MIDI Studio / MIDI Devices window.
4. Double-click on “N etwork.”
5. Click on “+” underneath the DIRECTORY e l d
to add a device. Insert Name, the IP of your
X-TOUCH EXTENDER and the por t (5004).
6. Create a Session by pressing “+” underneath
the “My Sessions” eld and ac tivate the
session created.
7. Activate the X-TOUCH EXTENDER and
click “Connect.”
8. The X-TOUCH EXTENDER is now available
as an RTP MIDI controller. Open the
preferences of your DAW and add it as
control surface. Within most DAWs, it will be
detected automatically.
Master
1. Make sure your computer and the X-TOUCH
EXTENDER are within the same network.
2. Open AUDIO/MIDI-Settings on the computer.
3. Open MIDI Studio / MIDI Devices window.
4. Double-click on “N etwork.”
5. Create a Session by pressing “+” underneath
the “My Sessions” eld and ac tivate the
session created.
6. For “Who may connect to me:” choos e
“Anyone.” X-TOUCH EXTENDER should app ear as
a participant of the session.
7. The X-TOUCH EXTENDER is now available
as an RTP MIDI controller. Open the
preferences of your DAW and add it as
control surface. Within most DAWs, it will be
detected automatically.
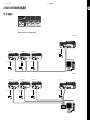
Using X-TOUCH EXTENDER as an RTP MIDI
device with Windows
Windows systems require the use of a third-party
external driver for RTP MIDI. For example, do an
internet search for “rtpMIDI” then download and
install it on your computer.
Slave
1. Make sure your computer and the
X-TOUCH EXTENDER are within the
same network.
2. Open the rtpMIDI driver.
3. Click on “+” underneath the DIRECTORY e l d
to add a device. Insert Name, the IP including
port address (e.g. 10.100.1.29:5004) of your
X-TOUCH EXTENDER.
4. Create a Session by pressing “+” underneath
the “My Sessions” eld and ac tivate the
session created.
5. Activate the X-TOUCH EXTENDER and
click “Connect.”
6. The X-TOUCH EXTENDER is now available as an
RTP MIDI controller. Open the preferences of
your DAW and add it as control sur face.
Master
1. Make sure your computer and the
X-TOUCH EXTENDER are within the
same network.
2. Open the rtpMIDI driver.
3. Create a Session by pressing “+” underneath
the “My Sessions” eld and ac tivate the
session created.
4. For “Who may connect to me:” choose
“Anyone.” X-TOUCH EXTENDER should app ear as
a participant of the session.
5. The X-TOUCH EXTENDER is now available as an
RTP MIDI controller. Open the preferences of
your DAW and add it as control sur face.
技术参数
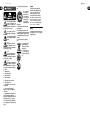
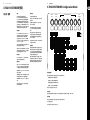
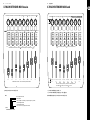
Controls
Rotary/Push control with LED collar 8
Buttons with LED bac klight 32
Faders 8 motorized faders, 100 mm, touch-sensiti ve
PowerOn/o switch
Display
Rotary control position 13-segment LED x 8
Channel level 8-segment LED with SIG and CLIP x 8
Channel display Color LCD scribble strip x 8
Computer Connection
USB USB 2.0, type B
EthernetRJ45
USB Hub
Type Multi-TT USB 2.0
Connectors (x2) USB 2.0, type A
Voltage (USB power to external devices)5 V
Power Supply
TypeInternal switch mode power supply
Voltage 100 - 240 VAC 50/60 Hz
Power consumption 30 W
Mains connection Standard IEC receptacle
Physical
Standard operating temperature range5°C - 40 °C (41°F - 104°F)
Dimensions (H x W x D) 97 x 290 x 303 mm (3.8 x 11.4 x 11.9 ")
Weight 3.1 kg (6.8 lbs)
*OS X is a trademark of Apple Inc.
*Windows is either a registered trademark or trademark of Microsoft Corporation in the United States and/or other countries.


 1
1
 2
2
 3
3
 4
4
 5
5
 6
6
 7
7
 8
8
 9
9
 10
10


Behringer X-TOUCH EXTENDER クイックスタートガイド
Behringer X-TOUCH クイックスタートガイド
Behringer X-TOUCH ONE クイックスタートガイド
Behringer X-TOUCH MINI クイックスタートガイド
Behringer X-TOUCH COMPACT クイックスタートガイド