• Before installing pressure drop modulation KIT, disassemble the lower cabinet.
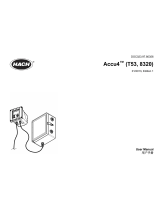
DVM 고낙차 KIT 설치안내서
•반드시실외기고압관에설치해야합니다.
•실외기용량에해당하는고낙차KIT를설치해야합니다.
69.6kW이상모델조합일경우각실외기의고압관에고낙차KIT를설치해야합니다.
예)98.6kW의경우AXD-A12K2A(40.6kW),AXD-A58K2A(58.0kW)2대의고낙차KIT를설치해야합니다.
•반드시설치전해당모델확인후고낙차KIT사양(파이프직경,모세관길이)을확인한다음전문가와협의후설치하여주십시오.
DB98-32789A-09
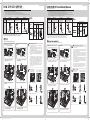
연결방법
KIT 모델명
AXD-A38K2A AXD-A12K2A AXD-A58K2A
SET 적용
모델명
ADX080
~120
AM080
~120
ADX140
~160
AM140
~160
ADX180
~200
AM180
~300
형상
모델명 기입
라벨 위치
고압 S/V
Main 배관
Main 배관
고압 S/V
모델명 기입
라벨 위치
Main 배관
고압 S/V
모델명 기입
라벨 위치
케이블타이
PIPE 연결 소켓
AXD-
A38K2A
AXD-
A12K2A
(ID12.7)
AXD-A58K2A
(ID15.88)
※ 필요시 제품 배관경에 맞추어 별도 포장된 부속품(소켓)을 사용하여 설치하십시오.
※ 실외기 내부에 설치가 되지 않을 경우 실외기 외부에 설치할 것. (Model : RD
, RVX
)
※ 외부 장착 시 PDM KIT Tray를 이용하여 장착할 것. (PDM KIT Tray Diagram 참조)
실외기에 배관을 용접할 경우 주의사항
•용접하기전주변에폭발및화재가능성이있는위험물/가연물을
반드시제거한후작업하십시오.
•제품에냉매가충전되어있으므로용접열에의한압력상승으로인해
인명피해가없도록충분히젖은물수건을사용하여배관및부품을
보호한후작업을진행해주십시오.
•배관을제품에용접할경우용접열및불꽃에의해기기가손상될
수있습니다.용접에의한손상이예상되는부위는방염포로감싼후
작업해주십시오.또한,용접부위좌측측면에실외온도를감지하기
위한센서가장착되어있으므로용접시손상되지않도록주의하여
주십시오.
•서비스밸브내부에는기밀용O-RING및테프론PACKING이들어
있으며,용접열에의해손상될수있습니다.반드시그림과같이젖은
물수건등을이용하여서비스밸브몸체하부의배관을감싼후에
용접을실시하십시오.젖은물수건에서물이흘러내릴경우용접에
방해가되므로젖은수건은물이흘러내리지않도록주의하십시오.
•실내•외기연결배관은서로간섭이없어야하며제품에닿지않도록
주의하십시오.(진동에의해파손될수있습니다.)
•배관용접후누설감지를위해사용되는감지액은지정된제품을
사용해주십시오.황성분이함유된감지액의경우배관부식을
유발할수있습니다.
Cautions when welding the piping to the outdoor unit
• Make sure to remove dangerous materials/combustibles that can explode or
catch re before welding.
• The product is lled with refrigerant so proceed to work after protecting the
piping and product by using wet towels in order to prevent casualties due to
an increase in pressure by welding heat.
• When welding the piping to the product, the device may be damaged by
welding heat or ame. Protect the area that can be damaged when welding
with ame retardant cloths. In addition, a sensor is installed on the left side
of the welded area to measure the outside temperature. Make sure it is not
damaged during welding.
• Sealing O-RING and Teon packing are included inside the service valve, and
they may be damaged by welding heat. Make sure to weld after protecting
the piping at the lower part of the service valve by using wet towels etc. as
shown in the picture. Make sure that water does not run from the wet towel
as it can interfere with the welding.
• The indoor and outdoor connection piping must not interfere with each
other and must not touch the product. (Damage is possible by vibration.)
• Use the designated product for the liquid used for detecting leakages after
welding. If the liquid contains sulfur, it can cause pipe corrosion.
부속품
∙ 고낙차 KIT 설치 전 하단부의 캐비닛을 분리해 주십시오.
Connection method
KIT model name MXD-A38K2A MXD-A12K2A MXD-A58K2A
SET application
model name
AM080
~120
AM072
/AA~120
/AA
4TV
0072
~0120
AM140
~160
AM144
/AA
4TV
0144
AM180
~300
AM168
/AA~216
/AA
4TV
0168
~0216
Image
Insert model
name label
location
High
Pressure S/V
Main Piping
Main Piping
High
Pressure
S/V
Insert model
name label
location
Main Piping
High
Pressure
S/V
Insert model
name label
location
Cable tie
Pipe connection socket
MXD-
A38K2A
MXD-A12K2A
(ID12.7)
MXD-A58K2A
(ID15.88)
When needed, use the appropriate accessories(sockets) packed separately, for each product piping hole.
Install on the outside of the outdoor unit if impossible to install inside. (Model : RD
, RVX
)
If outdoor unit is 460V model(Model: AM
JH/AA, AM
JR/AA, 4TV
400NB),
PDM KIT requires special cabinet for installation on pipe tray. (Refer to PDM KIT Tray Diagram)
Parts
DVM PDM KIT Installation Manual
• It must be installed to the high-pressure pipe of the outdoor unit.
• The appropriate PDM kit corresponding to the capacity of the outdoor unit must be installed.
• In case of the combination of models higher than 22HP, PDM KIT must be installed to the high-pressure pipe of each outdoor unit.
Ex) In case of 34HP, 2 PDM KIT units of MXD-A12K2A (14HP) and MXD-A58K2A (20HP) must be installed.
• Make sure to install after checking the appropriate model, confirming the PDM KIT specifications (pipe diameter, capillary tube length).
• When you install the PDM kit, please contact the local Samsung staff to take extra steps.
DB98-32789A-09
* PDM KIT : Pressure Drop Modulation KIT
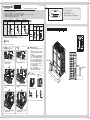
KIT 조립시 주의사항
-Check밸브가전면을
향하도록조립하십시오.
-반드시수직으로설치하십시오.
(좌우±5˚이내에서설치할것)
5˚
5˚
AM240H ~ 260H 설치 방법
25 mm
소켓 용접
AM240K ~ 300K 설치 방법
30 mm
소켓 용접
커팅
커팅
∙ 위의 그림은 완성된 형상이며 반드시 시운전 전에
가스누설이 있는지 확인하십시오.
∙ 준비된 고낙차 KIT를 소켓을 이용해 조립 후
용접하십시오.
용접
방염포
젖은 물수건
서비스밸브
충진포트
∙ 고낙차 KIT 조립을 위해 액관을 절단하십시오.
(왼쪽 끝단부에서 10mm 부위)
• Cut the liquid pipe for assembling pressure drop
modulation KIT.(10mm from the left edge)
∙ 고낙차 KIT 조립을 위한 고압관 서비스밸브 전단부
파이프를 분리하십시오.
• Separate the front pipe of the high-pressure pipe
in order to assemble the PDM KIT.
H/R 모델 (단, AM080~100∗∗모델은
H/P 모델과 같은 방법으로 연결)
H/R model
(However, AM080~120
should
be connected with the same way as H/P model.)
H/P 모델
H/P model
방염포
용접
절단대상
배관
충진포트
서비스밸브
젖은 물수건
Flame
retardant cloths
Welding
Piping for
separation
Filling
port
Service valve
Wet towel
방염포
용접
절단대상
배관
충진포트
서비스밸브
젖은 물수건
Flame
retardant cloths
Welding
Piping for
separation
Filling
port
Service valve
Wet towel
∙ 위의 그림은 완성된 형상이며 반드시 시운전 전에
가스누설이 있는지 확인하십시오.
∙ 준비된 고낙차 KIT를 조립한 후 용접하십시오.
용접
방염포
젖은 물수건
서비스밸브
충진포트
15 mm
Cautions while assembling KIT
• Assemble so that the check
valve faces forward.
• Make sure to install vertically. (Install
within ±5˚ to the left and to the right)
5˚
5˚
Installation method for AM240H ~ 260H
25 mm
Braze the
sockets
Installation method for AM240K ~ 300K
30 mm
Braze the
sockets
Cut
Cut
15 mm
• The above is the completed image, make sure to
check for gas leak before test operation.
• After assembling the supplied pressure drop
modulation kit with the sockets, weld them.
Welding
Flame retardant cloths
Wet towel
Service valve
Filling port
• The above is the completed image, make sure to
check for gas leak before test operation.
• Weld after assembling the prepared PDM KIT.
Welding
Flame retardant cloths
Wet towel
Service valve
Filling port
DVM S 고낙차 KIT AXD-A38K2A_IM_KEC 32789A-09.indd 1-2 2016-02-19 오후 1:14:25

连接方法
KIT 型号 MXD-A38K2A MXD-A12K2A MXD-A58K2A
SET 应用型号
ADX080
~120
AM080
~120
ADX140
~160
AM140
~160
ADX180
~240
AM180
~300
图像
插入型号
标签位置
高压 S/V
主配管
主配管
高压
S/V
插入型号
标签位置
主配管
高压
S/V
插入型号
标签位置
扎带
管连接插座
MXD-
A38K2A
MXD-
A12K2A
(ID12.7)
MXD-A58K2A
(ID15.88)
必要时,对于每个产品配管孔使用单独包装的合适附件 (插座)。
如果无法在内部安装,则在室外机的外部安装。(型号 :
RD
、
RVX
)
如果安装在室外,PDM KIT需要特殊的机柜安装在管道托盘上。(请参见 PDM KIT Tray 图)
部件
DVM PDM KIT 安装手册
DVM PDM KIT Tray Diagram
• 必须安装到室外机的液管。
• 必须安装与室外机容量相符的合适 PDM 套件。
• 为避免与高于 22HP 的型号相混合,PDM KIT 必须安装到每个室外机的液管。
Ex) 为避免与 34HP 型号相混合,必须安装 MXD-A12K2A (14HP) 和 MXD-A58K2A (20HP) 的 2 个 PDM KIT 装置。
• 确保在安装前先检查相应型号,确认 PDM KIT 规格(管直径、毛细管长度)。
• 安装 PDM 套件时,请联系当地三星员工采取额外步骤。
DB98-32789A-09
* PDM KIT : 压降调节 KIT * 使用产品前请仔细阅读本安装说明书,并请妥善保管。
•安装降压调节 KIT 之前,先拆下下部柜。
将配管焊接到室外机时的警告
• 确保在焊接前去除可能爆炸或着火的危险物质 / 易
燃物。
• 本产品充满制冷剂,因此在使用湿毛巾保护配管
和产品以防止因焊热导致压力增加而造成的伤害之
后,再继续工作。
• 在将配管焊接到本产品时,设备可能被焊热或火焰
损坏。 在使用阻燃布进行焊接时保护可能被损坏
的区域。 此外,在焊接区域左侧安装传感器以测
量室外温度。 确保在焊接过程中不会受到损坏。
• 检修阀内含有 O 形密封圈和特氟纶填料,焊热可
能会损坏它们。确保在焊接前使用湿毛巾等保护检
修阀下半部分的配管,如图所示。确保湿毛巾不会
滴水,因为水可能会妨碍焊接。
• 室内和室外连接配管不得相互干扰,也不得接触到
本产品。(振动可能会造成损坏。)
• 焊接后,对用于检测泄露的液体使用指定产品。
如果液体含有硫磺,则可能导致管腐蚀。
小心
小心
组装 KIT 时的警告
•组装时使止回阀面朝前。
•确保垂直安装。
(在±5°内向左向右
安装)
制 造 商:三星电子株式会社
原 产 地:韩国制造
销售商名称:三星(中国)投资有限公司
销售商地址:北京市朝阳区东三环中路5号财富金融中心6F
•分离液管以便组装降压调节 Kit。
(距离左边缘 10 毫米)
•分离液管前段管以便组装 PDM KIT。
H/R
型号
(但是,ADX080 ~ 120
应
使用与 H/P 型号相同的方式连接。)
H/P
型号
阻燃布
焊接
配管需
要分离
加液处
检修阀
湿毛巾
阻燃布
焊接
配管需
要分离
加液处
检修阀
湿毛巾
•上面是完整图像,请确保在进行测试操作
之前检查气体泄漏情况。
•拆下所提供的降压调节 Kit 和插座后,
将其焊接。
焊接
阻燃布
湿毛巾
检修阀
加液处
•上面是完整图像,请确保在进行测试操作
之前检查气体泄漏情况。
•拆下所提供的降压调节 Kit 和插座后,
将其焊接。
焊接
阻燃布
湿毛巾
检修阀
加液处
AM240K
~
300K
的安装方法
30 mm
铜焊和
插座
切割
15 mm
5˚
5˚
DVM S 고낙차 KIT AXD-A38K2A_IM_KEC 32789A-09.indd 3-4 2016-02-19 오후 1:14:30
-
 1
1
-
 2
2