
INSTALLATION MANUAL
Please read ‘Safety Precautions’ described in the installation manual of the air conditioner.
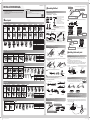
• Check the following parts in the package.
• For further information of the piping material and size of the refrigerant pipes, refer to the installation
manual of the air conditioner.
DB98-33821A-05
Branch joints
• Condensate may occur on the heat insulation surface according to the atmosphere inside of the ceiling.
• If the inside of the ceiling has high temperature or humidity rate is more than 80%, please add proper
insulation to prevent water drops.
• The stopper area of the pipe or socket should be spread with a welding material. EX)
Requirement
±10°
or less
The
horizon
Reducer Header joint
Pipe
Adhesive insulation tape
Insulating the pipe
Insulating
header joint
Insulating after brazing the cap
Adhesive insulation tape
Insulator
Header joint
Cover the connected part and fasten the header joint using a cable tie.
Insulate the header joint and the brazed part and wrap the connected
part with an adhesive insulation tape to prevent it from dewing.
Installing the Header joint
1. Select the reducer fitted on the diameter of the pipe.
Reducer
Pipe
To indoor unit
Pipe
<Gas side>
To outdoor unit
Reducer
Pipe
To indoor unit
Pipe
<Liquid side>
To outdoor unit
Brazed part
Provided
3. Install the header joint horizontally.
±15°
or less
The horizon
±10°
or less
The horizon
<Liquid side>
±15°
or less
The
horizon
The horizon
Oil balancing joint & gas side of the outdoor unit
Use an insulation with the heat resisting temperature over 120°C.
Wrap the branch joint with an insulation of a thickness of at least 10mm as shown in the diagram.
Wrap the connected part between the Outdoor joint and the gas side of the outdoor unit to
prevent it from defrosting. Wrap the oil balancing joint and gas side pipe of the outdoor unit
wholly to prevent it from dewing.
øD
øD
90°
90°
100mm or more
Cut the insulation
at the proper angle.
Cut the insulation
at the proper angle.
Wrap here with plastic tape
Use EPDM insulation.
Pipe insulation
(Field supply)
90°
Pipe
Pipe insulation
(Field supply)
Insulation
( Field supply)
2. Block the reducer that is not used by brazing the cap if the number of connected indoor
unit is fewer than header joint holes.
Blocked the hole of
header joint
In order
<Gas side>
<Liquid side>
Blocked the hole of
header joint
In order
Provided
Brazed part
Pipe
Oil balancing joint
(Field supply)
To outdoor unit
To other oil balancing joint or outdoor unit
Pipe
To other oil balancing
joint or outdoor unit
When combining 2 units, connect the oil balancing
pipe directly between the outdoor units.
Oil balancing
pipe
Installing the Oil balancing joint
Note
Connect the header joint to the pipe by cutting the provided reducer properly.
10~15mm
or more
Installing the Outdoor joint
Use the attached reducer according to the selected pipe size.
Pipe
Reducer
Reducer
Pipe
To other outdoor unit
To other outdoor joint or Y-joint of the main pipe
<Liquid side>
To other outdoor joint or outdoor unit
Pipe
Reducer
Reducer
Pipe
To other outdoor unit
To other outdoor
joint or outdoor unit
To other outdoor joint or Y- joint of the main pipe
To other outdoor unit
To other outdoor
joint or outdoor unit
Use the attached reducer according to the selected pipe size.
<Gas side>
Note
Connect the Outdoor joint to the pipe by cutting the outlet of the Outdoor joint or provided reducer properly.
10~15mm or more
<Gas side>
The horizon
Y-joint
Reducer
Model
Name
MXJ-YA1509K MXJ-YA2512L MXJ-YA2812K MXJ-YA2815K MXJ-YA3119K MXJ-YA3819K MXJ-YA4422K
Liquid side
Gas side
x 2 EA
1
x 2 EA
1
x 2 EA
2
x 2 EA
3
x 2 EA
1
x 2 EA
2
x 1 EA
7
x 1 EA
3
x 1 EA
7
x 1 EA
3
x 2 EA
2
x 2 EA
2
x 1 EA
4
x 1 EA
3
x 1 EA
5
x 1 EA
4
x 1 EA
3
x 1 EA
6
x 1 EA
5
x 1 EA
3
x 2 EA
3
x 1 EA
1
1 2 3 4 5 6 7
Model name Total indoor unit’s capacities
MXJ-YA1509K
15.0 kW and below
MXJ-YA2512L
Over 15.0~40.6 kW and below
MXJ-YA2812K
Over 40.6~46.4 kW and below
MXJ-YA2815K
Over 46.4~69.6 kW and below
MXJ-YA3119K
Over 69.6~98.6 kW and below
MXJ-YA3819K
Over 98.6~139.2 kW and below
MXJ-YA4422K
Over 139.2 kW
Y-joint for HR (High pressure gas)
Reducer
1 2 3
Model
MXJ-YA1500K MXJ-YA2500K MXJ-YA3100K MXJ-YA3800K
x 2 EA
1
x 1 EA
2
x 1 EA
1
x 1 EA
3
x 1 EA
2
x 1 EA
1
Model name Total indoor unit’s capacities
MXJ-YA1500K
23.2 kW and below
MXJ-YA2500K
Over 23.2~69.6 kW and below
MXJ-YA3100K
Over 69.6~139.2 kW and below
MXJ-YA3800K
Over 139.2 kW
Header joint
Model
Name
MXJ-HA2512K MXJ-HA3115K MXJ-HA3819K
Liquid side
Gas side
x 4 EA
1
x 1 EA
a7
x 1 EA
2
x 8 EA
1
x 1 EA
b7
x 1 EA
4
x 1 EA
c7
x 8 EA
1
x 4 EA
3
x 1 EA
8
x 2 EA
8
x 2 EA
8
x 1 EA
5
x 8 EA
3
x 1 EA
6
x 8 EA
3
Reducer
1 2 3 4 5 6
7 a b c
Model name
Total indoor unit’s
capacities
The maximum
quantity of connection
MXJ-HA2512K 46.4 kW and below 4
MXJ-HA3115K 69.6 kW and below 8
MXJ-HA3819K
Over 69.6kW ~
139.2KW and below
8
Outdoor joint for HR (High pressure gas)
Model
MXJ-T3100 MXJ-T3800
x 1 EA
3
x 1 EA
2
x 1 EA
1
x 1 EA
6
x 1 EA
5
x 1 EA
4
Reducer
1 2 3 4 5 6
Model name Total outdoor unit’s capacities
MXJ-T3100
Below 48 HP
MXJ-T3800
Above 50 HP
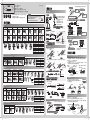
Installation of outdoor joints
Do not install the outdoor
joint in this direction.
Liquid pipeGas pipe
Oil balancing
pipe
High pressure gas pipe
Connecting Method
Installing the Y-joint
Insulating the branch joint
Y-joint & liquid side of the outdoor unit
Attach the insulation provided with a branch joint to the insulation supplied in the eld
without a gap. Wrap the connected part with an insulation (Field supply) of a thickness of at
least 10mm.
Use an insulation with the heat resisting temperature over 120°C.
Wrap the branch joint with an insulation of a thickness of at least 10mm.
When insulating in high humidity(higher than 30°C, 80%), wrap the supplied insulation with
more than 10mm of extra insulation such as Polyethylene Foam or other similar material.
Attach the adhesive insulation tape to the pipe
as shown in the picture after insulating the pipe.
Insulation tape
(Field supply)
Pipe insulation
(Field supply)
Pipe
Fix securely without any gap.
Pipe insulation
Provided
Fix securely
without any gap.
Pipe insulation
(Field supply)
Pipe insulation
(Field supply)
150mm
Branch
Y-joint
A thickness of the insulation (Field supply)
should be at least 10mm.
(Field supply)
Connect the header joint in order respecting the number of the indoor unit.
Connet the indoor unit as the highest capacity comes first.
Install the Y-joint ‘horizontally’ or ‘vertically’.
<Install vertically>
<Using reducer>
- Use connection part of Y-joint or provided
reducer by cutting them in accordance with
diameter of connecting pipe.
- Make certain 10~15mm or more for reducer
which connected with pipe.
- Remove burr on cut part of reducer.
It is impossible to connect reducer with pipe,
if pipe is deformed or reducer is untrimmed.
10~15mm
or more
Keep a minimum distance of 500mm or more before
connecting a branch joint.
<Install horizontally>
Maintain ±15° on
the horizon
Install the Y-joint within ±15° on
the horizon or on the vertical.
500mm
or more
Main pipe
To outdoor unit
Pipe
Front
Rear
Rear
Pipe
Reducer
To other branch
joints or indoor unit
Reducer
Do not insert the pipe deeply into the Y-joint.
( Do not insert more than 70mm.)
<Insertion depth of the connecting pipe>
Connecting pipe Connecting pipe
Basic specification
When cutting the connection part
Outdoor joint
Model
Name
MXJ-T3819 MXJ-T4422 MXJ-TA3819L MXJ-TA4422L
Liquid side
x 2 EA
1
x 2 EA
1
Gas side
x 2 EA
3
x 1 EA
2
x 1 EA
6
x 1 EA
5
x 1 EA
4
x 1 EA
7
x 1 EA
3
x 1 EA
5
x 1 EA
6
Model name Total outdoor unit’s capacities
MXJ-T3819
/MXJ-TA3819L Below 48 HP
MXJ-T4422
/MXJ-TA4422L Above 50 HP
Reducer
1 2 3 4 5
6 7
55
90
20
ID ø22.4
ID ø19.2
OD ø15.9
8
DVM MXJ-YA1509-_IM_EN+ZH_33821A-05.indd 1 2014-12-12 오후 5:41:22

安装手册
DB98-33821A-05
≤ ±10°
水平线
承口 歧管接头
配管
分歧管接头
◆ 用电缆扎带扎紧分歧管接头并封住连接部位。
◆ 分歧管接头和焊接部位保温,用保温胶带缠绕连接
部位以防止结露。
安装室外机接头
安装歧管接头
1.选择与管道直径匹配的承口。
承口
配管
至室内机
配管
<气体侧>
至室外机
承口
配管
至室内机
配管
<液体侧>
至室外机
备置
铜焊部件
2.如果连接的室内机数量少于歧管连接孔时,用焊接堵头封住不使用的接口。
歧管接头孔堵塞
按顺序
<气体侧>
歧管接头孔堵塞
按顺序
<液体侧>
备置
铜部件
油平衡接头和室外机气体侧
◆ 使用可耐120 ℃以上高温的保温材料。
◆ 使用10 mm以上厚度的保温材料包缠分支管接头,如图所示。
◆ 包缠室外接头和室外机气侧之间的连接部件,以防止结霜。包缠油平衡接
头和这个室外机的气侧管路以防止结露。
3.水平安装分歧管接头。
≤
±15°
水平线
<液体侧>
水平线
安装油平衡接头
备注
适当切割提供的承口将歧管接头连接到配管上。
≥ 10-15 mm
≤
±15°
水平线
≤
±10°
水平线
<气体侧>
水平线
Y形接头
分歧管接头
歧管接头
HR户外接头(高压气体)
承口
户外接头
型号
名称
MXJ-YA1509K MXJ-YA2512L MXJ-YA2812K MXJ-YA2815K MXJ-YA3119K MXJ-YA3819K MXJ-YA4422K
液体侧
气体侧
x 2 个
1
x 2 个
1
x 2 个
2
x 2 个
3
x 2 个
1
x 2 个
2
x 1 个
7
x 1 个
3
x 1 个
7
x 1 个
3
x 2 个
2
x 2 个
2
x 1 个
4
x 1 个
3
x 1 个
5
x 1 个
4
x 1 个
3
x 1 个
6
x 1 个
5
x 1 个
3
x 2 个
3
x 1 个
1
1 2 3 4 5 6 7
型号 室内机总容量
MXJ-YA1509K < 15.0 kW
MXJ-YA2512L > 15.0~40.6 kW
MXJ-YA2812K > 40.6~46.4 kW
MXJ-YA2815K > 46.4~69.6 kW
MXJ-YA3119K > 69.6~98.6 kW
MXJ-YA3819K > 98.6~139.2 kW
MXJ-YA4422K > 139.2 kW
型号
名称
MXJ-HA2512K MXJ-HA3115K MXJ-HA3819K
液体侧
气体侧
x 4 个
1
x 1 个
a7
x 1 个
2
x 8 个
1
x 1 个
b7
x 1 个
4
x 1 个
c7
x 8 个
1
承口
1 2 3 4 5 6
HR Y形接头(高压气体)
承口
1 2 3
型号
MXJ-YA1500K MXJ-YA2500K MXJ-YA3100K MXJ-YA3800K
x 2 个
1
x 1 个
2
x 1 个
1
x 1 个
3
x 1 个
2
x 1 个
1
型号 室内机总容量
MXJ-YA1500K < 23.2 kW
MXJ-YA2500K > 23.2~69.6 kW
MXJ-YA3100K > 69.6~139.2 kW
MXJ-YA3800K > 139.2 kW
型号
室内机总容量 室内机总容量
MXJ-HA2512K < 46.4 kW 4
MXJ-HA3115K < 69.6 kW 8
MXJ-HA3819K
< 69.6 kW ~
139.2 kW
8
牢牢固定,不留
间隙,配管保温
备置
配管保温
(现场备置)
管道保温
(现场备置)
150 mm
Y形接头
保温胶带(现场备置)
至少10 mm以上
(现场备置)
牢牢固定,
不留间隙。
分支接头保温
Y形接头和室外机液体侧接头保温
◆ 将随分支接头提供的保温材料安装到与现场备置的保温材料连接到一起,
不要留有间隙。至少要使用10 mm厚的保温材料(现场配置)保缠连接部件。
◆ 使用可耐120 ℃以上高温的保温材料。
分支接头保温厚度至少为10 mm。
◆ 当在高湿度(30 ℃,80 % 以上)下进行绝缘时,请再另外用 10 mm 的聚
乙烯泡沫或类似材料将随供的绝缘部分缠绕。
保温带(现场备置)
保温套(现场制作)
* 完成上述操作后,请用胶带
缠绕保温处。
配管
请仔细阅读空调器安装手册中“安全注意事项”的内容。
·请检查包装中的下列部件。
·管道的材料和冷媒管的尺寸请参照空调器安装手册。
øD
øD
90°
90°
≥
100 mm
以适宜的角度切
割保温材料
以适宜的角度
切割保温材料
用塑胶带包缠配管
使用 EDPM 泡沫保温材料
管道保温套 ( 现场备置 )
90°
管道保温套
( 现场备置 )
配管
保温套
( 现场备置 )
保温胶带
配管保温
歧管接头保温
焊接堵头后保温
保温胶带
隔热材料
配管
油平衡接头(现场备置)
至室外机
至其它油平衡接头或室外机
配管
至其它油平衡
接头或室外机
* 当并联两台机组时在室外机之间直接连
接油平衡接头。
油平衡管
室外接头安装
液体管
气体管
油平衡管
高压气体管
注 切割室外接头的出口或提供的承口将室外接头,正确连接室外接头和配管。
≥10-15 mm
此方向不要安装
室外接头
* 在气体侧使用与所选管道尺寸相匹配的承口附件。
配管
承口
承口
配管
至其它室外机
至其它室外接头或主管的 Y 形接头
<气体侧>
至其它室外接
头或室外机
至其它室外机
至其它室外接
头或室外机
<液体侧>
* 在液体侧使用与所选配管尺寸相匹配的承口附件。
配管
承口
承口
配管
至其它室外机
至其它室外接头或主管的 Y 形接头
至其它室外接头或室外机
连接方法
安装Y形接头
“水平”或“垂直”安装Y形接头。
◆
请勿将配管过深的插入 Y 形接头。
( 请勿使插入深度超过 70 毫米。)
注意
<垂直连接>
<使用承口>
- 请根据连接配管的直径切割Y形接头
(岔管)的连接部分或者提供的承口
后使用。
- 确保连接配管的承口间隙为
10-15 mm以上。
- 去除切割承口截面上的毛刺。
如果配管变形或承口不整齐,
无法连接承口和配管。
≥10-15 mm
◆
在连接分支接头之前,保持最小
500mm 以上的距离。
注意
<水平连接>
以水平线为
基准保持 ±15°
* 在水平或垂直方向
±15°范围内安装 Y 形接头。
≥ 500 mm
主配管
至室外机
管道
前
后
后
配管
承口
至其它分支管或
室内机
承口
<插入连接管道深度>
连接管道 连接管道
* 基本规格 * 切割连接部分时
型号
名称
MXJ-T3819 MXJ-T4422 MXJ-TA3819L MXJ-TA4422L
液体侧
x 2 个
1
x 2 个
1
气体侧
x 2 个
3
x 1 个
2
x 1 个
6
x 1 个
5
x 1 个
4
x 1 个
7
x 1 个
3
x 1 个
5
x 1 个
6
型号 室外机总容量
MXJ-T3819
/MXJ-TA3819L
< 48 HP
MXJ-T4422
/MXJ-TA4422L
> 50 HP
承口
1 2 3 4 5
6 7
型号
MXJ-T3100 MXJ-T3800
x 1 个
3
x 1 个
2
x 1 个
1
x 1 个
6
x 1 个
5
x 1 个
4
承口
1 2 3 4 5 6
型号 室外机总容量
MXJ-T3100
< 48 HP
MXJ-T3800
> 50 HP
• 根据天花板内的空气条件可能会出现绝缘材料表面结露现象。
• 如果天花板内部存在高温或湿度大于 80 %,
应增加适当的绝缘以防止滴水。
• 配管或承口的堵塞部分应与焊接材料相分离。
要求事项
EX)
◆
按照室内机的编号顺序连接分歧管接头。
◆
连接室内机,先连接容量高的室内机。
注意
制 造 商:三星电子株式会社
原 产 地:韩国制造
销售商名称:三星(中国)投资有限公司
销售商地址:北京市朝阳区建国路乙118号京汇大厦2108室
使用产品前请仔细阅读本安装说明书,并请妥善保管。
x 4 EA
3
x 1 EA
8
x 2 EA
8
x 2 EA
8
x 1 EA
5
x 8 EA
3
x 1 EA
6
x 8 EA
3
7 a b c
55
90
20
ID ø22.4
ID ø19.2
OD ø15.9
8
DVM MXJ-YA1509-_IM_EN+ZH_33821A-05.indd 2 2014-12-12 오후 5:41:26
-
 1
1
-
 2
2

