
XT-DTV20LN
2006 Sony Corporation
Operating Instructions
CT
Digital TV Tuner
2-666-623-11 (1)
GB
For installation and connections, see the supplied Installation/Connections
manual.

2
Welcome!
Thank you for purchasing the Sony
Digital TV Tuner.
• High fidelity DVD quality video
presentation.
• 2,000 programmable favourite
channels.
• EPG function, supports PIG (Picture in
Graphics) display.
• Parental lock option available.
• Last channel memory function.
• Dual tuner options available for
diversity function.
• Mobile reception mode, can receive
several dozens terrestrial digital TV
programmes during moving in high
speed.

3
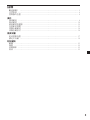
Table of contents
Welcome! .............................................................................................................................. 2
Precautions........................................................................................................................... 4
Location of controls ............................................................................................................6
Operation
Searching channels ............................................................................................................. 8
Receiving channels ........................................................................................................... 10
Using channel manager ................................................................................................... 12
Checking the Programme Guide .................................................................................... 15
Switching the audio channel ........................................................................................... 16
Switching the audio language......................................................................................... 16
Changing Setup
Changing the menu settings ........................................................................................... 17
Locking the unit ................................................................................................................19
Additional Information
Maintenance ...................................................................................................................... 21
Specifications ..................................................................................................................... 22
Troubleshooting ................................................................................................................ 23
Messages ............................................................................................................................ 23

4
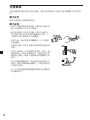
Precautions
To avoid the risk of serious injury or accident, read the following precautions before
installing and operating the unit.
On safety
Comply with your local traffic rules and regulations.
On installation
• Installing this unit requires technical expertise.
This unit should be installed by a qualified
technician or service personnel.
• If you try to install this unit by yourself, do it
properly, referring to the installation and wiring
diagrams in the installation/connections manual.
Improper installation may result in fire or electric
shock.
• Before installation, be sure to turn the ignition
switch to the OFF position or take the key out.
Installing this unit with the ignition on may
cause battery drain or a short circuit.
• Do not damage any pipes, tubes, the fuel tank or
electric wiring when installing this unit. This can cause
a fire. If you drill a hole in car panels, make sure that
any hidden car parts will not be damaged.
• Do not use any nuts or bolts for safety devices such as
steering linkage, fuel supply or braking systems. This
can cause a fire or an accident.
• Take care to prevent cords and wires from getting
tangled or crimped in the moving portion of a seat rail.

5
Where to install
Before installing this unit, please check your local traffic rules and regulations.
Do not install this unit where:
- It will obstruct the driver’s view.
- It will obstruct the operation of the airbag system.
- It will obstruct the operation of the vehicle, especially
the steering wheel, shift lever, or brake pedal.
-A driver or passengers may injure themselves when
getting into or out of the car.
If you have any questions or problems concerning your unit that are not covered
in this manual, please consult your nearest Sony dealer.

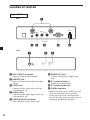
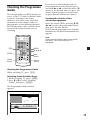
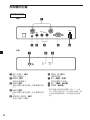
6
ANT 1 ANT 2
SERVICE
POWER
12V
VIDEO
REMOTE
L
OUTPUT
RAUDIO
1
5 6
432
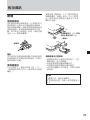
Location of controls
Digital TV Tuner
1 ANT 1/ANT 2 terminals
Input to connect the antennas.
2 REMOTE jack
Input to connect the remote control
sensor.
3 VIDEO jack
Connect to the video input jack on
your monitor, etc.
4 AUDIO jacks
Connect to the audio input jacks on
your monitor, etc.
5 SERVICE (RS232) terminal
This terminal is for service only.
6 POWER 12V jack
Connect the power supply cord
here.
7 |/a (power) button*
Turns on or off the unit.
8 |/1 (power) indicator
9 SIGNAL indicator
* When installing in a car without an ACC
(accessory) position on the ignition
switch, be sure to press this button to
turn off the unit when you do not use it.
Otherwise the battery will drain.
SIGNAL@ / 1
987
Rear
Front

7
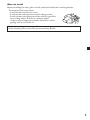
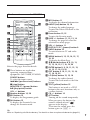
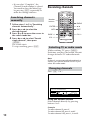
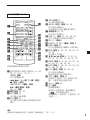
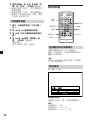
Card remote commander RM-X711
Refer to the pages listed for details.
1 These buttons are used when
operating connected Sony
equipments (MV-700HR, XVM-F65).
SOURCE button
To select the input source.
./> (previous/next) buttons
x (stop) button
MONITOR |/1 (power) button
u (play/pause) button
VOL +/– buttons
2 Number buttons 10, 20
3 EPG button 15
To display the Programme guide.
4 FAV button 13
To display the Favorite List or
change the Favorite mode.
5 INFO button 11
To display the channel information.
6 AUDIO (red) button 14, 16
To change the audio language.
To enter the Delete CH mode as the
red button.
7 Green button 12, 15
To enter the Favorite mode.
8 PAGE +/– buttons 11, 12, 13, 14
To change the page list when the
selection has many pages.
9 VOL +/– buttons 11
0 DIGITAL TV |/1 (power) button 8
qa RADIO button 10
To switch between TV and radio
mode.
qs MENU button 8, 12, 13, 14, 15, 17,
19, 20
To display the Main Page.
qd M/m/</, buttons 8, 9, 10, 11,
12, 13, 14, 15, 17, 18, 19, 20
qf ENTER button 8, 9, 10, 11, 12, 13,
14, 15, 17, 18, 19, 20
qg EXIT button 9, 10, 11, 12, 13, 14,
17, 18, 19, 20
qh L/R (blue) button 13, 15, 16
To change the audio channel.
To enter the Lock mode as the blue
button.
qj TEXT (yellow) button 15
This button is not used as a TEXT
button in this unit (functions only as
a yellow button).
qk CH +/– buttons 10
ql ATT button
Turning off the sound temporarily.
When you press the button, the
sound is turned off and “
”
appears in the display.
To restore the sound, press the
button again (or (VOL) +).
0
qa
qf
qs
qd
qj
qh
qg
ql
qk
1
2
3
4
8
9
5
6
7
MONITORSOURCE
FAV
EPG
.
ux
`
/
1`
/
1
>
DIGITAL TV
ENTER
123
456
789
0
VOL
PAG E VOL CHATT
RADIO
MENU
INFO EXIT
L/RTEXTAUDIO
Tip
Refer to “Replacing the lithium battery” for details on how to replace the batteries (page 21).

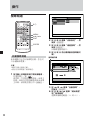
8
Operation
Searching channels
`/1
MENU
EXIT
ENTER
B/V/v/b
MONITORSOURCE
FAV
EPG
.
ux
`
/
1`
/
1
>
DIGITAL TV
ENTER
123
456
789
0
VOL
PAG E VOL CHATT
RADIO
MENU
INFO EXIT
L/RTEXTAUDIO
Searching channels
automatically
If the radio signal is included in the
broadcast, you can also store the radio
stations.
Notes
• Make sure to connect the antennas
correctly.
• When searching channels, make sure to
perform while the car is stopped.
1 Press the power button on the
main unit to turn on the unit.
On the remote, press .
When you turn on the unit for the
first time, the Main Page appears. If
the Main Page does not appear when
you turn on the unit, press (MENU)
on the remote.
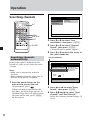
Main Page
TV Channel
Program Guide
User Instalation
TV Channel
Radio Channel
2 Press M or m to select “User
Installation”, then press (ENTER).
3 Press M or m to select “Channel
Search”, then press (ENTER).
Channel Search window appears.
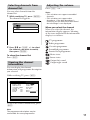
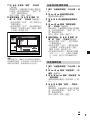
4 Press M or m to move the cursor to
the search mode bar.
Frequency
Channel
Channel Search
FFT Mode: 8K
Guard Interval: 1/4
Constellation: 16QAM
Hierarchy: None
Code Rate: 2/3
Strength 21
557000
28
Auto Search
Quality 0
5 Press < or , to select “Auto
Search”, then press (ENTER).
6 Press M/m/</, to select “Start
Channel” and “End Channel”.
Select the scanning channel range (14
to 69).
Search mode bar

9
7 Press M or m to select “Search”,
then press (ENTER).
The search starts. The scanned
channels are automatically stored in
order. If the broadcasting station is
scanned, a numerical value of
“Strength” and “Quality” will
increase.
To stop searching, press (EXIT).
8 When the search is completed,
press M or m to select “View” or
“Complete”, then press (ENTER).
•If you select “View”, the selected
channel will be received
immediately.
•If you select “Complete”, the
Channel Search window is closed.
You need to close the Main Page by
pressing (EXIT) repeatedly to make
the settings effective.
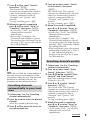
Frequency
Channel
Channel Search
FFT Mode: 8K
Guard Interval: 1/8
Constellation: QPSK
Hierarchy: None
Code Rate: 1/2
Strength 21
177500
5
Auto Suarch
Quality 0
Channel Search
View
Complete
Scanning 100%
Strength
Quality
TV Radio
Channel 32 581Mhz 6/6
Note
When the unit finds the same broadcast in
the same channel, the broadcast will be
overwritten. When the unit finds the same
broadcast in a different channel, the
broadcast will be additionally stored.
Searching channels
automatically in your local
area
1 Follow steps 1 to 3 in “Searching
channels automatically”.
2 Press < or , to select the desired
channel.
Select the scanning channel range.
3 Press M or m to move the cursor to
the search mode bar.
4 Press < or , to select “Search
local channels”, then press
(ENTER).
The search starts. The scanned
channels are automatically stored in
order. If a broadcasting station is
scanned, a numerical value of
“Strength” and “Quality” will
increase.
To stop searching, press (EXIT).
5 When the search is completed,
press M or m to select “View” or
“Complete”, then press (ENTER).
•If you select “View”, the selected
channel will be received
immediately.
•If you select “Complete”, the
Channel Search window is closed.
You need to close the Main Page by
pressing (EXIT) repeatedly to make
the settings effective.
•If the reception is poor, the channel
information is displayed as TVch 1,
2... and will not be properly
displayed. In this case, try it again
in a different area.
Searching channels quickly
1 Follow steps 1 to 4 in “Searching
channels automatically”.
2 Press < or , to select “Quick
Search”, then press (ENTER).
3 Press M/m/</, to select “Start
Channel” and “End Channel”.
Select the scanning channel range
(Default is 14 to 36).
4 Press M or m to select “Search”,
then press (ENTER).
The search starts. The scanned
channels are automatically stored in
order. If the broadcasting stations is
scanned, a numerical value of
“Strength” and “Quality” will
increase.
To stop searching, press (EXIT).
5 When the search is completed,
press M or m to select “View” or
“Complete”, then press (ENTER).
• If you select “View”, the selected
channel will be received
immediately.
Continued

10
Receiving channels
RADIO
EXIT
CH +/–
V/v
ENTER
INFO
VOL +/–
PAG E +/ –
MONITORSOURCE
FAV
EPG
.
ux
`
/
1`
/
1
>
DIGITAL TV
ENTER
123
456
789
0
VOL
PAG E VOL CHATT
RADIO
MENU
INFO EXIT
L/RTEXTAUDIO
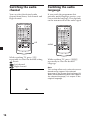
Selecting TV or radio mode
While watching TV, press (RADIO).
Each time you press the button, the unit
changes between TV and radio mode.
Note
If there is no corresponding broadcasting
station, you cannot receive it even if you
select the radio mode.
Changing channels
Press (CH) + or –.
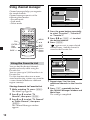
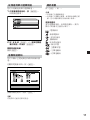
14:00 – 14:30 Country House
12:35 – 14:00
CH: 32
003
581000 Sep. 8 12 : 58
Blood On The Moon
English 1/2
Using the number button
Select channels directly by pressing
buttons 0 to 9.
Example:
To select channel 5, press 5.
To select channel 25, press 2 and 5.
To select channel 125, press 1, 2 and 5.
Number
buttons
• If you select “Complete”, the
Channel Search window is closed.
You need to close the Main Page
by pressing (EXIT) repeatedly to
make the settings effective.
Searching channels
manually
1 Follow steps 1 to 3 in “Searching
channels automatically”.
2 Press < or , to select the
desired channel.
3 Press M or m to move the cursor to
the search mode bar.
4 Press < or , to select “Search
single channel”, then press
(ENTER).
The search starts.
To stop searching, press (EXIT).

11
Selecting channels from
channel list
You can select channels from the
channel list.
1 While watching TV, press (ENTER).
The channel list appears.
All TV
001
002
003
2 Press M/m or (PAGE) +/– to select
the channel you want to watch,
then press (ENTER).
To close the channel list
Press (EXIT).
Viewing the channel
information
You can display the channel
information and programme description
you selected.
While watching TV, press (INFO).
Program Information
CH Name :
Channel number : 3
Scramble : None
Favorite : None
Lock : None
Channel : 32
Frequency : 581000
Guard Interval : 1/4
Constellation : 16QAM
Code Rate : 2/3
Video PID
Audio PID
PCR PID
Quality–1 99
Quality–2 0
4021
4022
4021
To close the channel information, press
(EXIT).
Note
The programme description may be
unavailable for some programmes.
Adjusting the volume
Press (VOL) + or –.
Notes
• This unit does not support scrambled
channels.
• This unit does not support data
broadcasts. If the data broadcast is
received, you can hear the audio sound
but the image is not displayed.
When you select the channel
When you select the channel, the
information display appears. Meaning
of the icons indicated in the information
display is as follows:
: TV programme
: Radio programme
: Favorite programme
: Scrambled programme
: Parental lock programme
: Mute status
: Stereo status
: Output left sound
: Output right sound

12
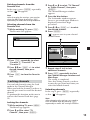
TV Channel
Press 'ENTER' key to select favorite/unfavorite channel
Channel : 32
Frequency : 581000
Delete
Favorite Lock
Favorite 1
001
002
003
4 Press the green button repeatedly
to select “Favorite 1”, “Favorite 2”
or “Favorite 3”.
5 Press M/m or (PAGE) +/– to select
the desired channel.
6 Press (ENTER).
“
” appears next to your selected
channel name. And the channel is
stored to the Favorite List.
TV Channel
Press 'ENTER' key to select favorite/unfavorite channel
Channel : 32
Frequency : 581000
Delete
Favorite Lock
Favorite 1
001
002
003
7 Repeat steps 3 to 6 to store
additional channels to the Favorite
List.
8 Press (EXIT) repeatedly to close
the Channel Manager window and
Main Page.
The setting is completed.
Using channel manager
Channel manager helps you organize
the stored channels.
Channel manager consists of the
following three modes:
• Favorite mode
• Lock mode
• Delete mode
MENU
EXIT
PAG E +/ –
V/v
ENTER
FAV
MONITORSOURCE
FAV
EPG
.
ux
`
/
1`
/
1
>
DIGITAL TV
ENTER
123
456
789
0
VOL
PAG E VOL CHATT
RADIO
MENU
INFO EXIT
L/RTEXTAUDIO
Using the Favorite List
You can find the desired channels
quickly and easily while using the
Favorite List.
You can store up to 2,000 broadcasts to
Favorite List.
Use this function when two or more
same broadcasting stations are stored in
a same channel number in a different
region (country).
Storing channels to Favorite List
1 While watching TV, press (MENU).
The Main Page appears.
2 Press M or m to select “TV
Channel”, then press (ENTER).
3 Press M or m to select “TV Channel”
or “Radio Channel”, then press
(ENTER).
The Channel Manager window
appears.
Red
button
Green
button
Blue
button

13
Deleting channels from the
Favorite List
In the step 6, press (ENTER) repeatedly
so that “
” disappears.
Note
After changing the settings, you need to
close the Main Page by pressing (EXIT)
repeatedly to make the settings effective.
Selecting channels from the
Favorite List
1 While watching TV, press (FAV).
The Favorite List appears.
Favorite 1
003
2 Press (FAV) repeatedly to select
“Favorite 1”, “Favorite 2” or
“Favorite 3”.
3 Press M/m or (PAGE) +/– to select
desired channel, then press
(ENTER).
4 Press (EXIT) to close the Favorite
List.
Locking channels
You can lock channels using the Lock
mode in the Channel Manager.
When you lock the channel, you have to
enter the password to watch the desired
channel.
To perform this function, make sure to
activate the Parental Lock first (page
19).
Locking the channels
1 While watching TV, press (MENU).
The Main Page appears.
2 Press M or m to select “TV
Channel”, then press (ENTER).
3 Press M or m to select “TV Channel”
or “Radio Channel”, then press
(ENTER).
The Channel Manager window
appears.
4 Press the blue button.
The Lock mode window appears.
In case a password input window is
displayed, enter the 4-digit
password.
5 Press M/m or (PAGE) +/– to select
the desired channel.
6 Press (ENTER).
“
” appears next to your selected
channel name.
TV Channel
Press 'ENTER' key to select favorite/unfavorite channel
Channel : 32
Frequency : 581000
Delete
Favorite Lock
LOCK
001
002
003
7 Repeat steps 3 to 6 to lock
additional channels.
8 Press (EXIT) repeatedly to close
the Channel Manager window and
Main Page.
The setting is completed.
Once this setting is made, you have
to enter the password next time you
select the locked channel.
Unlocking channels
In the step 6, press (ENTER) repeatedly
so that “
” disappears.
Note
After changing the settings, you need to
close the Main Page by pressing (EXIT)
repeatedly to make the settings effective.

14
Deleting channels
You can delete the stored channels
using the Delete CH mode in the
Channel Manager.
1 While watching TV, press (MENU).
The Main Page appears.
2 Press M or m to select “TV
Channel”, then press (ENTER).
3 Press M or m to select “TV Channel”
or “Radio Channel”, then press
(ENTER).
The Channel Manager window
appears.
4 Press the red button.
The Delete CH mode window
appears.
5 Press the red button repeatedly to
select “Delete CH”, “Delete
Multiplex” or “Delete all”.
Delete CH: delete the selected
channel
Delete Multiplex: delete all the
channels in the same frequency.
Delete all: delete all stored channels
in the unit
6 Press M/m or (PAGE) +/– to select
the desired channel.
7 Press (ENTER).
“
” appears on the selected channel
name.
TV Channel
Press 'ENTER' key to select favorite/unfavorite channel
Channel : 32
Frequency : 581000
Delete
Favorite Lock
DELETE CH
001
002
8 Press (EXIT) once.
The confirmation window appears.
If you do not want to delete the
channel, select “CANCEL”.
TV Channel
Press 'ENTER' key to select favorite/unfavorite channel
Channel : 21
Frequency : 581000
Delete
Favorite Lock
DELETE CH
001
002
Message Box
OK
CANCEL
Are you sure to
delete marked channels ?
9 Select “OK”, then press (ENTER).
The selected channels are deleted.
10
Repeat steps 3 to 9 to delete
additional channels.
11
Press (EXIT) repeatedly to close
the Channel Manager window and
Main Page.
The setting is completed.
To cancel deleting channels
In the step 7, press (ENTER) repeatedly
so that “
” disappears.
Notes
• After changing the settings, you need to
close the Main Page by pressing (EXIT)
repeatedly to make the settings effective.
• The deleted channels cannot be
recovered unless the search function is
performed again.

15
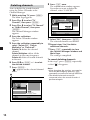
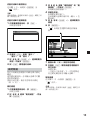
Checking the Programme
Guide
This unit provides you EPG function to
access to the TV Guide (or Radio Guide
if you are listening to the radio
channels) that shows titles and other
information of the current and next
programmes on the different channels.
The information is only available from
the network of the channel you are
watching.
MENU
EPG
ENTER
B/V/v/b
MONITORSOURCE
FAV
EPG
.
ux
`
/
1`
/
1
>
DIGITAL TV
ENTER
123
456
789
0
VOL
PAG E VOL CHATT
RADIO
MENU
INFO EXIT
L/RTEXTAUDIO
Viewing the Programme Guide
While watching TV, press (EPG).
Selecting from the Main Page
1 While watching TV, press (MENU).
2 Press M or m to select “Program
Guide”, then press (ENTER).
The Programme Guide window
appears.
TV Program Guide
003
– 6 : 00
+ 6 : 00
10 : 009 : 00May.27
Self The Teen Big From001
No information yet002
003
No information yet
If you want to check the previous or
next information of the channel, press
and hold < or , so that the cursor (V)
moves to the desired time. Or, press the
yellow button (progresses for 6 hours)
or green button (returns for 6 hours).
Viewing the details of the
selected programme
Move the cursor (V) by pressing M/m/
</, to select the programme name,
then press the blue button.
If the selected programme has detailed
information, the detail information box
appears.
Note
If the selected channel does not provide
EPG data, “No information yet” is
displayed.
Blue
button
Green
button
Yellow
button

16
Switching the audio
channel
You can select the desired audio
channel from Stereo, Left channel and
Right channel.
L/R
MONITORSOURCE
FAV
EPG
.
ux
`
/
1`
/
1
>
DIGITAL TV
ENTER
123
456
789
0
VOL
PAG E VOL CHATT
RADIO
MENU
INFO EXIT
L/RTEXTAUDIO
While watching TV, press (L/R)
repeatedly to select the desired setting.
: Stereo
: Left channel
: Right channel
Switching the audio
language
If you watch the programme that
provides multi-language services, you
can switch the language. This depends
on the transmission of the audio signal.
AUDIO
MONITORSOURCE
FAV
EPG
.
ux
`
/
1`
/
1
>
DIGITAL TV
ENTER
123
456
789
0
VOL
PAG E VOL CHATT
RADIO
MENU
INFO EXIT
L/RTEXTAUDI O
While watching TV, press (AUDIO)
repeatedly to select the desired
language.
Note
This setting affects only when the current
broadcasting supports the selected
language in the System Setting (page 18).
When the broadcasting does not support
the selected language, it is output in the
original language.

17
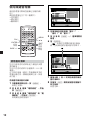
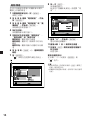
System Setting
Beijing, Singapore, Hongkong, Taipei
Select OSD Language
Start On Channel None
TV Type NTSC
Screen Format 16:9
Antenna feed 5V ON
Summer Time OFF
Set Local Time +8:00
Audio Language English
OSD Language English
4 Press M or m repeatedly to select
the desired item.
5 Press < or , repeatedly to
change the selection, or press
(ENTER) to show the Drop-Down
List Box that displays the selection
list.
System Setting
Beijing, Singapore, Hongkong, Taipei
Select OSD Language
Start On Channel None
TV Type NTSC
Screen Format 16:9
Antenna feed 5V ON
Summer Time OFF
Set Local Time 0:00
Audio Language English
OSD Language English
English
6 Press (ENTER) on the desired
selection.
7 Press (EXIT) repeatedly to close
the Main Page.
See the next page for the System Setting
options.
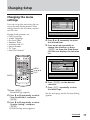
Changing Setup
Changing the menu
settings
You can set up this unit using the on-
screen System Setting menus. Most
settings need to be set when you first
use this unit.
System Setting menus are:
• OSD Language
• Audio Language
• Set Local Time
• Summer Time
• Antenna feed 5 V
• Screen Format
• TV Type
• Start On Channel
MENU
EXIT
ENTER
B/V/v/b
MONITORSOURCE
FAV
EPG
.
ux
`
/
1`
/
1
>
DIGITAL TV
ENTER
123
456
789
0
VOL
PAG E VOL CHATT
RADIO
MENU
INFO EXIT
L/RTEXTAUDIO
1 Press (MENU).
The Main Page appears.
2 Press M or m repeatedly to select
“User Installation”, and press
(ENTER).
3 Press M or m repeatedly to select
“System Setting”, and press
(ENTER).
System Setting menu appears.
Continued

18
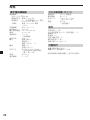
The default settings are underlined.
Settings Setting options
OSD Language Default: Chinese
Changing the OSD language.
Audio Language Default: Chinese
Changing the audio language.
1 Press (ENTER) on “Audio Language”.
A popup window showing the 4 language priorities appears.
2 Press < or , repeatedly to select the desired audio language for
each priority.
3 Press M or m repeatedly to select “OK” to change the setting or
“CANCEL” to cancel the setting.
Note
You can select the desired audio language priority under the
condition that the selected language is supported by the channel.
Set Local Time Settable time: –12:00 to +12:00 (default setting is “+8:00”)
Setting the time zone. This will affect the time of the unit and EPR
time.
Summer Time ON, OFF
Setting the Summer Time. Turning on this selection forwards the time
for one hour.
Antenna feed 5 V ON, OFF
Selecting whether to feed or not 5 volts from the unit to the antenna. If
you use the TV antenna amplifier unit, turn it ON (5 V, 20 mA ANT 1/
ANT 2). If you use a TV antenna without amplifier, turn it OFF.
Screen Format 4:3, 16:9, 4:3 letter box
Setting the screen mode.
4:3: An image with an aspect ratio of 4 to 3.
16:9: An image with an aspect ratio of 16 to 9.
4:3 letter box: An image with an aspect ratio of 4:3 enlarged to the
edges of the screen.
TV Type NTSC, PAL, PAL&NTSC
Setting the colour system to NTSC or PAL.
Start On Channel Setting the channel to start when the unit is turned on.
1 Press (ENTER) on “Start On Channel”.
A popup window with a channel list appears.
2 Press M or m repeatedly to select the channel.
3 Press (ENTER).
Note
Once you set the Start On Channel, a message box appears to
confirm if you want to activate the Start On Channel. In this case,
select “OK” to change the setting, or select “CANCEL” to cancel.
Note
After changing the above settings, you need to close the Main Page by pressing (EXIT)
repeatedly to make the settings effective.

19
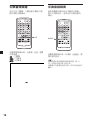
Locking the unit
MENU
EXIT
V/v
MONITORSOURCE
FAV
EPG
.
ux
`
/
1`
/
1
>
DIGITAL TV
ENTER
123
456
789
0
VOL
PAG E VOL CHATT
RADIO
MENU
INFO EXIT
L/RTEXTAUDIO
Setting the password
1 Press (MENU).
The Main Page appears.
2 Press M or m repeatedly to select
“User Installation”, then press
(ENTER).
3 Press M or m repeatedly to select
“Parental Lock”, then press
(ENTER).
Parental Lock
Enter current password
Confirm Password
New Password
Install Lock
OFF
Parental Lock
ON
Current Password
4 Enter the current password.
The default password is 0000.
5 Press (EXIT) repeatedly to close
the Main Page.
Changing the password
1 Press (MENU).
The Main Page appears.
2 Press M or m repeatedly to select
“User Installation”, then press
(ENTER).
3 Press M or m repeatedly to select
“Parental Lock”, then press
(ENTER).
4 Enter the current password.
5 Press M or m repeatedly to select
“New Password”.
6 Enter the new password, then
press m to move the cursor to
“Confirm Password”.
7 Enter the new password again to
confirm.
8 Press (EXIT) repeatedly to close
the Main Page.
Settings for the Parental
Control
You can set the parental control using
the Parental Lock function.
1 Press (MENU).
The Main Page appears.
2 Press M or m repeatedly to select
“User Installation”, then press
(ENTER).
3 Press M or m repeatedly to select
“Parental Lock”, then press
(ENTER).
4 Enter the current password.
5 Press M or m repeatedly to select
“Parental Lock”, then press
(ENTER).
6 Press < or , repeatedly to select
“ON”.
To cancel the Parental Lock, select
“OFF”.
7 Press (EXIT) repeatedly to close
the Main Page.
Number
buttons

20
Note
After changing the settings, you need to
close the Main Page by pressing (EXIT)
repeatedly to make the settings effective.
Setting the Install Lock
You can protect your installed data and
information using the Install Lock.
1 Press (MENU).
The Main Page appears.
2 Press M or m repeatedly to select
“User Installation”, then press
(ENTER).
3 Press M or m repeatedly to select
“Parental Lock”, then press
(ENTER).
4 Enter the current password.
5 Press M or m repeatedly to select
“Install Lock”.
6 Press < or , repeatedly to select
“ON”.
To cancel the Install Lock, select
“OFF”.
7 Press (EXIT) repeatedly to close
the Main Page.
Note
After changing the settings, you need to
close the Main Page by pressing (EXIT)
repeatedly to make the settings effective.
If you forget the password
While the Main Page is displayed,
press 4, 7, 8, 9 and 3. The Factory
Default window appears. Then select
“OK” and press (ENTER). The
setting of the unit will be set back to
the factory default. To cancel, select
“CANCEL”.
Note
If the unit is set back to the factory
default, all the settings will be lost.
Make the settings again.
ページが読み込まれています...
ページが読み込まれています...
ページが読み込まれています...
ページが読み込まれています...
ページが読み込まれています...
ページが読み込まれています...
ページが読み込まれています...
ページが読み込まれています...
ページが読み込まれています...
ページが読み込まれています...
ページが読み込まれています...
ページが読み込まれています...
ページが読み込まれています...
ページが読み込まれています...
ページが読み込まれています...
ページが読み込まれています...
ページが読み込まれています...
ページが読み込まれています...
ページが読み込まれています...
ページが読み込まれています...
ページが読み込まれています...
ページが読み込まれています...
ページが読み込まれています...
ページが読み込まれています...
ページが読み込まれています...
ページが読み込まれています...
ページが読み込まれています...
ページが読み込まれています...
-
 1
1
-
 2
2
-
 3
3
-
 4
4
-
 5
5
-
 6
6
-
 7
7
-
 8
8
-
 9
9
-
 10
10
-
 11
11
-
 12
12
-
 13
13
-
 14
14
-
 15
15
-
 16
16
-
 17
17
-
 18
18
-
 19
19
-
 20
20
-
 21
21
-
 22
22
-
 23
23
-
 24
24
-
 25
25
-
 26
26
-
 27
27
-
 28
28
-
 29
29
-
 30
30
-
 31
31
-
 32
32
-
 33
33
-
 34
34
-
 35
35
-
 36
36
-
 37
37
-
 38
38
-
 39
39
-
 40
40
-
 41
41
-
 42
42
-
 43
43
-
 44
44
-
 45
45
-
 46
46
-
 47
47
-
 48
48


