ROSIERES RVG2TG Installation Instructions Manual
- カテゴリー
- ホブ
- タイプ
- Installation Instructions Manual
このマニュアルも適しています
ROSIERES RVG2TG は、料理をより簡単かつ効率的にするのに役立つ機能を数多く備えたガスビルドインコンロです。
- 超高速バーナー: RVG2TG には、通常の高速バーナーと比較して、炎の熱と広がりが最大 1.5 倍のパワフルな超高速バーナーが装備されています。 これにより、より短時間で食べ物を調理することができます。
- 幅広いバーナー配置: RVG2TG のバーナーは、大きな中華鍋を使用できるように広く間隔を空けて配置されています。
- 電子点火: 各バーナーには電子点火装置が搭載されており、コントロールノブをひねって点火することができます。
- シマー コントロール: RVG2TG には、各バーナーにシマー コントロールが搭載されており、調理する食品に最適な温度を維持することができます。

1
Gas Built-in Domino
Model –RVG1TG
RVG2TG
INSTALLATION INSTRUCTIONS
(FOR REGISTERED GAS INSTALLER ONLY)
&
USER AND OPERATOR INSTRUCTIONS
Installation must be in accordance with manufacturers’ instruction, relevant
Gas Fitting Regulations, AGA Installation Code for Gas Burning Appliances
and Equipment and any codes and regulations.
These instructions should be read carefully prior to initial use and retained in
a safe place in order that full advantage can be taken of the features of your
DOMINO
ANY SERVICING OF THE DOMINO & INSTALLATION MUST
BE CARRIED OUT BY A REGISTERED GAS INSTALLER.
YOUR HOB IS DELIVERED PRE-SET FOR TOWN GAS USE
A
A – English B - 中文

2
INSTALLATION INSTRUCTIONS
DATA PLATE DETAILS:
The data plate is located on the front side of the tray.
According to the Gas Safety Regulations of Hong Kong, any gas installation
works including the installation of appliances and connection tubing, must be
undertaken by registered gas installers who are registered for that appropriate
classes and be employed by registered gas contractors.
CHECK THAT THE DATA PLATE SHOWS THAT THE APPLIANCE IS
SUITABLE FOR THE AVAILABLE GAS SUPPLY.
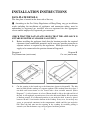
1. Before installing the appliance check that the location provides the required
clearances from combustible materials and if necessary provide protection to
adjacent surfaces as required by the regulations. Make provision for the gas
supply to be connected in the position shown in Diagram A.
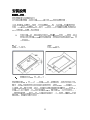
Diagram A Diagram B
Tray Dimensions (unit in mm) Cut out (unit in mm)
2. Cut the opening in the bench top to the dimensions shown in diagram B. The hob
must be built into the worktop of a support cupboard. This worktop must be at least 3
cm thick and heat-resistant or else coated with a heat resistant material. (Refer
Diagram C.) A side-clearance of at least 30 mm should be left to the right and left of
the hob. A tall cupboard or partition too close to the hob would hinder free movement
of kitchen utensils. If a horizontal partition is put under the hob, it must be placed
between 10 and 15 cm from the bottom of the worktop. In any case, do not keep any
sprays or pressurized containers in the compartment, which could be just under the
hob. Place the hob unit into the opening in the worktop by carefully pulling it
onwards you. Put the burners, caps and pan grates back into position.

3
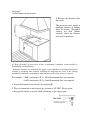
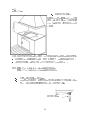
Diagram C
Overall dimension description
Keep all natural air-vents open or have a mechanical ventilation system installed (a
mechanically ventilated hood).
- Prolonged, intensive use of the hob may require extra ventilation; by opening a window for
example or producing more efficient ventilation by increasing the power of the existing
mechanical ventilation (a minimum air input 2m3/hr per kW of gas energy is required)
For example: 5.0kW (total power) X 2 = 10 m3/h minimum flow rate required
4.8kW (total power) X 2 = 9.6m3/h minimum flow rate required
4. Install the Domino in the cut-out (See diagram B).
5. The gas connection to the external gas governor is 1/2”BSP. Please ensure
sealing gasket/washer is in place while connecting to gas supply pipe.
3.
Remove the Domino from
the carton.
The protection must extend a
minimum distance of 450mm
above the burner. Horizontal
surfaces less than 750mm
vertically above the Domino
must also be protected.
Gas inlet

4
6. Test the appliance:
• Depress the control knob and turn to full flame setting.
• The burner will ignite. Adjust control knob to desired setting. Normally,
no adjustment should be necessary.
• If any problems occur, refer to the fault isolation chart.
7. Instruct the user to keep the users instructions manual.
If the above test does not produce satisfactory results, the agent’s service department should
be consulted for more specialized assistance.
8. The Domino is fitted with the flame failure device that cuts off the gas supply when
burner flame extinguishes suddenly or abnormally in order to avoid the gas leakage.
9. Room Ventilation
When installing built-in gas hob on top of stove cabinet, please check that there is provision
for ventilation at the cabinet to ensure proper operation of the gas hob.
10. Gas Connection
According to the Gas Safety Regulations of Hong Kong, any gas installation works
including the installation of appliances and connection tubing, must be undertaken by
registered gas installers who are registered for that appropriate classes and be employed by
registered gas contractors.
11. Town Gas Connection
Use approved gas tubing bearing EMSD approval marking (such as :
EMSD APPROVAL GTXXXX) for connection to appliances, or other appropriate methods
accepted by EMSD.

5
OPERATING INSTRUCTIONS
The Domino is unique in its burner design and layout. It is fitted with the ultra hi-speed
burner. The model RVG1TG is specifically designed for WOK COOKING. It delivers up to
one and a half times the flame heat and spreads compared to normal hi-speed burners. All
burners retain normal simmer cooking facilities. The widely spaced positioning of RVG1TG
allows for the use of large woks.
IGNITION
This Domino is equipped with electronic ignition to each burner and is operated by
depressing the individual control knob and turning it a quarter turn anti-clockwise.
CONTROLS
The Domino has the control knob, which is situated, at the front of the glass plate. An
indicator motif advises which knob controls each burner. A large and small flame graphic
on the glass plate next to the control knob indicates the “full on” and “pre-set” simmer
positions.
BURNER OPERATION
1. Depress the required control knob anti-clockwise to the FULL-ON position.
2. When the burner has ignited, adjust the control knob to the required setting. Flame
adjustment is achieved by rotating the control knob further in an anti-clockwise fashion
towards the pre-set simmer position.
3. If the burner flame accidentally goes out, the gas continues to exit for a few moments
before the safety device activates. Turn the control knob to the off position and do not
attempt ignition for at least 1 minute, thereby letting the gas disperse, which could otherwise
be a danger.
BATTERY REPLACEMENT
1. Open the battery holder cover flap
2. Remove old battery
3. Replace with new 1.5 Volt “D” size battery noting correct polarity
4. Close cover flap
CLEANING
- Allow the Domino to cool before attempting to dismantle or clean it. The glass plate is
best cleaned with a cloth, using warm soapy water. Use of abrasive powders and pastes
should be avoided as far as possible, but when necessary use only a mild abrasive. For
removal of hardened grease, very fine steel wool, wetted and liberally soaped, can be
used.
- Caustic solutions, washing soda, aerosol spray cleaners, bleach and some biological
cleaners are detrimental to some surface finishes and care must be taken not to apply
them to the burner bodies and caps.

6
- Do not wash burner caps in a dishwasher
- For ease of cleaning, remove spillage from the bowls as soon as possible. Control
knobs may be pulled off for cleaning beneath them, but take care not to allow water to
enter the holes in the glass plate.
- When re-assembling the spillage bowl always ensure that it is correctly located over the
spark electrode. Care should be taken to keep the electrode clean and avoid damage to
the porcelain insulator when removing the spillage bowl during cleaning.
HINTS ON THE USE OF THE DOMINO
Utensils should always be placed centrally on the pan supports and over the
burners.
Flames, which extend beyond the bottom of utensils are wasteful and can damage
or overheat handles. Large diameter utensils (greater than 200mm in diameter)
must not be allowed to protrude beyond the perimeter of the Domino, as this could
cause overheating or damage to the adjacent bench.
Do not place anything, e.g. flame tamer, asbestos mat,
between pan and pan support as serious damage to the
appliances may result.
Do not remove the pan support and enclose the burner
with a wok stand as this will concentrate the flame and
deflect the heat onto the Domino.
Do not use large pots or heavy weights, which can bend
the pan, support or deflect the flame onto the Domino.
Locate pan centrally over burner so that it is stable and
does not overhang the appliance.
Use only wok support supplied or recommended by the
manufacturer of the appliance.

7
SAFETY HINTS
Always turn pan handles to the side or back of the Domino – not out into the
kitchen where they can easily be knocked.
Do not wear loose fitting garments while the burners are in operation, due to the
possibility of fabric ignition, which may result in personal injury.
RECOGNISING ABNORMAL OPERATION
In the event of any failure, before calling your service agent,
Please check the following:
NO IGNITION: Check if anything is obstructing the electrode metal tip.
NO GAS: Check that the gas is turned on at the mains meter.
BURNER FLAME
NOT BURNING EVENLY: Check the burner head is sitting evenly and that
the slots in the burner head are not obstructed.
In the event that you are not satisfied with the Domino, the distributor in your
region should be consulted.
IMPORTANT:
ANY SERVICING TO THIS APPLIANCE MUST BE CARRIED
OUT BY A REGISTERED GAS INSTALLER
The glass top is high resistant but not tota
lly unbreakable:
avoid any bumps with saucepan.
SHOULD A CRACK APPEAR ON THE GLASS, PLEASE STOP USING
YOUR APPLIANCE IMMEDIATELY AND CONTACT YOUR AFTER-
SALES SERVICE.
ANY SERVICING TO THIS APPLIANCE MUST BE CARRIED
OUT BY A REGISTERED GAS INSTALLER
D.C. Battery pack
Check the data label affixed to your unit to ensure the
correct model has been supplied.
Design and specification may change due to product improvement. No prior notice will be given.
Please refer to the English version of this manual as the standards.

8
WARNING:
- Do not spray aerosols in the vicinity of this Domino while it is in operation.
- Some propellant gases can break down when heated and produce corrosive vapors,
which will attack some materials.
- Do not store any flammable materials, sprays or pressurized containers inside the stove
cabinet.
- The silicone rubber gasket should not be removed under any circumstances. In the
event that any protective rubber gasket is dropped off or damaged, the consumer should
cease forthwith the use of the unit until it is duly rectified.
- Do not store articles within 50mm of the bottom of the Domino casing.
- Do not touch spark igniter while lighting the burner.
- When the appliance is installed in a marine craft or in caravans, it shall not be used as a
space heater.
- The panel of this built-in hob is made of tempered glass which is safer than normal
glass for this application. However, the following safety precautions for using built-in
hob with glass top panel should also be noted in order to prevent the glass top panel
from breaking
1. Clean the burner assembly frequently to maintain a clear gas passage on the flame
distributor. Clean and tidy up the flame distributor after spillage of food and liquid
once the burner assembly cooled down.
2. Turn off the gas appliance immediately if abnormal noise propagates from the gas
appliance and contact gas supply company or gas hob importer for inspection.
3. Do not use oversized utensils for cooking.
4. Do not impact the glass surface with hard objects or place heavy objects on the glass
surface.

9
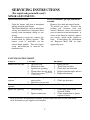
SERVICING INSTRUCTIONS
(For registered gas installer only!)
MINOR ADJUSTMENTS
Access to By Pass Screw
Access to manifold, gas taps and burner
assembly
-
Light the burner and turn to minimum
setting (marked small flame).
-
The flame should be stable on minimum
setting and should not extinguish when
passing from maximum setting to low
setting.
- If adjustment is necessary, r
emove the
control knob by pulling upward. The
bypass screw is accessible via the
control knob spindle. Turn the bypass
screw anti-
clockwise to increase the
turndown rate.
-
Remove glass hob and control knobs.
-
To remove gas cocks. Unscrew the
locking nut
(between cock and
burner). Remove screws, the cock can
now be removed from the manifold. If
access to the barrel is required, remove
two screws, which retain spindle to
body. If lubricating the mechanism
use Regosine Moly LM or other
approved grease.
FAULT ISOLATION CHART
FAULT
CAUSES
REMEDY
Burner will not light
1.
Air in gas line
2. Blockage in line
3. Ignition not sparking
4. Flame failure device faulty
5. Check the battery
(applicable
to DC version)
1.
Purge gas line
2. Trace back and clear
3. Check lead and electrode
4. Replace thermocouple and test
5. Replace the battery
Burner lights back to
injector
1.
Excessive lint up of burner
mixing tube
2.
Excessive gas pressure
1.
Remove and clean burner
2. Check gas pressure.
Burner has explosive
ignition
1.
Excessive gas pressure
1.
Check ga
s pressure.
Igniter not sparking
1.
Electrode gap
2. Igniter connections
1.
Check gap, adjust if not
between 4-5mm
2. Check connections to igniter,
replace if faulty.
In case you have any problem or enquiry, please contact the after service team of the
local distributor or gas supplier for assistance

10
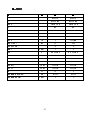
SPECIFICATION TABLE

11

12
1. RVG1TG
2. RVG2TG
安裝和操作說明書
安裝和操作說明書安裝和操作說明書
安裝和操作說明書
A – English B - 中文
B

13
安裝說明
安裝說明安裝說明
安裝說明
1.

14
C
450
750
:
5.0kW X 2 = 10 m3/h
4.8kW X 2 = 9.6 m3/h
½

15
( : EMSD
APPROVAL GTXXXX)

16
操
操操
操作說明
作說明作說明
作說明
¼
-
-
-

17
-
-

18

19
-
-
-
-
-
-
-
-

20
維修資料
維修資料維修資料
維修資料
(
((
(所有程序
所有程序所有程序
所有程序必須由註冊氣體裝
必須由註冊氣體裝必須由註冊氣體裝
必須由註冊氣體裝置技工進行
置技工進行置技工進行
置技工進行)
))
)
-
-
-
-
-
ページが読み込まれています...
ページが読み込まれています...
-
 1
1
-
 2
2
-
 3
3
-
 4
4
-
 5
5
-
 6
6
-
 7
7
-
 8
8
-
 9
9
-
 10
10
-
 11
11
-
 12
12
-
 13
13
-
 14
14
-
 15
15
-
 16
16
-
 17
17
-
 18
18
-
 19
19
-
 20
20
-
 21
21
-
 22
22


ROSIERES RVG2TG Installation Instructions Manual
- カテゴリー
- ホブ
- タイプ
- Installation Instructions Manual
- このマニュアルも適しています
ROSIERES RVG2TG は、料理をより簡単かつ効率的にするのに役立つ機能を数多く備えたガスビルドインコンロです。
- 超高速バーナー: RVG2TG には、通常の高速バーナーと比較して、炎の熱と広がりが最大 1.5 倍のパワフルな超高速バーナーが装備されています。 これにより、より短時間で食べ物を調理することができます。
- 幅広いバーナー配置: RVG2TG のバーナーは、大きな中華鍋を使用できるように広く間隔を空けて配置されています。
- 電子点火: 各バーナーには電子点火装置が搭載されており、コントロールノブをひねって点火することができます。
- シマー コントロール: RVG2TG には、各バーナーにシマー コントロールが搭載されており、調理する食品に最適な温度を維持することができます。
他の言語で
- English: ROSIERES RVG2TG
その他のドキュメント
-
Siemens ER70962HK/01 ユーザーマニュアル
-
Indesit PHN 932 T2/IX/A ユーザーガイド
-
-
-
Aeg-Electrolux HC411520GB ユーザーマニュアル
-
Indesit PH 741 RQO GH CN ユーザーガイド
-
Siemens EC915WB90W ユーザーマニュアル
-
Bosch PPW916B2TT/01 ユーザーマニュアル
-
-