
HC411520GB
CN
ZH
燃气炉架 用户手册
2
EN
GAS HOB USER MANUAL
16

力求完美
感谢您选择这款 AEG 产品。 我们打造该款产品的目的,在于多年为您提供完美的
性能表现,且采用了普通器具上所没有的创新技术,帮助让生活变得更加简单。 请
花几分钟时间阅读,以便充分了解该款产品的功能。
配件和消耗品
您可以在 AEG 网上商店找到所需的各种 AEG 器具,一切都完美无瑕,运转良好。
此外,我们还提供一系列配件可供选择,它们设计和制造的高品质标准超乎您的想
象。从专业炊具到刀叉筐,从瓶架到精美的洗衣袋应有尽有……
敬请访问网络商店:
www.aeg.com/shop
2

目录
4 安全信息
6安装
11 产品说明
12 操作
13 实用建议和提示
14 养护和清洁
15 如果……应该如何处理
15 技术数据
15 环保问题
手册中使用了以下的符号:
有关您人身安全的重要信息和如何避免损坏机
器的信息。
综合信息和提示
环境信息
如有更改恕不另行通知
目录
3

安全信息
为了确保您的安全及正确操作本设备,请在安装与使用前认真阅读本手册。请务必将使用说明
与本设备一同保存,即使当您搬运或销售设备时也应如此。用户必须完全了解本设备的操作与
安全特点。
一般安全要求
警告!
身体、感官或心理机能受损,或缺乏操作经验及知识的人士(包括儿童),均不适合使用本设
备。此类人员如需操作本设备,必须在负责其安全人士的监督或指导下进行。
儿童安全要求
• 只有成人方可使用本设备。儿童应受到适当的监督,以确保其不会以本设备作为玩具。
• 确保所有包装物远离儿童,因为有窒息和身体受伤的危险。
• 确保在器具运行期间和器具运行之后、冷却之前让儿童远离器具。
操作时的安全注意事项
• 初次使用前,请去掉本电器的所有包装、粘附物和覆盖层。
• 每次使用后,请将烹饪区域设为“off”。
• 小心烫伤!燃炉和易触及部件在使用过程中会变热。切勿将餐具或锅盖放置在炉面上。
警告!
火灾危险! 加热过度的油脂可以很快引起燃烧。
正确操作
• 运作过程中,请务必留人看管本电器。
• 请在操作过程中始终监控本器具。
• 本设备仅适用于家庭烹饪!
• 切勿将本设备用作作业表面或储物表面。
• 切勿将易燃液体和材料或易熔物体(由塑料或铝制成)放置或存放在设备上或附近。
• 在将器具与附近的插座连接时,请务必当心。切勿使电线接触设备或热烫炊具。切勿使电线
缠绕。
警告!
如果表面出现裂缝,请断开与电源的连接,以防触电。
如何防止对设备造成损坏
• 如果物体或炊具落在玻璃上,则可能导致表面受损。
安装
• 请务必阅读以下注意事项。制造商不对由于违反这些要求所造成的人员及宠物受伤或财产
损失承担任何责任。
• 应按照现行规定安装本电器,并且只能在通风良好的地方使用。安装或使用本电器之前,请
阅读产品说明。
4
安全信息

• 为了防止结构性损坏或人身伤害,安装、连接电器与电源及燃气系统以及搭建和维护工作必
须由合格人员依照标准和地方法规来完成。
• 请确保本电器不会因运输而受损。切勿连接损坏的器具。必要时请与供应商联系。
• 只有在将设备与符合标准的内置设备与作业表面组装之后方可使用内置设备。
• 未经允许,切勿将炉架安装在家用电器上。
• 只能将本电器安装在平坦的操作台上。
• 切勿更改规格或者改动本产品。因为存在人身伤害和损坏本电器的风险。
• 请严格遵守器具使用所在国家/地区的现行法律、法规、指令及标准(安全法规、回收法规、
电气安全规定等)
• 标签(或数据盘)上注明了本电器的调整条件。
• 本电器未与燃烧物疏散装置相连。应根据当前安装规定来完成安装和连接任务。应特别注
意通风方面的相关要求
• 请与其他器具和装置保持最小间距。
• 请安装防震保护装置,例如:在设备正下方安装带有防护板的抽屉。
• 请使用正确的密封剂,防止操作台切割表面受潮和受损。
• 请使用正确的密封剂将设备与操作台密封,确保不存在任何空隙。
• 请防止设备底部受到蒸汽和湿气的影响(如:洗碗机或烤箱)。
• 切勿将器具安装在门附近和窗户下方。否则,当您打开门窗时可能会将感应炉上的热炊具撞
落。
• 在安装之前,请确保当地配状况(燃气和燃气压力的性质)与电器调整相兼容。
• 本电器未与燃烧物疏散装置相连。必须根据当前安装规定来完成安装和连接任务。必须特
别注意通风方面的相关要求。
• 使用燃气烹饪电器会在安装它的室内产生热量和湿气。确保厨房通风良好:保持自然通风孔
打开或安装机械通风装置(机械排油烟机)。
• 长时间密集使用电器时需要确保更高的通风性(例如,打开窗户或者相应地增强机械通风水
平)。
如果您使用 C-FRAME 配件框架,那么请先阅读随框架一同提供的说明,然后再安装本电器。
警告!
小心触电受伤。请严格遵守电气连接说明。
• 电源端子带电。
• 确保电源端子无电压。
• 请正确安装,以提供防触电保护。
• 松动、不正确的电源插头和插座连接会导致端子过热。
• 具有资质的电气技师必须正确安装夹紧接头。
• 在电缆上使用紧松钩。
• 请使用合适的电源电缆并将损坏的电源电缆更换为合适的专用电缆。请与您当地的服务中
心联系。
本器具必须具备可让您完全断开本器具与电源各极连接的电气装置,并且该装置的触点开口宽
度至少为 3 毫米。
务必使用合适的隔离装置:线路保护断流器、保险丝(可从保险丝座上卸下的螺旋式保险丝)、
接地保护自动断路器和接触器。
安全信息
5

制造商不对由于违反这些要求所造成的人员及宠物受伤或财产损失承担任何责任。
安装
安装之前,请记下铭牌上的序列号 (Ser. Nr.)。器具的铭牌位于其机箱的下方。
Made in Switzerland
Qn (Hs): 5 kW
Butan: 329 g/h
AC 220-240 V 50/60 Hz
P<0,025 kW
Adjusted for: G20 2H 2E 2E - 20 mbar
Typ: 55 WOK 04 GA
Mod.: HC411520GB
Serie-Nr:
PNC: 941 560 827/00
PIN 0063CL3461
10
0063
警告!
以下关于安装、连接和维护的工作必须由合格人员依照现行标准和当地法规实施。
燃气连接
请确保在安装过程中电器未与电源相连。拔下电源插头或关闭保险丝。断开主燃气供应。
请确保供气室与电器之间安装了一个断流旋塞。
本电器的设置位于铭牌上。标签上注明了燃气类型和燃气压力的当前设置
选择固定连接或者使用符合现行规定在不锈钢软管。如果您使用金属软管,那么应注意它们不
能与移动部件接触或者受到挤压。当炉架与烤箱一起使用时也需要小心。
本电器未与排气口相连。必须根据合适的安装条件来连接它。应特别注意气流是否正确。
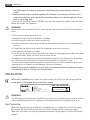
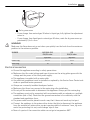
请确保本电器的供气压力符合建议值。可调整的连接已通过一个 G 1/2"螺母固定在综合斜面
上。转动部件(不许用暴力),将连接调整至所需方向并拧紧它们。
1
2
3
1 轴端与螺母
2 垫圈
3 弯头
警告!
安装完成后应始终检查使用肥皂溶液检查连接的密封性。切勿用火焰来检查密封性。
非金属软道连接:
如果可以轻松控制连接的全部区域,那么可以使用软管。使用夹子牢固连接软管。
液化气:使用橡胶管座。始终使用垫圈。然后继续燃气连接。准备好的软管应符合以下要求:
– 不长于 1500 毫米;
– 没有节流装置;
– 不受拉曳或扭转的影响;
6
安装

– 未与切口或棱角接触;
– 可以轻松地检查其状态。
软管保留控制包括检查以下事项:
– 两端及中间部分没有裂缝、切口或烧痕;
– 材料不坚硬,而是具有适当的弹性;
– 紧固夹具没有生锈;
– 未过期。
如果存在一个或多个明显缺陷,请不要修理软管,而是更换它。
安装完成后,请确保每个管具都经过正确密封。使用肥皂溶液,而不是火焰!
喷射器更换
1. 拆除锅支撑。
2. 拆除镜燃炉的盖板和碹顶。
3. 使用套筒扳手 7 拆除喷射器并将其更改为适用于所用燃气类型的喷射器。
4. 采用相反的程序组装部件。
5. 将标识贴纸(位于供气管附近)更换为适用于新供气类型的标识贴纸。您可以在随本电器
一同提供的喷射器包装上找到该标签。
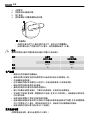
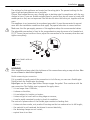
调整最低水平
要调整燃炉的最低水平:
安装
7

1. 点燃燃炉。
2. 将旋钮转动至最低位置。
3. 取下旋钮。
4. 使用细螺丝刀调整旁通螺丝的位置。
1
1
旁通螺丝
– 如果您从要天然气 20 毫巴切换为液化气,请完全拧死调整螺丝。
– 如果您要从液化气切换天然气 20 毫巴,请将旁通螺丝松开 1/4 圈。
警告!
请确保将旋钮从最大位置快速转动至最小位置时火焰未熄灭。
燃炉 天然气
G20/20 毫巴
LPG
G30/30 毫巴
喷射器 喷射器
外环 2x115 2x72
内环 70 46
电气连接
• 根据安全防范措施将电器接地。
• 请确保铭牌上的额定电压和电源类型与当地的供电电压及电源保持一致。
• 本电器配有电源电缆。
• 任何电器元件都必须由服务中心的技术人员或合格的维修人员安装或更换。
• 请始终使用正确安装的防电击插座。
• 请确保安装后有足够的空间操作电源插头。
• 断开本电器与电源的连接时,不要拉扯电源电缆。应始终拉扯电源插座。
• 本电器不可连接扩展电缆、适配器或多个连接(有发生火灾的危险)。检查接地标准符合现
行标准和法规。
• 电源电源在放置时不得与任何发热部件接触。
• 连接电器与电源的设备必须可让您断开本电器与电源各极连接的电气装置,并且该装置的触
点开口宽度至少为 3 毫米,例如自动线保护开孔、接地保护自动断路器或保险丝。
• 连接电缆的任何部分都不能达到 90°C 的温度。
更换连接电缆
如需更换连接电缆,请与当地服务队中心联系!
8
安装

只能使用 H05BB-F Tmax 90°C(或更高)型号更换连接电缆。请确保电缆截面适合功率和工
作温度。黄色/绿色接地线必须比所有相线长约 2 厘米。
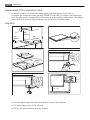
装配
min.
50mm
min.
450mm
min.
650mm
=
=
340
+1
mm
600mm
490
+1
mm
R 5mm
min.
30 mm
min. 20 mm
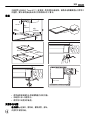
• 使用硅胶密封操作台和玻璃陶瓷之间的空隙。
• 在硅胶上涂一些肥皂水。
• 使用刮刀去除多余硅胶。
安装多台电器
补充部件:连接杆、耐热硅、橡胶成型、封条。
仅使用专有耐热硅。
安装
9

操作台断流器
与墙之间的距离:最少 50 毫米
深度:490 毫米
宽度:要内置的所有电器的总宽度并且要减去 20 毫米(另请参阅“所有电器宽度概述”)
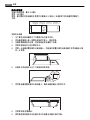
示例:
580 mm
520 mm
490 mm
360 mm
+-=
20 mm 920 mm
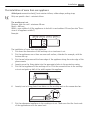
安装多台电器
1. 记下操作台断流器的尺寸并确保它处于断开状态。
2. 将电器底面朝上逐一放置在较软的平面上,例如毛毯。
3. 沿着玻璃陶瓷的外边缘,将封条粘贴在电器的下边缘。
4. 将固定板轻轻拧入防护罩的孔中。
5. 将第一台电器放置在操作台断流器上。将连接杆放置在操作台断流器中并将电器向上推
动一半宽度。
6. 在操作台和连接杆上从下方轻轻转动固定板。
7. 将后续电器放置在操作台断流器上。确保电器前端处于相同水平。
8. 拧紧固定板/护握螺丝。
9. 使用硅胶密封操作台与电器之间以及电器与电器之间的空隙。
10
安装

10. 在硅胶上涂一些肥皂水。
11. 稍用力将橡胶成型压到玻璃陶瓷上,并沿空间慢慢移动它。
12. 请勿触摸硅胶,直到它变硬,这可能会持续一天。
13. 使用剃须刀刀片小心去除突出的硅胶。
14. 充分清洁玻璃陶瓷。
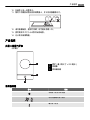
产品说明
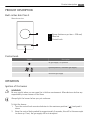
内置 3 级燃气炉架
总体概览
1
2
3
1 燃炉(最小锅尺寸 = 220 毫米)
2 玻璃棒
3 旋转编码器
旋转编码器
符号 说明
没有燃气供应/关闭位置
点火位置/最大燃气供应
最小燃气供应
产品说明
11

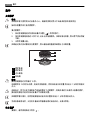
操作
点燃燃炉
警告!
在厨房环境中使用明火时应格外小心。制造商拒绝对用火不当造成的损失承担责任
始终在放置炊具之前点燃燃炉。
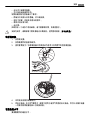
要点燃燃炉:
1. 转动控制旋钮逆时针旋转至最大位置 (
) 并将其推下。
2. 按住控制旋钮保持约 5 秒不动;这会让热电偶预热。如果没有这样做,那么燃气供应将被
中断。
3. 正常后调整火焰。
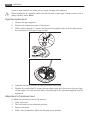
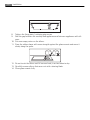
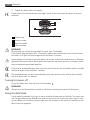
如果经过多次尝试都没有点燃燃炉,那么请检查其盖板和碹顶处于正确位置。
1
2
34
1 燃炉盖板
2 燃炉碹顶
3 点火蜡烛
4 热电偶
警告!
推动控制旋钮时切勿超过 15 秒。
如果燃炉在 15 秒后未点燃,则松开控制旋钮,将其转动至关闭位置并在至少 1 分钟后再尝试
点火。
在断电时,您可以在不借助电气设备的情况下点燃燃炉;其具体是的方法是将火焰靠近燃炉,
推动相关旋钮并逆时针转动至最大气体释放位置。
如果燃炉意外熄灭,则将控制旋钮转动至关闭位置并在至少 1 分钟后再尝试点火。
完成安装或停电后,火花发生器会在您接通电源时自动启动。这是正常的。
关闭燃炉
要熄灭,请将旋钮转动于符号 。
12
操作

警告!
从燃炉上取下锅之前,应始终熄灭或关闭火焰。
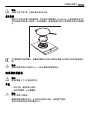
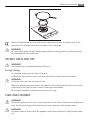
使用锅架
锅架可允许您在炉架上使用圆底锅。您只能在双燃料燃炉 (Dual Burner) 上使用锅架并且不可
与任何其他类型的锅一起使用。在安装锅架时,请确保框架中的凹口牢固固定在锅支承的横杆
上。
为双燃料燃炉加装炉栅时,请确保炉栅的中空部分与固定在玻璃上的铭牌上的参考标准相匹
配。
警告!
将锅支承放回原位时应格外小心,以防止玻璃炉架顶部刮伤。
实用建议和提示
警告!
使用直径最小为 220 毫米的炊具。
节能
• 如有可能,请始终盖上锅盖。
• 当液体沸腾后,关火慢慢煮。
警告!
炊具不得进入控制区。
请确保将锅放置在环中央,并且没有突出炉灶边缘,以降低燃气消耗。
切勿将不稳或变形的炊具放置在环上。
实用建议和提示
13

养护和清洁
警告!
在清洁污渍之前,请关闭电器并使其充分冷却。断开电器的电源连接,然后再执行任何清洁或
维护工作。
警告!
出于安全原因,切勿用蒸汽清洗装置或高压清洗装置清洁器具。
警告!
切勿使用清洁剂、钢丝绒垫或酸,它们会对电器造成损伤。
您可以拆除锅支承以便于清洗炉架。清洗炉架之后,确保锅支承位置正确。更换锅支承时应注
意防止玻璃炉架顶部刮伤。用手清洗和擦干锅支承时应格外小心,因为其上釉流程有时会留下
一些粗糙的边缘。如有必要,请使用无水清洁膏去除顽固污渍。
去除灰尘:
1. – 立即去除: 熔态塑料、塑料薄膜与含糖食物。使用专用玻璃陶瓷刮刀。将刮刀呈锐角
放在玻璃陶瓷表面,然后在表面上滑动刀片。
– 在清洁以下污渍之前,请关闭设备并使其充分冷却:水垢圈、水圈、油渍、光亮金属
褪色。对于玻璃陶瓷或不锈钢,请使用专用清洁剂。
2. 使用湿布和适量洗涤剂清洁设备。
3. 最后,用干净的抹布将器具擦干。
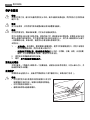
清洗点火蜡烛
本型号配有一个陶瓷点火蜡烛和一个金属电极。请保持这些组件的清洁,以防止难以点火,并
检查燃炉碹顶未堵塞。
定期维护
定期联系当地服务中心,检查供气管道和压力调节器的状况(如果安装了的话)。
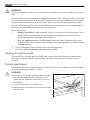
警告!
• 切勿使用刮刀或尖锐物体来清洁玻璃杆以及它和
玻璃陶瓷之间的空间。玻璃杆与陶瓷铭牌相连。
• 切勿将锅放在玻璃杆上。
• 请确保壶和锅未接触玻璃杆。
14
养护和清洁

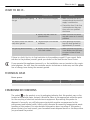
如果……应该如何处理
故障 可能的原因 补救方法
点火时没有火花 • 没有电力供应 • 请确保电器接通并开启了电
源。
• 控制保险丝。如果保险丝多
次断开,请咨询有资质的电气
技师。
• 燃炉的盖板和碹顶未放平 • 请确保燃炉的盖板和碹顶处
于正确的位置。
点火后火焰立即迸出 • 热电偶的热量不够 • 点火后,推动控制旋钮时并保
持约 5 秒时间。
燃气环燃烧不均匀 • 燃炉碹顶被食物残渣堵塞 • 请确保喷射器未堵塞,并且燃
炉碹顶中没有食物残渣。
如果出现故障,请首先尝试自己查找解决问题的方法。如果自己无法解决问题,请与经销商或
当地服务中心联系。
如果本电器操作不当,或者安装任务未由注册工程师完成,那么客户服务技术人员或经销商来
访是非免费的,即使在保修期内也是如此。
技术数据
燃炉功耗
燃炉/燃气类型 天然气 液化气
燃炉 5 kW 4,6 kW / 329 g/h
环保问题
产品上或其包装上的 标记表示不能把本产品作为家庭垃圾般处理,而是应该将其送至适当
的电气和电子设备回收站点。通过确保本品得到正确处理,您可以帮助避免由于本产品废弃后
处理不当而给环境和人类健康带来的潜在负面效果。如需了解更多有关本产品回收的详细信
息,请联系您当地的废品回收部门、您的家庭垃圾处理服务点或您购买本产品的商店。
包装材料
包装材料为环保材料,可回收利用。塑料元件的识别标记为:>PE<、>PS< 等。将包装材料作
为生活废品丢弃在您所在地的废品处理设施内。
警告!
在处理之前,请确保所使用的电器无法使用。从电源插座上拔下电源插头,然后从电器上取下
电源电缆。
如果……应该如何处理
15

FOR PERFECT RESULTS
Thank you for choosing this AEG product. We have created it to give you
impeccable performance for many years, with innovative technologies that help
make life simpler – features you might not find on ordinary appliances. Please
spend a few minutes reading to get the very best from it.
ACCESSORIES AND CONSUMABLES
In the AEG webshop, you’ll find everything you need to keep all your AEG
appliances looking spotless and working perfectly. Along with a wide range of
accessories designed and built to the high quality standards you would expect,
from specialist cookware to cutlery baskets, from bottle holders to delicate
laundry bags…
Visit the webshop at:
www.aeg.com/shop
16

CONTENTS
18 Safety information
20 Installation
27 Product description
27 Operation
29 Helpful hints and tips
29 Care and cleaning
31 What to do if…
31 Technical data
31 Environment concerns
The following symbols are used in this user
manual:
Important information concerning your
personal safety and information on how to
avoid damaging the appliance.
General information and tips
Environmental information
Subject to change without notice
Contents
17

SAFETY INFORMATION
For your safety and correct operation of the appliance, read this manual carefully before
installation and use. Always keep these instructions with the appliance even if you move or
sell it. Users must fully know the operation and safety features of the appliance.
General safety
WARNING!
Persons (including children) with reduced physical sensory, mental capabilities or lack of ex-
perience and knowledge must not use the appliance. They must have supervision or instruc-
tion for the operation of the appliance by a person responsible for their safety.
Child safety
• Only adults can use this appliance. Children must get supervision to make sure that they
do not play with the appliance.
• Keep all packaging away from children. There is a risk of suffocation and physical injury.
• Keep children away from the appliance during and after the operation, until the appli-
ance is cold.
Safety during operation
• Remove all packaging, stickers and layers from the appliance before fist use.
• Set the cooking zones to "off" after each use.
• Risk of burns! Burners and accessible part become hot during use. Do not put cutlery or
saucepan lids on the cooking surface.
WARNING!
Fire danger! Overheated fats and oils can ignite very quickly.
Correct operation
• Do not leave the appliance unattended during operation.
• Always monitor the appliance during operation.
• Only use the appliance for domestic cooking tasks!
• Do not use the appliance as a work or a storage surface.
• Do not put or keep flammable liquids and materials, or fusible objects (made of plastic or
aluminium) on or near the appliance.
• Be careful when you connect the appliance to the near sockets. Do not let electricity
bonds touch the appliance or hot cookware. Do not let electricity bonds tangle.
WARNING!
If there is a crack on the surface, disconnect power supply to prevent the electric shock.
How to prevent a damage to the appliance
• If the objects or cookware fall on the glass, the surface can be damaged.
18 Safety information

Installation
• You must read these. The manufacturer is not responsible for any injury to persons
and pets or damage to property caused by failure to obey these requirements.
• This appliance shall be installed in accordance with the regulations in force and only
used in a well ventilated space. Read the instructions before installing or using this
appliance.
• To prevent the risks of structural damage or physical injury, installation, connection
of the appliance to the power supply and gas system, setting up and maintenance
must only be done by qualified personnel in compliance with standards and local
regulation force.
• Make sure that the appliance is not damaged because of transport. Do not connect a
damaged appliance. If it is necessary, speak to the supplier.
• Only use built-in appliances after you assemble the appliance into correct built-in units
and work surfaces that obey the standards.
• Do not install the hob over a domestic appliances if these do not allow it.
• Install the appliance only on worktop with flat surface.
• Do not change the specifications or modify this product. There is the risk of injury and
damage to the appliance.
• Fully obey the laws, ordinances, directives and standards in force in the country where
you use the appliance (safety regulations, recycling regulations, electrical safety rules
etc.)
• The adjustment conditions for this appliance are stated on the label (or data plate).
• This appliance is not connected to a combustion products evacuation device. It shall be
installed and connected in accordance with current installation regulations. Particular
attention shall be given to the relevant requirements regarding ventilation
• Keep the minimum distances to other appliances and units.
• Install anti-shock protection, for example install the drawers only with a protective panel
directly below the appliance.
• Prevent damage of the cut surfaces of the worktop against moisture with a correct seal-
ant.
• Seal the appliance to the worktop with no space left with a correct sealant.
• Prevent damage of the bottom of the appliance from steam and moisture, e.g. from a
dishwasher or oven.
• Do not install the appliance adjacent to doors and below windows. If not, hot cookware
can be hit off the hob when you open the doors or windows.
• Prior to installation, ensure that the local distribution conditions (nature of the gas and
gas pressure) and the adjustment of the appliance are compatible.
• This appliance is not connected to a combustion products evacuation device. It must be
installed and connected in accordance with current installation regulations. Particular
attention must be given to the relevant requirements regarding ventilation.
• The use of a gas cooking appliance cause heat and moisture in the room in which it
is installed. Make sure that the ventilation in kitchen is good: keep natural ventila-
Safety information
19

tion holes open or install a mechanical ventilation device (mechanical extractor
hood).
• More ventilation (for example opening of a window or increasing the level of me-
chanical ventilation where present) is necessary when you intensive operate the ap-
pliance for a long time.
If, you use the accessory frame C-FRAME, first read the instruction supplied with the frame
before you install the appliance.
WARNING!
Risk of injury from electrical current. Carefully obey the instructions for electrical connec-
tions.
• The electrical mains terminal is live.
• Make electrical mains terminal free of voltage.
• Install correctly to give anti-shock protection.
• Loose and incorrect mains plug and socket connections can make the terminal become
too hot.
• A qualified electrician must install the clamping connections correctly.
• Use a strain relief clamp on cable.
• Use the correct mains connection cable and replace the damaged mains cable with prop-
er special cable. Speak your local Service Force Centre.
The appliance must have the electrical installation which lets you disconnect the appliance
from the mains at all poles with a contact opening width of minimum 3 mm.
You must have correct isolation devices: line protecting cut-outs, fuses (screw type fuses
removed from the holder), ground leakage trips and contactors.
Manufacturer is not responsible for any injury to persons and pets or damage to prop-
erty caused by failure to obey these requirements.
INSTALLATION
Before the installation, note down the serial number (Ser. Nr.) from the rating plate.The
rating plate of the appliance is on its lower casing.
Made in Switzerland
Qn (Hs): 5 kW
Butan: 329 g/h
AC 220-240 V 50/60 Hz
P<0,025 kW
Adjusted for: G20 2H 2E 2E - 20 mbar
Typ: 55 WOK 04 GA
Mod.: HC411520GB
Serie-Nr:
PNC: 941 560 827/00
PIN 0063CL3461
10
0063
WARNING!
The following instructions about installation, connection and maintenance must be carried
out by qualified personnel in compliance with standards and local regulations in force.
Gas Connection
Make sure that during the installation the appliance is not connected to electrical supply.
Disconnect the mains plug or deactivate the fuses. Disconnect the mains gas supply.
Make sure that there is a stop tap assembled between the gas supply of house and the ap-
pliance.
20 Installation
ページが読み込まれています...
ページが読み込まれています...
ページが読み込まれています...
ページが読み込まれています...
ページが読み込まれています...
ページが読み込まれています...
ページが読み込まれています...
ページが読み込まれています...
ページが読み込まれています...
ページが読み込まれています...
ページが読み込まれています...
ページが読み込まれています...
ページが読み込まれています...
ページが読み込まれています...
ページが読み込まれています...
ページが読み込まれています...
-
 1
1
-
 2
2
-
 3
3
-
 4
4
-
 5
5
-
 6
6
-
 7
7
-
 8
8
-
 9
9
-
 10
10
-
 11
11
-
 12
12
-
 13
13
-
 14
14
-
 15
15
-
 16
16
-
 17
17
-
 18
18
-
 19
19
-
 20
20
-
 21
21
-
 22
22
-
 23
23
-
 24
24
-
 25
25
-
 26
26
-
 27
27
-
 28
28
-
 29
29
-
 30
30
-
 31
31
-
 32
32
-
 33
33
-
 34
34
-
 35
35
-
 36
36


他の言語で
その他のドキュメント
-
Bosch PRB3A6B70X Built In Gas Hob ユーザーマニュアル
-
Siemens ER3A6BB70X/37 ユーザーマニュアル
-
Gaggenau VG415315SG ユーザーマニュアル
-
-
AEG IKE42640KB ユーザーマニュアル
-
-
Indesit PHN 932 T2/IX/A ユーザーガイド
-
-
Fisher & Paykel FISHER PAYKEL CG752DLPGB1 Gas on Glass Cooktop ユーザーガイド
-
Bugera G20 INFINIUM クイックスタートガイド