
B
Talkabout T82C
OWNER’S MANUAL
en-US
zh-CN


1
English
RF ENERGY EXPOSURE AND
PRODUCT SAFETY GUIDE FOR
PORTABLE TWO-WAY RADIOS
ATTENTION!
Before using this product, read the RF Energy Exposure and
Product Safety Guide that ships with the radio which
contains instructions for safe usage and RF energy
awareness and control for compliance with applicable
standards and regulation.
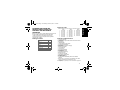
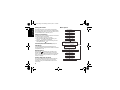
Package Contents
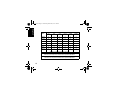
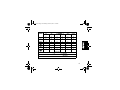
Frequency Chart
Features and Specifications
• 20 analog channels
• 121 Sub-Codes (38 CTCSS Codes and 83 DCS codes)
• iVOX/VOX
• Easy Pairing
• LED Flashlight
• 20 Selectable Call Tone Alerts
• Segmented LED Display
• Roger Tone
• Micro USB Connector for charging
• Battery Indicator Bar
• Channel Monitor
• Channel Scan
• Dual Channel Monitor
• Keypad Lock
• Auto Squelch Control
• Auto Repeat (Scrolling)
• Battery Low Alert
• Keypad Tone (On/Off)
• Silent Mode (Vibrate Alert)
• Emergency Features
• IP Rating: IPx2
• Power Source: NiMH battery Pack/3 x AA Alkaline
batteries
• Battery Life: Up to 18 hours (Typical battery life, 5/5/90
profile. Actual observed runtimes may vary).
Note: Range may vary depending on environmental and/or topographical
conditions.
Package Content
T82C
Radio
1
Belt clip
1
Battery
1
Power Supply
1
Charger Tray
1
Owner’s manual
1
Channel Frequency
(MHz)
Channel Frequency
(MHz)
Channel Frequency
(MHz)
1 409.75000 8 409.83750 15 409.92500
2 409.76250 9 409.85000 16 409.93750
3 409.77500 10 409.86250 17 409.95000
4 409.78750 11 409.87500 18 409.96250
5 409.80000 12 409.88750 19 409.97500
6 409.81250 13 409.90000 20 409.98750
7 409.82500 14 409.91250
T82.book Page 1 Wednesday, March 28, 2018 1:28 PM

2
English
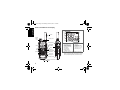
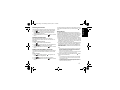
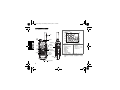
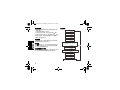
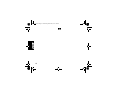
Radio Control Buttons and Display
Note: The radio screen dims 5 seconds after the last button is
pressed. LED blinks and the radio screen turns off after
another 5 seconds for battery saving purposes. Press any
button (except Flashlight button) to resume the display.
1. Channel [1–20]
2. Call Tone [Off, 1–20]
3. Roger Tone [On/Off]
4. Dual Channel Monitor
5. Keypad Tone [On/Off]
6. Easy Pairing
7. Scan Indicator
8. Battery Indicator
[3 Battery Levels]
9. Status [Transmit/
Receive]
10. Vibrate Alert [On/Off]
11. Keypad Lock
12. iVOX [Off, L1, L2, L3]
VOX [Off, L1, L2, L3]
13. Sub-Code [0–121]
2
3
4
5
1
6
7
8
9
11
13
10
12
Volume/
Power
Knob
Menu
Lock
Screen
Speaker
Flashlight Button
Micro-USB
Charging Port
Easy Pairing Button
Microphone
Emergency Button
Call Tone
Scroll
Scan/Monitor
PTT Button
Accessory Port
Antenna
Space for Personalization
Stickers
T82.book Page 2 Wednesday, March 28, 2018 1:28 PM

3
English
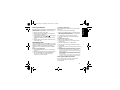
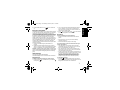
Installing the Batteries
Each radio can either use a NiMH rechargeable battery pack
or three units of AA Alkaline Battery, and beeps when the
batteries are low.
1. Make sure your radio is turned OFF.
2. With the back of the radio facing you, push the latch to
the left to unlock the battery door.
3. Insert the battery pack with the and signs facing you
for NiMH battery pack. Observe polarity.
For AA Alkaline batteries, insert the batteries. Observe
polarity.
4. Close the battery door and push the latch to the right to
lock the battery door.
Radio Battery Meter
The number of bars (0–3) on the Radio Battery icon shown
indicates the charge remaining in the battery. When the radio
battery meter shows one segment left, the radio chirps
periodically or after releasing the PTT button (Low Battery
Alert).
Battery Capacity Maintenance
1. Charge the NiMH batteries once every 3 months when
not in use.
2. Remove the battery from the radio for storage purposes.
3. Store the NiMH batteries in a temperature between
-20 °C to 35 °C and in low humidity. Avoid damp
conditions and corrosive materials.
Using the Micro-USB Charger
The micro-USB charger allows you to charge your NiMH
battery pack.
1. Power off your radio before start charging.
2. Plug the micro-USB cable into the micro-USB charging
port on your radio. Connect the other end of the micro-
USB charger to wall power outlet.
3. An empty battery will be fully charged in 8 hours.
4. The battery indicator bar moves up and down while
charging.
Using the Charging Cradle
1. Make sure your radio is turned OFF.
2. Connect the AC adapter to the micro-USB port of the
charging cradle.
3. Place the charging cable on a stable surface.
4. Place the radio in the charging cradle with the keypad
facing forward.
5. The radio battery indicator bar moves up and down while
charging.
Note: Motorola Solutions recommends to power OFF your radio while
charging. However, if power is ON while charging, you may not be
able to transmit a message if the battery is completely empty.
Allow time for the battery to charge to one bar before attempting to
transmit a message.
When moving between hot and cold temperatures, do not charge
the NiMH battery pack until the temperature acclimates (usually
about 20 minutes).
For optimal battery life, remove the radio from the charger within
16 hours. Do not store the radio while connected to the charger.
Turning your Radio On and Off
To turn your radio ON, turn the rotary knob clockwise.
To turn your radio OFF, turn the rotary knob
counterclockwise.
T82.book Page 3 Wednesday, March 28, 2018 1:28 PM

4
English
Setting the Volume
To increase the volume, turn the rotary knob clockwise.
To decrease volume, turn the rotary knob counterclockwise.
Do not hold the radio close to your ear. If the volume is set to
an uncomfortable level, it could hurt your ear.
Talking and Listening
All radios in your group must be set to the same channel and
Sub-Code in order to communicate.
1. Hold your radio 2–3 cm from your mouth.
2. Press and hold the PTT button while speaking. The
Transmit icon appears on the display.
3. Release the PTT button to receive incoming calls. The
radio displays receive icon.
For maximum clarity, hold the radio 2 to 3 cm away and
avoid covering the microphone while talking.
Talk Range
Your radio is designed to maximize performance and
improve transmission range. Ensure the radios are at least 5
feet apart when in use.
Monitor Button
Press and hold Scan/Monitor for 3 seconds to enter
Monitor mode and listen for weak signals on the current
channel. You can also listen to the volume level of the radio
when you are not receiving. This allows you to adjust the
volume, if necessary.
Push-to-Talk Time-out Timer
To prevent accidental transmissions and save battery life,
the radio emits a continuous warning tone and stops
transmitting if you press the PTT button for 60 seconds
continuously.
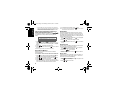
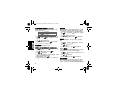
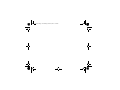
Menu Options
Menu Key
Menu Key
Menu Key
Menu Key
Menu Key
Menu Key
Menu Key
Menu Key
Menu Key
Menu Key
Two Way Mode
Channel (1-)
Sub-Code (0-121)
Call Tone (Off, 1-20)
Vibrate Alert (On/Off)
Keypad Tones (On/Off)
Roger Tones (On/Off)
Dual Watch Channel (1-8)
Dual Watch Sub-Code (0-121)
Internal Voice Operated Transmission/
Voice Operated Transmission
(iVOX,VOX) (Off, L1,L2,L3)
T82.book Page 4 Wednesday, March 28, 2018 1:28 PM

5
English
Selecting the Channel
The channel is the frequency of the radio uses to transmit.
1. Press Menu until the channel number starts to flash.
2. Press or to change the channel. Long press on
these keys allows you to scroll through the channels
rapidly to browse the codes.
3. Press the PTT button to exit menu or Menu to continue
set up.
Selecting the Sub-Code
Sub-Codes help minimize interference by blocking
transmissions from unknown sources. Your radio has 121
Sub-Codes.
To set the code for a channel:
1. Press Menu until the code starts to flash.
2. Press or to select the code. You can hold down the
button to speed up scrolling through the codes.
3. Press the PTT button to exit menu or Menu to continue
set up.
Setting and Transmitting Call Tones
Your radio can transmit different call tones to other radios in
your group. Your radio has 20 call tones for you to choose
from.
To set a call tone:
1. Press Menu until the Call Tone icon appears. The
current call tone setting flashes.
2. Press or to change and listen to the call tone.
3. Press the PTT button to exit menu or Menu to continue
set up.
In order to transmit your call tone to other radios, set up the
same channel and Sub-Code on your radio and press Call
Ton e.
Easy Pairing
The Easy Pairing feature allows a group of radio users to
program all their radios to the same Channel and Sub-Code
settings quickly and simultaneously. Any one radio within the
group can be designated as the “Leader’s radio” and have
it’s Channel and Sub-Code settings transmitted to and
copied by all the other radios in the group (Members’ radios).
1. Pick any one of the radios as the “Leader’s radio”. On this
radio, program the Channel and Sub-Code to the desired
settings.See “Selecting the Channel” and “Selecting the
Sub-Code” sections in this user manual.
2. To copy the channel and Sub-Code combination to all the
other “Members’ radios”, press and hold the button on
the Members’ radios until you hear a beep. Release the
button after the beep, and wait for the transmission from
the Leader’s radio.
Note:
• You will see the icon blinking on the display. This confirms that
the radio is in Easy Pairing mode waiting to receive the Channel
and Sub-Code settings from the Leader’s radio. All Members’
radios remain in this mode for 3 minutes.
• A group with many radios should have all users take this step at the
same time, so all radios can be programmed in one go.
3. On the Leader’s radio, press and hold down the button
until you hear a double beep.
Note:
• At the double beep, this radio’s Channel and Sub-Code settings
will be transmitted, which will be received and copied by all the
other (Members’) radios.
• The Leader’s radio must make this transmission when all the
Members’ radios are still in the Easy Pairing mode, otherwise the
transmission will not be picked up.
T82.book Page 5 Wednesday, March 28, 2018 1:28 PM

6
English
• On the Leader’s radio, user must remember not to release the
button on the first (single) beep, otherwise this radio will become
another Member’s radio. If that happens, you can press PTT to
escape, and retry the steps described in #3 again.
Internal Voice Operated Transmission/
Voice Operated Transmission ( / )
Transmission is initiated by speaking into the microphone of
the radio/audio accessory instead of pushing the PTT
button.
1. Press Menu until the icon appears on the
display. When audio accessory is connected, the
icon will be shown. The current setting (Off, L1–L3)
flashes.
2. Press or to select the sensitivity level.
3. Press the PTT button to exit menu or Menu to continue
set up.
Note: When using iVOX/VOX, there will be a short delay.
Dual Channel Monitor
Enables you to scan the current channel and another
channel alternately.
To set another channel and start Dual Channel Monitor:
1. Press Menu until the Dual Channel Monitor icon
appears. The Dual Channel Monitor icon flashes.
2. Press or to select the channel then press Menu.
3. Press or to select the Sub-Code.
4. Press the PTT button or wait until time out to activate
Dual Channel Monitor. The screen will alternate between
home channel and Dual Channel Monitor channel.
5. To end Dual Channel Monitor, press Menu.
Note: If you set the same channel and Sub-Code as the current channel,
Dual Channel Monitor does not work.
Silent Mode
Silent Mode (Vibrate Alert) notifies you that your radio is
receiving a message. This is useful in noisy environments.
The Vibrate Alert is triggered when you received a call. The
Vibrate Alert is triggered again if there is no activity within 30
seconds after the previous call.
1. Press Menu until the Vibrate Alert icon is displayed.
The current setting will flash.
2. Press or to change the setting to On/Off.
3. Press the PTT button to exit menu or Menu to continue
set up.
Keypad Tones
You may enable or disable the keypad tones. You will hear
the key tone each time a button is pushed.
1. Press Menu until the Keypad Tone icon appears.
The current setting On/Off will flash.
2. Press either or to turn On/Off.
3. Press the PTT button to confirm or Menu to continue
set up.
Roger Tone
You can set your radio to transmit a unique tone when you
finish transmitting. It is like saying “Roger” or “Over” to let
others know you have finished talking.
1. Press Menu until the Roger Tone icon appears. The
current setting On/Off flashes.
2. Press or to turn On or Off.
L3 = High Sensitivity for quiet environments
L2 = Medium Sensitivity for most environments
L1 = Low Sensitivity for noisy environments
T82.book Page 6 Wednesday, March 28, 2018 1:28 PM

7
English
3. Press the PTT button to set or Menu to continue set
up.
Emergency Alert Mode
The Emergency Alert feature can be used to signal members
in your group for help. T82C radios operate in an automatic
“hands-free” emergency control mode for a total of 30
seconds after activating the Emergency Alert. T82C radios in
your group will automatically advance the speaker volume to
the maximum setting and sound a warbling alert tone for 8
seconds. The alert tone is emitted from your own radio
speaker and the receiving radios in your group. After the 8
second alert, any spoken words or incidental sounds at your
end is transmitted to the group for 22 seconds. For the 30
second duration of Emergency Alert mode, T82C radio
controls and buttons are locked to maximize reception of the
emergency message.
1. Press and hold the Emergency Alert button for 3
seconds.
2. Release the button and the alert tone begin to sound.
There is no need to continue to hold the Emergency Alert
button or use PTT for your message to be transmitted.
WARNING: The Emergency Alert feature should only be used in the
even of an actual emergency. Motorola Solutions is not responsible
if there is no response to the emergency alert from the receiving
group.
LED Flashlight
Your radio has a built-in-LED Flashlight.
The LED Flashlight remains on until the button is released.
Keypad Lock
To avoid accidentally changing your radio settings:
1. Press and hold Key Lock until the Key Lock Indicator
icon displays.
2. You can turn the radio ON and OFF, adjust the volume,
receive, transmit, send a call tone, send Emergency
Alert, and monitor channels when in the lock mode. All
other functions remain locked.
3. Press Key Lock and hold until the Key Lock Indicator
is no longer displayed to unlock the radio.
Scanning
Use the scan function to do the following:
• Search all channels for transmissions from unknown
parties.
• Find someone in your group who has accidentally
changed channels or
• Find unused channels quickly for own usage.
The priority feature, basic and advanced to make your
search more effective.
• The “Basic Scan” mode uses the channel and code
combinations for each of the channels as you have set
them (or with the default code value of 1).
• The “Advance Scan” mode scans all channels for any
and all codes; detect any code in use and use that code
value temporarily for that channel.
• Priority is given to the “Home Channel” (For example, the
channel and Sub-Code your radio is set to when you start
the scan). This means the initial channel (and code
settings) is scanned more often than the other seven
channels and your radio will respond quickly to any
activity occurring on the home channel as a priority.
To start Basic Scanning:
1. Press the Scan/Monitor button briefly. The Scan
icon appears in the display and the radio begins to scroll
through the channel and code combinations.
T82.book Page 7 Wednesday, March 28, 2018 1:28 PM

8
English
2. When the radio detects channel activities matching the
channel and Sub-Code combination, the radio stops
scrolling and you can hear the transmission.
3. Press the PTT button within 5 seconds after the end of
the transmission to respond and talk to the person
transmitting.
4. The radio resumes scrolling through the channels 5
seconds after the end of any received activity.
5. Press the Scan/Monitor button briefly to stop scanning.
To start Advanced Scanning:
1. Set home channel’s Sub-Code to “zero” or OFF.
2. Press the Scan/Monitor button briefly. The Scan
icon appears in the display and the radio begins to scroll
through the channels. No Sub-Codes filters what is
heard.
3. When the radio detects channel activities with any code
(or NO code), it stops scrolling and you can hear the
transmission. Any Sub-Code that may be use by other
party will be detected and displayed.
4. Press the PTT button within 5 seconds after the end of
the transmission to talk.
5. The radio resumes scrolling through the channels 5
seconds after the end of any received activity.
6. Press the Scan/Monitor button briefly to stop scanning.
Note:
1. The transmission will be on the “Home Channel” if you press the PTT
button while the radio is scrolling through inactive channels. You may
press the Scan/Monitor button to stop scanning at any time.
2. You may immediately resume the scan by briefly pressing or if
the radio stops on an undesired transmission.
3. You may temporarily remove that channel from the scan list by
pressing and holding or for 3 seconds if the radio stops
repeatedly on an undesired transmission. You may remove more
than one channel this way.
4. Turn the radio OFF and then ON, or EXIT and re-enter the scanning
mode by pressing Scan/Monitor to restore the removed
channel(s) to the scan list.
5. You cannot remove the “Home Channel” from the scan list.
6. In the Advanced Scan, the detected code is used for one
transmission. You must take note of that code, exit scan, and set the
detected code on that channel to permanently use.
Warranty Information
The authorized Motorola Solutions dealer or retailer where
you purchased your Motorola Solutions two-way radio and/or
original accessories will honour a warranty claim and/or
provide warranty service.
Please return your radio to your dealer or retailer to claim
your warranty service. Do not return your radio to Motorola
Solutions.
In order to be eligible to receive warranty service, you must
present your receipt of purchase or a comparable substitute
proof of purchase bearing the date of purchase. The two-
way radio should also clearly display the serial number. The
warranty will not apply if the type or serial numbers on the
product have been altered, deleted, removed, or made
illegible.
T82.book Page 8 Wednesday, March 28, 2018 1:28 PM

9
English
What Is Not Covered By The Warranty
• Defects or damage resulting from use of the Product in
other than its normal and customary manner or by not
following the instructions in this user manual.
• Defects or damage from misuse, accident, or neglect.
• Defects of damage from improper testing, operation,
maintenance, adjustment, or any alteration or
modification of any kind.
• Breakage or damage to aerials unless caused directly by
defects in material or workmanship.
• Products disassembled or repaired in such a manner as
to adversely affect performance or prevent adequate
inspection and testing to verify any warranty claim.
• Defects or damage due to range.
• Defects or damage due to moisture, liquid, or spills.
• All plastic surfaces and all other externally exposed parts
that are scratched or damaged due to normal use.
• Products rented on a temporary basis.
• Periodic maintenance and repair or replacement of parts
due to normal usage, wear, and tear.
Copyright Information
The Motorola Solutions products described in this manual
may include copyrighted Motorola Solutions programs,
stored semiconductor memories or other media. Laws in the
United States and other countries preserve for Motorola
Solutions, certain exclusive rights for copyrighted computer
programs, including the exclusive right to copy or reproduce
in any form, the copyrighted Motorola Solutions programs.
Accordingly, any copyrighted Motorola Solutions computer
programs contained in the Motorola Solutions products
described in this manual may not be copied or reproduced in
any manner without express written permission of Motorola
Solutions. Furthermore, the purchase of Motorola Solutions
products shall not be deemed to grant either directly or by
implication, estoppel, or otherwise, any license under the
copyrights, patents or patent applications of Motorola
Solutions, except for the normal non-exclusive royalty free
license to use that arises by operation of law in the sale of a
products.
T82.book Page 9 Wednesday, March 28, 2018 1:28 PM

10
English
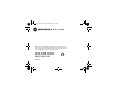
Part
Name
Hazardous Substances
(Pb) (Hg) (Cd) (Cr + 6) (PBB) (PBDE)
Housing O O O O O O
Display
PCBA
OOOOOO
PCBA X O O O O O
Cable O O O O O O
Battery X O O O O O
PSU X O O O O O
Charger
Tray
XOOOOO
This table is prepared according to SJ/T 11364.
O: Indicates that the content of such hazardous substance in all homogeneous
materials of such component is within the limits specified in GB/T 26572.
X: Indicates that the content of such hazardous substance in at least one homogeneous
material of such component exceeds the limits specified in GB/T 26572.
T82.book Page 10 Wednesday, March 28, 2018 1:28 PM

1
简体中文
便携式双向对讲机的射频能量辐射和产品
安全指南
注意!
使用本产品前,请阅读对讲机附带的《射频能量辐射和产品
安全指南》,其中包含有关安全使用以及射频能量认识和控
制的说明,以便遵守适用的标准和法规。
包装内容
频率图表
功能和规格
•20 个模拟信道
•121 个子代码(38 个 CTCSS 代码和 83 个 DCS 代码)
•
iVOX/VOX
• 轻松配对
•LED 手电筒
•20 个可选的呼叫提示音提示
• 分段式 LED 显示屏
• Roger 提示音
• 微型 USB 充电连接器
• 电池电量指示格
• 信道监听
• 信道扫描
• 双信道监听
• 键盘锁定
• 自动降噪控制
• 自动重复(滚动)
• 电池电量低提示
• 键盘音(开/关)
• 静音模式(振动提示)
• 紧急功能
•IP 防护等级:IPx2
• 电源:镍氢电池组/3 节 AA 碱性电池
• 电池寿命:长达 18 小时(5/5/90工作周期。实
• 际观察到的电池运行时间可能存在差异)。
注意:覆盖范围会因环境和/或地形条件而异
包装内容
T82
对讲机
1
皮带夹
1
电池
1
电源
1
电池充电座
1
使用手册
1
信道 频率(MHz) 信道 频率(MHz) 信道 频率 (MHz)
1 409.75000 8 409.83750 15 409.92500
2 409.76250 9 409.85000 16 409.93750
3 409.77500 10 409.86250 17 409.95000
4 409.78750 11 409.87500 18 409.96250
5 409.80000 12 409.88750 19 409.97500
6 409.81250 13 409.90000 20 409.98750
7 409.82500 14 409.91250
T82.book Page 1 Wednesday, March 28, 2018 1:28 PM

2
简体中文
对讲机控制按钮和显示屏
注意:按下最后一个按键后,对讲机屏幕将变暗 5 秒。出于节省
电池电量的目的,LED 指示灯将闪烁且再过 5 秒后对讲机
屏幕将关闭。按下任何按键(手电筒按键除外)可恢复显
示屏。
1. 信道 [1–20]
2. 呼叫提示音 [关,1–
20]
3. Roger 提示音 [开/关]
4. 双信道监听
5. 键盘音 [开/关]
6. 轻松配对
7. 扫描指示符
8. 电池指示符
[3 个电池电量级别]
9. 状态 [传输/接收]
10. 振动提示 [开/关]
11. 键盘锁定
12. iVOX [关,L1,L2,L3]
VOX [关,L1,L2,L3]
13. 子代码 [0–121]
2
3
4
5
1
6
7
8
9
11
13
10
12
音量/
电源
旋钮
菜单
锁定
屏幕
扬声器
手电筒按键
微型 USB
充电端口
轻松配对按键
麦克风
紧急键
呼叫提示音
滚动
扫描/监听
PTT 按键
附件端口
天线
个性化空间贴纸
T82.book Page 2 Wednesday, March 28, 2018 1:28 PM

3
简体中文
安装电池
每个对讲机都可以使用镍氢可充电电池组或三节 AA 碱性电
池,并且会在电池电量低时发出蜂鸣声。
1. 确保对讲机已关闭。
2. 对讲机背面朝向您时,向左推动电池锁以解锁电池盖。
3. 对于镍氢电池组,插入电池组,插入时 和 符号朝向
您。注意极性。
对于 AA 碱性电池,插入电池。注意极性。
4. 关闭电池盖并向右推动电池锁,以锁定电池盖。
对讲机电池表
显示的对讲机电池图标上的电量格数量 (0–3) 指示电池中的
剩余电量。当对讲机电池表显示左侧一个格时,对讲机会定
期或在释放 PTT 按键后发出啁啾音(电量低警报)。
电池容量维护
1. 不使用时,每 3 个月给镍氢电池充电一次。
2. 存放时,从对讲机上取下电池。
3. 将镍氢电池存放在温度介于 -20 °C 至 35 °C 之间且低湿
度的地方。避免潮湿情况和腐蚀性材料。
使用微型 USB 充电器
微型 USB 充电器让您可给镍氢电池组充电。
1. 在开始充电前关闭对讲机电源。
2. 将微型 USB 电缆插入对讲机上的微型 USB 充电端口。将微
型 USB 充电器的另一端连接到墙上电源插座。
3. 为电量耗尽的电池充满电需要 8 小时。
4. 在充电期间,电池电量指示格会上下移动。
使用充电座充电
1.确保对讲机已经关机。
2.将电源适配器连接到充电座的微型USB插孔。
3.把充电座放到一个平坦的地方。
4.将对讲机放入充电插座,保持键盘向前。
5.在充电期间,对讲机电池电量指示格会上下移动。
注意:Motorola Solutions 建议在充电时关闭对讲机。但是,如果在充电
时开机,若电池电量已完全耗尽,您可能无法传输消息。等待电池
充电到一格电量后,再尝试传输消息。
在热冷温度之间移动时,请等待到镍氢电池组适应温度变化之后,
才为它充电(一般需要 20 分钟左右)。
要获得最佳电池寿命,请在 16 小时内从充电器中拔下对讲机。存
放对讲机时,请勿连接到充电器。
打开和关闭对讲机
要打开对讲机,请顺时针转动旋钮。
要关闭对讲机,请逆时针转动旋钮。
设置音量
要调高音量,请顺时针转动旋钮。
要调低音量,请逆时针转动旋钮。
切勿让对讲机靠近您的耳朵。如果音量设置不合宜,可能会
损伤您的听力。
T82.book Page 3 Wednesday, March 28, 2018 1:28 PM

4
简体中文
通话和收听
您的组中的所有对讲机都必须设置为相同的信道和子代码,
才能进行通信。
1. 将对讲机拿到离嘴巴 2-3 厘米处。
2. 讲话时按住 PTT 按键。显示屏上将显示传输 图标。
3. 释放 PTT 按键以接听来电。对讲机将显示接收 图标。
要获得最大清晰度,请将对讲机拿到离嘴巴 2-3 厘米处,并
且避免在通话时盖住麦克风。
通话范围
您的对讲机在设计上可最大程度提升性能并扩大传输范围。
使用时确保对讲机至少距离 5 英尺。
监听键
按住 扫描/监听 3 秒,以进入监听模式并侦听当前信道上
的弱信号。当您未在收听时,还可以侦听对讲机的音量级
别。这可让您根据需要调节音量。
通话按键超时计时器
为了防止意外传输和延长电池寿命,如果您持续按下 PTT 按
键 60 秒,对讲机将发出连续警告提示音并停止传输。
菜单选项
㨒ঋ䭤
㨒ঋ䭤
㨒ঋ䭤
㨒ঋ䭤
㨒ঋ䭤
㨒ঋ䭤
㨒ঋ䭤
㨒ঋ䭤
㨒ঋ䭤
㨒ঋ䭤
ਂੇ⁗ᕅ
ᆆԙ⸷ (0-121)
લਡᨆ⽰丩δީθ1-20ε
ᥥࣞᨆ⽰δᔶ/ީε
䭤ⴎ丩δᔶ/ީε
Roger ᨆ⽰丩δᔶ/ީε
ਂ仇ⴇؗ䚉 (1-8)
ਂ仇ⴇᆆԙ⸷ (0-121)
䜞༦Ֆ䗉/༦Ֆ䗉
(iVOX,VOX)δީθL1θL2θL3ε
ؗ䚉 (1-20)
T82.book Page 4 Wednesday, March 28, 2018 1:28 PM

5
简体中文
选择信道
信道是指对讲机用于传输的频率。
1. 按下 菜单,直至信道编号开始闪烁。
2. 按下 或 以更改信道。长按这些按钮将让您可快速滚
动浏览信道,以浏览代码。
3. 按下 PTT 按键以退出菜单,或按下 菜单以继续设置。
选择子代码
子代码可通过阻止未知来源的传输,将干扰降至最低。您的
对讲机具有 121 个子代码。
要设置信道的代码,请执行以下操作:
1. 按下 菜单,直至代码开始闪烁。
2. 按下 或 以选择代码。您可以按住该按钮以加速滚动
浏览代码。
3. 按下 PTT 按键以退出菜单,或按下 菜单以继续设置。
设置和传输呼叫提示音
您的对讲机可以将不同的呼叫提示音传输到您的组中的其他
对讲机。您的对讲机有 20 种呼叫提示音可供您选择。
要设置呼叫提示音,请执行以下操作:
1. 按下 菜单,直至呼叫提示音 图标显示出来。当前呼
叫提示音设置将闪烁。
2. 按下 或 以更改并聆听呼叫提示音。
3. 按下 PTT 按键以退出菜单,或按下 菜单以继续设置。
为了将您的呼叫提示音传输到其他对讲机,请在您的对讲机
上设置相同的信道和子代码,然后按下 呼叫提示音。
轻松配对
轻松配对功能让一组对讲机用户可快速、同时将其所有对讲
机都编程为相同的信道和子代码设置。该组中的任何一台对
讲机都可被指定为“领导者对讲机”,并将其信道和子代
码设置传输到该组中的其他所有对讲机(成员对讲机)并供
其复制。
1. 挑选任意一台对讲机作为“领导者对讲机”。在此对讲
机上,将信道和子代码编程为所需设置。请参阅本用户手
册中的“选择信道”部分和“选择子代码”部分。
2. 要将信道和子代码组合复制到其他所有“成员对讲机
”,请按住成员对讲机上的 按键,直到听到一声蜂鸣
声。听到蜂鸣声后释放该按键,并等待领导者对讲机传输
设置。
注意:
• 您将看到 图标在显示屏上闪烁。这确认对讲机处于轻松配对模
式,正在等待接收来自领导者对讲机的信道和子代码设置。所有成
员对讲机都将保持在此模式 3 分钟。
• 包含许多对讲机的组应让所有用户同时执行此步骤,以便所有对讲
机同时编程。
3. 在领导者对讲机上,按住 按键,直至您听到一声双音蜂
鸣声。
注意:
• 在听到双音蜂鸣声时,将传输此对讲机的信道和子代码设置,而
其他所有(成员)对讲机都将接收并复制这些设置。
• 领导者对讲机必须在所有成员对讲机仍处于轻松配对模式时进行
此类传输,否则传输的设置无法被拾取。
• 在领导者对讲机上,用户必须记住不要在听到第一声(单音)蜂
鸣声时释放按键,否则此对讲机将变成另一台成员对讲机。如果
发生这种情况,您可以按下 PTT 以退出,然后再次重试 #3 中介绍
的步骤。
T82.book Page 5 Wednesday, March 28, 2018 1:28 PM

6
简体中文
内部声控传输/声控传输 (/)
传输通过对着对讲机/音频附件的麦克风说话发起,而不是
通过按下 PTT 按键发起。
1. 按下 菜单,直至 图标出现在显示屏上。连接音
频附件时,将显示 图标。当前设置(关,L1–L3)
将会闪烁。
2. 按下 或 以选择灵敏度级别。
3. 按下 PTT 按键以退出菜单,或按下 菜单以继续设置。
注意:使用 iVOX/VOX 时,将存在短暂延迟。
双信道监听
可让您交替扫描当前信道和另一个信道。
要设置另一个信道并启动双信道监听,请执行以下操作:
1. 按下 菜单,直至双信道监听 图标显示出来。双信
道监听图标将闪烁。
2. 按下 或 以选择信道,然后按下 菜单。
3. 按下 或 以选择子代码。
4. 按下 PTT 按键或等待到超时,以激活双信道监听。屏幕将
交替显示主信道和双信道监听信道。
5. 要结束双信道监听,请按下 菜单。
注意:如果您设置与当前信道相同的信道和子代码,双信道监听将无法
运行。
静音模式
静音模式(振动提示)通知您对讲机正在接收消息。这在嘈
杂环境中很有用。接听呼叫时,将触发振动提示。如果在前
一个呼叫后的 30 秒内没有任何活动,会再次触发振动提示。
1. 按下 菜单,直至振动提示 图标显示出来。当前设置
将闪烁。
2. 按下 或 以将设置更改为“开/关”。
3. 按下 PTT 按键以退出菜单,或按下 菜单以继续设置。
键盘音
您可启用或禁用键盘音。每次按下某个按键,都会听到按
键音。
1. 按下 菜单,直至键盘音 图标显示出来。当前设置“
开/关”将闪烁。
2. 按下 或 以打开/关闭。
3. 按下 PTT 按键以确认,或按下 菜单以继续设置。
Roger 提示音
可将对讲机设置为在完成传输后传输独特的提示音。这就像
说 “Roger” 或 “Over”,让其他人知道您已完成通话。
1. 按下 菜单,直至 Roger 提示音 图标显示出来。当前
设置“开/关”将闪烁。
2. 按下 或 以打开或关闭。
3. 按下 PTT 按键以设置,或按下 菜单以继续设置。
紧急提示模式
紧急提示功能可用于向您组中的成员寻求帮助。激活紧急提
示后,T82C 对讲机将以自动“免提”紧急控制模式总共运
行 30 秒。您组中的 T82C 对讲机会自动将扬声器音量调到最
L3 = 高灵敏度,适用于安静环境
L2 = 中灵敏度,适用于大多数环境
L1 = 低灵敏度,适用于嘈杂环境
T82.book Page 6 Wednesday, March 28, 2018 1:28 PM

7
简体中文
高设置并发出颤音提示音 8 秒。您自己的对讲机扬声器和您
组中的接收对讲机都将发出提示音。
8 秒提示后,您自己说的任何话或意外声音都将传输到组,
持续 22 秒。在紧急提示模式的 30 秒持续时间内,将锁定
T82C 对讲机控件和按键,以最大程度接收紧急
消息。
1. 按住“紧急提示”按键 3 秒。
2. 释放该按键,将开始发出提示音。无需继续按住“紧急
提示”按键或使用 PTT 即可传输您的消息。
警告:紧急提示功能只能用于真正发生紧急情况的时刻。如果接收组没有
响应紧急提示,Motorola Solutions 不承担任何责任。
LED 手电筒
您的对讲机具有内置 LED 手电筒。
LED 手电筒将保持打开,直至释放该按键。
键盘锁定
要避免意外更改对讲机设置,请执行以下操作:
1. 按住 按键锁定,直至按键锁定指示器 图标显示出来。
2. 处于锁定模式时,您可以打开和关闭对讲机,调节音量,
接收、传输、发送呼叫提示音,发送紧急提示,以及监听
信道。其他所有功能都保持锁定状态。
3. 按住 按键锁定,直至不再显示 按键锁定指示器,以
解锁对讲机。
扫描
使用扫描功能可执行以下操作:
• 搜索所有信道,了解是否有来自未知方的传输。
• 查找您组中意外更改信道的人员,或者
• 快速找到未使用的信道供自己使用。
优先级功能(基本和高级)可让您的搜索更高效。
•“基本扫描”模式使用您为每个信道设置的信道和代码组合(或使
用默认代码值 1)。
•“高级扫描”模式将扫描任何和所有代码的所有信道;检测任何使
用中的代码并将该代码值临时用于该信道。
•“主信道”将优先(例如,启动扫描时为您的对讲机设置的信道和
子代码)。这意味着,相比其他七个信道,将更频繁地扫描初始信
道(和代码设置),而且对讲机将优先快速响应主信道上发生的任
何活动。
要启动基本扫描,请执行以下操作:
1. 短按 扫描/监听按钮。扫描 图标将出现在显示屏
上,而且对讲机开始滚动浏览信道和代码组合。
2. 对讲机检测到与信道和子代码组合匹配的信道活动时,对
讲机将停止滚动,并且您会听到传输。
3. 在传输结束后的 5 秒内按下 PTT 按键,以响应传输之人并
与之通话。
4. 对讲机将在任何收到的活动结束后 5 秒恢复滚动浏览信道。
5. 短按 扫描/监听按钮以停止扫描。
要启动高级扫描,请执行以下操作:
1. 将主信道的子代码设置为“零”或“关”。
2. 短按 扫描/监听按钮。扫描 图标将出现在显示屏
上,而且对讲机开始滚动浏览信道。无子代码会过滤听到
的内容。
3. 对讲机使用任何代码(或无代码)检测到信道活动时,将
停止滚动,并且您会听到传输。将检测并显示其他方可使
用的任何子代码。
4. 在传输结束后的 5 秒内按下 PTT 按键以进行通话。
5. 对讲机将在任何收到的活动结束后 5 秒恢复滚动浏览信道。
6. 短按 扫描/监听按钮以停止扫描。
T82.book Page 7 Wednesday, March 28, 2018 1:28 PM

8
简体中文
注意:
1. 如果您在对讲机在滚动浏览非活动信道时按下 PTT 按键,将在“主
信道”上传输。您可以随时按下 扫描/监听按钮以停止扫描。
2. 如果对讲机在意外传输时停止,通过短按 或 ,可立即恢复扫描。
3. 如果对讲机反复在意外传输时停止,通过按住 或 3 秒,可临时
从扫描列表中删除该信道。您可以采用这种方法删除多个信道。
4. 关闭再打开对讲机,或者退出并重新进入扫描模式,方法是按下
扫描/监听,以将删除的信道恢复到扫描列表。
5. 您不能从扫描列表中删除“主信道”。
6. 在高级扫描中,检测到的代码用于一次传输。您必须记下该代码,退
出扫描,然后在该信道上设置检测到的代码以永久使用。
保修信息
您购买 Motorola Solutions 双向对讲机和/或原装附件的授
权 Motorola Solutions 经销商或零售商将尊重保修要求和/
或提供保修服务。
请将您的对讲机退还给经销商或零售商,以要求保修服务。
不要将您的对讲机退还给 Motorola Solutions。
为了获得保修服务资格,您必须提供包含购买日期的购买收
据或类似的替代购买证明。双向对讲机还应清晰显示序列
号。如果产品上的类型或序列号已被修改、删除、移除或难
以辨认,则保修将不适用。
保修不包括的范围
• 以错误方式使用产品或未遵循本用户手册中的说明造成的缺陷或损坏。
• 由于滥用、意外或疏忽造成的缺陷或损坏。
• 由于错误测试、操作、维护、调整或者任何类型的改造或修改造成的
缺陷或损坏。
• 不是直接由于材料或工艺缺陷造成的天线破损或损坏。
• 以会给性能带来负面影响或阻止充分检查和测试来验证任何保修要求
的方式拆卸或维修产品。
• 范围造成的缺陷或损坏。
• 潮湿、液体或溢出物造成的缺陷或损坏。
• 因正常使用而刮花或损坏的所有塑料表面和所有其他外露部件。
• 临时租赁的产品。
• 因正常使用和磨损产生的部件定期维护和维修或更换。
版权信息
本手册所介绍的 Motorola Solutions 产品可能包括受版权保
护的 Motorola Solutions 程序、存储的半导体存储器或其他
介质。美国和其他国家/地区的法律保护 Motorola
Solutions 的某些受版权保护的电脑程序的专有权利,其中
包括以任何形式拷贝或复制受版权保护的 Motorola
Solutions 程序的专有权利。
因此,未经 Motorola Solutions 明确的书面许可,不得以任
何方式对本手册中介绍的 Motorola Solutions 产品中包含的
任何受版权保护的 Motorola Solutions 电脑程序进行拷贝或
复制。除此之外,购买 Motorola Solutions 产品不应被认为
拥有直接或暗示、禁止反言或其他方式的 Motorola Solutions
之版权、专利或专利申请的任何许可证授权,产品销售过程
中法律运用所引起的普通非排他性免税许可证除外。
T82.book Page 8 Wednesday, March 28, 2018 1:28 PM
ページが読み込まれています...
ページが読み込まれています...
ページが読み込まれています...
ページが読み込まれています...
-
 1
1
-
 2
2
-
 3
3
-
 4
4
-
 5
5
-
 6
6
-
 7
7
-
 8
8
-
 9
9
-
 10
10
-
 11
11
-
 12
12
-
 13
13
-
 14
14
-
 15
15
-
 16
16
-
 17
17
-
 18
18
-
 19
19
-
 20
20
-
 21
21
-
 22
22
-
 23
23
-
 24
24


他の言語で
関連論文
-
Motorola Two Way Radio T37 Scan Monitoring Function Walkie Talkie ユーザーガイド
-
-
-
-
Motorola WM500 ユーザーマニュアル
-
-
-


