
Réf. NC00112494 • 03/2012 • Subject to modifications
JPM & Associés • marketing-design-communication
FuzzyLogic_NC00112494_Mise en page 1 27/03/12 08:47 PageA

www.tefal.com
EN
FUZZY LOGIC
ZH
MS
TH
FuzzyLogic_NC00112494_Mise en page 1 27/03/12 08:47 PageB

N
H
MS
H
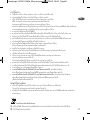
Control box / 控制面板 / แผงควบคุมการทำงาน / Kotak kawalan
1
14
15
9
10
7
2
3
4
13
12
5
8
11
6
13b 13g
13d 13i
13a 13f
13e
13c 13h
13b 13g
13d 13i
13a 13f
13e
13c 13h
FuzzyLogic_NC00112494_Mise en page 1 27/03/12 08:47 PageC

MAX.MAX.
8cups8cups
MAX.
8cups
1
2
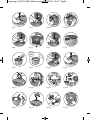
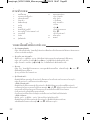
Fig.1 Fig.2 Fig.3a Fig.3b
Fig.4 Fig.5 Fig.6 Fig.7
Fig.8 Fig.9 Fig.10 Fig.11
Fig.12 Fig.13 Fig.14 Fig.15
Fig.16 Fig.17 Fig.18 Fig.19
a
b
MAX.MAX.MAX.
8cups
8cups8cups
FuzzyLogic_NC00112494_Mise en page 1 27/03/12 08:47 PageD

MAX.
8cups
MAX.
8cups
Important safeguards
Safety instructions
• Read and follow the instructions for use. Keep them safe.
• This appliance is not intended to be operated using an external timer or separate remote
control system.
For your safety, this appliance complies with the safety regulations and directives in effect
at the time of manufacture (Low-voltage Directive, Electromagnetic Compatibility, Food
Contact Materials Regulations, Environment…).
• Check that the power supply voltage corresponds to that shown on the appliance
(alternating current).
• Given the diverse standards in effect, if the appliance is used in a country other than that
in which it is purchased, have it checked by an approved service centre.
• Do not place the appliance near a heat source or in a hot oven, as serious damage could
result.
• This appliance is designed for domestic use only. In case of professional use, inappropriate
use or failure to comply with the instructions, the manufacturer accepts no responsibility
and the guarantee does not apply.
•
It is not intended to be used in the following applications, and the guarantee will not apply
for:
- staff kitchen areas in shops, offices and other working environments;
- farm houses;
- by clients in hotels, motels and other residential type environments;
- bed and breakfast type environments.
Connecting to the power supply
• Do not use the appliance if:
- the appliance or the cord is damaged.
- the appliance has fallen or shows visible damage or does not work properly.
In these cases, the appliance must be sent to your nearest approved service centre to avoid
any possible danger. Do not take the appliance apart yourself.
• Do not leave the cord hanging.
• Always plug the appliance into an earthed socket.
• Do not use an extension cord. If you accept liability for doing so, only use an extension
cord which is in good condition, has an earthed plug and is suited to the power of the
appliance.
• Do not unplug the appliance by pulling on the cord.
• Always unplug the appliance:
- immediately after use,
- when moving it,
- prior to any cleaning or maintenance,
- if it fails to function correctly.
Using
• Use a flat, stable, heat-resistant work surface away from any water splashes.
• Never leave the appliance in operation unattended. Keep away from children.
• This appliance is not intended for use by persons (including children) with reduced physical,
sensory or mental capabilities, or lack of experience and knowledge, unless they have been
2
FuzzyLogic_NC00112494_Mise en page 1 27/03/12 08:47 Page2

given supervision or instruction concerning use of the appliance by a person responsible
for their safety.
• Children should be supervised to ensure that they do not play with the appliance.
• Burns can occur by touching the hot surface of the appliance, hot water, steam or food.
• Never try to operate the appliance when the bowl is empty or without the bowl.
• The cooking function/knob must be allowed to operate freely. Do not prevent or obstruct
the function from automatically changing to the keep warm function.
• Do not remove the bowl while the appliance is working.
• Do not put the appliance directly onto a hot surface, or any other source of heat or flame,
as it will cause a failure or danger.
• The bowl and the heating plate should be in direct contact. Any object or food inserted
between these two parts would with the correct operation.
• Do not put any food or water into the appliance until the bowl is in place.
• Respect the levels indicated in the recipes.
• During cooking, the appliance gives out heat and steam. Keep face and hands away from
the hot appliance and the steam outlet. Do not obstruct the steam outlet.
• Do not immerse the body in water nor pour water into it, only into the bowl.
• Should any part of your appliance catch fire, do not attempt to put it out with water, use
a damp tea towel.
• Any service repair should only be made by a service centre with original spare parts.
• If your appliance is fitted with a removable power cord: if the power cord is damaged,
it must be replaced by a special cord or unit available from a Tefal authorised service centre.
• If your appliance is fitted with a fixed power cord: if the power supply cord is damaged,
it must be replaced by a Tefal authorised service centre or a similarly qualified person in
order to avoid any danger.
Protect the environment
• Your appliance has been designed to run for many years. However, when you decide to
replace it, remember to think about how you can contribute to protecting the environment.
• Before discarding your appliance you should remove the battery from the timer and
dispose of it at a local civic waste collection centre (according to model).
Environment protection first!
i Your appliance contains valuable materials which can be recovered or recycled.
‹ Leave it at a local civic waste collection point.
EN
ZH
TH
MS
3
FuzzyLogic_NC00112494_Mise en page 1 27/03/12 08:47 Page3

4
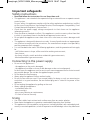
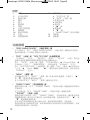
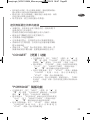
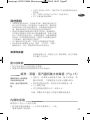
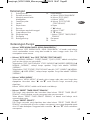
Description of functions
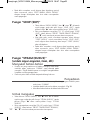
• “KEEP WARM/CANCEL” key
Press “KEEP WARM/CANCEL” key under working mode to cancel all the setting and return
to standby status. The LCD screen displays current time.
• “RICE” and “RICE TEXTURE” keys
“NORMAL”, “EXPERT”, “QUICK” functions are for selection of the type of rice and the
preferred rice texture.
Press “RICE” key and select “STICKY → FLAVORED → NORMAL”, the corresponding lamp
lights. The default function is “NORMAL”.
Press “RICE TEXTURE” key and select “SOFT
→ NORMAL→ HARD”, the corresponding
lamp lights. The default function is “NORMAL”.
• “MENU” key
Press “MENU” key under standby status, and the function menu will be displayed. Then
press “ ” and“ ” to select the required cooking function.
“MENU” key is null under working mode.
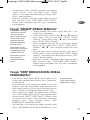
• “PRESET TIMER” key
Select the function needed and then press “PRESET TIMER” key to enact preset time and
cooking time.
Press “PRESET TIMER” key under working mode to check the time.
- “Preset” Function.
Select the cooking function needed and press “PRESET TIMER” key to switch to preset
time adjusting status, the time display on the LCD screen will flicker. Users may press
“ ” or “ ” key to adjust the preset time.
You can preset cook time to maximum to 24 hours and the cook will be finished when
preset time is due.
The preset time should be based on the real time. If preset time interval is less than the
default cooking time of the function, the system will postponed the preset time to next
day by default.
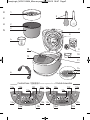
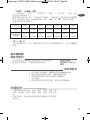
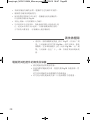
1. Steam basket
2. Graduation for water and rice
3. Removable ceramic bowl
4. Measuring cup
5. Spoons
6. Power cord
7. Lid
8. Removable inner steam shield
9. Micro pressure valve
10. Condensation collector
11. Handle
12. Lid opening button
13. Control box
a. “KEEP WARM/CANCEL” key
b. “RICE” key
c. “MENU” key
d. “RICE TEXTURE” key
e. Display
f. “ ” key
g. “START” key
h. “ ” key
i. “PRESET TIMER” key
14. Hotplate
15. Sensor
Description
FuzzyLogic_NC00112494_Mise en page 1 27/03/12 08:47 Page4

EN
ZH
TH
MS
5
Read the instructions
and carefully follow
the operating method.
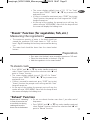
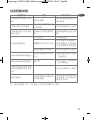
- “TIMER” Function
(“NORMAL”, “EXPERT”, “QUICK” functions cannot be used to set timer).
Select the required cooking function and press “Preset Timer” key to switch to Timer
Adjusting Mode, the clock on the digital screen will flicker. Press “ ” and“ ” to set
cooking time.
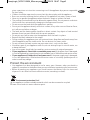
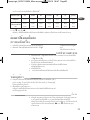
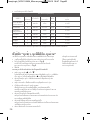
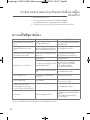
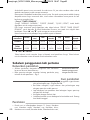
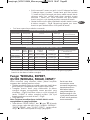
The cooking time for various functions is as below:
•“ ” and “ ” keys
Press the keys to switch functions under function selection mode; Press the keys to adjust
time under time adjusting mode.
Before the first use
Unpack the appliance
• Remove the appliance from the packaging and unpack all
the accessories and printed documents.
• Open the lid by pushing the opening button located on the
housing
– Fig.1.
Clean the appliance
• Remove the ceramic bowl – Fig.2, the pressure valve and the
steam shield
– Fig.3a and 3b.
• Clean the bowl, the valve and the steam shield with a sponge
and washingup liquid.
• Wipe the outside of the appliance and the metal parts of the lid
with a damp cloth.
• Dry off carefully.
• Put all the elements back in their original position. Install the
detachable cord.
The appliance
• This rice cooker is equipped with 12 functions: Rice cooking,
Quick cooking, Soup cooking, Steam cooking, Brown rice
cooking, Congee cooking, Porridge cooking, Cake cooking,
Reheat, Keep warm, Timer and Preset.
•
At the end of the cooking period, the appliance will
automatically switch over to keep warm which will last up to 24h.
Cooking
Function
Congee Porridge Cake
Brown
rice
Soup Steam Reheat
Timer 01:30 01:00 00:45 01:30 01:15 00:40 00:10
Adjustable
Scope
of the timer
01:10
~
02:00
01:00
~
01:40
00:30
~
01:00
01:10
~
20:00
00:40
~
04:00
00:30
~
02:00
00:08
~
00:20
FuzzyLogic_NC00112494_Mise en page 1 27/03/12 08:47 Page5

6
Time setting
• The rice cooker displays time in 24-hour format. For example:
if cooker shows time 8:30 while real time is 12: 30, you may
follow these steps:
Switch on power and long press “PRESET/TIMER” key for
several seconds, and the time display will flicker. Then press
“ ” and “ ” to adjust the time. For every press, the time will
be increased or decreased by one unit in rotation.
00→01→02→...→23→0 for hour rotation:
00→01→02→...→59→00 for minute rotation. Hold down
the key to achieve rapid increase or decrease. After time
setting, press “Start” key to confirm, otherwise, the rice
cooker will remains in real time setting status.
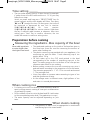
Preparation before cooking
Measuring the ingredients - Max capacity of the bowl
• The graduated markings on the inside of the bowl are given in
liters and cups, these are used for measuring the amount of
water when cooking rice.
• The plastic measuring cup provided with your appliance is for
measuring rice and not water. 1 level measuring cup of rice
weighs about 150 g.
• Fill with water up to the CUP mark printed in the bowl
corresponding to the number of measuring cups put in the
bowl. The water gauge on the inside face of the inner pot are
reference water levels for rice cooking.
• Before cooking, measure the rice with measuring cup, rinse it
and add water according to the proportion of rice and water.
The rice water proportion is 1: 1.0~1.2 for rice cook and around
1: 7 for porridge cook.
• Users may reduce or increase water according to types of rice
and their preference of taste.
• As the voltage varies in different areas, slight spillover of rice
and water is a normal phenomenon.
When cooking rice
• It is better not to rinse rice directly inside the bowl in order to
avoid scuffing ceramic coating of inner pot or deformation
of pot body by impact.
• Put the already rinsed rice into the bowl and fill it with water
to the corresponding water level (The graduations in cups).
• The water quantity can be adjusted depending on your
taste.
When steam cooking
• The quantity of water must be appropriate to avoid water
overflowing up to the steam basket.
Never add ingredients
or water higher than
the highest level mark.
FuzzyLogic_NC00112494_Mise en page 1 27/03/12 08:47 Page6

EN
ZH
TH
MS
7
• Place the steam basket onto the bowl – Fig.4.
• Add the ingredients.
For all functions
• Carefully wipe the outside of the bowl (especially the
bottom). Make sure that there are no foreign residues or
liquid underneath the bowl and on the heating element
– Fig.5.
• Place the bowl into the appliance, making sure that it is
correctly positioned
– Fig.6.
Make sure that the sensor moves when you put the bowl on
it.
• Make sure that the steam shield is correctly in position.
• Close the lid in place with a sound of “crack”.
• Plug the power cord into the socket on the base and then
plug another end of power cord into power outlet. Turn on
the rice cooker, there will be prompt of startup music, LCD
screen will display the current time (the time is 12:00), “Start”
lamp will flicker and the power lamp will remain on. The rice
cooker is at standby status and is ready for function
selection.
• Do not switch on the appliance until all the above stages
have been completed.
• Do not touch the heating element when the product is
plugged.
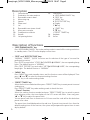
Cooking
•
The table below gives a guide to cooking different types of rice. For
best results, we recommend using ordinary rice rather than ‘easy
cook’ type of rice which tends to give a stickier rice and may adhere
to the base. With other types of rice, such as brown or wild rice, the
quantities of water need adjustment, check the table below.
• To cook 1 cup of white rice (serves 2 small or 1 large portion),
use 1 measuring cup of white rice and then add 1
1/2
measuring cup of water. With some types of rice it is normal for
a little rice to stick on the base when cooking 1 cup of rice. To
cook other quantity of white rice, refer to cooking guide below.
• The maximum quantity of water + rice should not exceed the
8 cup mark inside the bowl – Fig.8. Depending on the type of
rice, quantities of water may need adjustment. See the table
below.
Never place your
hand on the steam
vent during cooking,
as there is a danger
of burns.
If you wish to
change the selected
cooking menu of an
error, press "CANCEL"
key and choose the
menu you want.
Only use the inner
pot provided with
the appliance.
Do not pour water or
put ingredients in
the appliance
without the bowl
inside.
FuzzyLogic_NC00112494_Mise en page 1 27/03/12 08:47 Page7

8
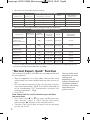
Measuring cups
of white rice
Weight
of white rice
Water level
in the bowl ( + the rice)
Serves
Approximative
cooking time*
2
300 g 2 cup mark 3per.-4per. 49 min
4 600 g 4 cup mark 5per.-6per.
50 min
6 900 g 6 cup mark 8per.-10per.
52 min
8 1200 g 8 cup mark 13per.-14per. 54 min
COOKING GUIDE FOR WHITE RICE
• Rinse the rice thoroughly before cooking except for risotto rice.
• Rinse the rice thoroughly before cooking.
* The rice cooker will automatically determine the exact cooking time depending on the
quantity of water and rice placed in the bowl.
Type of rice
Measuring
cup of rice
Weight
of white rice
Water level
in the bowl
( + the rice)
Serves
Approximative
cooking time*
Rice cooking
Round white rice
(Italian rice -
often a stickier rice)
4 600 g 4 cup mark 5per.-6per. 41 min
Whole grain
Brown rice
4 600 g 4,5 cup mark 5per.-6per.
57 min
Risotto rice
(Arborio type)
4 600 g 4 cup mark 4per.-5per. 47 min
Glutinous rice 4 620 g 4 cup mark 5per.-6per. 47 min
Brown rice
4 570 g 4,5 cup mark 5per.-6per.
59 min
Japanese rice
4 580 g 4 cup mark 5per.-6per.
56 min
Fragrant rice
4 640 g 4 cup mark 5per.-6per. 59 min
COOKING GUIDE FOR OTHER TYPES OF RICE
“Normal, Expert, Quick” Function
The cooking times given in the tables are only approximate and
for your guidance.
• Place the appliance on a flat, stable, heat-resistant work
surface away from water splashes and any other sources of
heat.
• Pour the required quantity of rice into the bowl using the
measuring cup provided –
Fig.8. Then fill with cold water up
to the corresponding “CUP” mark printed in the bowl (See
cooking guide above) –
Fig.9.
• Close the lid.
Note: Always add the rice first otherwise you will have
too much water.
• Press “Menu” and “ ” or “ ” key under standby status and
select “Normal”, “Expert” or “Quick” function, the function
selection mark “ ” will point to the selected function.
• Then press “Rice” key to select the type of rice you are going
to cook, e.g. “Sticky”.
The rice cooker itself
determines the exact
cooking time
depending on the
quantity of water and
ingredients placed in
the bowl (see cooking
table above for a
guide to times).
FuzzyLogic_NC00112494_Mise en page 1 27/03/12 08:47 Page8

EN
ZH
TH
MS
9
• Press “Rice texture” key to select the taste you prefer, e.g.
“Soft”.
• If there is no need to preset time, press “START” key to enter
cooking status of the selected function, and the prompt
music will ring, the start key will remain on and LCD screen
will display a dynamic rotating line frame.
• After water is dried up in the pot, the prompt music will ring,
the cooker will start simmer and the screen will count down
the simmering time of the selected function.
• After simmering, the prompt music will ring, the cooker will
enter warm keep status with green lamp turning on and the
screen will display the holding time.
• After each use empty and clean the condensation collector.
Some recommendations
for best results when cooking rice
• Measure the rice and rinse it thoroughly under running water
in a sieve for a long time (except for risotto rice which should
not be rinsed). Then place the rice in the bowl together with
the corresponding quantity of water.
• Make sure that the rice is well distributed around the whole
surface of the bowl, in order to allow even cooking.
• Add salt to your personal taste if required.
• Water may be substituted to stock. If using stock, there is the
risks of rice browning a bit in the bottom.
• Do not open the lid during cooking as steam will escape and
this will affect the cooking time and the taste.
• On completion of cooking, when the “KEEP WARM” indicator
light is on, stir the rice and then leave it in the rice cooker for
a few minutes longer in order to get perfect rice with
separate grains.
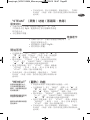
“Congee” Function
• Press “MENU” and “ ” or “ ” key under standby mode and
select “Congee” function, the function selection mark “ ”
will point to “Congee” function.
• The screen displays default time of “01:30” for “Congee”
function, press “PRESET TIMER”, “ ”, “ ” key to enact timer
and preset time.
• If there is no need for enactment, press “START” key to start
“Congee” function, the prompt music will ring and the
“START” lamp will remain on.
• At the end of the cooking, the prompt music will ring, the
cooker will enter “Keep warm” status with the lamp on and
the screen will display the holding time.
FuzzyLogic_NC00112494_Mise en page 1 27/03/12 08:47 Page9

10
“Porridge” Function
• Press “MENU” and “ ” or “ ” key under standby mode and
select “Porridge” function, the function selection mark “ ”
will point to “Porridge” function.
• The screen displays default time of “01: 00” for “Porridge”
function, press “PRESET TIMER”, “ ”, “ ” key to enact timer
and preset time.
• If there is no need for enactment, press “START” key to start
“Porridge” function, the prompt music will ring and the
“START” lamp will remain on.
• At the end of the cooking, the prompt music will ring, the
cooker will enter “KEEP WARM” status with the lamp on and
the screen will display the holding time.
“Cake” Function
• Press “MENU” and “ ” or “ ” key under standby mode and
select “Cake” function, the function selection mark “ ” will
point to “Cake” function.
• The screen displays default time of “00: 45” for “Cake”
function, press “PRESET TIMER”, “ ”, “ ” key to enact timer
and preset time.
• If there is no need for enactment, press “START” key to start
“Cake” function, the prompt music will ring and the “START”
lamp will remain on.
• At the end of the cooking, the prompt music will ring, the
cooker will enter “KEEP WARM” status with the lamp on and
the screen will display the holding time.
“Brown Rice” Function
• Press “MENU” and “ ” or “ ” key under standby mode and
select “Brown Rice” function, the function selection mark “ ”
will point to “Brown Rice” function.
• The screen displays default time of “01: 30” for “Brown Rice”
function, press “PRESET TIMER”, “ ”, “ ” key to enact timer
and preset time.
• If there is no need for enactment, press “START” key to start
“Brown Rice” function, the prompt music will ring and the
“START” lamp will remain on.
• At the end of the cooking, the prompt music will ring, the
cooker will enter “KEEP WARM” status with the lamp on and
the screen will display the holding time.
“Soup” Function
• Press “MENU” and “ ” or “ ” key under standby mode and
select “Soup” function, the function selection mark “ ” will
point to “Soup” function.
FuzzyLogic_NC00112494_Mise en page 1 27/03/12 08:47 Page10

EN
ZH
TH
MS
11
• The screen displays default time of “01: 15” for “Soup”
function, press “PRESET TIMER”, “ ”, “ ” key to enact timer
and preset time.
• If there is no need for enactment, press “START” key to start
“Soup” function, the prompt music will ring and the “START”
lamp will remain on.
• At the end of the cooking, the prompt music will ring, the
cooker will enter “KEEP WARM” status with the lamp on and
the screen will display the holding time.
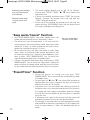
“Steam” Function (for vegetables, fish, etc.)
Measuring the ingredients
• The maximum quantity of water in the bowl should not
exceed the maximum CUP mark shown in “CUP” on the
bowl –
Fig.9. Exceeding this level may cause overflow during
use.
• The water level should be lower than the steam basket
bottom.
Preparation
•
Pour water into the bowl, never exceed the maximum CUP mark.
• Place the steam basket in the bowl – Fig.10.
• Add the ingredients in the steam basket.
To steam cook
• Press “MENU” and “ ” or “ ” key under standby mode and
select “Steam” function, the function selection mark “ ” will
point to “Steam” function.
• The screen displays default time of “00: 40” for “Steam”
function, press “PRESET TIMER”, “ ”, “ ” key to enact timer
and preset time.
• If there is no need for enactment, press “START” key to start
“Steam” function, the prompt music will ring and the “Start”
lamp will remain on.
• At the end of the cooking, the prompt music will ring, the
cooker will enter “KEEP WARM” status with the lamp on and
the screen will display the holding time.
“Reheat” Function
• Do not use reheat function more than 1 jour after end of
keep warm.
• Press “MENU” and “ ” or “ ” key under standby mode and
select “Reheat” function, the function selection mark “ ” will
point to “Reheat” function.
Repeat use of “reheating”
in case of excessive rice
or too little rice during
cooking will result in
burnt rice at the bottom.
FuzzyLogic_NC00112494_Mise en page 1 27/03/12 08:47 Page11

12
• The screen displays default time of “00: 10” for “Reheat”
function, press “PRESET TIMER”, “ ”, “ ” key to enact timer
and preset time.
• If there is no need for enactment, press “START” key to start
“Reheat” function, the prompt music will ring and the
“START” lamp will remain on.
• At the end of the cooking, the prompt music will ring, the
cooker will enter “KEEP WARM” status with the lamp on and
the screen will display the holding time.
“Keep warm/ Cancel” Function
• Press “KEEP WARM/CANCEL” key under standby status, the
cooker will automatically turn to “keep warm” status.
• The maximum time for keep warm is 24 hours and the
microcomputer will automatically cancel keep warm after
maximum 24 hours. In order to keep the rice fresh in taste,
please limit holding time within 12 hours.
• All the other keys are null when the cooker is under “keep
warm” status or functional mode (except “preset/timer” key
for checking current time). To process other operation, users
have to press “KEEP WARM/CANCEL” key to cancel the
original enactment and return to standby status.
• If there is no need for keep warm after cooking, press “KEEP
WARM/CANCEL” key to cancel the keep warm, unplug the
power cord from the power outlet and then from the socket
on the cooker base and take the food out from the inner pot.
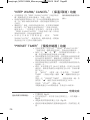
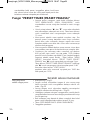
“Preset/Timer” Function
• During the process of setting, you may press “KEEP
WARM/CANCEL” key to cancel all the setting and turn back
to standby status.
• For each press of “ ” and “ ”, the time will be increased or
decreased by one minute. Long press the keys to increase or
decrease the time by 10 minutes.
• The preset time is the time when the cooking is finished. If
the preset timer is less than the cooking time of the function,
the cooker will start heating immediately and the cooking
time will be the time default-set by the system or specially
set by the user.
• If the preset time is prior to the current time, the system will
postpone the preset time to the next day by default.
• For example, if someone wants to cook soup before 8:00 am
and would like to have the soup ready at 12:00. Suppose the
timer for soup cooking is 2 hours, the detailed steps are as
below :
Reheating thick porridge
may cause burnt paste
at the bottom.
Reheating cold rotten
rice may cause stink
smell.
Do not use keep warm
function on cold food.
FuzzyLogic_NC00112494_Mise en page 1 27/03/12 08:47 Page12

EN
ZH
TH
MS
13
Press “MENU” key then “Preset/Timer” key and “ ” to
increase time until 2 hours.
Press “PRESET/TIMER” key again and then “ ” to programm
the end of cooking at 12:00.
Then press “START” key.
The appliance will start to cook soup at 10:00 and end at
12:00.
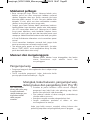
On completion of cooking
• Open the lid – Fig.11.
• Never place your hand on the steam outlet during cooking,
as there is a danger to burn yourself –
Fig.12.
• Glove must be used when manipulating the cooking bowl
and steam tray –
Fig.13.
• Serve the food using the plastic spoon provided with your
appliance and reclose the lid.
• The food remaining in the container will keep warm for any
second serving in the coming 24 hours.
• Press "KEEP WARM/CANCEL".
• Unplug the appliance.
Miscellaneous information
•
The rice has memory function. In case of power failure, the rice
cooker will memorize the cooking state right before the failure will
continue the cooking process if the power is resumed within
10 minutes. If the power failure lasts for more than 10 minutes,
the cooker will cancel previous cooking and return to standby
status.
• The service life of battery varies in different environments. When
the power supply is switch off, vibration or non-display of LCD
screen indicate that the battery is exhausted. If in this case a
preset function is needed, you should switch on power, adjust to
real time if necessary and then preset time accordingly. It's
recommended that you change the exhausted batteries at
authorized Service Center to ensure normal operation.
• To ensure good cooking efficiency, please do not open the lid
during cooking process.
• If during the operation process the set function is not selected,
please press “START” key to confirm setting. Otherwise, the
cooker will be remained in setting status.
Cleaning and Maintenance
Ensure that the power supply plug is unplugged and the main
body is completely cooled down before cleaning and
maintenance.
The escaping steam is
very hot.
FuzzyLogic_NC00112494_Mise en page 1 27/03/12 08:47 Page13

14
Condensation collector
• The condensation collector should be emptied and cleaned
after each use.
•
To remove the collector, press on each side of the plastic cover
and remove
– Fig.14.
Bowl, steam basket, condensation
collector, steam tray and steam shield (Fig.15)
• Use hot water liquid soap and a sponge to clean the bowl,
the condensation collector, the steam basket and the steam
shield. Scouring powders and metal sponges are not
recommended.
• If food has stuck to the bottom, allow the bowl to soak for a
while before washing it.
• Dry the bowl carefully.
• Do not immerse the appliance in water nor pour water into
it.
You can also wash the bowl, the steam tray and the steam
shield in the bottom shelf of a dishwasher.
Taking care of the bowl
For the bowl, carefully follow the instructions below:
• When putting into the machine, be careful not to damage
the inside coating on the dishwasher racks.
• So as to keep the ceramic quality for as long as possible, it is
recommended not to cut food in it.
• Make sure you put the bowl back into the rice cooker.
• Use the plastic spoon provided or a wooden spoon and not
a metal type so as to avoid damaging the bowl surface
–
Fig.16.
• To avoid any risk of corrosion, do not pour vinegar into the
bowl.
• The color of the bowl surface may change after using for the
first time or after longer use. This change in color is due to
the action of steam and water and does not have any effect
on the use of the rice cooker, nor is it dangerous for your
health. It is perfectly safe to continue using it.
Cleaning the micro pressure valve
• When clean the micro-pressure valve, please remove it from
the lid –
Fig.17 and open it by rotating in the direction of
“open” –
Fig.18a. After cleaning it, please wipe dry it and
meet the two triangle in the two parts together–
Fig.18b,
and rotate it in the direction of “close” until you heard “ka”,
then put it back to the lid of the rice cooker.
The brown marks and
scratches that may
appear after many
hours of use are not a
problem.
FuzzyLogic_NC00112494_Mise en page 1 27/03/12 08:47 Page14

EN
ZH
TH
MS
15
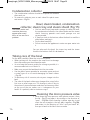
Cleaning and care of the other
parts of the appliance
• Unplug the appliance before cleaning.
• Clean the outside of the Rice Cooker, the inside of the lid
–
Fig.19 and the cord with a damp cloth and wipe dry. Do
not use abrasive products.
• Do not use water to clean the interior of the appliance body
as it could damage the heat sensor.
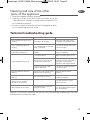
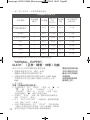
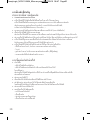
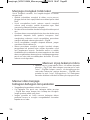
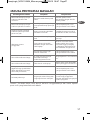
Malfunction description Causes Solution
Any indicator lamp off and no
heating.
Rice cooker not plugged.
Verify the main plug is well
engaged in the product body.
Any indicator lamp off and
heating.
Problem of the connection of
the indicator lamp or indicator
lamp is damaged.
Send to the authorized service
center for repair.
Cooking indicator lamp off,
keep warm indicator on.
Cook button is not in cooking
position.
Put the cook button in low
position (cooking).
Steam leakage during using.
Lid is badly closed.
Open and close again the lid.
Micro pressure valve not well
positioned or uncomplete.
Stop the cooking (unplug the
product) and check the valve is
complete (2 parts locked
together) and well positioned.
Lid or micro pressure valve
gasket is damaged.
Send to the authorized service
center for repair.
Rice half cooked or overtime
cooking.
Too much or not enough water
compared to rice quantity.
Refer to table for water
quantity.
Rice half cooked or overtime
cooking.
Not sufficiently simmered.
Simmer as required in table
cooking paragraph.
Automatic warm-keeping fails
(product stay in cooking
position, or no heating).
Send to authorized service
center for repair.
Water leakage on the table.
Dew collector missing or dew
collector overflow.
Empty the dew collector for each
use verify good positionning of
the dew collector.
Remark: if inner bowl is deformed, do not use it anymore and get a replacement from the
authorized service center for repair.
Technical troubleshooting guide
FuzzyLogic_NC00112494_Mise en page 1 27/03/12 08:47 Page15

安全指示
安全事項
• 請細閱並遵照使用說明,說明書宜妥為保存。
• 該電器產品無需使用外部定時開關或單獨的遙控系統即可正常工作。
該電器產品符合所有相關的安全法規,包括低電壓指令、電磁兼容性法規以
及食品接觸材料法規和環境法規。
• 檢查產品銘牌上的額定電源電壓與供電電源電壓相符(交流電)。
• 基於各地的標準有異,如果您在購買國以外的國家使用本產品,請先將產品
送交到認可的服務中心進行檢查。
• 切勿將本產品放近發熱處或開著的焗爐,因為這樣可能會導致本產品嚴重受
損。
• 本產品只供家居用途,倘用作專業用途、使用不當或沒有遵照使用說明者,
生產商一概不負責任,而保修條款亦不適用。
• 該電器產品僅為家用設計。請不要在下列保修涵蓋範圍以外的情形下使用
-商店、辦公室和其他職業環境中的員工專用廚房中,
-農場中,
-酒店或汽車旅館的顧客,或其他住宅樓宇,
-住宿加早餐型的旅館和其他類似環境。
連接電源
• 在以下情況下切勿使用本產品:
-本產品或電源線損毀。
-本產品跌壞了、出現明顯損毀或不能正常操作。
假如出現以上情況,必需將本產品送交最近的認可服務中心,以免構成潛在
危險。切勿自行拆開本產品。
• 請勿讓電源線隨意懸垂。
• 務必確保該產品接在接地插座上。
• 請勿使用延長線。如果您自己承擔責任,那麽可以使用完好的、與該產品功
率相符的接地延長線。
• 不要用拉、扯、拽電源線的方式來拔取電源插頭。
• 以下情況下,請務必斷開該電器產品:
-即時使用後,
-移動時,
-維護或清潔前,
-不能正常工作時。
使用本產品
• 將本產品放在穩固防熱的平坦工作面上,並避免被水濺濕。
• 切勿在無人照看的情況下讓產品工作。不要把產品放於兒童可接觸處。
16
FuzzyLogic_NC00112494_Mise en page 1 27/03/12 08:47 Page16

• 該電器產品不適用於以下人士(包括兒童):身體、感官或心智有缺陷的人
士,缺乏相關經驗或知識的人士。下列情況除外:有專人協助並負責他們的
安全,有他人指導或提前接受該設備的使用說明指導。
• 兒童必需在監督下使用本產品,以確保不會將之用作戲耍。
• 本產品運行時會產生高溫,請勿接觸產品的暖熱部位、熱水、蒸汽及食物。
• 內鍋沒有水或食物或沒有放置內鍋時切勿操作本產品。
• 煮飯功能/掣的操作不得受阻。切勿阻止或阻礙煮飯功能自動跳至保溫。
• 本產品操作期間切勿移走內鍋。
• 切勿將本產品直接放在燙熱面上、其他發熱源或火焰上,因為這樣會令其失
靈或構成危險。
• 內鍋應該直接接觸發熱板,在兩者之間放置任何物件或食物均會干擾本產品
的正確操作。
• 放好內鍋後才可放入食物或水。
• 根據內鍋的刻度來調節米、水比例。
• 在烹調期間,產品會產生高溫和蒸汽。請將手和臉部遠離蒸汽孔。亦不要阻
塞蒸汽出口。
• 切勿將煲身浸入水中或倒水在煲身上。水只能倒進內鍋。
•
如果本產品有任何部位著火,切勿嘗試用水滅火,應該利用濕碗布冚熄火焰。
• 一切零件處理必需由備有原裝零件的服務中心進行。
• 如有問題或查詢,請跟我們的客戶關係組聯絡或瀏覽我們的網站:
groupeseb.com。
• 產品的電源線可移除者:若電源線損壞,必需以特福認可服務中心出售的特
種電線或型號替換。
• 產品的電源線不可移除者:若電源線損壞,必需由特福認可服務中心或相類
的合資格人士更換,以防發生危險。
保護環境
• 本產品可供使用多年,但如果你要更換新的,請想想自己可以如何出一分力
保護環境。
• 掉棄本產品前必需先拿走計時器的電池,並將之棄置在當地的家居廢物收集
中心(視乎型號)。
保護環境為上﹗
i 本產品含可以回收或循環再造的寶貴物料。
‹ 請將之送往家居廢物收集站。
EN
ZH
TH
MS
17
FuzzyLogic_NC00112494_Mise en page 1 27/03/12 08:47 Page17
ページが読み込まれています...
ページが読み込まれています...
ページが読み込まれています...
ページが読み込まれています...
ページが読み込まれています...
ページが読み込まれています...
ページが読み込まれています...
ページが読み込まれています...
ページが読み込まれています...
ページが読み込まれています...
ページが読み込まれています...
ページが読み込まれています...
ページが読み込まれています...
ページが読み込まれています...
ページが読み込まれています...
ページが読み込まれています...
ページが読み込まれています...
ページが読み込まれています...
ページが読み込まれています...
ページが読み込まれています...
ページが読み込まれています...
ページが読み込まれています...
ページが読み込まれています...
ページが読み込まれています...
ページが読み込まれています...
ページが読み込まれています...
ページが読み込まれています...
ページが読み込まれています...
ページが読み込まれています...
ページが読み込まれています...
ページが読み込まれています...
ページが読み込まれています...
ページが読み込まれています...
ページが読み込まれています...
ページが読み込まれています...
ページが読み込まれています...
ページが読み込まれています...
ページが読み込まれています...
ページが読み込まれています...
ページが読み込まれています...
-
 1
1
-
 2
2
-
 3
3
-
 4
4
-
 5
5
-
 6
6
-
 7
7
-
 8
8
-
 9
9
-
 10
10
-
 11
11
-
 12
12
-
 13
13
-
 14
14
-
 15
15
-
 16
16
-
 17
17
-
 18
18
-
 19
19
-
 20
20
-
 21
21
-
 22
22
-
 23
23
-
 24
24
-
 25
25
-
 26
26
-
 27
27
-
 28
28
-
 29
29
-
 30
30
-
 31
31
-
 32
32
-
 33
33
-
 34
34
-
 35
35
-
 36
36
-
 37
37
-
 38
38
-
 39
39
-
 40
40
-
 41
41
-
 42
42
-
 43
43
-
 44
44
-
 45
45
-
 46
46
-
 47
47
-
 48
48
-
 49
49
-
 50
50
-
 51
51
-
 52
52
-
 53
53
-
 54
54
-
 55
55
-
 56
56
-
 57
57
-
 58
58
-
 59
59
-
 60
60


