
SIEMENS
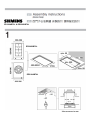
ER326AB70L & ER326BB70L
ER326BB70L
ER326AB70L
Measurements in mm
302-306

Measurements in mm

Read the appliance's instructions
before installing and using.
The graphics in these Assembly
instructions are given as a guide only.
The manufacturer is exempt from
all liability if this manual's
requirements
are not complied
with.
Attention!
According to the Gas Safety
Regulations of Hong Kong, any gas
installation works including the
installation of appliances and
connection tubing, must be
undertaken by registered gas
installers who are registered for
that appropriate classes and be
employed by registered gas
contractors.
Safety instructions
Use approved gas tubing bearing
EMSD approval marking (such as :
機電工程署批准EMSD APPROVAL
GTXXXX) for connection to
appliances, or other appropriate
methods accepted by EMSD.
Please do not use additional fitting,
such as aluminum cover.
This appliance has been designed for
home use only. This appliance cannot
be installed on yachts or in caravans.
Before installing, you need to check
that local distribution conditions (gas
type and pressure) and the
appliance's adjustment are
compatible. The appliance's
adjustment conditions are written on
the label or the specifications plate.
This appliance can only be installed in
a well-ventilated place in accordance
with existing regulations and
ventilation specifications. The
appliance must not be connected to a
combustion product evacuation
device.
The supply cable must be attached to
the unit to prevent it from touching hot
parts of the oven or hob.
Appliances with electrical supply must
be earthed.
Do not tamper with the appliance's
interior. If necessary, call our
mechanical Assistance Service.
When installing built-in gas hob on
top of stove cabinet, please check
that there is provision for
ventilation at the cabinet to ensure
proper operation of the gas hob.
Do not store any flammable
materials, sprays or pressurized
containers inside the stove
cabinet.
The panel of this built-in hob is
made of ceramic glass which is
safer than normal glass for this
application. However, the following
safety precautions for using
built-in hob with glass top panel
should also be noted in order to
prevent the glass top panel from
breaking:
1. Clean the burner assembly
frequently to maintain a clear gas
passage on the flame distributor.
Clean and tidy up the flame
distributor after spillage of food
and liquid once the burner
assembly cooled down.
2. Turn off the gas appliance
immediately if abnormal noise
propagates from the gas appliance
and contact gas supply company
or gas hob importer for inspection.
3. Do not use oversized utensils for
cooking.
4. Do not impact the glass surface
with hard objects or place heavy
objects on the glass surface.
Before installing
This appliance is class 3 type,
according to the EN 30-1-1 regulation
for gas appliances: built-in appliance.
These individual appliances can be
combined with other identical
appliances and/or with conventional
hobs of the same make, using the
joint accessory.
See the catalogue for details.
The units next to the appliance must be
made of non-flammable materials. The
laminated covering and glue for adhering it
must be heat resistant.
This appliance cannot be installed above
fridges, washing machines, dishwashers
or similar.
An oven must have a power cooling fan to
install a hob above it.
Check the oven's dimensions in its
installation manual.
If an extractor fan is installed, you must
follow the installation manual's instructions,
always keeping a minimum distance of 650
mm to the hob.
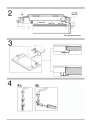
Preparation of kitchen unit
(fig. 1-2)
Make an appropriate size cut in the work
surface.
If the hob is electric or mixed (gas and
electricity) and there is no oven below,
place a non-flammable separator (e.g.
metal or plywood) 10 mm from the bottom
of the hob. This will prevent access to the
base of the hob.
If the hob is gas, it is recommendable to
place the separator at the same distance.
On wood work surfaces, varnish the
cutting surfaces with a special glue. This
protects them from moisture which could
collect under the work surface.
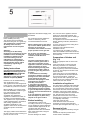
Installation of appliance
The clips and the adhesive seal (underside
of the hob) are factory-fitted: do not under
any circumstances remove them. The seal
ensures that the entire work surface will be
watertight, and prevents water seepage.
In order to fit the appliance into the kitchen
unit, first place the hob in the correct
position then loosen each of the clips so
that they all turn freely (it is not necessary
to completely undo them).
Insert and centre the hob.
Press the sides of the hob until it is
supported around its entire perimeter.
Turn the clips and tighten them fully. Fig. 3
Removal of hob
Turn off the appliance's electricity and gas
supply.
Unscrew the clips and proceed in the
reverse order to installation.

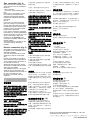
Gas connection (fig. 4)
The end of the inlet connection point
of the gas hob has a 1/2” thread that
allows for:
- fixed connection.
- connection using a flexible metal
pipe.
In this case, it is necessary to insert
the accessory (427950) and the
watertight seal (034308) supplied
between the manifold outlet and the
gas supply.
Fig. 4a.
In this case, you must prevent the
pipe from coming into contact with
moving parts of the kitchen unit being
inserted (for example, a drawer) and
prevent access to any spaces which
might become obstructed.
If you need to connect the gas supply
horizontally, our Technical Assistance
Service can supply you with an L-tube
(code 173018) and a seal (code
034308). Fig. 4b. Warning! If any
connection is handled, check the seal.
Danger of leaks.
The manufacturer is not liable for any
connection leaking, after being
handled.
Electric connection (fig. 5)
Check that the voltage and power of
the appliance are compatible with the
electrical installation.
The hobs are supplied with a power
cable with or without a wall socket
plug.
Provide an omnipolar cut-off switch
with a minimum contact separation of
3 mm (except for plug connections, if
the user has access to it).
Appliances with plugs must only be
connected to sockets that have earth
wires correctly installed.
This appliance is type “Y”: the supply
cable can only be changed by the
Technical Assistance Service and not
the user. The cable type and
minimum cross-section must be
respected.
安全說明
注意! 根據香港氣體安全規例,任何氣
體裝置工程,包括爐具和接駁喉管的安
裝,必須由註冊氣體裝置技工執行,而
該技工已於相關的氣體工程類別註冊
及受聘於註冊氣體工程承辦商。
本爐具僅可根據現行規例及通風規範
在良好通風之處安裝。
使用認可印有機電工程署批准標記
(
例如 : 機電工程署批准EMSD
APPROVAL GTXXXX)
的氣
體接駁喉管連接爐具,或使用機電工程
署接納的其他恰當方法。
注意: 涉及安裝、調校氣體等之所有操
作,必須由註冊氣體裝置技工執行,而
該技工已於相關的氣體工程類別註冊
及受聘於註冊氣體工程承辦商。
安裝技師需注意氣體及電力供應商的
標準和規格。
安裝前,請關上爐具的供電及供氣。
本爐具設計成僅供家居使用。本爐具不
可裝於遊艇上或活動房屋內。
安裝前須檢查本地的供氣狀況(氣體種
類及氣壓)與爐具的調節相匹配。爐具
的調節條件載於標籤或規範銘牌上。
當在灶櫃面安裝嵌入式氣體煮食爐時,
灶櫃應設有透氣設施,以確保煮食爐在
使用時操作正常。
不應將易燃物料、噴霧及壓縮容器放置
在灶櫃內。
此煮食爐的面板是用陶瓷玻 璃 製造,較
一般玻璃安全。唯使用嵌入式玻璃面板
煮食爐時還須注意以下事項,以避免玻
璃面板爆裂:
1. 經常清潔爐頭組件以保持火蓋焰孔
暢通,如滾瀉食物及汁液,應在爐頭組
件冷卻後儘快作出妥善清理。
2. 如煮食爐出現不尋常聲音,應即停
用並安排氣體供應公司或爐具進口商
檢查。
3. 切勿使用過大的器皿煮食。
4. 切勿以硬物撞擊或將重物放置於玻
璃面板。
本爐具僅可根據現有規例及通風規範
在良好通風之處安裝。
供電線必須直接接到爐具以防接觸爐
灶或爐架的熱部件。
帶供電的爐具必須接地。
請勿隨便更動本爐具的內部組件。如有
必要,請電話聯繫我們的技術支援服務
部。
安裝前
根據燃氣爐具EN 30-1-1規例,本電器為
3類置入式爐具。使用接駁配件,這些
個別爐具可與同類其他爐具結合及/或
同類普通爐架結合使用,詳見產品目錄
介紹。
爐具旁邊的器具必須用非易燃物材料
製成。分層蓋及粘接膠水必須防熱。
本爐具不可裝於冰箱、洗衣機、洗碗機
或類似電器之上。焗爐必須有一臺強力
冷卻風機以在其上面安裝本爐具。
檢查安裝說明書上焗爐的尺寸。
若裝有抽風機,必須遵守安裝手冊指引,
經常保持離爐架650mm的最小距離。
廚房裝置的準備(圖 1-2)
在工作枱面上作出合適尺碼的切口。
如爐架使用電或氣電混合且下面并無
焗爐,在離爐架底10mm處放用非易燃
分隔件(即金屬或夾板)。此舉可防止
觸及爐架基座。
如用氣體爐,建議將分隔件置於相同距
離。
在木質工作枱面用特種膠將切口拋光。此舉
可保護枱面免受潮,因潮濕會在工作枱面下
積聚。
爐具的安裝
夾子及黏貼密封(在爐架下側)乃出廠時配
置。任何情況下均勿將它們移除。密封確保
整個工作枱面成為防水式,並防止水滲泄。
為將爐具裝進廚櫃裝置,首先將爐具放在正
確的位置,然後鬆開每只夾子令其均可自由
轉動(不必完全鬆開它們)。
放入爐具並將其置中。
按下爐具側邊直到其整個周邊得到支承。
轉動夾子並完全收緊它們。
見圖3。
爐具拆除
關上爐具的供電和供氣。
鬆開夾子的螺絲並按安裝之相反步驟進
行。
供氣接駁(圖 4)
有1/2”螺紋供:
- 固定接駁。
- 用撓性金屬管接駁。
此時須在歧管出口和供氣之
間插入配件(427950) 及水密封
件(034308),見圖 4a。
此時,須防止管子接觸插入的
廚櫃裝置動件(如抽屜),并防
止接觸可能變為受堵塞的任何地
方。
若要水平接駁供氣,我們的
技術支援服務處可提供直角管
(編碼 173018)及密封件(編碼
034308),見圖4b
警告! 進行任何接駁時均須檢查密封件。
泄漏的危險
接駁處理後製造商不承擔任何接
駁泄漏的責任。
供電接駁(圖 5)
檢查確保爐具的電壓及功率
與供電裝置的相匹配。
隨爐提供一條供電電纜,連
同或不帶墻裝插座插頭。
提供一隻最小接觸分離3mm 的單極切斷開
關(如用戶接觸它,插頭連接除外)。
帶插頭的爐具只可駁至正確安裝接地線的
插座。
此爐具為“Y”型供電,電纜只能由技術支援服
務處而非用戶更改。電纜的種類及最小橫切
面必須遵從。
Cod. 9000925641B
电 国 门 份 标许
-
 1
1
-
 2
2
-
 3
3
-
 4
4


Siemens Gas Hob ユーザーマニュアル
- タイプ
- ユーザーマニュアル
- このマニュアルも適しています
他の言語で
- English: Siemens Gas Hob User manual
関連論文
その他のドキュメント
-
Bosch HMT75G451/36 インストールガイド
-
-
-
-
-
-
ROSIERES RVG2TG Installation Instructions Manual
-
Bosch HBC86P753W/45 ユーザーマニュアル
-
Groupe Brandt DPG7341B 取扱説明書