
0
MODEL / MODEL / 型号
RCF-FITTO301-5B/RCF-FITTO302-5B
USER MANUAL/PANDUAN PENGGUNA/用户手册

1
CEILING FAN / KIPAS SILING /吊扇
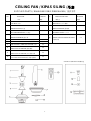
SUPPLIED PARTS / BAHAGIAN YANG DIBEKALKAN / 提供零件
NO
PARTS
BAHAGIAN
零件
QUANTITY
KUANTITI
数量
NO
SCREW PACK
BUNGKUSAN SKRU
螺丝包
QUANTITY
KUANTITI
数量
1
HANGING TUBE /
ROD BESI /
吊杆
x 1
11
BLADE SCREWS /
SKRU BILAH /
叶片螺丝
x 11
2
TOP CANOPY /
SENGKUAP ATAS/
吊盅
x 1
12
WIRE NUT /
PENUTUP WAYAR /
接线帽
x 3
3
BALANCING KIT /
SET PENGIMBANGAN /
平衡包
x 1 set
13
FLAT WASHER /
SESENDAL LEPER /
平介
x 11
4
COUPLING COVER /
SENGKUAP BAWAH/
接头罩
x 1
14
LIVE WIRE & NEUTRAL WIRE
WAYAR HIDUP & WAYAR NEUTRAL
火线
&
零线
x 1
5
FAN MOTOR / MOTOR KIPAS /
风扇电机
x 1
6
FAN BLADES / BILAH KIPAS /
风扇叶片
x 5
7
FAN HOUSING / PENUTUP HIASAN /
下罩
x 1
8
RECEIVER COVER /
PENUTUP ALAT HIASAN /
接收器盖
x 1
9
INFRARED SENSOR CAP /
PENUTUP ALAT HIASAN /
红外接感应罩
x 1
10
INFRARED TRANSMITTER/
ALAT KAWALAN INFRAMERAH/
红外线发射器
x 1
SCREW PACK/BUNGKUSAN/螺丝包

2
FAN SIZE
SAIZ KIPAS
风扇寸数
VOLTAGE
VOLTAN
电压
MAX FAN POWER
KUASA KIPAS MAX
风扇最大功率
MAX SPEED
KELAJUAN MAX
最大转速
NETT WEIGHT
BERAT BERSIH
净重
GROSS WEIGHT
BERAT KASAR
毛重
56” FITTO301-5B
220-240V/50Hz
85W
230+/-10%
6.5 KG
13.8 KG
46” FITTO301-5B
220-240V/50Hz
75W
270+/-10%
6.2 KG
13.2 KG
WARNING / AMARAN / 警告
A) TO ENSURE YOUR PERSONAL SAFETY, PLEASE READ THROUGH THE INSTRUCTION
MANUAL BEFORE OPERATING THE PRODUCT.
SEBELUM MENGENDALIKAN PRODUK, SILA BACA BUKU PANDUAN INI DENGAN TELITI DEMI
KESELAMATAN PENGGUNA.
为了确保您的人身安全,请在使用前详细阅读本产品说明书;
1)Do not bend the blade holders during installation, blades balancing or fan cleaning.
Dilarang membengkokkan bilah kipas semasa pemasangan, pengimbangan ataupun pembersihan kipas siling.
在安装风扇
,
平衡叶片及清洁风扇时不能将叶架弯曲。
2) To prevent accidents, power switch must be OFF and electrical wiring must be disconnected before ceiling fan
installation, dismantling, maintenance or cleaning.
Sebelum kerja-kerja pemasangan, penyelenggaraan atau pembersihan kipas, bekalan kuasa mestilah diputuskan untuk
menggelakkan kecederaan.
安装此吊扇接电线前、拆卸、维修或清洁前必须关闭电源开关,以免造成意外。
3) Ceiling fan installation and electrical wiring must be done by qualified technician in accordance with all
applicable codes and air conditioning engineers (ASHRAE) or the local qualified authorities.
Pemasangan mestilah dilakukan oleh juruteknik yang berkelayakan sahaja.
安装吊扇接电线必须由具有专业电工遵循当地电线标准来连接电线。
4) Be cautious when drilling the wall to avoid damaging electrical wiring and other hidden parts.
Berhati-hati semas amenggerudi siling agar tidak merosakkan atau memutuskan wayar elektrik yang tidak kelihatan.
请注意钻墙时不要损坏电线和其他隐蔽的设施。
5) Ceiling fan must be hooked on concrete ceiling. Do not install the ceiling fan on plaster ceiling or any types of
drywall ceilings. During ceiling fan installation, all screws must be tightened at all allocated parts.
Kipas wajib dipasangkan pada siling konkrit atau struktur siling yang kukuh untuk keselamatan pengguna. Semua skru pada kipas
mestilah diketatkan demi mengelakkan kemalangan.
吊扇安装时,吊扇必须安装在水泥天花板上面,不能安装在石膏板或其他类型的石膏天花板上,各零件螺丝必须锁紧。

3
B) SAFETY GUIDELINES / LANGKAH KESELAMATAN & PENCEGAHAN / 安全注意事项
1) Please do not install the ceiling fan at high humidity areas.
Elakkan kipas dipasang di kawasan yang berminy akatau lembap.
请不要将吊扇安装在潮湿的地方。
2) Distance between fan blades and ground must be at least 2.5 meter and above.
Jarakan tarabilah kipas dengan lantai mestilah lebih daripada 2.5 meter.
安装吊扇时,叶片至少离地面
2.5
米高处,以防叶片发生意外触碰。
3) Do not touch the ceiling fan while it is operating.
Dilarang sentuh kipas siling ketika ia sedang beroperasi.
吊扇运转时,请不要用任何物品触碰吊扇,以免发生危险。
4) For safety purposes, all electrical connections must conform to the national electrical safety codes and earth
wire must be installed correctly (suitable for power supply of 240VAC/50Hz).
Setiap sambungan elektrik mestilah selaras dengan piawaian dan akta kod keselamatan elektrik tempatan, untuk memastikan
keselamatan pengguna.
为了安全考虑,所有电气连接地线必须正确安装,必须符合国家电气安全规范(适用于
240VAC/50Hz
供电)。
5) Do not modify the ceiling fan and only use the parts supplied to prevent injuries.
Untuk mengelakkan kemalangan, jangan mengubahsuai kipas atau mengguna alat ganti / komponen yang tidak asli.
为避免损坏,请用风扇内提供的零件包,不要随意更改。
6) Do not attempt to repair the fan. Always return the defective fan to our authorized service agent.
Sekiranya kipas tidak berfungsi, dilarang cuba untuk membaiki kipas. Pastikan kipas dihantar ke pusat servis kami yang sah untuk
pembaikan.
不要尝试自己维修风扇,请把有问题的风扇反馈给我们授权的服务代理。
7) This appliance is not intended for use by persons (including children) with reduced physical, sensory or mental
capabilities, or lack of experience and knowledge, unless they have been given supervision or instruction
concerning use of the appliance by a person responsible for their safety.
Perkakas ini tidak sesuai untuk digunakan oleh orang kurang upaya fizikal, deria atau mental, mahupun kanak-kanak serta orang
yang kurang berpengetahuan / pengalaman terhadap perkakas ini, melainkan mereka dibawah pengawasan atau arahan orang
yang bertanggungjawab terhadap keselamatan mereka.
本产品不能由儿童、身体上、感觉上或者精神上有缺陷者或缺乏经验的人来使用。除非他们在监督人的指导下对其安全负责的人来使
用该项产品。
8) Children should be supervised to ensure that they do not play with the appliance.
Kanak-kanak mestilah sentiasa dibawah pengawasan untukmemastikan mereka tidak bermain dengan perkakas ini.
应该监督以及确保儿童不要玩这个产品。
9)The ceiling fan electrical wiring must be installed with means for disconnection incorporated in the fixed wiring
provided and safety cable must be installed according to the steps in this manual.
Wayar elektrik dan dawai keselamatan kipas mestilah dipasang mengikuti arahan buku panduan ini supaya penyambungan wayar
elektrik kipas akandiputuskan sekiranya kipas tertanggal dari siling.
此吊扇必须接入具有混合断电装置的固定布线电气线路中,安全钢索必须按说明书的产品步骤安装。

4
INSTALLATION PROCEDURES / TATACARA PEMASANGAN / 安装步骤
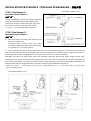
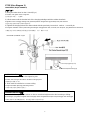
STEP 1 (See Diagram 1)
LANGKAH 1 (Rujuk Gambar 1)
步骤
1(
图
1)
1) Before installation, remove the rubber wheel and
plastic plug from both side of the hanging tube.
Sebelum pemasangan, keluarkan roda getah, plug plastic
dan semua skru /bolt dari kedua-dua belah rod besi.
在安装之前,把吊杆两侧的胶轮和塑胶套的横栓拆下。
STEP 2 (See Diagram 2)
LANGKAH 2 (Rujuk Gambar 2)
步骤
2(
图
2)
1) Place the lead wire and safety cable separately into
both side of plastic plug。
Tembuskan wayar elektrik utama dan dawai
keselamatan melalui plug plastikseca reberasingan.
将电源线跟钢丝绳分别穿到塑胶塞的两侧。
2) Insert the plastic plug into the motor shaft, position the two holes of plug aligning it to the shaft holes. Place the lead
wire and safety cable out the top of hanging tube. Insert the hanging tube into plastic plug and aligning shaft holes to
plastic plug holes. Screw the hanging tube to motor with the previous bolt, washer, nut and R-pin.
Masukkan plug plastic ke dalam shaft motor dan selaraskan kedua-dua lubang plug plastic dengan lubang shaft.
Tembuskan wayar elektrik utama dan dawai keselamatan melalui dan keluar dari bahagian atas rod besi. Masukkan rod
besi ke dalam plug plastic dan selaraskan lubang rod besi dengan lubang plug plastic dan shaft. Pasang and ketatkan rod
besi pada motor dengan menggunakan bolt, sesendal, nat dan pin-R yang dikeluarkan sebelum ini.
将塑胶套装入电机轴心上,把塑胶套的两个孔与轴心孔对准。将电源线跟钢丝绳穿过吊杆,吊杆装入塑胶套跟轴心并且使孔位对准用
之前拆下的螺栓和配件锁紧。
DIAGRAM 2/GAMBAR 2 /图 2
DIAGRAM 1/GAMBAR 1 /图 1

5
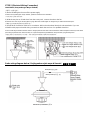
STEP 3(See Diagram 3)
LANGKAH 3 (Rujuk Gambar3)
步骤
3(
图
3)
1) Hang the tuber wheel on the U-Hook.(Fig.a)
Posisikan roda getah di atas cangkuk-U.
把吊轮挂在吊钩上。(见图
a
)
2) Lift the motor until the bracket hole of the hanging tubealigns with the rubber wheelhole.
Angkatkan motor sehingga lubang roda getah berpadanan dengan lubang pendakap besi pada rod besi.
将电机举起直到吊杆的支架和吊轮孔准对。
3) Tighten the hanging tube to the rubber wheel with the previously loosen bolt、washer、nut and R-pin.
Pasang dan ketatkan rod besi pada roda getah dengan menggunakan bolt, sesendal, nat dan pin-R yang dikeluarkan sebelum ini.
用螺栓穿过吊杆支架和胶轮并锁紧之前松开的螺栓、平介、螺母、
R
销。
NOTE/PERHATIAN/注意:
1. Remember to lock the pin after tightening bolt.
Pastikan bolt heksagon diketatkan dan dikunci dengan pin-R.
锁紧螺栓后请插上
R
销
2. Hook must be installed on concrete ceiling.
Cangkuk mestilah dipasang pada siling konkrit.
必须将吊钩安装在坚固的天花板上。
WARNING/AMARAN/警告:
Installation without proper procedures as above mentioned might result to fan loosening or falling.
Pemasangan yang tidak mengikuti tatacara lengkap boleh mengakibatkan kipas menjadi longgar atau tertanggal.
如果没有按照上面步骤遵循安装,有可能会导致吊扇松开或下坠。
DIAGRAM 3/GAMBAR 3 /图 3
U-Hook /Cangkuk-U/吊钩
Rubber Wheel/Roda Getah/胶轮

6
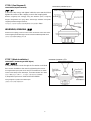
STEP 4 (Safety Cable Installation)
LANGKAH 4 (Pemasangan Dawai Keselamatan)
步骤
4 (
安装安全钢丝绳
)
1) Remove the safety cable screw from the hanging tube bracket.
Keluarkan skru dawai keselamatan dari pendakap rod besi.
移开吊杆支架上的安全钢丝绳螺丝(图
1
)
2) Arrange the safety cable as above image labelled with 2.
Pasang dan ikatkan dawai keselamatan seperti gambar rajah 2 diatas.
整理安全钢丝绳(图
2
)
3) Firmly screw the safety cable onto the hanging tube.
Ketatkan skru dawai keselamatan pada rod besi.
用螺丝拧紧吊杆上的钢丝绳(图
3
)
!WARNING/AMARAN/警告:
Safety cable must be fixed correctly,May cause injury if ceiling fan drops.
Pastikan dawai keselamatan dipasang dengan tepat, untuk mengelakkan kemalangan sekiranya kipas tertanggal.
如果没有正确固定钢丝绳,有可能会导致吊扇下坠。

7
STEP 5 (Electrical Wiring Connection)
LANGKAH 5 (Penyambungan Wayar Elektrik)
步骤
5
(电线连接)
1) Before installing the fan turn off the power supply.
Sebelum menyambungkan wayar elektrik, pastikan bekalan kuasa dimatikan.
在安装风扇之前请关闭电源。
2) With the two pieces of lead wires from the screw pack, connect the wire to the fan.
Keluarkan dua utas wayar dari bungkusan yang diberi dan sambungkan ia dengan wayar elektrik utama dari kipas.
从螺丝包里取出两条电源线并连接到风扇上。
3) All electrical connections must be in accordance with local and national electrical code standards. If you are
unfamiliar with proper electrical wiring connections obtain the services of a qualified electrician.
Semua sambungan elektrik mestilah selaras dengan piawaian dan akta kod keselamatan elektrik tempatan.Sekiranya anda tidak
pasti dengan piawaian dan akta tersebut, sila rujuk atau dapatkan perkhidmatan dari juruteknik yang berkelayakan.
请通过获得电工资格证的电工来安装,所有电线连接必须根据当地国家法规电线标准。
Refer wiring diagram below / Rujukgambar rajah wayar di bawah / 按照以下布线图:
DIAGRAM 5/GAMBAR5 /图 5
Blue/Biru/蓝色(N)
Brown/Coklat/棕色 (L)

8
STEP 6 (See Diagram6)
LANGKAH 6(Rujuk Gambar6)
步骤
6 (
图
6)
1) Raise the top canopy and tighten it with the screw attached, Next,
tighten the screw on the coupling cover to the hanging tube.
Naikkan sengkuap atas sehingga siling dan kekalkan posisi, Sengkuap
dengan mengetatkan skru yang diberi. Seterusnya, ketatkan skru pada
sengkuap bawah dengan rod besi.
将吊盅向上提升到天花板并拧紧固定螺丝
,
然后拧紧接头罩螺丝。
WARNING/ AMARAN /
注意
Distance of coupling cover from the motor should be more than 5mm.
Jarak sengkuap bawah dengan motor haruslah lebih daripada 5mm.
接头盖与电机的距离要超过
5
毫米
.
STEP 7 (Blade Installation)
LANGKAH 7 (Pemasangan Bilah Kipas)
步骤
7 (
安装叶片
)
1) Insert the blade screws through the flat washer and blade
then secure the blade to the motor by tightening the screws.
Pasangkan bilah kipas pada motor dengan menembuskan skr ubilah
melalui sesendal leper dan bilah kipas, kemudian ketatkan skru bilah
将叶片螺丝穿过平介和叶片,然后把叶片装到电机并拧紧螺丝。
2) Repeat this process to install all the other blades.
Ulang langkah ini pada semua bilah kipas.
重复这个动作安装其他的扇叶。
DIAGRAM6 /GAMBAR 6/图 6
DIAGRAM7/GAMBAR 7/图 7

9
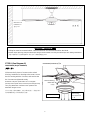
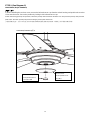
STEP 8 (See Diagram 8)
LANGKAH 8 (Rujuk Gambar8)
步骤
8 (
图
8)
1)Remove the 3 pieces of screws on the switch
housing. Install the fan housing to the motor, secure
the fan housing with the 3 screws, and ensure that
the 3 screws are tightened evenly.
Keluarkan 3 biji skru pada bekas suis. Pasangkan
penutup hiasan pada motor, kuncikan posisi dengan 3 biji
skru yang dikeluarkan sebelum ini dan pastikan skru
diketatkan dengan serata.
拆下开关箱上的
3
颗螺丝,安装下罩到电机上,将刚才拆下
的
3
颗螺丝固定下罩并确保均匀拧紧。
DIAGRAM8/GAMBAR 8/图 8
Screw/ Skru /螺丝
2.5 m
2.5 m
2.5 米
WARNING / AMARAN /警告
Ceiling fan must be mounted above 2.5m from the floor and 1m from the wall to the blade.
Pastikan kipas dipasang pada jarak bilah kipas dengan lantai melebihi 2.5m dan jarak bilah kipas dari dinding melebihi 1m.
安装吊扇的高叶片度须离地面
2.5
米并且叶片离墙面要超过
1
米。
More than 1 m
Lebihdari 1 m
超过
1
米
Fan Housing
Penutup Hiasan
下罩
Switch Housing
Bekas Suis
开关箱

10
STEP 9 (See Diagram 9)
LANGKAH 9 (Rujuk Gambar9)
步骤
9 (
图
9)
1) Before installing the receiver cover, remove the infrared sensor cap from the switch housing and position the receiver
cover onto the motor. Secure the position by locking it with infrared sensor cap.
Sebelu memasang penutup alat penerima, keluarkan penutup alat inframerah dari bekas suis dan posisikan penutup alat penerima
pada motor. Kuncikan penutup alat penerima dengan penutup alat inframerah.
安装接收器盖之前,先拆下开关箱上的红外线感应器罩再将接收盖放到电机底部,确保装上红外线感应器并锁紧。
DIAGRAM9/GAMBAR 9/图 9
Receiver Cover
PenutupAlatPenerima
接收器盖
Infared Sensor Cap
PenutupAlatInframerah
红外线感应器罩

11
-
 1
1
-
 2
2
-
 3
3
-
 4
4
-
 5
5
-
 6
6
-
 7
7
-
 8
8
-
 9
9
-
 10
10
-
 11
11
-
 12
12


Rubine RCF-FITTO301-5B ユーザーマニュアル
- タイプ
- ユーザーマニュアル
- このマニュアルも適しています
他の言語で
- English: Rubine RCF-FITTO301-5B User manual