
4239 001 0830 4
User Manual
Mode d’emploi
Petunjuk Pengguna
사용 설명서
Manual Pengguna
Hướng dẫn sử dụng
用户手册
使用手冊
GC9600
PerfectCare
Elite Plus
1
2
4
12
11
10
13
16
17
14
9
8
5
1918
6 7 20
3
15
1

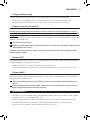
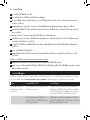
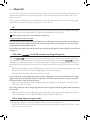
EN IMPORTANT: Perform descaling regularly for great steam
and prolonged life.
FR IMPORTANT : eectuez régulièrement un détartrage
pour obtenir une vapeur de qualité et une durée de vie
prolongée.
ID Lakukan pembersihan kerak secara berkala agar uap
tetap optimal dan masa pakai menjadi lebih lama.
KO
중요
사항
:
뛰어난
스팀
성능과
수명
연장을
위해
정기적으로
석회질을
제거하십시오
.
MS PENTING: Tanggalkan kerak secara berkala untuk
mendapatkan stim yang hebat dan hayat lebih panjang.
TH :
VI QUAN TRỌNG: Thường xuyên tẩy sạch cặn bám để có hơi nước
tối ưu và kéo dài tuổi thọ của thiết bị.
ZH-CN 注意事项:定期执行除垢可获得更出色的蒸汽和更长的使用
寿命。
ZH-T
重要事項:定期除垢,以達到良好蒸氣效果和延長壽命。
. : FA
.
: AR
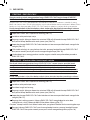
DE
CALC
2x
2 sec.
2
6
10
14
18
3
7
11
15
19
4
8
12
16
20
5
9
13
17

GC9600 PerfectCare Elite Plus
ENGLISH 6
FRANÇAIS 12
INDONESIA 19
한국어 25
BAHASA MELAYU 31
ภาษาไทย 38
TIẾNG VIỆT 45
简体中文 51
繁體中文 57
67
72

6 ENGLISH
Introduction
This iron has been approved by The Woolmark Company Pty Ltd for the ironing of wool
only products provided that the garments are ironed according to the instructions on the
garment label and those issued by the manufacturer of this iron. R1703. The Woolmark
symbol is a certication mark in many countries.
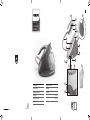
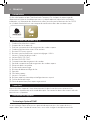
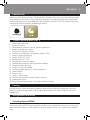
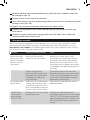
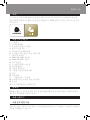
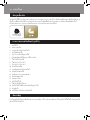
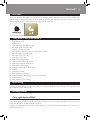
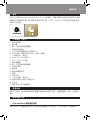
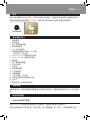
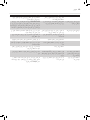
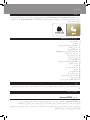
Product overview (Fig. 1)
1 Steam supply hose
2 Iron platform
3 First supply hose storage compartment
4 Mains cord with plug
5 ECO button with light
6 On/o button with light and MAX setting
7 ‘Water tank empty’ light
8 EASY DE-CALC light
9 EASY DE-CALC knob
10 Cord storage compartment
11 Second supply hose storage compartment
12 Detachable water tank
13 Carry lock
14 Carry lock release button
15 Soleplate
16 Steam trigger
17 ‘Iron ready’ light
18 Intelligent automatic steam button with light
19 Filling hole
20 Protective glove for vertical ironing
Important
Read the separate important information leaet and the user manual carefully before
you use the appliance. Save both documents for future reference.
Using your appliance
OptimalTEMP technology
The OptimalTEMP technology enables you to iron all types of ironable fabrics, in any
order, without adjusting the iron temperature setting.
Fabrics with these symbols are ironable, for example linen, cotton, polyester, silk, wool,
viscose and rayon (Fig. 2).

7
ENGLISH
Fabrics with this symbol are not ironable. These fabrics include synthetic fabrics such as
Spandex or elastane, Spandex-mixed fabrics and polyolens (e.g. polypropylene), but
also prints on garments (Fig. 3).
During ironing, you can place the iron either on the iron platform or horizontally on the
ironing board. Thanks to the OptimalTEMP technology, the soleplate will not damage the
ironing board cover (Fig. 4).
Ironing
Read this user manual, the important information leaet, and the quick start guide
carefully before you use the appliance. Save them for future reference.
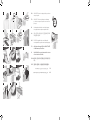
1 Press and hold the steam trigger to start ironing (Fig. 5).
Never direct steam at people.
Note: For best result on tough fabrics such as cotton, linen and jeans, keep the steam
trigger pressed continuously when you move the iron over the fabric. Then move the
iron over the same area a few more times without steam to dry the fabric.
Note: For the best results on silk and shiny synthetic fabrics, it is recommended to keep
the steam trigger pressed continuously while ironing.
sensor and intelligent automatic steam mode
The intelligent sensor inside your iron knows exactly when and how your iron is
moving. When you activate intelligent automatic steam mode, the sensor will
start recognizing the movements of your iron and will enable your iron to release the right
amount of steam automatically without you having to press the steam trigger. This will
help you to get great results faster and easier.
- To activate the intelligent automatic steam mode, press the intelligent automatic
steam button on top of the iron handle. The intelligent automatic steam light turns on
(Fig. 6).
- The ‘iron ready’ light moves back and forth when the iron is moving.
Note: in intelligent automatic steam mode, steam comes out automatically when you
move the iron and stops when you stop moving the iron (Fig. 7). You can still press the
steam trigger in this mode to activate the steam when the iron is not moving.
- You can use the intelligent automatic steam mode in all steam settings, including ECO
and MAX.
Note: for your safety, in intelligent automatic steam mode, the steam stops when the
soleplate is tilted.
- To exit the intelligent automatic steam mode, press the intelligent automatic steam
button. The intelligent automatic steam light turns o. You need to press the steam
trigger to continue your ironing.

8
ENGLISH
Steam boost function
The steam boost function is designed to help tackle dicult creases.
- Press the steam trigger twice quickly to activate the steam boost function. The
appliance releases 3 powerful shots of steam (Fig. 8).
Vertical ironing
Hot steam is emitted from the iron. Never attempt to remove creases from a garment
that someone is wearing. Do not apply steam near your or someone else’s hand.
You can use the iron in vertical position to remove wrinkles from hanging fabrics.
1 Put on the glove.
2 Hold the iron in vertical position, press the steam trigger and touch the garment
slightly with the soleplate (Fig. 9).
Note: for your safety, the intelligent automatic steam mode is not available for vertical
ironing.
ECO setting
By using the ECO setting (reduced amount of steam), you can save energy without
compromising on the ironing result.
- Press the ECO button. The green ECO light turns on (Fig. 10).
- To deactivate ECO setting, press then ECO button again. The green ECO light goes o.
MAX setting
For faster ironing and a higher amount of steam, you can use MAX setting.
1 Press and hold the on/o button for 2 seconds until the light turns white (Fig. 11).
2 To deactivate MAX setting, press and hold the on/o button again for 2 seconds
until the white light turns blue.
Auto shut-o
- The appliances enters the standby mode if it has not been used for 10 minutes. The
light in the on/ o button starts to ash (Fig. 12).
- To activate the appliance again, press the on/o button. The appliance starts to heat
up again.
- The appliance switches o automatically if it has not been used for another 10
minutes after it enters the standby mode. The light in the on/o button goes o.
IMPORTANT - EASY DE-CALC
It is very important to use the EASY DE-CALC function as soon as the EASY DE-CALC
light starts to ash and the appliance beeps continuously.

9
ENGLISH
The EASY DE-CALC light ashes and the appliance beeps continuously after about
a month or 10 ironing sessions to indicate that the appliance needs to be descaled.
Perform the following EASY DE-CALC procedure before you continue ironing.
To avoid the risk of burns, unplug the appliance and let it cool down for at least two
hours before you perform the EASY DE-CALC procedure.
1 Remove the plug from the wall socket (Fig. 13).
2 Place the appliance on the edge of the tabletop.
3 Hold a cup (with a capacity of at least 350ml) under the EASY DE-CALC knob and
turn the knob anticlockwise (Fig. 14).
4 Remove the EASY DE-CALC knob and let the water with scale particles ow into the
cup (Fig. 15).
5 When no more water comes out of the appliance, reinsert the EASY DE-CALC knob
and turn it clockwise to fasten it (Fig. 16).
6 You can continue using your iron immediately after completing the EASY DE-CALC
procedure.
IMPORTANT – Descaling the soleplate
If you do not use the EASY DE-CALC function regularly, scale particles may build up in
the soleplate and brown stains may come out of the soleplate during ironing. In this
situation, you need to descale the soleplate by following the procedure below. We
advice you to repeat the procedure twice to better clean the soleplate.
To avoid the risk of burns, unplug the appliance and let it cool down for at least two
hours before you descale the soleplate.
1 Remove the plug from the wall socket (Fig. 13).
2 Place the appliance on the edge of the tabletop.
3 Make sure that the water tank is empty.
4 Hold a cup (with a capacity of at least 350ml) under the EASY DE-CALC knob and
turn the knob anticlockwise (Fig. 14).
5 Remove the EASY DE-CALC knob and let the water with scale particles ow into the
cup (Fig. 15).
6 Hold the appliance in the position that EASY DE-CALC opening is facing up and pour
900ml distilled water into the opening (Fig. 17).
Note: Be mindful on the heavy weight of the appliance when you tilt it.
7 Keep the EASY DE-CALC opening facing up, reinsert the EASY DE-CALC knob and
turn it clockwise to fasten it (Fig. 18).
8 Put the appliance back on a stable and even surface. Plug in the appliance and
switch it on (Fig. 19).
9 Wait for 5 minutes for the appliance to heat up.

10
ENGLISH
10 Keep the steam trigger pressed continuously while you move the iron on a piece of
thick cloth for 3 minutes (Fig. 20).
Warning: hot, dirty water comes out of the soleplate.
11 Stop moving the iron when no more water comes out or when steam starts coming
out.
12 You can continue to use the appliance immediately. Otherwise unplug the appliance
after the descaling is completed.
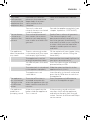
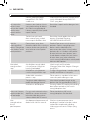
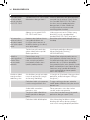
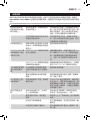
Troubleshooting
This chapter summarises the most common problems you could encounter with the
appliance. If you are unable to solve the problem with the information below, visit
www.philips.com/support for a list of frequently asked questions or contact the
Consumer Care Centre in your country.
Problem Possible cause Solution
The ironing board
cover becomes
wet or there are
water droplets
on the garment
during ironing.
Steam has condensed on
the ironing board cover after
a long ironing session.
Replace the ironing board cover if
the foam material has worn out. You
can also add an extra layer of felt
material under the ironing board
cover to prevent condensation on
the ironing board. You can buy felt in
a fabric shop.
You have an ironing board
cover that is not designed
to cope with the high steam
rate of the appliance.
Put an extra layer of felt material
under the ironing board cover to
prevent condensation on the ironing
board. You can buy felt in a fabric
shop.
Water droplets
come out of the
soleplate.
The steam that was
still present in the hose
has cooled down and
condensed into water. This
causes water droplets to
come out of the soleplate.
Steam away from the garment for a
few seconds.
Steam and/or
water come out
from under the
EASY DE-CALC
knob.
The EASY DE-CALC knob is
not tightened properly.
Switch o the appliance and let the
appliance cool down for 2 hours.
Unscrew the EASY DE-CALC knob
and screw it back onto the appliance
properly. Note: Some water may
escape when you remove the knob.
The rubber sealing ring of
the EASY DE-CALC knob is
worn.
Contact an authorised Philips service
centre for a new EASY DE-CALC
knob.

11
ENGLISH
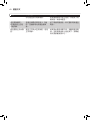
Problem Possible cause Solution
Dirty water
and impurities
come out of the
soleplate or the
soleplate is dirty.
Impurities or chemicals
present in the water have
deposited in the steam
vents and/or on the
soleplate.
Clean the soleplate with a damp
cloth.
Too much scale and
minerals have accumulated
inside the appliance.
Descale the appliance regularly (see
chapter ‘Important - DESCALING’).
The iron leaves
a shine or an
imprint on the
garment.
The surface to be ironed
was uneven, for instance
because you were ironing
over a seam or a fold in the
garment.
PerfectCare is safe on all garments.
The shine or imprint is not
permanent and will come o if you
wash the garment. Avoid ironing
over seams or folds or you can place
a cotton cloth over the area to be
ironed to avoid imprints at seams
and folds.
The appliance
does not produce
any steam.
There is not enough water
in the water tank (the ‘water
tank empty’ light ashes).
Fill the water tank (see chapter ‘Using
your appliance’, section ‘Filling the
water tank’).
The appliance is not hot
enough to produce steam.
Wait until the ‘iron ready’ light on the
iron lights up continuously.
You did not press the steam
trigger.
Press the steam trigger and keep it
pressed while you iron.
The water tank is not placed
in the appliance properly.
Slide the water tank back into the
appliance rmly (‘click’).
The appliance is not
switched on.
Insert the plug in the wall socket and
press the on/o button to switch on
the appliance.
The appliance
has switched o.
The light in the
on/o button
ashes.
The auto-o function is
activated automatically
when the appliance has not
been used for more than 10
minutes.
Press the power on/o button to
switch on the appliance again.
The appliance
produces a
pumping sound.
Water is pumped into the
boiler inside the appliance.
This is normal.
If the pumping sound continues
nonstop, switch o the appliance
and remove the plug from the wall
socket. Contact an authorised Philips
service centre.

12 FRANÇAIS
Introduction
Ce fer a été approuvé par The Woolmark Company Pty Ltd pour le repassage de
vêtements en laine à condition que ceux-ci soient repassés selon les instructions
indiquées sur l'étiquette du vêtement et celles fournies par le fabricant du fer. R1703.
Le symbole Woolmark est une marque de certication dans de nombreux pays.
Présentation du produit (Fig. 1)
1 Cordon d'arrivée de la vapeur
2 Support du fer à repasser
3 Premier compartiment de rangement du cordon vapeur
4 Cordon d'alimentation avec che secteur
5 Bouton ECO avec voyant
6 Bouton marche/arrêt avec voyant et réglage « MAX »
7 Voyant « Réservoir d'eau vide »
8 Voyant EASY DE-CALC
9 Bouton EASY DE-CALC
10 Compartiment de rangement du cordon
11 Second compartiment de rangement du cordon vapeur
12 Réservoir d'eau amovible
13 Système de verrouillage
14 Bouton de déverrouillage du fer
15 Semelle
16 Gâchette vapeur
17 Voyant « Fer prêt »
18 Bouton vapeur automatique intelligente avec voyant
19 Orice de remplissage
20 Gant de protection pour repassage vertical
Important
Avant d'utiliser l'appareil, lisez attentivement la brochure distincte contenant les
informations importantes et le mode d'emploi. Conservez les deux documents an de
pouvoir vous y reporter.
Utilisation de l'appareil
Technologie OptimalTEMP
La technologie OptimalTemp vous permet de repasser tous les types de tissus
repassables, dans l'ordre de votre choix, sans avoir à régler la température du fer.

13
FRANÇAIS
Les tissus avec les symboles suivants sont repassables. Par exemple, le lin, le coton, le
polyester, la soie, la laine, la viscose et la rayonne (Fig. 2).
Les tissus comportant les symboles suivants ne sont pas repassables. Ces tissus incluent
les bres synthétiques comme le Spandex ou l'élasthanne, les tissus mélangés à base
de Spandex et les polyolénes (le polypropylène, par exemple), mais également les
vêtements imprimés (Fig. 3).
Lors du repassage, vous pouvez placer le fer sur sa base ou à l'horizontale sur la planche
à repasser. La technologie OptimalTEMP permet d'éviter que la semelle endommage la
housse de la planche à repasser (Fig. 4).
Repassage
Lisez attentivement ce mode d’emploi, la brochure « Informations importantes » et le
guide de démarrage rapide avant d’utiliser l’appareil. Conservez ces documents pour
toute consultation ultérieure.
1 Appuyez sur la gâchette vapeur pour commencer le repassage (Fig. 5).
Ne dirigez en aucun cas le jet de vapeur vers des personnes.
Remarque : pour un résultat optimal sur les tissus diciles, comme le coton, le lin et
les jeans, maintenez la gâchette vapeur enfoncée lorsque vous déplacez le fer sur le
tissu. Repassez ensuite le fer plusieurs fois sur la même zone sans vapeur pour sécher
le tissu.
Remarque : pour des résultats optimaux sur la soie et les tissus synthétiques brillants,
il est recommandé de maintenir la gâchette vapeur enfoncée en continu lors du
repassage.
Capteur et mode Vapeur automatique intelligente
Le capteur intelligent à l'intérieur de votre fer sait exactement quand
et comment votre fer est en mouvement. Lorsque vous activez le mode Vapeur
automatique intelligente, le capteur commence à reconnaître les mouvements
du fer, ce qui permet à votre fer de produire automatiquement la quantité de vapeur
appropriée sans que vous ayez à appuyer sur la gâchette vapeur. Cela vous aidera à
obtenir plus rapidement et plus facilement des résultats optimaux.
- Pour activer le mode Vapeur automatique intelligente, appuyez sur le bouton vapeur
automatique intelligente situé sur la poignée du fer. Le voyant « Vapeur automatique
intelligente » s'allume (Fig. 6).
- Le voyant « Fer prêt » se déplace d'avant en arrière lorsque le fer est en mouvement.
Remarque : en mode Vapeur automatique intelligente, la vapeur sort
automatiquement de l'appareil lorsque vous déplacez le fer et s'arrête lorsque vous ne
déplacez pas le fer (Fig. 7). Vous pouvez toujours appuyer sur la gâchette vapeur dans
ce mode pour activer la vapeur lorsque le fer n'est pas en mouvement.
- Vous pouvez utiliser le mode Vapeur automatique intelligente dans tous les réglages
de vapeur, y compris les réglages ECO et MAX.

14
FRANÇAIS
Remarque : pour votre sécurité, en mode Vapeur automatique intelligente, la vapeur
s'arrête lorsque la semelle est inclinée.
- Pour quitter le mode Vapeur automatique intelligente, appuyez sur le bouton vapeur
automatique intelligente. Le voyant « Vapeur automatique intelligente » s'éteint. Vous
devez appuyer sur la gâchette vapeur pour poursuivre le repassage.
Fonction Eet pressing
La fonction Eet pressing est conçue pour vous aider à éliminer les faux plis les plus
tenaces.
- Appuyez deux fois rapidement sur la gâchette vapeur pour activer la fonction Eet
pressing. L’appareil produit 3 jets de vapeur puissants (Fig. 8).
Repassage vertical
Le fer émet de la vapeur chaude. N'essayez jamais d'enlever les plis d'un vêtement porté
par quelqu'un. N'appliquez pas de vapeur près de vos mains ou de celles de quelqu'un
d'autre.
Vous pouvez utiliser le fer en position verticale pour enlever les plis sur des vêtements sur
cintre.
1 Mettez le gant.
2 Maintenez le fer en position verticale, appuyez sur la gâchette vapeur et eeurez le
vêtement avec la semelle (Fig. 9).
Remarque : pour votre sécurité, le mode Vapeur automatique intelligente n'est pas
disponible pour le repassage vertical.
Réglage ECO
Avec le réglage ECO (quantité réduite de vapeur), vous pouvez économiser de l'énergie
sans compromettre le résultat du repassage.
- Appuyez sur le bouton ECO. Le voyant ECO vert s'allume (Fig. 10).
- Pour désactiver le réglage ECO, appuyez de nouveau sur le bouton ECO. Le voyant
vert ECO s'éteint.
Réglage MAX
Pour un repassage plus rapide et une plus grande quantité de vapeur, vous pouvez
utiliser le réglage MAX.
1 Maintenez le bouton marche/arrêt enfoncé pendant 2 secondes jusqu'à ce que le
voyant soit blanc (Fig. 11).
2 Pour désactiver le réglage MAX, maintenez de nouveau le bouton marche/arrêt
enfoncé pendant 2 secondes jusqu'à ce que le voyant soit bleu.

15
FRANÇAIS
Arrêt automatique
- L'appareil passe en mode Veille s'il n'a pas été utilisé pendant 10 minutes. Le voyant
du bouton marche/arrêt commence à clignoter (Fig. 12).
- Pour activer de nouveau l'appareil, appuyez sur le bouton marche/arrêt. L'appareil
recommence à chauer.
- L'appareil s'éteint automatiquement s'il n'a pas été utilisé pendant 10 minutes après
avoir basculé en mode Veille. Le voyant du bouton marche/arrêt s'éteint.
IMPORTANT – EASY DE-CALC
Il est très important d'utiliser la fonction EASY DE-CALC dès que le voyant EASY DE-
CALC commence à clignoter et que l'appareil émet un signal sonore continu.
Le voyant EASY DE-CALC clignote, et l'appareil émet un signal sonore continu après
environ un mois ou 10 séances de repassage pour indiquer que l'appareil doit être
détartré. Avant de poursuivre le repassage, eectuez la procédure EASY DE-CALC.
Pour éviter tout risque de brûlure, débranchez l'appareil et laissez-le refroidir pendant
au moins deux heures avant d'eectuer la procédure EASY DE-CALC.
1 Retirez l’adaptateur de la prise murale (Fig. 13).
2 Placez l'appareil au bord de la table à repasser.
3 Placez une tasse (d'une contenance de 350 ml au moins) sous le bouton EASY DE-
CALC et tournez-le dans le sens inverse des aiguilles d'une montre (Fig. 14).
4 Retirez le bouton EASY DE-CALC et laissez l'eau s'écouler avec les dépôts de calcaire
dans la tasse (Fig. 15).
5 Lorsque toute l'eau est sortie de l'appareil, remettez le bouton EASY DE-CALC en
place et tournez-le dans le sens des aiguilles d'une montre pour le repositionner
(Fig. 16).
6 Vous pouvez continuer à utiliser votre fer à repasser immédiatement après avoir
eectué la procédure EASY DE-CALC.
IMPORTANT – Détartrage de la semelle
Si vous n'utilisez pas régulièrement la fonction EASY DE-CALC, des particules de
calcaire peuvent s'accumuler sur la semelle, et des taches marron provenant de la
semelle peuvent se déposer sur les textiles lors du repassage. Dans ce cas, vous devez
détartrer la semelle en suivant la procédure ci-dessous. Nous vous conseillons de
répéter la procédure deux fois pour mieux nettoyer la semelle.
Pour éviter tout risque de brûlure, débranchez l'appareil et laissez-le refroidir pendant
au moins deux heures avant de le détartrer la semelle.
1 Retirez l’adaptateur de la prise murale (Fig. 13).
2 Placez l'appareil au bord de la table à repasser.
3 Assurez-vous que le réservoir d'eau sale est vide.

16
FRANÇAIS
4 Placez une tasse (d'une contenance de 350 ml au moins) sous le bouton EASY DE-
CALC et tournez-le dans le sens inverse des aiguilles d'une montre (Fig. 14).
5 Retirez le bouton EASY DE-CALC et laissez l'eau s'écouler avec les dépôts de calcaire
dans la tasse (Fig. 15).
6 Maintenez l'appareil dans la position dans laquelle l'orice de remplissage DE-CALC
est orienté vers le haut et versez 900 ml d'eau distillée dans l'orice (Fig. 17).
Remarque : n'oubliez pas que l'appareil pèse lourd lorsque vous l'inclinez.
7 Maintenez l'orice de remplissage EASY DE-CALC orienté vers le haut, remettez
le bouton EASY DE-CALC en place et tournez-le dans le sens des aiguilles d'une
montre pour le repositionner (Fig. 18).
8 Repositionnez l'appareil sur une surface stable et plane. Branchez l'appareil et
allumez-le (Fig. 19).
9 Attendez 5 minutes que l'appareil chaue.
10 Lorsque vous déplacez le fer sur du tissu épais, maintenez la gâchette vapeur
enfoncée en continu pendant 3 minutes (Fig. 20).
Avertissement : l'eau chaude qui s'écoule de la semelle est sale.
11 Cessez de déplacer le fer lorsque toute l'eau est sortie ou lorsque de la vapeur
commence à s'échapper.
12 Vous pouvez continuer immédiatement à utiliser l'appareil. Autrement, débranchez
l'appareil une fois le détartrage terminé.
Dépannage
Ce chapitre présente les problèmes les plus courants que vous pouvez rencontrer avec
votre appareil. Si vous ne parvenez pas à résoudre le problème à l'aide des informations
ci-dessous, rendez-vous sur www.philips.com/support pour consulter les questions
fréquemment posées, ou contactez le Service Consommateurs de votre pays.
Problème Cause possible Solution
La housse de
la planche à
repasser devient
humide ou des
gouttes d'eau
apparaissent
sur le vêtement
pendant le
repassage.
La vapeur s'est condensée
sur la housse de la planche
à repasser après une longue
séance de repassage.
Remplacez la housse de la planche
à repasser si la mousse est usée.
Vous pouvez ajouter une couche
de feutre sous la housse de la
planche à repasser pour empêcher
la condensation sur la planche à
repasser. Vous pouvez acheter le
feutre dans un magasin de tissu.
Votre housse de planche à
repasser n'est pas conçue
pour résister au débit élevé
de vapeur de l'appareil.
Mettez une couche supplémentaire
de feutre sous la housse de la
planche à repasser pour empêcher
la condensation sur la planche à
repasser. Vous pouvez acheter le
feutre dans un magasin de tissu.

17
FRANÇAIS
Problème Cause possible Solution
Des gouttes
d'eau s'écoulent
de la semelle.
La vapeur contenue dans
le cordon d'arrivée de
la vapeur refroidit et se
condense. Ceci provoque
l'apparition de gouttes d'eau
au niveau de la semelle.
Faites fonctionner la vapeur à l'écart
du vêtement pendant quelques
secondes.
De l'eau et/ou
de la vapeur
s'échappe(nt) de
sous le bouton
EASY DE-CALC.
Le bouton EASY DE-CALC
n'a pas été correctement
vissé.
Veuillez éteindre l'appareil et le
laisser refroidir pendant 2 heures.
Dévissez le bouton EASY DE-CALC
et revissez-le correctement sur
l'appareil. Remarque : il est possible
que de l'eau s'échappe lorsque vous
enlèverez le bouton.
La bague d'étanchéité en
caoutchouc du bouton
EASY DE-CALC est usée.
Contactez un Centre Service Agréé
Philips pour vous procurer un
nouveau bouton EASY DE-CALC.
De l'eau sale et
des impuretés
s'échappent de
la semelle ou la
semelle est sale.
Des impuretés ou dépôts de
calcaire se sont formés sur
les évents à vapeur et/ou à
l'intérieur de la semelle.
Nettoyez le fer avec un chion
humide.
L'appareil contient trop de
calcaire/minéraux.
Détartrez régulièrement l'appareil
(reportez-vous au chapitre
« Important – DÉTARTRAGE »).
Le fer laisse un
voile ou une
marque sur le
vêtement.
La surface à repasser était
non plane, par exemple
parce que vous repassiez
sur une couture ou un pli
dans le vêtement.
PerfectCare peut être utilisé sur
tous les vêtements. Les traces
lustrées ne sont pas permanentes
et disparaissent au lavage. Évitez
de repasser sur les coutures ou plis,
ou placez un chion en coton sur
la zone à repasser an d'éviter des
marques sur les coutures et plis.
L'appareil ne
produit pas de
vapeur.
Il n'y a pas assez d'eau dans
le réservoir d'eau (le voyant
« Réservoir d'eau vide »
clignote).
Remplissez le réservoir d'eau
(reportez-vous au chapitre
« Utilisation de l'appareil », section
« Remplissage du réservoir »).
L'appareil n'a pas chaué
susamment pour produire
de la vapeur.
Attendez que le voyant « Fer prêt »
du fer soit allumé en continu.
Vous n'avez pas appuyé sur
la gâchette vapeur.
Maintenez la gâchette vapeur
enfoncée lorsque vous repassez.

18
FRANÇAIS
Problème Cause possible Solution
Le réservoir d'eau n'est pas
correctement inséré dans
l'appareil.
Repositionnez le réservoir d'eau
sur l'appareil (jusqu'à ce que vous
entendiez un « clic »).
L'appareil n'est pas allumé. Branchez la che sur la prise secteur
et appuyez sur le bouton marche/
arrêt pour allumer l'appareil.
L'appareil s'est
éteint. Le voyant
du bouton
marche/arrêt
clignote.
La fonction d'arrêt
automatique est
automatiquement activée
lorsque l'appareil n'a pas
été utilisé pendant plus de
10 minutes.
Appuyez sur le bouton marche/arrêt
pour allumer à nouveau l'appareil.
Le fer produit un
bruit de pompe.
L'eau est aspirée dans la
chaudière de l'appareil. Ce
phénomène est normal.
Si le bruit de la pompe est continu,
éteignez l'appareil et débranchez la
che de la prise secteur. Contactez
un Centre Service Agréé Philips.

19
INDONESIA
Pendahuluan
Setrika ini telah disetujui oleh The Woolmark Company Pty Ltd untuk menyetrika produk
yang berbahan wol saja, asalkan pakaian disetrika sesuai dengan petunjuk pada label
pakaian dan petunjuk yang diberikan oleh pabrikan setrika ini. R1703. Simbol Woolmark
merupakan tanda sertikasi di berbagai negara.
Tinjauan umum produk (Gbr. 1)
1 Selang pasokan uap
2 Platform setrika
3 Tempat penyimpanan selang pasokan pertama
4 Kabel listrik dengan steker
5 Tombol ECO dengan lampu
6 Tombol on/o dengan lampu dan setelan MAX
7 Lampu ‘tangki air kosong’
8 Lampu EASY DE-CALC
9 Kenop EASY DE-CALC
10 Tempat penyimpanan kabel
11 Tempat penyimpanan selang pasokan kedua
12 Tangki air lepas-pasang
13 Pengunci saat membawa
14 Tombol pelepas pengunci saat membawa
15 Tapak setrika
16 Pemicu uap
17 Lampu ‘setrika siap’
18 Tombol uap otomatis cerdas dengan lampu
19 Lubang pengisian
20 Sarung tangan pelindung untuk penyetrikaan berdiri
Penting
Bacalah brosur informasi penting terpisah dan petunjuk pengguna dengan saksama
sebelum Anda menggunakan alat. Simpan kedua dokumen untuk referensi di masa
mendatang.
Menggunakan alat Anda
Teknologi OptimalTEMP
Teknologi OptimalTEMP memungkinkan Anda untuk menyetrika semua jenis kain yang
dapat disetrika, dalam urutan apa pun, tanpa menyesuaikan suhu setrika atau setelan
uap.

20
INDONESIA
Kain dengan simbol ini dapat disetrika, misalnya linen, katun, poliester, sutera, wol,
viskose, dan rayon (Gbr. 2).
Kain dengan simbol ini tidak dapat disetrika. Jenis kain ini termasuk kain sintetis seperti
Spandex atau elastan, kain bercampur Spandex, dan poliolen (mis. Polipropilena), juga
sablon pada pakaian (Gbr. 3).
Selama menyetrika, Anda dapat meletakkan setrika pada dudukannya atau secara
horizontal pada papan setrika. Berkat teknologi OptimalTEMP, tapak setrika tidak akan
merusak penutup meja setrika (Gbr. 4).
Menyetrika
Baca buku petunjuk pengguna, informasi penting dan panduan memulai cepat ini
dengan saksama sebelum menggunakan alat. Simpanlah semua dokumen petunjuk
untuk referensi nanti.
1 Tekan dan tahan pemicu uap untuk mulai menyetrika (Gbr. 5).
Jangan sekali-kali mengarahkan uap ke orang.
Catatan: Untuk hasil terbaik pada kain yang tebal seperti katun, linen, dan jeans, terus
tekan pemicu uap saat Anda menggosokkan setrika pada kain. Lalu gerakkan setrika
di atas area yang sama beberapa kali lagi tanpa uap untuk mengeringkan kain.
Catatan: Untuk hasil terbaik pada sutera dan kain sintetis mengkilap, disarankan
untuk terus menekan pemicu uap sewaktu menyetrika.
Sensor dan mode uap otomatis yang cerdas
Sensor cerdas di dalam setrika mengetahui persis kapan dan bagaimana
setrika bergerak. Bila Anda mengaktifkan mode uap otomatis cerdas, sensor
akan mulai mengenali gerakan setrika, memungkinkan setrika untuk melepaskan jumlah
uap yang tepat secara otomatis tanpa perlu menekan pemicu uap. Ini akan membantu
Anda mendapatkan hasil yang hebat dengan lebih cepat dan lebih mudah.
- Untuk mengaktifkan mode uap otomatis cerdas, tekan tombol uap otomatis cerdas di
bagian atas gagang setrika. Lampu uap otomatis cerdas menyala (Gbr. 6).
- Lampu 'setrika siap' akan bergerak maju mundur bila setrika bergerak.
Catatan: Dalam mode uap otomatis cerdas, uap akan keluar secara otomatis saat
Anda menggerakkan setrika dan akan berhenti bila setrika berhenti bergerak (Gbr. 7).
Anda masih dapat menekan pemicu uap dalam mode ini untuk mengaktifkan uap bila
setrika tidak bergerak.
- Anda dapat menggunakan mode uap otomatis cerdas di semua setelan uap,
termasuk ECO dan MAX.
Catatan: Demi keselamatan Anda, dalam mode uap otomatis cerdas, uap akan
berhenti bila tapak setrika dimiringkan.
- Untuk keluar dari mode uap otomatis cerdas, tekan tombol uap otomatis cerdas.
Lampu uap otomatis cerdas mati. Anda perlu menekan pemicu uap untuk
melanjutkan menyetrika.

21
INDONESIA
Fungsi semburan uap
Fungsi sembura uap dirancang untuk menangani kusut yang membandel.
- Tekan pemicu uap dua kali untuk mengaktifkan fungsi semburan uap. Alat
mengeluarkan 3 semburan uap yang kuat secara terus-menerus (Gbr. 8).
Penyetrikaan secara vertikal
Setrika akan mengeluarkan uap panas Jangan sekali-kali menghilangkan kusut dari
pakaian yang sedang dikenakan. Jangan mengarahkan uap di dekat tangan Anda atau
orang lain.
Anda dapat menggunakan setrika dalam posisi berdiri untuk menghilangkan kerutan dari
pakaian yang digantung.
1 Kenakan sarung tangan.
2 Pegang setrika dalam posisi berdiri, tekan pemicu uap, dan sentuhkan sedikit tapak
setrika pada kain (Gbr. 9).
Catatan: Demi keselamatan Anda, mode uap otomatis cerdas tidak tersedia untuk
penyetrikaan vertikal.
Setelan ECO
Dengan menggunakan setelan ECO (mengurangi jumlah uap), Anda dapat menghemat
energi tanpa mengurangi hasil setrika.
- Tekan tombol ECO. Lampu ECO hijau menyala (Gbr. 10).
- Untuk menonaktifkan setelan ECO, tekan lagi tombol ECO. Lampu ECO hijau mati.
Setelan MAX
Untuk menyetrika lebih cepat dan dengan jumlah uap yang lebih banyak, Anda dapat
menggunakan setelan MAX.
1 Tekan dan tahan tombol on/o selama 2 detik hingga lampu berubah jadi putih
(Gbr. 11).
2 Untuk menonaktifkan setelan MAX, tekan dan tahan lagi tombol on/o selama 2
detik hingga lampu putih berubah jadi biru
Mati otomatis
- Alat akan masuk ke mode siaga jika tidak digunakan selama 10 menit. Lampu pada
tombol on/o mulai berkedip (Gbr. 12).
- Untuk mengaktifkan kembali alat, tekan tombol on/o. Alat mulai memanas lagi.
- Alat akan mati secara otomatis jika tidak digunakan selama 10 menit setelah
memasuki mode siaga. Lampu pada tombol on/o mati.

22
INDONESIA
PENTING - EASY DE-CALC
Sangat penting untuk menggunakan fungsi EASY DE-CALC begitu lampu EASY DE-
CALC mulai berkedip dan alat berbunyi bip terus-menerus.
Lampu EASY DE-CALC berkedip dan alat berbunyi bip terus-menerus setelah kurang
lebih satu bulan atau 10 kali menyetrika untuk menandakan bahwa alat perlu dibersihkan
keraknya. Lakukan prosedur EASY DE-CALC berikut sebelum melanjutkan menyetrika.
Untuk menghindari risiko luka bakar, cabut steker alat dan biarkan mendingin selama
setidaknya dua jam sebelum melakukan prosedur EASY DE-CALC.
1 Lepaskan steker dari stopkontak dinding (Gbr. 13).
2 Letakkan alat pada tepi meja.
3 Pegang cangkir (dengan kapasitas minimal 350 ml) di bawah kenop EASY DE-CALC
dan putar kenop berlawanan arah jarum jam (Gbr. 14).
4 Lepaskan kenop EASY DE-CALC dan biarkan air bersama partikel kerak mengalir ke
cangkir (Gbr. 15).
5 Bila tidak ada lagi air yang keluar dari alat, pasang kembali kenop EASY DE-CALC
dan putar searah jarum jam untuk mengencangkannya (Gbr. 16).
6 Anda dapat terus menggunakan setrika segera setelah menyelesaikan prosedur
EASY DE-CALC.
PENTING - Membersihkan kerak tapak setrika
Jika Anda tidak menggunakan fungsi EASY DE-CALC secara teratur, partikel kerak
mungkin akan terbentuk di dalam tapak setrika dan noda cokelat mungkin keluar
dari tapak setrika ketika menyetrika. Jika hal ini terjadi, Anda perlu membersihkan
kerak pada tapak setrika dengan mengikuti prosedur di bawah. Kami sarankan untuk
mengulangi prosedur sebanyak dua kali untuk membersihkan tapak setrika dengan
lebih baik.
Untuk menghindari risiko luka bakar, cabut steker alat dan biarkan mendingin selama
setidaknya dua jam sebelum membersihkan kerak pada tapak setrika.
1 Lepaskan steker dari stopkontak dinding (Gbr. 13).
2 Letakkan alat pada tepi meja.
3 Pastikan tangki air kosong.
4 Pegang cangkir (dengan kapasitas minimal 350 ml) di bawah kenop EASY DE-CALC
dan putar kenop berlawanan arah jarum jam (Gbr. 14).
5 Lepaskan kenop EASY DE-CALC dan biarkan air bersama partikel kerak mengalir ke
cangkir (Gbr. 15).
6 Pegang alat sehingga posisi lubang EASY DE-CALC menghadap ke atas dan
tuangkan air suling sebanyak 900 ml ke dalam lubang (Gbr. 17).
Catatan: Harap berhati-hati akan bobot alat yang berat ketika Anda memiringkannya.
7 Dengan lubang EASY DE-CALC masih menghadap ke atas, pasang kembali kenop
EASY DE-CALC dan putar searah jarum jam untuk mengencangkannya (Gbr. 18).
ページが読み込まれています...
ページが読み込まれています...
ページが読み込まれています...
ページが読み込まれています...
ページが読み込まれています...
ページが読み込まれています...
ページが読み込まれています...
ページが読み込まれています...
ページが読み込まれています...
ページが読み込まれています...
ページが読み込まれています...
ページが読み込まれています...
ページが読み込まれています...
ページが読み込まれています...
ページが読み込まれています...
ページが読み込まれています...
ページが読み込まれています...
ページが読み込まれています...
ページが読み込まれています...
ページが読み込まれています...
ページが読み込まれています...
ページが読み込まれています...
ページが読み込まれています...
ページが読み込まれています...
ページが読み込まれています...
ページが読み込まれています...
ページが読み込まれています...
ページが読み込まれています...
ページが読み込まれています...
ページが読み込まれています...
ページが読み込まれています...
ページが読み込まれています...
ページが読み込まれています...
ページが読み込まれています...
ページが読み込まれています...
ページが読み込まれています...
ページが読み込まれています...
ページが読み込まれています...
ページが読み込まれています...
ページが読み込まれています...
ページが読み込まれています...
ページが読み込まれています...
ページが読み込まれています...
ページが読み込まれています...
ページが読み込まれています...
ページが読み込まれています...
ページが読み込まれています...
ページが読み込まれています...
ページが読み込まれています...
ページが読み込まれています...
-
 1
1
-
 2
2
-
 3
3
-
 4
4
-
 5
5
-
 6
6
-
 7
7
-
 8
8
-
 9
9
-
 10
10
-
 11
11
-
 12
12
-
 13
13
-
 14
14
-
 15
15
-
 16
16
-
 17
17
-
 18
18
-
 19
19
-
 20
20
-
 21
21
-
 22
22
-
 23
23
-
 24
24
-
 25
25
-
 26
26
-
 27
27
-
 28
28
-
 29
29
-
 30
30
-
 31
31
-
 32
32
-
 33
33
-
 34
34
-
 35
35
-
 36
36
-
 37
37
-
 38
38
-
 39
39
-
 40
40
-
 41
41
-
 42
42
-
 43
43
-
 44
44
-
 45
45
-
 46
46
-
 47
47
-
 48
48
-
 49
49
-
 50
50
-
 51
51
-
 52
52
-
 53
53
-
 54
54
-
 55
55
-
 56
56
-
 57
57
-
 58
58
-
 59
59
-
 60
60
-
 61
61
-
 62
62
-
 63
63
-
 64
64
-
 65
65
-
 66
66
-
 67
67
-
 68
68
-
 69
69
-
 70
70


