
Made in Germany
170 24 9850 - 0305
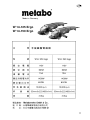
W 14-125 Ergo
W 14-150 Ergo
5
11
17
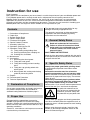
Operating Instructions .................. page
.....................................
................................................
170 24 9850 - 1112 (incl.SHW)

2
D
max
(mm)
(inch)
125
5
150
6
n
(rpm)
(min-1)
10.000 10.000
M
M14
5/8“-11 UNC
P
1
(W) 1.400 1.400
P
2
(W) 800 800
a
hw
(m/s
2
)
(ft/s
2
)
4
12
4
12
L
pA
(dB(A)) 90 90
L
WA
(dB(A)) 103 103
m
(kg)
(lb)
2,8
6.2
2,8
6.2
14
W 14-125 Ergo
W 14-150 Ergo
EN 50144,
98/37/EG, 89/336/EWG.
Jürgen Kusserow, Geschäftsleitung
© 2005 Metabowerke GmbH, Postfach 1229, D-72602 Nürtingen
EN 60745
2006/42/EC, 2004/108/EC, 2011/65/EU
Director Product Engineering & Quality
Responsible Person for Documentation
Metabowerke GmbH, 72622 Nuertingen, Germany
2012-11-28
Volker Siegle

3
8
6
5
4
3
1
2
7
910

4
b
a
c
d
e f f f
h i j
k l
m
g
n

5
Contents
1 Declaration of Compliance
2 Proper Use
3 General Safety Rules
4 Specific Safety Rules
5 Functional Description
6 Special Product Features
7 Assembly, Initial Use
8 Operation, Switching On/Off
9 Operation, Fitting Tools
9.1 Fitting cutting and grinding discs
9.2 Securing/releasing the clamping nut
9.3 Grinding disc, threaded
10 Maintenance
11 Accessories
11.1 Removing the wheel guard
11.2 Fitting the hand guard
11.3 Fitting the backing pad and sanding
discs
11.4 Fitting the cup-grinding wheel with
wheel guard
11.5 Wheel guard with cutting and chasing
guide for processing stone
12 Repairs
13 Environmental Protection
14 Technical Specifications
1 Declaration of Compliance
On our own responsibility, we hereby declare that
this product complies with the standards or
standard-setting documents listed on page 2.
2 Proper Use
Equipped with the appropriate accessories,
Metabo angle grinders are suitable for cutting,
grinding, sanding with a backing pad and brushing
metal, concrete, stone and similar materials in dry
operating conditions.
Saw discs, saw chains or similar parts must not be
used under any circumstances.
The operator bears sole responsibility for any
damage caused by inappropriate use.
The generally recognised accident prevention
regulations and the accompanying Safety
Instructions must be observed
3 General Safety Rules
Read and understand all instructions.
Failure to follow all instructions listed
below and in the red booklet may result
in electric shock, fire and/or serious
personal injury.
SAVE THESE INSTRUCTIONS.
Keep all of the documents supplied with the tool in
a safe place and pass them on to the new owner if
you part with the tool.
4 Specific Safety Rules
Always use proper guard with grinding wheel.
A guard protects operator from broken wheel
fragments.
Accessories must be rated for at least the
speed recommended on the tool warning label.
Wheels and other accessories running over rated
speed can fly apart and cause injury. Use at least
"max. 80 m/s".
Hold tool by insulated gripping surfaces when
performing an operation where the cutting tool
may contact hidden wiring or its own cord.
Contact with a "live" wire will make exposed metal
parts of the tool "live" and shock the operator.
Pay particular attention to the
parts of the text marked with this
symbol for your own safety and
the protection of your power tool.
Always wear eye goggles and hearing protection.
Use other available protective equipment such as
protective gloves, suitable protective work clothing
and helmet.
Before using the angle grinder, install the side
handle (3) and always keep both hands on the
tool at all times during use.
Instruction for use
Dear Customer,
Many thanks for the confidence you have shown in us with the purchase of your new Metabo power tool.
Every Metabo power tool is carefully tested and is subjected to the strict quality controls of the
Metabo Quality Assurance section. However, the service life of any power tool is to a great degree
dependent on yourself as the user. Please read and understand the information contained in these
Operating Instructions and the accompanying documents. The more care you exercise in handling your
Metabo power tool, the longer will be the reliable service it provides for you.

During machining, of metals
in particular, conductive dust
can form deposits inside the
machine. This can lead to the
transfer of electrical energy onto the machine
housing. This can mean a temporary danger of
electric shocks. This is why it is necessary when
the machine is running to blow compressed air
through the rear ventilation slots of the machine
regularly, frequently and thoroughly. Here, the
machine must be held firmly.
It is recommended to use a stationary extraction
system and to place a ground fault circuit
interrupter (GFCI) downstream.
If the angle grinder is deactivated by the GFCI
circuit interrupter, the angle grinder must be
checked and cleaned. Cleaning the motor, see
Maintenance.
The dust generated during operation is often
injurious to health (e.g. when processing oak and
beech woods, stone or paintwork which may
contain lead or other harmful materials). This dust
must not be allowed to penetrate the body. Use
dust-extraction equipment as well as wearing a
suitable dust mask. Remove any accumulations of
dust thoroughly, using a suitable vacuum cleaner.
Dust can be explosive!
Materials which generate hazardous dusts or
vapours during processing (e.g. asbestos) should
not be used.
Ensure that sparks produced during work do not
constitute a risk to the user or other personnel and
are not able to ignite inflammable substances.
Endangered areas must be protected with flame-
resistant covers. Make sure that fire-risk areas are
always provided with suitable fire extinguishers.
Ensure that the accessories used always fulfil
the following minimum requirements.
Respect the maximum
grinding-disc diameter (please
see Technical Specifications).
The diameter of the central
hole in the grinding disc (5)
must fit the inner flange (8)
without any play. Do not use
any adapters or reducers.
The permitted speed n
max
must correspond at least
to the no-load speed for the
power tool (please see
Technical Specifications).
Use at least "max. 45 m/s".
Carry out a test run after every tool change,
ensuring that you are holding the angle grinder
firmly with both hands. Hold the angle grinder
away from your body. Ensure that there is no-one
present in the area at risk. Run the angle grinder
for approximately 30 seconds.
The angle grinder runs on for approx. 10 seconds
after switch-off.
Observe the information and instructions provided
by the tool or accessory manufacturer.
Do not contaminate discs with grease or subject
them to impact.
Damaged, eccentric or vibrating tools should not
be used.
Never use cutting discs for grinding purposes.
Cutting discs must not be subjected to any lateral
pressure.
During cutting or grinding operation, always work
with the wheel guard (4) fitted.
Use tools in dry operating conditions only.
Do not attempt to touch the moving tool - risk of
injury.
Ensure that no damage is caused to gas or water
pipes, electrical cables and weight-bearing walls
(statics).
When using the power tool outdoors, an FI safety
switch with a maximum tripping current of 30 mA
must be connected on the incoming line side.
Angle grinder in continuous operation: To avoid
the possibility of unintentional start-up: always turn
off the switch when the plug is removed from the
socket or if an interruption to the power supply has
occurred.
Use elastic cushioning layers, if they are provided
with the coated abrasive and if they are called for.
If using thread hole discs, ensure that the thread
in the disc is long enough for the spindle.
Hold the work piece securely in place.
Ensure that ventilation openings are kept clear
when working in dusty conditions. If it should
become necessary to clear dust, first disconnect
the tool from the mains supply (use non metallic
objects) and avoid damaging internal parts.
Abrasive wheels shall be stored and handled with
care in accordance with manufacturer’s
instructions.
max. 80 mm
5
8
6

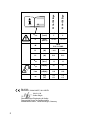
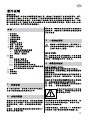
Read operation instructions
Wear safety goggles
A damaged or cracked side handle must be
replaced. Never operate a machine with a
defective side handle.
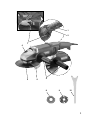
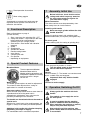
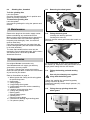
5 Functional Description
Refer to illustrations on page 3
(Please fold out).
1 Start / stop lever for switching ON / OFF
2 * Safety lock button – to prevent the tool from
being switched on unintentionally /
Switching ON for a longer period
3 * Side handle / Side handle with vibration
damping
4 Guard
5 * Grinding disc
6 Spindle lock button
7 Handle setting button
8 Inner flange
9 Clamping nut with
10 Pin spanner
* depending on equipment
6 Special Product Features
Marathon-Motor
The dust-protected Metabo
Marathon-Motor with its
Metabo winding-protection grid
and powder-coated coil winding
ensures up to 50% longer
service life.
Wheel guard
The wheel guard requires no tools for adjustment.
This allows it to be adjusted for a variety of
applications in a matter of seconds.
Auto-stop carbon brushes
When the auto-stop carbon brushes wear down to
a predetermined level the power tool is
automatically switched off, thus ruling out the
possibility of damage to the armature.
The handle can be twisted without the need for
special tools
Whether for cut-off work or for roughing down, the
trigger is always in the ideally accessible position.
Additional side handle with vibration damping
(depending on scope of supply):
For comfortable work in continuous operation.
7 Assembly, Initial Use
Before initial use, check that the mains
voltage and mains frequency stated on
the rating plate match the figures for
your own mains supply.
Mains connection
The mains sockets must be protected by slow-
blow safety fuses or circuit breakers.
Attaching side handle
Never use angle grinder without the side
handle attached!
Screw in handle to stop in left, middle or right-
hand threaded hole (as required) and tighten fully.
Fit wheel guard
(before working with the cutting or grinding disc)
Place the guard in position as shown.
Turn the wheel guard so that the closed
area is towards the operator.
Handle
Press in button (7). The handle can now be turned
by 90° to both sides and engaged.
Important! Work only with the handle
engaged
Connect to mains supply
8 Operation, Switching On/Off
Always guide the machine with both
hands!
First switch on, then apply the tool to
the work piece!
It must be avoided that the machine
draws in additional dust and shavings.
When switching the machine on and off,
keep it away from dust deposits.
After switching off the machine, only
place it down when the motor has come
to a standstill.
7

Switching the angle grinder ON just for a
moment:
Press the safety lock button (2).
Push the start / stop lever (1).
Release the safety lock button (2).
To switch OFF, release the start / stop lever (1).
Switching the angle grinder ON for a longer
period (procedure differs according to model):
Push the start / stop lever (1) and keep pressed.
Press the safety lock button (2) again and keep
pressed.
Release first the start / stop lever (1), then the
safety lock button (2).
To switch OFF, push the start / stop lever (1) and
then release again.
If switched on continuously, the
machine continues running if it is jerked
out of your hands. Therefore, always
hold the machine with both hands on
the handles, stand safely, and
concentrate on your work.
9 Operation, Fitting Tools
Before any tool changing operation,
always remove the plug from the mains
supply socket and check that the angle
grinder is switched off and that the
spindle has come to a halt.
The spindle lock button (6) may only be
pressed when the spindle is completely
stationary!
(Failure to observe this instruction may
damage the gear system)
Locking the spindle
Press in the spindle-lock button (6) and turn the
spindle by hand until the spindle-lock button can
be felt to engage in position.
9.1 Fitting cutting and grinding discs
Locate the inner flange (8) on the spindle, as
illustrated, ensuring that the inner flange cannot
turn on the spindle.
Position the cutting disc or the grinding disc on the
inner flange, as illustrated, ensuring that the
cutting disc is supported evenly by the inner
flange. When cutting, the sheet metal flange on
the cutter disc should be resting on the inner
flange.
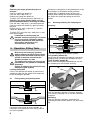
9.2 Securing/releasing the clamping nut
Securing
Turn the clamping nut (9) onto the spindle:
Thin grinding wheels (A):
Move collar of clamping nut upwards, so that the
grinding wheel can be safely clamped securely.
Thick grinding wheels (B):
Move collar of clamping nut downwards, so that
the clamping nut can be fitted securely.
Lock the spindle in position. Fit the pin spanner
(10) onto the clamping nut (9) and turn clockwise
to tighten.
Releasing
Lock the spindle in position, slacken off the
clamping nut with the pin spanner (10) and screw
off.
9
10
9
9
B
A
8
8
8

9.3 Grinding disc, threaded
To fit the grinding disc
Lock the spindle.
Place the threaded grinding disc in position and
tighten by turning clockwise.
To remove the grinding disc
Lock the spindle.
Unscrew the grinding disc using the spanner and
remove.
10 Maintenance
Remove the plug from the mains supply socket
before undertaking any maintenance work.
Motor cleaning: blow compressed air through the
rear ventilation slots of the machine regularly,
frequently and thoroughly. Here, the machine
must be held firmly.
From time to time blow any dust away from the
handle setting button (with the button held down,
in all three positions).
The auto-stop carbon brushes must only be
replaced in an accredited workshop. Have checks
and maintenance carried out by Metabo
Authorized Services.
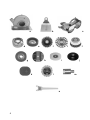
11 Accessories
Use original Metabo accessories only.
Your Metabo dealer will supply you with any
accessories you may require.
To assist in selecting the correct accessories,
make sure that you take a note of the exact model
of your tool for your dealer.
Refer to illustrations on page 4:
a Wheel guard with cutting and chasing guide
for processing stone
b Hand guard
c Safety goggles
d Cup-grinding wheel guard
e Cup-grinding wheel for surface smoothing
f Wire brushes
g Lamellar surface dressing discs
h Cutting and grinding discs
i Backing pads
j Cling-fit backing pads
k Sanding discs
l Diamond cutting blade
m Extension for working wigh backing pads
n Pin spanner (offset)
11.1 Removing the wheel guard
11.2 Fitting the hand guard
(working with backing pad and
sanding disc or brush)
Remove the tool, wheel guard and side-handle, as
necessary.
Fit the hand guard (b) over the threaded part of
the handle (3). Adjust the hand guard and fit to the
angle grinder along with the side-handle.
11.3 Fitting the backing pad and sanding
disc
Use only the clamping nut supplied
along with the backing pad.
Tighten the sanding disc and backing pad by
turning clockwise by hand.
Slacken off manually or with the pin spanner (10),
as necessary.
11.4 Fitting the cup-grinding wheel with
wheel guard
b
2
1
3
9

Remove the wheel guard (4). Fit the cup-grinding
wheel guard to the angle grinder, turning it on in
the direction indicated by the arrow until fully in
position. Use a screwdriver to tighten the screw.
Locate the inner flange (8) on the spindle,
ensuring that the flange cannot turn on the
spindle. Position the cup-grinding wheel so that it
rests evenly on the inner flange.
Screw the clamping nut (9) onto the spindle. Lock
the spindle in position. Secure the cup-grinding
wheel with the clamping nut (9).
Use the offset pin spanner (n).
Set the cup-grinding wheel/wheel guard projection
as required (approx. 0.5 - 1 cm/0.2" - 0.4").
Slacken off the two wing screws and adjust the
wheel guard evenly upwards or down. Retighten
wing screws.
11.5 Wheel guard with cutting and chasing
guide for processing stone
To reduce dust: only cut stone slab to 2/3 of its
thickness, then break it.
12 Repairs
Repairs to power tools must be carried
out by a qualified electrician only.
Any Metabo power tools in need of repair can be
sent to one of the addresses listed in the spare
parts list.
Please send the tool for repair with a brief
description of the fault identified.
13 Environmental Protection
Metabo packaging is 100% suitable for recycling.
Power tools and accessories at the end of their
service life still contain large amounts of valuable
raw materials and plastics which can likewise be
fed back into a recycling process.
As the dust generated during grinding/cutting may
contain harmful materials, do not dispose of it
along with domestic waste but ensure it is taken to
a collection point for special waste for proper
disposal.
These Operating Instructions are printed on paper
produced in a chlorine-free bleaching process.
14 Technical Specifications
Notes on the details on page 2.
We reserve the right to undertake modifications to
reflect technical advances.
D
max
= maximum grinding disc diameter
n = no-load speed
M = spindle thread
P
1
= rated input
P
2
= output power
a
hw
= typically rated acceleration in the
hand-arm area
Typical A-rated acoustic level:
L
pA
= acoustic pressure level
L
WA
= acoustic power level
During operation, the acoustic level may
exceed 85 dB(A).
Wear ear protectors!
m = weight
Measured values established according to
EN 50144.
The stated technical specifications are subject to
tolerances (as specified in the respective current
standards).
8
10

1) Work area safety
a) Keep work area clean and well lit. Cluttered or dark
areas invite accidents.
b) Do not operate power tools in explosive
atmospheres, such as in the presence of flammable
liquids, gases or dust. Power tools create sparks
which may ignite the dust or fumes.
c) Keep children and bystanders away while operating
a power tool. Distractions can cause you to lose
control.
2) Electrical safety
a) Power tool plugs must match the outlet. Never
modify the plug in any way. Do not use any adapter
plugs with earthed (grounded) power tools.
Unmodified plugs and matching outlets will reduce risk of
electric shock.
b) Avoid body contact with earthed or grounded
surfaces, such as pipes, radiators, ranges and
refrigerators. There is an increased risk of electric
shock if your body
is earthed or grounded.
c) Do not expose power tools to rain or wet
conditions. Water entering a power tool will increase
the risk of electric shock.
d) Do not abuse the cord. Never use the cord for
carrying, pulling or unplugging the power tool.
Keep cord away from heat, oil, sharp edges or
moving parts. Damaged or entangled cords increase
the risk of electric shock.
e) When operating a power tool outdoors, use an
extension cord suitable for outdoor use. Use of a
cord suitable for outdoor use reduces the risk of electric
shock.
f) If operating a power tool in a damp location is
unavoidable, use a residual current device (RCD)
protected supply. Use of an RCD reduces the risk of
electric shock.
3) Personal safety
a) Stay alert, watch what you are doing and
use common sense when operating a power tool.
Do not use a power tool while you are tired or
under the influence of drugs, alcohol or
medication. A moment of inattention while
operating power tools may result in serious personal
injury.
b) Use personal protective equipment. Always wear
eye protection. Protective equipment such as dust
mask, non-skid safety shoes, hard hat, or hearing
protection used for appropriate conditions will reduce
personal injuries.
c) Prevent unintentional starting. Ensure
the switch is in the off-position before connecting
to power source and/or battery pack, picking up or
carrying the tool. Carrying power tools with your finger
on the switch or energising power tools that have the
switch on invites accidents.
d) Remove any adjusting key or wrench before
turning the power tool on. A wrench or a key left
attached to a rotating part of the power tool may result
in personal injury.
e) Do not overreach. Keep proper footing and balance
at all times. This enables better control of the power
tool in unexpected situations.
f) Dress properly. Do not wear loose clothing or
jewellery. Keep your hair, clothing and gloves away
from moving parts. Loose clothes, jewellery or long
hair can be caught in moving parts.
g) If devices are provided for the connection
of dust extraction and collection facilities, ensure
these are connected and properly used. Use of dust
collection can reduce dust-related hazards.
4) Power tool use and care
a) Do not force the power tool. Use the correct power
tool for your application. The correct power tool will
do the job better and safer at the rate for which it was
designed.
b) Do not use the power tool if the switch does not
turn it on and off. Any power tool that cannot be
controlled with the switch is dangerous and must be
repaired.
c) Disconnect the plug from the power source and/or
the battery pack from the power tool before making
any adjustments, changing accessories, or storing
power tools. Such preventive safety measures reduce
the risk of starting the power tool accidentally.
d) Store idle power tools out of the reach of children
and do not allow persons unfamiliar with the power
tool or these instructions to operate the power tool.
Power tools are dangerous in the hands of untrained
users.
e) Maintain power tools. Check for misalignment or
binding of moving parts, breakage of parts and any
other condition that may affect the power tool’s
operation.
If damaged, have the power tool repaired before
use. Many accidents are caused by poorly maintained
power tools.
f) Keep cutting tools sharp and clean. Properly
maintained cutting tools with sharp cutting edges are
less likely to bind and are easier to control.
g) Use the power tool, accessories and tool bits etc. in
accordance with these instructions, taking into
account the working conditions and the work to be
performed. Use of the power tool for operations
different from those intended could result in a
hazardous situation.
5) Battery tool use and care
a) Recharge only with the charger specified by the
manufacturer. A charger that is suitable for one type of
battery pack may create a risk of fire when used with
another battery pack.
b) Use power tools only with specifically designated
battery packs. Use of any other battery packs may
create a risk of injury and fire.
c) When battery pack is not in use, keep it away from
other metal objects, like paper clips, coins, keys,
nails, screws or other small metal objects, that can
make a connection from one terminal to another.
Shorting the battery terminals together may cause
burns or a fire.
d) Under abusive conditions, liquid may be ejected
from the battery; avoid contact.
If contact accidentally occurs, flush with water. If
liquid contacts eyes, additionally seek medical
help. Liquid ejected from the battery may cause
irritation or burns.
6) Service
a) Have your power tool serviced by a qualified repair
person using only identical replacement parts. This
will ensure that the safety of the power tool is
maintained.
WARNING Read all safety warnings and all instructions. Failure to follow the warnings and instructions may result in
electric shock, fire and/or serious injury. Save all warnings and instructions for future reference! The term "power tool"
in the warnings refers to your mains-operated (corded) power tool or battery-operated (cordless) power tool.
General Power Tool Safety Warnings
170 24 9420 - 1110


11
Made in Germany
W 14-125 Ergo
W 14-150 Ergo
13A
13A
800W 800W

12
5
8

13
max. 80 mm
㩓㚜⭭᧨䰐㷱㝜⇫崁㳮⣷ᇭ
㉔檗㦃㙪㚜⭭㒥䫃孑䤓㓚㩓ᇭⰑ㨫㳮⣷䤓㓚
∎㖐儛㝜⇫㦃┯咡拸ᇭ
棓
棓
ヅ
ヅ
䂪
䂪
㖾
㖾
㓚
㓚
㩓
㩓
᧤
᧤
㫈
㫈
㝩
㝩
∪
∪
強
強
乓
乓
⦜
⦜
䭉
䭉
⸩
⸩
᧥
᧥
᧶
᧶
㓚㩓/䂪㖾㓚㩓

14
8
8
9
9
B
A
9
10

15
2
1
3
b
8

16

警告 閱讀所有的警告提示和指示。如未確實遵循警告提示和指示,可能導致電擊、火災並且/或其他的嚴重傷
害。妥善保存所有的警告提示和指示,以便日後查閱。在警告提示和指示中使用的“電動工具”是指必須連接電
源的電動工具(配備電線)和使用蓄電池的電動工具(無電線)。
針對電動工具的一般性警告提示
1) 工作場所的安全規章
a)工作場所必須保持乾淨並且照明要充足。雜亂或昏暗
的工作場所容易導致意外。
b)不可在有爆炸危險的環境下操作本電動工具。有爆炸
危險的環境是指充斥了易燃液體、瓦斯或塵埃的工作
場所。操作機器時會產生火花,火花容易引燃塵埃或
易燃蒸汽。
c)操作機器時不可讓兒童或旁觀者靠近工作場所。工作
時如果因為第三者的幹擾而分散注意力可能導致操作
失控。
2) 使用電器用品的安全指示
a)使用的插座必須能夠配合電動工具的插頭。切勿擅自
更改插頭。轉接插頭不可以和接了地線的電動工具一
起使用。使用機器出廠時的原裝插頭和合適的插座可
以降低遭受電擊的危險。
b)避免讓身體碰觸接地的物體,例如水管、散熱器、電
爐和冰箱等。如果您的身體接地了,非常容易遭受電
擊。
c)機器必須遠離雨水或濕氣。如果讓水滲入電動工具
中,會提高操作者遭受電擊的危險。
d)正確地處理電線。不可以使用電線提攜電動工具、懸
掛電動工具或者以抽拉電線的方式拔出插頭。電線必
須遠離高溫、油垢、鋒利的邊緣或轉動中的機件。電
線如果受損或纏繞在一起,會提高操作者遭受電擊的
危險。
e)如果在戶外使用電動工具,只能使用合適的戶外專用
延長線。使用合格的戶外專用延長線,可降低操作者
遭受電擊的危險。
f)如果無法避免的,必須在潮濕的環境中使用本電動工
具,得使用剩餘電流保護開關。使用剩餘電流保護開
關可以預防遭受電擊。
3) 針對操作者的安全指示
a)工作時務必要全神貫注,不但要保持頭腦清醒更要理
性地操作電動工具。疲憊、喝酒或服用毒品、興奮
劑、藥物之後,切勿操作電動工具。使用電動工具
時只要稍微分心便可能發生後果嚴重的意外。
b)穿好您個人的防護裝備並戴上護目鏡。根據所使用的
電動工具穿戴合適的防護裝備,例如防塵面罩、止
滑工作鞋、安全帽或耳罩,可降低工作傷害的發生
機率。
c)避免意外啟動機器。插上插頭並且/或安裝蓄電池之
前,提起或搬運機器之前,務必先檢查電動工具是否
處在關閉狀況。如果您在提攜電動工具時,手指碰觸
了開關,或著在連接電源時,起停開關仍然設定在開
動位置,都可能造成極嚴重的意外。
d)開動電動工具之前必須拆除仍然插在機器上的調整工
具/或螺絲扳手。如果機器已經開始轉動,而機器上仍
然插著調整工具,很容易傷害使用者。
e)避免錯誤的持機姿勢。操作機器時要確保立足穩固,
並要隨時保持平衡。正確的操作姿勢能夠幫助您在突
發狀況下及時控制住電動工具。
f)穿著合適的工作服。工作時不可以穿太寬鬆的衣服,
也不可以戴首飾。不可以讓頭髮、衣服和手套接觸機
器上的轉動機件。寬鬆的衣物、長髮或首飾容易被捲
入轉動的機件中。
g)如果能夠在機器上安裝吸塵裝置、集塵裝備,務必按
照指示安裝此類輔助工具,並且正確地操作該裝置。
使用吸塵裝備可以防止工作塵危害人體。
4) 小心地使用和處理電動工具
a)勿讓機器承載過重的負荷。根據工作性質選擇適合的
電動工具。正確地選用電動工具可以在規定的功率範
圍中,更有效率更安全的操作機器。
b)
勿使用開關故障的電動工具。如果無法正常操控起停
開關,極容易在操作機器時產生意外。盡快將故障的
機器送修。
c)在調整機器設定、更換零件或不使用機器時,都必須
先從插座上拔出插頭並且/或取出蓄電池。這個預防
措施可以避免不小心開動電動工具。
d)不使用電動工具時,必須把機器存放在兒童無法取得
之處。勿讓不熟悉機器操作方法及未閱讀本說明書的
人使用本機器。讓經驗不足的人操作電動工具容易發
生意外。
e)細心地保養、維護電動工具。檢查機器上的轉動零件
是否運作正常,並確定是否有零件斷裂或損壞。故障
的機件會影響電動工具的運作功能。使用機器之前務
必先更換或修理故障的機件。若未徹底執行機器的維
護工作容易導致工作意外。
f)切割工具必須保持鋒利、清潔。經過細心保養而且刀
刃鋒利的切割工具不易被夾住,而且較容易操作。
g)遵照
這些指示使用電動工具、配件及安裝在機器上的
工具。另外也必須注意有關機器操作方式及機器適用
範圍的解說。如果使用電動工具執行不符合該機器性
能的工作,極容易發生意外。
5) 小心地使用和處理充電式機器
a)只能使用製造商推薦的充電器為蓄電池充電。不可以
使用針對某些特定蓄電池的充電器,為其他的蓄電池
充電,可能引起火災。
b)務必使用電動工具的專用蓄電池。使用了不合適的蓄
電池可能發生工作意外並引起火災。
c)不使用的蓄電池必須遠離回形針、硬幣、鑰匙、釘
子、螺絲或其他的金屬物體。上述物體可能連接蓄
電池上的觸點引起短路。蓄電池的兩個觸點如果發
生短路,可能引起火災。
d)如果使用不當可能從蓄電池滲出液體。避免接觸此類
流動物體。如果不小心觸摸了,馬上用水沖洗。如果
上述液體侵入眼睛必須即刻就醫。
從
蓄電池流出的液體會刺激或灼傷皮膚。
6)檢修服務
a)只能將電動工具交給合格的專業人員檢修。檢修時只
能換裝原廠零、配件。唯有如此才能確保機器的安全
性能。

ページが読み込まれています...
ページが読み込まれています...
ページが読み込まれています...
ページが読み込まれています...
ページが読み込まれています...
ページが読み込まれています...
ページが読み込まれています...
ページが読み込まれています...
-
 1
1
-
 2
2
-
 3
3
-
 4
4
-
 5
5
-
 6
6
-
 7
7
-
 8
8
-
 9
9
-
 10
10
-
 11
11
-
 12
12
-
 13
13
-
 14
14
-
 15
15
-
 16
16
-
 17
17
-
 18
18
-
 19
19
-
 20
20
-
 21
21
-
 22
22
-
 23
23
-
 24
24
-
 25
25
-
 26
26
-
 27
27
-
 28
28


