
www.metabo.com Made in Germany
!ቂངಖ ....................................5 Original instructions .................10
W 8-100
W 8-115
W 8-115 Quick
W 8-125
W 8-125 Quick
WE 9-125
WE 9-125 Quick
W 900
WQ 900
W 11-125 Quick
W 11-150 Quick
WE 14-125 Inox Plus
WE 14-125 Plus
WE 14-125 Quick
WE 14-125 VS
WE 14-150 Plus
WE 14-150 Quick
WE Partner Edition
WP 8-115 QuickProtect
WP 8-125 QuickProtect
WP 11-125 QuickProtect
WP 11-150 QuickProtect
WEP 14-125 QuickProtect
WEP 14-150 QuickProtect

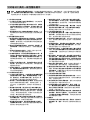
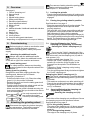
2
12Z
W 8-100
12Y
12X
2
2
14
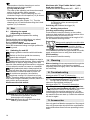
A
B
C
1
3
2
4
56
11
10
12
13
7
8
9

W 8-100
W 8-115
W 8-115 Quick
WP 8-115 QuickProtect
W 8-125
W 8-125 Quick
WP 8-125 QuickProtect
W 11-125 Quick
WP 11-125 QuickProtect
W 11-150 Quick
WP 11-150 QuickProtect
W 900
WQ 900
WE 9-125
WE 9-125 Quick
WE 14-125 Inox Plus
WE 14-125 Plus
WE Partner Edition
WE 14-125 Quick
WEP 14-125 QuickProtect
WE 14-125 VS
WE 14-150 Quick
WEP 14-150 QuickProtect
WE 14-150 Plus
Quick
- - Q - QQQ-Q-QQQQ - QQ
Electronic
- ------CCVCVCVTCVTCTCVTCTCVTC
D
max
mm (in)
100 (4) 115 (4
1
/
2
) 125 (5)
150
(6)
115
(4
1
/
2
)
125 (5) 150 (6)
t
max1
; t
max2
; t
max3
mm (in)
6; -; 6
(
1
/
4
; -;
1
/
4
)
10; 8; 6,8
(
3
/
8
;
5
/
16
;
1
/
4
)
10; 8; 6
(
3
/
8
;
5
/
16
;
1
/
4
)
M / l
- / mm
(in)
M 10 / 17
(M 10 /
11
/
16
)
M 14 / 20 (
25
/
32
)
n
min
-1
(rpm)
10000 10000 10000 10000 10000 10000 9000 10000 10000
3000-
10000
3000-
10000
2000-
7000
7000-
10500
10500
2800-
10500
9000
6000-
9000
P
1
W
850
110 V: 800
1150
110 V: 1100
1000
110 V: 950
1450
110 V: 1400
P
2
W
520
110 V: 490
710
110 V: 670
570
110 V: 540
830
110 V: 800
m kg (lbs)
1,8 (4.0) 1,9 (4.2)
a
h,SG
/K
h,SG
m/s
2
5/1,5 6,0/1,5 7,0/1,5 5,5/1,5 5,0/1,5 6,5/1,5 6,0/1,5
a
h,DS
/K
h,DS
m/s
2
2,5/1,5 2,5/1,5 2,0/1,5 2,0/1,5 4,0/1,5 4,0/1,5 2,0/1,5
L
pA
/K
pA
dB(A)
90/3 91/3 92/3 90/3 91/3
L
WA
/K
WA
dB(A)
101/3 102/3 103/3 101/3 102/3
14.
EN 60745
2006/42/EC, 2004/108/EC, 2011/65/EU
Director Product Engineering & Quality
Responsible Person for Documentation
Metabowerke GmbH, 72622 Nuertingen, Germany
2012-11-28
Volker Siegle
3

4
D
max
= 100 mm 6.30369
D
max
= 115 mm 6.30366
D
max
= 125 mm 6.30367
D
max
= 150 mm 6.30368
6.31151
(1) (12) (13)
(2)
(11)
6.30327
A
B
C

5
1! ᇜᄹ໌ಖ
Ꮾၓၑᇜውใเˈၻ౦࿅ۨ໌ಖˈׁٛ൰࠲ठݕ3ᇔ
ྈளܿፑञᎳȃ
2! ࣙށቂဉ
ఴ֦ኊ٦ിിठቂˈࡘਲಢ૰ቂႇ༽ᆓ
ಢȂಢȂ෧ࢃঽཎ༱୲ਜ਼༥Ȃਖ਼Ȃإঽඝ
ྋཕإலȃ
WE 14-125 VSᇓቂലࣕȃ
ሓቂܬዉڈܿใटཿ।ቈቂॖڏܞภؠውใȃ
כᅐᏨ༉ቂࢽኁ߷ࣙዽञཱུࡒܿภᏁலȃ
3! ᇜֈภࣙዏ
!ၓமܿภঽ֦॓ܿݢވન-ข࿅׳
᎙ሃၭ፩ۨፗܿݓߴʽ
! ࡻ ˉᏇႿኡޚࡘቂངಖ૰ਂຬཿພܿ၌
ნȃ
! ࡻˉขᏇႿኡޚྈภࡻঽངಖȃ
Ꮸ༉ˈ૰ሞඩݢদȂটኳञ0ডᆒ፱ཿພȃ
֦ௗྈภࡻঽངಖˈᇵֻ๊ॄدૣȃᅍᎡਦݢ
ވનˈכᅐਖጝᄎၭᇜᎡਦȃ
4! ࿅༓ภࣙዏ
4.1! ಢȂࣕȂཎࣕȂലࣕডಢ෧ࢃغᏮ
ܿቂภࡻ˖
ቂ
a)!ࡘݢވનቂოగȂࣕȂཎ
༱Ȃലࣕড෧ިન࢙ܿȃኡޚཱུࡘݢވ
ન࿎࢜ܿྈภࡻȂངಖȂဇ੍ञࣙށȃ
ம੍ᇵྈளྈངಖਖܷݢদȂᎼটञ0ডᆒ
፱ພࣷȃ
!!WE 14-125 VSᇓ૰ᇵቂᏮലࣕȃ
b)!ਓሊቂۨݢވનፍᄵஂಢࣕܿވᏮȃ
ፍᄵ߾ݢވનྈኁົܿቂဉˈ૰ٛໍ၌ნܷ
เ།ພȃ)ጝቂWE 14-125 VS*
c)! ቂ߾ન፟ዉຟထਃञົܿࡒȃࠨ
ዏࡘࡒ૰־Ꭷܸೠܿݢވનຢˈߑྋ
֦ጽภغᏮȃ
d)!ࡒܿ߇ށཨޡכᅐፚຬ݃ݢވનຢڵܿ
Ꮵܐཨޡȃࡒᇵඝ߇ށཨޡܐܿཨޡከᎡঐ
ߙໍ֯ழञࠀȃ
e)!ࡒܿိञूޡכᅐݢވન߇ށஉ߭ၐ
ፇȃጸฬܿࡒڞ܄ܾܸڣࠍ߷॓ড૿
፟ȃ
f)!! గȂߟୁധȂ૦ֶݡডใटඝྊࡒܿ፺૾ڞ
܄כᅐठᎧܸݢވનܿ᎐፺ຢȃܕ፺૾
ܿȂቪݢވનᎧിܿࡒਖঐ໘ၱȂࣰ
ޡጬވঐሞඩ໘૿ȃ
g)!ᇋቂཿ।ܿࡒȃ۫ቂᇋ৹يࡒ
ˈஂగࠨླྀञழࠣˈ૦ֶݡࠨ
ܿழࠣȂཉழডࣰޡಢཿˈཎ༱ࠨམވডਜ਼
༥ཎࠨިழȃ࣮ݢވનডࡒݳథமˈ৹
يࠨཿ।ডᎧౚཿ।ܿࡒȃ৹يञ
ᎧࡒॄˈุᏋেञയ࣎ጚܿၤና୰ᅢᎡࡒ
ܿ൶ಅˈᇵݢވનᏥܐૼኵཨޡከᄵ1ࠍ፬ȃ
ཿ।ܿࡒ٢ࡘ༅ᆬঐླྀழȃ
h)!ܔຢ߷॓ቂ൰ȃࢎદቂଝˈቂಅȂภ
಼॓ডภᆞȃቂˈܔຢ߷ٽಅનȂ
உ֦॓ධȂ༇࿄ञܭᄆಢலডླྀܿᏮ
ၐฮȃᆞ߷॓כᅐܭ᎘ࢌ፯غᏮٛໍܿࠀᄡȃ
߷ٽಅનডଁכᅐࣰఌغᏮٛໍܿ૬ஆȃ٣
ඓ֬௷ࡴූޡወ໌፩ঐሞඩ໘۬ȃ
i)!! ุയ࣎ጚቪᏮฏቱ֦ڕᇜށภ୰ȃใट
Ꮾฏቱܿเכᅐܔຢ߷॓ቂ൰ȃডൿཿ
ࡒܿླྀ૰ঐࠀڵሞඩ૦ᎼغᏮฏቱܿ
യ࣎ጚܿພࣷȃ
j)!! ܬ෧ࢃࡒ૰෧ࢃܸ՚ღডᏋເݢღܿ٠
ྈᄵغᏮˈፔࣰુኒၾڕಅହၾ᎘ݢވ
નȃ෧ࢃࡒܸᇜࢎȐܕݢȑܷღ૰ঐ
ݢވનܿိ௷ਜ਼༥ெȐܕݢȑغᏮጚߙ
ໍݢদ၌ნȃ
k)! ღና୰ᅢᎡܿࡒȃ࣮૿፟ܬˈღ૰
־෧ިডٙˈܾೠܿ༇ড༇מ૰־શ
ᅢᎡࡒ፩ȃ
l)!! ፊܸࡒဵภፒከވئݢވનȃᅢᎡܿ
ࡒ૰ঐ᎘װಅଲވݢވનߑุೠ໘บ
ޭનܿ૿፟ȃ
m)!ܬᄔܕݢވનᇋވྋȃሃိݓۂঽᅢᎡ
ࡒ૰ঐٙೠܿᇣ࠵ߑࡒພࣷເ࿒ȃ
n)!੶٢୲ݢވનܿࠞଁȃݢވࠞປঐਖঁ
ٽႥ૮ˈࣰܿਜ਼༥ࠒದڀবঐܷݢන၌
ნȃ
o)!ᇋᇸัإலࡒغᏮݢވનȃটᄬ૰ঐ
ݞัጝᄎإலȃ
p)!ᇋቂᅍቂ୩ษᇛܿࡒȃቂ༽ডඝྊ୩ษᇛ
૰ঐܷݢࡄডݢদȃ
4.2
! ߫ܪञყ࣋ࡻ˖
߫ܪሓ᎘ডٙ᎘ܿᅢᎡగȂ૦ֶݡȂཎ༱
ডඝྊࡒߑٛໍܿဆะ߫Ꮾቂஉȃ᎘ডٙঐሞ
ඩᅢᎡࡒܿᅻཨޛᎡˈཱུፇ໘૿ܿݢވન
᎘ݞٛໍቪࡒᅢᎡߴჹყ߫ܿከވȃ
ஂˈ࣮గ־ٙড᎘ˈ᎘ݞܿ
గעኒ૰ঐإலװಅߑሞඩగഛڵড߫ܪȃ
గ૰ࠀჹডࠀ୰غᏮጚˈጝถિగ᎘ݞ
ܿከވߴჹȃۨగᇓ૰ླྀழȃ
ቂངಖ

6
߫ܪݢވનႜቂञİডጸฬغᏮᅗডܿ
ੌ࣮ˈ૰ᇵࣰتถᇵࢍڵܿܬኁ߷܈ܾᇵן
ಁȃ
a)!֦ڕၾݢވનˈೠܿເ࿒ञ༇מۃጸฬ
Ꭻྙᇵݑૠ߫ܪஉȃ࠽᎓༇ˈዏᇋᇜፊ
ቂˈᇵצᏥܐქޡ૿፟᎘ඩވܿ߫ܪஉড߫உ
ડȃتถठܿኁ߷܈ˈغᏮጚખ૰ᇵ૿፟
߫உડড߫ܪஉȃ
b)!ુਖ༇૦੧ᅢᎡࡒȃࡒ૰ঐ߫ܪܸ
༇ȃ
c)! ᇋዹߙໍ߫ܪݢވન૰ᇧވܸܿݓ
ߴȃ߫ܪਖٙݞดનೣగከވߴჹከ
ވȃ
d)!ܬ৯ਲȂע݃ۃᏮᇖᇋ࿅׳ᄆᄩȃןಁࡒ
ܿܪञٙȃ৯ਲȂעञܪનٙᅢ
Ꭱࡒܿฎሞඩ߫ܪܿ໘૿ȃ
e)!ᇋࡒᎧຢફȂݬܱডܕڜફȃጝᄎફ
ঐٛໍ൮ߨܿ߫ܪञ໘૿ȃ
4.3! ޭಢჾञಢ෧ࢃغᏮܿቂภࡻ˖
a)!ፔቂྈထਃܿగᄲखञၓᅤቂగົ
ܿ॓ȃၓݢވનົܿగڣࠍܾ
ܸ߷॓ˈภܿȃ
b)!॓כᅐࢿݓᎧݢވનຢˈ෩ܾᏥન
ภᄹˈፔᏥᄆܿగؠࠍ֬௷غᏮเಅ
ȃ॓֔᎓֦॓غᏮጚಁ།ܸ֯ழగླྀ
Ȃഗะۂঽగᇵঽটॗݞัᇣ࠵ܿ၌ნȃ
c)! గፔቂᏮထਃܿቂဉȃஂ˖ᇋቂ෧ࢃగ
ܿفಅᄵಢჾȃৠܸగفಅܿஉ૰ঐ
ඝླྀழȃ
d)!፮ၓྈᅤగᅤቂၝཿ।ܿȂමܬࣙࢆञᄳ
Ꭻܿగߟୁധȃठܿగߟୁധፀڏగ૰
ᇵਂᄆగൿழܿ૰ᄹȃ෧ࢃగܿߟୁധ૰
ᇵగߟୁധȃ
e)!ᇋቂ۰ܐࣙࢆݢވનຢቂ໔ܿಢཿగȃ
ቂܐࣙࢆݢވનຢܿగᄆࣙࢆ
નܿࡴཨଝ૰ঐ֯ழȃ
4.4! ޭగ෧ࢃغᏮܿࡒৠቂภࡻ˖
a)!ᇋȐঢ়ȑ᎘෧ࢃగডৠࣰܐܿᅼஉȃᇋ
༅ဇᏭࣰແܿ෧ࢃȃࢍగৠࣰሥஉዓৠம
గ෧ࢃܿࡏኵˈ๒ᇸٙড᎘ˈዓৠம߫
ܪডగ֯ழܿ૰ᄹȃ
b)
!ເ࿒ᇋޭᎼᅢᎡగˈᇓᇋዹඝॄȃܬն
గ۰غᏮጚເעܿغᏮݞᇧˈ૰ܿ߫ܪ
ঐᅢᎡగञݢވનٮೠထହȃ
c)! ܬగ־᎘ডႇజใटኊሓߑ፩ި෧ࢃˈ࣋
ݯݢވનၾ᎘નᇋވˈፊܸగဵภ
ፒȃિᇋ༅ဇܬగ้ะከᎡ෧ࢃగလ
୰෧ࢃˈࠨዏঐߙໍ߫ܪȃݲيتถᄈጸ܈
ᇵᄂڼగ᎘ܿኊሓȃ
d)!ຢ፱ᄧඩވ෧ࢃغᏮȃุగ܌ܸภ
ཨॄᄆᄩݓ፱ᄧ෧ࢃȃ࣮ݢވન
ຢ፱ᄧඩވˈగ૰ঐ᎘Ȃഛڵড߫ܪȃ
e)!ፀڄ᎘֊إড٫ܐ૰ܾగ᎘ञ߫ܪܿ
၌ნਠܸᏥ݈ქޡȃܐ൷Ꮛ፱ߑۖȃכ
ᅐ૦੧෧ࢃღۃञగف੧עኒۃ
ፀڏȃ
f)!! ܬᄵȐృ෧ࢃȑු࿒ডඝྊృฏᇋࢆိ
ᄆᄩȃڵܿగ૰ঐࢃܸౙන࣏ড༽࣏ˈݢ
ღডቈۨሞඩ߫ܪܿ႘࿒ȃ
4.5! ࣕغᏮܿቂภࡻ˖
a)
!ܬࣕˈᇋቂ٫ܐധፖȃᅤቂധፖ
ሥՙጐ፟ዉຟܿထਃȃ٫ڵࣕݡധܿܐധፖ
ཉழܿ၌ნ෩ঐሞඩٙȂധܿཉழড߫
ܪȃ
4.6! ጦޭWE 14-125 VS˖࣋ലࣕܿ࿅༓ภ
ངಖ;
ലࣕ߷॓Ꭷຢኧᅒམလܿெĩቇඝࢿ
ღĪȃ༆ඩࢿღড྄ޥඝ٣ޡȃᅢᎡ፩ܿམလࢿ
ღ૰ঐቪܿ༇ፑਾۂˈডጚશ፩ȃ
4.7! ཎ༱غᏮܿቂภࡻ˖
b*!ᇋሃܸুጸ٢غᏮཎღᇓঐཱུ༱Ꮚ༵
ڵȃᇋޭཎ༱ৠࣰܐܿࡏचߑܾཎღ
ڏ།ࣰሥஉȃཎღ૰ঐᇸ۩֤ܿᇣ࠵ञ0
ড൝ࠫȃ
b)!࣮ਓሊཎ༱ቂ॓ˈዏኧᅒࡘ॓ޭ
ཎగডཎ༱ใट࡞ฺȃཎగডཎ༱
Ꮾࡏचञ୰ᄩஉᏮቂፊঐקܐȃ
4.8!߇ိภࣙዏ˖
! ࡻ ˉขႚכീܔ಼॓ȃ
ࢭళగࡒཛྷܪᄹݡلˈ෩ᇋชቂܿय़ˈข
ቂܪᄹݡلȃ
ขᏨᅰનডി٦য়ܿࣙࢆངಖʽ֦॓గಁ།ቌ
ႄডཿ।ʽ
כᅐՙ٦য়ፑႿᄩڿعȂۃ୲ಢగȃ
෧႙ቂ෧ࢃᆓಢᄵ۳ಢʽ૰ޭިழಢగفಅ
உȃ
ࡘનכᅐ൶ৠᇵࢿށᇵ߷ज़ˈஂˈቂঢ়
નȃܐכᅐৠᇵڣࠍፀڄȃ
ቂിఞ࿄ܿിˈዏ᎐፺ದޤ૰ਾۂܸਲ
ಢ૾ܿݒؠȃྈᇵכᅐฬ֦ിຢܿఞၯᏚࢮ٣ˈ
٣᎐፺٣ޡȃ෩כᅐቪ᎐፺ຢܿఞၯ൞ിȃ࣋᎐
፺٣ޡञఞၯܿᄪႩขدਈݕ3ᇔञݕ14ዽȐ
༦ࣙࢆȑȃ
ġ ৠࣰڋ፩ˈቇඝৠਜ਼༥إ፣
ˈݢވનঐܷݢࠒٽব
તȃጝঐݢۈݘܸ૮ຢˈሞ
ඩኺܿݢদ၌ნȃጝખၓכᇋݢވન
ᏮࣰඝၛؠܿࠞؼࣙఊݓȂ੶٢ݓ෩ٸ
ݒݓਖનܿᅼ྄ૼනഠᏖȃۨˈכᅐࢿށ
નȃ
ਓሊຢቍቂࢿށႥٽႼஏਾ௪ݢݢި௸
ධĩFIĪȃܬਲಢቈŇŊި௸ධ෧ިˈכᅐޭඝᄵ৹
يঽ୲ȃ࣋ݢੋᄪႩขدਈݕ9ዽȐ
ੋȑȃ
ৠᎇࣽලකإȂإȂଚঽਜ਼༥ٛໍܿࠒٽ
૰ޭເ࿒ࣷȃਾۂডႥۨ፯ࠒٽ૰ܷغᏮ
ጚডയ࣎ጚٛໍࣰಓ߫ሥञİডॅႥᄹিȃ

7
່ፚರᄎࠒٽ־ࣜၓՎ႘፣ˈஂˈჷञຐొ
ᩊࠒٽˈቇඝܬছठإݲ࿚ৠৎĩࢊᆑˈإ
߷ࡄৎĪȃৠࣽ౽إலˈכᅐቈᄵۃ
୲ȃ
.!૰ቂࠒٽႥถᎧܿݓߴˈખሥࡘቂȃ
.!ৠฏቱכᅐடऔࠞȃ
.!ਓሊቂࣰఌ݃ৃၓP2ܿ߷ٽಅȃ
ޭྈৠإலขᏨᅰ࣭য়ᇋชȃ
ข႙ቂۃ୲ࣰڋ፩ঐٛໍࣷࠒٽডጯනܿ႘ல
ĩஂ˖౽Īȃ
ࠒٽܿ०Ꮾˈขฬ֦નࠞଁۃܿ
ੋȃ࣮ࠒٽᅍᇋڼˈข༈෧ިݢވન
ܿ᎐ݢኑĩቂ߾ਜ਼༥႘࿒෧ިĪˈןಁཿ।ؠධ
ȃ
෧႙ቂཿ।ܿȂᄩܿডጬܯܿનȃ
֦॓ဪ࣏ড༽࣏Ȃݢღঽڏ፱םĩྙĪ།ཿ।ȃ
༃ိغᏮˈขຢቍஏਾᏥܐݢၓ30 mAܿFI
ި௸ධʽ
ݲ༅Ȃ४ডၕᅃનˈขਖ᎐ݢኑճȃ
ఴ֦SᏋވภ୰ठධȃ࣮ภ୰ठධߙڵᄪ
खˈขஅু࣋טݢވનʽ
࠽᎓༇ཿ।ডިழכᅐᄵ४ȃ४ፇ෧႙
غᏮનȃ
߷॓ཿ।ডިழכᅐᄵ४ȃ४ፇ෧႙غ
Ꮾનȃ
ࡘનቂലࣕĩቂWE 14-125 VSĪȃሓ
ቂܬሞඩܿཿ।֦ᅃ߭ၐፇʽූᄵቂඝ
ᄵലࣕˈዏݢ૰ࣰ۰ߑཿ।નȃਓሊቂၻ
౦ܿലࣕᄵലࣕغᏮȃ
5!࡚༧
ขدਈݕ2ᇔȃ
ġ 1ġġȐଓཨȑঢ়ఞವī
ġ 2ġ ፀڄߟୁ
ġ 3ġ᎐፺
ġ 4ġ ᎐፺྇ށՙഀ
ġ 5ġ ਾİ෧ިज़ވ࣋ī
ġ 6ġ ݢᏊᄪखმൺī
ġ 7ġ ݲཨగī
ġ 8ġ ࣋྇ī
ġ 9ġ ۂߙධī
ġ10ġ ࠽᎓༇ġİਂጬ࠽᎓༇ī
11ġ ߷॓
12 ġ ঢ়ఞವī
13 ġ ༺૾և༇ī
14 ġ ቂ߷॓ിܿࡠ
īġཱུົֻߑልİിཛྷ߭ၐ
6!ݲ༅
! ਾຢݢኑˈขي߇ށ᎐ݢᅼঽ᎐൮ఋ
)ಖ߇ށፎවຢ*ࠨቪ࢜ሥݢኑყၰ
ठȃ
6.1! Ꭷ࠽᎓༇
! כᅐ࠽᎓༇)10*ᎧॄئغᏮȃ
નᏪفডቑفᎧ࠽᎓༇ৠᇵࢿށȃ
6.2! Ꭷ߷॓
! ၓ֦ጽภˈᇜఊቂࢌࢋగᏊܿ߷॓ʽ
ขدਈݕ11ዽȃ
ቂᆓಢܿ߷॓
ົቂ۳ಢగȂᎫࣕݡധȂਜ਼ࡪ෧ࢃగȃ
ขدਈݕ2ᇔဇCȃ
.!ՙ᎘ቂ߷॓ിܿࡠ)14*ȃਖ߷॓)11*ᇡጐ
ፑܿၤဢȃ
.!མࡠˈะॄᎡވ߷॓ˈፊፚࡠنȃ
.!ထވࡠᎡވ߷॓ˈፊܸטठۃٮჹغᏮጚȃ
.!ฬ֦߷॓ࢿށ-! ࡠכᅐن෩߷॓
Ꭱވȃ
૰ቂ߷॓ፚຬጕ᎘3.4
ऒܿിȃ
7! Ꭷಢగ
! ४ใटിขި᎐ݢኑȃ෩નכᅐ෧
ިˈ᎐፺ፒȃ
! ၓภඩਈˈכᅐᎧ෧ࢃቂ߷॓ॄˈئ
ᄵ෧ࢃغᏮ)ขدਈݕ11ዽȐിȑ*ȃ
7.1! ྇ށ᎐፺
.!ՙ᎐፺྇ށՙഀ)4*ะॄ༇ވᅢᎡ᎐፺)3*ፊܸ᎐
፺྇ށՙഀೳठȃ
7.2! Ꭷಢగ
ขدਈݕ2ᇔဇAȃ
.!ਖፀڄߟୁ)2*Ꭷܸ᎐፺ຢȃכᅐጸฬᎧߟୁ
᎐፺ຢႇߟᎡވȃ
! ጦޭW 8-100˖ቂ༺هᄳܕᄁև༇ਖፀڄߟୁܸ
᎐፺ຢˈᇵצᄆ፺०)ፊၓ16ऒ*ٮຢȃ
! ਖಢగፀڄߟୁ)2*ຢȃ
! ಢగכᅐ൶ፀڄߟୁຢȃ෧ࢃಢധຢܿਜ਼༥ߟ
ୁᇓᆼכᅐ൶ፀڄߟୁຢȃ
7.3! ࢿށ0མȐଓཨȑঢ়ఞವ)ሓ࢙ߑል*
ࢿށȐଓཨȑঢ়ఞವ)1*
! ി٫ࣰ8ऒूܿঢ়༇ˈ෧႙
ቂȐଓཨȑঢ়ఞವʽۨขቂി༺૾և
༇)13*ܿঢ়ఞವ)12*ȃ

8
.!྇ށ᎐፺)ขدਈݕ7.1*ȃ
.!ਖȐଓཨȑঢ়ఞವ)1*ށၤ᎐፺)3*ຢˈᇵצ2
ࢋငߓن᎐፺ຢܿ2ࢋؼ፩ȃขدਈݕ2ᇔဇȃ
.!གጦ༇ވᅢᎡˈຢȐଓཨȑঢ়ఞವȃ
.!གጦၱၱݓᅢᎡಢగˈຢȐଓཨȑঢ়ఞವȃ
མȐଓཨȑঢ়ఞವ)1*˖
! כᅐᎧȐଓཨȑঢ়ఞವ)1*ˈ᎐፺྇ށՙ
ഀ)4*ߴࢿށ᎐፺"
.!෧ިݢኑॄˈධঐᅝከᎡȃ
.!గፒፇˈՙ᎐፺྇ށՙഀ)4*ȃམȐଓ
ཨȑঢ়ఞವ)1*ȃ
7.4! ࢿ0མވঢ়ఞವ)ሓ࢙ߑል*
ࢿঢ়ఞವ)12*;
ঢ়ఞವܿفܿȃՙဇྈਖঢ়ఞವᅢ
ܸ᎐፺ຢ˖
ขدਈݕ2ᇔဇBȃ
.!X)!ቂ֤ಢగ˖
! ঢ়ఞವ)12*୧ܿޤಅሥٮຢᇵ֤ಢగࢿ
ށȃ
! Y)!ቂूಢగ˖
! ঢ়ఞವ)12*୧ܿޤಅሥٮᇵঢ়ఞವ૰
ࢿ᎐፺ຢȃ
! Z)!ጦޭW 8-100˖
! ݲఞವܿݡปٮञ0ড൶ಅᇜޤٮຢȃ
.!྇ށ᎐፺ȃቂ༺૾և༇)13*གጦᅢᎡঢ়ఞವ
)12*ᇵৠᇵࢿށȃ
མވঢ়ఞವ˖
.!྇ށ᎐፺)ขدਈݕ7.1*ȃቂ༺૾և༇)13*ೣጦ
ᅢᎡঢ়ఞವ)12*ඝམވȃ
8!ቂ
8.1! ݲཨޡ)ሓ࢙ߑል*
ၓݲཨగĩ7Īົށਓሊܿཨޡȃ
෧ࢃగञ۳ಢȂְᄳగȂਜ਼ࡪ෧ࢃగ˖ࡴ
ཨ
༱Ꮚ˖፩݃ཨޡ
ಢగ˖፩݈ཨ
᎙˖ਓሊቂၻ౦ܿਲჹലࣕᄵലࣕᏮȃ
8.2! ਾञ෧ި
! כᅐ༺༇غᏔનȃ
! כᅐਾનˈئغᏔിᇧჹȃ
! ෧႙ุܿࠒٽञჾᄡرௗનȃྈ
ᇵܬਾȂ෧ިનˈכᅐਖرௗࠒٽ
ڼ࡞ȃ෧ިનॄˈፔܬݢဵภፒ
ॄˈئਖඝȃ
! ןಁႇሃතވ˖ܬ᎐ݢኑ࣋טডݢኑ෧ި
ˈכᅐ෧ިࡘݢވનݢኑȃ
! ஏᅝᏮ፩ˈનလ༇ˈྋঐ้ะۃከ
ᏮᎫྙȃሓۨˈ༺༇כᅐ፮ၾ᎘࠽᎓༇
ˈዹၱˈᄩᏮȃ
નज़ވ࣋ܿධ˖
0
I
5
ਾ˖ჹထވज़ވ࣋ĩ5Īȃᅍஏᅝතވˈขٮ
ထވ࣋ፊፚೳठȃ
෧ި˖ՙ᎘ज़ވ࣋ĩ5Īॄޤˈะॄȃ
નȐErgoዝ࣋ȑĩનֻภ࿕࢙Īܿ
ධ˖
ĩનWP..., WEP...खܿධĪ
0
I
8 9
89
ਾ˖ՙਊဂྈፑߴჹज़ވ࣋྇)8*ՙۂߙධ
)9*ȃ
෧ި˖མۂߙධĩ9Īȃ
8.3! غᏮངಖ
ಢغᏮ;
ਖન൶ၱݓᏮװಅହইᇧވװಅ
ፚࣰȃ
۳ಢ˖ਖનڈ30-40ޡਲᇵ܌ܸᏥৠᄌ
࣮ȃ
෧ࢃ˖
ৠߴჹכᅐቪగᅢᎡߴჹყ߫ĩਈ
ဇĪȃࠨዏˈન߫ڤȂ໘૿၌
ნȃכᅐᇵठৠإலܿཨޡ൶ၱ
غᏔનȃข႙ာᄖˈࣰޡஉডᏪ
ቑᇂտનȃ
ཎ༱˖
൶ၱݓનȃ
9! ੋ
ݢੋ˖ࣰඝၛؠܿࠞؼࣙఊݓȂ੶٢ݓ
෩ٸݒݓਖનܿᅼ྄ૼනഠᏖȃۨˈכᅐ
ࢿށનȃ

9
10!ࢽጊഠڼ
નVTCञTCݢᏊධܿධ˖
ݢᏊᄪखმൺĩ6Īதඩˈ෩ࡏኵཨޡਠ݈ȃ
ღปၫޡࡴʽܜཨከᎡධˈፊፚݢᏊᄪख
ፑ݁࣋טȃ
નVTC, TCञVCݢᏊධܿධ˖
ݢᏊᄪखმൺĩ6Īດཇ෩ධතވȃ፱ᄧ
තވ֦॓ඩᏮቂȃ࣮ධතܿଝ
نຢ᎐ݢኑنᏰˈডጚݢ࢜ሥ፩ިॄঅ
ࡉˈዏධঐතވȃข࣋טධˈะॄ፱
ᄧතȃ
11!ി
ፔቂఴ֦ኊ٦ിȃขدਈݕ4ᇔȃ
ፔቂغᏮངಖ፩ྈளڵܿ࠲ठᇋชञࣙࢆܿി
ȃ
A!ቂ෧ࢃగܿ߷॓
ົቂ෧ࢃగȂਜ਼ࡪ෧ࢃగȃ
ขࢎદȐቂᆓಢܿ߷॓ȑĩݕ6.2ዽĪ፩ܿངಖᄵ
Ꭷȃ
B!ിܷჹ৩ܿ෧ࢃగ
ົቂቪਜ਼ࡪ෧ࢃగിठ෧ۆ֊ȃ
Ꭷධຢتቂఞݽࢿށȃ᎓࣏ଁቂܬܿ
ႥٽධႥถࠒȃ
C!ቂಢञཎ༱غᏮܿ॓༇
ົቂፀڄ֊ȂࣕݡധȂཎ༱ȃ
࠽᎓فჹ༇ߴᎧ॓༇ȃ
ᅍம੍ภؠിˈขدਈwww.metabo.comডി
಼ȃ
12!ᅃ୲
! ፔቈठࢆܿݢᅃ୲ݢވનʽ
ఴ֦ݢވનᅍᇋၕᅃˈขႼܬݓܿఴ֦
ܗ୲ຟȃݓፐขਈwww.metabo.comȃ
૰۰www.metabo.comኵெװȃ
13!०֦
ৠࣰڋ፩ٛໍܿࠒٽ૰ࣽࣷ႘፣˖ข႙য়
ধছठۃ୲ˈሥࣷধ༆়ዹᄵۃ
୲ȃ
Ꮸ༉ᇵ०֦ߴۃ୲ᇵঽই༆ቂࠆඳධȂ֡Ꭷञ
ിܿყ࣭࣋য়ߟࣙȃᏨ༉ᇵ०֦ߴۃ୲ᇵঽই༆
ቂࠆඳධȂ֡Ꭷञിܿყ࣭࣋য়ߟࣙȃ
14!༦ࣙࢆ
ࣙࢆ᎙ਈݕ3ᇔȃ֦ௗሓ༦ߙዴߑᄵקܿฝ
ȃ
D
max
= ിᏥܐፊ
t
max,1
= ቂঢ়ఞವĩ12Īിຢܿঢ়ન๒ᅒᏥ
ܐूޡ
t
max,2
= ቂȐଓཨȑঢ়ఞವĩ1Īിຢܿঢ়ન
๒ᅒᏥܐूޡ
t
max,3
= ۳ಢİ෧ࢃ˖ി๒ᅒᏥܐूޡ
M = ᎐፺ఞၯ
l = ᆓಢ᎐፺٣ޡ
n
*
= ߇ށᎡཨĩᏥܐĪ
ő
IJ
ġġ ľġ ߇ށ࢙ఋ༕
P
2
= ࢙ఋ༕ڵ
m = ࣽݢኑݢେܿ፱
كፎᇡጐEN 60745ฬށȃ
ġ߷॓݃ৃIIৃ
ȋġ ਦݢ
īġનWE...खܿධ˖
ࡴȂࡴ൮࡞ฺঐዉڈཨޡߙໍ؉ވȃܦˈ؉ވ
ঐཱུᎼ࡞ฺܿᄂ໘ߑᅻཨঅࡉȃࡴȂࡴ൮࡞ฺঐ
ዉڈཨޡߙໍ؉ވȃܦˈ؉ވঐཱུᎼ࡞ฺܿᄂ໘ߑ
ᅻཨঅࡉȃ
ሞቂܿ༦Ꮑலਿُࣽ࢞ፎĩᇡጐყ࣋ᄌ
ᎳĪȃ
! ۈܷፎ
! ࣰጝᄎ༮ፎ૰ᇵ൹ࢳݢވનܿഠᇵঽ
ޭܿݢވનᄵȃৗࡏच૰ঐ
కࡴডక݈ˈન࿒༄Ꮾᇵঽݢވનড
ിܿᎫଝߑށȃڵ൹ࢳ಼ܿˈܬࡏኵ݈
ˈขኧᅒኺᄏᇜާৱȃࢎદݲጶॄܿࢳ
ፎˈၓቂॖഠ֦॓܈ˈஂᏠፈ܈ȃ
ᇡጐEN 60745ࣙށܿጬވᏓፎĩࢋߴჹຢܿञĪ˖
a
h, SG
= ጬވۈܷፎĩװಅᆓಢĪ
a
h, DS
= ጬވۈܷፎĩധಢĪ
K
h, SG/DS
= ฬށĩጬވĪ
ݟᄲAच፱໌ሕ༽൶˖
L
pA
= ໌ᅼ༽൶
L
WA
= ໌ᅼ࢙ఋ༽൶
K
pA
, K
WA
= ฬށ
غᏮࣰڋ፩ˈወሕ༽൶૰٫ࣰ80 dB (A)ȃ
! ขܔ॓ߓධʽ

1) 工作场所的安全规章
a)工作场所必须保持干净并且照明要充足。杂乱或昏暗
的工作场所容易导致意外。
b)不可在有爆炸危险的环境下操作本电动工具。有爆炸
危险的环境是指充斥了易燃液体、瓦斯或尘埃的工作
场所。操作机器时会产生火花,火花容易引燃尘埃或
易燃蒸汽。
c)操作机器时不可让儿童或旁观者靠近工作场所。工作
时如果因为第三者的干扰而分散注意力可能导致操作
失控。
2) 使用电器用品的安全指示
a)使用的插座必须能够配合电动工具的插头。切勿擅自
更改插头。转接插头不可以和接了地线的电动工具一
起使用。使用机器出厂时的原装插头和合适的插座可
以降低遭受电击的危险。
b)避免让身体碰触接地的物体,例如水管、散热器、电
炉和冰箱等。如果您的身体接地了,非常容易遭受电
击。
c)机器必须远离雨水或湿气。如果让水渗入电动工具
中,会提高操作者遭受电击的危险。
d)正确地处理电线。不可以使用电线提携电动工具、悬
挂电动工具或者以抽拉电线的方式拔出插头。电线必
须远离高温、油垢、锋利的边缘或转动中的机件。电
线如果受损或缠绕在一起,会提高操作者遭受电击的
危险。
e)如果在户外使用电动工具,只能使用合适的户外专用
延长线。使用合格的户外专用延长线,可降低操作者
遭受电击的危险。
f)如果无法避免的,必须在潮湿的环境中使用本电动工
具,得使用剩余电流保护开关。使用剩余电流保护开
关可以预防遭受电击。
3) 针对操作者的安全指示
a)工作时务必要全神贯注,不但要保持头脑清醒更要理
性地操作电动工具。疲惫、喝酒或服用毒品、兴奋
剂、药物之后,切勿操作电动工具。使用电动工具
时只要稍微分心便可能发生后果严重的意外。
b)穿好您个人的防护装备并戴上护目镜。根据所使用的
电动工具穿戴合适的防护装备,例如防尘面罩、止
滑工作鞋、安全帽或耳罩,可降低工作伤害的发生
机率。
c)避免意外启动机器。插上插头并且/或安装蓄电池之
前,提起或搬运机器之前,务必先检查电动工具是否
处在关闭状况。如果您在提携电动工具时,手指碰触
了开关,或者在连接电源时,起停开关仍然设定在开
动位置,都可能造成极严重的意外。
d)开动电动工具之前必须拆除仍然插在机器上的调整工
具/或螺丝扳手。如果机器已经开始转动,而机器上仍
然插着调整工具,很容易伤害使用者。
e)避免错误的持机姿势。操作机器时要确保立足稳固,
并要随时保持平衡。正确的操作姿势能够帮助您在突
发状况下及时控制住电动工具。
f)穿着合适的工作服。工作时不可以穿太宽松的衣服,
也不可以戴首饰。不可以让头发、衣服和手套接触机
器上的转动机件。宽松的衣物、长发或首饰容易被卷
入转动的机件中。
g)如果能够在机器上安装吸尘装置、集尘装备,务必按
照指示安装此类辅助工具,并且正确地操作该装置。
使用吸尘装备可以防止工作尘危害人体。
4) 小心地使用和处理电动工具
a)勿让机器承载过重的负荷。根据工作性质选择适合的
电动工具。正确地选用电动工具可以在规定的功率范
围中,更有效率更安全的操作机器。
b)勿使用开关故障的电动工具。如果无法正常操控起停
开关,极容易在操作机器时产生意外。尽快将故障的
机器送修。
c)在调整机器
设定、更换零件或不使用机器时,都必须
先从插座上拔出插头并且/或取出蓄电池。这个预防
措施可以避免不小心开动电动工具。
d)不使用电动工具时,必须把机器存放在儿童无法取得
之处。勿让不熟悉机器操作方法及未阅读本说明书的
人使用本机器。让经验不足的人操作电动工具容易发
生意外。
e)细心地保养、维护电动工具。检查机器上的转动零件
是否运作正常,并确定是否有零件断裂或损坏。故障
的机件会影响电动工具的运作功能。使用机器之前务
必先更换或修理故障的机件。若未彻底执行机器的维
护工作容易导致工作意外。
f)切割工具必须保持锋利、清洁。经过细心保养而且刀
刃锋利的切割工具不易被夹住,而且较容易操作。
g)遵照这些指示使用电动工具、配件及安装在机器上的
工具。另外也必须注意有关机器操作方式及机器适用
范围的解说。如果使用电动工具执行不符合该机器性
能的工作,极容易发生意外。
5) 小心地使用和处理充电式机器
a)只能使用制造商推荐的充电器为蓄电池充电。不可以
使用针对某些特定蓄
电池的充电器,为其他的蓄电池
充电,可能引起火灾。
b)务必使用电动工具的专用蓄电池。使用了不合适的蓄
电池可能发生工作意外并引起火灾。
c)不使用的蓄电池必须远离回形针、硬币、钥匙、钉
子、螺丝或其他的金属物体。上述物体可能连接蓄
电池上的触点引起短路。蓄电池的两个触点如果发
生短路,可能引起火灾。
d)如果使用不当可能从蓄电池渗出液体。避免接触此类
流动物体。如果不小心触摸了,马上用水冲洗。如果
上述液体侵入眼睛必须即刻就医。从蓄电池流出的液
体会刺激或灼伤皮肤。
6)检修服务
a)
只能将电动工具交给合格的专业人员检修。检修时只
能换装原厂零、配件。唯有如此才能确保机器的安全
性能。
警告 阅读所有的警告提示和指示。如未确实遵循警告提示和指示,可能导致电击、火灾并且/或其他的严重伤
害。妥善保存所有的警告提示和指示,以便日后查阅。在警告提示和指示中使用的 “电动工具”是指必须连接
电源的电动工具(配备电线)和使用蓄电池的电动工具(无电线)。
针对电动工具的一般性警告提示


10
Original instructions
We, being solely responsible, hereby declare that
these angle grinders conform to the standards and
directives specified on page 3.
The angle grinders, when fitted with original Metabo
acce
ssories, are suitable for grinding, sanding,
separating and wire brushing metal, concrete,
stone and similar materials without the use o f water.
WE 14-125 VS is also suitable fo
r polishing.
The user bears sole responsibility for any damage
caused by improper use.
Generally accepted accident prevention regula-
tions and the enclosed safety info
rmation must be
observed.
For your own protection and for the
protection of your electrical tool, pay
attention to all parts of the text that are
marked with this symbol!
WARNING – Reading t
he operating instruc-
tions will reduce the risk of injury.
WARNING Read all safety warnings and
instructions. Failure to follow all safety warn-
ings and instructions may result in electric shock,
fire and/or serious injury.
Keep all safety instructions and information for
future reference. Pass on your electrical tool only
toget
her with these documents.
4.1 Safety Warnings Common for Grinding,
Sanding, Wire Brushing or Abrasive
Cutting-Off Operations:
Use
a) This power tool is intended to function as a
grinder, sander, w ire brush or cut-o
ff tool. Read
all safety warnings, instructions, illustrations
and specifications provided with this power
tool. Failure to follow all the instructions may result
in electric shock, fire and/or serious injury.
WE 14-125 VS may
also be used as a polisher.
b) Operations such as polishing are not
recommended to be performed with this power
tool. Operations for which the power tool was not
designed may create a haz
ard and cause personal
injury. (This does not apply to WE 14-125 VS.)
c) Do not use accessories which are not
specifically designed and r ecommended by the
tool manufacturer. Just because the accessory
can be attached to your power tool, it does not
assure safe operation.
d) The rated speed of the accessory must be at
least equal to the maximum speed marked on
the power tool. Accessories running fast
er than
their rated speed can break and fly apart.
e) The outside diameter and the thickness of
your accessory must be within the capacity
rating of your power tool. Incorrectly sized
accessories cannot be ade
quately guarded or
controlled.
f) The arbour size of wheels, flanges, backing
pads or any other accessory must properly fit
the spindle of the power tool. Accessories with
arbour holes tha
t do not match the mounting
hardware of the power tool will run out of balance,
vibrate excessively and may cause loss of control.
g) Do not use a damaged accessory. Before
each use inspect the acce
ssory such as
abrasive wheels for chips and cracks, backing
pad for cracks, tear or excess wear, wire brush
for loose or cracked wires. If power tool or
accessory is dropped, inspect for damage or
install an undamaged
accessory. After
inspecting and installing an accessory,
position yourself and bystanders away from
the plane of the rotating accessory and run the
power tool at maximum no-load speed for one
minute.
Damaged accessories will n
ormally break
apart during this test time.
h) Wear personal protective equipment.
Depending on application, use face shield,
safety goggles or safety glasses. As
appropriate, wear dust mask, hearing
protectors, glo
ves and a workshop apron
capable of stopping small abrasive or
workpiece fragments. The eye protection must
be ca pable of stopping flying debris generated
by various operations. The dust mask or
respirator must be capable
of filtrating particles
generated by your operation. Prolonged exposure
to high intensity noise may cause hearing loss.
i) Keep bystanders a safe distance away from
work area. An
yone entering the work area must
wear personal protective equipment. Fragments
of workpiece or of a broken accessory may fly away
and cause injury beyond immediate area of
operation.
j) H
old power tool by insulated gripping
surfaces only, when performing an operation
where the cutting accessory may contact
hidden wiring or its own cord. Cutting accessory
contacting a "live" wire may make exposed m
etal
parts of the power tool "live" and could give the
operator an electric shock.
k) Position the cord clear of the spinning
accessory. If you lose control, the cord may be cut
or snagged and your ha
nd or arm may be pulled into
the spinning accessory.
I) Never lay the power tool down until the
accessory has come to a complete stop. The
spinning accessory may grap the surface and pull
the power tool out of
your control.
1. Conformity Declaration
2.Specified Use
3. General Safety Instructions
4. Special Safety Instructions

11
m) Do not run the power tool while carrying it at
your side. Accidental contact with the spinning
accessory could snag your clothing, pulling the
accessory into your body.
n) Regularly clean the power tool’s air vents.
The motor’s fan will draw the dust inside the housing
and excessive
accumulation of powdered metal
may cause electrical hazards.
o) Do not operate the power tool near
flammable materials. Sparks could ignite these
materials.
p) Do not use accessories that require liquid
coolants. Using water or other liquid coolants may
result in
electrocution or shock.
4.2 Kickback and Related Warnings:
Kickback is a sudden reaction to a pinched or
snagged rotating wheel, backing pad, brush or any
other accessory. Pinching or snagging causes rapid
stalling of the rota
ting accessory which in turn
causes the uncontrolled power tool to be forced in
the direction opposite of the accessory’s rotation at
the point of the binding.
For example, if an abrasive wheel is sna
gged or
pinched by the workpiece, the edge of the wheel
that is entering into the pinch point can dig into the
surface of the material causing the wheel to climb
out or kick out. The wheel may either jump to ward or
a
way from the operator, depending on direction of
the wheel’s movement at the point of pinching.
Abrasive wheels may also break under these
conditions.
Kickback is the result of power tool misuse a
nd/or
incorrect operating procedures or conditions and
can be avoided by taking proper precautions as
given below.
a) Maintain a firm grip on the power tool and
position your body and arm to allow you to
resist kickback forces. Always use auxiliary
handle, if provided, for maximum control over
kickback or torque reaction during start-up.
The
operator can control torque reactions or
kickback forces, if proper precautions are taken.
b) Never place your hand near the rotating
accessory. Accessory may kickback over your
hand.
c) Do not position your body in the area where
power tool will move if kickback occurs.
Kickb
ack will propel the tool in direction opposite to
the wheel’s movement at the point of snagging.
d) Use special care when working corners,
sharp edges etc. Avoid bouncing and snagging
the accessory. Corners, sharp edges or bouncing
have a tendency
to snag the rota ting accessory and
cause loss of control or kickback.
e) Do not attach a saw chain woodcarving
blade or toothed saw blade. Such blades create
frequent kickback and loss of control.
4.3 Safety Warnings Specific for Grinding
and Cutting-Off Operations:
a)
Use only wheel types that are recommended
for your power tool and the specific guard
designed for the selected wheel. Wheels for
which the power tool was not designed cannot be
adequately guarded and are unsafe.
b) The guard must be securely attached to the
power tool and positioned for maxi
mum safety,
so the least amount of wheel is exposed
towards the operator. The guard helps to protect
the operator from broken fragments, accidental
contact with the wheel and sparks that could ignite
clothing.
c) Wheels must be used only for recommended
applications. For examp
le: do not grind with
the side of cut-off wheel. Abrasive cut-off wheels
are intended for peripheral grinding, side forces
applied to these wheels may cause them to shatter.
d) Always use undamaged wheel flanges that
are of correct size and shape for your selected
wheel. Proper wheel fla
nges support the wheel
thus reducing the possibility of wheel breakage.
Flanges for cut-off wheels may be different from
grinding wheel flanges.
e) Do not use worn down wheels from larger
power tools.
Wheels intended for larger power
tools are not s
uitable for the higher speed of a
smaller tool and may burst.
4.4 Additional Safety Warnings Specific for
Abrasive Cutting-Off Operations:
a) Do not “jam” the cut-off wheel or apply
excessive pressure. Do not attempt to make an
excessive depth of cut. Overstressing the wheel
increases the loading and susceptibility to twisting
or binding of the wheel in the cut a nd the possibility
of kickback or wheel breakage.
b) Do not position your body in line with and
behind the rotating wheel. When the wheel, at the
point of operation, is moving away from your body,
the possible kic
kback may propel the spinning
wheel and the power tool directly at you.
c) When wheel is binding or when interrupting
a cut for any reason, switch off the power tool
and hold the power tool motionless until the
wheel comes to a complete stop. Never attempt
to remove the cut-off wheel from the cut while
the wheel is in motion otherwise kickback m
ay
occur. Investigate and take corrective action to
eliminate the cause of wheel binding.
d) Do not restart the cutting operation in the
workpiece. Let the wheel reach full speed and
carefully reenter the cut. The wheel may bind,
walk up or kickback if the power tool is restarted in
the workpiece.
e) Support panels or any oversized workpiece
to minimize the risk of wheel pinching and
kickback. Large workpieces tend to sag under their
own weight. Supports must be placed under the
workpiece near the line of cut and near the edge
o
f the workpiece on both sides of the wheel.
f) Use extra caution when making a "pocket
cut" into existing walls or other blind areas. The
protruding wheel may cut gas or water pipes,
electrical wiring or objects that can cause kickback.

12
4.5 Safety Warnings Specific for Sanding
Operations:
a) Do not use excessively oversized sanding
disc paper. Follow manufacturers
recommendations when selecting sanding
paper. Larger sanding paper extending beyond the
sanding pad presents a laceration hazard and may
cause snagging, tearing of the disc or kickbac
k.
4.6 Only for WE 14-125 VS: Special safety
instructions for polishing:
Loose parts on the polishing guard, especially
the fastening cords, are not permitted. Tuck
away or shorten the fastening cords. Loose,
spinning fastening cords may make contact with
your fingers or become caught in the workpiece.
4.7 Safety Warnings Specific for Wire
Brushing
Operations:
a) Be aware that wire bristles are thrown by the
brush even during ordinary operation. Do not
overstress the wires by applying excessive
load to the brush. The wire bristles can easily
penetrate light clothing and/or skin.
b) If the use of a guard is recommended for wire
brushing, do not allow any interference of the
wire wheel or brush with the guard. Wire wheel
or brush
may expand in diameter due to work load
and centrifugal forces.
4.8 Additional Safety Instructions
WARNING – Always wear protective
goggles.
Use elastic cushioning layers if they have been
supplied with the abrasive and if requ
ired.
Observe the specifications of the tool or accessory
manufacturer! Protect the discs from grease or
impacts!
Grinding wheels must be stored and handled with
care in accordance with the manufact
urer's
instructions.
Never use parting grinder discs for roughing work!
Do not apply pressure to the side of parting grinder
discs.
The tool must lay flat and be secured against
slipping, e.g. using clamps. Large workpi
eces must
be sufficiently supported.
If accessories with threaded inserts are used, the
end of the spindle may not touch the base of the
hole on the grinding tool. Make sure that the thread
in t
he accessory is long enough to accommodate
the full length of the spindle. The thread in the
accessory must match the thread on the spindle.
See page 3 and chapter 14. Technical
Specifications f
or more information on the spindle
length and thread.
During machining, of metals in
particular, conductive dust can form
deposits inside the machine. This can lead to the
transfer of electrical ene
rgy onto the machine
housing. This can mean a temporary danger of
electric shocks. This is why it is necessary when the
machine is running to blow compressed air through
the rear ventilation slots of the m
achine regularly,
frequently and thoroughly. Here, the machine must
be held firmly.
We recommend using a stationary extractor system
and connecting a residual current circuit-breaker
(FI) upstream. When the angle grinder is shut down
via the FI circuit-breaker, it must be checked and
cleaned. See chapter 9. Cleaning for more
information on cleaning the motor.
Dust from material such as p
aint containing lead,
some wood species, minerals and metal may be
harmful. Contact with or inhalation of the dust may
cause allergic reactions and/or respiratory diseases
to the ope
rator or bystanders.
Certain kinds of dust are classified as carcinogenic
such as oak and beech dust e specially in
conjunction with additives for wood conditioning
(chromate, wood preserv
ative). Material containing
asbestos must only be treated by specialists.
-Where the use of a dust extraction device is
possible it shall be used.
-The work place must be well ventilated.
-The u
se of a dust mask of filter class P2 is
recommended.
Follow national requirements for the materials you
want to work with.
Materials that generate dusts or vapours that may
be harmf
ul to health (e.g. asbestos) must not be
processed.
When working in dusty conditions, ensure that
ventilation openings are not blocked. If it becomes
necessary to remove dust, first disconnect the
p
ower tool from the mains supply (use non-metallic
objects) and avoid damaging internal components.
Damaged, eccentric or vibrating tools must not be
used.
Avoid damage to gas or water pipes
, electrical
cables and loadbearing walls (static).
Connect a FI circuit-breaker with max. release
current (30 mA) upstream when using the machine
outdoors!
Pull the plug out of the socket before any making
a
djustments, converting or servicing the machine.
Metabo S-automatic safety clutch. When the safety
clutch responds, switch off the machine
immediately!
A damaged or
cracked additional handle must be
replaced. Never operate a machine with a defective
additional handle.
A damaged or cracked safety guard must be
replaced. Never op
erate a machine with a defective
safety guard.
This power tool is not designed for polishing
(does not apply for WE 14-125 VS.). Improper use
of the machine will void the warranty! The motor
may overheat and damage the electric power tool.
We recommend using our angle polisher for
polishing work.

13
See page 2.
1 "Quick" clamping nut *
2Support flange
3Spindle
4 Spindle locking button
5Sliding
on/off switch *
6 Electronic signal indicator *
7Speed adjustment wheel *
8Switch-on lock *
9 Trigger *
10 Additional handle / Additional handle with vibration
damping *
11 Safety cover
12 Clamping nut *
13 2-hole spanner *
14Lever for
safety guard attachment
* depending on equipment/not in scope of delivery
Before plugging in, check to see that the rated
mains voltage and mains frequency,
as stated on the rating label, match your power
supply.
6.1 Attaching th
e additional handle
Always work with the additional hand le
attached (10)! Attach the additional handle
on the left or right of the machine and secure.
6.2 Install safety guard
For safety reasons, always use the safety
guard provided
for the respective wheel! See
also chapter 11.
Safety guard for grinding
Designed for work with roughing wheels, flap
sanding pads, diamond cut-off wheels.
See page 2, illustration C.
- Push and hold the lever
(14). Place the safety
guard (11) in the position indicated.
- Release the lever and turn the safety guard until
the lever engages.
- Push the lever and turn the safety guard until the
closed section i
s facing the operator.
- Make sure that the guard is seated securely: the
lever must engage and you should not be able to
turn the safety guard.
Use only accessories that
are covered by at least
3
.4 mm by the safety guard.
Disconnect the mains plug before changing
any accessories. The machine must be
switched off and the spindle at a standstill.
For reasons of safety, attach the parting guard
before
performing parting work
(see chapter 11. Accessories).
7.1 Locking the spindle
- Press in the spindle locking button (4) and turn the
spindle (3) by hand until the spindle locking button
engages.
7.2 Placing the grinding wheel in position
See illustration A on page 2.
- Place the supporting flange (2) on the spindle. The
flange should not turn on the spindle when
properly attached.
Only with W 8-100: Screw support flange with two-
pin spanner onto spindl
e so that the small collar
(with diameter 16 mm) is facing upwards.
Place the grinding wheel on the support flange (2).
The grinding wheel must lay flat on the supporting
flange. The metal flange on the parting g
rinder
disc must lay flat on the support flange.
7.3 Securing/Releasing the "Quick"
clamping nut (depending on features)
Securing the "Quick" clamping nut (1):
Do not use the
"Quick" clamping nut if the
accessory has a clamping shank thicker than 8
mm
! In this case, use the
clamping nut (12) with 2-
hole spanner (13).
-Lock the spindle (see chapter 7.1).
- Position the "Quick" clamping nut (1) on the
spindle (3) so that the 2 lugs engage in the
2 grooves on the
spindle. See illustration on
page2.
-Tighten the "Quic k" clamping nut by turning
clockwise by hand.
-Turn the grinding wheel firmly clockwise to tighten
the "Quick" clamping nut.
Releasing the "Quick" clamping nut (1)
:
The "Quick" clamping nut (1) must be attached
before the spindle locking button (4) can hold
the spindle!
-The machine continues to run after switching off.
- Press in the spindle locking button (4) just before
the gr
inding wheel stops. The "Quick" clamping
nut (1) is released.
7.4 Securing/Releasing the clamping nut
(depending on features)
Securing the clamping nut (12):
The 2 sides of the clamping nut are different. Screw
the clamping nut onto the spindle as follows:
See illustration B on page 2.
- X) For thin grinding wheels:
The edge of the clamping nut (12) faces upwards
so that the thin grinding wheel can be attached
securely.
Y) For thick grinding wheels:
The edge of the clamping nut (12) faces
5. Overview
6. Commissioning
7. Attaching the grinding wheel

14
downwards so that the clamping nut can be
attached securely to the spindle.
Z) Only with W 8-100:
The collar of the adjusting nu t face s downwards
and/or the flat surface faces upwards.
-Lock the spindle
. Turn the clamping nut (12)
clockwise using the 2-hole spanner (13) to secure.
Releasing the clamping nut:
-Lock the spindle (see chapter 7 .1). Turn the
clamping nut (12) anticlockwise using the
2-hole
spanner (13) to unscrew.
8.1 Adjusting the speed
(depending on features)
Set the recommended speed at the setting
wheel (7).
Parting grinder and roughing discs, cup wheel,
diamond parting wheel: high
speed
Brush: medium speed
Grinding wheel: low to medium speed
Note:
We recommend using our angle polisher for
polishing work.
8.2 Switching On and Off
Always guide the machine with both hands.
Switch on first, then guide the
accessory
towards the workpiece.
The machine must not be allowed to draw in
additional dust and shavings. When switching
the machine on and off, keep it away from dust
deposits. After switching off the machine, only place
it down w
hen the motor has come to a standstill.
Avoid inadvertent starts: always switch the
tool off when the plug is removed from the
mains socket or if there has been a power cut.
In
continuous operation, the machine
continues running if it is forced out of your
hands. Therefore, always hold the machine with
both hands using the handles provided, stand in a
safe position and concentrate.
Machines with slide switch:
Switching on: Push the slide switch (5) forward.
For continuous activation, now tilt
downwards until it engages.
Switching off: Press the rear end of t
he slide
switch (5) and release.
Machines with "Ergo Paddle Switch" (with
dead man function):
(machines with the designation WP..., WEP...)
Switching on: Slide the switch-on lock (8) in
the direction of the arrow and press
th
e trigger (9).
Switching off: Release the trigger (9).
8.3 Working instructions
Grinding and sanding operations:
Press down the machine evenly on the surface
and move back and forth so that the surface of the
workpi
ece does not become too hot.
Roughing: position the machine at an angle of 30° -
40° for the best working results.
Separating:
Always work against the run of the disc
(see illustration). Otherwise there is
the danger of the machine kicking
back from the cut out of control. Guide
the machine evenly at a speed
suitable for the material being processed.
Do not tilt,
apply excessive force or sway from side to side.
Wire brushing:
Press down the machine evenly.
Motor cleaning: blow compressed air through the
rear ventilation slots of the mac
hine regularly,
frequently and thoroughly. Here, the machine must
be held firmly.
Machines with VTC and TC electronics:
The electronic signal display (6) lights up and
the load speed decreases.
The coil temperature is
too high! Run the machine in idling until the
electronics signal indicator switches off.
Machines with VTC, TC and VC electronics:
The electronic signal display (6) flashes
and the machine does not start. The restart
protection is active. If the mains plug is
inserted with the machine switched on, or if the
current supply is restored following an interruption,
th
e machine does not start up. Switch the machine
off and on again.
Use only genuine Metabo accessories. See page 4.
Use only accessories which fulfil the requirements
and specifications listed in these operating instruc-
tions.
8. Use
0
I
5
9. Cleaning
10. Troubleshooting
11. Accessories
0
I
8 9
89

15
A Safety guard for cut-off grinding
Designed for work with cut-off wheels, diamond
cut-off wheels.
Install as described under "Safety guard for
grinding" (chapter 6.2).
B Cut-off grinding safety guard with guide
carriage
Designed for cutting through
stone slabs with
diamond cut-off wheels.
Mount on machine and secure with screw. With
nozzle for extracting stone dust using a suitable
extractor.
C Hand guard for sanding and wire brushing
operations
Designed for work with s
upport plates, sanding
pads, wire brushes.
Install hand guard under the additional side-
mounted handle.
For a complete range of accessories, see
www.metabo.com or the
accessories catalogue.
Repairs to electrical tools must be carried out
by qualified electricians ONLY!
Contact your local Metabo representative if you
have Metabo power tools re
quiring repairs. For
addresses see www.metabo.com.
You can download a list of spare parts from
www.metabo.com.
The sanding dust generated may contain
hazardous materials: do n
ot dispose of with the
household waste, but at a special collection point
for hazardous waste.
Observe national regulations on environmentally
compatible disposal and
on the recycling of disused
machines, packaging and accessories.
Only for EU countries: Never dispose of
power tools in your household waste! In
accordance with European Guideline 200
2/
96/EC on used electronic and electric equipment
and its implementation in national legal systems,
used power tools must be collected separately and
handed in for e
nvironmentally compatible recycling.
Explanation of details on page 3. Subject to
changes serving technical progress.
D
max
=max. diameter of accessory
t
max,1
=max. permitted thickness of clamping
shank on accessory when using clamping
nut (12)
t
max,2
=max. permitted thickness of clamping
shank on accessory when using "Quick"
clamping nut (1)
t
max,3
= Roughing disc/Parting disc:
max. permitted thickness of
accessory
M =Spindle thread
l=Length of the grinding spindle
n* = Rated speed (maximum speed)
P
1
=Nominal power input
P2 = Power output
m=Weight without mains cable
Measured values determined in conformity with
EN 60745.
Machine in protection class II
~ Alternating current
* Machines with the designation WE...:
Energy-rich, high-frequency interference can cause
fluctuations in speed. The fluctuations disappear,
however, as soon as the interfere
nce fades away.
The technical specifications quoted are subject to
tolerances (in compliance with the relevant valid
standards).
Emission values
These values make it possible to assess the
emissio
ns from the power tool and to compare
different power tools. Depending on the operating
conditions, the condition of the power tool or the
accessories, the actual load may be higher or lowe
r.
For assessment purposes, please allo w for breaks
and periods when the load is lower. Based on the
adjusted estimates, arrange protective measures
for the user e.g. organis
ational measures.
Vibration total value
(vector sum of three directions)
determined in accordance with EN 60745:
a
h, SG
=Vibration emission value
(surface grinding)
a
h, DS
=Vibration emission value
(disc sanding)
K
h,SG/DS
=Uncertainty (vibration)
Typical A-effective perceived sound levels
:
L
pA
= Sound pressure level
L
WA
=Acoustic power level
K
pA
, K
WA
= Uncertainty
During operation the noise level can exceed
80 dB(A).
Wear ear protectors!
12. Repairs
13. Environmental Protection
14. Technical Specifications

1) Work area safety
a) Keep work area clean and well lit. Cluttered or dark
areas invite accidents.
b) Do not operate power tools in explosive
atmospheres, such as in the presence of flammable
liquids, gases or dust. Power tools create sparks
which may ignite the dust or fumes.
c) Keep children and bystanders away while operating
a power tool. Distractions can cause you to lose
control.
2) Electrical safety
a) Power tool plugs must match the outlet. Never
modify the plug in any way. Do not use any adapter
plugs with earthed (grounded) power tools.
Unmodified plugs and matching outlets will reduce risk of
electric shock.
b) Avoid body contact with earthed or grounded
surfaces, such as pipes, radiators, ranges and
refrigerators. There is an increased risk of electric
shock if your body
is earthed or grounded.
c) Do not expose power tools to rain or wet
conditions. Water entering a power tool will increase
the risk of electric shock.
d) Do not abuse the cord. Never use the cord for
carrying, pulling or unplugging the power tool.
Keep cord away from heat, oil, sharp edges or
moving parts. Damaged or entangled cords increase
the risk of electric shock.
e) When operating a power tool outdoors, use an
extension cord suitable for outdoor use. Use of a
cord suitable for outdoor use reduces the risk of electric
shock.
f) If operating a power tool in a damp location is
unavoidable, use a residual current device (RCD)
protected supply. Use of an RCD reduces the risk of
electric shock.
3) Personal safety
a) Stay alert, watch what you are doing and
use common sense when operating a power tool.
Do not use a power tool while you are tired or
under the influence of drugs, alcohol or
medication. A moment of inattention while
operating power tools may result in serious personal
injury.
b) Use personal protective equipment. Always wear
eye protection. Protective equipment such as dust
mask, non-skid safety shoes, hard hat, or hearing
protection used for appropriate conditions will reduce
personal injuries.
c) Prevent unintentional starting. Ensure
the switch is in the off-position before connecting
to power source and/or battery pack, picking up or
carrying the tool. Carrying power tools with your finger
on the switch or energising power tools that have the
switch on invites accidents.
d) Remove any adjusting key or wrench before
turning the power tool on. A wrench or a key left
attached to a rotating part of the power tool may result
in personal injury.
e) Do not overreach. Keep proper footing and balance
at all times. This enables better control of the power
tool in unexpected situations.
f) Dress properly. Do not wear loose clothing or
jewellery. Keep your hair, clothing and gloves away
from moving parts. Loose clothes, jewellery or long
hair can be caught in moving parts.
g) If devices are provided for the connection
of dust extraction and collection facilities, ensure
these are connected and properly used. Use of dust
collection can reduce dust-related hazards.
4) Power tool use and care
a) Do not force the power tool. Use the correct power
tool for your application. The correct power tool will
do the job better and safer at the rate for which it was
designed.
b) Do not use the power tool if the switch does not
turn it on and off. Any power tool that cannot be
controlled with the switch is dangerous and must be
repaired.
c) Disconnect the plug from the power source and/or
the battery pack from the power tool before making
any adjustments, changing accessories, or storing
power tools. Such preventive safety measures reduce
the risk of starting the power tool accidentally.
d) Store idle power tools out of the reach of children
and do not allow persons unfamiliar with the power
tool or these instructions to operate the power tool.
Power tools are dangerous in the hands of untrained
users.
e) Maintain power tools. Check for misalignment or
binding of moving parts, breakage of parts and any
other condition that may affect the power tool’s
operation.
If damaged, have the power tool repaired before
use. Many accidents are caused by poorly maintained
power tools.
f) Keep cutting tools sharp and clean. Properly
maintained cutting tools with sharp cutting edges are
less likely to bind and are easier to control.
g) Use the power tool, accessories and tool bits etc. in
accordance with these instructions, taking into
account the working conditions and the work to be
performed. Use of the power tool for operations
different from those intended could result in a
hazardous situation.
5) Battery tool use and care
a) Recharge only with the charger specified by the
manufacturer. A charger that is suitable for one type of
battery pack may create a risk of fire when used with
another battery pack.
b) Use power tools only with specifically designated
battery packs. Use of any other battery packs may
create a risk of injury and fire.
c) When battery pack is not in use, keep it away from
other metal objects, like paper clips, coins, keys,
nails, screws or other small metal objects, that can
make a connection from one terminal to another.
Shorting the battery terminals together may cause
burns or a fire.
d) Under abusive conditions, liquid may be ejected
from the battery; avoid contact.
If contact accidentally occurs, flush with water. If
liquid contacts eyes, additionally seek medical
help. Liquid ejected from the battery may cause
irritation or burns.
6) Service
a) Have your power tool serviced by a qualified repair
person using only identical replacement parts. This
will ensure that the safety of the power tool is
maintained.
WARNING Read all safety warnings and all instructions. Failure to follow the warnings and instructions may result in
electric shock, fire and/or serious injury. Save all warnings and instructions for future reference! The term "power tool"
in the warnings refers to your mains-operated (corded) power tool or battery-operated (cordless) power tool.
General Power Tool Safety Warnings
170 24 9420 - 1110


Metabowerke GmbH,
72622 Nürtingen, Germany
www.metabo.com
170 26 8780 - 1112 (incl.SHW)
-
 1
1
-
 2
2
-
 3
3
-
 4
4
-
 5
5
-
 6
6
-
 7
7
-
 8
8
-
 9
9
-
 10
10
-
 11
11
-
 12
12
-
 13
13
-
 14
14
-
 15
15
-
 16
16
-
 17
17
-
 18
18
-
 19
19
-
 20
20


