
Wireless Dock for iPod
IS301
ENGLISHFRANÇAISDEUTSCHNEDERLANDSESPAÑOLITALIANOSVENSKA

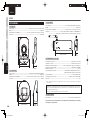
CAUTION
RISK OF ELECTRIC SHOCK DO NOT OPEN
CAUTION: TO REDUCE THE RISK OF ELECTRIC SHOCK,
DO NOT REMOVE COVER (OR BACK) NO USER-SERVICEABLE
PARTS INSIDE REFER SERVICING TO QUALIFIED SERVICE PERSONNEL
The lightning fl ash with arrowhead symbol within an equilateral triangle is intended to alert
the user to the presence of uninsulated “dangerous voltage” within the product’s enclosure
that may be of suffi cient magnitude to constitute a risk of electric shock to persons.
The exclamation point within an equilateral triangle is intended to alert the user to the
presence of important operating and maintenance (servicing) instructions in the literature
accompanying the product.
WARNING
TO REDUCE THE RISK OF FIRE OR ELECTRIC SHOCK,
DO NOT EXPOSE THIS APPLIANCE TO RAIN OR MOISTURE.
NOTE:
This equipment has been tested and found to comply
with the limits for a Class B digital device, pursuant
to Part 15 of the FCC Rules. These limits are
designed to provide reasonable protection against
harmful interference in a residential installation. This
equipment generates, uses and can radiate radio
frequency energy and, if not installed and used in
accordance with the instructions, may cause harmful
interference to radio communications. However,
there is no guarantee that interference will not occur
in a particular installation. If this equipment does
cause harmful interference to radio or television
reception, which can be determined by turning the
equipment off and on, the user is encouraged to
try to correct the interference by one or more of the
following measures:
Reorient or relocate the receiving antenna. Increase
the separation between the equipment and receiver.
Connect the equipment into an outlet on a circuit
different from that to which the receiver is connected.
Consult the dealer or an experienced radio/TV
technician for help.
NOTE:
Changes or modifi cations may cause this unit
to fail to comply with Part 15 of the FCC Rules
and may void the user's authority to operate the
equipment.
This Class B digital apparatus complies with
Canadian ICES-003.
Cet appareil numerique de la Classe B est
conforme a la norme NMB-003 du Canada.
IMPORTANT SAFETY INSTRUCTIONS
READ BEFORE OPERATING EQUIPMENT
This product was designed and manufactured to meet strict quality and safety standards.
There are, however, some installation and operation precautions which you should be particularly aware of.
1. Read these instructions.
2. Keep these instructions.
3. Heed all warnings.
4. Follow all instructions.
5. Do not use this apparatus near water.
6. Clean only with dry cloth.
7.
Do not block any ventilation openings. Install in accordance with the manufacture's instructions.
8. Do not install near any heat sources such as radiators, heat registers, stoves, or other apparatus (including
amplifi ers) that produce heat.
9. Do not defeat the safety purpose of the polarized or grounding-type plug. A polarized plug has two blades
with one wider than the other. A grounding type plug has two blades and a third grounding prong. The
wide blade or the third prong are provided for your safety. If the provided plug does not fi t into your outlet,
consult an electrician for replacement of the obsolete outlet.
10.
Protect the power cord from being walked on or pinched particularly at plugs, convenience receptacles, and
the point where they exit from the apparatus.
11. Only use attachments/accessories specifi ed by the manufacturer.
12. Use only with the cart, stand, tripod, bracket, or table specifi ed by the manufacturer, or sold with the
apparatus. When a cart is used, use caution when moving the cart/apparatus combination to avoid injury
from tip-over.
13. Unplug this apparatus during lightning storms or when unused for long periods of time.
14. Refer all servicing to qualifi ed service personnel. Servicing is required when the apparatus has been
damaged in any way, such as power-supply cord or plug is damaged, liquid has been spilled or objects
have fallen into the apparatus, the apparatus has been exposed to rain or moisture, does not operate
normally, or has been dropped.

English
WARNINGS
- Do not expose the equipment to rain, moisture, dripping
or splashing.
- Do not handle the AC adaptor with wet hands.
- Do not cover the ventilation with any items such as
tablecloths, newspapers, curtains, etc.
- No naked fl ame sources, such as lighted candles, should
be placed on the equipment.
- When disposing of used batteries, please comply with
governmental regulations or environmental public
instruction’s rules that apply in your country or area.
- Make a space of about 0.1 meter around the unit.
- No objects fi lled with liquids, such as vases, shall be
placed on the equipment.
- When the switch is in the OFF position, the equipment is
not completely switched off from MAINS.
- The equipment shall be installed near the power supply
so that the power supply is easily accessible.
- Do not expose the unit and batteries to excessive heat
such as direct sunlight, fi re or the like.
Français
AVERTISSEMENTS
-
Ne pas exposer l’appareil à la pluie, à l’humidité, à
l’égouttement ou aux éclaboussures.
- Ne pas manipuler l'adaptateur secteur avec les mains
humides.
-
Ne pas recouvrir les ouïes de ventilation avec un objet
quelconque comme une nappe, un journal, un rideau, etc.
- Ne placer aucune source de fl amme nue, comme une
bougie allumée, sur l'appareil.
- Pour mettre au rebut les piles usées, respecter les lois
gouvernementales ou les règlements offi ciels concernant
l’environnement qui s'appliquent à votre pays ou région.
- Veiller à ce qu’aucun objet ne soit à moins de 0,
1
mètre
des côtés de l'appareil.
- Aucun objet rempli de liquide, un vase par exemple, ne
doit être placé sur l'appareil.
- Lorsque l'interrupteur est sur la position OFF, l'appareil
n'est pas complètement déconnecté du SECTEUR
(MAINS).
-
L'appareil sera installé près de la source d'alimentation, de
sorte que cette dernière soit facilement accessible.
- N'exposez pas l'appareil et les piles à une chaleur
excessive, comme par exemple aux rayons directs du
soleil, au feu, etc.
Deutsch
WARNHINWEISE
- Das Gerät nicht Regen, Feuchtigkeit, Tropf- oder
Spritzwasser aussetzen.
-
Berühren Sie den Netzadapter nicht mit nassen Händen.
- Decken Sie die Lüftungsöffnungen nicht mit einem
Tischtuch, einer Zeitung, einem Vorhang usw. ab.
- Es dürfen keine Gegenstände mit offener Flamme, wie
etwa brennende Kerzen, auf dem Gerät aufgestellt
werden.
- Beachten Sie bei der Entsorgung der verbrauchten
Batterien alle geltenden lokalen und überregionalen
Regelungen.
- Auf allen Geräteseiten muß ein Zwischenraum von
ungefähr 0,1 meter vorhanden sein.
- Auf das Gerät dürfen keine mit Flüssigkeiten gefüllte
Behälter, wie etwa eine Vase, gestellt werden.
- Wenn der Schalter ausgeschaltet ist (OFF-Position),
ist das Gerät nicht vollständig vom Stromnetz (MAINS)
abgetrennt.
- Das Gerät sollte in der Nähe einer Netzsteckdose
aufgestellt werden, damit es leicht an das Stromnetz
angeschlossen werden kann.
- Setzen Sie das Gerät und die Batterien keiner
übermäßigen Wärme aus, z.B. durch Aufstellung in
direkter Sonneneinstrahlung, in der Nähe eines offenen
Feuers usw.
Nederlands
WAARSCHUWINGEN
- Stel het apparaat niet bloot aan regen, vocht, druppels of
spetters.
- Raak de wisselstroomadapter niet aan met natte
handen.
- Bedek de ventilatieopeningen niet met enige voorwerpen,
zoals tafelkleden, kranten, gordijnen, enz.
- Plaats geen brandende voorwerpen, zoals kaarsen, op
het apparaat.
- Volg bij het weggooien van verbruikte batterijen de
overheidswetgeving of milieuvoorschriften op die van
kracht zijn in het land of de regio waarin u zich bevindt.
- Zorg dat er 0,1 meter vrije ruimte rond het toestel is.
- Plaats geen voorwerpen met een vloeistof erin, zoals
een bloemenvaas, op het apparaat.
- Als de schakelaar op OFF staat, is het apparaat niet
volledig losgekoppeld van de netspanning (MAINS).
- De apparatuur wordt in de buurt van het stopcontact
geïnstalleerd, zodat dit altijd gemakkelijk toegankelijk is.
- Stel het apparaat en de batterijen niet bloot aan grote
warmte, zoals direct zonlicht, vuur en dergelijke.
ENGLISH
WARRANTY
For warranty information, contact your local Marantz
distributor.
RETAIN YOUR PURCHASE RECEIPT
Your purchase receipt is your permanent record of a
valuable purchase. It should be kept in a safe place to be
referred to as necessary for insurance purposes or when
corresponding with Marantz.
IMPORTANT
When seeking warranty service, it is the responsibility of the
consumer to establish proof and date of purchase. Your purchase
receipt or invoice is adequate for such proof.
FOR U.K. ONLY
This undertaking is in addition to a consumer's statutory
rights and does not affect those rights in any way.
FRANÇAIS
GARANTIE
Pour des informations sur la garantie, contacter le
distributeur local Marantz.
CONSERVER L'ATTESTATION D'ACHAT
L'attestation d'achat est la preuve permanente d'un achat
de valeur. La conserver en lieu sur pour s'y reporter aux fi ns
d'obtention d'une couverture d'assurance ou dans le cadre de
correspondances avec Marantz.
IMPORTANT
Pour l'obtention d'un service couvert par la garantie, il
incombe au client d'établir la preuve de l'achat et d'en
corroborer la date. Le reçu ou la facture constituent des
preuves suffi santes.
DEUTSCH
GARANTIE
Bei Garantiefragen wenden Sie sich bitte an Ihren Marantz-
Händler.
HEBEN SIE IHRE QUITTING GUT AUF
Die Quittung dient Ihnen als bleibende Unterlage für Ihren
wertvollen Einkauf Das Aufbewahren der Quittung ist wichtig,
da die darin enthaltenen Angaben für Versicherungswecke
oder bei Korrespondenz mit Marantz angeführt werden
müssen.
WICHTIG!
Bei Garantiefragen muß der Kunde eine Kaufunterlage mit
Kaufdatum vorlegen. Ihren Quittung oder Rechnung ist als
Unterlage ausreichend.
NEDERLANDS
GARANTIE
Voor inlichtingen omtrent garantie dient u zich tot uw
plaatselijke Marantz.
UW KWITANTIE, KASSABON E.D. BEWAREN
Uw kwitantie, kassabon e.d. vormen uw bewijs van aankoop
van een waardevol artikel en dienen op een veilige plaats
bewaard te worden voor evt, verwijzing bijv, in verbend met
verzekering of bij correspondentie met Marantz.
BELANGRIJK
Bij een evt, beroep op de garantie is het de verantwoordelijkheid
van de consument een gedateerd bewijs van aankoop te tonen.
Uw kassabon of factuurzijn voldoende bewijs.
ESPAÑOL
GARANTIA
Para obtener información acerca de la garantia póngase en
contacto con su distribuidor Marantz.
GUARDE SU RECIBO DE COMPRA
Su recibo de compra es su prueba permanente de haber
adquirido un aparato de valor, Este recibo deberá guardarlo
en un lugar seguro y utilizarlo como referencia cuando
tenga que hacer uso del seguro o se ponga en contacto
con Marantz.
IMPORTANTE
Cuando solicite el servicio otorgado por la garantia el
usuario tiene la responsabilidad de demonstrar cuándo
efectuó la compra. En este caso, su recibo de compra será
la prueba apropiada.
ITALIANO
GARANZIA
L’apparecchio è coperto da una garanzia di buon
funzionamento della durata di un anno, o del periodo
previsto dalla legge, a partire dalla data di acquisto
comprovata da un documento attestante il nominativo del
Rivenditore e la data di vendita. La garanzia sarà prestata
con la sostituzione o la riparazione gratuita delle parti
difettose.
Non sono coperti da garanzia difetti derivanti da uso
improprio, errata installazione, manutenzione effettuata da
personale non autorizzato o, comunque, da circostanze
che non possano riferirsi a difetti di funzionamento
dell’apparecchio. Sono inoltre esclusi dalla garanzia gli
interventi inerenti l’installazione e l’allacciamento agli
impianti di alimentazione.
Gli apparecchi verranno riparati presso i nostri Centri di
Assistenza Autorizzati. Le spese ed i rischi di trasporto sono
a carico del cliente.
La casa costruttrice declina ogni responsabilità per danni
diretti o indiretti provocati dalla inosservanza delle prescrizioni
di installazione, uso e manutenzione dettagliate nel presente
manuale o per guasti dovuti ad uso continuato a fini
professionali.
SVENSKA
GARANTI
För information om garantin, kontakta Marantz lokalagent.
SPAR KVITTOT
Kvittot är ett inköpsbevis på en värdefull vara. Det skall
förvaras säkert och hänvisas till vid försäkringsfall eller
vidkorrespondens mod Marantz.
VIKTIGT
Fö att garantin skall gälla är det kundens sak att framställa
bevis och datum om köpet. Kvitto eller faktura är tillräokligt
bevis fö detta.

ENGLISH
A NOTE ABOUT RECYCLING
This product’s packaging materials are recyclable and can be reused. This product and the accessories
packed together are the applicable product to the WEEE directive except batteries.
Please dispose of any materials in accordance with your local recycling regulations.
When discarding the unit, comply with your local rules or regulations.
Batteries should never be thrown away or incinerated but disposed of in accordance with your local
regulations concerning chemical wastes.
FRANÇAIS
REMARQUE CONCERNANT LE RECYCLAGE
Le matériel d’emballage de cet appareil est recyclable et peut être réutilisé. Cet appareil et les accessoires
qui sont emballés avec celui-ci sont conformes, à l’exception des piles, à la directive DEEE (relative aux
déchets d’équipements électriques et électroniques).
Jetez ce matériel conformément aux réglementations de recyclage locales.
Pour mettre l’appareil au rebut, respectez les règles ou réglementations locales.
Les piles ne doivent jamais être jetées ou incinérées, mais être mises au rebut conformément aux
réglementations locales concernant les déchets chimiques.
DEUTSCH
RECYCLING-HINWEIS
Das Verpackungsmaterial dieses Produkts ist für Recycling geeignet und kann wiederverwendet werden.
Dieses Produkt und das in seinem Verpackungskarton enthaltene Zubehör mit Ausnahme der Batterien
entsprechen der WEEE-Direktive.
Bitte beachten Sie bei der Entsorgung irgendwelcher Materialien die örtlichen Recycling-Bestimmungen.
Bei der Entsorgung des Gerätes sind die einschlägigen Umweltschutzaufl agen sorgfältig zu befolgen.
Batterien dürfen nicht weggeworfen oder verbrannt werden, sondern müssen gemäß den örtlichen
Vorschriften zur Entsorgung von chemischem Abfall entsorgt werden.
NEDERLANDS
RECYCLING VAN APPARATUUR EN VERPAKKINGSMATERIAAL
De verpakking van dit product is geschikt voor recycling. Dit product en de accessoires, als geheel verpakt,
zijn het relevante product volgens de WEEE-richtlijn, behalve de batterijen.
Gooi materialen bij het afval volgens de gemeentelijke voorschriften voor recycling.
Gooi dit apparaat bij het afval volgens de gemeentelijke wetten of voorschriften.
Batterijen mogen nooit bij het normale afval en mogen nooit worden verbrand, maar moeten worden
weggegooid volgens de gemeentelijke voorschriften voor chemisch afval.
ESPAÑOL
NOTA SOBRE EL RECICLADO
Los materiales de embalaje de este producto son reciclables y pueden ser reutilizados. En este producto
y sus accesorios incluidos es aplicable la directiva europea sobre residuos de aparatos eléctricos y
electrónicos (RAEE), excepto en lo referente a las pilas.
Se ruega eliminar cualquiera de esos materiales de acuerdo con las normas locales de reciclado.
Cuando deseche esta unidad, cumpla con las normas o reglamentaciones locales.
Las pilas no deben tirarse ni incinerarse, sino que deben eliminarse de acuerdo con las normas locales
sobre residuos químicos.
ITALIANO
NOTA SUL RICICLAGGIO
I materiali di imballaggio di questo prodotto sono riciclabili e possono essere riutilizzati. Questo prodotto
e gli accessori in dotazione con esso, eccettuate le batterie, rappresentano il prodotto applicabile per la
direttiva RAEE (rifi uti di apparecchiature elettriche ed elettroniche).
Smaltirli seguendo le proprie normative locali sul riciclaggio.
Quando si desidera eliminare l’apparecchio, attenersi alle indicazioni e alle normative locali.
Non gettare via le batterie e non bruciarle, ma smaltirle in conformità alle normative locali relative ai rifi uti
chimici.
SVENSKA
OM ÅTERVINNING
Den här produktens förpackningsmaterial är återvinningsbart och kan återanvändas. Den här produkten och
de med produkten levererade tillbehören, förutom batterierna, överensstämmer med WEEE-direktivet.
Kassera allt material i enlighet med lokala miljöföreskrifter.
När enheten ska kasseras ska du följa lokala miljöföreskrifter.
Batterier får aldrig slängas i hushållsavfall eller brännas. Dom ska hanteras i enlighet med lokala
miljöföreskrifter för kemiskt avfall.
Español
ADVERTENCIAS
- No exponga el equipo a la lluvia, la humedad, goteos o
salpicaduras.
- No toque el adaptador de CA con las manos húmedas.
- No cubra la ventilación con objetos como manteles,
periódicos, cortinas, etc.
- No deben colocarse sobre el equipo elementos con
fuego, por ejemplo velas encendidas.
- Cuando se eliminen baterías usadas, deben cumplirse
las reglamentaciones ofi ciales o las normas de protección
medioambiental aplicables en su país o en su zona.
- Deje un espacio de unos 0,1 metro alrededor de la
unidad.
- No se deben colocar sobre el aparato recipientes que
contengan líquidos, como por ejemplo jarrones.
- Cuando el interruptor está en la posición OFF, el equipo
no está completamente desconectado de la alimentación
MAINS.
- El equipo se instalará cerca de la fuente de alimentación
de manera que resulte fácil acceder a ella.
- No exponga la unidad y las pilas a un calor excesivo,
tal como el derivado de la luz directa del sol, el fuego, o
alguna fuente térmica similar.
Italiano
AVVERTENZE
- Non esporre l’apparecchio alla pioggia, all’umidità, al
gocciolamento o agli spruzzi.
- Non toccare l’adattatore CA con le mani bagnate.
- Non coprire le fessure di ventilazione con tovaglie,
giornali, tende od oggetti analoghi.
- Non posare sull'apparecchio sorgenti di fi amme scoperte
quali candele accese.
- Smaltire le pile usate in conformità alle norme governative
o disposizioni ambientali vigenti nel proprio paese o
zona.
- Lasciare 0,1 metro liberi tutto intorno l'unità.
- Non mettere sull'apparecchiatura alcun contenitore di
liquido, come ad esempio dei vasi.
- Quando l'interruttore è nella posizione OFF,
l'apparecchiatura non è completamente scollegata da
MAINS.
- L’apparecchio va installato in prossimità della fonte di
alimentazione, in modo che quest’ultima sia facilmente
accessibile.
- Non esporre l'unità e le batterie a calore eccessivo come
la luce diretta del sole, il fuoco o così via.
Svenska
VARNINGAR
- Utsätt inte utrustningen för regn, fukt, droppande vatten
eller vattenstänk.
- Hantera inte nätadaptern med våta händer.
- Täck inte för ventilationsöppningarna med några föremål
som till exempel bordsdukar, dagstidningar, gardiner
e.d.
- Inga föremål med öppen låga, som till exempel tända
stearinljus, bör placeras på utrustningen.
- Följ de lagar och miljöskyddsråd som gäller i det land
eller område där du bor när du gör dig av med batterier.
- Se till att det fi nns omkring 0,1 meter fri plats runt omkring
enheten.
- Inga objekt som är fyllda med någon vätska, till exempel
blomstervaser, bör placeras på apparaten.
- Även om strömbrytaren står i det avstängda läget
OFF, så är utrustningen inte helt bortkopplad från det
elektriska nätet (MAINS).
- Utrustningen ska vara installerad nära strömuttaget så
att strömförsörjningen är lätt att tillgå.
- Utsätt inte enheten och batterierna för kraftig värme,
såsom direkt solljus, eld eller liknande.
Marking
In line with CE marking regulations: the CE
mark and the class 2 identifier are added to the
equipment:


IS_080918U2N1F1
1.
2.
3.
2.4FH1

1
NAMES AND
FUNCTIONS
ENGLISH
BASIC
OPERATIONS
ADVANCED
OPERATIONS
TROUBLESHOOTING
OTHERS
Thank you for purchasing the Marantz IS301 Wireless Dock for iPod.
This remarkable component has been engineered to provide you with many years of
listening enjoyment. Please take a few minutes to read this manual thoroughly before
you connect and operate the IS301.
As there are a number of connection and confi guration options, you are encouraged to
discuss your own particular system setup with your Marantz authorized dealer.
FEATURES ...................................................................................................................................................1
BEFORE USE ...............................................................................................................................................1
CONNECTABLE iPod PRODUCTS ................................................................................................................................................ 1
CHECKING THE PRODUCT AND ACCESSORIES ...................................................................................................................... 2
NAMES AND FUNCTIONS .......................................................................................................................3
HANDSET (IS301) ............................................................................................................................................................................3
BASE UNIT (IS301DS) ....................................................................................................................................................................4
EXTENDER (IS301RX) .....................................................................................................................................................................5
BASIC OPERATIONS .................................................................................................................................6
PREPARATION OF THE AC ADAPTOR ........................................................................................................................................6
WIRELESS CONNECTION .............................................................................................................................................................6
IS-LINK (WIRED) CONNECTIONS ..............................................................................................................................................10
ADVANCED OPERATIONS .....................................................................................................................12
CONNECTING THE EXTENDER WITH OTHER BLUETOOTH DEVICES ............................................................................... 12
MOUNTING ON A WALL ............................................................................................................................................................. 13
USE OF THE REMOTE CONTROLLER (RC001IS) ......................................................................................................................15
TROUBLESHOOTING...............................................................................................................................17
OTHERS .....................................................................................................................................................17
SPECIFICATIONS ..........................................................................................................................................................................18
CONTENTS
• By connecting an iPod and your home audio equipment via this unit, you can play back
audio fi les in the iPod with your audio equipment.
• According to your purposes and environment of use, either wireless connection or
wired connection can be selected.
• Thanks to audio wireless transmission technologies using the Bluetooth
®
A2DP profi le,
the handset and extender can be used via wireless connection.
• Thanks to wireless remote control technologies using the Bluetooth
®
AVRCP Profi le,
you can remotely control Marantz audio amplifi ers and other equipment that supports
the Bluetooth
®
AVRCP Profi le.
• This unit supports the SCMS-T content protection method for Bluetooth
®
. (IS301RX)
• Video signals can be output from an iPod.
• Thanks to the thickness adjustment knob on the handset, an iPod can be attached to
the handset without using a docking adaptor.
• Two methods for installing this unit are available: on the table or on the wall.
• An iPod can be easily attached or detached.
• Recharging of an iPod is possible.
BEFORE USE
CONNECTABLE iPod PRODUCTS
• iPod touch (1st and 2nd generations)
• iPod classic
• iPod nano (1st, 2nd, 3rd, and 4th generations)
• iPod (4th and 5th generations)
• iPod mini
iPod is a trademarks of Apple Inc., registered in the U.S. and other countries.
Notes
• Before use, be sure to update your iPod product to the latest version.
• Visit and acquire the updater for updating your iPod to the latest version from the Web site of Apple Inc.
FEATURES

2
NAMES AND
FUNCTIONS
BASIC
OPERATIONS
ADVANCED
OPERATIONS
TROUBLESHOOTING
OTHERS
ENGLISH
BEFORE USE
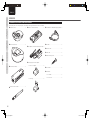
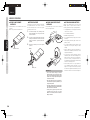
CHECKING THE PRODUCT AND ACCESSORIES
After opening the cover of the packing box, check that the following product and accessories are included.
0
Handset (IS301) ................................................ 1
USB
0
Base unit (IS301DS) .......................................... 1
VIDEO
COMPONENT
S-VIDE
O
0
Extender (IS301RX) ........................................... 1
0
Antenna for the extender .................................1
0
Remote controller (RC001IS) ............................ 1
0
AC adaptors (for the base unit and extender) .. 2
0
Power plugs for the AC adaptors
• For the U.S.A./Japan ..................................... 2
• For Europe .................................................... 2
0
IS-LINK cables (CAT5/LAN straight-type cables) ...
2
0
AV cable ............................................................ 1
0
Remote cable .................................................... 1
0
USB cable ......................................................... 1
0
Wall-mounting screws ...................................... 4
0
User Guide ........................................................ 1
0
Warranties
• For Canada .................................................... 1
• For the U.S.A. ............................................... 1

3
NAMES AND
FUNCTIONS
ENGLISH
BASIC
OPERATIONS
ADVANCED
OPERATIONS
TROUBLESHOOTING
OTHERS
NAMES AND
FUNCTIONS
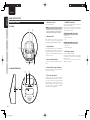
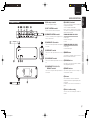
HANDSET (IS301)
uo
ew
i
r
qyt
NAMES AND FUNCTIONS
q USB connector
Connect your PC, using the supplied USB cable.
Synchronizing the iPod with iTunes is possible with
your iPod docked in the handset.
w iPod docking connector
Connect the docking connector of the iPod.
e Base connector
Connect the Handset connector of the base unit.
r Thickness adjustment knob
Turn this knob to adjust the thickness, according to
the thickness of your iPod product. Inappropriate
thickness adjustment may result in damage to the
connectors.
For details, see “CONNECTING YOUR iPOD WITH
THE HANDSET” (page 8).
t PAIRING button
Use this button to establish Bluetooth connection
with the extender.
y PAIRING indicator
This indicates connection status with the extender
with lighting/fl ashing and colors.
u POWER button
(AMP control buttons)
This button turns ON/OFF the Marantz amplifi er/
receiver that is remotely connected with the
extender.
i VOL +/– buttons
(AMP control buttons)
These buttons increase/decrease the volume of
the Marantz amplifier/receiver that is remotely
connected with the extender.
o INPUT button
(AMP control buttons)
This button switches the input sources of the
Marantz amplifier/AV receiver that is remotely
connected with the extender.
(Some products do not correspond to this function.)

4
NAMES AND
FUNCTIONS
BASIC
OPERATIONS
ADVANCED
OPERATIONS
TROUBLESHOOTING
OTHERS
ENGLISH
NAMES AND
FUNCTIONS
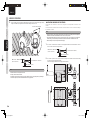
BASE UNIT (IS301DS)
TOP VIEW
d
g
f
a
s
SIDE AND BOTTOM VIEWS
jk
h
NAMES AND FUNCTIONS
a Handset connector
Connect the handset here.
Note
NEVER connect an iPod directly with this
connector, because the shape of this connector is
different from the docking connector of the iPods.
s Handset holder
When the base unit is mounted on a wall, raise
this holder. For details, see INSTALLATION
PROCEDURES FOR THE BASE UNIT (page 13).
d Power indicator
This indicator lights when power is supplied from
the AC adaptor or when the base unit is connected
with the powered extender via the IS-LINK cable.
It fl ashes when an infrared signal from the remote
controller is received.
f Holes for wall mounting
Use these holes when mounting the base unit on
a wall.
g Infrared signal reception window
This is the reception window for infrared signals
from the remote controller.
h Video selection switch
Select video signals (S-VIDEO/VIDEO/
COMPONENT) that are output from the extender.
If the Video selection switch is switched during
video playback, the output signal may not be
switched, depending on the type of iPods being
connected. In such a case, go back to the MENU
screen then restart video playback.
j IS-LINK A/V terminals
Used to connect the base unit and the extender via
the supplied IS-LINK cables.
Before connection, unplug the power cord then
check that the connections to the IS-LINK A and V
terminals are properly made.
TRANSMISSION SIGNALS VIA IS-LINK A
• Audio signal
• Remote control signal
• Power
TRANSMISSION SIGNALS VIA IS-LINK V
• Video signal
• External control signal
k AC adaptor terminal
Connect the supplied AC adaptor.
If the base unit and the extender is connected by
the IS-LINK A connection, power will be supplied
from the extender.
Therefore, it is not required to connect the AC
adaptor to the base unit.

5
NAMES AND
FUNCTIONS
ENGLISH
BASIC
OPERATIONS
ADVANCED
OPERATIONS
TROUBLESHOOTING
OTHERS
NAMES AND
FUNCTIONS
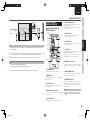
EXTENDER (IS301RX)
qwe r
!3
t
!1!2 !0 o i
yu
NAMES AND FUNCTIONS
q AC adaptor terminal
Connect the supplied AC adaptor.
w EXT. CONTROL terminal
Used to connect an external control system.
e REMOTE CONTROL terminal
Connect to a Marantz product equipped with a
remote control terminal.
r AUDIO OUT L/R terminals
Connect to the audio input terminals of an amplifi er/
receiver/TV.
t VIDEO OUT terminal
Connect to the video input terminal of a receiver/
TV.
y S-VIDEO OUT terminal
Connect to the S-VIDEO input terminal of a receiver/
TV.
u
COMPONENT (Y, Cb/Pb, Cr/Pr)
VIDEO OUT terminals
Connect to the component video input terminals of
a receiver/TV.
i IS-LINK A/V terminals
Used to connect the base unit and the extender via
the supplied IS-LINK cables.
Connect the supplied IS-LINK cables.
Before connection, unplug the power cord then
check that the connections to the IS-LINK A and V
terminals are properly made.
TRANSMISSION SIGNALS VIA IS-LINK A
• Audio signal
• Remote control signal
• Power
TRANSMISSION SIGNALS VIA IS-LINK V
• Video signal
• External control signal
o MODE button
Use this button to establish a wireless connection
between the handset and extender.
!0
PAIRING indicator
This indicates connection status with the handset
with lighting/fl ashing and colors.
!1 POWER indicator
This indicator lights when the AC adaptor is
connected to the extender.
!2 Antenna
This is an antenna for wireless communication.
At shipment, this antenna is packed separately from
the extender.
For details on how to mount on the extender, see
page 7.
!3 Holes for wall mounting
Use these holes when mounting the extender on
the wall.

6
NAMES AND
FUNCTIONS
BASIC
OPERATIONS
ADVANCED
OPERATIONS
TROUBLESHOOTING
OTHERS
ENGLISH
BASIC
OPERATIONS
BASIC OPERATIONS
PREPARATION OF THE AC ADAPTOR
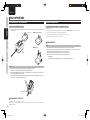
POWER PLUG ATTACHMENT PROCEDURES
1.
Attach the supplied power plug to the supplied AC adaptor, by sliding the plug in the direction
of the arrow.
0
For Europe
0
For the U.S.A./Japan
AC adaptor
Power plug
Notes
• NEVER use the power plug with equipment other than the supplied AC adaptor.
• Connect the AC adaptor to the wall outlet nearest its installation position.
• Before plugging/unplugging the cable of the AC adaptor to/from the AC input terminal, make sure that the
power cord is unplugged from the wall outlet.
• If an improper power plug is attached to the AC adaptor, detach it by pressing the release button with a pointed
object, such as a pen, as shown in the fi gure below.
Release button
ON POWER SUPPLY TO THIS UNIT
A power switch is not provided for this unit.
After connecting the AC adaptor to this unit, when the AC adaptor is plugged into a wall outlet, power is
supplied to this unit.
WIRELESS CONNECTION
WHAT ARE AVAILABLE WHEN WIRELESS CONNECTIONS ARE USED
• Audio playback
• Remote operations of a Marantz amplifi er or receiver, using the AMP control buttons on the handset
• Use of an iPod with the handset detached from the base unit
• Control of a Marantz amplifi er, using the supplied remote controller
(When the handset is connected with the base unit)
BEFORE CONNECTION
Notes
• If the cable is connected to the IS-LINK terminals, wireless connection will not be enabled.
• If an iPod and the handset are used detached from the base unit, the handset will be powered by the built-in
battery of the iPod. This makes it diffi cult to use them for a long duration.
The operable time will differ, depending on the type of iPod products you use.
• What are NOT available when wireless connections are made are as follows:
• Video playback
• Use of the base unit as an infrared signal receiver for controlling a Marantz product

7
NAMES AND
FUNCTIONS
ENGLISH
BASIC
OPERATIONS
ADVANCED
OPERATIONS
TROUBLESHOOTING
OTHERS
BASIC
OPERATIONS
COMPONENT
S-VIDEO
VIDEO
USB
MENU
REMOTE AUDIO IN
LR
LR
L R
Handset
Base unit
Extender
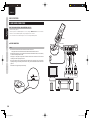
q CONNECTING THE EXTENDER AND AN AMPLIFIER
1.
Attach the supplied antenna to the antenna terminal of the extender.
2.
Connect the AUDIO OUT terminals of the extender with the line input terminals of an amplifi er/
receiver, via the supplied AV cable.
3.
If you wish to remotely control the connected amplifi er/receiver using the Marantz remote
control terminals, connect the REMOTE CONTROL terminals of both pieces of equipment via the
supplied remote cable.
This connection makes it possible to operate the Marantz amplifi er/receiver with the AMP
control buttons (POWER button, VOLUME +/– buttons, and INPUT button) on the handset.
4.
Connect the supplied AC adaptor to the AC adaptor terminal of the extender.
(For details, see “PREPARATION OF THE AC ADAPTOR”. (page 6))
Antenna
BASIC OPERATIONS

8
NAMES AND
FUNCTIONS
BASIC
OPERATIONS
ADVANCED
OPERATIONS
TROUBLESHOOTING
OTHERS
ENGLISH
BASIC
OPERATIONS
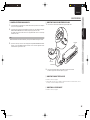
w CONNECTING THE HANDSET TO THE BASE UNIT
1.
Attach the handset to the base unit, as shown in the fi gure below.
VIDEO
COMPONENT
S-VIDEO
USB
AC adaptor
Base unit
Handset
2.
Connect the supplied AC adaptor to the AC adaptor terminal of the base unit.
(For details, see “PREPARATION OF THE AC ADAPTOR”. (page 6))
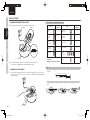
e CONNECTING iPod TO THE HANDSET
1.
Turn the Thickness adjustment knob of the handset, according to the type of your iPod. For
details on the positions of the knob, see the “LIST OF THICKNESS ADJUSTMENT KNOB
POSITIONS” table.
VIDEO
COMPONENT
S-VIDEO
USB
BASIC OPERATIONS
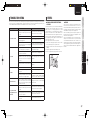
LIST OF THICKNESS ADJUSTMENT KNOB POSITIONS
iPod
Positions of
the knob
iPod
Positions of
the knob
iPod touch
1G/2G
3
iPod 4G Photo
20GB/30GB
7
iPod classic
160GB
9
iPod 4G Photo
40GB/60GB
12
iPod classic
80GB/120GB
4 iPod 4G 20GB 6
iPod 5G Video
60GB/80GB
9 iPod 4G 40GB 11
iPod 5G Video
30GB
4
iPod nano
1G/2G/3G/4G
1
G in the table stands for Generation of
iPod products.
Example:
iPod 5G (iPod, 5th generation)
iPod mini 7
Notes
• The location of the docking connector on an iPod product varies, according to the generation, type, and capacity
of products.
• Before attaching an iPod, be sure to turn the Thickness adjustment knob to an appropriate position. If an iPod
is plugged/unplugged without adjusting the thickness to an appropriate position, damage to the connectors may
result.

9
NAMES AND
FUNCTIONS
ENGLISH
BASIC
OPERATIONS
ADVANCED
OPERATIONS
TROUBLESHOOTING
OTHERS
BASIC
OPERATIONS
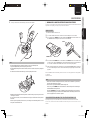
2.
Securely connect the iPod to the docking connector of the handset.
VIDE
O
COMPONEN
T
S-VI
DEO
USB
MENU
Notes
• When attaching/detaching the iPod to/from the handset, be sure to grip the handset by hand.
Improper attaching/detaching of the iPod may damage the connectors.
• When attaching/detaching the iPod to/from the handset, be sure NOT to twist the iPod, as this may damage the
connectors.
• Be careful NOT to tilt the iPod forward during use, as this may damage the connectors.
USB
MENU
USB
MENU
• NEVER insert the iPod into the handset with its protective case attached. Doing so may result in poor connection
or damage to the connectors.
• Do not use other accessories, such as an FM transmitter or microphone, with the handset. This may result in a
malfunction.
• Marantz accepts no responsibility whatsoever for any loss or damage of iPod data resulting from the use of an
iPod product connected with this unit.
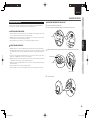
r MAKING WIRELESS CONNECTION BETWEEN THE HANDSET AND EXTENDER
For wireless connection between the handset and extender, pairing is required for mutual authentication and
registration. Perform pairing, according to the procedures shown below.
PAIRING PROCEDURES
1.
Attach the handset to the base unit.
2.
Locate the extender near the base unit and connect the AC adaptors to each of them.
3.
Press and release the PAIRING button of the handset and the MODE button of the extender once.
The PAIRING indicator will light in red (connection not established).
MODE
MENU
PAIRING
4.
Press and hold the PAIRING button of the handset and the MODE button of the extender for 5
seconds or more until the PAIRING indicator starts alternate fl ashing in blue and red at intervals
of 0.5 second. The handset and extender will search for each other’s pairing device.
5.
After searching and pairing are completed, the color of the fl ashing PAIRING indicator at intervals
of 0.5 second will change to blue. The unit will automatically start preparing for wireless audio
playback.
When the PAIRING indicator starts fl ashing in blue at intervals of 5 seconds, preparation for audio playback
is completed.
Play back the iPod.
Notes
• Even if wireless connection is interrupted for some reason, such as radio wave interference or power failure,
reconnection will automatically be performed.
• If reconnection is not possible, the PAIRING indicator will light in red.
In such a case, press the PAIRING button of the handset twice to disconnect then press the same button again
so that the PAIRING indicator lights in red.
Then press the PAIRING button once again. The PAIRING indicator will start fl ashing in blue at intervals of
0.5 second to start preparing for reconnection. When the PAIRING indicator starts fl ashing in blue at intervals
of 5 seconds, preparation for reconnection is completed.
IN A CASE WHERE THE IPOD AND HANDSET ARE USED DETACHED FROM THE BASE UNIT
Depending on the type of iPod, the handset may not enter Wireless mode when the iPod is started.
In such a case, detach the iPod from the handset with the iPod’s power on then reconnect it to the
handset.
BASIC OPERATIONS

10
NAMES AND
FUNCTIONS
BASIC
OPERATIONS
ADVANCED
OPERATIONS
TROUBLESHOOTING
OTHERS
ENGLISH
BASIC
OPERATIONS
BASIC OPERATIONS
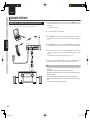
IS-LINK (WIRED) CONNECTIONS
WHAT ARE AVAILABLE WHEN IS-LINK CONNECTIONS ARE USED
• Audio and video playback
• Remote operations of a Marantz amplifi er or receiver, using the AMP control buttons on the handset
• Remote control of a Marantz amplifi er, using the supplied remote controller
• Use of the base unit as an infrared signal receiver for controlling a Marantz product
BEFORE CONNECTION
Notes
• What are NOT available when IS-LINK connections are made are as follows:
• Video playback of an iPod when the iPod and the handset are detached from the base unit
• During IS-LINK connection, power is supplied to the base unit from the extender. Therefore, it is not necessary
to connect the AC adaptor to the base unit.
• Three types of video signals are output from the extender. Set the Video selection switch of the base unit
according to the video output signal to be used.
• If the Video selection switch is switched during video playback, the output signal may not be switched,
depending on the type of iPods being connected. In such a case, go back to the MENU screen then restart video
playback.
• Some iPods do not support component video output.
VID
E
O
COMPON
ENT
S-
VID
EO
COMPONENT
S-VIDEO
USB
MENU
VIDEO
REMOTE AUDIO IN
LR
S-VIDEO
IN
VIDEO
IN
Y Cb / Pb Cr / Pr
COMPONENT
VIDEO IN
LR
L R
IS-LINK cables
Handset
Base unit
Extender

11
NAMES AND
FUNCTIONS
ENGLISH
BASIC
OPERATIONS
ADVANCED
OPERATIONS
TROUBLESHOOTING
OTHERS
BASIC
OPERATIONS
q CONNECTING THE EXTENDER AND AN AMPLIFIER
1.
Connect the AUDIO OUT terminals of the extender with the line input terminals of an amplifi er/
receiver, via the supplied AV cable.
2.
Connect the video input terminal of an amplifi er/receiver/TV to one of the VIDEO OUT terminals
(VIDEO/S-VIDEO/COMPONENT) of the extender, using an appropriate video cable.
The S-VIDEO and component video cables are not supplied with this unit. Use a commercially
available video cable.
Note
NEVER connect different video cables simultaneously, as this may result in disturbed video signals or a failure.
3.
If you wish to remotely control the connected equipment using the Marantz REMOTE CONTROL
terminals, connect the REMOTE CONTROL terminals of the connected equipment and the
extender with the supplied remote cable.
BASIC OPERATIONS
w
CONNECTING THE BASE UNIT AND EXTENDER WITH IS-LINK
1.
Connect the base unit and extender with two supplied IS-LINK cables.
COMPONENT
S-VIDEO
VIDEO
Extender
Base unit
IS-LINK cables
2.
Connect the supplied AC adaptor to the AC adaptor terminal of the extender.
(For details on preparation of the AC adaptor, see page 6.)
e CONNECTING THE HANDSET TO THE BASE UNIT
For details on connection, see page 8.
• During IS-LINK connection, power is supplied to the base unit from the extender. Therefore, it is not
necessary to connect the AC adaptor to the base unit.
r CONNECTING AN iPod TO THE HANDSET
For details on connection, see page 8.

12
NAMES AND
FUNCTIONS
BASIC
OPERATIONS
ADVANCED
OPERATIONS
TROUBLESHOOTING
OTHERS
ENGLISH
ADVANCED
OPERATIONS
ADVANCED OPERATIONS
CONNECTING THE EXTENDER WITH OTHER BLUETOOTH DEVICES
The extender can be connected with other Bluetooth devices with the A2DP profi le.
AUDIO IN
LR
LR
L R
Extender
1.
When the handset and extender are connected wirelessly, press the PAIRING button of the
handset. The PAIRING indicator will light in red, and wireless communication on the handset
side will stop.
Let the handset for 10 seconds.
2.
Locate other Bluetooth device near the extender.
3.
Press the MODE button of the extender once. The PAIRING indicator will light in red. Refer to the
operation manual of your Bluetooth device for pairing procedures of the connected Bluetooth
device.
4.
Hold the MODE button pressed for 5 seconds or more until the PAIRING indicator starts alternate
fl ashing in blue and red at intervals of 0.5 second. The unit will search for a device for pairing.
5.
After a device to be paired is found, the color of the fl ashing PAIRING indicator at intervals of
0.5 second will change to blue. The unit will automatically start preparing for wireless audio
playback.
If passcode input is requested on the other Bluetooth device, enter “0000”.
6.
After connection with the A2DP/AVRCP profi les is established, the PAIRING indicator starts
fl ashing in blue at intervals of 5 seconds, and preparation for playback is completed.
Notes
• Once pairing is completed, further pairing operation is not required for the same devices from the next Bluetooth
communication.
• Up to 8 Bluetooth devices that have A2DP/AVRCP profi les can be paired with this unit.
• If the number of paired devices exceeds 8, each time a new device is paired, the already paired devices are
cleared from the oldest one.
• Connection of the handset with other Bluetooth devices is possible in the same way as with the handset.
• Bluetooth and its logo are trademarks of Bluetooth SIG, Inc. and Marantz uses them based on the appropriate
license.
• Connection with all existing Bluetooth devices is not guaranteed.

13
NAMES AND
FUNCTIONS
ENGLISH
BASIC
OPERATIONS
ADVANCED
OPERATIONS
TROUBLESHOOTING
OTHERS
ADVANCED
OPERATIONS
MOUNTING ON A WALL
This unit can be mounted on a wall. Read the precautions described below and carefully install the unit.
For safety, it is recommended to delegate mounting to a professional contractor.
NOTES ON INSTALLATION LOCATION
• Before installation, check the material and construction compatibilities of the installation location. If they
are not assured, the unit may fall, which may result in personal injury.
• NEVER mount the unit in a location subject to lot of vibration, shock, or strong force. Doing so may cause
a fall or damage of the unit and may result in personal injury.
• Before installation, make sure that there is no electrical wiring nor piping inside the wall.
PRECAUTIONS ON INSTALLATION
• NEVER modify the unit or use it in an inappropriate way. Dropping the unit may result in personal injury.
• The supplied wall-mounting screws are for wooden walls. If the unit is to be mounted on a wall other
than wooden walls, procure commercially available screws suitable for the structure and materials of the
wall.
• Secure the screws tightly when mounting the base unit. Loose screws may cause an accident, such as
falling of the unit. NEVER leave the screws not securely tightened.
• NEVER mount the unit so that it will protrude away from an exterior corner of the wall. Doing so may lead
to personal injury, because a person or object may bump into the unit.
• Marantz accepts no responsibility whatsoever for any accident or damage resulting from improper
mounting or handling.
• When mounting, be careful not to pinch your fi ngers or hands.
• Make sure that the two screws are securely tightened in the holes for wall mounting of the extender.
ADVANCED OPERATIONS
INSTALLATION PROCEDURES FOR THE BASE UNIT
1.
Remove the handset from the base unit.
2.
Push the stopper holder from through the hole on the bottom of the base unit.
Stopper
3.
With the handset holder raised, push the stopper down so that it clicks and locks in place.
COMPOSITE
COMPONENT
S-VIDEO
Stopper
Handset holder
Release button
4.
Connect the cables.

14
NAMES AND
FUNCTIONS
BASIC
OPERATIONS
ADVANCED
OPERATIONS
TROUBLESHOOTING
OTHERS
ENGLISH
ADVANCED
OPERATIONS
5.
Secure the base unit on the wall, by tightening the screws of the size shown in the fi gure below,
using a screwdriver, through the holes for wall mounting of the base unit.
Holes for wall mounting
MIN.6.0mm ~ MAX.8.0mm
(1/4 ins.~5/16 ins.)
3.0 ~ 4.0mm(1/8 ins.~5/32 ins.)
MAX. 3.0mm (1/8 ins.)
Notes
• Check that the unit is securely fi xed on the wall.
• Securely connect the cables to the unit.
• To detach the unit from the wall and use it on a table, return the stopper to its original position, by holding the
release button pressed, then return the handset holder to its original position.
ADVANCED OPERATIONS
INSTALLATION PROCEDURES FOR THE EXTENDER
The extender can be mounted on a wall or a rack, using the two holes provided on the bottom of the
extender.
The extender can be installed in either a horizontal or vertical orientation. Select the orientation according to
the installation conditions.
Notes
• Reception sensitivity varies, depending on the direction of the antenna. Before installing the extender, adjust the
orientation of the antenna and check that radio waves can be securely received.
• The supplied wall-mounting screws are for wooden walls. If the unit is to be mounted on a wall other than
wooden walls, procure commercially available screws suitable for the structure and materials of the wall.
• Before mounting on a wall, read the precautions thoroughly.
1.
Procure two screws that are suitable for the strength and material of the wall surface. The size
of the screws is shown in the fi gure below.
MIN.6.0mm ~ MAX.8.0mm
(1/4 ins.~5/16 ins.)
3.0 ~ 4.0mm(1/8 ins.~5/32 ins.)
MAX. 3.0mm (1/8 ins.)
2.
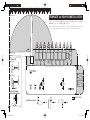
The relative positions of the holes for wall mounting of the extender and screw-mounting
positions are shown in the fi gure below.
(Use the template provided on the last page of this manual.)
4mm
(5/32 ins.)
75mm (2-15/16ins.)
75mm (2-15/16ins.)
4mm
(5/32 ins.)
ページが読み込まれています...
ページが読み込まれています...
ページが読み込まれています...
ページが読み込まれています...
ページが読み込まれています...
ページが読み込まれています...
-
 1
1
-
 2
2
-
 3
3
-
 4
4
-
 5
5
-
 6
6
-
 7
7
-
 8
8
-
 9
9
-
 10
10
-
 11
11
-
 12
12
-
 13
13
-
 14
14
-
 15
15
-
 16
16
-
 17
17
-
 18
18
-
 19
19
-
 20
20
-
 21
21
-
 22
22
-
 23
23
-
 24
24
-
 25
25
-
 26
26


