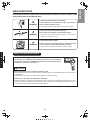
Hitachi Air Conditioner RAS-SX13HAK / RAC-SX13HAK ユーザーマニュアル
- カテゴリー
- スプリットシステムエアコン
- タイプ
- ユーザーマニュアル
このマニュアルも適しています

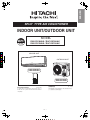
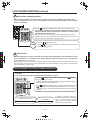
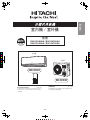
OUTDOOR UNIT
INDOOR UNIT
– 1 –
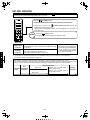
使用说明书 49 ~ 95 页
请详细阅读这本使用说明书以了解正确的使用安装方
法,使机器长久发挥最高性能。
Instruction manual Page 1~48
To obtain the best performance and ensure years of
trouble free use, please read this instruction manual
completely.
RAS-SX10HAK / RAC-SX10HAK
RAS-SX13HAK / RAC-SX13HAK
SPLIT TYPE AIR CONDITIONER
INDOOR UNIT/OUTDOOR UNIT
MODEL
ENGLISH
DEUTSCHFRANÇAISITALIANOSPANISHPORTUGUÊS
∂ÏÏËÓÈο
РУССКИЙ
RAS-SX10HAK
RAS-SX13HAK
RAC-SX10HAK
RAC-SX13HAK

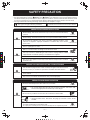
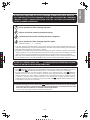
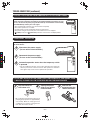
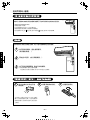
• Please read the “Safety Precaution” carefully before operating the unit to ensure correct usage of the unit.
• Pay special attention to signs of “ Warning” and “ Caution”. The “Warning” section contains matters which, if
not observed strictly, may cause death or serious injury. The “Caution” section contains matters which may result
in serious consequences if not observed properly. Please observe all instructions strictly to ensure safety.
• The signs indicate the following meanings. (The following are examples of signs.)
• Please keep this manual after reading.
PRECAUTIONS DURING OPERATION
WARNING
WARNING
SAFETY PRECAUTION
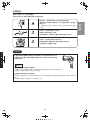
• Do not reconstruct the unit.
Water leakage, fault, short circuit or fi re may occur if you reconstruct the unit by
yourself.
• Please ask your sales agent or qualified technician for the installation of your unit.
Water leakage, short circuit or fire may occur if you install the unit by yourself.
• Please use earth line.
Do not place the earth line near water or gas pipes, lightning-conductor, or the
earth line of telephone. Improper installation of earth line may cause electric
shock or fire.
• Be sure to use the specifi ed piping set for R410A. Otherwise, this may result in
broken copper pipes or faults.
• A circuit breaker should be installed depending on the mounting site of the unit.
Without a circuit breaker, the danger of electric shock exists.
• Do not install the unit near a location where there is fl ammable gas. The outdoor
unit may catch fi re if fl ammable gas leaks around it. Piping shall be suitable
supported with a maximum spacing of 1m between the supports.
• Please ensure smooth fl ow of water when installing the drain hose.
• Make sure that a single phase 220V power source is used.
The use of other power sources may cause electrical components to overheat
and lead to fi re.
PRECAUTIONS DURING INSTALLATION
PROHIBITION
CONNECT EARTH LINE
PROHIBITION
WARNING
CAUTION
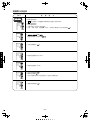
•
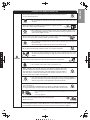
• Should abnormal situation arise (like burning smell), please stop operating the
unit and remove plug from the socket. Contact your agent. Fault, short circuit or
fi re may occur if you continue to operate the unit under abnormal situation.
• Please contact your agent for maintenance. Improper self maintenance may cause electric
shock and fi re.
• Please contact your agent if you need to remove and reinstall the unit. Electric shock or fi re
may occur if you remove and reinstall the unit yourself improperly.
PRECAUTIONS DURING SHIFTING OR MAINTENANCE
• Do not use any conductor as fuse wire, this could cause fatal accident.
• During thunder storm, disconnect the plug top and turn off the circuit
breaker.
• Do not put objects like thin rods into the panel of blower and suction side
because the high-speed fan inside may cause danger.
• Spray cans and other combustibles should not be located within a meter of the
air outlets of both indoor and outdoor units.
As a spray can’s internal pressure can be increased by hot air, a rupture may result.
PROHIBITION
PROHIBITION
PROHIBITION
PROHIBITION
“OFF”
“OFF”
This sign in the fi gure indicates prohibition. Indicates the instructions that must be followed.
PROHIBITION
– 2 –
Avoid an extended period of direct airflow for your health.

• Do not place plants directly under the airfl ow as it is bad for the plants.
• Do not direct the cool air coming out from the air-conditioner panel to face
household heating apparatus as this may affect the working of apparatus such
as the electric kettle, oven etc.
• The product shall be operated under the manufacturer specifi cation and not
for any other intended use.
PRECAUTIONS DURING OPERATION
CAUTION
• Do not attempt to operate the unit with wet hands, this could cause fatal
accident.
• When operating the unit with burning equipments, regularly ventilate
the room to avoid oxygen insuffi ciency.
• Please ensure that outdoor mounting frame is always stable, fi rm and without
defect. If not, the outdoor unit may collapse and cause danger.
• Do not wash the unit with water or place a water container such as a vase on
the indoor unit.
Electrical leakage could be present and cause electric shock.
• Be sure to stop the operation by using the remote controller and turn off the
circuit breaker during cleaning, the high-speed fan inside the unit may cause
danger.
• Turn off the circuit breaker if the unit is not be operated for a long period.
• Do not climb on the outdoor unit or put objects on it.
• When operating the unit with the door and windows opened, (the room
humidity is always above 80%) and with the air defl ector facing down or moving
automatically for a long period of time, water will condense on the air deflector
and drips down occasionally. This will wet your furniture. Therefore, do not
operate under such condition for a long time.
• If the amount of heat in the room is above the cooling or heating capability of
the unit (for example: more people entering the room, using heating equipments
and etc.), the preset room temperature cannot be achieved.
• Indoor unit cleaning must be performed by authorized personnel only. Consult
This appliance is not intended for use by young children or infirm persons unless they have been
Young children should be supervised to ensure that they do not play with the appliance.
your sales agent.
adequately supervised by a responsible person to ensure that they can use this appliance safely.
Using a commercially available detergent or similar can damage the plastic parts
or clog the drain pipe, causing water to drip with potential electric shock hazard.
• Do not touch the air outlet, bottom surface and aluminium fi n of the outdoor
unit.
You may get hurt.
Do not touch the refrigerant pipe and connecting valve.
Burns may result.
PROHIBITION
DON’T WET
PROHIBITION
PROHIBITION
PROHIBITION
DON’T TOUCH
“OFF”
PROHIBITION
PROHIBITION
PROHIBITION
PROHIBITION
PROHIBITION
DON’T TOUCH
STRICTLY OBSERVE
PRECAUTIONS
“OFF”
DEUTSCHFRANÇAISITALIANOSPANISHPORTUGUÊS
∂ÏÏËÓÈο
РУССКИЙ
– 3 –
ENGLISH
•
•
•

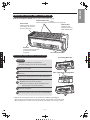
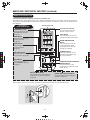
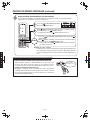
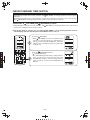
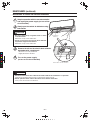
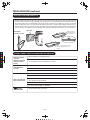
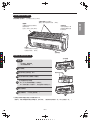
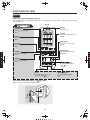
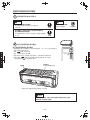
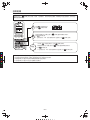
Drain Port (bottom)
Air Outlet
Discharges cool air when in heating
mode and warm air when in cooling
and dry cool modes, and warm or
cold air when in the dehumidifying
mode.
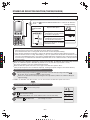
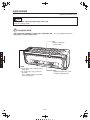
NAMES AND FUNCTIONS OF EACH PART
INDOOR UNIT
OUTDOOR UNIT
Signal Receiver
(internal)
Receive signal from the
remote control.
Indicator
Front Panel
(Page 8)
Horizontal/
Vertical Air Deflector
(internal)
Air Outlet
Electric Dust Collector Electrode
Remote Controller
Pipe/Wiring
Drain Hose
Drains dehumidified water generated from the indoor unit when in
the cooling, dehumidifying and dry cool modes.
Air Inlet (rear and left side)
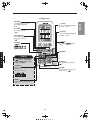
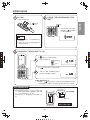
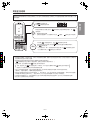
• Even if the operation is stopped, the outdoor
unit fan continues to rotate for 10~60 seconds
to cool down the electrical parts.
• In heating operation, condensed water and
defrosted water is discharged from the outdoor
unit. Do not block the drain port as the water in
the drain may freeze in a cold area.
• Even during cooling operation, the water
condensed in the pipe, etc. may flow out from
the outdoor unit.
• When installing the outdoor unit under eaves,
etc. of the apartment, install a bush and drain
pipe on the drain port for drainage treatment.
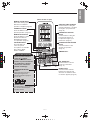
ABOUT OUTDOOR UNIT
(Understanding The Operating Mechanism, page 39)
Earth Terminal
(side bottom)
• While the power is on, a very small amount of power is
consumed within the control circuit even when the unit
is not in operation.
Power can be saved if the circuit breaker is switched off.
CAUTION
Pull out the power plug if the unit is not in
use for a long period.
(Or turn off the circuit breaker.)
Infrared
Dynamic Air Deflection Sensor
Temporary Operation Switch
(Forced Cooling Switch)
When the remote
controller does not
work due to factors
like dead batteries,
you can press the
temporary operation
switch to start
temporary
operation. (Page 44)
– 4 –

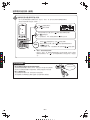
Air Cleaning Mesh Box
DEUTSCHFRANÇAISITALIANOSPANISHPORTUGUÊS
∂ÏÏËÓÈο
РУССКИЙ
1
2
3
4
5
6
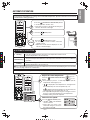
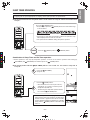
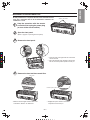
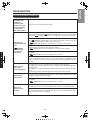
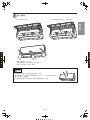
Replace the air cleaning mesh box.
● “Make sure that it clicks into place.”
● “If it dose not click into place, abnormal sounds
may be heard or the box may fall off.”
Close the front panel.
※
2
4
3
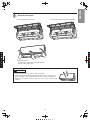
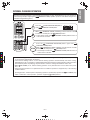
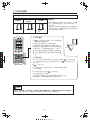
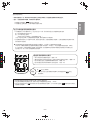
INDOOR UNIT CONTROL PANEL / CLEANING UNIT
Open the front panel to operate. (How to open the front panel, page 8)
Dust Catcher
Collects the dust swept by
the cleaning unit. (At front
and top.) (Page 37)
Cleaning Unit
Cleans the dust
caught by the micro
mesh stainless filter.
Dust Box
Collects and keeps the dust
that has been cleaned.
(Page 34)
Stainless Mesh Filter
(inside)
Collects particulates and dusts in the air. (Page 35)
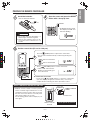
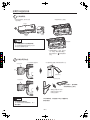
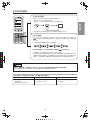
Air Cleaning Mesh Box
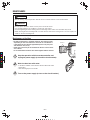
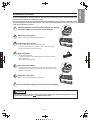
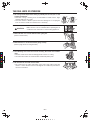
How to Attach the Nano Titanium Air Cleaning Mesh
Preparation
Stop the air conditioner, and disconnect
the power supply (or turn off the circuit breaker).
Open the front panel.
Pull out the air cleaning mesh box as illustrated to
remove it.
Insert the air cleaning mesh into the slot as illustrated.
Connect the power cord (or turn on the circuit breaker).
Jaw
Nano Titanium Air Cleaning Mesh
With the air cleaning mesh used, the air-conditioning capability will fall slightly.
Remove dust from the surface with a vacuum cleaner, and DO NOT clean it with water.
(We recommend you clean it once every 6 months and replace it once every 2 years.)
– 5 –
ENGLISH

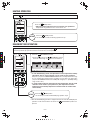
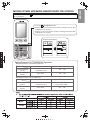
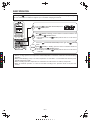
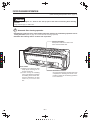
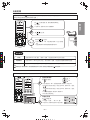
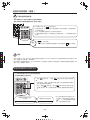
Transmission Indicator
The transmission indicator
ROOM TEMPERATURE
Button
Press this button to set the
room temperature. Keep
pressing and the value will
change more quickly.
STOP Button
HEAT Button
Press this button to start
heating operation.
(Page 14)
DEHUMIDIFY Button
Press this button to start
dehumidifying operation.
(Page 14)
COOL Button
Press this button to start
cooling operation.
(Page 15)
DRY COOL Button
Press this button to start dry
cool operation. (Page 16)
AUTO Button
Press this button to
start automatic operation.
(Page 13)
BUTTONS TO
ST
ART OPERATIONS
Remote controller can be used when it is fixed on a wall or pillar using the remote controller holder.
Before fixing it, make sure the indoor unit can be controlled from the remote controller fixing point.
SLEEP
TIMER Operation Button
Press this button to start sleep timer
operation. (Page 29)
REMOTE CONTROLLER
Transmits the operation and timer settings to the indoor unit.
The LCD shown in the illustration below is the display immediately after the reset switch is pressed. Usually not
all the data are displayed. On the LCD shown below, the functions not available for this room air conditioner are
also displayed.
NAMES AND FUNCTIONS OF EACH PART (continued)
Transmission Part
HUMIDITY Button
Press this button to set the
humidity for dehumidify and
dry cool operations.
Screw
INFRARED HUMAN-PRESENCE
SENSING Button
Press this button to enter
the dynamic air deflection mode.
(Page 19, 20)
AIR CLEANING Button
Press this button to start plasma air
cleaning (air circulation) operation.
(Page 18)
– 6 –
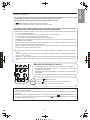
Press this button to stop any
operation except the preset timer.
lit when a signal is sent.

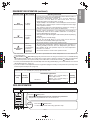
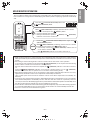
These are preset functions
except for (SAVE).
Preset can be done if these
buttons are pressed while the
air conditioner is stopped,
however, the unit will not
function accordingly.
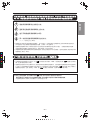
FUNCTION SELECTOR
Buttons
Each time when you press,
blinking changes in the
following sequence (page 12,
21, 22, 23):
ON/OFF Button
Use this button to set or cancel
the function selected by the
function selector.
FUNCTION SELECTOR
(When the door is open)
MANUAL CLEAN Button
Starts filter cleaning operation
while the air conditioner
operation is stopped. (Page 32)
FAN SPEED Button
Press this button to
select fan speed.
VERTICAL AIRFLOW Button
Use this button to swing the
vertical air deflector or to adjust
the angle to your preference.
(Page 24)
HORIZONTAL AIRFLOW
Button
Use this button to swing the
horizontal air deflector or
to adjust the angle to your
preference. (Page 25)
SET TIME Button
Use this button to set and
check the current time.
(Page 11)
TIMER Buttons
RESET Button
Press this button after the
batteries are replaced and
when the air conditioner does
not function properly. (Page 11)
DEUTSCHFRANÇAISITALIANOSPANISHPORTUGUÊS
∂ÏÏËÓÈο
РУССКИЙ
POWERFULL Button
Press this button to start
powerful operation. (Page 18)
MANUAL/AUTO Button
Press this button to switch
between auto/manual
dehumidifying and dry
cool operation. (Page 18)
Four options are available:
Auto, Strong, Weak,
Gentle, and Quiet.
DYNAMIC AIR DEFLECTION
Button
Press this button to start
dynamic air operation.
(Page 27)
– 7 –
ENGLISH

22
21
21
4
13
•
2
•
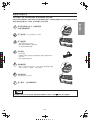
Take out the anti-mold wasabi
cassette from the aluminium bag.
Do not remove or tear
the aluminium sheet on
the surface nor make a
hole on it.
•
Remove the dust box housing
Dust Box Housing
Dust Box Housing
Handle
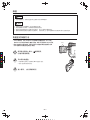
INSTALLING ANTI-MOLD WASABI CASSETTE
Open the front panel.
•
Do not hold the movable panel
when opening and closing the
front panel.
Front panel
Gripping part
Gripping part
Panel support
•
Hold and lift up the front panel.
•
Push up the panel support until it
clicks to lock it.
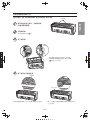
Lower the front panel and fix in
position with the panel support.
Install the anti-mold wasabi cassette.
Aluminium bag
Slide the anti-mold
wasabi cassette that
has been taken out of
the wrapper directly
into the Dust Box
Housing.
CAUTION
• Do not put your face close to the package when
you open it.
Your eyes or nose may be irritated by wasabi aroma.
• Do NOT eat.
1
No daily maintenance is required. However,
the effectiveness of anti-mold wasabi cassette
will be lost after approximately 10 years have
elapsed. Replace the anti-mold wasabi cassette
in such event.
CAUTION
•
Do not open the front panel during operation
.
It may interrupt the movable panel to work properly.
Be sure to stop
the operation first before opening
the front panel.
Anti-mold wasabi
cassette
– 8 –

DEUTSCH
DEUTSCHFRANÇAISITALIANOSPANISHPORTUGUÊS
∂ÏÏËÓÈο
РУССКИЙ
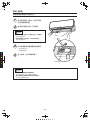
Close the front panel.
•
Hold and lift up the front panel.
CAUTION
• If the front panel is loose, it may come off and drop.
• When opening the front panel upwards, please do not use excessive force.
If the front panel comes off the device, this may cause it to malfunction.
• When the front panel remains open, be sure to push up the panel
support.
•
Push down the panel support until it clicks.
Push the both ends of the front panel first and
then its center until it clicks.
•
Pull it downward.
3
– 9 –
ENGLISH

FILTER CLEANING UNIT OPERATION CHECK
Make sure the power plug is firmly plugged into the power outlet.
WARNING
• Be sure to use the power outlet exclusively for
air conditioner
Use of other power outlet may cause heat, which
could result in fire.
• Make sure that dust is not deposited on the
power plug and be sure to plug in until the blades
of the plug are fully inserted to avoid unstable
plug-in and dust from being accumulated
Use of air conditioner with dusty power plug or
improper power connection could result in electrical
shock or fire.
CAUTION
Do not operate with
wet hands
It may cause electric
shock.
Compulsory
Wet Hand
Prohibited
Performing operation check after the power is turned on.
Perform the filter cleaning unit operation check
• After the power is turned on (after the power plug is inserted into the power
outlet or after the circuit breaker is switched on after power failure), the
cleaning unit makes one cycle of back and forth movement.
• At this time, the (CLEAN) indicator is lit.
• One cycle of operation check will take approximately 5 minutes.
• During the operation check, the unit performs “Fan” operation while the movable
panel and horizontal air deflector remain closed.
• If the (CLEAN) indicator blinks (lit for 4 seconds/off 1 second) after the
operation check, refer to “Troubleshooting” on page 44.
Cleaning Unit
There is a filter cleaning wiper inside.
Dust catcher
CAUTION
Do not put your fingers or a stick etc into the top surface during
the filter cleaning operation
It may result in injury or malfunction.
• The illustration shows the unit without front
panel for your reference only.
1
2
Compulsory
TEMPORARY
SWITCH
– 10 –

DEUTSCHFRANÇAISITALIANOSPANISHPORTUGUÊS
∂ÏÏËÓÈο
РУССКИЙ
DEUTSCH
Address
Address
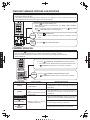
PREPARE THE REMOTE CONTROLLER
Install the batteries.
• Use two AAA-size batteries.
Set the current time (Ex: set to 1:30 p.m.)
RESET
1
2
Press the (TIMER) button to adjust to the current time.
• You can fast forward the time by continuously pressing the
button.
Confirm the current time
• Press the
(SET TIME) button to check the current time
(The time display disappears 3 minutes later). If necessary,
readjust the time following the above procedure 1 and 2.
• Address selector switch is used to prevent
remote controller signal interference in such
circumstance where 2 indoor units are used in
the same room. This switch is not usually used.
(The factory setting is at “A” side.)
For this setting, please make an inquiry to your
sales agent.
Address selector
switch
Switch lever
Remote controller
backside
Do not operate by yourself.
Push mark
and pull.
ABOUT ADDRESS SELECTOR SWITCH
Time is incremented
Time is decremented
Press
(SET TIME) button to set the current time.
• “AM” or “PM” is lit instead of
blinking. It automatically goes
off in 10 seconds.
1
2
Open the cover and press the RESET
button with a sharp tip item.
3
• 18:88 lights up on the current
time display and “AM” and
“PM” start blinking.
CAUTION
1. Do not mix new and old batteries, or
different type of batteries together.
2. Remove the batteries when you do
not use the remote controller for 2 or 3
months.
DEUTSCH
– 11 –
ENGLISH

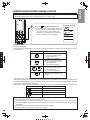
1
While (SAVE) is blinking, point the remote controller towards
the unit and press the (ON/OFF) button.
• A short beep sounds and (SAVE) indicator turns on.
Press the (FUNCTION SELECTOR)
button until
(SAVE) blinks.
Press the (FUNCTION SELECTOR) button again until
(SAVE) blinks.
While (SAVE) is blinking, point the remote controller towards
the unit and press the (ON/OFF) button.
• A short beep sounds and (SAVE) indicator turns off, indicates
the setting is released.
Notes for “save” setting
• If ampere is set to “Save”, the maximum heating capacity slightly lowers
and starting up of heating operation will take a little longer. Besides,
the preset temperature may not be reached if outside temperature is
low.
• Point the remote controller to the signal receiver of the unit
Signal reception distance is approximately 7m in front of the unit.
However, this distance may be shorter or the signal may not be
receivable if there is an electronic lighting device in the same room.
• Handle the remote controller with care
Dropping it or getting it wet may compromise its signal transmission
capability. After new batteries are inserted into the remote controller,
the unit require approximately 10 seconds before it can respond to
commands and begin operation.
WHEN OPERATING THE REMOTE CONTROLLER
Approximately
7m from the front
PREPARE THE REMOTE CONTROLLER (continued)
Ampere setting (Standard/Save) can be selected.
If you experience frequent circuit breaker tripping, set ampere to “Save” to avoid this problem.
(Ampere is set to “Standard” at the time of purchase.)
4
2
RELEASE
– 12 –

SPANISHPORTUGUÊS
∂ÏÏËÓÈο
РУССКИЙ
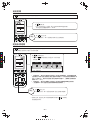
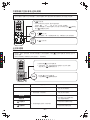
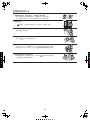
AUTOMATIC OPERATION
•
•
•
。
1
2
2
1
TEMPORARY
SWITCH
Based on the room temperature and outside temperature, the unit determines the most suitable operation
mode (heating, dehumidifying or cooling) and a comfortable temperature. (Set the current time on the remote
controller before starting operation.)
Press the (AUTOMATIC OPERATION) button
to set the operation mode to auto.
•
Every time you press it, the mode will change as
shown in the chart on the right.
Press the (STOP) button.
Press the (STOP) button again.
A short beep sounds and the automatic
operation stops.
Operation mode will be displayed on the
remote controller display.
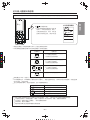
Increase
Decrease
Adjust the room temperature
Press the (ROOM TEMPERATURE)
button.
• Every time you press it, a short beep sounds and the
temperature will change by 1°C.
•
is displayed if the temperature is set higher than
the automatically set room temperature by 1°C.
is displayed if the temperature is set lower than the
automatically set room temperature by 1°C.
• The adjustable temperature range is not higher or lower
than 3°C of the automatically set room temperature.
• Humidity setting cannot be adjusted.
Select the fan speed
Press the (FAN SPEED) button.
• “AUTO”, “LOW” and “SILENT”
can be selected.
• Every time you press it, the
mode will change as shown in
the chart on the right.
Beep
STOP
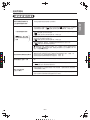
• Performs heating operation when the room temperature is below 23°C.
Set the temperature to be around 23°C.
• Performs dehumidifying operation when the room temperature is 23~26°C.
The preset temperature will be the room temperature at the time of start of air conditioner
operation.
• Performs cooling operation when the room temperature is above 27°C.
Set the temperature to be around 27°C.
Room temperature and fan speed can be adjusted to your preference.
AUTOMATIC OPERATION
Heating
Dehumidifying
Cooling
Even if dehumidifying operation is set, the air conditioner may not execute dehumidifying if the room humidity
is not very high. This is not a malfunction.
DEUTSCHFRANÇAISITALIANOSPANISHPORTUGUÊS
∂ÏÏËÓÈο
РУССКИЙ
– 13 –
ENGLISH

•
•
•
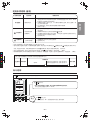
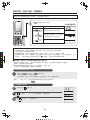
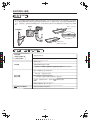
HEATING OPERATION
Press the (HEAT) button to start heating operation.
Press the (HEAT) button.
• Adjust the room temperature and fan speed to your preference.
Temperature range between 16°C~32°C can be set.
Press the (STOP) button.
A short beep sounds and heating operation stops.
STOP
DEHUMIDIFYING OPERATION
3 types of dehumidifying operations can be performed by pressing the (DEHUMIDIFY) button.
Performs powerful dry operation without lower down the room temperature.
Press the (DEHUMIDIFY) button.
• Every time you press the (DEHUMIDIFY) button,
the mode will change as shown in the chart below.
Condensation
Control
Auto
Dehumidifying
Quick
Laundry
(“AUTO” flashes for 5 seconds)
•
In auto dehumidifying mode, fine adjustment of room temperature,humidity
adjustment and fan speed selection can be made to your preference.
Every time you press the ROOM TEMPERATURE button, the temperature will change
by 1°C. (Temperature setting range is not higher or lower than 3°C.) Every time
you press the HUMIDITY button, the humidity will change by 5%. (Humidity setting
range is 40%~70%.)
• In quick laundry mode, fine adjustment of room temperature and fan speed
Press the (STOP) button.
• A short beep sounds and dehumidifying operation stops.
STOP
• After the dehumidifying operation is stopped, the remote controller will display the
operation mode that had been set before the (DEHUMIDIFY) button was
pressed.
ENGLISH
DEUTSCHFRANÇAISITALIANOSPANISHPORTUGUÊS
∂ÏÏËÓÈο
РУССКИЙ
– 14 –
selection can be made to your preference. (Fine adjustment of room
temperature and humidity adjustment cannot be made in condensation
control mode.)

DEHUMIDIFYING OPERATION (continued)
Auto
Dehumidifying
Operation mode In this situation Operating mechanism
• In damp
weather
• In most of the cases, the room temperature at the time the button is
pressed becomes the preset temperature.
(When room temperature is below 12°C, set 13°C. When it is
13°C~22°C, set +2°C. When it is below 23°C~26°C, set room
temperature. When it is above 26°C, set 26°C)
• Target humidity is around 50~60%. If the humidity becomes lower than
the target value, operation stops. If it becomes higher than the target
value, operation resume.
• The operation mode may automatically be switched to cooling or
heating for temperature control. (Refer to table below)
• To dry the
laundry
quickly
• Detects outdoor temperature, room temperature and humidity to
automatically select the most suitable combination of heating and
powerful dehumidifying operations.
• This operation is performed together with stainless plasma air purifying
operation.
• Priority is given to laundry drying.
Be sure use this mode when no one is in the room as the room
temperature and humidity will be high temporarily.
• 3-hour timer function is used for this operation mode.
• When
controlling
condensation
formed on
windows in
winter time
•
To control the condensation, priority is given to the operation for
lowering humidity. Therefore, the room temperature goes down in
this operation mode. The operation stops if the room temperature
becomes 1°C or below.
• 2-hour timer function is used for this operation mode.
Condensation
Control
Quick Laundry
• Be careful when condensation control operation is performed if the outside temperature is low as it will lower the
room temperature.
• (OFF TIMER) and (ON TIMER) (page 26), which are to be set using clock function, are not available during
dehumidifying (quick laundry and condensation control modes) operation. However, the timer (for 30 minutes
and 1-9 hours) can be set for quick laundry and condensation control modes with the (SLEEP) button.
• To set to your desired temperature and humidity while executing dehumidifying, it is recommended to use manual
dehumidifying function. (Page 17)
• If you do not wish room temperature to be too high when drying the laundry, use the preference (Powerful) mode
instead of quick laundry mode. (Page 18)
The operation mode may automatically be switched to cooling or heating for temperature control.
At this time, the room humidity may vary by approximately 10%.
Heating
operation
Dehumidifying operation
Operation
stop
Cooling
operation
About 3
°C
Approx. 3°C if outside temp. is
below approx. 32°C.
Approx. 1°C if outside temp. is
above approx. 32°C.
Room temperature set
Current room temperature
1ºC
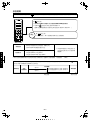
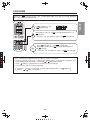
COOLING OPERATION
Press the (COOL) button to start cooling operation.
Press the
(COOL) button.
• Adjust the room temperature and fan speed to your preference.
Temperature range between 16°C~32°C can be set.
Press the
(STOP) button.
• A short beep sounds and cooling operation stops.
STOP
– 15 –
ENGLISH

•
If you want to set the desired temperature and humidity during dry cool operation, we recommend
you use the manual cooling operation. (Page 17)
STOP
DRY COOL OPERATION
When you operates cooling operation with the dry function, press the (DRY COOL) button, the air conditioner
automatically sets temperature and humidity in dry cool mode.
Press the (DRY COOL) button.
•
Adjust the room temperature and fan speed to your preference.
• Every time you press the (ROOM TEMPERATURE) button, the
temperature will change by 1°C.
(Temperature setting range from the auto set temperature is not higher or
lower than 3°C.)
Press the (STOP) button.
• A short beep sounds and dry cool operation stops.
Humidity
to be set
Temperature
to be set
Based on the detected outside and room temperature,
the temperature is set on an hourly basis within the range
of 24~28°C.
• Even if the room temperature
reached the preset temperature,
the air conditioner may continue
to operate if the preset humidity
has not been reached.
50% when temperature above 27°C is set.
55% when temperature of 26°C is set.
60% when temperature below 25°C is set.
Dry
intermittent
operation
Dry cool operation
Operation
stops
Cooling
operation
About 3ºC
Approx. 3°C if outside temp. is
below approx. 32°C.
Approx. 1°C if outside temp. is
above approx. 32°C.
Room temperature set Current room temperature
About 1ºC
The operation mode may automatically be switched to cooling or heating for temperature control.
If the room temperature is lower than the preset temperature, intermittent operation (repeat of operation state
and stop state) is performed to avoid excessive lowering of temperature and to control the humidity.
DEUTSCHFRANÇAISITALIANOSPANISHPORTUGUÊS
∂ÏÏËÓÈο
РУССКИЙ
– 16 –

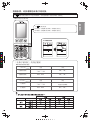
※The default setting is AUTO.
●Adjustment Range of Dehumidifying Operation
Room Temperature
Room Temperature
Humidity
Humidity
Automatically adjusted in the
range of
50% to 60%
Auto-controlled
temperature
±3°C
Auto-controlled
temperature
±3°C
Auto dry cool
operation
Manual dry cool
operation
●Adjustment Range of Dry Cool Operation
Setting Range of AUTO/MANUAL Operation
•
Switches to the manual mode if the machine is working in the auto dehu
midifying/dry cool operation.
•
Switches to the auto mode if the machine is working in the manual dehu
midifying/dry cool operation.
Press the AUTO/MANUAL button.
Example: Dehumidifying
Indicates
MANUAL
40 70
40 70
40 70
SWITCHING BETWEEN AUTO/MANUAL DEHUMIDIFYING/DRY COOL OPERATION
The AUTO/MANUAL button allows you to set the temperature and humidity manually during
dehumidifying/
dry cool operation.
Auto Dehumidifying
operation
Manual Dehumidifying
operation
10°C~32°C
16°C~32°C
– 17 –
ENGLISH
-10
-15
24
18
---
---

• Stainless plasma air purifying (Fan) operation is the combined operation mode of the fan operation and the
electric dust collector operation.
• If the stainless plasma air purifying mode is set while the air conditioner is in basic operation mode, the air
purifying function by the electric dust collector will operate together.
Press the (AIR PURIFYING) button.
• Adjust the fan speed to your preference. “HI”, “MED”, “LOW”, “SILENT”
can be selected.
• When only stainless plasma air purifying operation is set,
and (ON TIMER) preset cannot be done.
(OFF TIMER)
Press the (STOP) button.
• A short beep sounds and stainless
plasma
air
purifying
operation
stops.
STOP
Press the (AIR PURIFYING) button.
CANCEL
during
operation
POWERFUL OPERATION
•
• The airflow will be extended so that the air can reach even further during powerful operation.
(Extended Airflow)
Press the (POWERFUL PERATION) button during operation.
• A short beep sounds and the preference (Powerful) operation starts.
( POWERFUL) indicator lit on the remote controller.)
CANCEL
Press the (POWERFUL PERATION) button again.
• POWERFUL) indicator turns off on the remote controller.
Operation mode In this situation Operating mechanism
Heating
• When you want the room to be
a little warmer
• Set approximately 2°C higher than the preset
temperature. Powerful heating operation is
performed.
Cooling
• When you want a little cooler
air
• When you want the room to be
a little cooler
Auto Dehumidifying
• When you want to remove
humidity a little faster
• Laundry drying efficiency is enhanced.
• Condensation-control efficiency is enhanced.
Dehumidifying
• Set approximately 3°C lower than the preset
temperature. Powerful cooling operation is
performed.
• High speed dehumidifying operation is performed
aiming to achieve humidity of approximately 40%.
Condensation
Control
Quick Laundry
By pressing the (POWERFUL PERATION) button during auto, heating, dehumidifying, cooling or stainless
plasma air purifying operation, the air conditioner performs the “Powerful” operation.
STAINLESS PLASMA AIR PURIFYING (FAN) OPERATION
– 18 –

Example: Cooling
With the infrared sensor, the air conditioner can detect the activity level in a room and adjust the temperature
and humidity automatically, thus achieving the purpose of energy saving.
Press the INFRARED SENSOR button.
The infrared sensor automatically adjusts the
indoor temperature and humidity according to
the activity level in the room. However, the
temperature
e and humidity specified by the
remote controller remain unchanged.
1
•
The energy saving effect can be achieved only after the energy-saving temperature control function keeps
working
for more than 2 hours.
In the energy-saving temperature-control mode, the energy consumption saved by the air conditioner varies with
the activity level.
•
INFRARED HUMAN PRESENCE SENSING FUNCTION
•
Sensor in operation
Operation mode
Reduces the preset temperature
in one of the following cases:
Operation Description
Heating
Cooling
Auto
Dehumidifying/Dry Cool
Dehumidifying/Dry Cool
Operation mode Actions in case of no person
·Decreases the temperature by 2°C.
·Increases the temperature by 2°C .
·Increases the temperature by 5–10%.
·Energy-saving operation in auto mode.
•
•
•
Auto
Cooling
Heating
•
•
Raises the preset temperature
in one of the following cases:
Low activity level
Low indoor temperature
•
•
Increases the preset temperature
in one of the following cases:
Energy-saving operation in auto
mode.
The infrared sensor detects changes to the infrared generated by human bodies. Therefore, the accuracy
of infrared
sensor may be affected negatively in the following cases:
··
The activity level is very low (reading, watching TV, etc.) or human bodies are blocked by a screen, cabinet, or glass board.
··
The indoor temperature is very high and exceeds or approaches the human body temperature (when the refrigeration
just begins).
··
The person wears thick clothes and turns his/her back to the air conditioner.
··
Curtains or plant leaves swing due to pet movement or airflow.
Low activity level
Low indoor temperature
•
•
The tracing function (Page 20) can further reduce the energy consumption.
After detecting that the person leaves the room for 30 minutes, the air conditioner turns to the energy-saving modes
according to the settings in the remote controller as shown in the right table, but the preset temperature and humidity
in the remote controller remain unchanged.
When the air conditioner works in powerful operation, setting the energy-saving mode will cancel the powerful operation.
High activity level
High indoor temperature
– 19 –
ENGLISH

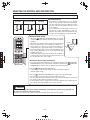
DYNAMIC AIR DEFLECTION FUNCTION (TRACING/EVASION)
The infrared sensor can detect the position of people and automatically change the airflow direction.
Press the AUTO AIR DEFLECTION button to switch the air deflection
mode.
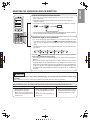
■How to change the detection speed of the sensor of the dynamic air deflection (tracing/evasion) function:
·
There are 2 detection speeds: “Standard” (by intervals of 15"–3') and “Slow” (by intervals of 1'–10').
·The remote controller is set to the standard speed by default.
·When the detection speed of the sensor is too high, set the detection speed to “Slow”
(when people and pets in the room behave frequently, resulting in frequent changes to the airflow direction).
·
After the dynamic air deflection mode is set, the sensor usually works once every 15 seconds to 3 minutes to
detect the position of the person and adjusts the airflow direction accordingly.
(The airflow direction does not change with the movement of human body immediately.)
·If the dynamic air deflection mode fails to achieve the desired effect, adjust the airflow direction manually.
·When the machine works in cooling, dehumidifying, or dry cool operation after the dynamic air deflection is set,
if the indoor humidity/temperature is very high, the left/right/upper/lower air deflectors may change their angles
to prevent drop of condensed water. After the temperature falls, the air conditioner returns to the dynamic air
deflection status.
1
·(Tracing) Adjusts the airflow direction
automatically to send the air flow to
the location of the person.
·
(Tracing) Adjusts the airflow direction
automatically to keep the air flow away
from the location of the person.
·
Return to the setting prior to the dynamic
air deflection mode.
Pressing the
DYNAMIC
AIR DEFLECTION
button
Release the
Dynamic Air
Deflection button
Operation Description
Example: Heating
1
2
3
4
Hold down after the running stops
Select the desire setting.
(Finely tuned within +3 to -3. The indicator turns off 10 seconds later)
Press the (STOP) button ·The settings are saved.
Set the detection speed of the sensor to “Slow”.
After the running stops, hold down for more than 5 seconds while pressing and holding .
·
At this time, the air conditioner beeps for signal receiving.
·Return to the “Standard” mode by repeating the above procedure (until the air conditioner beeps for
signal receiving).
In addition to “Standard” and “Slow” modes, you can also fine tune the detection speed of the sensor.
Fine tune the detection speed of the sensor
DEUTSCHFRANÇAISITALIANOSPANISHPORTUGUÊS
∂ÏÏËÓÈο
РУССКИЙ
– 20 –
ページが読み込まれています...
ページが読み込まれています...
ページが読み込まれています...
ページが読み込まれています...
ページが読み込まれています...
ページが読み込まれています...
ページが読み込まれています...
ページが読み込まれています...
ページが読み込まれています...
ページが読み込まれています...
ページが読み込まれています...
ページが読み込まれています...
ページが読み込まれています...
ページが読み込まれています...
ページが読み込まれています...
ページが読み込まれています...
ページが読み込まれています...
ページが読み込まれています...
ページが読み込まれています...
ページが読み込まれています...
ページが読み込まれています...
ページが読み込まれています...
ページが読み込まれています...
ページが読み込まれています...
ページが読み込まれています...
ページが読み込まれています...
ページが読み込まれています...
ページが読み込まれています...
ページが読み込まれています...
ページが読み込まれています...
ページが読み込まれています...
ページが読み込まれています...
ページが読み込まれています...
ページが読み込まれています...
ページが読み込まれています...
ページが読み込まれています...
ページが読み込まれています...
ページが読み込まれています...
ページが読み込まれています...
ページが読み込まれています...
ページが読み込まれています...
ページが読み込まれています...
ページが読み込まれています...
ページが読み込まれています...
ページが読み込まれています...
ページが読み込まれています...
ページが読み込まれています...
ページが読み込まれています...
ページが読み込まれています...
ページが読み込まれています...
ページが読み込まれています...
ページが読み込まれています...
ページが読み込まれています...
ページが読み込まれています...
ページが読み込まれています...
ページが読み込まれています...
ページが読み込まれています...
ページが読み込まれています...
ページが読み込まれています...
ページが読み込まれています...
ページが読み込まれています...
ページが読み込まれています...
ページが読み込まれています...
ページが読み込まれています...
ページが読み込まれています...
ページが読み込まれています...
ページが読み込まれています...
ページが読み込まれています...
ページが読み込まれています...
ページが読み込まれています...
ページが読み込まれています...
ページが読み込まれています...
ページが読み込まれています...
ページが読み込まれています...
ページが読み込まれています...
ページが読み込まれています...
-
 1
1
-
 2
2
-
 3
3
-
 4
4
-
 5
5
-
 6
6
-
 7
7
-
 8
8
-
 9
9
-
 10
10
-
 11
11
-
 12
12
-
 13
13
-
 14
14
-
 15
15
-
 16
16
-
 17
17
-
 18
18
-
 19
19
-
 20
20
-
 21
21
-
 22
22
-
 23
23
-
 24
24
-
 25
25
-
 26
26
-
 27
27
-
 28
28
-
 29
29
-
 30
30
-
 31
31
-
 32
32
-
 33
33
-
 34
34
-
 35
35
-
 36
36
-
 37
37
-
 38
38
-
 39
39
-
 40
40
-
 41
41
-
 42
42
-
 43
43
-
 44
44
-
 45
45
-
 46
46
-
 47
47
-
 48
48
-
 49
49
-
 50
50
-
 51
51
-
 52
52
-
 53
53
-
 54
54
-
 55
55
-
 56
56
-
 57
57
-
 58
58
-
 59
59
-
 60
60
-
 61
61
-
 62
62
-
 63
63
-
 64
64
-
 65
65
-
 66
66
-
 67
67
-
 68
68
-
 69
69
-
 70
70
-
 71
71
-
 72
72
-
 73
73
-
 74
74
-
 75
75
-
 76
76
-
 77
77
-
 78
78
-
 79
79
-
 80
80
-
 81
81
-
 82
82
-
 83
83
-
 84
84
-
 85
85
-
 86
86
-
 87
87
-
 88
88
-
 89
89
-
 90
90
-
 91
91
-
 92
92
-
 93
93
-
 94
94
-
 95
95
-
 96
96


Hitachi Air Conditioner RAS-SX13HAK / RAC-SX13HAK ユーザーマニュアル
- カテゴリー
- スプリットシステムエアコン
- タイプ
- ユーザーマニュアル
- このマニュアルも適しています
関連論文
-
Hitachi RAC-DX18HDK ユーザーマニュアル
-
-
-
-
-
-
-
Hitachi RAC-DX10HDK ユーザーマニュアル
-
-