
Register your
new device on
MyBosch now and
get free benefits:
bosch-home.com/
welcome
MC812....G
MultiTalent 8
Compact food processor
[en] Instruction manual
[ms] Arahan pengendalian
[zf] 使用說明書
[zh] 使用说明书
[ar]
Compact food processor 3
Pemproses makanan kompak 14
多功能食物處理器 26
小型食物處理器 35
54


3
Intended use
en
Intended use
This appliance is intended for domestic use and the household
environment only. Use the appliance only for processing normal
amounts of food and for normal amounts of time in domestic use.
The appliance is suitable for mixing, kneading, beating, cutting and
shredding food. The appliance must not be used for processing
other substances or objects. Additional applications are possible if
other accessories approved by the manufacturer are used. Only use
the appliance with approved genuine parts and accessories. Never
use the accessory parts for other appliances.
Only use the appliance indoors at room temperature and up to
2000 m above sea level.
Important safety notices
Read and follow the instruction manual carefully and keep for later
reference! Enclose these instructions when you give the appliance
to someone else. If the instructions for correct use of the appliance
are not observed, the manufacturer’s liability for any resulting
damage will be excluded.
This appliance can be used by persons with reduced physical,
sensory or mental capabilities or lack of experience and / or
knowledge if they are given supervision or instruction concerning
use of the appliance in a safe way and if they understand the
hazards involved. Keep children away from the appliance and
connecting cable and do not allow them to use the appliance.
Do not let children play with the appliance. Cleaning and user
maintenance must not be performed by children.
W Risk of electric shock and fire!
Connect and operate the appliance only in accordance with the
specifications on the rating plate. Do not use the appliance if the
power cord and / or appliance are damaged. Only our customer
service may repair the appliance, e.g. by replacing a damaged
power cord, in order to avoid hazards.
Never connect the appliance to timer switches or remote-
controllable sockets. Never leave the appliance unattended while
it is switched on!
Do not place the appliance on or near hot surfaces, e.g. hobs.
The power cord must not come into contact with hot parts or be
pulled across sharp edges.
Never immerse the base unit in water or place it in the
dishwasher. Do not steam-clean the appliance. Do not use the
appliance with damp hands.

4
en Important safety notices
After each use, whenever the appliance is unsupervised, prior to
assembly, disassembly or cleaning and in the event of an error, it
must always be disconnected from the mains.
If the power is interrupted, the appliance remains switched on
and restarts when the power is restored.
W Risk of injury!
Before replacing accessories or additional parts which move
during operation, the appliance must be switched off and
disconnected from the power supply. After switching off, the drive
continues running for a short time. Wait until the drive has come
to a standstill.
While operating the appliance, never reach into the bowl or
filling shaft with your hands. Always use the pusher for adding
ingredients. Do not insert any objects (e.g. wooden spoon) into
the bowl or filling shaft.
Care should be taken when handling sharp cutting blades,
emptying the container and during cleaning. Clean with a brush.
Do not touch the sharp edges of the universal blade with bare
hands. When not in use, always store the universal blade in
the blade guard. Do not grasp the sharp blades or edges of the
cutting discs. Take hold of the cutting discs by the edge only.
Never reach into the attached blender jug. Do not remove / attach
the blender jug until the drive has stopped. Do not touch the
blender blades with bare hands.
W Risk of scalding!
When processing hot liquids, steam escapes through the funnel in
the lid. Add a maximum of 0.4 litres of hot or frothing liquid.
W Risk of suffocation!
Do not allow children to play with the packaging material.
W Caution!
We recommend that the appliance is never switched on for longer
than is necessary to process ingredients. Do not operate at no-load.
Do not expose the blender jug to temperatures above 80°C.
W Important!
It is essential to clean the appliance thoroughly after each use or
after it has not been used for an extended period. X “Cleaning and
maintenance” see page 11

5
Important safety notices
en
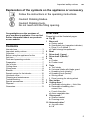
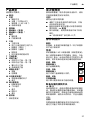
Explanation of the symbols on the appliance or accessory
i
Follow the instructions in the operating instructions.
Y
Caution! Rotating blades.
W
Caution! Rotating tools.
Do not reach into the filling opening.
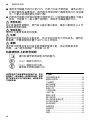
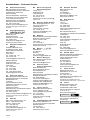
Overview
Please fold out the illustrated pages.
X Fig. A
1 Base unit
a Rotary switch
b Illuminated ring (operation indicator)
c Drive (2 or 3-speed *)
d Cable storage compartment
2 Bowl
3 Drive shaft 1 (grey)
4 Drive shaft 2 (black) *
5 Lid
a Pusher
b Pusher insert
6 Tools
a Tool holder
b Universal blade with blade guard
c Kneading hook (plastic) *
d Kneading hook (metal) *
e Stirring whisk
f Drive housing for stirring whisk
7 Disc holder
8 Cutting discs *
a Reversible slicing disc – thick / thin
b Reversible shredding disc –
coarse / fine
c French fries disc
d Asian vegetable disc
9 Citrus press *
a Strainer basket
b Pressing cone
10 Universal cutter *
a Jug with drive
b Lid
Congratulations on the purchase of
your new Bosch appliance. You can find
further information about our products
on our website.
Contents
Intended use ...............................................3
Important safety notices .............................3
Overview.....................................................5
Before using the appliance for the
first time ......................................................6
Parts and operating controls.......................6
Preparation .................................................7
Use of tools.................................................7
Cutting discs ...............................................8
Citrus press ...............................................9
Blender .....................................................10
Sample recipe for the blender ..................10
Universal cutter......................................... 11
Cleaning and maintenance ....................... 11
Troubleshooting ........................................12
Special accessories ..................................13
Disposal ....................................................13
Guarantee.................................................13

6
en
11 Blender
a Blender jug made of Tritan
b Blade insert
c Lid
d Filling opening
e Funnel
12 Accessories bag
* depending on model
Before using the appliance
for the first time
Before the new appliance can be used,
it must be fully unpacked, cleaned and
checked.
Caution!
Never operate a damaged appliance!
Remove the base unit and all
accessories from the packaging and
dispose of the packing materials.
Check that all parts are present and
examine them for obvious damage.
X Fig. A
Thoroughly clean and dry all parts
before using for the first time.
X “Cleaning and maintenance” see
page 11
Parts and operating
controls
Important!
The bowl, lid / jug of the universal cutter and
the blender jug are not suitable for use in
the microwave.
Colour coding
The appliance has a 2 or 3-
speed drive
(depending on the model). Every speed
setting is identified with a different
colour (black, grey und red). This colour
coding system can also be found on
the accessories. The accessories are
automatically connected to the right speed
setting.
Low speed, black
to drive shaft 2
For using the metal kneading hook.
Medium speed, grey
to drive shaft 1
For using the cutting discs and
citrus press.
High speed, red
without drive shaft
For using the blender and
universal cutter.
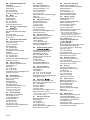
Rotary switch with illuminated
ring
X Fig. B
The rotary switch is used to select the
required speed or to switch the appliance
off. The integrated illuminated ring lights
up during operation. If there is an error in
operation, the electronic fuses trip or the
appliance has a defect, the appliance will
no longer switch on and the illuminated ring
will flash.
Caution!
Only use the rotary switch to switch the
appliance on and off. Switching off by
opening the lid will damage the appliance.
Settings
r
Instantaneous switching
at maximum speed. Hold down
switch for required duration.
0/off Stop / Switch off
min
–
max
Operating speed steplessly
adjustable from low to high
speed.
Pulse Intermittent operation at
maximum speed. Recommended
for making e.g. milkshakes in the
blender.

7
Preparation
en
Cable storage compartment
X Fig. C
The appliance is equipped with a cable
storage compartment. The length of the
power cord can be adjusted as required by
pulling out or pushing it back.
After finishing work, push the power cord
into the cable storage compartment by
jerking it back in.
Preparation
Place the base unit on a flat, clean and
stable surface.
Pull the power cord out to the required
length.
W Risk of injury!
– Do not insert the mains plug until
all preparations for working with the
appliance are complete.
– While operating the appliance, never
reach into the bowl or filling shaft.
– After switching off, the drive continues
running for a short time. Change
tools / accessories only once the drive is
at a standstill.
Important!
– Do not switch the appliance on until
tools or accessories have been
completely attached.
– The appliance cannot be switched on
unless the bowl has been inserted
correctly and closed with the lid. The lid
lug must be fully inserted in the slot of
the bowl handle.
– Only use the rotary switch to switch the
appliance on and off.
Use of tools
W Risk of injury!
While operating the appliance, never reach
into the bowl or filling shaft with your hands.
Do not insert any objects (e.g. wooden
spoon) into the bowl or filling shaft.
Universal blade
For cutting and chopping.
W Risk of injury!
Do not touch the sharp edges of the uni-
versal blade with bare hands. When not
in use, always store the universal blade in
the blade guard. Take hold of the universal
blade by the edge of the plastic handle only.
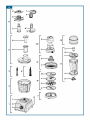
Kneading hook (plastic)
For kneading dough and mixing
in ingredients which are not to be cut up
(e.g. raisins, chocolate chips).
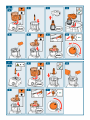
X Fig. D
1. Attach the bowl. Observe the
marking (.) when doing so. Rotate the
bowl clockwise as far as possible.
2. Press drive shaft 1 into the tool holder
until it locks into position.
3. Place the tool holder with the drive shaft
on the drive. Place the universal blade
or kneading hook on the tool holder and
release.
Caution!
Do not add ingredients until tools have been
fitted.
4. Add ingredients.
5. Attach the lid with the pusher. Observe
the marking (.) when doing so.
6. Rotate the lid clockwise as far as
possible.
7. Insert the mains plug. Set the rotary
switch to the desired setting.
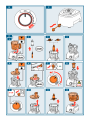
Adding more ingredients
8. To add more ingredients, set the rotary
switch to P. Remove the pusher
and add ingredients through the filling
opening.
Add liquids through the pusher.
The pusher insert can be used as a
measuring jug.

8
en Cutting discs
9. After processing, set the rotary switch to
P. Disconnect the mains plug.
Emptying the bowl
10. Rotate the lid anti-clockwise and
remove.
11. Take the tool holder with the universal
blade or kneading hook out of the bowl.
Remove the tool from the tool holder.
12. Rotate the bowl anti-clockwise and
remove. Empty the bowl.
Clean all parts immediately after use.
X “Cleaning and maintenance” see
page 11
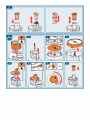
Stirring whisk
For cream, egg white and light
dough. Not suitable for solid
ingredients.
X Fig. E
1. Attach the bowl. Observe the
marking (.) when doing so. Rotate the
bowl clockwise as far as possible.
2. Place the drive shaft on the drive.
3. Insert the stirring whisk in the drive
housing until it locks into position.
4. Attach the drive housing to the drive
shaft, rotating slightly.
5. Add ingredients.
6. Attach the lid with the pusher. Observe
the marking (.) when doing so.
7. Rotate the lid clockwise as far as
possible.
8. Insert the mains plug. Set the rotary
switch to the desired setting.
After processing, set the rotary switch to
P. Disconnect the mains plug.
Clean all parts immediately after use.
X “Cleaning and maintenance” see
page 11
Kneading hook (metal)
For kneading heavy dough and
mixing in ingredients which are not
to be cut up (e.g. raisins, chocolate chips).
X Fig. F
1. Place drive shaft 2 on the drive.
Caution!
Always use drive shaft 2 with the metal
kneading hook.
2. Attach the bowl. Observe the
marking (.) when doing so. Rotate the
bowl clockwise as far as possible.
3. Place the metal kneading hook on the
drive shaft and press firmly.
4. Add ingredients.
5. Attach the lid with the pusher. Observe
the marking (.) when doing so.
6. Rotate the lid clockwise as far as
possible.
7. Insert the mains plug. Set the rotary
switch to the desired setting.
X “Adding more ingredients” see
page 7
After processing, set the rotary switch to
P. Disconnect the mains plug.
Clean all parts immediately after use.
X “Cleaning and maintenance” see
page 11
Cutting discs
W Risk of injury!
Do not grasp the sharp blades or edges of
the cutting discs. Take hold of the discs by
the edge only. Do not reach into the filling
opening. Always use the pusher for adding
ingredients.
Reversible slicing disc –
thick / thin
For slicing fruit and vegetables.
Marking on the reversible slicing disc:
“1” for the thick cutting side
“3” for the thin cutting side
Caution!
The reversible slicing disc is not suitable
for slicing hard cheese, bread, rolls or
chocolate. Only slice boiled waxy potatoes
when they are cold.

9
Citrus press
en
Reversible shredding disc –
coarse / fine
For shredding vegetables, fruit and cheese,
except hard cheese (e.g. Parmesan).
Marking on the reversible shredding disc:
“2” for the coarse shredding side
“4” for the fine shredding side
Caution!
The reversible shredding disc is not suitable
for shredding nuts. Shred soft cheese with
the coarse side only.
French fries disc
For slicing raw potatoes for chips.
Asian vegetable disc
For slicing fruit and vegetables into
fine strips for Asian vegetable dishes.
Note: Attach French fries disc or Asian
vegetable disc with the blade facing
up. Discs suitable for other purposes
are available from specialist outlets
(see chapter “Special accessories”).
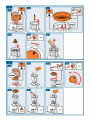
Pusher with insert
X Fig. G
The pusher can be used in two variants.
Variant 1: For e.g. herbs, leeks, carrots.
Insert the pusher in the opening of the lid.
Push down the food to be processed with
the pusher insert.
Variant 2: For e.g. apples, potatoes.
Position the pusher insert in the pusher and
rotate until both parts are connected. Push
down the food to be processed with the
pusher.
X Fig. H
1. Attach the bowl. Observe the
marking (.) when doing so. Rotate the
bowl clockwise as far as possible.
2. Place the drive shaft on the drive.
3. Take the disc out of the protective cover.
Place the disc on the disc holder. Turn
the desired slicing / shredding side to
face up. Place the disc on the disc
holder so that the drive couplings on the
holder engage with the disc openings.
The disc must rest on the lateral lugs of
the disc holder.
4. Attach the disc holder to the drive shaft,
rotating it slightly.
5. Attach the lid with the pusher. Observe
the marking (.) when doing so.
6. Rotate the lid clockwise as far as
possible.
7. Insert the mains plug. Set the rotary
switch to the desired setting.
8. Add the ingredients for slicing or
shredding and push down with the
pusher, applying light pressure. Cut
beforehand if necessary.
After processing, set the rotary switch to
P. Disconnect the mains plug.
Clean all parts immediately after use.
Doing so prevents residue from drying
on. X “Cleaning and maintenance” see
page 11
Caution!
Finish processing and empty the bowl
before the processed food reaches the
lower edge of the disc holder.
Note: Add chocolate before switching on
and cover with the pusher. After switching
on, push down with the pusher.
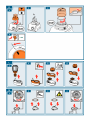
Citrus press
For squeezing juice out of citrus
fruits, e.g. oranges, grapefruits and lemons.
Caution!
The citrus press must be completely
assembled before use.
X Fig. I
1. Attach the bowl. Observe the
marking (.) when doing so. Rotate the
bowl clockwise as far as possible.
2. Place the drive shaft on the drive.
3. Place the strainer basket on the drive
shaft. Observe the marking (.) when
doing so. Turn the strainer basket
clockwise. The lug on the strainer
basket must be fully inserted in the slot
in the bowl handle.
4. Attach and press on the pressing cone.
5. Insert the mains plug.Set the rotary
switch to the setting min.


12
en Troubleshooting
Cleaning the base unit
Never immerse the base unit in liquids
or hold under running water and do not
clean in the dishwasher. Do not steam-
clean the appliance.
Wipe the base unit with a damp cloth.
If required, use a little detergent.
Then dry the base unit.
Cleaning the bowl, tools and
accessories
It is recommended rinsing all parts
under running water immediately after
use.
Take accessories apart before cleaning.
Do this in reverse order as described in
the individual chapters.
After cleaning, allow all parts to dry
thoroughly or rub dry.
Taking the stirring whisk apart for
cleaning
The stirring whisk can be taken apart for
cleaning.
X Fig. L
1. Remove the stirring whisk from the gear.
2. Push in the lug and lift off the gear
cover.
3. Remove both gear wheels from the
housing. Clean carefully with a brush.
4. After cleaning and drying, re-assemble
all parts in reverse order.
Cleaning the blender
The blender jug (without the blade insert),
lid and funnel are dishwasher-proof. Do not
clean the blade insert in the dishwasher but
under running water (do not soak in water).
Taking the blade insert apart for cleaning
X Fig. M
1. Turn the empty blender jug over. Rotate
the blade insert anti-clockwise by the
wings. The blade insert will release.
2. Take the blade insert out and remove
the sealing ring.
3. After cleaning and drying, fit the sealing
ring to the blade insert.
4. Fit the blade insert into the blender
jug from below and rotate clockwise
to secure. Rotate the blade insert at
least until the wing matches up with the
marking on the blender jug.
Caution!
Never use the blade insert without the seal.
Cleaning the universal cutter
It is recommended cleaning the universal
cutter immediately after use. This will
prevent residues from drying on and
possibly attacking the plastic (e.g. essential
oils in herbs). Do not clean the jug with the
drive in the dishwasher but under running
water using a brush. Do not leave in water.
To dry, place the jug with the drive facing
up.
Troubleshooting
W Risk of injury!
Before dealing with any faults, disconnect
the mains plug.
Important information:
The illuminated ring (operation indicator)
will flash if there is an error in operation,
the electronic fuses have tripped or the
appliance has a defect.
Fault:
Appliance is no longer working.
Possible cause:
The appliance has been overloaded
(e.g. tool jammed by food) and the
electronic fuse has tripped.
Remedial action:
Set rotary switch to P.
Disconnect the mains plug.
Eliminate the cause of the overload.
Switch the appliance back on again.

13
Special accessories
en
Possible cause:
An attempt was made to attach the bowl or
blender to the appliance while switched on.
Remedial action:
Set rotary switch to P.
Disconnect the mains plug.
Attach the bowl or blender.
Switch the appliance back on again.
Fault:
Appliance does not start.
Possible cause:
Parts not correctly attached. Lid not closed
completely.
Remedial action:
Set rotary switch to P.
Disconnect the mains plug.
Attach parts correctly according to the
instructions and close the lid completely.
Switch the appliance back on again.
Important information:
If the fault cannot be eliminated, please
contact customer service (see customer
service addresses at the end of this
booklet).
Special accessories
(available from a specialist outlet if not
included with the appliance)
French fries disc (MUZ45PS1)
For slicing raw potatoes for chips.
Asian vegetable disc (MUZ45AG1)
For slicing fruit and vegetables into fine
strips for Asian vegetable dishes.
Grating disc coarse (MUZ45RS1)
For grating raw potatoes e.g. for potato
pancakes or dumplings.
Potato fritter disc (MUZ45KP1)
For grating raw potatoes for rösti and potato
fritters and for cutting fruit and vegetables
into thick slices.
Disposal
J
Dispose of packaging in an environ
mentallyfriendly manner. This
appliance is labelled in accordance
with European Directive 2012/19/EU
concerning used electrical and
electronic appliances (waste electrical
and electronic equipment – WEEE).
The guideline determines the frame
work for the return and recycling
of used appliances as applicable
throughout the EU. Please ask your
specialist retailer about current
disposal facilities.
Guarantee
The guarantee conditions for this appliance

14
ms Pengendalian mengikut peraturan
Pengendalian mengikut peraturan
Perkakas ini hanya sesuai untuk pengunaan di dalam rumah atau
persekitaran sepertinya. Gunakan peranti hanya untuk kuantiti dan
masa pemprosesan domestik.
Perkakas ini sesuai untuk mengadun, menguli, memukul, memotong
dan memarut makanan. Perkakas ini tidak boleh digunakan untuk
memproses objek atau bahan yang lain. Aplikasi tambahan boleh
digunakan, apabila menggunakan aksesori lain yang diluluskan oleh
pengilang. Gunakan alat hanya dengan bahagian dan aksesori asli
yang diluluskan. Jangan gunakan pemasangan ini untuk peranti
lain.
Gunakan perkakas ini hanya di dalam bangunan pada suhu bilik
dan ketinggian sehingga 2000 m di atas paras laut.
Arahan keselamatan penting
Baca arahan pengendalian dengan teliti, patuhinya dan simpan!
Jika perkakas diberikan kepada pihak yang lain, sertakan bersama
manual ini. Ketidakpatuhan terhadap arahan bagi penggunaan
perkakas dengan betul akan mengecualikan pengeluar dari liabiliti
kerosakan yang berlaku.
Perkakas ini boleh digunakan oleh orang dengan kekurangan
keupayaan fizikal, deria atau metal, atau kekurangan pengalaman
dan / atau pengetahuan dibawah selian atau telah dilatih mengikut
keselamatan pengendalian peralatan ini dan memahami kesan
bahayanya. Kanak-kanak hendaklah dijauhkan daripada perkakas
dan kabel penyambungan serta tidak dibenarkan mengendalikan
perkakas ini. Kanak-kanak tidak dibenarkan bermain dengan
perkakas ini. Kanak-kanak tidak dibenarkan untuk mencuci atau
menyelenggara perkakas ini.
W Bahaya kejutan elektrik dan kebakaran!
Sambung dan kendalikan perkakas hanya mengikut spesifikasi
pada plat kadaran. Hanya kendalikan sekiranya tiada tanda
kerosakan pada perkakas dan kord kuasa. Pembaikan pada
perkasas, seperti penukaran kord kuasa yang rosak, hanya boleh
dilakukan oleh servis pelanggan kami bagi mengelakkan bahaya.
Jangan sambungkan perkakas pada pemasa atau soket yang
dikawal dengan alat kawalan jauh. Sentiasa awasi perkakas
semasa menggunakannya!
Jangan letak perkakas di atas atau berdekatan dengan
permukaan panas, seperti. Plat panas. Jangan biarkan kord
kuasa bersentuhan dengan bahagian panas atau menariknya di
atas bahagian sisi yang tajam.

15
Arahan keselamatan penting
ms
Jangan sesekali merendam unit asas ke dalam air atau mesin
basuh pinggan mangkuk. Jangan gunakan pembersih wap.
Jangan kendalikan perkakas dengan tangan yang basah.
Peralatan ini mestilah sentiasa dipisahkan dari punca kuasa
selepas setiap penggunaan,ketika tanpa penyeliaan, sebelum
pemasangan, penanggalan atau pembersihan dan kerosakan.
Jika bekalan kuasa terganggu, perkakas masih hidup dan
dimulakan semula apabila bekalan pulih.
W Risiko kecederaan!
Sebelum menukar alat ganti atau tambah, yang bergerak semasa
pengendalian, perkakas mestilah dimatikan dan dipisahkan
dari punca kuasa. Selepas dimatikan, pemacu bergerak untuk
seketika. Tunggu sehingga pemacu telah berhenti sepenuhnya!
Jangan sesekali mencapai ke dalam mangkuk atau aci pengisi
dengan tangan semasa operasi. Untuk menekan makanan,
sentiasa gunakan penolak. Jangan masukkan sebarang objek
(contohnya sudu kayu) dalam mangkuk atau dalam aci pengisi.
Berhati-hati semasa mengendalikan bilah tajam, semasa
mengosongkan bekas dan semasa membersih. Untuk
membersihkannya, gunakan berus.
Jangan sentuh bilah pisau universal dengan tangan yang
terdedah. Sentiasa simpan bilah pisau universal dalam
sarungnya apabila tidak digunakan. Jangan menggenggam bilah
tajam atau pinggir cakera pemotong. Pegang cakera pemotong
pada pinggirnya sahaja!
Jangan sesekali pegang di dalam bekas pengadun yang telah
dipasang! Pasang / tanggal bekas pengadun hanya apabila
pemacu telah berhenti. Jangan pegang bilah pengadun dengan
tangan kosong.
W Risiko lecur!
Semasa penyediaan bahan campuran yang panas, stim boleh
terbentuk dalam tudung melalui corong. Masukkan maks. 0.4 liter
cecair panas dan berbuih.
W Risiko lemas!
Jangan biarkan kanak-kanak bermain dengan bahan
pembungkusan.
W Perhatian!
Adalah dicadangkan supaya jangan sesekali tinggalkan
alat dihidupkan terlalu lama daripada yang diperlukan untuk
pemprosesan makanan. Jangan kendalikan dalam keadaan tanpa
beban.
Jangan dedahkan pengadun kepada suhu melebihi 80°C.

16
ms Arahan keselamatan penting
Tahniah atas pembelian perkakas Bosch
baru anda. Anda boleh mendapatkan
maklumat lanjut tentang produk kami di
halaman web kami.
W Penting!
Perkakas mestilah dibasuh dengan teliti selepas setiap penggunaan
atau selepas tidak menggunakannya untuk jangka waktu yang
panjang. X “Pembersihan dan penjagaan” lihat halaman 23
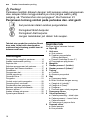
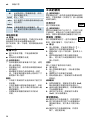
Penjelasan tentang simbol pada perkakas dan. alat ganti
i
Ikut peraturan dalam arahan pengendalian.
Y
Peringatan! Bilah berputar.
W
Peringatan! Alat berputar.
Jangan meletakkan jari dalam tiub suapan.
Sepintas lalu
Sila lipat keluar halaman ilustrasi.
X Rajah A
1 Unit asas
a Suis putaran
b Paparan pengendalian
(Gelang berlampu)
c Pemacu (bertahap 2 atau 3 *)
d Penyimpanan plag kuasa
2 Mangkuk
3 Gandar pemacu 1 (kelabu)
4 Gandar pemacu 2 (hitam) *
5 Tudung
a Penolak
b Aksesori penyumbat
6 Alat
a Pemegang alatan
b Bilah universal dengan sarung
c Cangkuk uli (plastik) *
d Cangkuk uli (besi) *
e Pengacau
f Perumah gear untuk pengacau
7 Pemegang cakera
8 Cakera pemotong *
a Cakera pemotong – tebal / nipis
b Cakera pemarut – kasar / halus
c Cakera kerepek
d Cakera sayur-sayuran Asia
9 Pemerah sitrus *
a Bakul penapis
b Kon penekan
Kandungan
Pengendalian mengikut peraturan............14
Arahan keselamatan penting ....................14
Sepintas lalu .............................................16
Sebelum penggunaan kali pertama ..........17
Bahagian dan elemen kawalan ................17
Persediaan ...............................................18
Penggunaan alat ......................................18
Cakera pemotong .....................................19
Pemerah Sitrus ........................................21
Pengadun .................................................21
Contoh resipi untuk pengadun..................22
Pemotong kecil universal..........................22
Pembersihan dan penjagaan....................23
Bantuan sekiranya bermasalah ................24
Aksesori pilihan ........................................25
Arahan tentang pelupusan .......................25
Syarat-syarat waranti................................25

17
Sebelum penggunaan kali pertama
ms
10 Pemotong kecil universal *
a Bekas dengan pemacu
b Tudung
11 Pengadun
a Bekas pengadun daripada Tritan
b Unit bilah
c Tudung
d Port isian semula
e Corong
12 Beg aksesori
* bergantung kepada model
Sebelum penggunaan kali
pertama
Sebelum perkakas baru boleh digunakan,
perkakas ini mestilah dikeluarkan
sepenuhnya, dibersihkan dan diperiksa.
Perhatian!
Jangan kendalikan perkakas yang rosak!
Keluarkan unit asas dan semua
aksesori daripada pembungkusan dan
buang bahan bungkusan yang ada.
Periksa kesempurnaan semua
bahagian.dan untuk kerosakan yang
boleh dilihat. X Rajah A
Sebelum penggunaan pertama, basuh
semua bahagian dengan teliti dan
keringkan.
X “Pembersihan dan penjagaan” lihat
halaman 23
Bahagian dan elemen
kawalan
Penting!
Mangkuk, penutup / bekas pemotong kecil
universal dan bekas pengadun tidak sesuai
digunakan di dalam ketuhar gelombang
mikro!
Kod warna
Perkakas mempunyai 2 atau 3 tahap pacuan
(bergantung kepada model). Setiap kelajuan
telah ditanda dengan warna yang berbeza
(hitam, kelabu dan merah). Kod warna juga
boleh ditemui dalam lampiran. Bahagian
aksesori akan disambung secara automatik
dengan tahap kelajuan yang betul.
Putaran rendah, hitam
dengan paksi pemacu 2
Untuk penggunaan cangkuk uli besi.
Putaran sederhana, kelabu
dengan paksi pemacu 1
Untuk penggunaan cakera
penghancur dan pemerah sitrus.
Putaran tinggi, merah
tanpa paksi pemacu
Untuk penggunaan pengadu dan
pemotong kecil universal.
Suis putaran dengan gelang
berlampu
X Rajah B
Dengan suis putaran memilih hidup atau
mati pada kelajuan yang dimahukan bagi
alat. Gelang berlampu menyala juga
semasa penggunaan. Apabila terdapat
ralat dalam operasi peranti, mencetuskan
fius elektrik atau kerosakan pada peranti,
peranti tidak boleh dihidupkan dan gelang
berlampu akan berkelip.
Perhatian!
Hanya gunakan suis putar untuk
menghidupkan atau mematikan perkakas.
Penghentian melalui pembukaan penutup
boleh menyebabkan kerosakan pada
perkakas.
Tetapan
r
Tork litar pada kelajuan penuh.
Tahan suis untuk tempoh yang
dimahukan.
0/off Hentikan / Matikan
min
–
max
Kelajuan kerja bleh ditetapkan tak
bertahap dari putaran rendah ke
tinggi.
Pulse Operasi selang dengan putaran
tertinggi. Disarankan untuk
penyediaan cth. Susu kock di
dalam pengadun.

18
ms Persediaan
Penyimpanan plag kuasa
X Rajah C
Alat ini disediakan dengan ruang kabel
kuasa. Panjang kord kuasa boleh
dilaraskan sewajarnya dengan menarik
atau menolak kembali kabel.
Selepas kerja, kord boleh ditolak kembali
ke dalam ruang simpan kord dengan
penolakan sedikit.
Persediaan
Letakkan unit ke atas permukaan yang
licin, bersih dan teguh.
Tarik kabel kuasa mengikut panjang
yang dimahukan.
W Risiko kecederaan!
– Jangan memasukkan palam sesalur
sehingga semua persiapan untuk
bekerja dengan perkakas telah lengkap.
– Jangan sesekali mencapai ke dalam
mangkuk atau tiub masukan semasa
operasi.
– Selepas dimatikan, pemacu masih
bergerak untuk seketika. Jangan
menukar alat / aksesori sehingga
pemacu telah berhenti sepenuhnya.
Penting!
– Hanya hidupkan perkakas apabila
peralatan atau aksesori telah dipasang
sepenuhnya.
– Alat ini tidak boleh dihidupkan jika
mangkuk tidak diletakkan dengan betul
dan ditutup dengan penutup. Hidung
penutup mesti duduk sepenuhnya di
dalam slot pemegang mangkuk.
– Hanya gunakan suis putar untuk
menghidupkan atau mematikan
perkakas.
Penggunaan alat
W Risiko kecederaan!
Jangan sesekali mencapai ke dalam
mangkuk atau aci pengisi dengan
tangan semasa operasi. Tiada objek
(contohnya sudu kayu) boleh dimasukkan
dalam mangkuk atau dalam aci pengisi.
Bilah universal
Untuk mencincang dan melumat.
W Risiko kecederaan!
Jangan sentuh bilah pisau universal dengan
tangan yang terdedah. Sentiasa simpan
bilah pisau universal dalam sarungnya
apabila tidak digunakan. Pegang bilah
universal hanya pada hujung pemegang
plastik.
Cangkuk uli (plastik)
Untuk menguli doh dan untuk
mencampur bahan, yang tidak harus dikisar
(cth. kismis, cip coklat).
X Rajah D
1. Pasang mangkuk. Beri perhatian pada
tanda (.). Putar mangkuk mengikut
arah jam sepenuhnya.
2. Tekan paksi pemacu 1 ke dalam
pemegang peralatan sepenuhnya.
3. Pasang pemegang peralatan dengan
paksi pemacu di atas pemacu. Letak
bilah universal atau cangkuk uli di atas
pemegang peralatan dan lepaskan.
Perhatian!
Sentiasa masukkan bahan penyediaan
hanya selepas peralatan dipasang.
4. Tambah ramuan.
5. Letakkan penutup dengan penolak. Beri
perhatian pada tanda (.).
6. Putar penutup mengikut arah jam
sepenuhnya.
7. Pasangkan plag. Setkan suis putar pada
pengesetan yang dikehendaki.
Menambah lebih banyak bahan
8. Untuk menambah bahan, setkan suis
putar pada P. Tanggalkan penolak
dan masukkan ramuan keras sedikit
demi sedikit melalui tiub suapan.

19
Cakera pemotong
ms
Tambah cecair melalui penolak.
Aksesori penolak boleh digunakan
sebagai bekas pengukur.
9. Selepas dioperasikan, setkan suit putar
pada P. Cabutkan plag.
Kosongkan mangkuk
10. Putar tudung dalam arah lawan jam dan
tanggalkannya.
11. Keluarkan pemegang alatan bersama
dengan bilah universal atau cangkuk
uli daripada mangkuk. Tanggalkan
peralatan daripda pemegang peralatan.
12. Putarkan mangkuk mengikut arah lawan
jam dan tanggalkannya. Kosongkan
mangkuk.
Cuci semua bahagian segera selepas
digunakan. X “Pembersihan dan
penjagaan” lihat halaman 23
Pengacau
Untuk krim, putih telur dan doh
ringan. Tidak sesuai untuk bahan
makanan keras.
X Rajah E
1. Pasang mangkuk. Beri perhatian pada
tanda (.). Putar mangkuk mengikut
arah jam sepenuhnya.
2. Letakkan paksi pemacu di atas pemacu.
3. Pasang bekas pengacau ke dalam
perumah gear sepenuhnya.
4. Psang perumah gear ke atas paksi
pemacu dengan memutarkannya
sedikit.
5. Tambah ramuan.
6. Letakkan penutup dengan penolak. Beri
perhatian pada tanda (.).
7. Putar penutup mengikut arah jam
sepenuhnya.
8. Pasangkan plag. Setkan suis putar pada
pengesetan yang dikehendaki.
Selepas dioperasikan, setkan suit putar
pada P. Cabutkan plag.
Cuci semua bahagian segera selepas
digunakan. X “Pembersihan dan
penjagaan” lihat halaman 23
Cangkuk uli (besi)
Untuk menguli doh berat dan untuk
mencampurkan bahan, yang tidak
harus dikisar (cth. kismis, cip coklat).
X Rajah F
1. Pasang paksi pemacu 2 di atas
pemacu.
Perhatian!
Untuk cangkuk uli besi, paksi pemacu 2
mesti digunakan.
2. Pasang mangkuk. Beri perhatian pada
tanda (.). Putar mengkuk mengikut
arah jam sepenuhnya.
3. Letakkan cangkuk uli besi di atas paksi
pemacu dan tekan kuat.
4. Tambah ramuan.
5. Letakkan penutup dengan penolak. Beri
perhatian pada tanda (.).
6. Putar penutup mengikut arah jam
sepenuhnya.
7. Pasangkan plag. Setkan suis putar pada
pengesetan yang dikehendaki.
X “Menambah lebih banyak bahan”
lihat halaman 18
Selepas operasi, setkan suis putar pada
P. Cabutkan plag.
Cuci semua bahagian segera selepas
digunakan. X “Pembersihan dan
penjagaan” lihat halaman 23
Cakera pemotong
W Risiko kecederaan!
Jangan menggenggam bilah tajam atau
pinggir cakera pemotong. Pegang cakera
pada pinggirnya sahaja! Jangan meletakkan
jari dalam tiub suapan. Untuk menekan
makanan, sentiasa gunakan penolak.
Cakera pemotong –
tebal / nipis
Untuk menghiris buah-buahan dan
sayur-sayuran.
Label pada cakera hiris boleh terbalik:
"1" untuk bahagian hiris tebal
"3" untuk bahagian hiris nipis

20
ms Cakera pemotong
Perhatian!
Cakera hiris boleh terbalik tidak sesuai
untuk memotong keju, roti, kek dan coklat.
Hiris kentang rebus yang berlilin hanya
apabila ia telah sejuk.
Cakera pemarut –
kasar / halus
untuk memayang sayur-sayuran,
buah-buahan, keju, kecuali keju keras
(misalnya Parmesan).
Label pada cakera pemarut boleh terbaik:
“2” untuk sisi parutan kasar
“4” untuk sisi parutan halus
Perhatian!
Cakera pemarut boleh terbalik tidak sesuai
untuk memarut kekacang. Parut keju
lembut hanya dengan bahagian kasar.
Cakera kerepek
Untuk menghiris kentang mentah
menjadi kerepek.
Cakera sayur-sayuran Asia
Menghiris buah-buahan dan sayur-
sayuran menjadi kepingan halus untuk
hidangan sayur-sayuran Asia.
Tip: Letakkan cakera kentang jejari atau
sayur-sayuran Asia dengan bilah ke atas.
Cakera, yang sesuai untuk tujuan lain,
boleh didapati daripada pengedar (rujuk
tajuk "Aksesori pilihan").
Penolak dengan pemasangan
X Rajah G
Penolak boleh digunakan dalam dua
variasi.
Variasi 1: Untuk cth. Herba, bawang, lobak.
Pasang penolak ke dalam pembukaan.
Tolak masuk bahan makanan dengan
pemasangan penolak.
Variasi 2: Untuk cth. Epal, kentang. Pasang
pemasangan penolak ke dalah penolak
dan pusing sehingga kedua-dua bahagian
bersambung antara satu dengan yang
lain. Tolak masuk bahan makanan dengan
penolak.
X Rajah H
1. Pasang mangkuk. Beri perhatian pada
tanda (.). Putar mangkuk mengikut
arah jam sepenuhnya.
2. Letakkan paksi pemacu di atas pemacu.
3. Keluarkan cakera daripada sarung
keselamatan. Letak cakera di atas
pemegang cakera. Pusing bahagian
potongan / parutang yang diingini ke
atas. Letakkan cakera seperti itu di atas
pemegang cakera supaya pembawa
pada pemegang cakera masuk ke
dalam bukaan cakera. Cakera mesti
di letakkan di atas pin sisi pemegang
cakera.
4. Letakkan pemegang cakera di atas
paksi pemacu dengan memutarkannya
sedikit.
5. Letakkan penutup dengan penolak. Beri
perhatian pada tanda (.).
6. Putar penutup mengikut arah jam
sepenuhnya.
7. Pasangkan plag. Setkan suis putar pada
pengesetan yang dikehendaki.
8. Masukkan bahan untuk dipotong
atau diparut dan tolak masuk dengan
penolak dengan perlahan. Sekiranya
perlu, kecilkan terlebih dahulu.
Selepas dioperasikan, setkan suit putar
pada P. Cabutkan plag.
Cuci semua bahagian segera selepas
digunakan. Jangan keringkan sisa
seperti di bawah. X “Pembersihan dan
penjagaan” lihat halaman 23
Perhatian!
Hentikan pemprosesan dan kosongkan
mangkuk sebelum makanan yang diproses
tersebut mencapai bahagian bawah
pemegang cakera.
Tip: Masukkan coklat sebelum
menghidupkannya dan tutup dengan
penolak. Selepas dihidupkan, tolak masuk
dengan penolak.
ページが読み込まれています...
ページが読み込まれています...
ページが読み込まれています...
ページが読み込まれています...
ページが読み込まれています...
ページが読み込まれています...
ページが読み込まれています...
ページが読み込まれています...
ページが読み込まれています...
ページが読み込まれています...
ページが読み込まれています...
ページが読み込まれています...
ページが読み込まれています...
ページが読み込まれています...
ページが読み込まれています...
ページが読み込まれています...
ページが読み込まれています...
ページが読み込まれています...
ページが読み込まれています...
ページが読み込まれています...
ページが読み込まれています...
ページが読み込まれています...
ページが読み込まれています...
ページが読み込まれています...
ページが読み込まれています...
ページが読み込まれています...
ページが読み込まれています...
ページが読み込まれています...
ページが読み込まれています...
ページが読み込まれています...
ページが読み込まれています...
ページが読み込まれています...
ページが読み込まれています...
ページが読み込まれています...
ページが読み込まれています...
ページが読み込まれています...
ページが読み込まれています...
ページが読み込まれています...
ページが読み込まれています...
ページが読み込まれています...
ページが読み込まれています...
ページが読み込まれています...
ページが読み込まれています...
ページが読み込まれています...
ページが読み込まれています...
-
 1
1
-
 2
2
-
 3
3
-
 4
4
-
 5
5
-
 6
6
-
 7
7
-
 8
8
-
 9
9
-
 10
10
-
 11
11
-
 12
12
-
 13
13
-
 14
14
-
 15
15
-
 16
16
-
 17
17
-
 18
18
-
 19
19
-
 20
20
-
 21
21
-
 22
22
-
 23
23
-
 24
24
-
 25
25
-
 26
26
-
 27
27
-
 28
28
-
 29
29
-
 30
30
-
 31
31
-
 32
32
-
 33
33
-
 34
34
-
 35
35
-
 36
36
-
 37
37
-
 38
38
-
 39
39
-
 40
40
-
 41
41
-
 42
42
-
 43
43
-
 44
44
-
 45
45
-
 46
46
-
 47
47
-
 48
48
-
 49
49
-
 50
50
-
 51
51
-
 52
52
-
 53
53
-
 54
54
-
 55
55
-
 56
56
-
 57
57
-
 58
58
-
 59
59
-
 60
60
-
 61
61
-
 62
62
-
 63
63
-
 64
64
-
 65
65


