
user manual
用户手册
Iron AidTM
Iron Aid TM
EDI97170W

Electrolux. Thinking of you.
Share more of our thinking at www.electrolux.com
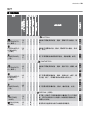
Contents
Important safety information 2
Environment 4
Product description 5
Control panel 6
What is shown in the display 6
Before first use 6
Sorting and preparing laundry 7
Starting up for the first time 7
Iron AidTM Steam System 8
Starting an Iron AidTM programme 12
Drying 13
Starting a drying programme 15
Drying rack 16
Cleaning and maintenance 17
What to do if ... 21
Technical data 23
Machine settings 23
Hints for test institutes 24
Installation 24
Service 28
Subject to change without notice
Important safety information
Important! Only operate the Iron Aid
programmes with distilled water!
Mains water causes damage to the ap-
pliance.
Important! In the interest of your safety
and to ensure the correct use, before
installing and first using the appliance,
read this user manual carefully,
including its hints and warnings. To
avoid unnecessary mistakes and
accidents, it is important to ensure that
all people using the appliance are
thoroughly familiar with its operation
and safety features. Save these
instructions and make sure that they
remain with the appliance if it is moved
or sold, so that everyone using it through
its life will be properly informed on
appliance use and safety.
- Please read the instruction book be-
fore using this appliance.
General safety
• It is dangerous to alter the specifications or
attempt to modify this product in any way.
• This appliance is not intended for use by
persons (including children) with reduced
physical, sensory or lack of experience and
knowledge, unless they have been given
supervision or instruction concerning use
of the appliance by a person responsible
for their safety.
• Make sure that small pets do not climb into
the drum. To avoid this, please check into
the drum before using.
• Any objects such as coins, safety pins,
nails, screws, stones or any other hard,
sharp material can cause extensive dam-
age and must not be placed into the ma-
chine.
• In order to avoid danger of fires caused by
excessive drying, do not use appliance to
dry the following items: cushions, quilts
and the like (these items accumulate heat).
• Items such as foam rubber (latex foam),
shower caps, waterproof textiles, rubber
backed articles and clothes or pillows fit-
ted with foam rubber pads should not be
dried in the tumble dryer.
• Always unplug the appliance after use,
clean and maintenance.
• Under no circumstances should you at-
tempt to repair the machine yourself. Re-
pairs carried out by inexperienced persons
may cause injury or serious malfunction-
ing. Contact your local Service Centre. Al-
ways insist on genuine spare parts.
2 electrolux

• Items that have been soiled with substan-
ces such as cooking oil acetone, petrol,
kerosene, spot removers, turpentine, wax-
es and wax removers should be washed in
hot water with an extra amount of deter-
gent before being dried in the tumble dry-
er.
• Danger of explosion: never tumble dry
items that have been in contact with in-
flammable solvents (petrol, methylated
spirits, dry cleaning fluid and the like). As
these substance are volatile, they could
cause an explosion. Only tumble dry items
washed with water.
• Risk of fire: items that have been spotted
or soaked with vegetable or cooking oil
constitute a fire hazard and should not be
placed in the tumble dryer.
• If you have washed your laundry with stain
remover you must execute an extra rinse
cycle before loading your tumble dryer.
• Please make sure that no gas lighters or
matches have accidentally been left in
pockets of garments to be loaded into ap-
pliance
• When removing from the socket, never pull
the mains plug by the cable, instead take
a hold of the plug.
• The height adjustable screw feet must
never be removed.
• Manifold plugs, couplings and extension
cables must not be used. Risk of fire from
overheating!
• Do not spray down the appliance with jets
of water. Risk of electric shock!
• Do not lean on the open door. The appli-
ance may tip over.
• Once the drying cycle or Iron Aid pro-
gramme has been interrupted, the laundry
and drum may be hot. Risk of burns! Take
care when removing the laundry.
• Take care when interrupting the Iron Aid
programme: Do not open the machine
door during the steam phase. Hot steam
may result in burns. The display shows a
message to indicate the steam phase.
• The final part of a drying cycle occurs with-
out heat (cool down cycle) to ensure that
the items are left at a temperature that en-
sures that the items will not be damaged.
•
Caution – Hot surface:
Do not touch the back of the appliance
while it is operating.
Warning! Never stop a tumble dry
before the end of the drying cycle
unless all items are quickly removed
and spread out so that the heat is
dissipated. Risk of fire!
•
Risk of electric shock! Do not spray
down the appliance with jets of water.
Installation
• This appliance is heavy. Care should be
taken when moving it.
• When unpacking the appliance, check that
it is not damaged. If in doubt, do not use it
and contact the Service Centre.
• All packaging must be removed before
use. Serious damage can occur to the
product and to property if this is not ad-
hered to. See relevant section in the user
manual.
• The final part of a tumble dryer cycle oc-
curs without heat ( cool down cycle ) to
ensure that the items are left at a temper-
ature that ensures that items will not be
damaged.
• Any electrical work required to install this
appliance should be carried out by a quali-
fied electrician or competent person.
• Care must be taken to ensure that the ap-
pliance does not stand on the electrical
supply cable.
• If the machine is situated on a carpeted
floor, please adjust the feet in order to al-
low air to circulate freely under the appli-
ance.
• After having installed the appliance, check
that it is not pressing or standing on its
electrical supply cable.
• If the tumble dryer is placed on top of a
washing machine, it is compulsory to use
the stacking kit (optional accessory).
Use
• The appliance is intended for drying and
steam treatment of standard laundry in do-
mestic applications.
• This appliance is designed for domestic
use. It must not be used for purposes other
than those for which it was designed.
• Only dry fabrics which are designed to be
machine dried. Follow the instructions on
each garment label.
• Do not dry unwashed items in the tumble
dryer.
electrolux 3

• Do not overload the appliance. See the
relevant section in the user manual.
• Clothes which are dripping wet should not
be placed in the dryer.
• Garments which have been in contact with
volatile petroleum products should not be
machine dried. If volatile cleaning fluids are
used, care should be taken to ensure that
the fluid is removed from the garment be-
fore placing in the machine.
• When using dry-cleaning sets: only use
those products which are declared as suit-
able for the dryer by the manufacturer.
• Clean the micro-fine filter and fine strainer
after each drying cycle or Iron Aid pro-
gramme.
• Do not use the machine without a lint filter
or with a damaged lint filter. Risk of fire!
• Only fill the water reservoir for steam treat-
ment with distilled water. Do not use tap
water or any additives! The condensed
water from this appliance’s condensed
water container can also be used, if it is
filtered first (e. g. with a coffee filter).
• Clean the heat exchanger regularly.
• Never pull the power supply cable to re-
move the plug from the socket; always
take hold of the plug itself.
• Never use the tumble dryer if the power
supply cable, the control panel, the work-
ing surface or the base are damaged so
that the inside of the tumble dryer is ac-
cessible.
• With stacked washer and Iron Aid appli-
ance: do not place objects on the appli-
ance. These may fall off during operation.
• The lamp cover for the interior light must
be screwed down tightly.
• Fabric softeners, or similar products
should be used as specified by the fabric
softener instructions.
• Caution - hot surface : Do not touch the
door light cover surface when the light is
switched on.
Child safety
• This machine is not intended for use by
young children or infirm persons without
supervision.
• Children should be supervised to ensure
that they do not play with the appliance.
• The packaging components (e.g. plastic
film, polystyrene) can be dangerous to chil-
dren - danger of suffocation! Keep them
out of children’s reach.
• Keep all detergents in a safe place out of
children’s reach.
• Make sure that children or pets do not
climb into the drum.
Environment
The symbol on the product or on its
packaging indicates that this product may
not be treated as household waste. Instead
it should be taken to the appropriate
collection point for the recycling of electrical
and electronic equipment. By ensuring this
product is disposed of correctly, you will help
prevent potential negative consequences for
the environment and human health, which
could otherwise be caused by inappropriate
waste handling of this product. For more
detailed information about recycling of this
product, please contact your local council,
your household waste disposal service or the
shop where you purchased the product.
Old appliance
Warning!
Remove mains plug from socket when you
have no further use for the machine. Cut off
mains cable and dispose of together with
plug. Destroy loading door hook. Children
cannot then lock themselves in the machine
and put their lives at risk.
Packaging material
The packaging materials are environmentally
friendly and can be recycled. The plastic
components are identified by markings, e.g.
>PE<, >PS<, etc. Please dispose of the
packaging materials in the appropriate con-
tainer at the community waste disposal fa-
cilities.
Environmental tips
• In the dryer, laundry becomes fluffy and
soft. Fabric softeners are not therefore
needed when washing.
4 electrolux

• Your dryer will function most economically
if you:
– always keep the ventilation slots on the
base of the dryer unobstructed;
– use the loading volumes specified in the
programme overview;
– ensure you have good ventilation in the
installation room;
– clean the micro-fine filter and fine strain-
er after each drying cycle;
– spin the laundry well before drying.
Energy consumption depends on spin-
ning speed set in washing machine.
Higher spinning speed - lower energy
consumption.
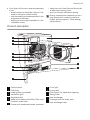
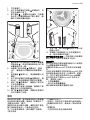
Product description
6
7
8
9
10
11
12
13
14
1
2
3
4
5
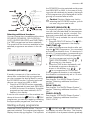
1 Control panel
2 Fluff filters
3 Loading door (reversible)
4 Ventilation grille
5 Adjustable feet
6 Water recirculation valve/filter, Filler neck
for steam water tank
7 Drawer with condensed water container
8 Drum light
9 Drying rack
10 Push button for base door opening
11 Rating Plate
12 Heat exchanger
13 Drainage hose for water tank
14 Heat exchanger door
electrolux 5

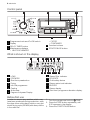
Control panel
1 2 3 4
65
1 Programme knob and On/Off switch
2 Display
3 DELAY TIMER button
4 Maintenance displays
– HEAT EXCHANGER
–FILTER
–CONTAINER
5 Function buttons
6 START/PAUSE button
What is shown in the display
1 2 3 4 5 6 7 8
9 10 11 12 13 1514
1 LOAD
2 DRYNESS
3 Start time preselection
4 Drying
5 Iron Aid programme
6 Cooling
7 Anticrease
8 Degree of dryness Display
9 Steam Filter indicator
10 DELICATE
11 Child safety device
12 Steam water tank indicator
13 BUZZER
14 Steam display
15 Start time /programme duration display
Before first use
In order to remove any residues which may
have been produced during production, wipe
the dryer drum with a damp cloth or carry out
a brief drying cycle (30 MIN) with damp clo ths
in the machine.
1.
Turn the programme knob to
TIME.
2. Press the TIME button repeatedly until
0.30 appears in the display.
3. Press the START/PAUSEbutton.
6 electrolux

Sorting and preparing laundry
Sorting laundry
• Sort by fabric type:
–
Cotton/linen for programmes in
COTTONS programme group.
– Mixed fibres and synthetics for pro-
grammes in the
SYNTHETICS pro-
gramme group.
• Sorting by care label. The care labels
mean:
Drying in the tumble
dryer possible in princi-
ple
Dry at normal tempera-
ture
Dry at reduced temper-
ature (press DELICA-
TEbutton!)
Drying in the tumble
dryer not possible
Important! Do not place in the appliance any
wet laundry which is not specified on the care
label as being suitable for tumble-drying.
This appliance can be used for all wet laundry
items which are labelled as suitable for tum-
ble-drying.
• Do not dry new, coloured textiles together
with light-coloured laundry items. Textile
colours may bleed.
• Do not dry cotton jersey and knitwear with
the EXTRA programme. Items may shrink!
• Wool and wool-like textiles can be dried
using the
WOOL programme. Before
the drying cycle spin the woollen textiles as
well as possible (max. 1200 rpm). Only dry
woollen textiles together which are similar
or the same with respect to material, col-
our and weight. Please dry heavy laundry
items made of wool separately.
Special notes about Iron Aid
Caution!
• The following textiles cannot be treated
using an Iron Aid programme: woollen
knitwear, leather, textiles with large metal,
wooden or plastic parts, textiles with rust-
ing metal parts, oilskins or wax cotton gar-
ments.
• To smooth or freshen laundry with an Iron
Aid programme, sort laundry by size,
weight, material and colour. Only smooth
textiles together that are similar in terms of
size, weight, material and colour.
• Do not dry new, coloured textiles together
with light-coloured laundry items. Colours
may fade (check colour fastness of fabric
when damp in an inconspicuous area).
• Do not use dry cleaning sets such as dryel
in combination with Iron Aid programmes.
Preparing laundry
• To avoid laundry becoming tangled: close
zips, button up duvet covers and tie loose
ties or ribbons (e.g. of aprons).
• Empty pockets. Remove metal items (pa-
per clips, safety pins, etc).
• Turn items with double-layered fabrics in-
side out (e.g. with cotton-lined anoraks,
the cotton layer should be outermost).
These fabrics will then dry better.
Special notes about Iron Aid
• Before treating garments with an Iron Aid
programme, remove stains by washing or
using localised stain removal.
• Turn items with double-layered fabrics in-
side out (e.g. with cottonlined anoraks, the
cotton layer should be outermost). These
fabrics will then dry better.
Starting up for the first time
Switching appliance on / switching light on.
Turn the programme selector to any pro-
gramme. The appliance has been switched
on. When the loading door is opened, the
drum is illuminated. Opening loading door /
loading laundry
1. Open loading door: Push against the
loading door (push point )
electrolux 7

2. Load your laundry (do not force it in/ over-
load the machine).
Caution! Be careful not to trap laundry
in between the loading door and rubber
seal.
3. Close loading door securely. Lock must
audibly lock.
Iron Aid
TM
Steam System
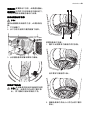
Fill water tank
You must fill up the water tank before using
an Iron Aid programme for the first time. Use
the distilled water provided if there is not yet
any condensed water from previous drying
programmes (see chapter on "Cleaning and
Maintenance, Emptying condensed water
container"). If, after an Iron Aid programme is
selected, the
water tank indicator on the
display lights up, you will need to fill up the
water tank with distilled water. Otherwise,
you will not be able to start any Iron Aid pro-
gramme.
Caution! Important! Only fill the water
tank with distilled or fully desalinated
water. Do not use tap water or additives!
You can also use the condensed water
from the tank, as long as you filter it first
(use the canister supplied with the filter
fitted: see figure opposite).
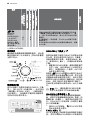
1. Pull drawer containing condensed water
container out a little (1),
1
2. Push down the water tank’s filler neck (1)
and pull out it (2).
1
2
3. Fill with distilled water from the canister
provided, up to the MAX mark inside the
container.
8 electrolux

max
4. Push filler neck and drawer with con-
densed water container back in.
When dry, all textiles not specifically prohibi-
ted in the chapter ‘Sorting and preparing
laundry’ may be treated with the Iron Aid
Steam System. Wet textiles may only be trea-
ted if they are labelled as suitable for dry pro-
grammes.
Water recirculation system
This system allows you to automatically use
for an Iron Aid Steam cycle the condensed
water collected in the condense water tank
during a drying cycle.
Caution! The water in the condense
water tank will never automatically fill the
steam water tank. The water
recirculation system works only if it is
supplied by water arising during
standard drying cycles.
To activate this system turn the valve to the
ON position. When the valve is ON the steam
water tank will be filled during the next drying
cycle. Water will be supplied by the water
circuit directly to the steam water tank filling
it automatically.
To activate recirculation set valve to the ON
position. To do that:
1. Pull drawer containing condensed water
container out a little (1). Behind the draw-
er there is water tank’s filler neck (2).
1
2
2. Turn the valve to the ON position. Water
will be supplied by the water circuit di-
rectly to the steam water tank filling it au-
tomatically during the next drying cycle.
The steam water tank is empty. Please fill it
and then press START/PAUSE
If valve is closed (OFF position) recircu-
lation system does not work.
Overview of Iron Aid programmes
Programmes
max. load
(weight when dry)
Additional
functions / op-
tions
Application/properties
LOAD
BUZZER
COTTON
1.0 kg • •
For 1- 6 cotton shirts. Min. 80% natural
fibres (cotton, linen etc).
wet,
dry
electrolux 9

Programmes
max. load
(weight when dry)
Additional
functions / op-
tions
Application/properties
LOAD
BUZZER
SYNTHETICS
1.0 kg • •
For 1- 6 synthetic shirts. Max. 20% nat-
ural fibres (cotton, linen etc).
wet,
dry
COTTON
3.0 kg • •
For smoothing cotton garments. Min.
80% natural fibres (cotton, linen etc).
wet,
dry
SYNTHETICS
1.5 kg • •
For smoothing easy-care garments.
Max. 20% natural fibres (cotton, linen
etc).
wet,
dry
REFRESH
2.5 kg • •
For one suit or up to two suit jackets or
pairs of trousers or similar garments. Al-
so suitable for removing odours. For dry
garments only
All information on applications is for
guidance only. Smoothing results
may vary depending on the selected
programme and especially the fit-
tings and material properties of the
textile. The results can be improved
if necessary by using different pro-
grammes and steam volumes. For
example, some textiles containing
more than 20% synthetics but with
the right fittings may behave more
like cotton textiles in an Iron Aid pro-
gramme. You may therefore get bet-
ter smoothing results by selecting a
cotton Iron Aid programme.
Given the wide range of different
textile grades and properties that
can be manufactured today using
different mechanical and chemical
processes, we recommend running
the first few Iron Aid programmes at
low steam levels and with a small
number of garments that are as sim-
ilar as possible. Later, you can care-
fully start to vary the conditions of
Iron Aid programmes to learn from
experience how to get the best re-
sults from the volume of laundry loa-
ded, the quality of the textiles and
the most suitable steam levels and
Iron Aid
TM
programmes. Please also
note the accompanying ‘Textile
Guide’.
10 electrolux

Programme LOAD Loading volume
DURATION
dry [min.]
1)
DURATION
wet [min.]
1)
COTTON
MIN
MED
MAX
1 - 2 shirts
3 - 4 shirts
5 - 6 shirts
20-23 41-51
SYNTHETICS
MIN
MED
MAX
1 - 2 shirts
3 - 4 shirts
5 - 6shirts
14-17 24-49
COTTON
MIN
MED
MAX
0.5 - 1 kg
1 - 2 kg
2 - 3 kg
13-16 53-64
SYNTHETICS
MIN
MED
MAX
0.2 - 0.5 kg
0.5 - 1 kg
1 - 1.5 kg
12-16 43-53
REFRESH
MIN
MED
MAX
1 pair of trousers
1 jacket
1 suit
12-16
1) exact programme times appear in the display once the machine has performed wet/dry recognition
(approx. 2 min.)
All information provided on select-
ing the steam level and correspond-
ing load are suggestions only. In
some cases, using a higher steam
level or smaller load may give better
results. The
REFRESHprog-
ramme is a gentle Iron Aid pro-
gramme for nonwashable textiles.
Any distortion to the shape of a gar-
ment which might occur in few ca-
ses, can be remedied by ironing.
Selecting the programme
Use the programme selector to set the pro-
gramme you require. The estimated pro-
gramme duration (in minutes) appears in the
multi-display.
Select steam level LOAD (LOAD)
To achieve the best results, different steam
levels are required for different volumes of
laundry.
The LOAD button is used to set the required
steam level: MIN, MED or MAX.
All Iron Aid programmes, apart from the
REFRESH programme, automatically recog-
nise the remaining dampness in clothes.
When laundry is wet, a drying cycle is acti-
vated first if required.
The table shows the steam levels appropriate
for the selected load, under LOAD.
1. Press the LOAD button repeatedly until
the desired steam level (MIN, MED or
MAX) is shown in the display.
If the LOAD button is not pressed after an
Iron Aid programme is selected, then me-
dium steam level (MED) is selected automat-
ically. If you select the
REFRESH pro-
gramme, MIN is selected automatically.
electrolux 11

Important: If in doubt, always select a
lower steam level first until you have
more experience with load volumes, fab-
ric types and the corresponding opti-
mum steam level. If too high a steam
level is selected, garments may lose their
shape. If too low a steam level is selec-
ted, creases may remain.
Selecting additional functions
The additional functions available for the
Iron Aid programmes are BUZZER (BUZ-
ZER), DELAY (DELAY) and the CHILD LOCK.
BUZZER (BUZZER)
The appliance is supplied with the BUZZER
function activated. When the drying cycle
has finished, an intermittent acoustic signal
will sound. Each time a button is pressed or
a programme is changed using the pro-
gramme knob, an audible signal is also set to
sound. The button is used to switch the func-
tion on or off. When the function is active, the
BUZZER
symbol appears in the display.
DELAY (DELAY)
With the DELAY button, you can delay
the start of a programme by between 30
minutes (
) and a maxi-
mum of 20 hours (
).
1. Select the programme and additional
functions.
2. Press the DELAY button as many times
as necessary until the required start delay
appears on the display, e.g.
if the programme is to be started in
12 hours.
3. To activate the delay timer, press the
START/PAUSE button. The amount of
time remaining until the programme is set
to start is continuously displayed (e.g.
, ,
, … etc).
If the display is showing
and you press the button again, the
time delay will be cancelled. The display
will show
and then the duration of the
selected programme.
CHILD LOCK
The child lock can be set to prevent a pro-
gramme being accidentally started or a pro-
gramme in operation being accidentally
changed. The child safety device locks all
buttons and the programme knob. The child
safety device can be activated or deactivated
by holding down the BUZZER and TIME but-
tons simultaneously for 5 seconds.
• Before programme is started: Appliance
cannot be used
• After programme is started: Programme in
operation cannot be changed
The symbol
appears in the display to in-
dicate that the child safety device is activa-
ted. The child safety device is not deactivated
once the programme comes to an end. If you
want to set a new programme, you must first
deactivate the child safety device.
Starting an Iron Aid
TM
programme
Press the START/PAUSE button. The pro-
gramme is started. First, the drying phase in-
dicator appears in the display. The display
will also show the programme duration for
the selected Iron Aid programme, not includ-
ing the additional drying phase. With wet
laundry, after a few minutes the appliance will
show the correct programme duration for the
Iron Aid programme including the preceding
drying programme. As soon as the right level
of dryness is reached, the Iron Aid pro-
gramme will start automatically. The steam
indicator shows the progress of the Iron Aid
programme in the display. The individual
steam phases are shown by animated
clouds of steam.
Caution! Important: During the steam
phases that form part of the Iron Aid
programme and also the anti-crease
phase (represented by animated clouds
of steam in the display), the loading door
cannot be opened. Risk of burns!
12 electrolux

If the water tank indicator lights up when
you select an Iron Aid programme, the pro-
gramme cannot be started. You will need to
fill the water tank first (see section on ‘Clean-
ing and maintenance,filling water tank’.)
It is normal for the appliance to make
noises during an Iron Aid or drying pro-
gramme if garments with hard parts,
such as metal buttons, are put in the
drum.
Changing a programme
To change a programme which has been se-
lected by mistake once the programme has
started, first turn the programme selector to
O OFF and then reset the programme.
The programme can no longer be
changed directly once the programme
has started. If you nevertheless attempt
to change the programme with the pro-
gramme knob or an additional function
button (except the BUZZERbutton), the
START/PAUSE button and
will
flash in the display. The drying pro-
gramme is not however affected by this.
Putting in extra items or taking items out be-
fore end of programme
1. Open door.
2. Load or remove laundry items.
3. Close door securely.
4. Press the START/PAUSE button to con-
tinue the drying cycle.
Iron Aid programme complete /
removing laundry
After the Iron Aid phase has ended,
is illuminated and the icon AN-
TICREASE appears in the display. If the
BUZZER has been activated, an audible sig-
nal sounds at regular intervals.
The Iron Aid programme is automatically
followed by an anti-crease phase, in-
cluding brief steam phases, which lasts
around 90 minutes.
The drum rotates during the anti-crease
phase. This keeps the laundry loose and free
of creases. It can be removed at any point
during the anti-crease phase, except during
steam phases (look for steam animation in
the display!). Laundry should be removed as
quickly as possible.
1. Open the loading door to remove the
laundry.
2. Before removing the laundry, remove fluff
from the micro-fine filter. It is best to use
a damp hand for this purpose. (See
“Cleaning and maintenance” section.)
3. Remove laundry one garment at a time.
4. Turn the programme knob to O OFF.
Important! After each drying cycle
– Clean the micro-fine filter and fine filter
– Drain the condensed water container
(See section “Cleaning and mainte-
nance”.)
5. Close door.
Caution! To retain the effects of the Iron
Aid treatment, clothes must be removed
one garment at a time during the anti-
crease phase and hung immediately on
a clothes hanger to dry (for at least 5-15
mins, depending on fabric and selected
steam level). Do up the buttons and tug
the garment into shape, paying particu-
lar attention to cuffs and seams.
Drying
Overview of drying programmes
Programmes
max. load
(weight when dry)
Additional
functions /
options
Application/properties
Care symbols
BUZZER
DELICATE
DRYNESS
TIME
COTTON
electrolux 13

Programmes
max. load
(weight when dry)
Additional
functions /
options
Application/properties
Care symbols
BUZZER
DELICATE
DRYNESS
TIME
EXTRA
7 kg • • • -
Thorough drying of thick or multilayered fabrics, e.g.
terry towelling items, bathrobes.
CUPBOARD
7 kg • • • -
Thorough drying of fabrics of even thicknesses, e.g.
terry towelling items, knitwear, towels.
DAMP
7 kg • • • -
For normal thickness cotton or linen laundry, e.g.
bedding, table linen .
SYNTHETICS
EXTRA
3 kg • • • -
Thorough drying of thick or multilayered fabrics, e.g.
pullovers, bedding, table linen.
1)
CUPBOARD
3 kg • • • -
For thin fabrics which are not ironed e.g. easy care
shirts, table linen, baby clothes, socks, lingerie with
bones or wires.
1)
DAMP
3 kg • • • -
For thin textiles which are still to be ironed, e.g. knitted
items, shirts.
1)
SPECIA L
TIME
7 kg • • - •
For further drying of individual items of laundry or for
small volumes of less than 1kg. You can select a pro-
gramme duration from 10 mins to 3 hrs in 10-minute
steps.
SILK
1 kg •
a
u
t
o
• -
Special programme for drying silk using warm air and
gentle movement. .
WOOL
& SPORT
SHOES
1 kg •
a
u
t
o
- •
For drying woollen fabrics after they have been wash-
ed, using warm air at minimum mechanical load (Fol-
low section “Sorting and preparing washing”). Rec-
ommendation: Remove fabrics immediately after dry-
ing, as no anticrease programme follows.
For gentle drying of one pair of sport shoes, washed
and spindried at 1000 rpm.
You can select a programme duration from 30 mins
to 3 hrs in 10-minute steps.
1) Press the DELICATE button.
Selecting the programme
Use the programme selector to set the pro-
gramme you require. The estimated pro-
gramme duration (in minutes) appears in the
multi-display.
14 electrolux

Selecting additional functions
You can choose from the additional functions
DRYNESS (DRYNESS), DELICATE(DELI-
CATE), BUZZER (BUZZER) and TIME(TIME ),
(if a TIME programme has been selected).
The symbols of the functions available for the
selected programme are shown in the dis-
play.
DRYNESS (DRYNESS)
If laundry comes out of the machine too
damp after a standard drying programme,
you can increase the drying result by using
the DRYNESS function. Laundry becomes
drier as you move from MIN to MAX.
1. Press the DRYNESS button repeatedly
until the desired dryness level (MIN, MED
or MAX) is shown in the display. If another
programme has been selected, AUTO
flashes in the display.
If wool or silk comes out of the machine too
damp at the end of a
WOOL or SILK
programme, you can dry it again by restarting
the appropriate programme, this time with
the DRYNESS function selected and dryness
level MIN, MED or MAX. In the case of a dry-
ing cycle with relatively dry laundry, the length
of the programme cycle displayed at the be-
ginning is corrected after a while.
Caution! Caution: Make sure that by
selecting the DRYNESS function, you do
not over-dry your wool or silk.
DELICATE (DELICATE)
For especially gentle drying of sensitive fab-
rics with the care label and for temperature-
sensitive textiles (e.g. acrylic, viscose). Pro-
gramme is executed with reduced heat.
DELICATE is only suitable for use with loads
of up to 3kg.
1.
Press the DELICATE button. The
DEL-
ICATE symbol appears in the display.
TIME (TIME)
To select the programme duration after set-
ting the
TIME programme. You can select
a programme duration from 10 minutes to 3
hours in 10-minute steps. (corresponding to
the
COOLING(COOLING) programme).
1.
Turn the programme knob to the
TIMED PROGRAMME. The
minutes is in the display
2. Press the TIME button repeatedly until
the desired programme duration is
shown in the display, e.g.
for a programme of 20 minutes.
If the programme duration is not selected,
the duration is automatically set to 10 mins.
BUZZER(BUZZER)
See chapter "Iron AidTM Steam System" ,
section "Selecting additional functions -
BUZZER"
DELAY (DELAY)
See chapter "Iron AidTM Steam System" ,
section "Selecting additional functions - DE-
LAY"
CHILD LOCK
See chapter "Iron AidTM Steam System" ,
section "Selecting additional functions -
CHILD LOCK"
Starting a drying programme
Press the START/PAUSE button. The pro-
gramme is started. The programme progress
display shows drying progress. The symbols
for
DRYING and COOLING appear in
the display one after the other. The number
of droplets in the dryness indicator gradually
electrolux 15

goes down as the drying process progress-
es.
Changing a programme
To change a programme which has been se-
lected by mistake once the programme has
started, first turn the programme selector to
O off and then reset the programme.
The programme can no longer be
changed directly once the programme
has started. If you nevertheless attempt
to change the programme with the pro-
gramme knob or an additional function
button (except the BUZZER button), the
START/PAUSEbutton and
will
flash in the multi-display. The drying pro-
gramme is not however affected by this.
Removing laundry or loading laundry
when necessary
Warning! Laundry and drumcan be-
come hot. Risk of burns!
1. Open loading door
2. Load or remove laundry items.
3. Close the door securely. Lock must au-
dibly lock.
4. Press the START/PAUSE button to con-
tinue the drying cycle.
Drying cycle complete / removing
laundry
Once the drying programme has finished,
CREASE GUARD lights up in the display.
If the
BUZZER is activated, an audible
signal sounds at regular intervals.
The drying cycle is automatically fol-
lowed by a anti-crease phase which
lasts around 30 minutes.
The drum rotates at intervals during this
phase. This keeps the laundry loose and free
of creases. It can be removed at any time
during the anti-crease phase. (The laundry
should be taken out towards the end of the
anti-crease phase at the latest to prevent
creases from forming.)
1. Open door.
2. Before removing the laundry, remove fluff
from the micro-fine filter. It is best to use
a damp hand for this purpose. (See
“Cleaning and maintenance” section.)
3. Remove laundry.
4.
Turn the programme knob to O off.
5. Important! After each drying cycle
– Clean the micro-fine filter and fine filter
– Drain the condensed water container
(See section “Cleaning and mainte-
nance”.)
6. Close door.
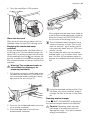
Drying rack
Special equipment for gentle drying washa-
ble woollens and sport shoes. Incomparable
for drying wet woollens - eliminated move-
ment, protection from matting.
For drying rack unpacking see Installa-
tion chapter.
Important! Before drying rack installation
check the dryer drum. It must be empty!
Sport shoes cannot be dry without the drying
rack - drum damage.
Installation and use
1. Open the loading door.
2. Insert the rack carefully resting its two
support brackets on the front of plastic
flange.
16 electrolux

3. Place the woollens or pair of sport shoes
on the rack.
4. Select the suitable rack drying pro-
gramme and drying time.
5. Press the START/PAUSE button.
6. When cycle is finished open the loading
door and remove the woollens or shoes.
7. Turn the programme selector to OFF.
8. Take out the drying rack of the drum.
Drying tips
• for the best drying result spread the wool-
lens out loosely on the drying rack and roll
it up
• do not squash and fold the woollens
• open support and put sport shoes on it
• the insoles should be placed beside the
shoes on the drying rack and the shoela-
ces should be tied
Cleaning and maintenance
Cleaning lint filters
To ensure that the appliance works perfectly,
the lint filters in the door and in front of the
drum must be cleaned after every Iron
Aid
TM
or drying cycle.
Caution! Important. Never operate the
dryer without the lint filter or with a
damaged or blocked lint filter.
1. Open loading door
electrolux 17

2. Use a damp hand to clean the micro- fine
filter, which is built into the lower part of
the loading aperture.
3. After a period of time, a patina due to de-
tergent residue on laundry forms on the
filters. When this occurs, clean the filters
with warm water using a brush. Remove
the filter from the door pulling it out. It can
be positioned with the tooth facing to the
left or to the right). After cleaning do not
forget to put it back.
4. Remove fluff from lint filter, preferably us-
ing a damp hand for this purpose.
5. Replace the filter.
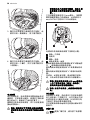
Cleaning the water recirculation valve/
filter
If the
STEAM FILTER symbol is shown in
the display, the recirculation filter needs to be
cleaned. The valve/filter is placed behind the
tank handle - see chapter "Product descrip-
tion".
1. Push down the water tank’s filler neck (1)
and pull out it (2).
1
2
2. Clean the valve/filter under warm water.
3. Re-insert the valve/filter.
18 electrolux

4. Turn the valve/filter in ON position.
Clean the door seal
Wipe the door seal using a damp cloth im-
mediately after the Iron Aid or drying cycle.
Emptying the condensed water
container
Empty condensed water container after ev-
ery drying cycle. If the condensed water con-
tainer is full, an active programme will break
off automatically and the
icon display will
light up. In order to continue the programme,
the condensed water container must first be
emptied.
Warning! The condensed water is
not suitable for drinking or for
preparing foodstuffs.
1. Pull drawer containing condensed water
container all the way out (1) and pull up
the condensed water container’s drain-
age pipe as far as it will go (2).
1.
2.
2. Pour out the condensed water into a ba-
sin or similar container.
3. Push drainage pipe in and refit con-
densed water container.
If the programme has been interrupted as
a result of the condensed water container
being full: Press the START/PAUSE but-
ton to continue the drying cycle.
The condensed water container has a
volume of approx. 4 litres. This is suffi-
cient for around 7 kg of laundry which
has previously been spun at 1000 revo-
lutions/ minute.
4. The condensed water can be used as
distilled water, e.g. for steam irons. How-
ever, first filter the condensed water to
remove any residues and small pieces of
fluff.
Using the attached canister to filter: Pour
the water out of the container straight
through the filter at the top of the canis-
ter.
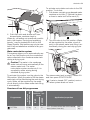
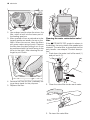
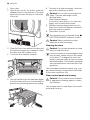
Cleaning heat exchanger
If the
HEAT EXCHANGER is displayed,
the heat exchanger needs to be cleaned.
Caution! Operating when the heat
exchanger is blocked with fluff can
damage the dryer. This also increases
energy consumption.
electrolux 19

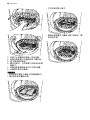
1. Open door.
2. Open door in plinth. To do this, press the
release button on the bottom of the door
aperture and open the door in the plinth
to the left.
3. Clean fluff from the inside of the door and
the heat exchanger front chamber. Wipe
the door seal with a damp cloth.
4. Turn both lock washers inwards.
5. Use the handle to pull the heat exchanger
out of the base and carry it horizontally to
prevent any remaining water from spilling.
6. To empty the heat exchanger, hold verti-
cally over a washing-up bowl.
Caution! Do not use sharp objects to
clean. The heat exchanger could
develop leaks.
7. Clean heat exchanger.
It is best to use a brush or to rinse thor-
oughly with a hand-held shower.
8. Replace heat exchanger and lock into
place (turn both lock washers outwards
until they snap into place).
9. Close door in plinth.
The appliance will not operate if the
HEAT EXCHANGER indicator is still lit.
Caution! Never operate the dryer
without the heat exchanger.
Cleaning the drum
Caution! Do not use abrasives or steel
wool to clean the drum.
Lime in the water or cleaning agents may
form a barely visible lining on the inside
of the drum. The degree to which the
laundry has been dried is then no longer
detected reliably. The laundry is damper
than expected when removed from the
appliance.
Use a standard domestic cleaner (e.g. vine-
gar-based cleaner) to wipe down the inside
of the drum and drum ribs.
Clean control panel and housing
Caution! Do not use furniture cleaners
or aggressive cleaning agents to clean
the machine.
Use a damp cloth to wipe down the control
panel and housing.
20 electrolux
ページが読み込まれています...
ページが読み込まれています...
ページが読み込まれています...
ページが読み込まれています...
ページが読み込まれています...
ページが読み込まれています...
ページが読み込まれています...
ページが読み込まれています...
ページが読み込まれています...
ページが読み込まれています...
ページが読み込まれています...
ページが読み込まれています...
ページが読み込まれています...
ページが読み込まれています...
ページが読み込まれています...
ページが読み込まれています...
ページが読み込まれています...
ページが読み込まれています...
ページが読み込まれています...
ページが読み込まれています...
ページが読み込まれています...
ページが読み込まれています...
ページが読み込まれています...
ページが読み込まれています...
ページが読み込まれています...
ページが読み込まれています...
ページが読み込まれています...
ページが読み込まれています...
ページが読み込まれています...
ページが読み込まれています...
ページが読み込まれています...
ページが読み込まれています...
ページが読み込まれています...
ページが読み込まれています...
ページが読み込まれています...
ページが読み込まれています...
-
 1
1
-
 2
2
-
 3
3
-
 4
4
-
 5
5
-
 6
6
-
 7
7
-
 8
8
-
 9
9
-
 10
10
-
 11
11
-
 12
12
-
 13
13
-
 14
14
-
 15
15
-
 16
16
-
 17
17
-
 18
18
-
 19
19
-
 20
20
-
 21
21
-
 22
22
-
 23
23
-
 24
24
-
 25
25
-
 26
26
-
 27
27
-
 28
28
-
 29
29
-
 30
30
-
 31
31
-
 32
32
-
 33
33
-
 34
34
-
 35
35
-
 36
36
-
 37
37
-
 38
38
-
 39
39
-
 40
40
-
 41
41
-
 42
42
-
 43
43
-
 44
44
-
 45
45
-
 46
46
-
 47
47
-
 48
48
-
 49
49
-
 50
50
-
 51
51
-
 52
52
-
 53
53
-
 54
54
-
 55
55
-
 56
56


