
中 文 书
DFD1081CH
使 用 说 明
INSTRUCTIONS FOR USE
Condenser tumble dryer

2
Dear Customer,
You have just acquired a
DE DIETRICH
dryer and we would like to thank you.
Our research teams have created this new generation of appliances for you. Their quali-
ty, design, features and technological advances make them exceptional products, and
reveal our unique know-how.
In the
DE DIETRICH
product range, you will also find a wide choice of hobs, ovens,
microwaves, dishwasher, hoods, cookers, fridges, freezers, that you can coordinate with
your new
DE DIETRICH
dryer.
Visit our website
www.dedietrich-electromenager.com
, where you will find our latest inno-
vations as well as useful and complementary information.
DE DIETRICH
Setting New Values
As part of our commitment to constantly improving our products, we reserve the right to
make changes to them based on technical advances to their technical and functional fea-
tures and appearance.
Warning :
Before installing and using your appliance, please carefully read this Installation and
Usage, which will allow you to quickly familiarise yourself with its operation.
尊敬的客户,
您购买的是一款
DE DIETRICH
干衣机,在此感谢您对我们产品的支持。
这是我们的研发团队为您精心设计的新一代产品。产品的质量、设计、特色以及技术优势使得它
们与众不同,同时也显示了我们独一无二的技术。
在
DE DIETRICH
的产品线中,还有大量的灶具、烤箱、微波炉、洗碗机、抽油烟机、电饭煲、
冰箱及冷冻柜供您选择,可以与
DE DIETRICH
干衣机同时使用。
详细信息请访问我们的网站
www.dedietrich-electromenager.com
,您可以找到我们的最新动
态以及一些实用的其他信息。
DE DIETRICH
创造新价值
为履行不断改善产品的承诺,我们保留根据我们的技术优势对产品的技术、功能及外形做改进的
权利。
注意:
安装使用设备前,请仔细阅读此安装及使用说明书,这会使您更快熟悉产品操作。

3
EN
CONTENTS
1 / FOR THE USER’S ATTENTION
• Safety instructions ------------------------------------------------------------------------------4
• Environmental protection--------------------------------------------------------------------5
• Energy savings------------------------------------------------------------------------------------5
2 / DESCRIPTION OF YOUR APPLIANCE
• General presentation of the tumble dryer ------------------------------------------6
3 / INSTALLING YOUR TUMBLE DRYER
• The appliance’s surroundings ------------------------------------------------------------7
• Levelling-----------------------------------------------------------------------------------------------7
• Built-in installation -------------------------------------------------------------------------------8
• Combined washer/dryer installation---------------------------------------------------8
• Modifying the door opening direction ------------------------------------------------8
• Electrical connection --------------------------------------------------------------------------9
• Replacing the electric power cable ----------------------------------------------------9
4 / PREPARING YOUR ITEMS
• Checking the condition of your textiles--------------------------------------------10
• Inserting your items in the drum-------------------------------------------------------10
5 / PROGRAMMING
• Presentation of the control panel -----------------------------------------------------11
• Programming a drying cycle -------------------------------------------------------------11
• Your dryer’s programs ----------------------------------------------------------------------15
6 / REGULAR MAINTENANCE
• Cleaning the filter ------------------------------------------------------------------------------16
• Emptying the condensation container ---------------------------------------------16
• Direct evacuation of water condenser----------------------------------------------17
• Changing the bulb-----------------------------------------------------------------------------18
• Cleaning the condenser--------------------------------------------------------------------18
• Cleaning the appliance----------------------------------------------------------------------19
7 / TROUBLESHOOTING--------------------------------------------------------------------------------20
8 / AFTER-SALES SERVICE ---------------------------------------------------------------------------21
目录
中文
用户注意事项
产品描述
安装滚筒式干衣机
准备您的衣物
程序设置
定期保养
故障诊断
_________________________________________________________
售后服务
_________________________________________________________
安全指南 ______________________________________________________
滚筒式干衣机介绍 ______________________________________________
设备所处环境 __________________________________________________
检查纺织面料情况 _____________________________________________
操作面板说明 _________________________________________________
清洗过滤器 ___________________________________________________
清空冷凝器 ___________________________________________________
直接排空水冷凝器 _____________________________________________
更换灯泡 _____________________________________________________
清洗冷凝器 ___________________________________________________
清洗设备 _____________________________________________________
设置干衣程序 _________________________________________________
干衣机程序 ___________________________________________________
把您的物品放入滚筒 ___________________________________________
水平放置 ______________________________________________________
嵌入式安装 ____________________________________________________
洗衣机和干衣机的组合安装 ______________________________________
调节开门方向 __________________________________________________
电气连接 ______________________________________________________
更换电缆 ______________________________________________________
环境保护 ______________________________________________________
节约能源 ______________________________________________________

4
EN
• SAFETY INSTRUCTIONS
1 / FOR THE USER’S ATTENTION
Important :
Keep these operating instructions with
your appliance. If you should sell your
machine or give it to someone else, ensure
that the operating instructions are provided.
Please take note of these safety instructions
before installing and using your appliance.
They have been written for your safety and
that of others.
•
Installation
— When you receive the appliance, unpack it or
have it unpacked immediately. Check that it
has not suffered any damage during trans-
port. Express any reservations in writing on
the delivery slip and keep a copy.
Never connect a damaged appliance.
If your appliance is damaged, please contact
your dealer.
— Before connecting your appliance, please
refer to the installation instructions.
— Your tumble dryer must be kept disconnec-
ted from the mains supply throughout the
whole installation process.
— The electrical connection details shown on
your appliance’s information plate must match
those of the local mains supply.
— Once your appliance has been installed, the
electrical plug must remain accessible.
— Do not alter or try to alter the appliance’s
characteristics. This could be dangerous.
— If your installation requires alteration, only
entrust the electrical and plumbing work to
qualified electricians and plumbers.
— The appliance must not be installed behind a
locking door, a sliding door or a door with hin-
ges on the opposite side to those on the dryer.
— Your appliance is designed for normal
domestic use. Do not use it for commercial or
industrial purposes or for any purpose other
than the one for which it has been designed
•
Children’s safety
— This appliance must only be used by adults.
Do not let children play with the appliance and
keep pets away from it.
— Keep young children away from the
appliance when it is operating.
— Keep the packaging materials out of chil-
dren’s reach (e.g.: plastic bags, polystyrene,
etc.) because they can be dangerous for chil-
dren : risk of suffocation.
— This appliance is not intended for use by per-
sons (including children) with reduced physi-
cal, sensory or mental capabilities, or lack of
experience and knowledge, unless they are
supervised or instructed concerning use of
the appliance by the person responsible for
their safety.
•
Use
Important :
Your tumble dryer is designed for
domestic use only, for drying textiles suitable
for tumble drying.
Important :
You must observe the following instruc-
tions. We decline any responsibility and res-
cind the guarantee if these recommendations
are ignored : failure to observe them can
result in material damage and physical injury.
— Use your appliance in accordance with its
method of use, thereby avoiding injury to your-
self and damage to your items. Do not use sol-
vents in the appliance (risk of fire and explo-
sion).
— Strictly comply with the care instructions on
your laundry.
— If you have to open the door of the drum
during the drying cycle, ensure that you do not
touch the drum immediately, as it is very hot.
1/ 用户注意事项
中文
安全性介绍
- 收到设备后,请立刻打开,确认设备是否在运输
途中受到损坏。若有任何意见请写在发货单上,一
式两份。切勿连接已损坏的机器。若产品有损坏,
请联系您的供应商。
- 安装前请参照说明书中的安装指示。
- 滚筒式干衣机在安装过程中,切勿连接电源。
- 使用当地的电源必须符合产品铭牌上具体的电气
连接要求。
- 设备安装完成后,必须保证电插头方便使用。
- 为了您的安全,请勿尝试私自改装设备。
- 如果需要改变安装位置,请委托有资质的电工和
水管工完成与电源和水管有关的工作。
- 本设备切勿安装在锁定的门或滑动门后面,也不
能与铰链门一侧连接。
- 本设备设计为家用,请勿在产品使用范围外的工
业或商业活动中使用。
- 为了您和您衣物的安全,请遵照使用方法使用此
设备。请勿在设备中使用溶剂,以防着火和爆炸。
- 洗衣过程中请严格遵守保养说明。
- 如果在烘干过程中需要打开机门,确保不要立即
打开,因为它非常热。
- 此设备仅限成年人使用。切勿让儿童接触,宠物
应远离此设备。
- 设备运行时保证儿童远离。
- 请将所有包装材料(如塑料袋、泡沫塑料等)置
于儿童不可及之处,以免对儿童造成伤害(窒息)。
- 身体、感官及精神能力不全的人群、或缺少经验
和知识的人群(包括儿童)仅能在监护人的指导监
督并保证安全的情况下使用本设备。
注意:
请保存好此使用说明书。若设备被出售或转
注意:
滚筒式干衣机专门设计为家用,用于适合用
注意:
请遵守以下注意事项。因未遵守如下建议而
让,请确保新用户获得该使用说明书。为了您和他
人的安全,安装及使用前请仔细阅读安全指南。
干衣机烘干的织物。
导致物质损失和人生伤害,我们概负任何责任和也
不提供保修。
●
儿童安全注意事项
使用
●
设备安装
4
EN
• SAFETY INSTRUCTIONS
1 / FOR THE USER’S ATTENTION
Important :
Keep these operating instructions with
your appliance. If you should sell your
machine or give it to someone else, ensure
that the operating instructions are provided.
Please take note of these safety instructions
before installing and using your appliance.
They have been written for your safety and
that of others.
•
Installation
— When you receive the appliance, unpack it or
have it unpacked immediately. Check that it
has not suffered any damage during trans-
port. Express any reservations in writing on
the delivery slip and keep a copy.
Never connect a damaged appliance.
If your appliance is damaged, please contact
your dealer.
— Before connecting your appliance, please
refer to the installation instructions.
— Your tumble dryer must be kept disconnec-
ted from the mains supply throughout the
whole installation process.
— The electrical connection details shown on
your appliance’s information plate must match
those of the local mains supply.
— Once your appliance has been installed, the
electrical plug must remain accessible.
— Do not alter or try to alter the appliance’s
characteristics. This could be dangerous.
— If your installation requires alteration, only
entrust the electrical and plumbing work to
qualified electricians and plumbers.
— The appliance must not be installed behind a
locking door, a sliding door or a door with hin-
ges on the opposite side to those on the dryer.
— Your appliance is designed for normal
domestic use. Do not use it for commercial or
industrial purposes or for any purpose other
than the one for which it has been designed
•
Children’s safety
— This appliance must only be used by adults.
Do not let children play with the appliance and
keep pets away from it.
— Keep young children away from the
appliance when it is operating.
— Keep the packaging materials out of chil-
dren’s reach (e.g.: plastic bags, polystyrene,
etc.) because they can be dangerous for chil-
dren : risk of suffocation.
— This appliance is not intended for use by per-
sons (including children) with reduced physi-
cal, sensory or mental capabilities, or lack of
experience and knowledge, unless they are
supervised or instructed concerning use of
the appliance by the person responsible for
their safety.
•
Use
Important :
Your tumble dryer is designed for
domestic use only, for drying textiles suitable
for tumble drying.
Important :
You must observe the following instruc-
tions. We decline any responsibility and res-
cind the guarantee if these recommendations
are ignored : failure to observe them can
result in material damage and physical injury.
— Use your appliance in accordance with its
method of use, thereby avoiding injury to your-
self and damage to your items. Do not use sol-
vents in the appliance (risk of fire and explo-
sion).
— Strictly comply with the care instructions on
your laundry.
— If you have to open the door of the drum
during the drying cycle, ensure that you do not
touch the drum immediately, as it is very hot.

5
EN
1 / FOR THE USER’S ATTENTION
• ENERGY SAVINGS
• ENVIRONMENTAL PROTECTION
The appliance’s packaging material is recyclable. Help recycle it and protect the environment by
dropping it off in the municipal receptacles provided for this purpose.
Your appliance also contains a great amount of recyclable material. It is marked with this
label to indicate that in countries that are a members of the European Union the used
appliances should not be mixed with other waste. This way, the appliance recycling orga-
nised by your manufacturer will be done under the best possible conditions, in compliance
with European Directive 2002/96/EC on Waste Electrical and Electronic Equipment.
Contact your town hall or your retailer for the used appliance collection points closest to your
home.
We thank you for doing your part to protect the environment.
— Spin your textiles at high speeds ; the residual dampness will be low, as will your energy
consumption. Even synthetic textiles must be spun before drying.
— Place the maximum load in your machine ; this will optimize the energy used. When doing so,
comply with the indications on volume provided in this instruction manual.
— The drying time and the energy consumption are both increased by a high ambient temperature
and too small a room.
— Clean the filter after each drying cycle.
— Clean the condenser twice a month.
— Swich off your tumble dryer at the cycle ends.
— Substances contained in soiling such as oil, acetone, alcohol, petrol, kerosene, stain removers,
turpentine or wax must be removed before drying in your machine (by using an adapted warm water
washing programme with additional detergent for example).
— Precautions for using stain-removing products : any preliminary treatment by solvent, stain-remo-
ver, aerosol, such as acetone, alcohol, gasoline, kerosene, térébentine is prohibited because these
products are very inflammable. If your laundry requires this type of treatment, this must be done
before washing. Similarly, we recommend that you do not use these products near to your dryer or,
in general, near any electrical appliance in a poorly ventilated room in order to avoid any risk of an
explosion.
— If any incidents occur, which you cannot resolve using the troubleshooting advice we provide (see
“TROUBLESHOOTING”), contact our Technical Service Center.
— Before disposing of your worn-out appliance, make it unusable. Unplug and cut off the power
cable flush with the appliance and make the door lock inoperable.
— For your safety’s sake, if you wish to change your appliance’s power cable, contact a qualified
electrician.
— If any operating anomalies occur, disconnect your appliance and call our Technical Service
Center.
1/ 用户注意事项
中文
- 如果使用化学品来清洁衣物, 则滚筒式干衣机不能使用。
- 如果使用, 经常清理棉屑收集器。
- 棉屑不允许堆积在滚筒式干衣机的周围
- 必须提供足够的通风以避免从器具倒流出的气体流入空间点燃其他物质,包括明火。
- 应使用一套新的软管将器具连接到水源且不能重复使用旧的软管。
- 不允许向供燃烧气体或其他材料的器具排烟的烟道中排气。
- 在放入烘干前,务必先清除物品污渍中含有的如下成分:油、丙酮、酒精、汽油煤油、污渍清洁剂、松节
油或蜡等。(例如:可以用适量温水和洗涤剂加以清洗)。
- 使用去污产品的注意事项:在预处理时,禁止使用如下产品:溶剂、污渍去除剂、气雾剂,如丙酮、酒精、汽油、
和煤油等,因为这些产品易燃。如果您的衣服需要这样处理,请在洗涤前处理。同样地,为防止发生爆炸,
我们建议在通风不良的空间,在烘干器附近或任何电器附近,不要使用这些产品。
- 发生故障时,如果通过我们提供的故障排除建议(见“故障诊断”)也无法解决,请联系我们的技术服务中心。
- 在处理破旧的家电前,确保其无法继续使用。拔下并切断电源线,冲洗设备。使门锁无法使用。
- 为了您的安全,如想更换设备的电源线,请联系合格的电工。
- 如发生任何异常,切断设备电源,并致电我们的技术服务中心。
- 使用高速脱水甩干织物 ; 这样预先能降低织物的含水量,达到节能的目的。即使合成织物在烘干前都要先
进行甩干。
- 在电器里放置最大负荷的衣物,这将优化能源使用。放置衣物时,请遵守本说明书中提供的干衣容量说明。
- 由于外界温度较高以及空间过小,烘干时间和能耗都会有所增加。
- 每次烘干结束后,清洁过滤器。
- 每个月清洁两次冷凝器
- 烘干结束时,关闭滚筒式干衣机。
感谢您为环保事业献出一份力。
本产品中也包含大量可回收材料,此标志表明欧盟成员国使用过的机器应当与其他废弃物分开
处理。如此一来,制造商能够尽可能地回收废弃设备,以符合欧洲的电子电气产品的废弃指令
2002/96/EC。请向市政厅或零售商咨询离你家最近的废弃设备回收站。
产品的包装是由可回收材料制成,请将包材投放于专供可回收垃圾处,帮助保护环境。
●
环保注意事项
●
节约能源
5
EN
1 / FOR THE USER’S ATTENTION
• ENERGY SAVINGS
• ENVIRONMENTAL PROTECTION
The appliance’s packaging material is recyclable. Help recycle it and protect the environment by
dropping it off in the municipal receptacles provided for this purpose.
Your appliance also contains a great amount of recyclable material. It is marked with this
label to indicate that in countries that are a members of the European Union the used
appliances should not be mixed with other waste. This way, the appliance recycling orga-
nised by your manufacturer will be done under the best possible conditions, in compliance
with European Directive 2002/96/EC on Waste Electrical and Electronic Equipment.
Contact your town hall or your retailer for the used appliance collection points closest to your
home.
We thank you for doing your part to protect the environment.
— Spin your textiles at high speeds ; the residual dampness will be low, as will your energy
consumption. Even synthetic textiles must be spun before drying.
— Place the maximum load in your machine ; this will optimize the energy used. When doing so,
comply with the indications on volume provided in this instruction manual.
— The drying time and the energy consumption are both increased by a high ambient temperature
and too small a room.
— Clean the filter after each drying cycle.
— Clean the condenser twice a month.
— Swich off your tumble dryer at the cycle ends.
— Substances contained in soiling such as oil, acetone, alcohol, petrol, kerosene, stain removers,
turpentine or wax must be removed before drying in your machine (by using an adapted warm water
washing programme with additional detergent for example).
— Precautions for using stain-removing products : any preliminary treatment by solvent, stain-remo-
ver, aerosol, such as acetone, alcohol, gasoline, kerosene, térébentine is prohibited because these
products are very inflammable. If your laundry requires this type of treatment, this must be done
before washing. Similarly, we recommend that you do not use these products near to your dryer or,
in general, near any electrical appliance in a poorly ventilated room in order to avoid any risk of an
explosion.
— If any incidents occur, which you cannot resolve using the troubleshooting advice we provide (see
“TROUBLESHOOTING”), contact our Technical Service Center.
— Before disposing of your worn-out appliance, make it unusable. Unplug and cut off the power
cable flush with the appliance and make the door lock inoperable.
— For your safety’s sake, if you wish to change your appliance’s power cable, contact a qualified
electrician.
— If any operating anomalies occur, disconnect your appliance and call our Technical Service
Center.

6
EN
• GENERAL PRESENTATION OF THE TUMBLE DRYER
2 / DESCRIPTION OF YOUR APPLIANCE
Control panel
Condensate container
Condenser grill
Filter
Information plate
(Reference for After-Sales)
Adjustable feet
F
E
D
C
B
A
Fig. 01
B
A
D
F
C
E
2/ 产品介绍
中文
滚筒式干衣机概述
图
控制面板 过滤器
可调节支脚
产品铭牌
(详见售后服务)
冷凝器
冷凝架

7
EN
• LEVELLING
• THE APPLIANCE’S SURROUNDINGS
3 / INSTALLING YOUR TUMBLE DRYER
Fig. 03
Fig. 02
Important :
We strongly advise against :
— Installing your appliance on a carpeted floor.
If you cannot avoid this, take all possible mea-
sures not to obstruct the circulation of air at
its base.
— Installing your dryer in a location where it
can be subject to being splashed with water.
— Installing your dryer in a small closed room
(if this is the case, open the door or the win-
dow during drying).
— Installing your dryer in a poorly ventilated
room. The temperature in the room must
remain below 30°C during drying.
1 cm mini
Advice :
Your tumble dryer releases heat. If you place it next to another appliance or a unit, we
advise you always to leave a space in-between to assist in air circulation (Fig. 02).
Important :
Use a level to check that the appliance
is horizontal :
Your dryer is fitted with 4 adjustable feet
(Fig.03).
To adjust the stability and levelness :
— Tip it slightly backwards.
— Screw one or more of the feet in or out using
a spanner or a screwdriver to adjust their
height to suit the shape of the floor
(Fig.03).
— Set your dryer back on its feet and check
that it is stable.
0.4 inches minimum
3/ 安装滚筒式干衣机
中文
设备所处环境
水平放置
建议:
滚筒式干衣机释放热量。如果干衣机旁边放置有别的家电或装置,我们建议您在两者中间留出一定的
注意:
使用水平仪检查设备是否水平:
注意:
我们强烈建议:
空间,以保持空气流通(图 02)。
图
图
最少 0.4 英寸
- 不要将电器安装在铺有地毯的地板上。如果安装
在有地毯的地板上,则尽可能地采取一切措施,
避免地毯阻碍其底部的空气流通。
- 不要把干衣机安装在易于被水溅到的地方。
- 不要将干衣机安装在狭小封闭的空间(如果不得
不如此安装,烘干过程中请打开门或窗)。
- 不要将干衣机安装在通风不良的室内。在烘干过
程中,房间里的温度必须保持在 30℃以下。
干衣机有 4 个可调节支脚 ( 图 03), 调整稳定性和
水平度:
- 稍稍向后倾斜。
- 用扳手或螺丝刀拧转一个或多个支脚调整高度以
适应地面的形状(如图 3)。
- 把干衣机固定在支脚上,检查是否稳定。

8
EN
• MODIFYING THE DOOR OPENING DIRECTION
• COMBINED WASHER/DRYER INSTALLATION
• BUILT-IN INSTALLATION
3 / INSTALLING YOUR TUMBLE DRYER
An adaptation kit is available from your dealer. This is used to mount your tumble dryer above your
washing machine.
Important :
Check with your dealer that the kit is compatible with your washing machine. For safety rea-
sons, fitting must be performed by a qualified professional.
Important :
If you are fitting the appliance underneath a worktop, you must either keep the original
laminated top, or replace it with a slimmer version using a kit available for this purpose from your
dealer. For safety reasons, the appliance must never be operated without a top.
If you wish, you can alter the direction the door opens as follows
(Fig. 04 or 05).
— Remove the 4 screws in the front panel holding the hinges and
.
— Reverse the hinge and fasten it back on.
— Refit the door on the hinge .
— Reverse the hinge and fasten it back on.
— Reverse the positions of the lock and the cover on the machine’s front.
— Reverse the positions of the bolt .
C
EF
B
A
A
BA
E
F
B
C
A
A
B
E
F
C
Fig. 04
Fig. 05
Left-hand Door
Right-hand door
3/ 安装滚筒式干衣机
中文
设备所处环境
洗衣机和干衣机的组合安装
●
改变门的打开方向
注意:
如果在工作台下方安装此电器,请务必保留原装的夹层顶板,或从经销商处用一个超薄版本的配件替
注意:
请与您的经销商核实,该配件与您的洗衣机兼容。出于安全考虑,必须由合格的专业人员安装。
代。出于安全考虑,该设备只能在有顶部的情况下运行。
经销商可以提供相关配件。使您能够在洗衣机的上方安装干衣机。
如果您愿意,如图所示,您可以改变门的打开方向(图 04 或 05)。
- 移除连接铰链 和 前面板上的 4 个螺丝钉。
- 把旋转铰链 放到干衣机的另外一侧并重新固定。
- 把门重新安装到铰链 上。
- 把旋转铰链 放到干衣机的另外一侧并重新固定。
- 在机器前部,对换门锁 和护盖 的安装位置。
- 反向拧紧螺栓 。
8
EN
• MODIFYING THE DOOR OPENING DIRECTION
• COMBINED WASHER/DRYER INSTALLATION
• BUILT-IN INSTALLATION
3 / INSTALLING YOUR TUMBLE DRYER
An adaptation kit is available from your dealer. This is used to mount your tumble dryer above your
washing machine.
Important :
Check with your dealer that the kit is compatible with your washing machine. For safety rea-
sons, fitting must be performed by a qualified professional.
Important :
If you are fitting the appliance underneath a worktop, you must either keep the original
laminated top, or replace it with a slimmer version using a kit available for this purpose from your
dealer. For safety reasons, the appliance must never be operated without a top.
If you wish, you can alter the direction the door opens as follows
(Fig. 04 or 05).
— Remove the 4 screws in the front panel holding the hinges and
.
— Reverse the hinge and fasten it back on.
— Refit the door on the hinge .
— Reverse the hinge and fasten it back on.
— Reverse the positions of the lock and the cover on the machine’s front.
— Reverse the positions of the bolt .
C
EF
B
A
A
B
A
E
F
B
C
A
A
B
E
F
C
Fig. 04
Fig. 05
Left-hand Door
Right-hand door
8
EN
• MODIFYING THE DOOR OPENING DIRECTION
• COMBINED WASHER/DRYER INSTALLATION
• BUILT-IN INSTALLATION
3 / INSTALLING YOUR TUMBLE DRYER
An adaptation kit is available from your dealer. This is used to mount your tumble dryer above your
washing machine.
Important :
Check with your dealer that the kit is compatible with your washing machine. For safety rea-
sons, fitting must be performed by a qualified professional.
Important :
If you are fitting the appliance underneath a worktop, you must either keep the original
laminated top, or replace it with a slimmer version using a kit available for this purpose from your
dealer. For safety reasons, the appliance must never be operated without a top.
If you wish, you can alter the direction the door opens as follows
(Fig. 04 or 05).
— Remove the 4 screws in the front panel holding the hinges and
.
— Reverse the hinge and fasten it back on.
— Refit the door on the hinge .
— Reverse the hinge and fasten it back on.
— Reverse the positions of the lock and the cover on the machine’s front.
— Reverse the positions of the bolt .
C
E
F
B
A
A
BA
E
F
B
C
A
A
B
E
F
C
Fig. 04
Fig. 05
Left-hand Door
Right-hand door
8
EN
• MODIFYING THE DOOR OPENING DIRECTION
• COMBINED WASHER/DRYER INSTALLATION
• BUILT-IN INSTALLATION
3 / INSTALLING YOUR TUMBLE DRYER
An adaptation kit is available from your dealer. This is used to mount your tumble dryer above your
washing machine.
Important :
Check with your dealer that the kit is compatible with your washing machine. For safety rea-
sons, fitting must be performed by a qualified professional.
Important :
If you are fitting the appliance underneath a worktop, you must either keep the original
laminated top, or replace it with a slimmer version using a kit available for this purpose from your
dealer. For safety reasons, the appliance must never be operated without a top.
If you wish, you can alter the direction the door opens as follows
(Fig. 04 or 05).
— Remove the 4 screws in the front panel holding the hinges and
.
— Reverse the hinge and fasten it back on.
— Refit the door on the hinge .
— Reverse the hinge and fasten it back on.
— Reverse the positions of the lock and the cover on the machine’s front.
— Reverse the positions of the bolt .
C
EF
B
A
A
BA
E
F
B
C
A
A
B
E
F
C
Fig. 04
Fig. 05
Left-hand Door
Right-hand door
图
图
左侧门
右侧门

9
EN
• REPLACING THE ELECTRIC POWER CABLE
3 / INSTALLING YOUR TUMBLE DRYER
• ELECTRICAL CONNECTION
Danger :
To make the electrical connection to your appliance :
— Do not use an extension, an adapter, a multiple socket or a programmable timer.
— The plug must be easily accessible but be out of children’s reach.
— If there's any doubt about the condition of your installation, contact your installer or a qualified
Brandt-approved professional.
— Never eliminate the electrical Earthing system.
The electrical installation must comply with the prevailing standards and the Electricity Board’s
regulations in the country concerned, particularly regarding Earthing and installation in shower
rooms.
We cannot be held responsible for any incident caused by poor electrical installation.
Advice :
In order to easily find your appliance’s reference numbers in the future, we recommend
that you note them down on the “After-Sales Service and Consumer Relations” page (this page
also explains where to find these on your appliance).
Your appliance complies with European Directives 2006/95/EEC (Low Voltage Directive) and
2004/108/EEC (Electromagnetic Compatibility).
Important :
To ensure your safety, this must be carried out by the manufacturer's after-sales service
team or a qualified professional.
3/ 安装滚筒式干衣机
中文
电气连接
更换电源线
危险:
将电器与电源连接时:
注意:
为确保安全,该操作需由制造商售后服务团队或合格的专业人员完成。
建议:
为了能轻松找到设备的参考信息,我们建议您关注“售后服务和客服联系方式”一页上的相关信息。(此
- 请勿使用延长线、适配器、多孔插座或可编程定时电源。
- 插座应置于易连接且儿童接触不到的地方。
- 如果在安装过程中有疑问,请联系安装人员或专业的技术人员。
- 切勿切断电路接地系统。
页对如何在电器上找到相关信息有所标注)。
您的设备符合 安全标准 GB4706.20-2004,GB4706.1-1998 和性能标准 GB/T 23118-2008。
由于错误的电气安装产生的故障,我们概不负责。
在特别涉及接地和淋浴室安装电源时,电气安装必须符合现行标准和国家供电局的相关条例。

10
EN
• INSERTING YOUR ITEMS IN THE DRUM
• CHECKING THE CONDITION OF YOUR TEXTILES
4 / PREPARING YOUR ITEMS
— Open the door by pushing (press where the
label is)
(Fig. 06)
.
— Check that the filter is in its housing .
— Insert washed and spun clothes loosely in
the drum
without folding it or piling it up.
— Take care not to let any fabrics get caught in
the door.
— Close the door.
•
Recommended volumes :
The maximum capacity of the dryer is 8 kg.
— To reduce creasing and optimise drying
times, we recommend you do not overload
the machine..
Fig. 06
Advice :
If, before you insert your clothes in the
tumble dryer, you notice any stains, even
after washing, do not dry the items concer-
ned. As a general rule, stains that have been
ironed or tumble-dried can no longer be
removed.
Please refer to the instructions for treating
stubborn stains provided in most washing
machine instruction manuals and, in particu-
lar, wash the stained items again.
•
Preparing your items :
— Close all zippers and snap buttons.
— Remove any loose buttons, pins or hook
fasteners.
— Knot any belts, apron strings, etc...
— Empty pockets.
— Always adhere to the manufacturer's ins-
tructions when using softening products.
Important :
Do not tumble-dry the following
articles :
— Clothing including rubber like materials (for
example: shower caps, waterproof clothing
and textiles, linings, pillows etc.)
— Chlorofibres (Thermolactyl* for example)
*Registered trademark
— Items containing underwiring that could
become detached
— Bulky items (duvets, eiderdowns, etc...)
— Laundry that has not been spun
— Laundry cleaned with inflammable chemi-
cals.
Important :
Check the labels on your textiles
Normal
drying
Gentle
drying
Do not tumble dry
4/ 准备衣物
中文
建议:
如果在将衣物放入滚筒式干衣机前发现任
注意:
请勿用干衣机烘干如下物品:
注意:
检查衣物上的标签。
准备衣物
推荐容量
何污渍,那么即使已经经过洗涤,也不要烘干相
关物品。通常,熨烫过或经过滚筒式干衣机干燥
后的污渍无法彻底清洗掉。
清洗顽固污渍,尤其是需要再次清洗污渍的衣物,
请参考大多数洗衣机提供的指导手册。
- 橡胶类衣物(例如:浴帽、防水服装和织物、垫
和枕头等)。
- 氯纤维(如 Thermolactyl*)* 注册商标。
- 产品中含有可分离的金属线。
- 大件物品(羽绒被、鸭绒被等)。
- 未脱水的衣物。
- 用易燃化学品清洁后的衣物。
- 合上拉链和纽扣。
- 去除所有松散的纽扣、别针以及挂钩扣件
- 将带子、围裙带等打结。
- 清空口袋。
- 打开门(在标签处按压)(图 06)
- 检查过滤器是否在机壳内。
- 将洗过的和脱水后的衣物松散地放入滚桶,勿折
叠,勿成堆放置。
- 注意别让面料将门卡住。
- 关门。
干衣机的最大容量为 8 公斤。
- 为了减少褶皱以及节省烘干时间,建议放置的衣
物不超过干衣机的最大容量。
标准烘干
温和烘干
不可用干衣机烘干
- 请遵照制造商提供的说明书使用软化剂。
将衣物放入滚筒
检查您的织物状况
图

11
EN
• PROGRAMMING A DRYING CYCLE
• PRESENTATION OF THE CONTROL PANEL
5 / PROGRAMMING
• Starting the appliance :
Check that the power cable is plugged in.
The
appliance will not start unless the door is pro-
perly closed.
Press the “On/Off” button .
Select your program (see the table “Your
dryer’s programs” on the following pages) by
turning the programs dial (it turns in both
directions). The indicator light shows you the
program you have selected.
Press “Start/Pause” and the program will
start.
The screen tells you the time remaining, which
becomes more precise as the drying cycle
progresses.
• “ MEMO ACTIV’ ” function :
Your dryer remembers the programs that you
use most often.
After a few drying cycles, the program displayed
when you switch on your machine is the one that
you have used most often.
G
A
H
Program progress
Time remaining
Programs dial
Anti-creasing
Buzzer
Additional drying
Delayed start “+”
Delayed start “-”
Start/Pause
On/Off
H
G
F
E
D
C
B
A
Pause - Drying - Cooling down - End of program
Program progress :
Pause Stop
+
-
Delayed start
Pause Stop
A B C D
E
G HF
5/ 程序设置
中文
控制面板说明
设定烘干程序
+
DFD1081CH
DFD1081CH - Modèle Eole - LCD - Condenseur - Bac Haut - Eclairage tambour
Pause Stop
A B C D E F G H
程序旋钮 预约启动“+”
预约启动“-”
启动 / 暂停
开/关
防皱
蜂鸣器
加时烘干
启动电器:
程序进程
程序进程
剩余时间
暂停 - 烘干 - 冷却 - 程序结束
记忆功能:
检查电源线是否插上。除非门已经完全关闭,否则
电器设备将无法启动。
按“开 / 关”按钮 。
通过程序旋钮 (可向两个方向转动)选择程序(见
下页“干衣机程序”表)。指示灯显示您所选择的
程序。
按“启动 / 暂停” ,程序将启动。
显示屏上将显示剩余时间,随着烘干程序运行,计
时变得更加精确。
干衣机会记下您最常用的程序。
经过几次的烘干后,当启动电器时,机器将显示你
最常使用的程序。
11
EN
• PROGRAMMING A DRYING CYCLE
• PRESENTATION OF THE CONTROL PANEL
5 / PROGRAMMING
• Starting the appliance :
Check that the power cable is plugged in.
The
appliance will not start unless the door is pro-
perly closed.
Press the “On/Off” button .
Select your program (see the table “Your
dryer’s programs” on the following pages) by
turning the programs dial (it turns in both
directions). The indicator light shows you the
program you have selected.
Press “Start/Pause” and the program will
start.
The screen tells you the time remaining, which
becomes more precise as the drying cycle
progresses.
• “ MEMO ACTIV’ ” function :
Your dryer remembers the programs that you
use most often.
After a few drying cycles, the program displayed
when you switch on your machine is the one that
you have used most often.
G
A
H
Program progress
Time remaining
Programs dial
Anti-creasing
Buzzer
Additional drying
Delayed start “+”
Delayed start “-”
Start/Pause
On/Off
H
G
F
E
D
C
B
A
Pause - Drying - Cooling down - End of program
Program progress :
Pause Stop
+
-
Delayed start
Pause Stop
A B C D
E
G HF
MODIFICATIONS TO BE DONE TO THE DFD1081CH MANUAL
Page 11 : put the correct pictures
Replace the letters « G » and « H » by picture + letter for each page.
Page 12 : put the correct pictures
MODIFICATIONS TO BE DONE TO THE DFD1081CH MANUAL
Page 11 : put the correct pictures
Replace the letters « G » and « H » by picture + letter for each page.
Page 12 : put the correct pictures
MODIFICATIONS TO BE DONE TO THE DFD1081CH MANUAL
Page 11 : put the correct pictures
Replace the letters « G » and « H » by picture + letter for each page.
Page 12 : put the correct pictures
11
EN
• PROGRAMMING A DRYING CYCLE
• PRESENTATION OF THE CONTROL PANEL
5 / PROGRAMMING
• Starting the appliance :
Check that the power cable is plugged in.
The
appliance will not start unless the door is pro-
perly closed.
Press the “On/Off” button .
Select your program (see the table “Your
dryer’s programs” on the following pages) by
turning the programs dial (it turns in both
directions). The indicator light shows you the
program you have selected.
Press “Start/Pause” and the program will
start.
The screen tells you the time remaining, which
becomes more precise as the drying cycle
progresses.
• “ MEMO ACTIV’ ” function :
Your dryer remembers the programs that you
use most often.
After a few drying cycles, the program displayed
when you switch on your machine is the one that
you have used most often.
G
A
H
Program progress
Time remaining
Programs dial
Anti-creasing
Buzzer
Additional drying
Delayed start “+”
Delayed start “-”
Start/Pause
On/Off
H
G
F
E
D
C
B
A
Pause - Drying - Cooling down - End of program
Program progress :
Pause Stop
+
-
Delayed start
Pause Stop
A B C D
E
G HF
5/ 程序设置
中文
控制面板说明
设定烘干程序
+
DFD1081CH
DFD1081CH - Modèle Eole - LCD - Condenseur - Bac Haut - Eclairage tambour
Pause Stop
A B C D E F G H
程序旋钮 预约启动“+”
预约启动“-”
启动 / 暂停
开/关
防皱
蜂鸣器
加时烘干
启动电器:
程序进程
程序进程
剩余时间
暂停 - 烘干 - 冷却 - 程序结束
记忆功能:
检查电源线是否插上。除非门已经完全关闭,否则
电器设备将无法启动。
按“开 / 关”按钮 。
通过程序旋钮 (可向两个方向转动)选择程序(见
下页“干衣机程序”表)。指示灯显示您所选择的
程序。
按“启动 / 暂停” ,程序将启动。
显示屏上将显示剩余时间,随着烘干程序运行,计
时变得更加精确。
干衣机会记下您最常用的程序。
经过几次的烘干后,当启动电器时,机器将显示你
最常使用的程序。
11
EN
• PROGRAMMING A DRYING CYCLE
• PRESENTATION OF THE CONTROL PANEL
5 / PROGRAMMING
• Starting the appliance :
Check that the power cable is plugged in.
The
appliance will not start unless the door is pro-
perly closed.
Press the “On/Off” button .
Select your program (see the table “Your
dryer’s programs” on the following pages) by
turning the programs dial (it turns in both
directions). The indicator light shows you the
program you have selected.
Press “Start/Pause” and the program will
start.
The screen tells you the time remaining, which
becomes more precise as the drying cycle
progresses.
• “ MEMO ACTIV’ ” function :
Your dryer remembers the programs that you
use most often.
After a few drying cycles, the program displayed
when you switch on your machine is the one that
you have used most often.
G
A
H
Program progress
Time remaining
Programs dial
Anti-creasing
Buzzer
Additional drying
Delayed start “+”
Delayed start “-”
Start/Pause
On/Off
H
G
F
E
D
C
B
A
Pause - Drying - Cooling down - End of program
Program progress :
Pause Stop
+
-
Delayed start
Pause Stop
A B C D
E
G HF
11
EN
• PROGRAMMING A DRYING CYCLE
• PRESENTATION OF THE CONTROL PANEL
5 / PROGRAMMING
• Starting the appliance :
Check that the power cable is plugged in.
The
appliance will not start unless the door is pro-
perly closed.
Press the “On/Off” button .
Select your program (see the table “Your
dryer’s programs” on the following pages) by
turning the programs dial (it turns in both
directions). The indicator light shows you the
program you have selected.
Press “Start/Pause” and the program will
start.
The screen tells you the time remaining, which
becomes more precise as the drying cycle
progresses.
• “ MEMO ACTIV’ ” function :
Your dryer remembers the programs that you
use most often.
After a few drying cycles, the program displayed
when you switch on your machine is the one that
you have used most often.
G
A
H
Program progress
Time remaining
Programs dial
Anti-creasing
Buzzer
Additional drying
Delayed start “+”
Delayed start “-”
Start/Pause
On/Off
H
G
F
E
D
C
B
A
Pause - Drying - Cooling down - End of program
Program progress :
Pause Stop
+
-
Delayed start
Pause Stop
A B C D
E
G HF
11
EN
• PROGRAMMING A DRYING CYCLE
• PRESENTATION OF THE CONTROL PANEL
5 / PROGRAMMING
• Starting the appliance :
Check that the power cable is plugged in.
The
appliance will not start unless the door is pro-
perly closed.
Press the “On/Off” button .
Select your program (see the table “Your
dryer’s programs” on the following pages) by
turning the programs dial (it turns in both
directions). The indicator light shows you the
program you have selected.
Press “Start/Pause” and the program will
start.
The screen tells you the time remaining, which
becomes more precise as the drying cycle
progresses.
• “ MEMO ACTIV’ ” function :
Your dryer remembers the programs that you
use most often.
After a few drying cycles, the program displayed
when you switch on your machine is the one that
you have used most often.
G
A
H
Program progress
Time remaining
Programs dial
Anti-creasing
Buzzer
Additional drying
Delayed start “+”
Delayed start “-”
Start/Pause
On/Off
H
G
F
E
D
C
B
A
Pause - Drying - Cooling down - End of program
Program progress :
Pause Stop
+
-
Delayed start
Pause Stop
A B C D
E
G HF
5/ 程序设置
中文
控制面板说明
设定烘干程序
+
DFD1081CH
DFD1081CH - Modèle Eole - LCD - Condenseur - Bac Haut - Eclairage tambour
Pause Stop
A B C D E F G H
程序旋钮 预约启动“+”
预约启动“-”
启动 / 暂停
开/关
防皱
蜂鸣器
加时烘干
启动电器:
程序进程
程序进程
剩余时间
暂停 - 烘干 - 冷却 - 程序结束
记忆功能:
检查电源线是否插上。除非门已经完全关闭,否则
电器设备将无法启动。
按“开 / 关”按钮 。
通过程序旋钮 (可向两个方向转动)选择程序(见
下页“干衣机程序”表)。指示灯显示您所选择的
程序。
按“启动 / 暂停” ,程序将启动。
显示屏上将显示剩余时间,随着烘干程序运行,计
时变得更加精确。
干衣机会记下您最常用的程序。
经过几次的烘干后,当启动电器时,机器将显示你
最常使用的程序。
11
EN
• PROGRAMMING A DRYING CYCLE
• PRESENTATION OF THE CONTROL PANEL
5 / PROGRAMMING
• Starting the appliance :
Check that the power cable is plugged in.
The
appliance will not start unless the door is pro-
perly closed.
Press the “On/Off” button .
Select your program (see the table “Your
dryer’s programs” on the following pages) by
turning the programs dial (it turns in both
directions). The indicator light shows you the
program you have selected.
Press “Start/Pause” and the program will
start.
The screen tells you the time remaining, which
becomes more precise as the drying cycle
progresses.
• “ MEMO ACTIV’ ” function :
Your dryer remembers the programs that you
use most often.
After a few drying cycles, the program displayed
when you switch on your machine is the one that
you have used most often.
G
A
H
Program progress
Time remaining
Programs dial
Anti-creasing
Buzzer
Additional drying
Delayed start “+”
Delayed start “-”
Start/Pause
On/Off
H
G
F
E
D
C
B
A
Pause - Drying - Cooling down - End of program
Program progress :
Pause Stop
+
-
Delayed start
Pause Stop
A B C D
E
G HF
11
EN
• PROGRAMMING A DRYING CYCLE
• PRESENTATION OF THE CONTROL PANEL
5 / PROGRAMMING
• Starting the appliance :
Check that the power cable is plugged in.
The
appliance will not start unless the door is pro-
perly closed.
Press the “On/Off” button .
Select your program (see the table “Your
dryer’s programs” on the following pages) by
turning the programs dial (it turns in both
directions). The indicator light shows you the
program you have selected.
Press “Start/Pause” and the program will
start.
The screen tells you the time remaining, which
becomes more precise as the drying cycle
progresses.
• “ MEMO ACTIV’ ” function :
Your dryer remembers the programs that you
use most often.
After a few drying cycles, the program displayed
when you switch on your machine is the one that
you have used most often.
G
A
H
Program progress
Time remaining
Programs dial
Anti-creasing
Buzzer
Additional drying
Delayed start “+”
Delayed start “-”
Start/Pause
On/Off
H
G
F
E
D
C
B
A
Pause - Drying - Cooling down - End of program
Program progress :
Pause Stop
+
-
Delayed start
Pause Stop
A B C D
E
G HF
11
EN
• PROGRAMMING A DRYING CYCLE
• PRESENTATION OF THE CONTROL PANEL
5 / PROGRAMMING
• Starting the appliance :
Check that the power cable is plugged in.
The
appliance will not start unless the door is pro-
perly closed.
Press the “On/Off” button .
Select your program (see the table “Your
dryer’s programs” on the following pages) by
turning the programs dial (it turns in both
directions). The indicator light shows you the
program you have selected.
Press “Start/Pause” and the program will
start.
The screen tells you the time remaining, which
becomes more precise as the drying cycle
progresses.
• “ MEMO ACTIV’ ” function :
Your dryer remembers the programs that you
use most often.
After a few drying cycles, the program displayed
when you switch on your machine is the one that
you have used most often.
G
A
H
Program progress
Time remaining
Programs dial
Anti-creasing
Buzzer
Additional drying
Delayed start “+”
Delayed start “-”
Start/Pause
On/Off
H
G
F
E
D
C
B
A
Pause - Drying - Cooling down - End of program
Program progress :
Pause Stop
+
-
Delayed start
Pause Stop
A B C D
E
G HF

12
EN
5 / PROGRAMMING
Program stop
Time remaining
Time remaining until drying cycle begins
Delayed start
• Delaying a program’s start :
Select your program using the program dial
. The indicator light shows you the program
you have selected.
Press the ”Delayed Start +” button to
delay the start of your program thirty minutes
at a time until you reach the desired delay
time (max 23 ½ hours). To decrease the diffe-
red starting time, press the “Départ différé -
” button
Confirm by pressing the “Start/Pause” button
.
The display shows you how much time
remains before your program starts.
Once the time delay has expired, the pro-
gram actually starts. The screen tells you the
time remaining, which becomes more precise
as the drying cycle progresses.
• Adding or removing an item during
drying :
Press “Start/Pause” to interrupt drying or
open the door.
Insert or remove the item or items and close the
door.
Press the “Start/Pause” button to resume
drying.
• Altering programming or drying
during operation :
If you have entered the wrong program, you
can change your selection during the cycle.
Press “Start/Pause” to interrupt drying.
Select another program using the program
dial.
Press the “Start/Pause” button to resume
drying.
G
G
G
G
G
E
F
A
Advice :
Consult the Programs table on the next page to determine the program needed for the
type of items.
5/ 程序设置
中文
预约启动:
在干燥过程中添加或取出衣物:
操作过程中更改程序或者改变烘干程序:
使用程序旋钮 选择所需的程序。指示灯将显示
您选择的程序。
按“预约启动 +” 按钮预约所需程序启动时间,
每按一次可预约三十分钟,直到达到您希望的预约
时间(最多23 个半小时)。为了减少预约时间,按“延
迟启动 -” 按钮 。
按“启动 / 暂停” 按钮 确认。
显示屏将显示程序开始之前的剩余时间。
一旦预约的时间已到,程序正式启动。显示屏幕上
会显示剩余时间,随着烘干程序的运行,时间会变
得更加精确。
按“启动 / 暂停” 中断烘干或打开机门。
放入或取出一件或多件衣物后,关闭机门。
按“启动 / 暂停”按钮 重新开始烘干。
如果不小心输入了错误的程序指令,您可以再在干
燥过程中进行修改。
按“启动 / 暂停” 按钮中断烘干。
使用程序旋钮 选择另一个程序。
按“启动 / 暂停” 按钮重新烘干。
11
EN
• PROGRAMMING A DRYING CYCLE
• PRESENTATION OF THE CONTROL PANEL
5 / PROGRAMMING
• Starting the appliance :
Check that the power cable is plugged in.
The
appliance will not start unless the door is pro-
perly closed.
Press the “On/Off” button .
Select your program (see the table “Your
dryer’s programs” on the following pages) by
turning the programs dial (it turns in both
directions). The indicator light shows you the
program you have selected.
Press “Start/Pause” and the program will
start.
The screen tells you the time remaining, which
becomes more precise as the drying cycle
progresses.
• “ MEMO ACTIV’ ” function :
Your dryer remembers the programs that you
use most often.
After a few drying cycles, the program displayed
when you switch on your machine is the one that
you have used most often.
G
A
H
Program progress
Time remaining
Programs dial
Anti-creasing
Buzzer
Additional drying
Delayed start “+”
Delayed start “-”
Start/Pause
On/Off
H
G
F
E
D
C
B
A
Pause - Drying - Cooling down - End of program
Program progress :
Pause Stop
+
-
Delayed start
Pause Stop
A B C D
E
G HF
烘干程序开始前的剩余时间
程序停止
预约启动
剩余时间
建议:
请参照下一页的程序表确定相应物品类型烘干时所需的程序。
MODIFICATIONS TO BE DONE TO THE DFD1081CH MANUAL
Page 11 : put the correct pictures
Replace the letters « G » and « H » by picture + letter for each page.
Page 12 : put the correct pictures
MODIFICATIONS TO BE DONE TO THE DFD1081CH MANUAL
Page 11 : put the correct pictures
Replace the letters « G » and « H » by picture + letter for each page.
Page 12 : put the correct pictures
MODIFICATIONS TO BE DONE TO THE DFD1081CH MANUAL
Page 11 : put the correct pictures
Replace the letters « G » and « H » by picture + letter for each page.
Page 12 : put the correct pictures
12
EN
5 / PROGRAMMING
Program stop
Time remaining
Time remaining until drying cycle begins
Delayed start
• Delaying a program’s start :
Select your program using the program dial
. The indicator light shows you the program
you have selected.
Press the ”Delayed Start +” button to
delay the start of your program thirty minutes
at a time until you reach the desired delay
time (max 23 ½ hours). To decrease the diffe-
red starting time, press the “Départ différé -
” button
Confirm by pressing the “Start/Pause” button
.
The display shows you how much time
remains before your program starts.
Once the time delay has expired, the pro-
gram actually starts. The screen tells you the
time remaining, which becomes more precise
as the drying cycle progresses.
• Adding or removing an item during
drying :
Press “Start/Pause” to interrupt drying or
open the door.
Insert or remove the item or items and close the
door.
Press the “Start/Pause” button to resume
drying.
• Altering programming or drying
during operation :
If you have entered the wrong program, you
can change your selection during the cycle.
Press “Start/Pause” to interrupt drying.
Select another program using the program
dial.
Press the “Start/Pause” button to resume
drying.
G
G
G
G
G
E
F
A
Advice :
Consult the Programs table on the next page to determine the program needed for the
type of items.
5/ 程序设置
中文
预约启动:
在干燥过程中添加或取出衣物:
操作过程中更改程序或者改变烘干程序:
使用程序旋钮 选择所需的程序。指示灯将显示
您选择的程序。
按“预约启动 +” 按钮预约所需程序启动时间,
每按一次可预约三十分钟,直到达到您希望的预约
时间(最多 23 个半小时)。为了减少预约时间,按“延
迟启动 -” 按钮 。
按“启动 / 暂停” 按钮 确认。
显示屏将显示程序开始之前的剩余时间。
一旦预约的时间已到,程序正式启动。显示屏幕上
会显示剩余时间,随着烘干程序的运行,时间会变
得更加精确。
按“启动 / 暂停” 中断烘干或打开机门。
放入或取出一件或多件衣物后,关闭机门。
按“启动 / 暂停”按钮 重新开始烘干。
如果不小心输入了错误的程序指令,您可以再在干
燥过程中进行修改。
按“启动 / 暂停” 按钮中断烘干。
使用程序旋钮 选择另一个程序。
按“启动 / 暂停” 按钮重新烘干。
11
EN
• PROGRAMMING A DRYING CYCLE
• PRESENTATION OF THE CONTROL PANEL
5 / PROGRAMMING
• Starting the appliance :
Check that the power cable is plugged in.
The
appliance will not start unless the door is pro-
perly closed.
Press the “On/Off” button .
Select your program (see the table “Your
dryer’s programs” on the following pages) by
turning the programs dial (it turns in both
directions). The indicator light shows you the
program you have selected.
Press “Start/Pause” and the program will
start.
The screen tells you the time remaining, which
becomes more precise as the drying cycle
progresses.
• “ MEMO ACTIV’ ” function :
Your dryer remembers the programs that you
use most often.
After a few drying cycles, the program displayed
when you switch on your machine is the one that
you have used most often.
G
A
H
Program progress
Time remaining
Programs dial
Anti-creasing
Buzzer
Additional drying
Delayed start “+”
Delayed start “-”
Start/Pause
On/Off
H
G
F
E
D
C
B
A
Pause - Drying - Cooling down - End of program
Program progress :
Pause Stop
+
-
Delayed start
Pause Stop
A B C D
E
G HF
11
EN
• PROGRAMMING A DRYING CYCLE
• PRESENTATION OF THE CONTROL PANEL
5 / PROGRAMMING
• Starting the appliance :
Check that the power cable is plugged in.
The
appliance will not start unless the door is pro-
perly closed.
Press the “On/Off” button .
Select your program (see the table “Your
dryer’s programs” on the following pages) by
turning the programs dial (it turns in both
directions). The indicator light shows you the
program you have selected.
Press “Start/Pause” and the program will
start.
The screen tells you the time remaining, which
becomes more precise as the drying cycle
progresses.
• “ MEMO ACTIV’ ” function :
Your dryer remembers the programs that you
use most often.
After a few drying cycles, the program displayed
when you switch on your machine is the one that
you have used most often.
G
A
H
Program progress
Time remaining
Programs dial
Anti-creasing
Buzzer
Additional drying
Delayed start “+”
Delayed start “-”
Start/Pause
On/Off
H
G
F
E
D
C
B
A
Pause - Drying - Cooling down - End of program
Program progress :
Pause Stop
+
-
Delayed start
Pause Stop
A B C D
E
G HF
11
EN
• PROGRAMMING A DRYING CYCLE
• PRESENTATION OF THE CONTROL PANEL
5 / PROGRAMMING
• Starting the appliance :
Check that the power cable is plugged in.
The
appliance will not start unless the door is pro-
perly closed.
Press the “On/Off” button .
Select your program (see the table “Your
dryer’s programs” on the following pages) by
turning the programs dial (it turns in both
directions). The indicator light shows you the
program you have selected.
Press “Start/Pause” and the program will
start.
The screen tells you the time remaining, which
becomes more precise as the drying cycle
progresses.
• “ MEMO ACTIV’ ” function :
Your dryer remembers the programs that you
use most often.
After a few drying cycles, the program displayed
when you switch on your machine is the one that
you have used most often.
G
A
H
Program progress
Time remaining
Programs dial
Anti-creasing
Buzzer
Additional drying
Delayed start “+”
Delayed start “-”
Start/Pause
On/Off
H
G
F
E
D
C
B
A
Pause - Drying - Cooling down - End of program
Program progress :
Pause Stop
+
-
Delayed start
Pause Stop
A B C D
E
G HF
11
EN
• PROGRAMMING A DRYING CYCLE
• PRESENTATION OF THE CONTROL PANEL
5 / PROGRAMMING
• Starting the appliance :
Check that the power cable is plugged in.
The
appliance will not start unless the door is pro-
perly closed.
Press the “On/Off” button .
Select your program (see the table “Your
dryer’s programs” on the following pages) by
turning the programs dial (it turns in both
directions). The indicator light shows you the
program you have selected.
Press “Start/Pause” and the program will
start.
The screen tells you the time remaining, which
becomes more precise as the drying cycle
progresses.
• “ MEMO ACTIV’ ” function :
Your dryer remembers the programs that you
use most often.
After a few drying cycles, the program displayed
when you switch on your machine is the one that
you have used most often.
G
A
H
Program progress
Time remaining
Programs dial
Anti-creasing
Buzzer
Additional drying
Delayed start “+”
Delayed start “-”
Start/Pause
On/Off
H
G
F
E
D
C
B
A
Pause - Drying - Cooling down - End of program
Program progress :
Pause Stop
+
-
Delayed start
Pause Stop
A B C D
E
G HF
11
EN
• PROGRAMMING A DRYING CYCLE
• PRESENTATION OF THE CONTROL PANEL
5 / PROGRAMMING
• Starting the appliance :
Check that the power cable is plugged in.
The
appliance will not start unless the door is pro-
perly closed.
Press the “On/Off” button .
Select your program (see the table “Your
dryer’s programs” on the following pages) by
turning the programs dial (it turns in both
directions). The indicator light shows you the
program you have selected.
Press “Start/Pause” and the program will
start.
The screen tells you the time remaining, which
becomes more precise as the drying cycle
progresses.
• “ MEMO ACTIV’ ” function :
Your dryer remembers the programs that you
use most often.
After a few drying cycles, the program displayed
when you switch on your machine is the one that
you have used most often.
G
A
H
Program progress
Time remaining
Programs dial
Anti-creasing
Buzzer
Additional drying
Delayed start “+”
Delayed start “-”
Start/Pause
On/Off
H
G
F
E
D
C
B
A
Pause - Drying - Cooling down - End of program
Program progress :
Pause Stop
+
-
Delayed start
Pause Stop
A B C D
E
G HF
11
EN
• PROGRAMMING A DRYING CYCLE
• PRESENTATION OF THE CONTROL PANEL
5 / PROGRAMMING
• Starting the appliance :
Check that the power cable is plugged in.
The
appliance will not start unless the door is pro-
perly closed.
Press the “On/Off” button .
Select your program (see the table “Your
dryer’s programs” on the following pages) by
turning the programs dial (it turns in both
directions). The indicator light shows you the
program you have selected.
Press “Start/Pause” and the program will
start.
The screen tells you the time remaining, which
becomes more precise as the drying cycle
progresses.
• “ MEMO ACTIV’ ” function :
Your dryer remembers the programs that you
use most often.
After a few drying cycles, the program displayed
when you switch on your machine is the one that
you have used most often.
G
A
H
Program progress
Time remaining
Programs dial
Anti-creasing
Buzzer
Additional drying
Delayed start “+”
Delayed start “-”
Start/Pause
On/Off
H
G
F
E
D
C
B
A
Pause - Drying - Cooling down - End of program
Program progress :
Pause Stop
+
-
Delayed start
Pause Stop
A B C D
E
G HF
11
EN
• PROGRAMMING A DRYING CYCLE
• PRESENTATION OF THE CONTROL PANEL
5 / PROGRAMMING
• Starting the appliance :
Check that the power cable is plugged in.
The
appliance will not start unless the door is pro-
perly closed.
Press the “On/Off” button .
Select your program (see the table “Your
dryer’s programs” on the following pages) by
turning the programs dial (it turns in both
directions). The indicator light shows you the
program you have selected.
Press “Start/Pause” and the program will
start.
The screen tells you the time remaining, which
becomes more precise as the drying cycle
progresses.
• “ MEMO ACTIV’ ” function :
Your dryer remembers the programs that you
use most often.
After a few drying cycles, the program displayed
when you switch on your machine is the one that
you have used most often.
G
A
H
Program progress
Time remaining
Programs dial
Anti-creasing
Buzzer
Additional drying
Delayed start “+”
Delayed start “-”
Start/Pause
On/Off
H
G
F
E
D
C
B
A
Pause - Drying - Cooling down - End of program
Program progress :
Pause Stop
+
-
Delayed start
Pause Stop
A B C D
E
G HF
11
EN
• PROGRAMMING A DRYING CYCLE
• PRESENTATION OF THE CONTROL PANEL
5 / PROGRAMMING
• Starting the appliance :
Check that the power cable is plugged in.
The
appliance will not start unless the door is pro-
perly closed.
Press the “On/Off” button .
Select your program (see the table “Your
dryer’s programs” on the following pages) by
turning the programs dial (it turns in both
directions). The indicator light shows you the
program you have selected.
Press “Start/Pause” and the program will
start.
The screen tells you the time remaining, which
becomes more precise as the drying cycle
progresses.
• “ MEMO ACTIV’ ” function :
Your dryer remembers the programs that you
use most often.
After a few drying cycles, the program displayed
when you switch on your machine is the one that
you have used most often.
G
A
H
Program progress
Time remaining
Programs dial
Anti-creasing
Buzzer
Additional drying
Delayed start “+”
Delayed start “-”
Start/Pause
On/Off
H
G
F
E
D
C
B
A
Pause - Drying - Cooling down - End of program
Program progress :
Pause Stop
+
-
Delayed start
Pause Stop
A B C D
E
G HF
11
EN
• PROGRAMMING A DRYING CYCLE
• PRESENTATION OF THE CONTROL PANEL
5 / PROGRAMMING
• Starting the appliance :
Check that the power cable is plugged in.
The
appliance will not start unless the door is pro-
perly closed.
Press the “On/Off” button .
Select your program (see the table “Your
dryer’s programs” on the following pages) by
turning the programs dial (it turns in both
directions). The indicator light shows you the
program you have selected.
Press “Start/Pause” and the program will
start.
The screen tells you the time remaining, which
becomes more precise as the drying cycle
progresses.
• “ MEMO ACTIV’ ” function :
Your dryer remembers the programs that you
use most often.
After a few drying cycles, the program displayed
when you switch on your machine is the one that
you have used most often.
G
A
H
Program progress
Time remaining
Programs dial
Anti-creasing
Buzzer
Additional drying
Delayed start “+”
Delayed start “-”
Start/Pause
On/Off
H
G
F
E
D
C
B
A
Pause - Drying - Cooling down - End of program
Program progress :
Pause Stop
+
-
Delayed start
Pause Stop
A B C D
E
G HF
烘干程序开始前的剩余时间
程序停止
预约启动
剩余时间
建议:
请参照下一页的程序表确定相应物品类型烘干时所需的程序。
按“启动 / 暂停” 中短烘干或打开机门。
放入或取出一件或多件衣物后, 关闭机门。
按“启动 / 暂停” 按钮 重新开始烘干。
MODIFICATIONS TO BE DONE TO THE DFD1081CH MANUAL
Page 11 : put the correct pictures
Replace the letters « G » and « H » by picture + letter for each page.
Page 12 : put the correct pictures
MODIFICATIONS TO BE DONE TO THE DFD1081CH MANUAL
Page 11 : put the correct pictures
Replace the letters « G » and « H » by picture + letter for each page.
Page 12 : put the correct pictures
12
EN
5 / PROGRAMMING
Program stop
Time remaining
Time remaining until drying cycle begins
Delayed start
• Delaying a program’s start :
Select your program using the program dial
. The indicator light shows you the program
you have selected.
Press the ”Delayed Start +” button to
delay the start of your program thirty minutes
at a time until you reach the desired delay
time (max 23 ½ hours). To decrease the diffe-
red starting time, press the “Départ différé -
” button
Confirm by pressing the “Start/Pause” button
.
The display shows you how much time
remains before your program starts.
Once the time delay has expired, the pro-
gram actually starts. The screen tells you the
time remaining, which becomes more precise
as the drying cycle progresses.
• Adding or removing an item during
drying :
Press “Start/Pause” to interrupt drying or
open the door.
Insert or remove the item or items and close the
door.
Press the “Start/Pause” button to resume
drying.
• Altering programming or drying
during operation :
If you have entered the wrong program, you
can change your selection during the cycle.
Press “Start/Pause” to interrupt drying.
Select another program using the program
dial.
Press the “Start/Pause” button to resume
drying.
G
G
G
G
G
E
F
A
Advice :
Consult the Programs table on the next page to determine the program needed for the
type of items.
5/ 程序设置
中文
预约启动:
在干燥过程中添加或取出衣物:
操作过程中更改程序或者改变烘干程序:
使用程序旋钮 选择所需的程序。指示灯将显示
您选择的程序。
按“预约启动 +” 按钮预约所需程序启动时间,
每按一次可预约三十分钟,直到达到您希望的预约
时间(最多 23 个半小时)。为了减少预约时间,按“延
迟启动 -” 按钮 。
按“启动 / 暂停” 按钮 确认。
显示屏将显示程序开始之前的剩余时间。
一旦预约的时间已到,程序正式启动。显示屏幕上
会显示剩余时间,随着烘干程序的运行,时间会变
得更加精确。
按“启动 / 暂停” 中断烘干或打开机门。
放入或取出一件或多件衣物后,关闭机门。
按“启动 / 暂停”按钮 重新开始烘干。
如果不小心输入了错误的程序指令,您可以再在干
燥过程中进行修改。
按“启动 / 暂停” 按钮中断烘干。
使用程序旋钮 选择另一个程序。
按“启动 / 暂停” 按钮重新烘干。
11
EN
• PROGRAMMING A DRYING CYCLE
• PRESENTATION OF THE CONTROL PANEL
5 / PROGRAMMING
• Starting the appliance :
Check that the power cable is plugged in.
The
appliance will not start unless the door is pro-
perly closed.
Press the “On/Off” button .
Select your program (see the table “Your
dryer’s programs” on the following pages) by
turning the programs dial (it turns in both
directions). The indicator light shows you the
program you have selected.
Press “Start/Pause” and the program will
start.
The screen tells you the time remaining, which
becomes more precise as the drying cycle
progresses.
• “ MEMO ACTIV’ ” function :
Your dryer remembers the programs that you
use most often.
After a few drying cycles, the program displayed
when you switch on your machine is the one that
you have used most often.
G
A
H
Program progress
Time remaining
Programs dial
Anti-creasing
Buzzer
Additional drying
Delayed start “+”
Delayed start “-”
Start/Pause
On/Off
H
G
F
E
D
C
B
A
Pause - Drying - Cooling down - End of program
Program progress :
Pause Stop
+
-
Delayed start
Pause Stop
A B C D
E
G HF
11
EN
• PROGRAMMING A DRYING CYCLE
• PRESENTATION OF THE CONTROL PANEL
5 / PROGRAMMING
• Starting the appliance :
Check that the power cable is plugged in.
The
appliance will not start unless the door is pro-
perly closed.
Press the “On/Off” button .
Select your program (see the table “Your
dryer’s programs” on the following pages) by
turning the programs dial (it turns in both
directions). The indicator light shows you the
program you have selected.
Press “Start/Pause” and the program will
start.
The screen tells you the time remaining, which
becomes more precise as the drying cycle
progresses.
• “ MEMO ACTIV’ ” function :
Your dryer remembers the programs that you
use most often.
After a few drying cycles, the program displayed
when you switch on your machine is the one that
you have used most often.
G
A
H
Program progress
Time remaining
Programs dial
Anti-creasing
Buzzer
Additional drying
Delayed start “+”
Delayed start “-”
Start/Pause
On/Off
H
G
F
E
D
C
B
A
Pause - Drying - Cooling down - End of program
Program progress :
Pause Stop
+
-
Delayed start
Pause Stop
A B C D
E
G HF
11
EN
• PROGRAMMING A DRYING CYCLE
• PRESENTATION OF THE CONTROL PANEL
5 / PROGRAMMING
• Starting the appliance :
Check that the power cable is plugged in.
The
appliance will not start unless the door is pro-
perly closed.
Press the “On/Off” button .
Select your program (see the table “Your
dryer’s programs” on the following pages) by
turning the programs dial (it turns in both
directions). The indicator light shows you the
program you have selected.
Press “Start/Pause” and the program will
start.
The screen tells you the time remaining, which
becomes more precise as the drying cycle
progresses.
• “ MEMO ACTIV’ ” function :
Your dryer remembers the programs that you
use most often.
After a few drying cycles, the program displayed
when you switch on your machine is the one that
you have used most often.
G
A
H
Program progress
Time remaining
Programs dial
Anti-creasing
Buzzer
Additional drying
Delayed start “+”
Delayed start “-”
Start/Pause
On/Off
H
G
F
E
D
C
B
A
Pause - Drying - Cooling down - End of program
Program progress :
Pause Stop
+
-
Delayed start
Pause Stop
A B C D
E
G HF
11
EN
• PROGRAMMING A DRYING CYCLE
• PRESENTATION OF THE CONTROL PANEL
5 / PROGRAMMING
• Starting the appliance :
Check that the power cable is plugged in.
The
appliance will not start unless the door is pro-
perly closed.
Press the “On/Off” button .
Select your program (see the table “Your
dryer’s programs” on the following pages) by
turning the programs dial (it turns in both
directions). The indicator light shows you the
program you have selected.
Press “Start/Pause” and the program will
start.
The screen tells you the time remaining, which
becomes more precise as the drying cycle
progresses.
• “ MEMO ACTIV’ ” function :
Your dryer remembers the programs that you
use most often.
After a few drying cycles, the program displayed
when you switch on your machine is the one that
you have used most often.
G
A
H
Program progress
Time remaining
Programs dial
Anti-creasing
Buzzer
Additional drying
Delayed start “+”
Delayed start “-”
Start/Pause
On/Off
H
G
F
E
D
C
B
A
Pause - Drying - Cooling down - End of program
Program progress :
Pause Stop
+
-
Delayed start
Pause Stop
A B C D
E
G HF
11
EN
• PROGRAMMING A DRYING CYCLE
• PRESENTATION OF THE CONTROL PANEL
5 / PROGRAMMING
• Starting the appliance :
Check that the power cable is plugged in.
The
appliance will not start unless the door is pro-
perly closed.
Press the “On/Off” button .
Select your program (see the table “Your
dryer’s programs” on the following pages) by
turning the programs dial (it turns in both
directions). The indicator light shows you the
program you have selected.
Press “Start/Pause” and the program will
start.
The screen tells you the time remaining, which
becomes more precise as the drying cycle
progresses.
• “ MEMO ACTIV’ ” function :
Your dryer remembers the programs that you
use most often.
After a few drying cycles, the program displayed
when you switch on your machine is the one that
you have used most often.
G
A
H
Program progress
Time remaining
Programs dial
Anti-creasing
Buzzer
Additional drying
Delayed start “+”
Delayed start “-”
Start/Pause
On/Off
H
G
F
E
D
C
B
A
Pause - Drying - Cooling down - End of program
Program progress :
Pause Stop
+
-
Delayed start
Pause Stop
A B C D
E
G HF
11
EN
• PROGRAMMING A DRYING CYCLE
• PRESENTATION OF THE CONTROL PANEL
5 / PROGRAMMING
• Starting the appliance :
Check that the power cable is plugged in.
The
appliance will not start unless the door is pro-
perly closed.
Press the “On/Off” button .
Select your program (see the table “Your
dryer’s programs” on the following pages) by
turning the programs dial (it turns in both
directions). The indicator light shows you the
program you have selected.
Press “Start/Pause” and the program will
start.
The screen tells you the time remaining, which
becomes more precise as the drying cycle
progresses.
• “ MEMO ACTIV’ ” function :
Your dryer remembers the programs that you
use most often.
After a few drying cycles, the program displayed
when you switch on your machine is the one that
you have used most often.
G
A
H
Program progress
Time remaining
Programs dial
Anti-creasing
Buzzer
Additional drying
Delayed start “+”
Delayed start “-”
Start/Pause
On/Off
H
G
F
E
D
C
B
A
Pause - Drying - Cooling down - End of program
Program progress :
Pause Stop
+
-
Delayed start
Pause Stop
A B C D
E
G HF
11
EN
• PROGRAMMING A DRYING CYCLE
• PRESENTATION OF THE CONTROL PANEL
5 / PROGRAMMING
• Starting the appliance :
Check that the power cable is plugged in.
The
appliance will not start unless the door is pro-
perly closed.
Press the “On/Off” button .
Select your program (see the table “Your
dryer’s programs” on the following pages) by
turning the programs dial (it turns in both
directions). The indicator light shows you the
program you have selected.
Press “Start/Pause” and the program will
start.
The screen tells you the time remaining, which
becomes more precise as the drying cycle
progresses.
• “ MEMO ACTIV’ ” function :
Your dryer remembers the programs that you
use most often.
After a few drying cycles, the program displayed
when you switch on your machine is the one that
you have used most often.
G
A
H
Program progress
Time remaining
Programs dial
Anti-creasing
Buzzer
Additional drying
Delayed start “+”
Delayed start “-”
Start/Pause
On/Off
H
G
F
E
D
C
B
A
Pause - Drying - Cooling down - End of program
Program progress :
Pause Stop
+
-
Delayed start
Pause Stop
A B C D
E
G HF
11
EN
• PROGRAMMING A DRYING CYCLE
• PRESENTATION OF THE CONTROL PANEL
5 / PROGRAMMING
• Starting the appliance :
Check that the power cable is plugged in.
The
appliance will not start unless the door is pro-
perly closed.
Press the “On/Off” button .
Select your program (see the table “Your
dryer’s programs” on the following pages) by
turning the programs dial (it turns in both
directions). The indicator light shows you the
program you have selected.
Press “Start/Pause” and the program will
start.
The screen tells you the time remaining, which
becomes more precise as the drying cycle
progresses.
• “ MEMO ACTIV’ ” function :
Your dryer remembers the programs that you
use most often.
After a few drying cycles, the program displayed
when you switch on your machine is the one that
you have used most often.
G
A
H
Program progress
Time remaining
Programs dial
Anti-creasing
Buzzer
Additional drying
Delayed start “+”
Delayed start “-”
Start/Pause
On/Off
H
G
F
E
D
C
B
A
Pause - Drying - Cooling down - End of program
Program progress :
Pause Stop
+
-
Delayed start
Pause Stop
A B C D
E
G HF
11
EN
• PROGRAMMING A DRYING CYCLE
• PRESENTATION OF THE CONTROL PANEL
5 / PROGRAMMING
• Starting the appliance :
Check that the power cable is plugged in.
The
appliance will not start unless the door is pro-
perly closed.
Press the “On/Off” button .
Select your program (see the table “Your
dryer’s programs” on the following pages) by
turning the programs dial (it turns in both
directions). The indicator light shows you the
program you have selected.
Press “Start/Pause” and the program will
start.
The screen tells you the time remaining, which
becomes more precise as the drying cycle
progresses.
• “ MEMO ACTIV’ ” function :
Your dryer remembers the programs that you
use most often.
After a few drying cycles, the program displayed
when you switch on your machine is the one that
you have used most often.
G
A
H
Program progress
Time remaining
Programs dial
Anti-creasing
Buzzer
Additional drying
Delayed start “+”
Delayed start “-”
Start/Pause
On/Off
H
G
F
E
D
C
B
A
Pause - Drying - Cooling down - End of program
Program progress :
Pause Stop
+
-
Delayed start
Pause Stop
A B C D
E
G HF
烘干程序开始前的剩余时间
程序停止
预约启动
剩余时间
建议:
请参照下一页的程序表确定相应物品类型烘干时所需的程序。
MODIFICATIONS TO BE DONE TO THE DFD1081CH MANUAL
Page 11 : put the correct pictures
Replace the letters « G » and « H » by picture + letter for each page.
Page 12 : put the correct pictures
12
EN
5 / PROGRAMMING
Program stop
Time remaining
Time remaining until drying cycle begins
Delayed start
• Delaying a program’s start :
Select your program using the program dial
. The indicator light shows you the program
you have selected.
Press the ”Delayed Start +” button to
delay the start of your program thirty minutes
at a time until you reach the desired delay
time (max 23 ½ hours). To decrease the diffe-
red starting time, press the “Départ différé -
” button
Confirm by pressing the “Start/Pause” button
.
The display shows you how much time
remains before your program starts.
Once the time delay has expired, the pro-
gram actually starts. The screen tells you the
time remaining, which becomes more precise
as the drying cycle progresses.
• Adding or removing an item during
drying :
Press “Start/Pause” to interrupt drying or
open the door.
Insert or remove the item or items and close the
door.
Press the “Start/Pause” button to resume
drying.
• Altering programming or drying
during operation :
If you have entered the wrong program, you
can change your selection during the cycle.
Press “Start/Pause” to interrupt drying.
Select another program using the program
dial.
Press the “Start/Pause” button to resume
drying.
G
G
G
G
G
E
F
A
Advice :
Consult the Programs table on the next page to determine the program needed for the
type of items.
5/ 程序设置
中文
预约启动:
在干燥过程中添加或取出衣物:
操作过程中更改程序或者改变烘干程序:
使用程序旋钮 选择所需的程序。指示灯将显示
您选择的程序。
按“预约启动 +” 按钮预约所需程序启动时间,
每按一次可预约三十分钟,直到达到您希望的预约
时间(最多 23 个半小时)。为了减少预约时间,按“延
迟启动 -” 按钮 。
按“启动 / 暂停” 按钮 确认。
显示屏将显示程序开始之前的剩余时间。
一旦预约的时间已到,程序正式启动。显示屏幕上
会显示剩余时间,随着烘干程序的运行,时间会变
得更加精确。
按“启动 / 暂停” 中断烘干或打开机门。
放入或取出一件或多件衣物后,关闭机门。
按“启动 / 暂停”按钮 重新开始烘干。
如果不小心输入了错误的程序指令,您可以再在干
燥过程中进行修改。
按“启动 / 暂停” 按钮中断烘干。
使用程序旋钮 选择另一个程序。
按“启动 / 暂停” 按钮重新烘干。
11
EN
• PROGRAMMING A DRYING CYCLE
• PRESENTATION OF THE CONTROL PANEL
5 / PROGRAMMING
• Starting the appliance :
Check that the power cable is plugged in.
The
appliance will not start unless the door is pro-
perly closed.
Press the “On/Off” button .
Select your program (see the table “Your
dryer’s programs” on the following pages) by
turning the programs dial (it turns in both
directions). The indicator light shows you the
program you have selected.
Press “Start/Pause” and the program will
start.
The screen tells you the time remaining, which
becomes more precise as the drying cycle
progresses.
• “ MEMO ACTIV’ ” function :
Your dryer remembers the programs that you
use most often.
After a few drying cycles, the program displayed
when you switch on your machine is the one that
you have used most often.
G
A
H
Program progress
Time remaining
Programs dial
Anti-creasing
Buzzer
Additional drying
Delayed start “+”
Delayed start “-”
Start/Pause
On/Off
H
G
F
E
D
C
B
A
Pause - Drying - Cooling down - End of program
Program progress :
Pause Stop
+
-
Delayed start
Pause Stop
A B C D
E
G HF
11
EN
• PROGRAMMING A DRYING CYCLE
• PRESENTATION OF THE CONTROL PANEL
5 / PROGRAMMING
• Starting the appliance :
Check that the power cable is plugged in.
The
appliance will not start unless the door is pro-
perly closed.
Press the “On/Off” button .
Select your program (see the table “Your
dryer’s programs” on the following pages) by
turning the programs dial (it turns in both
directions). The indicator light shows you the
program you have selected.
Press “Start/Pause” and the program will
start.
The screen tells you the time remaining, which
becomes more precise as the drying cycle
progresses.
• “ MEMO ACTIV’ ” function :
Your dryer remembers the programs that you
use most often.
After a few drying cycles, the program displayed
when you switch on your machine is the one that
you have used most often.
G
A
H
Program progress
Time remaining
Programs dial
Anti-creasing
Buzzer
Additional drying
Delayed start “+”
Delayed start “-”
Start/Pause
On/Off
H
G
F
E
D
C
B
A
Pause - Drying - Cooling down - End of program
Program progress :
Pause Stop
+
-
Delayed start
Pause Stop
A B C D
E
G HF
11
EN
• PROGRAMMING A DRYING CYCLE
• PRESENTATION OF THE CONTROL PANEL
5 / PROGRAMMING
• Starting the appliance :
Check that the power cable is plugged in.
The
appliance will not start unless the door is pro-
perly closed.
Press the “On/Off” button .
Select your program (see the table “Your
dryer’s programs” on the following pages) by
turning the programs dial (it turns in both
directions). The indicator light shows you the
program you have selected.
Press “Start/Pause” and the program will
start.
The screen tells you the time remaining, which
becomes more precise as the drying cycle
progresses.
• “ MEMO ACTIV’ ” function :
Your dryer remembers the programs that you
use most often.
After a few drying cycles, the program displayed
when you switch on your machine is the one that
you have used most often.
G
A
H
Program progress
Time remaining
Programs dial
Anti-creasing
Buzzer
Additional drying
Delayed start “+”
Delayed start “-”
Start/Pause
On/Off
H
G
F
E
D
C
B
A
Pause - Drying - Cooling down - End of program
Program progress :
Pause Stop
+
-
Delayed start
Pause Stop
A B C D
E
G HF
11
EN
• PROGRAMMING A DRYING CYCLE
• PRESENTATION OF THE CONTROL PANEL
5 / PROGRAMMING
• Starting the appliance :
Check that the power cable is plugged in.
The
appliance will not start unless the door is pro-
perly closed.
Press the “On/Off” button .
Select your program (see the table “Your
dryer’s programs” on the following pages) by
turning the programs dial (it turns in both
directions). The indicator light shows you the
program you have selected.
Press “Start/Pause” and the program will
start.
The screen tells you the time remaining, which
becomes more precise as the drying cycle
progresses.
• “ MEMO ACTIV’ ” function :
Your dryer remembers the programs that you
use most often.
After a few drying cycles, the program displayed
when you switch on your machine is the one that
you have used most often.
G
A
H
Program progress
Time remaining
Programs dial
Anti-creasing
Buzzer
Additional drying
Delayed start “+”
Delayed start “-”
Start/Pause
On/Off
H
G
F
E
D
C
B
A
Pause - Drying - Cooling down - End of program
Program progress :
Pause Stop
+
-
Delayed start
Pause Stop
A B C D
E
G HF
11
EN
• PROGRAMMING A DRYING CYCLE
• PRESENTATION OF THE CONTROL PANEL
5 / PROGRAMMING
• Starting the appliance :
Check that the power cable is plugged in.
The
appliance will not start unless the door is pro-
perly closed.
Press the “On/Off” button .
Select your program (see the table “Your
dryer’s programs” on the following pages) by
turning the programs dial (it turns in both
directions). The indicator light shows you the
program you have selected.
Press “Start/Pause” and the program will
start.
The screen tells you the time remaining, which
becomes more precise as the drying cycle
progresses.
• “ MEMO ACTIV’ ” function :
Your dryer remembers the programs that you
use most often.
After a few drying cycles, the program displayed
when you switch on your machine is the one that
you have used most often.
G
A
H
Program progress
Time remaining
Programs dial
Anti-creasing
Buzzer
Additional drying
Delayed start “+”
Delayed start “-”
Start/Pause
On/Off
H
G
F
E
D
C
B
A
Pause - Drying - Cooling down - End of program
Program progress :
Pause Stop
+
-
Delayed start
Pause Stop
A B C D
E
G HF
11
EN
• PROGRAMMING A DRYING CYCLE
• PRESENTATION OF THE CONTROL PANEL
5 / PROGRAMMING
• Starting the appliance :
Check that the power cable is plugged in.
The
appliance will not start unless the door is pro-
perly closed.
Press the “On/Off” button .
Select your program (see the table “Your
dryer’s programs” on the following pages) by
turning the programs dial (it turns in both
directions). The indicator light shows you the
program you have selected.
Press “Start/Pause” and the program will
start.
The screen tells you the time remaining, which
becomes more precise as the drying cycle
progresses.
• “ MEMO ACTIV’ ” function :
Your dryer remembers the programs that you
use most often.
After a few drying cycles, the program displayed
when you switch on your machine is the one that
you have used most often.
G
A
H
Program progress
Time remaining
Programs dial
Anti-creasing
Buzzer
Additional drying
Delayed start “+”
Delayed start “-”
Start/Pause
On/Off
H
G
F
E
D
C
B
A
Pause - Drying - Cooling down - End of program
Program progress :
Pause Stop
+
-
Delayed start
Pause Stop
A B C D
E
G HF
11
EN
• PROGRAMMING A DRYING CYCLE
• PRESENTATION OF THE CONTROL PANEL
5 / PROGRAMMING
• Starting the appliance :
Check that the power cable is plugged in.
The
appliance will not start unless the door is pro-
perly closed.
Press the “On/Off” button .
Select your program (see the table “Your
dryer’s programs” on the following pages) by
turning the programs dial (it turns in both
directions). The indicator light shows you the
program you have selected.
Press “Start/Pause” and the program will
start.
The screen tells you the time remaining, which
becomes more precise as the drying cycle
progresses.
• “ MEMO ACTIV’ ” function :
Your dryer remembers the programs that you
use most often.
After a few drying cycles, the program displayed
when you switch on your machine is the one that
you have used most often.
G
A
H
Program progress
Time remaining
Programs dial
Anti-creasing
Buzzer
Additional drying
Delayed start “+”
Delayed start “-”
Start/Pause
On/Off
H
G
F
E
D
C
B
A
Pause - Drying - Cooling down - End of program
Program progress :
Pause Stop
+
-
Delayed start
Pause Stop
A B C D
E
G HF
11
EN
• PROGRAMMING A DRYING CYCLE
• PRESENTATION OF THE CONTROL PANEL
5 / PROGRAMMING
• Starting the appliance :
Check that the power cable is plugged in.
The
appliance will not start unless the door is pro-
perly closed.
Press the “On/Off” button .
Select your program (see the table “Your
dryer’s programs” on the following pages) by
turning the programs dial (it turns in both
directions). The indicator light shows you the
program you have selected.
Press “Start/Pause” and the program will
start.
The screen tells you the time remaining, which
becomes more precise as the drying cycle
progresses.
• “ MEMO ACTIV’ ” function :
Your dryer remembers the programs that you
use most often.
After a few drying cycles, the program displayed
when you switch on your machine is the one that
you have used most often.
G
A
H
Program progress
Time remaining
Programs dial
Anti-creasing
Buzzer
Additional drying
Delayed start “+”
Delayed start “-”
Start/Pause
On/Off
H
G
F
E
D
C
B
A
Pause - Drying - Cooling down - End of program
Program progress :
Pause Stop
+
-
Delayed start
Pause Stop
A B C D
E
G HF
11
EN
• PROGRAMMING A DRYING CYCLE
• PRESENTATION OF THE CONTROL PANEL
5 / PROGRAMMING
• Starting the appliance :
Check that the power cable is plugged in.
The
appliance will not start unless the door is pro-
perly closed.
Press the “On/Off” button .
Select your program (see the table “Your
dryer’s programs” on the following pages) by
turning the programs dial (it turns in both
directions). The indicator light shows you the
program you have selected.
Press “Start/Pause” and the program will
start.
The screen tells you the time remaining, which
becomes more precise as the drying cycle
progresses.
• “ MEMO ACTIV’ ” function :
Your dryer remembers the programs that you
use most often.
After a few drying cycles, the program displayed
when you switch on your machine is the one that
you have used most often.
G
A
H
Program progress
Time remaining
Programs dial
Anti-creasing
Buzzer
Additional drying
Delayed start “+”
Delayed start “-”
Start/Pause
On/Off
H
G
F
E
D
C
B
A
Pause - Drying - Cooling down - End of program
Program progress :
Pause Stop
+
-
Delayed start
Pause Stop
A B C D
E
G HF
烘干程序开始前的剩余时间
程序停止
预约启动
剩余时间
建议:
请参照下一页的程序表确定相应物品类型烘干时所需的程序。
MODIFICATIONS TO BE DONE TO THE DFD1081CH MANUAL
Page 11 : put the correct pictures
Replace the letters « G » and « H » by picture + letter for each page.
Page 12 : put the correct pictures

13
EN
5 / PROGRAMMING
Additional time
Remarks :
The “Anti-creasing” and "Buzzer" options remains selected from one program to the next. You
can simply press the button to deactivate thes options, even during a program.
• Stopping the appliance :
At the end of the program, the “Filter”
End of program
The “Filter” and “Tank Full” lights flash
“Anti-creasing” option
“Buzzer” option
Press the “Start/Pause” button . The addi-
tional drying time is added at the end of the
selected program.
G
and “Tank Full” lights flash alternately to
remind you that you must clean the filter and
empty the water collection tank after every
drying cycle:
Press the “On/Off” button and empty your
dryer.
Clean the filter and empty the water collection
tank (see the “REGULAR MAINTENANCE”
section).
• “Anti-creasing” option :
The “Anti-creasing” option fluffs the textiles
every 10 minutes for up to 24 hours, until the
door is opened or the machine is turned off. It
begins as soon as the drying finishes and pre-
vents the clothes from settling in the machine.
To select this function, press the “Anti-crea-
sing” . An indicator lights up to show
that this option has been activated.
• “Buzzer” option :
Press the
“
Buzzer”
button . At the end
of drying, three beeps will sound every 10
minutes for one hour until the door is opened
or the appliance is stopped. The indicator light
corresponding to this option lights up at the
bottom of the screen, indicating that the buz-
zer is activated.
• “Additional Drying” option :
This function enables you to add drying time
at the end of a program in units of 10 minutes
by successively pressing the “Additional
Drying” button .
D
C
B
H
5/ 程序设置
中文
停止设备:
“防皱”选项:
“蜂鸣器”选项:
“额外烘干”选项:
程序结束时,每次烘干程序结束后 ,“过滤器”
和“水箱满槽” 指示等交替闪烁提醒您必须清
洁过滤器和清空水槽:
按“开 / 关”按钮 ,清空干衣机。
清洁过滤器和清空水箱(见“定期保养”章节)。
“防皱”选项每 10 分钟抖开织物,最多长达 24 小时,
直到机门打开或机器关闭。烘干结束后将运行防皱
程序,以防止衣物在机器里被搁置太久。
要选择此功能,按“防皱”按钮 。指示灯
起亮表示此选项已被激活。
按“蜂鸣器”按钮 。烘干结束时,每隔 10
分钟将蜂鸣三声,持续一个小时,直到机门被打开
或设备停止。对应此选项的指示灯在屏幕底部亮起,
指示蜂鸣器被激活。
此项功能可让您在程序结束后,通过连续按下的“额
外烘干”按钮 ,以每按一下 10 分钟为单位
增加烘干时间。
按“开始 / 暂停”按钮 。程序选择结束后,加
时烘干时间添加成功。
13
EN
5 / PROGRAMMING
Additional time
Remarks :
The “Anti-creasing” and "Buzzer" options remains selected from one program to the next. You
can simply press the button to deactivate thes options, even during a program.
• Stopping the appliance :
At the end of the program, the “Filter”
End of program
The “Filter” and “Tank Full” lights flash
“Anti-creasing” option
“Buzzer” option
Press the “Start/Pause” button . The addi-
tional drying time is added at the end of the
selected program.
G
and “Tank Full” lights flash alternately to
remind you that you must clean the filter and
empty the water collection tank after every
drying cycle:
Press the “On/Off” button and empty your
dryer.
Clean the filter and empty the water collection
tank (see the “REGULAR MAINTENANCE”
section).
• “Anti-creasing” option :
The “Anti-creasing” option fluffs the textiles
every 10 minutes for up to 24 hours, until the
door is opened or the machine is turned off. It
begins as soon as the drying finishes and pre-
vents the clothes from settling in the machine.
To select this function, press the “Anti-crea-
sing” . An indicator lights up to show
that this option has been activated.
• “Buzzer” option :
Press the
“
Buzzer”
button . At the end
of drying, three beeps will sound every 10
minutes for one hour until the door is opened
or the appliance is stopped. The indicator light
corresponding to this option lights up at the
bottom of the screen, indicating that the buz-
zer is activated.
• “Additional Drying” option :
This function enables you to add drying time
at the end of a program in units of 10 minutes
by successively pressing the “Additional
Drying” button .
D
C
B
H
13
EN
5 / PROGRAMMING
Additional time
Remarks :
The “Anti-creasing” and "Buzzer" options remains selected from one program to the next. You
can simply press the button to deactivate thes options, even during a program.
• Stopping the appliance :
At the end of the program, the “Filter”
End of program
The “Filter” and “Tank Full” lights flash
“Anti-creasing” option
“Buzzer” option
Press the “Start/Pause” button . The addi-
tional drying time is added at the end of the
selected program.
G
and “Tank Full” lights flash alternately to
remind you that you must clean the filter and
empty the water collection tank after every
drying cycle:
Press the “On/Off” button and empty your
dryer.
Clean the filter and empty the water collection
tank (see the “REGULAR MAINTENANCE”
section).
• “Anti-creasing” option :
The “Anti-creasing” option fluffs the textiles
every 10 minutes for up to 24 hours, until the
door is opened or the machine is turned off. It
begins as soon as the drying finishes and pre-
vents the clothes from settling in the machine.
To select this function, press the “Anti-crea-
sing” . An indicator lights up to show
that this option has been activated.
• “Buzzer” option :
Press the
“Buzzer”
button . At the end
of drying, three beeps will sound every 10
minutes for one hour until the door is opened
or the appliance is stopped. The indicator light
corresponding to this option lights up at the
bottom of the screen, indicating that the buz-
zer is activated.
• “Additional Drying” option :
This function enables you to add drying time
at the end of a program in units of 10 minutes
by successively pressing the “Additional
Drying” button .
D
C
B
H
11
EN
• PROGRAMMING A DRYING CYCLE
• PRESENTATION OF THE CONTROL PANEL
5 / PROGRAMMING
• Starting the appliance :
Check that the power cable is plugged in.
The
appliance will not start unless the door is pro-
perly closed.
Press the “On/Off” button .
Select your program (see the table “Your
dryer’s programs” on the following pages) by
turning the programs dial (it turns in both
directions). The indicator light shows you the
program you have selected.
Press “Start/Pause” and the program will
start.
The screen tells you the time remaining, which
becomes more precise as the drying cycle
progresses.
• “ MEMO ACTIV’ ” function :
Your dryer remembers the programs that you
use most often.
After a few drying cycles, the program displayed
when you switch on your machine is the one that
you have used most often.
G
A
H
Program progress
Time remaining
Programs dial
Anti-creasing
Buzzer
Additional drying
Delayed start “+”
Delayed start “-”
Start/Pause
On/Off
H
G
F
E
D
C
B
A
Pause - Drying - Cooling down - End of program
Program progress :
Pause Stop
+
-
Delayed start
Pause Stop
A B C D
E
G HF
13
EN
5 / PROGRAMMING
Additional time
Remarks :
The “Anti-creasing” and "Buzzer" options remains selected from one program to the next. You
can simply press the button to deactivate thes options, even during a program.
• Stopping the appliance :
At the end of the program, the “Filter”
End of program
The “Filter” and “Tank Full” lights flash
“Anti-creasing” option
“Buzzer” option
Press the “Start/Pause” button . The addi-
tional drying time is added at the end of the
selected program.
G
and “Tank Full” lights flash alternately to
remind you that you must clean the filter and
empty the water collection tank after every
drying cycle:
Press the “On/Off” button and empty your
dryer.
Clean the filter and empty the water collection
tank (see the “REGULAR MAINTENANCE”
section).
• “Anti-creasing” option :
The “Anti-creasing” option fluffs the textiles
every 10 minutes for up to 24 hours, until the
door is opened or the machine is turned off. It
begins as soon as the drying finishes and pre-
vents the clothes from settling in the machine.
To select this function, press the “Anti-crea-
sing” . An indicator lights up to show
that this option has been activated.
• “Buzzer” option :
Press the
“
Buzzer”
button . At the end
of drying, three beeps will sound every 10
minutes for one hour until the door is opened
or the appliance is stopped. The indicator light
corresponding to this option lights up at the
bottom of the screen, indicating that the buz-
zer is activated.
• “Additional Drying” option :
This function enables you to add drying time
at the end of a program in units of 10 minutes
by successively pressing the “Additional
Drying” button .
D
C
B
H
13
EN
5 / PROGRAMMING
Additional time
Remarks :
The “Anti-creasing” and "Buzzer" options remains selected from one program to the next. You
can simply press the button to deactivate thes options, even during a program.
• Stopping the appliance :
At the end of the program, the “Filter”
End of program
The “Filter” and “Tank Full” lights flash
“Anti-creasing” option
“Buzzer” option
Press the “Start/Pause” button . The addi-
tional drying time is added at the end of the
selected program.
G
and “Tank Full” lights flash alternately to
remind you that you must clean the filter and
empty the water collection tank after every
drying cycle:
Press the “On/Off” button and empty your
dryer.
Clean the filter and empty the water collection
tank (see the “REGULAR MAINTENANCE”
section).
• “Anti-creasing” option :
The “Anti-creasing” option fluffs the textiles
every 10 minutes for up to 24 hours, until the
door is opened or the machine is turned off. It
begins as soon as the drying finishes and pre-
vents the clothes from settling in the machine.
To select this function, press the “Anti-crea-
sing” . An indicator lights up to show
that this option has been activated.
• “Buzzer” option :
Press the
“
Buzzer”
button . At the end
of drying, three beeps will sound every 10
minutes for one hour until the door is opened
or the appliance is stopped. The indicator light
corresponding to this option lights up at the
bottom of the screen, indicating that the buz-
zer is activated.
• “Additional Drying” option :
This function enables you to add drying time
at the end of a program in units of 10 minutes
by successively pressing the “Additional
Drying” button .
D
C
B
H
11
EN
• PROGRAMMING A DRYING CYCLE
• PRESENTATION OF THE CONTROL PANEL
5 / PROGRAMMING
• Starting the appliance :
Check that the power cable is plugged in.
The
appliance will not start unless the door is pro-
perly closed.
Press the “On/Off” button .
Select your program (see the table “Your
dryer’s programs” on the following pages) by
turning the programs dial (it turns in both
directions). The indicator light shows you the
program you have selected.
Press “Start/Pause” and the program will
start.
The screen tells you the time remaining, which
becomes more precise as the drying cycle
progresses.
• “ MEMO ACTIV’ ” function :
Your dryer remembers the programs that you
use most often.
After a few drying cycles, the program displayed
when you switch on your machine is the one that
you have used most often.
G
A
H
Program progress
Time remaining
Programs dial
Anti-creasing
Buzzer
Additional drying
Delayed start “+”
Delayed start “-”
Start/Pause
On/Off
H
G
F
E
D
C
B
A
Pause - Drying - Cooling down - End of program
Program progress :
Pause Stop
+
-
Delayed start
Pause Stop
A B C D
E
G HF
备注:
“防皱”选项和“蜂鸣器”选项在程序的更换过程中一直处于选中状态。即使在程序运行过程中,
您也可以按下此按钮来关闭选项。
程序结束
“过滤器”和“水槽满”指示灯闪烁
“防皱”选项
“蜂鸣器”选项
额外加时
Page 13 : put the correct pictures
Page 14 : put the correct pictures
Page 13 : put the correct pictures
Page 14 : put the correct pictures
Page 13 : put the correct pictures
Page 14 : put the correct pictures
Page 13 : put the correct pictures
Page 14 : put the correct pictures
MODIFICATIONS TO BE DONE TO THE DFD1081CH MANUAL
Page 11 : put the correct pictures
Replace the letters « G » and « H » by picture + letter for each page.
Page 12 : put the correct pictures
13
EN
5 / PROGRAMMING
Additional time
Remarks :
The “Anti-creasing” and "Buzzer" options remains selected from one program to the next. You
can simply press the button to deactivate thes options, even during a program.
• Stopping the appliance :
At the end of the program, the “Filter”
End of program
The “Filter” and “Tank Full” lights flash
“Anti-creasing” option
“Buzzer” option
Press the “Start/Pause” button . The addi-
tional drying time is added at the end of the
selected program.
G
and “Tank Full” lights flash alternately to
remind you that you must clean the filter and
empty the water collection tank after every
drying cycle:
Press the “On/Off” button and empty your
dryer.
Clean the filter and empty the water collection
tank (see the “REGULAR MAINTENANCE”
section).
• “Anti-creasing” option :
The “Anti-creasing” option fluffs the textiles
every 10 minutes for up to 24 hours, until the
door is opened or the machine is turned off. It
begins as soon as the drying finishes and pre-
vents the clothes from settling in the machine.
To select this function, press the “Anti-crea-
sing” . An indicator lights up to show
that this option has been activated.
• “Buzzer” option :
Press the
“
Buzzer”
button . At the end
of drying, three beeps will sound every 10
minutes for one hour until the door is opened
or the appliance is stopped. The indicator light
corresponding to this option lights up at the
bottom of the screen, indicating that the buz-
zer is activated.
• “Additional Drying” option :
This function enables you to add drying time
at the end of a program in units of 10 minutes
by successively pressing the “Additional
Drying” button .
D
C
B
H
5/ 程序设置
中文
停止设备:
“防皱”选项:
“蜂鸣器”选项:
“额外烘干”选项:
程序结束时,每次烘干程序结束后 ,“过滤器”
和“水箱满槽” 指示等交替闪烁提醒您必须清
洁过滤器和清空水槽:
按“开 / 关”按钮 ,清空干衣机。
清洁过滤器和清空水箱(见“定期保养”章节)。
“防皱”选项每 10 分钟抖开织物,最多长达 24 小时,
直到机门打开或机器关闭。烘干结束后将运行防皱
程序,以防止衣物在机器里被搁置太久。
要选择此功能,按“防皱”按钮 。指示灯
起亮表示此选项已被激活。
按“蜂鸣器”按钮 。烘干结束时,每隔 10
分钟将蜂鸣三声,持续一个小时,直到机门被打开
或设备停止。对应此选项的指示灯在屏幕底部亮起,
指示蜂鸣器被激活。
此项功能可让您在程序结束后,通过连续按下的“额
外烘干”按钮 ,以每按一下 10 分钟为单位
增加烘干时间。
按“开始 / 暂停”按钮 。程序选择结束后,加
时烘干时间添加成功。
13
EN
5 / PROGRAMMING
Additional time
Remarks :
The “Anti-creasing” and "Buzzer" options remains selected from one program to the next. You
can simply press the button to deactivate thes options, even during a program.
• Stopping the appliance :
At the end of the program, the “Filter”
End of program
The “Filter” and “Tank Full” lights flash
“Anti-creasing” option
“Buzzer” option
Press the “Start/Pause” button . The addi-
tional drying time is added at the end of the
selected program.
G
and “Tank Full” lights flash alternately to
remind you that you must clean the filter and
empty the water collection tank after every
drying cycle:
Press the “On/Off” button and empty your
dryer.
Clean the filter and empty the water collection
tank (see the “REGULAR MAINTENANCE”
section).
• “Anti-creasing” option :
The “Anti-creasing” option fluffs the textiles
every 10 minutes for up to 24 hours, until the
door is opened or the machine is turned off. It
begins as soon as the drying finishes and pre-
vents the clothes from settling in the machine.
To select this function, press the “Anti-crea-
sing” . An indicator lights up to show
that this option has been activated.
• “Buzzer” option :
Press the
“Buzzer”
button . At the end
of drying, three beeps will sound every 10
minutes for one hour until the door is opened
or the appliance is stopped. The indicator light
corresponding to this option lights up at the
bottom of the screen, indicating that the buz-
zer is activated.
• “Additional Drying” option :
This function enables you to add drying time
at the end of a program in units of 10 minutes
by successively pressing the “Additional
Drying” button .
D
C
B
H
13
EN
5 / PROGRAMMING
Additional time
Remarks :
The “Anti-creasing” and "Buzzer" options remains selected from one program to the next. You
can simply press the button to deactivate thes options, even during a program.
• Stopping the appliance :
At the end of the program, the “Filter”
End of program
The “Filter” and “Tank Full” lights flash
“Anti-creasing” option
“Buzzer” option
Press the “Start/Pause” button . The addi-
tional drying time is added at the end of the
selected program.
G
and “Tank Full” lights flash alternately to
remind you that you must clean the filter and
empty the water collection tank after every
drying cycle:
Press the “On/Off” button and empty your
dryer.
Clean the filter and empty the water collection
tank (see the “REGULAR MAINTENANCE”
section).
• “Anti-creasing” option :
The “Anti-creasing” option fluffs the textiles
every 10 minutes for up to 24 hours, until the
door is opened or the machine is turned off. It
begins as soon as the drying finishes and pre-
vents the clothes from settling in the machine.
To select this function, press the “Anti-crea-
sing” . An indicator lights up to show
that this option has been activated.
• “Buzzer” option :
Press the
“
Buzzer”
button . At the end
of drying, three beeps will sound every 10
minutes for one hour until the door is opened
or the appliance is stopped. The indicator light
corresponding to this option lights up at the
bottom of the screen, indicating that the buz-
zer is activated.
• “Additional Drying” option :
This function enables you to add drying time
at the end of a program in units of 10 minutes
by successively pressing the “Additional
Drying” button .
D
C
B
H
11
EN
• PROGRAMMING A DRYING CYCLE
• PRESENTATION OF THE CONTROL PANEL
5 / PROGRAMMING
• Starting the appliance :
Check that the power cable is plugged in.
The
appliance will not start unless the door is pro-
perly closed.
Press the “On/Off” button .
Select your program (see the table “Your
dryer’s programs” on the following pages) by
turning the programs dial (it turns in both
directions). The indicator light shows you the
program you have selected.
Press “Start/Pause” and the program will
start.
The screen tells you the time remaining, which
becomes more precise as the drying cycle
progresses.
• “ MEMO ACTIV’ ” function :
Your dryer remembers the programs that you
use most often.
After a few drying cycles, the program displayed
when you switch on your machine is the one that
you have used most often.
G
A
H
Program progress
Time remaining
Programs dial
Anti-creasing
Buzzer
Additional drying
Delayed start “+”
Delayed start “-”
Start/Pause
On/Off
H
G
F
E
D
C
B
A
Pause - Drying - Cooling down - End of program
Program progress :
Pause Stop
+
-
Delayed start
Pause Stop
A B C D
E
G HF
13
EN
5 / PROGRAMMING
Additional time
Remarks :
The “Anti-creasing” and "Buzzer" options remains selected from one program to the next. You
can simply press the button to deactivate thes options, even during a program.
• Stopping the appliance :
At the end of the program, the “Filter”
End of program
The “Filter” and “Tank Full” lights flash
“Anti-creasing” option
“Buzzer” option
Press the “Start/Pause” button . The addi-
tional drying time is added at the end of the
selected program.
G
and “Tank Full” lights flash alternately to
remind you that you must clean the filter and
empty the water collection tank after every
drying cycle:
Press the “On/Off” button and empty your
dryer.
Clean the filter and empty the water collection
tank (see the “REGULAR MAINTENANCE”
section).
• “Anti-creasing” option :
The “Anti-creasing” option fluffs the textiles
every 10 minutes for up to 24 hours, until the
door is opened or the machine is turned off. It
begins as soon as the drying finishes and pre-
vents the clothes from settling in the machine.
To select this function, press the “Anti-crea-
sing” . An indicator lights up to show
that this option has been activated.
• “Buzzer” option :
Press the
“
Buzzer”
button . At the end
of drying, three beeps will sound every 10
minutes for one hour until the door is opened
or the appliance is stopped. The indicator light
corresponding to this option lights up at the
bottom of the screen, indicating that the buz-
zer is activated.
• “Additional Drying” option :
This function enables you to add drying time
at the end of a program in units of 10 minutes
by successively pressing the “Additional
Drying” button .
D
C
B
H
13
EN
5 / PROGRAMMING
Additional time
Remarks :
The “Anti-creasing” and "Buzzer" options remains selected from one program to the next. You
can simply press the button to deactivate thes options, even during a program.
• Stopping the appliance :
At the end of the program, the “Filter”
End of program
The “Filter” and “Tank Full” lights flash
“Anti-creasing” option
“Buzzer” option
Press the “Start/Pause” button . The addi-
tional drying time is added at the end of the
selected program.
G
and “Tank Full” lights flash alternately to
remind you that you must clean the filter and
empty the water collection tank after every
drying cycle:
Press the “On/Off” button and empty your
dryer.
Clean the filter and empty the water collection
tank (see the “REGULAR MAINTENANCE”
section).
• “Anti-creasing” option :
The “Anti-creasing” option fluffs the textiles
every 10 minutes for up to 24 hours, until the
door is opened or the machine is turned off. It
begins as soon as the drying finishes and pre-
vents the clothes from settling in the machine.
To select this function, press the “Anti-crea-
sing” . An indicator lights up to show
that this option has been activated.
• “Buzzer” option :
Press the
“Buzzer”
button . At the end
of drying, three beeps will sound every 10
minutes for one hour until the door is opened
or the appliance is stopped. The indicator light
corresponding to this option lights up at the
bottom of the screen, indicating that the buz-
zer is activated.
• “Additional Drying” option :
This function enables you to add drying time
at the end of a program in units of 10 minutes
by successively pressing the “Additional
Drying” button .
D
C
B
H
11
EN
• PROGRAMMING A DRYING CYCLE
• PRESENTATION OF THE CONTROL PANEL
5 / PROGRAMMING
• Starting the appliance :
Check that the power cable is plugged in.
The
appliance will not start unless the door is pro-
perly closed.
Press the “On/Off” button .
Select your program (see the table “Your
dryer’s programs” on the following pages) by
turning the programs dial (it turns in both
directions). The indicator light shows you the
program you have selected.
Press “Start/Pause” and the program will
start.
The screen tells you the time remaining, which
becomes more precise as the drying cycle
progresses.
• “ MEMO ACTIV’ ” function :
Your dryer remembers the programs that you
use most often.
After a few drying cycles, the program displayed
when you switch on your machine is the one that
you have used most often.
G
A
H
Program progress
Time remaining
Programs dial
Anti-creasing
Buzzer
Additional drying
Delayed start “+”
Delayed start “-”
Start/Pause
On/Off
H
G
F
E
D
C
B
A
Pause - Drying - Cooling down - End of program
Program progress :
Pause Stop
+
-
Delayed start
Pause Stop
A B C D
E
G HF
备注:
“防皱”选项和“蜂鸣器”选项在程序的更换过程中一直处于选中状态。即使在程序运行过程中,
您也可以按下此按钮来关闭选项。
程序结束
“过滤器”和“水槽满”指示灯闪烁
“防皱”选项
“蜂鸣器”选项
额外加时
按 “开始 / 暂停” 按钮。程序选择结束后,
加时烘干时间添加成功。
MODIFICATIONS TO BE DONE TO THE DFD1081CH MANUAL
Page 11 : put the correct pictures
Replace the letters « G » and « H » by picture + letter for each page.
Page 12 : put the correct pictures
12
EN
5 / PROGRAMMING
Program stop
Time remaining
Time remaining until drying cycle begins
Delayed start
• Delaying a program’s start :
Select your program using the program dial
. The indicator light shows you the program
you have selected.
Press the ”Delayed Start +” button to
delay the start of your program thirty minutes
at a time until you reach the desired delay
time (max 23 ½ hours). To decrease the diffe-
red starting time, press the “Départ différé -
” button
Confirm by pressing the “Start/Pause” button
.
The display shows you how much time
remains before your program starts.
Once the time delay has expired, the pro-
gram actually starts. The screen tells you the
time remaining, which becomes more precise
as the drying cycle progresses.
• Adding or removing an item during
drying :
Press “Start/Pause” to interrupt drying or
open the door.
Insert or remove the item or items and close the
door.
Press the “Start/Pause” button to resume
drying.
• Altering programming or drying
during operation :
If you have entered the wrong program, you
can change your selection during the cycle.
Press “Start/Pause” to interrupt drying.
Select another program using the program
dial.
Press the “Start/Pause” button to resume
drying.
G
G
G
G
G
E
F
A
Advice :
Consult the Programs table on the next page to determine the program needed for the
type of items.
5/ 程序设置
中文
预约启动:
在干燥过程中添加或取出衣物:
操作过程中更改程序或者改变烘干程序:
使用程序旋钮 选择所需的程序。指示灯将显示
您选择的程序。
按“预约启动 +” 按钮预约所需程序启动时间,
每按一次可预约三十分钟,直到达到您希望的预约
时间(最多 23 个半小时)。为了减少预约时间,按“延
迟启动 -” 按钮 。
按“启动 / 暂停” 按钮 确认。
显示屏将显示程序开始之前的剩余时间。
一旦预约的时间已到,程序正式启动。显示屏幕上
会显示剩余时间,随着烘干程序的运行,时间会变
得更加精确。
按“启动 / 暂停” 中断烘干或打开机门。
放入或取出一件或多件衣物后,关闭机门。
按“启动 / 暂停”按钮 重新开始烘干。
如果不小心输入了错误的程序指令,您可以再在干
燥过程中进行修改。
按“启动 / 暂停” 按钮中断烘干。
使用程序旋钮 选择另一个程序。
按“启动 / 暂停” 按钮重新烘干。
11
EN
• PROGRAMMING A DRYING CYCLE
• PRESENTATION OF THE CONTROL PANEL
5 / PROGRAMMING
• Starting the appliance :
Check that the power cable is plugged in.
The
appliance will not start unless the door is pro-
perly closed.
Press the “On/Off” button .
Select your program (see the table “Your
dryer’s programs” on the following pages) by
turning the programs dial (it turns in both
directions). The indicator light shows you the
program you have selected.
Press “Start/Pause” and the program will
start.
The screen tells you the time remaining, which
becomes more precise as the drying cycle
progresses.
• “ MEMO ACTIV’ ” function :
Your dryer remembers the programs that you
use most often.
After a few drying cycles, the program displayed
when you switch on your machine is the one that
you have used most often.
G
A
H
Program progress
Time remaining
Programs dial
Anti-creasing
Buzzer
Additional drying
Delayed start “+”
Delayed start “-”
Start/Pause
On/Off
H
G
F
E
D
C
B
A
Pause - Drying - Cooling down - End of program
Program progress :
Pause Stop
+
-
Delayed start
Pause Stop
A B C D
E
G HF
11
EN
• PROGRAMMING A DRYING CYCLE
• PRESENTATION OF THE CONTROL PANEL
5 / PROGRAMMING
• Starting the appliance :
Check that the power cable is plugged in.
The
appliance will not start unless the door is pro-
perly closed.
Press the “On/Off” button .
Select your program (see the table “Your
dryer’s programs” on the following pages) by
turning the programs dial (it turns in both
directions). The indicator light shows you the
program you have selected.
Press “Start/Pause” and the program will
start.
The screen tells you the time remaining, which
becomes more precise as the drying cycle
progresses.
• “ MEMO ACTIV’ ” function :
Your dryer remembers the programs that you
use most often.
After a few drying cycles, the program displayed
when you switch on your machine is the one that
you have used most often.
G
A
H
Program progress
Time remaining
Programs dial
Anti-creasing
Buzzer
Additional drying
Delayed start “+”
Delayed start “-”
Start/Pause
On/Off
H
G
F
E
D
C
B
A
Pause - Drying - Cooling down - End of program
Program progress :
Pause Stop
+
-
Delayed start
Pause Stop
A B C D
E
G HF
11
EN
• PROGRAMMING A DRYING CYCLE
• PRESENTATION OF THE CONTROL PANEL
5 / PROGRAMMING
• Starting the appliance :
Check that the power cable is plugged in.
The
appliance will not start unless the door is pro-
perly closed.
Press the “On/Off” button .
Select your program (see the table “Your
dryer’s programs” on the following pages) by
turning the programs dial (it turns in both
directions). The indicator light shows you the
program you have selected.
Press “Start/Pause” and the program will
start.
The screen tells you the time remaining, which
becomes more precise as the drying cycle
progresses.
• “ MEMO ACTIV’ ” function :
Your dryer remembers the programs that you
use most often.
After a few drying cycles, the program displayed
when you switch on your machine is the one that
you have used most often.
G
A
H
Program progress
Time remaining
Programs dial
Anti-creasing
Buzzer
Additional drying
Delayed start “+”
Delayed start “-”
Start/Pause
On/Off
H
G
F
E
D
C
B
A
Pause - Drying - Cooling down - End of program
Program progress :
Pause Stop
+
-
Delayed start
Pause Stop
A B C D
E
G HF
11
EN
• PROGRAMMING A DRYING CYCLE
• PRESENTATION OF THE CONTROL PANEL
5 / PROGRAMMING
• Starting the appliance :
Check that the power cable is plugged in.
The
appliance will not start unless the door is pro-
perly closed.
Press the “On/Off” button .
Select your program (see the table “Your
dryer’s programs” on the following pages) by
turning the programs dial (it turns in both
directions). The indicator light shows you the
program you have selected.
Press “Start/Pause” and the program will
start.
The screen tells you the time remaining, which
becomes more precise as the drying cycle
progresses.
• “ MEMO ACTIV’ ” function :
Your dryer remembers the programs that you
use most often.
After a few drying cycles, the program displayed
when you switch on your machine is the one that
you have used most often.
G
A
H
Program progress
Time remaining
Programs dial
Anti-creasing
Buzzer
Additional drying
Delayed start “+”
Delayed start “-”
Start/Pause
On/Off
H
G
F
E
D
C
B
A
Pause - Drying - Cooling down - End of program
Program progress :
Pause Stop
+
-
Delayed start
Pause Stop
A B C D
E
G HF
11
EN
• PROGRAMMING A DRYING CYCLE
• PRESENTATION OF THE CONTROL PANEL
5 / PROGRAMMING
• Starting the appliance :
Check that the power cable is plugged in.
The
appliance will not start unless the door is pro-
perly closed.
Press the “On/Off” button .
Select your program (see the table “Your
dryer’s programs” on the following pages) by
turning the programs dial (it turns in both
directions). The indicator light shows you the
program you have selected.
Press “Start/Pause” and the program will
start.
The screen tells you the time remaining, which
becomes more precise as the drying cycle
progresses.
• “ MEMO ACTIV’ ” function :
Your dryer remembers the programs that you
use most often.
After a few drying cycles, the program displayed
when you switch on your machine is the one that
you have used most often.
G
A
H
Program progress
Time remaining
Programs dial
Anti-creasing
Buzzer
Additional drying
Delayed start “+”
Delayed start “-”
Start/Pause
On/Off
H
G
F
E
D
C
B
A
Pause - Drying - Cooling down - End of program
Program progress :
Pause Stop
+
-
Delayed start
Pause Stop
A B C D
E
G HF
11
EN
• PROGRAMMING A DRYING CYCLE
• PRESENTATION OF THE CONTROL PANEL
5 / PROGRAMMING
• Starting the appliance :
Check that the power cable is plugged in.
The
appliance will not start unless the door is pro-
perly closed.
Press the “On/Off” button .
Select your program (see the table “Your
dryer’s programs” on the following pages) by
turning the programs dial (it turns in both
directions). The indicator light shows you the
program you have selected.
Press “Start/Pause” and the program will
start.
The screen tells you the time remaining, which
becomes more precise as the drying cycle
progresses.
• “ MEMO ACTIV’ ” function :
Your dryer remembers the programs that you
use most often.
After a few drying cycles, the program displayed
when you switch on your machine is the one that
you have used most often.
G
A
H
Program progress
Time remaining
Programs dial
Anti-creasing
Buzzer
Additional drying
Delayed start “+”
Delayed start “-”
Start/Pause
On/Off
H
G
F
E
D
C
B
A
Pause - Drying - Cooling down - End of program
Program progress :
Pause Stop
+
-
Delayed start
Pause Stop
A B C D
E
G HF
11
EN
• PROGRAMMING A DRYING CYCLE
• PRESENTATION OF THE CONTROL PANEL
5 / PROGRAMMING
• Starting the appliance :
Check that the power cable is plugged in.
The
appliance will not start unless the door is pro-
perly closed.
Press the “On/Off” button .
Select your program (see the table “Your
dryer’s programs” on the following pages) by
turning the programs dial (it turns in both
directions). The indicator light shows you the
program you have selected.
Press “Start/Pause” and the program will
start.
The screen tells you the time remaining, which
becomes more precise as the drying cycle
progresses.
• “ MEMO ACTIV’ ” function :
Your dryer remembers the programs that you
use most often.
After a few drying cycles, the program displayed
when you switch on your machine is the one that
you have used most often.
G
A
H
Program progress
Time remaining
Programs dial
Anti-creasing
Buzzer
Additional drying
Delayed start “+”
Delayed start “-”
Start/Pause
On/Off
H
G
F
E
D
C
B
A
Pause - Drying - Cooling down - End of program
Program progress :
Pause Stop
+
-
Delayed start
Pause Stop
A B C D
E
G HF
11
EN
• PROGRAMMING A DRYING CYCLE
• PRESENTATION OF THE CONTROL PANEL
5 / PROGRAMMING
• Starting the appliance :
Check that the power cable is plugged in.
The
appliance will not start unless the door is pro-
perly closed.
Press the “On/Off” button .
Select your program (see the table “Your
dryer’s programs” on the following pages) by
turning the programs dial (it turns in both
directions). The indicator light shows you the
program you have selected.
Press “Start/Pause” and the program will
start.
The screen tells you the time remaining, which
becomes more precise as the drying cycle
progresses.
• “ MEMO ACTIV’ ” function :
Your dryer remembers the programs that you
use most often.
After a few drying cycles, the program displayed
when you switch on your machine is the one that
you have used most often.
G
A
H
Program progress
Time remaining
Programs dial
Anti-creasing
Buzzer
Additional drying
Delayed start “+”
Delayed start “-”
Start/Pause
On/Off
H
G
F
E
D
C
B
A
Pause - Drying - Cooling down - End of program
Program progress :
Pause Stop
+
-
Delayed start
Pause Stop
A B C D
E
G HF
11
EN
• PROGRAMMING A DRYING CYCLE
• PRESENTATION OF THE CONTROL PANEL
5 / PROGRAMMING
• Starting the appliance :
Check that the power cable is plugged in.
The
appliance will not start unless the door is pro-
perly closed.
Press the “On/Off” button .
Select your program (see the table “Your
dryer’s programs” on the following pages) by
turning the programs dial (it turns in both
directions). The indicator light shows you the
program you have selected.
Press “Start/Pause” and the program will
start.
The screen tells you the time remaining, which
becomes more precise as the drying cycle
progresses.
• “ MEMO ACTIV’ ” function :
Your dryer remembers the programs that you
use most often.
After a few drying cycles, the program displayed
when you switch on your machine is the one that
you have used most often.
G
A
H
Program progress
Time remaining
Programs dial
Anti-creasing
Buzzer
Additional drying
Delayed start “+”
Delayed start “-”
Start/Pause
On/Off
H
G
F
E
D
C
B
A
Pause - Drying - Cooling down - End of program
Program progress :
Pause Stop
+
-
Delayed start
Pause Stop
A B C D
E
G HF
烘干程序开始前的剩余时间
程序停止
预约启动
剩余时间
建议:
请参照下一页的程序表确定相应物品类型烘干时所需的程序。

14
EN
Program stop
The”Tank Full” light illuminates.
5 / PROGRAMMING
• Cooling cycle :
All programs finish with a cooling cycle that
lasts for a few minutes to allow the washing to
cool gradually.
Important :
Do not stop your dryer before this
cycle has finished.
• During the cycle :
Your tank is full during the drying cycle.
The appliance stops during the program.
The “Tank Full” and “Pause” turns on,
the time remaining flashes.
Proceed to empty your water collection tank
(see the “REGULAR MAINTENANCE” sec-
tion).
Press “Start/Pause” to restart your pro-
gram.
G
Important :
A power failure cancels the current program. In this case, therefore, you have to reset all
the programming operations.
Advice :
As a safety measure, you are advised to unplug the power cable when you are not using
the appliance.
5/ 程序设置
中文
冷却程序:
程序运行期间:
14
EN
Program stop
The”Tank Full” light illuminates.
5 / PROGRAMMING
• Cooling cycle :
All programs finish with a cooling cycle that
lasts for a few minutes to allow the washing to
cool gradually.
Important :
Do not stop your dryer before this
cycle has finished.
• During the cycle :
Your tank is full during the drying cycle.
The appliance stops during the program.
The “Tank Full” and “Pause” turns on,
the time remaining flashes.
Proceed to empty your water collection tank
(see the “REGULAR MAINTENANCE” sec-
tion).
Press “Start/Pause” to restart your pro-
gram.
G
Important :
A power failure cancels the current program. In this case, therefore, you have to reset all
the programming operations.
Advice :
As a safety measure, you are advised to unplug the power cable when you are not using
the appliance.
程序结束后,均有一个持续几分钟的冷却程序,以
便烘干后逐渐冷却。
如果在烘干过程中,水槽是满的。此时,设备程序
停止运行。“水槽满箱” 和“暂停”开启,
时间显示持续闪烁。
排空水槽(见“定期保养”章节)
按“开始 / 暂停” 按钮 重启程序。
注意:
程序没有结束时,请勿停止干衣机。
13
EN
5 / PROGRAMMING
Additional time
Remarks :
The “Anti-creasing” and "Buzzer" options remains selected from one program to the next. You
can simply press the button to deactivate thes options, even during a program.
• Stopping the appliance :
At the end of the program, the “Filter”
End of program
The “Filter” and “Tank Full” lights flash
“Anti-creasing” option
“Buzzer” option
Press the “Start/Pause” button . The addi-
tional drying time is added at the end of the
selected program.
G
and “Tank Full” lights flash alternately to
remind you that you must clean the filter and
empty the water collection tank after every
drying cycle:
Press the “On/Off” button and empty your
dryer.
Clean the filter and empty the water collection
tank (see the “REGULAR MAINTENANCE”
section).
• “Anti-creasing” option :
The “Anti-creasing” option fluffs the textiles
every 10 minutes for up to 24 hours, until the
door is opened or the machine is turned off. It
begins as soon as the drying finishes and pre-
vents the clothes from settling in the machine.
To select this function, press the “Anti-crea-
sing” . An indicator lights up to show
that this option has been activated.
• “Buzzer” option :
Press the
“Buzzer”
button . At the end
of drying, three beeps will sound every 10
minutes for one hour until the door is opened
or the appliance is stopped. The indicator light
corresponding to this option lights up at the
bottom of the screen, indicating that the buz-
zer is activated.
• “Additional Drying” option :
This function enables you to add drying time
at the end of a program in units of 10 minutes
by successively pressing the “Additional
Drying” button .
D
C
B
H
11
EN
• PROGRAMMING A DRYING CYCLE
• PRESENTATION OF THE CONTROL PANEL
5 / PROGRAMMING
• Starting the appliance :
Check that the power cable is plugged in.
The
appliance will not start unless the door is pro-
perly closed.
Press the “On/Off” button .
Select your program (see the table “Your
dryer’s programs” on the following pages) by
turning the programs dial (it turns in both
directions). The indicator light shows you the
program you have selected.
Press “Start/Pause” and the program will
start.
The screen tells you the time remaining, which
becomes more precise as the drying cycle
progresses.
• “ MEMO ACTIV’ ” function :
Your dryer remembers the programs that you
use most often.
After a few drying cycles, the program displayed
when you switch on your machine is the one that
you have used most often.
G
A
H
Program progress
Time remaining
Programs dial
Anti-creasing
Buzzer
Additional drying
Delayed start “+”
Delayed start “-”
Start/Pause
On/Off
H
G
F
E
D
C
B
A
Pause - Drying - Cooling down - End of program
Program progress :
Pause Stop
+
-
Delayed start
Pause Stop
A B C D
E
G HF
注意:
因断电程序被取消后,需重新设置所有程序。
建议:
安全起见,不使用设备时,请拔掉电源线。
程序停止
“水槽满箱”指示灯闪烁
Page 13 : put the correct pictures
Page 14 : put the correct pictures
MODIFICATIONS TO BE DONE TO THE DFD1081CH MANUAL
Page 11 : put the correct pictures
Replace the letters « G » and « H » by picture + letter for each page.
Page 12 : put the correct pictures
14
EN
Program stop
The”Tank Full” light illuminates.
5 / PROGRAMMING
• Cooling cycle :
All programs finish with a cooling cycle that
lasts for a few minutes to allow the washing to
cool gradually.
Important :
Do not stop your dryer before this
cycle has finished.
• During the cycle :
Your tank is full during the drying cycle.
The appliance stops during the program.
The “Tank Full” and “Pause” turns on,
the time remaining flashes.
Proceed to empty your water collection tank
(see the “REGULAR MAINTENANCE” sec-
tion).
Press “Start/Pause” to restart your pro-
gram.
G
Important :
A power failure cancels the current program. In this case, therefore, you have to reset all
the programming operations.
Advice :
As a safety measure, you are advised to unplug the power cable when you are not using
the appliance.
5/ 程序设置
中文
冷却程序:
程序运行期间:
14
EN
Program stop
The”Tank Full” light illuminates.
5 / PROGRAMMING
• Cooling cycle :
All programs finish with a cooling cycle that
lasts for a few minutes to allow the washing to
cool gradually.
Important :
Do not stop your dryer before this
cycle has finished.
• During the cycle :
Your tank is full during the drying cycle.
The appliance stops during the program.
The “Tank Full” and “Pause” turns on,
the time remaining flashes.
Proceed to empty your water collection tank
(see the “REGULAR MAINTENANCE” sec-
tion).
Press “Start/Pause” to restart your pro-
gram.
G
Important :
A power failure cancels the current program. In this case, therefore, you have to reset all
the programming operations.
Advice :
As a safety measure, you are advised to unplug the power cable when you are not using
the appliance.
程序结束后,均有一个持续几分钟的冷却程序,以
便烘干后逐渐冷却。
如果在烘干过程中,水槽是满的。此时,设备程序
停止运行。“水槽满箱” 和“暂停”开启,
时间显示持续闪烁。
排空水槽(见“定期保养”章节)
按“开始 / 暂停” 按钮 重启程序。
注意:
程序没有结束时,请勿停止干衣机。
13
EN
5 / PROGRAMMING
Additional time
Remarks :
The “Anti-creasing” and "Buzzer" options remains selected from one program to the next. You
can simply press the button to deactivate thes options, even during a program.
• Stopping the appliance :
At the end of the program, the “Filter”
End of program
The “Filter” and “Tank Full” lights flash
“Anti-creasing” option
“Buzzer” option
Press the “Start/Pause” button . The addi-
tional drying time is added at the end of the
selected program.
G
and “Tank Full” lights flash alternately to
remind you that you must clean the filter and
empty the water collection tank after every
drying cycle:
Press the “On/Off” button and empty your
dryer.
Clean the filter and empty the water collection
tank (see the “REGULAR MAINTENANCE”
section).
• “Anti-creasing” option :
The “Anti-creasing” option fluffs the textiles
every 10 minutes for up to 24 hours, until the
door is opened or the machine is turned off. It
begins as soon as the drying finishes and pre-
vents the clothes from settling in the machine.
To select this function, press the “Anti-crea-
sing” . An indicator lights up to show
that this option has been activated.
• “Buzzer” option :
Press the
“Buzzer”
button . At the end
of drying, three beeps will sound every 10
minutes for one hour until the door is opened
or the appliance is stopped. The indicator light
corresponding to this option lights up at the
bottom of the screen, indicating that the buz-
zer is activated.
• “Additional Drying” option :
This function enables you to add drying time
at the end of a program in units of 10 minutes
by successively pressing the “Additional
Drying” button .
D
C
B
H
11
EN
• PROGRAMMING A DRYING CYCLE
• PRESENTATION OF THE CONTROL PANEL
5 / PROGRAMMING
• Starting the appliance :
Check that the power cable is plugged in.
The
appliance will not start unless the door is pro-
perly closed.
Press the “On/Off” button .
Select your program (see the table “Your
dryer’s programs” on the following pages) by
turning the programs dial (it turns in both
directions). The indicator light shows you the
program you have selected.
Press “Start/Pause” and the program will
start.
The screen tells you the time remaining, which
becomes more precise as the drying cycle
progresses.
• “ MEMO ACTIV’ ” function :
Your dryer remembers the programs that you
use most often.
After a few drying cycles, the program displayed
when you switch on your machine is the one that
you have used most often.
G
A
H
Program progress
Time remaining
Programs dial
Anti-creasing
Buzzer
Additional drying
Delayed start “+”
Delayed start “-”
Start/Pause
On/Off
H
G
F
E
D
C
B
A
Pause - Drying - Cooling down - End of program
Program progress :
Pause Stop
+
-
Delayed start
Pause Stop
A B C D
E
G HF
注意:
因断电程序被取消后,需重新设置所有程序。
建议:
安全起见,不使用设备时,请拔掉电源线。
程序停止
“水槽满箱”指示灯闪烁

15
EN
5 / PROGRAMMING
• YOUR DRYER’S PROGRAMS
Regular programs Type of textile Drying results
Extra drying
Cotton Dry
Ready to put away
Cotton Dry
Ready to iron
Cotton Slightly damp
Machine pressing
Cotton Damp
Ready to put away
Regular textiles Dry
Ready to iron
Regular textiles Slightly damp
Other drying programs
Schirts
Synthetic, easy iron Dry
Delicate, synthetic Dry
Very delicate: silk, light
synthetic lingerie ...
Dry
Refreshing and airing your textiles after prolonged storage
Air and refresh
Other textiles 15 minutes
Air woollens
Woollens already dry 6 minutes
RECOMMENDED PROGRAMS FOR TESTS TO EN 61121 - DIRECTIVE 95/13/EEC
Load I ”Dry Cotton” 8 kg ... select “Cotton” - Ready to put away
Load I ”Ready to iron Cotton” 8 kg ... select “Cotton” - Ready to iron
Load III ”Easy Maintenance Textiles” 4 kg ... select “Stretch”
5/ 程序设置
中文
干衣机程序
常规程序
EN 61121 – 指令 95/13/EEC 测试推荐程序
常规程序
准备收放
T 恤
通风晾干
毛料通风晾干
伸展
精细织物
准备熨烫
棉织物 烘干
烘干
烘干
烘干
烘干
15 分钟
6 分钟
略微湿润
烘干
略微湿润
湿润
棉织物
常规纺织面料
负载 I “烘干棉织物” 8 公斤 选择“棉织物”- 准备收放
选择“棉织物”- 准备熨烫
选择“伸展”
8 公斤
4 公斤
“准备熨烫棉织物”
“易保养纺织物”
负载 I
负载 III
合成织物,易熨烫
其他面料
已干的毛料衣物
精细织物,合成织物
非常精细的织物:
蚕丝、浅色
常规纺织面料
棉织物
棉织物
准备收放
准备熨烫
机压
纺织面料类型 烘干效果
棉织物
混合织物
其他烘干程序
长久存储后,将纺织类衣物通风晾干
15
EN
5 / PROGRAMMING
• YOUR DRYER’S PROGRAMS
Regular programs Type of textile Drying results
Extra drying
Cotton Dry
Ready to put away
Cotton Dry
Ready to iron
Cotton Slightly damp
Machine pressing
Cotton Damp
Ready to put away
Regular textiles Dry
Ready to iron
Regular textiles Slightly damp
Other drying programs
Schirts
Synthetic, easy iron Dry
Delicate, synthetic Dry
Very delicate: silk, light
synthetic lingerie ...
Dry
Refreshing and airing your textiles after prolonged storage
Air and refresh
Other textiles 15 minutes
Air woollens
Woollens already dry 6 minutes
RECOMMENDED PROGRAMS FOR TESTS TO EN 61121 - DIRECTIVE 95/13/EEC
Load I ”Dry Cotton” 8 kg ... select “Cotton” - Ready to put away
Load I ”Ready to iron Cotton” 8 kg ... select “Cotton” - Ready to iron
Load III ”Easy Maintenance Textiles” 4 kg ... select “Stretch”

16
EN
• EMPTYING THE CONDENSATION
CONTAINER
• CLEANING THE FILTER
6 / REGULAR MAINTENANCE
Important :
Please remember that the filter must
be cleaned after every drying.
This is located in the lower part of your dryer.
Clean it as follows:
— Remove it from its housing by pulling it
upwards
(Fig. 08).
— Open the filter
(Fig. 09).
— Clean it by removing the thin coating of fluff
covering it
(Fig. 10).
Ensure that there is no fluff accumulating
round the dryer.
Important :
Do not wash filter with water Fig. 11)
.
— Re-insert it in its housing, pushing it well in.
Fig. 08
Fig. 09
Fig. 10
Fig. 11
Fig. 12
Fig. 13
This is located at the top of your appliance. It
collects the water extracted from your items
as they are dried.
— To empty it, release it from its housing by
pulling it towards you
(Fig. 12).
Important :
The condensation container must be
emptied after each drying cycle (Fig.13).
Important :
Risk of frost : if there is a risk of frost,
empty the condensation container.
Important :
Moving the appliance : empty the
condensation container if you wish to move
or tilt your appliance.
— Empty the container
(Fig. 13).
6/ 定期保养
中文
清洗过滤器
注意:
切记每次烘干后,必须清洗过滤器。
注意:
请勿用水清洗过滤器。(图 11)
注意:
每个烘干程序结束后(图 13),必须清空
注意:
霜冻风险:如果有霜冻风险,排空冷凝容器。
注意:
移动电器:如果你想移动或倾斜您的电器,
- 重新放入机壳,推进到合适位置。
冷凝容器。
请清空冷凝容器。
- 清空容器(图 13)。
过滤器位于干衣机的下面。
清洗时,进行如下操作:
- 向上拉从机壳里取出过滤器。(图 08)
- 打开过滤器。(图 09)
- 清除绒毛覆盖的薄层。
冷凝容器位于电器的顶部。烘干时,它收集从衣物
中提取的水分。
- 要清空冷凝器,从机壳向外拉(图 12)。
确保干衣机里没有绒毛堆积。
清空冷凝容器
图
图
图
图
图
图

17
EN
6 / REGULAR MAINTENANCE
• DIRECT EVACUATION OF WATER CONDENSER
90 cm maxi
Fig. 16
Fig. 14
Fig. 15
Fig. 18
Fig. 17
To avoid having to empty the collection tank
every time you use the appliance, you have a
kit (*) for removing the water from the conden-
ser directly into the drain (hose and deflector).
To fit this :
— Take off the existing pipe and push it inside
the appliance
(Fig. 14).
— Clip the deflector with the top of the pump
(Fig. 15).
— Connect the hose from the kit to the end
connector on the appliance
(Fig. 16).
You can connect the other end of the hose
either :
- To a ventilated trap
(Fig. 17).
- Or a sink trap
(Fig. 18)
.
When connecting to a trap, you must remove
the filler plug. Then press home the rubber tip.
If necessary, add a clamp connection
(Fig. 18)
.
Important :
The deflector must necessarily be posi-
tioned before the drain hose connection to
avoid any water splashes when taking off the
hose.
Déflecteur
Encart
Tuyau
Remarks :
(*) This kit is provided with the
appliance or is available near your After-
sales service under the ref. 57X3184
(according to model).
Deflector
Hose
Insert
6/ 定期保养
中文
直接排空水冷凝器
为了避免每次使用电器时都要清空冷凝水槽,您可
以用工具包(*)将冷凝器里的水直接排入下水道(软
管和反转器)。
为此:
- 取下现有的管道,并置入设备内部(图 14)。
- 将导流板夹在泵的顶部(图 15)。
- 将套件软管与电器的连接器后部相连(图 16)。
也可以把软管的另一端与下面的设备连接:
- 与通风管连接。( 图 17)
- 与水槽连接。( 图 18)
当与其他管道连接时,请先移除填充塞子。然后将
橡胶顶按回原处。
如有必要,增加固定连接。( 图 18)
注意:
与下水道连接前,取软管时,为防止溅水,
备注:
(*) 此工具包与电器一起提供或在售后服
请确保反转器已安装到位。
务时可以获取,参考 57X3184(根据产品型号而
定)。
图
图
图
图
图
软管
插口
变流器

18
EN
6 / REGULAR MAINTENANCE
• CLEANING THE CONDENSER
Fig. 19
Fig. 20
Fig. 21
Important :
The condenser must be cleaned twice
a month.
Important :
Unplug the power cable from the
socket before cleaning the condenser.
— Open the grill at the front of the appliance.
— Release the condenser
(Fig.19)
.
— Remove it carefully
(Fig.20).
— Remove any fluff from the condenser.
— Clean it with water only under the tap
(Fig.21)
.
— After cleaning, ensure that none of the tubes
are “blocked” and that the fins are clean.
— Rub it superficially.
— Re-insert the condenser and lock it in place.
Close the grill.
Important :
When refitting the condenser, ensure
that it is pushed in firmly right to the back of
its housing when locking it in
• CHANGING THE BULB
Fig. 22
You can replace the light bulb (type E14-
15W/230V) yourself
(Fig. 22)
.
Important :
Unplug the power cord before chan-
ging the bulb.
To do this :
— Unscrew the glass cover located to the left
inside the appliance.
— Unscrew the extinguished bulb and replace it.
— Screw on the glass cover tightly.
Important :
The bulb must be replaced when the
appliance is cooled down.
6/ 定期保养
中文
清洗冷凝器
更换灯泡
注意:
冷凝器需每两个月清洗一次。
注意:
清洗冷凝器前,请从插座上拔出电源线。
注意:
改装冷凝器时,确保其在锁定的时候被用力
注意:
更换灯泡前,请拔掉电源。
注意:
设备冷却后,方可进行灯泡更换。
推进至机壳后部靠右。
请遵守如下操作:
- 打开设备左部的玻璃罩。
- 取出熄灭的灯泡进行更换。
- 拧紧玻璃罩。
- 打开设备前面的架子。
- 松开冷凝器(图 19)。
- 小心取出(图 20)。
- 去除冷凝器上的绒毛。
- 只能在自来水管下用水清洗。
- 清洗后,确保所有管子都未“阻塞”,所有散热
片都已经清洗干净。
- 擦干表面。
- 重新放入冷凝器,并锁定在恰当位置。
- 关闭架子。
您可以自己更换灯泡(型号:E14- 15W/230V)(图
22)。
图
图
图
图

19
6 / REGULAR MAINTENANCE
EN
• CLEANING THE APPLIANCE
Fig. 23
Advice :
To clean the control panel, the access
to the drum and the casing, use only a
sponge or a damp cloth and some soapy
water.
— Ensure that there is no fluff accumulating
round the dryer.
— Clean the door seal with a damp cloth.
— Clean the filter housing with your vacuum
cleaner once a year.
You should
n
ot use,
under any circumstances
(Fig 23)
:
— Abrasive powders
— Metal or plastic sponges
— Alcohol-based products (alcohol, thinners,
etc.)
To keep your appliance in good working order, we recommend that you use Clearit household pro-
ducts.
Professional expertise for the general public
Clearit offers you professional products and adapted solutions for the daily upkeep of your house-
hold and kitchen appliances.
You may find them in conventional retail outlets, along with a complete line of by-products and
consumables.
6/ 定期保养
中文
清洗电器
建议:
如要清洁控制面板、滚筒和机箱,使用一块
海绵或湿布蘸上一些肥皂水擦拭。
- 确保干衣机内没有累积的绒毛。
- 用湿布清洁门的封条。
- 每年用吸尘器对过滤器外壳进行一次清理。
无论如何,切勿使用 ( 图 23):
- 研磨粉。
- 金属或塑料海绵。
- 含酒精产品(乙醇、稀释剂等)。
无论如何,切勿使用 ( 图 23):
- 研磨粉。
- 金属或塑料海绵。
- 含酒精产品(乙醇、稀释剂等)。
图

20
EN
7 / TROUBLESHOOTING
Advice :
Some incidents may arise when you are using your dryer. Here are the points you should
check.
Fault : Check whether :
The dryer does not start :
- The plug is in the socket
- The “On/Off” button is pressed in
- The door is properly closed
- The condenser is correctly locked in place.
The drying times are too long :
- The filter in the drum is clogged with fluff
- The laundry has been spun enough beforehand
(500rpm minimum, but spinning at 850rpm provides
better drying times)
- The condenser is not clogged.
- The air inlets and outlets are unobstructed enough to
ensure correct air circulation.
- The drying program selected matches the type of
items in the drum.
The laundry is too damp :
- The filter in the drum is clogged with fluff
- The type of drying has been selected correctly (too
low) : switch to the next programme up or increase
the drying time.
- The condenser is not blocked by fluff.
The laundry is too dry, too creased :
- The drying time selected is too long : the drying time
is better to be too short than too long: this avoids the
laundry becoming too dry and difficult to iron.
The items are unevenly dried :
- The types of textiles in the load are too different (e.g.
sheets together with jeans)
- The laundry has been laid correctly ‘unfolded’ in the
dryer
- The drum is not overloaded.
The synthetic items are loaded with
static electricity :
- The laundry has been dried too much
- You have used softener during washing. By using this
product, you can reduce most of the problems with
static electricity.
The “Tank Full” indicator light is lit :
- The condensate container is full : once you have emp-
tied it, re-insert it correctly, pushing it completely into
its housing
The “Tank Full” indicator light illumi-
nates although the tank is empty :
- The container has been properly inserted: push it in
completely.
- The condenser is tightly locked on the two sides.
7/ 故障诊断
中文
建议:
使用干衣机时,可能出现一些故障。应该检查如下几点:
故障 检测如下几个方面的问题:
干衣机无法启动:
- 插头插入插座。
- 按下“开 / 关”按钮。
- 门已正常关闭。
- 冷凝器放在合适位置。
- 桶内过滤器被绒毛阻塞。
- 烘干类型选择正确(太低):切换到下一个程序或者增加
烘干时间。
- 冷凝器未被绒毛阻塞。
- 装入的织物类型差异太大(例如床单与牛仔裤放在一起)。
- 干衣机内的衣物“展开”,摆放正确。
- 桶内衣物未超载。
- 冷凝水容器装满:一旦清空冷凝器,重新正确将其放入,
将其完全推到机壳。
- 滚桶内过滤器被绒毛阻塞。
- 衣物需要预先完全脱水,(最小转速 500 转 / 分钟,但使用
850 转 / 分钟脱水后的衣物烘干效果更佳)。
- 冷凝器未被阻塞。
- 进风口和出风口畅通,保证空气流通。
- 选择的烘干程序与桶内衣物类型兼容。
- 所选烘干时间过长:烘干时间短比时间长好:因为这样可
以避免衣物变得过于干燥难以熨烫。
- 衣服烘得太干。
- 洗涤过程中使用了柔顺剂。使用这种产品,可以减少大部
分的静电问题。
- 容器放入正确:推进到合适位置。
- 冷凝器两面被紧紧锁住。
衣物太湿:
衣服烘干不均匀:
“水箱满槽”指示灯一直亮着:
烘干时间过长:
衣物太干、太皱:
合成衣物有静电:
即使水槽空着,“水箱满槽”指示灯也
一直亮:
ページが読み込まれています...
ページが読み込まれています...
ページが読み込まれています...
ページが読み込まれています...
ページが読み込まれています...
-
 1
1
-
 2
2
-
 3
3
-
 4
4
-
 5
5
-
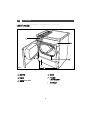 6
6
-
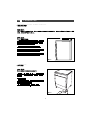 7
7
-
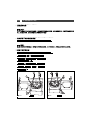 8
8
-
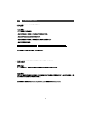 9
9
-
 10
10
-
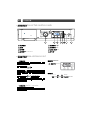 11
11
-
 12
12
-
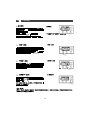 13
13
-
 14
14
-
 15
15
-
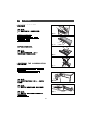 16
16
-
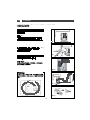 17
17
-
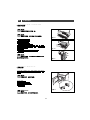 18
18
-
 19
19
-
 20
20
-
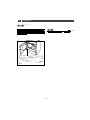 21
21
-
 22
22
-
 23
23
-
 24
24
-
 25
25


