
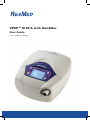
VPAP™ III ST-A with QuickNav
User Guide
English • 简体中文 • 繁體中文


ResMed Ltd (Manufacturer) 1 Elizabeth Macarthur Drive Bella Vista NSW 2153 Australia
ResMed Corp (US Designated Agent) 14040 Danielson Street Poway CA 92064-6857 USA
ResMed (UK) Ltd (EU Authorized Representative) 96 Milton Park Abingdon Oxfordshire OX14 4RY UK
ResMed Offices Australia, Austria, Belgium, Brazil, China, Finland, France, Germany, Greece, Hong Kong, India, Ireland, Italy, Japan,
Malaysia, Mexico, Netherlands, New Zealand, Norway, Portugal, Singapore, South Africa, Spain, Sweden, Switzerland, UK, USA (see
www.resmed.com for contact details).
VPAP III ST-A with QuickNav
Protected by patents: AU 697652, AU 699726, AU 713679, AU 2002233025, CA 2235939, CN ZL02804936.5, EP 0661071, EP 0858352,
HK 1065483, JP 3638613, JP 4083154, US 5199424, US 5522382, US 6213119, US 6240921, US 6705315. Other patents pending.
Protected by design registrations: AU 147283, AU 147335, CH 128.710, CH 128.711, DE 40202007, DE 40202008, ES 153515, ES
153516, ES 156136, FR 021395, GB 3001819, GB 3001820, JP 1164265, JP 1164266, NZ 527088, SE 75598, SE 75600, US D467335,
US D476077, US D477868, US D487311.
SmartStart, TiCONTROL, VPAP, and Vsync are trademarks of ResMed Ltd and SmartStart and VPAP are registered in U.S. Patent and
Trademark Office.
© 2008 ResMed Ltd.

Global leaders in sleep and respiratory medicine www.resmed.com
248210/4 08 10
VPAP™ III ST-A with
QuickNav
USER
APAC

VPAP™ III ST-A with QuickNav
User Guide
English
English

Introduction . . . . . . . . . . . . . . . . . . . . . . . . . . . . . . . . . . . . . . . . . . . . . . . 1
User/Owner Responsibility 1
Medical Information . . . . . . . . . . . . . . . . . . . . . . . . . . . . . . . . . . . . . . . 1
Intended Use 1
Contraindications 1
Adverse Effects 1
The VPAP III ST-A with QuickNav . . . . . . . . . . . . . . . . . . . . . . . . . . . 2
Masks 2
Humidifiers 2
Setting up the device . . . . . . . . . . . . . . . . . . . . . . . . . . . . . . . . . . . . . . 3
Attaching a Humidifier 4
Using the LCD QuickNav Screen and Keypad 4
Starting Treatment . . . . . . . . . . . . . . . . . . . . . . . . . . . . . . . . . . . . . . . . . 5
Patient Standby Screens 6
Using the Mask-Fit Feature 7
Stopping Treatment 7
How to Use the Menus . . . . . . . . . . . . . . . . . . . . . . . . . . . . . . . . . . . . . 8
QuickNav Screen 8
Menu Navigation 8
Patient Treatment Menu 8
Patient Summary Menu 8
Patient Settings Menu 9
Patient Options Menu 10
The Alarms . . . . . . . . . . . . . . . . . . . . . . . . . . . . . . . . . . . . . . . . . . . . . . . 11
Alarms Troubleshooting 11
Cleaning and Maintenance . . . . . . . . . . . . . . . . . . . . . . . . . . . . . . . . 13
Servicing 14
Helpful Hints . . . . . . . . . . . . . . . . . . . . . . . . . . . . . . . . . . . . . . . . . . . . . 14
Troubleshooting . . . . . . . . . . . . . . . . . . . . . . . . . . . . . . . . . . . . . . . . . . 15
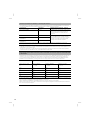
System Specifications . . . . . . . . . . . . . . . . . . . . . . . . . . . . . . . . . . . . 16
General Warnings and Cautions 18
Limited Warranty . . . . . . . . . . . . . . . . . . . . . . . . . . . . . . . . . . . . . . . . . 21

1Introduction
English
Introduction
The VPAP™ III ST-A with QuickNav™ is a bilevel pressure support ventilator specifically
designed for non-invasive mask ventilation.
This user manual contains the information you need for the correct use of your
VPAP III ST-A with QuickNav.
User/Owner Responsibility
The user or owner of this system shall have sole responsibility and liability for any injury to
persons or damage to property resulting from:
• operation which is not in accordance with the operating instructions supplied
• maintenance or modifications carried out unless in accordance with authorised
instructions and by authorised persons.
Please read this manual carefully before use.
This manual contains special terms and icons that appear in the margins to draw your
attention to specific and important information.
• Warning alerts you to possible injury.
• Caution explains special measures for the safe and effective use of the device.
• Note is an informative or helpful note.
Medical Information
Intended Use
The VPAP III ST-A system is intended to provide non-invasive ventilation for patients with
respiratory insufficiency or obstructive sleep apnoea (OSA), in the hospital or home.
Contraindications
This device should not be used if you have an insufficient respiratory drive to endure brief
interruptions in non-invasive ventilation therapy. This device is not a life support ventilator
and may stop operating with power failure or in the unlikely event of certain fault conditions.
If you have any of the following conditions, tell your doctor before using this device:
• acute sinusitis or otitis media
• epistaxis causing a risk of pulmonary aspiration
• conditions predisposing to a risk of aspiration of gastric contents
• impaired ability to clear secretions
• hypotension or significant intravascular volume depletion
• pneumothorax or pneumomediastinum
• recent cranial trauma or surgery.
Adverse Effects
You should report unusual chest pain, severe headache or increased breathlessness to your
physician. An acute upper respiratory tract infection may require temporary discontinuation
of treatment.
The following side effects may arise during the course of therapy:
• drying of the nose, mouth or throat
• bloating

2
• ear or sinus discomfort
• eye irritation
• mask-related skin irritations
• chest discomfort.
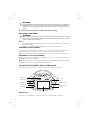
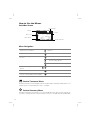
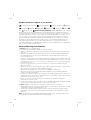
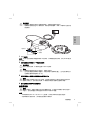
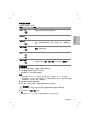
The VPAP III ST-A with QuickNav
The VPAP III ST-A with QuickNav comprises:
• VPAP III ST-A with QuickNav (shown above)
• Power cord
• Carry bag
• 2 m air tubing.
The following accessories may be purchased separately:
• 3 m air tubing
• Medium (52 cm) air tubing for the HumidAire and ResMed Passover humidifiers
• Hypoallergenic air filter.
!
WARNING
• Do not connect any device to the communication ports. Although your
health care provider may connect specially designed devices to the
communication ports of this device, connection of other devices could result
in injury, or damage to the unit.
• In the clinical environment, any PC that is used with this device must be at
least 1.5 m away from, or at least 2.5 m above the patient. It must also
comply with IEC 60950 or equivalent.
Masks
You will also need a ResMed mask (supplied separately). For information on using your
mask, see your mask manual. For the latest available masks, or to select the appropriate
setting for your mask, see www.resmed.com on the Products page under Service &
Support.
Humidifiers
A humidifier may be required if you are experiencing dryness of the nose, throat or mouth.
This device is compatible for use with the following ResMed humidifiers:
• HumidAire 2i™ heated humidifier
• HumidAire 2iC™ passover humidifier
DC Power Socket
AC Power Socket
Air filter cover
Power switch
Communication ports
Removable
front cover
Handle
LCD screen
Control panel
Air outlet

3Setting up the device
English
• HumidAire™ heated humidifier
• ResMed Passover humidifier.
!
WARNING
The HumidAire 2i, HumidAire 2iC, HumidAire heated humidifier and the ResMed
Passover are compatible for use with this device. Please refer to Warnings on
page 18.
Setting up the device
Place the device on a flat surface near the head of your bed.
!
CAUTION
• Be careful not to place the device where it can be bumped or where
someone is likely to trip over the power cord.
• Make sure the area around the flow generator is dry and clean. It should also
be clear of bedding, clothes and other potential blockages.
1 Connect the power cord.
Note: ResMed recommends using the AC power cord supplied with the unit. If a
replacement power cord is required, contact your ResMed service centre.
2 Plug the free end of the power cord into a power outlet.
!
CAUTION
Do not connect both AC and DC power cords to the device at the same time,
unless otherwise specified.
!
WARNING
• Make sure the power cord and plug are in good condition and the
equipment is not damaged.
• The air filter cover protects the device in the event of accidental liquid
spillage onto the device. Ensure that the air filter and air filter cover are fitted
at all times.
3 Connect one end of the air tubing firmly onto the air outlet of the device.
Power switch
AC locking clip
AC power cord

4
!
WARNING
Only ResMed air tubing should be used with your flow generator. A different
type of air tubing may alter the pressure you actually receive and reduce the
effectiveness of your treatment. Do not use conductive or anti-static hoses or
tubes.
4 Connect your mask system to the free end of the air tubing.
Attaching a Humidifier
!
WARNING
When using a humidifier, position it lower than your sleeping position, so that
any excess condensation drains back into the water chamber, and at the same
level or lower than the device.
Notes:
• You must activate the humidifier option in the menus if you are using a HumidAire or
Passover humidifier.
• For details on using humidifiers, please see you relevant user manual.
HumidAire 2i/2iC Humidifier
The HumidAire 2i or 2iC attaches to the front of the device to provide heated or passover
humidification, respsectively. No other accessories are required for its use. The
VPAP III ST-A with QuickNav automatically detects the presence of the HumidAire 2i.
HumidAire or Passover Humidifier
Medium size (52 cm) air tubing is a necessary accessory for connecting the device to the
HumidAire or Passover humidifier.
Note: Place the device on top of the humidifier. Do not place the device underneath the
humidifier. (This is to avoid water spilling into the device.)
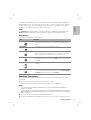
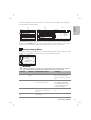
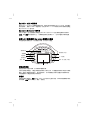
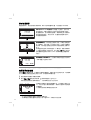
Using the LCD QuickNav Screen and Keypad
The control panel of this device includes an LCD screen, LEDs and keypad.
LCD Screen
The LCD screen displays the menus, treatment screens and alarm conditions.
Alarm LEDs
Alarm Mute
Start/Stop
Exit key
Enter (Soft) key
Up/Down key
LCD QuickNav screen
(green)
QuickView
(red)
Therapy LED

5Starting Treatment
English
To assist you in adjusting the device, the keypad and LCD are equipped with a backlight. The
LCD backlight comes on when the device is turned on or when you press a key, and turns
off after two minutes. The LCD backlight may be set to be on continually. The keypad
backlight is on at all times when the device is powered.
LEDs
The Therapy LED (white) may be on during treatment, if enabled by your clinician. The
Alarm LEDs (Red/Yellow) are on during an alarm condition or during alarm testing.
Keypad Keys
The device keypad has the following keys:
Starting Treatment
The device should be assembled beside your bed with the air tubing and mask system
connected.
1 Turn the power switch at the back of the device to on (I).
When the device is turned on, the Patient Standby screen is displayed.
Notes:
• If you have the HumidAire 2i attached, see “Using the HumidAire 2i Warm-up
Feature” on page 6.
• When the device is turned on, the alarm will sound a test beep and the red and yellow
LEDs will flash. To test the alarm manually, or to change the volume, see “Testing the
Alarm” on page 11.
2 Fit your mask as described in the mask user instructions.
3 Lie down and arrange the air tubing so that it is free to move if you turn in your sleep.
Key Function
Start/Stop • Starts or stops treatment.
• Extended hold for at least two seconds starts the MaskFitting
feature.
QuickView • Clinical menu function key. Clinical use only.
Alarm Mute • Press once to mute alarms. Press a second time to un-mute
alarms. If the problem is still present, the alarm will sound again
after two minutes. See “Alarm Mute Key” on page 11.
Exit (red)
• Allows you to exit the current menu or go back through the
menus. The function of this key is to exit from the current menu
or setting
.
Up/Down • Allows you to scroll through the device menus, submenus and
settings.
Enter (green)
• Allows you to enter or change the menu or function highlighted
on the LCD screen. Functions of this key includes enter, change
and apply, and it also operates as a soft key.

6
!
CAUTION
Do not leave long lengths of air tubing around the top of your bed. It could twist
around your head or neck while you are sleeping.
4 To start treatment, press the Start/Stop key
or
if the SmartStart function is enabled, simply breathe into the mask and treatment will
begin.
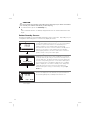
Patient Standby Screens
The Patient Standby screens are displayed when the device is turned on. Depending on your
configuration and settings, these screens may display as follows.
Using the HumidAire 2i Warm-up Feature
*
If using a HumidAire 2i with the device, you can use the Warm-
up feature to pre-heat the water in the humidifier prior to
starting treatment. The humidifer will be automatically
detected when the device is turned on and the standby screen
will give you the option to start warming up the humidifier.
After stopping treatment, the device will continue to blow air
gently to assist cooling of the heater plate.
* If you do not have a H2i attached and/or your clinician has not enabled Ramp time, these options
will not appear.
Ramp Time
*
Ramp time is a feature which can be enabled by your clinician.
If you have difficulty becoming accustomed to the full pressure,
select a ramp time. The airflow will start very gently and slowly
increase to full operating pressure over the selected ramp time.
If your clinician has set a maximum ramp time, the Set Ramp
option is displayed on the Patient Standby screen. Ramp time
can be altered in five-minute increments (from OFF to a
maximum ramp time set by your clinician) by using the Up/
Down key.
Patient Home Screen/Treatment Screen
This screen displays the time and date, the pressure bar and
the remaining Ramp time, if a Ramp time has been set.
ST
Set Ramp: 40min
Warm-up the Humidifier
22:23
12 Oct 2006
ST
Humidifier Warning
Set Ramp: 40min
ST
Ramp:
19:45
21:53
12 Oct 2006

7Starting Treatment
English
Using the Mask-Fit Feature
This device includes a mask-fit feature to help you fit your mask properly. If a Ramp time is
selected, the mask can be adjusted at a pressure closer to the prescribed pressure. To use
the mask-fit feature:
1 Fit your mask as described in the user instructions.
2 Hold down the Start/Stop key for at least two seconds until air pressure delivery starts
1
.
The flow generator will ramp to the mask-fit pressure
2
and will remain at this pressure
for three minutes.
3 If necessary, adjust your mask, mask cushion and headgear to reduce leak and check
your mask-fit star rating again on the LCD screen.
4 After three minutes, treatment will begin.
• If you do not wish to wait three minutes, hold down the Start/Stop key for at least
two seconds and treatment will begin immediately.
• If you press the Start/Stop key for less than two seconds, the device will return to
standby mode.
Stopping Treatment
To stop treatment at any time, remove your mask and press the Start/Stop key
or
if the SmartStart function is enabled, simply remove your mask and treatment will end
(SmartStop is not applicable with the "Mir Full" mask setting and certain alarms; see
“SmartStart™” on page 10).
1 The mask-fit feature can also be accessed from the Patient Settings Menu.
2 The mask-fit pressure is the set treatment pressure or 10 cm H
2
O, whichever is greater.
The LCD also displays a mask-fit star rating from zero to
five stars. Three to five stars indicate a good fit. Zero to
two stars indicate that you should adjust your mask.
The mask-fit star rating display disappears after three
minutes.
LK: 1.7
Press: 10
SETTINGS
21:53
Done
Mask Fitting
Good

8
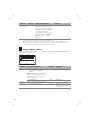
How to Use the Menus
QuickNav Screen
Menu Navigation
Patient Treatment Menu
The patient treatment menu displays a pressure bar and any remaining set Ramp time. See
“Patient Home Screen/Treatment Screen” on page 6.
Patient Summary Menu
The patient summary menu allows you to view details about the time used, a summary of
your device settings, and the current software version of your VPAP III ST-A with QuickNav.
To scroll through the menu icons or items
within a menu or submenu:
Press the Up/Down key to highlight your
selection.
To enter a menu or submenu: Press Enter.
To change a setting or activate a
function:
1. Press Enter.
2. Press the Up/Down key until the
desired setting appears.
3. Press Enter to select the setting.
To exit from changing settings or
options:
Press Enter or Exit
.
*
* Pressing Exit will not cancel changes you have made to the settings.
To exit out of a menu or submenu: Press Exit.
To scroll through pages or time periods,
using the soft key display (when available):
Press Enter.
SUMMARY
LK:
1.7 Vt: 780 RR: 10 MV: 7.8
21:53
EFFICACY DATA
6mths
Leak:
14.4
L/min
Vt:
0400-1000
ml
RR:
8-15
bpm
MV:
3.2-15.0
L/min
% Spont. T:
70
%
% Spont. C:
77
%
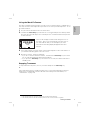
Title bar
Soft key display
Scroll bar
Menu icons
Main window
Therapy Status bar

9How to Use the Menus
English
The below example shows the progression of screens as you navigate to the Usage Data
from the Patient Summary Menu.
The data displayed in the Summary menu screens is view only. In some Summary menu
screens, pressing Enter when the soft key in the title bar is selected allows you to choose
a time period over which the data is measured (eg, a day, a week, a month, etc.).
Patient Settings Menu
The Patient Settings menu allows you to view and change settings such as mask type, tube
length and the humidifier used. You can also access the Mask-Fit feature.
!
WARNING
If these settings do not match your system set-up, this may alter the pressure
you actually receive and reduce the effectiveness of your treatment.
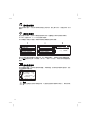
123
SUMMARY
LK:
1.7 Vt: 780 RR: 10 MV: 7.8
21:53
EFFICACY DATA
USAGE DATA
ALARM HISTORY
EVENT HISTORY
SETTINGS SUMMARY
SERVICING
SUMMARY
LK:
1.7 Vt: 780 RR: 10 MV: 7.8
21:53
EFFICACY DATA
USAGE DATA
ALARM HISTORY
EVENT HISTORY
SETTINGS SUMMARY
SERVICING
SUMMARY
LK:
1.7 Vt: 780 RR: 10 MV: 7.8
21:53
USAGE DATA
6mths
Used Since:
12 Oct 2006
Used:
740
hrs
102/106
days
Usage: 7: 15 hrs/day
LK:
1.7
Vt:
780
RR:
10
MV:
7.8
SETTINGS
21:53
Mask:
MIR FULL
Humidifier: None
Tube Length: 2m
Check Mask Fit
SmrtStrtStp: Off
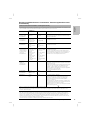
Function Default Function Description Settings
Mask MIR
FULL
Selects your mask type. See www.resmed.com or
ask your clinician for the
correct setting for your mask
type.
Humidifier NONE Selects the type of humidifier to
be used with the device.
NONE, H2i (HumidAire 2iC),
PASSOVER, HUMIDAIRE
If the HumidAire 2i is used, it
is automatically detected
and H2i is displayed.
Tube Length 2 m Selects the length of air tubing
connecting your mask to the
device.
2 m,
3 m
Check Mask-
Fit
Allows you to check your mask-
fit star rating.
View only

10
Patient Options Menu
The Patient Options menu allows you to set the local time, date and language and to test
and change the alarm volume.
SmartStart™
(SmrtStrtStp)
OFF If SmartStart is enabled, the
device will start automatically
when you breathe into the mask
and will stop automatically when
you take your mask off
(SmartStop). This means you do
not have to press the Start/
Stop key to begin or end
treatment.
*, †
ON/OFF
* If you select “Mir Full” as the mask option, SmartStop is automatically disabled. SmartStart may
not work with a full face mask due to safety features of the mask.
† When the Leak or Low MV Alarms are set to ON, SmartStop is automatically disabled. SmartStop
cannot be used with the Leak or Low MV Alarms because, if either of these conditions occur,
SmartStop will stop treatment before the alarm signal is activated.
Function Function Description Default Settings
Setup • Alarm Vol/Test: Allows you to
change and test the alarm
volume.
Note: When you select the volume
level and when you press enter, the
alarm will beep at the selected
volume as a test.
Medium Low, Medium and High.
• LCD Backlight AUTO ON/AUTO
Clock Allows you to set the time and date.
Language Selects the menu language.
*
* A tick will appear next to the currently selected language.
English English, German, French,
Italian, Spanish, Dutch,
Portuguese.
Function Default Function Description Settings
OPTIONS
LK:
1.7 Vt: 780 RR: 10 MV: 7.8
21:53
SETUP
CLOCK
LANGUAGE

11The Alarms
English
The Alarms
This device is fitted with alarms to alert you to changes that will affect your treatment.
Alarm Mute Key
You can mute an alarm by pressing the Alarm Mute key once. Pressing this key a
second time will un-mute the alarm. If the problem is still present, the alarm will sound again
after two minutes. An alarm LED will remain lit for as long as the problem is present. The
Title bar of the LCD will display the alarm description while the alarm is muted.
Testing the Alarm
When the device is turned on, the LEDs will flash and the alarm will beep to confirm that the
alarm is working.
Setting the Alarm Volume
You can set and test the alarm volume from the Patient Options Menu. The alarm will beep
at the selected volume when you press Enter.
All menus remain available during an alarm. Treatment screens are not viewable during an
alarm condition.
Alarms Troubleshooting
The most common reason for an alarm to sound is because the system has not been
properly assembled. Check that the air tubing has been properly attached to the flow
generator and mask (and humidifier if used).
When an alarm has been activated, the LCD screen will display either alarm information or
recommended instructions for you or your clinician.
Note: The alarm actions listed below are based on having the appropriate alarm settings for
your therapy. When an alarm is activated, consult your clinician.
!
CAUTION
In the event of power failure or machine malfunction, remove the mask to avoid
rebreathing your exhaled air.
Warning Signal/Cause Action
For all the medium priority alarms listed below, you will hear a
single intermittent tone and
the
yellow LED will flash.
LCD: LCD turns off
The flow generator stops delivering air pressure.
• Power failure.
• Power cord is disconnected or
device switched off while
delivering treatment (without
pressing the Start/Stop key).
Remove your mask until power is restored.
Notes:
• Treatment will re-start when power is restored.
• Unless muted, the alarm will sound for at least
two minutes in the event of a power failure.
LCD: CHECK TUBE
The flow generator stops delivering air pressure.
• Air tubing disconnected from the
HumidAire 2i/2iC.
1. Check that the air tubing is connected
properly to the HumidAire 2i/2iC.
2. Check that the HumidAire 2i/2iC or front cover
is connected properly to the flow generator.

12
3. Turn the device off and on again at the power
switch.
• There is a blockage in the air
circuit.
1. Check the air circuit for a blockage.
2. Remove blockage.
3. Re-start therapy.
• Hardware failure. If the alarm persists, return the unit to ResMed
for servicing.
LCD: IPAP LOWER
Device is operating outside device
specifications.
Continue using and contact your clinician about
this alarm. Device settings may require
adjustment.
LCD: SYSTEM ERROR-xxx TURN OFF & CALL SERVICE!
The flow generator stops delivering air pressure.
Component failure. • Return the device for servicing.
• DO NOT USE THE DEVICE.
LCD: HIGH LEAK!!!
High mask leak for more than 20
seconds.
Adjust the mask to minimise leak. See “Using
the Mask-Fit Feature” on page 7.
LCD: LOW PRESSURE:XX
• Air pressure at the mask has fallen
below the alarm setting level.
• Mask is removed while SmartStop
has been disabled.
1. Check that the air tubing is connected
properly.
2. Turn the device off and on again at the power
switch. If the alarm persists, return the unit to
ResMed for servicing.
LCD: HIGH PRESSURE:XX
Mask pressure exceeds alarm setting
level.
1. The treatment will stop.
2. Turn power off.
3. Turn power back on.
4. Try using the flow generator one more time.
5. If the high pressure alarm activates
repeatedly, discontinue use and return to
ResMed for servicing. If the alarm does not
recur, then continue to use as normal.
LCD: LOW MV:XX
Minute ventilation level has dropped
below the alarm setting level.
Contact your clinician.
Warning Signal/Cause Action

13Cleaning and Maintenance
English
Cleaning and Maintenance
You should regularly carry out the cleaning and maintenance described in this section.
LCD: NO MASK VENT
• Connection of a non-vented mask.
• Mask expiratory flow port (vent)
may be blocked.
• Use of supplemental oxygen with
a vented mask.
• Ensure your mask has an expiratory flow port
(vent).
• Ensure your mask expiratory flow ports
(vents) are not blocked.
• Contact your clinician.
Note: The non-vented mask alarm activates within
30 seconds (15 sec on average) of using therapy
with a non-vented mask.
Daily Cleaning
Mask
Clean the mask according to the instructions supplied with the mask.
Air tubing
Disconnect the air tubing from the device (and humidifier, if used) and
store the tubing and mask in a clean, dry place until next use.
CAUTION
Do not store the air tubing in direct sunlight as the tubing may harden over
time and eventually crack.
Humidifier
If you are using a humidifier, clean it according to the instructions supplied
with the humidifier.
Weekly Cleaning
1
Remove the air tubing from the device and the mask.
2
Wash the air tubing in warm water using mild detergent. Rinse thoroughly, hang and
allow to dry.
3
Reconnect the air tubing to the air outlet and mask.
CAUTION
• Do not use bleach, chlorine-, alcohol- or aromatic-based solutions
(including all scented oils), moisturising or antibacterial soaps to clean the
air tubing or the device. These solutions may cause hardening and reduce
the life of the product.
• Do not hang the air tubing in direct sunlight as the tubing may harden over
time and eventually crack.
Periodic Cleaning
1
Clean the exterior of the device with a damp cloth and mild liquid soap.
2
Inspect the air filter to check if it is blocked by dirt or contains holes. See “Replacing the
Air Filter” on page 14.
WARNING
Beware of electric shock. Do not immerse the flow generator or power cord in
water. Always unplug the flow generator before cleaning and be sure that it
is dry before reconnecting.
Warning Signal/Cause Action

14
Servicing
This device is intended to provide safe and reliable operation when operated and maintained
in accordance with the instructions provided by ResMed. To ensure that your device
continues to provide optimum performance it is recommended that this product (VPAP III
ST-A with QuickNav) be inspected by an authorised ResMed Service Centre five years from
the date of purchase. Applicable ResMed warranty details are provided with the device at
the time of original supply. Of course, as with all electrical devices, if any irregularity
becomes apparent, you should exercise caution and have the device inspected by an
authorised ResMed service centre.
If you feel that your device is not performing properly, see “Troubleshooting” on page 15.
!
CAUTION
Inspection and repair should only be performed by an authorised agent. Under
no circumstances should you attempt to service or repair the flow generator
yourself.
Helpful Hints
Travelling with the VPAP III ST-A with QuickNav
International Use
Your device has an internal power adapter that enables it to operate in other countries. It will
operate on power supplies of 100–240V, 50–60Hz and 110V, 400 Hz. No special adjustment
is necessary, but you will require an approved power cord for that country.
Using a Battery to Power the Device
Information regarding suitable DC and battery power supplies for this device can be found
on www.resmed.com on the Products page under Service and Support > Ventilation
Accessories.
Inverter or UPS
The power specifications for an inverter or a UPS are listed in the following table.
CAUTION
Do not attempt to open the device. There are no user serviceable parts inside.
Repairs and internal servicing should only be performed by an authorised
service agent.
Replacing the Air Filter
Inspect the air filter every month to check if it is blocked by dirt or contains holes. With normal
use of the device, the air filter needs to be replaced every six months (or more often if your
device is in a dusty environment). To replace the air filter:
1
Remove the air filter cover at the back of the device.
2
Remove and discard the old air filter.
3
Insert a new filter with the blue tinted side facing out.
4
Replace the air filter cover.
WARNING
Do not wash the air filter. The air filter is not washable or reusable.
ページが読み込まれています...
ページが読み込まれています...
ページが読み込まれています...
ページが読み込まれています...
ページが読み込まれています...
ページが読み込まれています...
ページが読み込まれています...
ページが読み込まれています...
ページが読み込まれています...
ページが読み込まれています...
ページが読み込まれています...
ページが読み込まれています...
ページが読み込まれています...
ページが読み込まれています...
ページが読み込まれています...
ページが読み込まれています...
ページが読み込まれています...
ページが読み込まれています...
ページが読み込まれています...
ページが読み込まれています...
ページが読み込まれています...
ページが読み込まれています...
ページが読み込まれています...
ページが読み込まれています...
ページが読み込まれています...
ページが読み込まれています...
ページが読み込まれています...
ページが読み込まれています...
ページが読み込まれています...
ページが読み込まれています...
ページが読み込まれています...
ページが読み込まれています...
ページが読み込まれています...
ページが読み込まれています...
ページが読み込まれています...
ページが読み込まれています...
ページが読み込まれています...
ページが読み込まれています...
ページが読み込まれています...
ページが読み込まれています...
ページが読み込まれています...
ページが読み込まれています...
ページが読み込まれています...
ページが読み込まれています...
ページが読み込まれています...
ページが読み込まれています...
ページが読み込まれています...
ページが読み込まれています...
ページが読み込まれています...
ページが読み込まれています...
ページが読み込まれています...
ページが読み込まれています...
-
 1
1
-
 2
2
-
 3
3
-
 4
4
-
 5
5
-
 6
6
-
 7
7
-
 8
8
-
 9
9
-
 10
10
-
 11
11
-
 12
12
-
 13
13
-
 14
14
-
 15
15
-
 16
16
-
 17
17
-
 18
18
-
 19
19
-
 20
20
-
 21
21
-
 22
22
-
 23
23
-
 24
24
-
 25
25
-
 26
26
-
 27
27
-
 28
28
-
 29
29
-
 30
30
-
 31
31
-
 32
32
-
 33
33
-
 34
34
-
 35
35
-
 36
36
-
 37
37
-
 38
38
-
 39
39
-
 40
40
-
 41
41
-
 42
42
-
 43
43
-
 44
44
-
 45
45
-
 46
46
-
 47
47
-
 48
48
-
 49
49
-
 50
50
-
 51
51
-
 52
52
-
 53
53
-
 54
54
-
 55
55
-
 56
56
-
 57
57
-
 58
58
-
 59
59
-
 60
60
-
 61
61
-
 62
62
-
 63
63
-
 64
64
-
 65
65
-
 66
66
-
 67
67
-
 68
68
-
 69
69
-
 70
70
-
 71
71
-
 72
72


他の言語で
- English: ResMed III ST-A User manual
その他のドキュメント
-
Philips HU4706/01 ユーザーマニュアル
-
-
Drive Medical Hybrid Universal Interface 取扱説明書
-
Withings BPM Connect インストールガイド
-
 Hach Accu4 ユーザーマニュアル
-
 Hach MET ONE 6005 ユーザーマニュアル
-
Boston Scientific LATITUDE 6288 Patient Manual
-
Samsung SCC-C7453P ユーザーマニュアル
-
-

