
1
P41TN001813 1A
Quick Start Guide
Quick Start Guide
CONTENTS
IMPORTANT
NOTE: This quick setup guide is used with several different LCD TV models. Not all features (and drawings) discussed in this
manual will necessarily match those found with your LCD TV set. This is normal and does not require that you contact your
dealer or request service.
WARNING: TO PREVENT FIRE OR SHOCK HAZARD DO NOT EXPOSE THIS UNIT TO RAIN OR EXCESSIVE.
INSTALLING LCD TV ON THE WALL . . . . . . . . . . . . . . . . . . . . . . . 1
TV CHANNEL INSTALLATION . . . . . . . . . . . . . . . . . . . . . . . . . . . . . 2
PRESENTATION OF THE LCD TV. . . . . . . . . . . . . . . . . . . . . . . . . . . 2
ACCESSORIES . . . . . . . . . . . . . . . . . . . . . . . . . . . . . . . . . . . . . . . . . 3
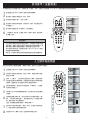
BATTERY INSTALLATION . . . . . . . . . . . . . . . . . . . . . . . . . . . . . . . . . 3
REMOTE CONTROL OPERATION . . . . . . . . . . . . . . . . . . . . . . . . . . . 3
ANTENNA TV . . . . . . . . . . . . . . . . . . . . . . . . . . . . . . . . . . . . . . . . 4
BASIC CABLE TV CONNECTION . . . . . . . . . . . . . . . . . . . . . . . . . . . . . . . . . . . . . 4
AUTO STORE (SETTING UP CHANNEL) . . . . . . . . . . . . . . . . . . . . . . .5
M
ANUAL SOTRE OF TV CHANNEL . . . . . . . . . . . . . . . . . . . . . . . . . . . . . . 5
CABLE BOX (WITH RF IN/OUTPUTS) . . . . . . . . . . . . . . . . . . . . . . . . . . . . . 6
CABLE BOX (WITH AUDIO/VIDEO OUTPUTS) . . . . . . . . . . . . . . . . . . . . . . . .6
VCR, DVD PLAYER, OR OTHER DEVICES WITH RCA CONNECTORS . . . . . . .7
DVD PLAYER OR OTHER VIDEO DEVICES WITH COMPONENT VIDEO
CONNECTORS . . . . . . . . . . . . . . . . . . . . . . . . . . . . . . . . . . . . . . . . . . . . . .7
AV OUTPUT . . . . . . . . . . . . . . . . . . . . . . . . . . . . . . . . . . . . . . . . . . . . . . .8
PC (MONITOR) CONNECTIONS . . . . . . . . . . . . . . . . . . . . . . . . . . . . . . . . .8
DVD PLAYER WITH HDMI CONNECTOR . . . . . . . . . . . . . . . . . . . . . . . . . 9
INSTALLING LCD TV ON THE WALL
EnglishArabic
中文
There is no need to attach the base if you want to install your LCD TV on the wall.
400mm
200mm
When installing the LCD TV on the wall, please consult a professional technician for proper installing.
The manufacture accepts no liability for installations not performed by professional technician.

2
Quick Use and Hookup Guide
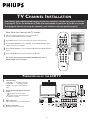
TV CHANNEL INSTALLATION
Immediately after unpacking and plugging in your new television, run the auto program function
to set up the TV for the broadcast or cable channels available in your area. If you do not run the
auto program function to set up the channels , your television may not operate properly.
PRESENTATION OF THE LCD TV
1
2
3
4
1
2
3
4
A/CH
AV
i
+
Picture
Sound
Features
Install
Language
Auto store
Manual store
Channel setting
Factory reset
Install
Main Controls Install
Language
Auto store
Manual store
Channel setting
Factory reset
Auto store
Main Controls
Install
Auto store
Start?
Please wait
Prog. found
Frequency
Auto store
0
MHz
2
1
3
4
5
1
3
4
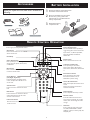
Television Keys
• VOLUME + / - : To adjust sound level.
• CHANNEL + / - : To select programs.
• MENU : To access or close onscreen
menu.
Power button, LED light and infrared
sensor
• : To switch the TV on or off.
• Aim remote control at infrared sensors
to activate TV controls.
Rear connectors
The connectors at the rear of the LCD TV.
Bottom connectors
Located at the bottom of the set.
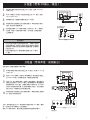
Please follow these steps to install TV channels:
Select a TV source via AV button on your remote control.
Press the CURSOR RIGHT button to confi rm.
Press MENU button on your remote control to open the onscreen menu.
Press CURSOR DOWN to move to INSTALL, press CURSOR RIGHT on your
remote control to enter INSTALL.
Press CURSOR DOWN to move to AUTO STORE and press CURSOR RIGHT to
enter it.
Press CURSOR RIGHT to start auto install the TV Channels.
1
2
3
4
For more detailed explanation of AUTO STORE, please refer to
AUTO STORE section on page 5.
5

3
BATTERY INSTALLATION
1
2
3
REMOTE CONTROL OPERATION
ACCESSORIES
When you unpack this unit, make sure it includes the
following:
Power cable
Warranty Card
Power cable
Guarantee Card
User’s Manual & Quick Start Guide
Remove the battery compartment lid on
the bottom of the remote control.
Place two AA batteries in the remote.
Be sure the (+) and (-) ends of the
batteries line up as marked inside the
battery compartment.
Reattach the battery
compartment lid.
3
1
2
A/CH
AV
i
+
A/CH button
Press to go to previously selected channel.
Sleep button
Press to set the LCD TV to turn itself off
within a certain time.
Unused key
Smart Sound button
Press repeatedly to select among the 5
settings; Personal, Speech, Music, Movie,
or Multimedia.
Menu button
Press to activate onscreen menu or press
to exit the onscreen menu.
Cursor Buttons
(Left, Right, Up, Down)
Press these buttons to highlight, select,
return, and adjust items on the TV’s on
screen menu.
Volume button
Press to increase or decrease the sound
level.
Mute button
Press to eliminate or restore the LCD TV
sound. Mute will appear on the screen
when the sound is muted.
Information button
Press to see the current channel number
on the TV screen.
Unused key
Picture Format button
Press the FORMAT button repeatedly to
toggle among the six screen format sizes;
Super Zoom, 4:3, Movie expand14:9,
Movie expand16:9, 16:9 Subtitle,
Widescreen.
Power button
Press to turn the LCD TV on or off.
I-II button / Sound mode
Press repeatedly to select Mono,
Stereo, Dual I, Dual II, Nicam Mono,
Nicam Stereo, Nicam Dual I, Nicam Dual
II.
Smart Picture button
Press repeatedly to select either
Personal, Rich, Nature, Soft, or
Multimedia of picture setting.
Virtual Surround button
Adds greater depth and dimension to TV
sound.
Select from Virtual Surround ON or
Virtual Surround OFF.
Channel button
Press to adjust the channel up or down.
Number buttons
Press the number buttons for direct
access to the TV channels. For a 2 digit
channel, enter the 2nd digit after enter
1st digit.
AV button
Press to select the video input source:
TV, HDMI, COMP VIDEO 1, COMP
VIDEO 2, S-video1, S-video 2 (Side), AV1,
AV2(Side), PC.

4
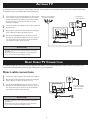
ANTENNA TV
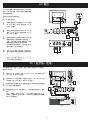
A combination antenna receives normal broadcast channels. Your connection is easy because there is only one 75 Ω (ohm) antenna jack
on the back of your TV, and that’s where the antenna goes.
1
Outdoor or Indoor Antenna
(Combination VHF/UHF)
Twin-lead wire
to 300-75
� adpter
Antenna
with 75�
cable
Wall outlet
or
3
2
BASIC CABLE TV CONNECTION
The Cable TV Signal
from Cable Company
75� coaxial cable
2
1
Wall outlet
If your antenna has a round cable (75 ohm) on the end, then
you’re ready to connect it to the LCD TV. If your antenna
has fl at, twin-lead wire (300 ohm), you fi rst need to attach
the antenna wires to the screws on a 300- to 75-ohm
adapter(not supplied).
Connect the antenna (or adapter) to the TV jack on the back
of the LCD TV.
Plug the power cable into AC inlet on LCD TV set. Plug the
power cable into an outlet and switch TV set on.
Run the AUTO STORE function to set up the TV for the
broadcast or cable channels available in your area. If you do
not run the auto program function to set up the channels ,
your television may not operate properly.
1
2
3
4
• Remember, an antenna or cable TV signal must fi rst be connected to
your LCD TV.
• Please make sure that you have selected the TV mode with AV key
on your remote control, before installing TV channels.
HELPFUL HINT
Your Cable TV input into your home may be a single (75 ohm) cable or use a cable box decoder. In either case the connection is very
simple. Follow the steps below to connect your cable signal to your new television.
Direct cable connections:
Connect the Cable TV signal to the TV jack on the LCD TV.
Plug the power cable into AC inlet on LCD TV set. Plug the
power cable into an outlet and switch TV set on.
Run the AUTO STORE function to set up the TV for the
broadcast or cable channels available in your area. If you do
not run the auto program function to set up the channels ,
your television may not operate properly.
1
2
3
• Remember, an antenna or cable TV signal must fi rst be connected to
your LCD TV.
• Please make sure that you have selected the TV mode with AV key
on your remote control, before installing TV channels.
HELPFUL HINT

5
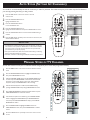
Your LCD TV can automatically set itself for local area (or cable TV) channels. This makes it easy for you to select only the TV stations in
your area by pressing the CH(+) or CH(-) button.
AUTO STORE (SETTING UP CHANNELS)
Press the MENU button on the remote control to show the
onscreen menu.
Press the CURSOR DOWN button to
highlight the INSTALL menu.
Press the CURSOR RIGHT button
to enter the INSTALL menu.
Press the CURSOR DOWN button to
highlight the AUTO STORE control and press CURSOR RIGHT to enter it.
Press the CURSOR RIGHT button to start the AUTO STORE scanning of
channels.
Press the MENU button repeatedly to clear the menu from the screen, after
AUTO STORE has fi nished.
1
2
3
4
5
6
• Immediately after unpacking and plugging in your new television, run the auto
sotre function to set up the TV for the broadcast or cable channels available in
your area. If you do not run the auto store function to set up the channels ,
your television may not operate properly.
• After you’ve run Auto Store, check out the results. Press the CH(+) or the CH(-)
button and see which channels you can select.
• Remember, an antenna or cable TV signal must fi rst be connected to your LCD TV.
HELPFUL HINT
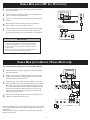
You can also choose to tune your TV channels. Manual tuning allows you to store each programme manually.
MANUAL STORE OF TV CHANNEL
Press the MENU button on the remote control to show the onscreen
menu.
Press the CURSOR DOWN button to highlight the INSTALL menu,
then press CURSOR RIGHT to enter.
Select the MANUAL STORE, then press the CURSOR RIGHT button
to enter and press CURSOR RIGHT to activate auto search channel
frequence or press number button to show your desired channel
frequence, then press CURSOR RIGHT to start searching.
After the channel frequence is confi rmed, select PROG. NO by
pressing CURSOR DOWN and pressing CURSOR RIGHT to enter.
Press CURSOR UP/DOWN to adjust the channel number and press
CURSOR RIGHT/LEFT to confi rm the channel.
If the channel reception is not satisfactory, press CURSOR DOWN
button to highlight the FINETUNE and press CURSOR RIGHT to
enter, then press CURSOR UP/DOWN to adjust, press CURSOR
RIGHT/LEFT to confi rm.
Press CURSOR DOWN to highlight STORE function. Press
CURSOR RIGHT to enter, then press CURSOR RIGHT to confi rm
sotred.
Press the MENU button repeatedly to clear the menu from the
screen.
1
2
3
4
5
6
7
8
A/CH
AV
i
+
Picture
Sound
Features
Install
Language
Auto store
Manual store
Channel setting
Factory reset
Install
Main Controls Install
Language
Auto store
Manual store
Channel setting
Factory reset
Manual store
Main Controls
Install
Manual store
Manual store
Prog. no
Finetune
Store
Manual store
Prog. no
Finetune
Store
Main Controls
I Install
Manual store Manual store
Start?
xxx.xx MHz
Manual store
Manual store
Prog. no
Finetune
Store
Main Controls
I Install
Manual store Prog. no
2
Prog. no
Manual store
Prog. no
Finetune 50
Main Controls
I Install
Manual store
Finetune 50
Store
Finetune
Manual store
Prog. no
Finetune
Main Controls
I Install
Manual store
Store
Store
Store?
1
8
5
6
2
3
4
5
6
7
5
6
2
3
4
5
6
7
A/CH
AV
i
+
Picture
Sound
Features
Install
Language
Auto store
Manual store
Channel setting
Factory reset
Install
Main Controls Install
Language
Auto store
Manual store
Channel setting
Factory reset
Auto store
Main Controls
Install
Auto store
Start?
Please wait
Prog. found
Frequency
Auto store
0
MHz
3
4
5
2
4
1
6

6
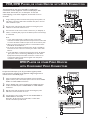
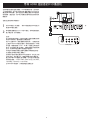
CABLE BOX (WITH RF IN / OUTPUTS):
CABLE BOX (WITH AUDIO / VIDEO OUTPUTS):
CABLE
IN
TO
TV
3 4
OUTPUT
CH
Cable Box
The Cable TV
signal from
Cable Company
75� coaxial cable
1
2
5
3
4
Wall outlet
Wall outlet
CABLE
IN
TO
TV
VIDEO
OUT
S VIDEO
L
R
AUDIO
OUT
3 4
OUTPUT
CH
Cable Box
Cable TV signal
1
2
3
4
Connect the Cable TV signal to the IN jack (or RF IN or CABLE
IN) on the Cable Box.
Connect an RF coaxial cable (not supplied) to the OUT jack (or
TO TV or RF OUT) of the Cable Box.
Connect the other end of the coaxial cable to the TV jack on the
LCD TV.
Plug the power cable into AC inlet on LCD TV set. Plug the
power cable into an outlet and switch TV set on.
Set the Channel 3/4 (or Output channel) switch of the Cable Box
to 3 or 4. Set the TV to the same channel. When watching TV
programming, change channels at the Cable Box, not the LCD TV.
1
2
3
4
5
• Immediately after unpacking and plugging in your new television,
run the auto program function to set up the TV for the broadcast
or cable channels available in your area. If you do not run the auto
program function to set up the channels , your television may not
operate properly.
• Please make sure that you have selected the TV mode with AV key
on your remote control, before installing TV channels.
HELPFUL HINT
This connection will supply stereo sound to the LCD TV.
Connect the Cable TV signal to the IN jack (or RF IN or CABLE
IN) on the Cable Box.
Using a S-video cable (not supplied) connect one end of the video
cable to the Video Out jack of the Cable Box. Connect the other
end of the cable to the back of the TV.
Using RCA-type, stereo audio cables (not supplied), connect one
end of the cables to the left and right Audio Out jacks of the Cable
Box. Connect the other end of that cable to the Audio jack on the
back of the LCD TV. Audio cables are usually marked with red and
white and are available from Philips or electronics retailers. The
right audio jack is red and the left audio jack is white. Match the
cable colors to the jack colors.
Plug the power cable into AC inlet on LCD TV set. Plug the power
cable into an outlet and switch TV set on.
1
2
3
Note: Use the AV button on the remote control to tune to the AV channel
for the cable box signal. Once tuned, change channels at the cable box, not
the television.
When you watch programs using VCR, it’s recommended to select Soft
Mode via Smart picture.
4

7
A/CH
AV
i
+
4
1
2
3
Accessory device equipped with
component video outputs
Wall outlet
1
2
3
1
2
AV Player with A/V connectors
A/CH
AV
i
+
3
1
2
Wall outlet
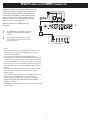
VCR, DVD PLAYER, OR OTHER DEVICES WITH RCA CONNECTORS
The AV IN jacks on the rear of the LCD TV enable quick
connections of other equipment. Connect a DVD player, VCR
Video Game, Camcorder, etc., to these jacks. To view the
material playing on the other equipment, set the LCD TV to its
AV mode.
DVD PLAYER OR OTHER VIDEO DEVICES
WITH COMPONENT VIDEO CONNECTORS
Component Video Input (Y, Pb, Pr) provide the highest possible
color and picture resolution in the playback of digital signal source
material, such as with DVD player.
3
4
Using an RCA-type Video and Audio cable (usually marked yellow, red,
and white), connect the VCR’s Video and Audio Out jacks to the TV’s
Video and Audio In jacks.
Plug the power cable into AC inlet on LCD TV set. Plug the power
cable into an outlet and switch TV set on.
Use AV button on the remote control to select AV 1 (or AV2(Side), S-
Video1, or S-Video2 (Side) if you use the different jacks for this hookup)
to watch VCR.
Note:
1. If your VCR equipped with a S-Video Out jack, uses S-Video
connection for better picture detail and clarity. Use the S-Video cable
to connect the VCR’s S-Video Out jacks to the TV’s S-Video In jacks.
2. When you watch programs using VCR, it’s recommended to select
SOFT Mode via Smart Picture.
3. You can also use the Video and Audio jacks in AV IN 1 and Side AV
located on the rear of the TV to connect your VCR or other Video
Devices.
4. If your DVD Player is equipped with Component (Y, Pb, Pr) Output
Jacks, please refer to “Connecting a DVD Player or other Video
Equipments with Component Video Connectors” section for use
of Component Video Connection for highest color and picture
resolution in video playback.
Using a Component Video cable (not supplied), connect the DVD
player’s Y, Pb, Pr jacks to the Y, Pb, Pr jacks on the TV. Use the COMP
VIDEO1 or COMP VIDEO2 connections.
Using an AUDIO cable, connect the DVD player’s AUDIO OUT jacks
to the TV’s AUDIO IN jacks in COMP VIDEO1 or COMP VIDEO2
connections.
Plug the power cable into AC inlet on LCD TV set. Plug the power
cable into an outlet and switch TV set on.
Use AV button on the remote control to select COMP VIDEO1 or
COMP VIDEO2 to watch DVD.
Note:The Y, Pb, Pr jacks do not provide audio, so audio cables
must be connected to provide sound.

8
Computer
A/CH
AV
i
+
4
2
3
1
Wall outlet
PC (MONITOR) CONNECTIONS:
This LCD TV can be used as a PC monitor. Your computer will
have to equipped with a VGA type video output and VGA cable.
Using a VGA cable (not supplied), connect PC’s VGA OUT connector
to the VGA connector on the TV. Use the PC IN connections.
Using a MINI-JACK type AUDIO cable (not supplied), connect the
PC’s AUDIO OUT connector to the AUDIO connector on the TV.
Use the PC IN connections.
Plug the power cable into AC inlet on LCD TV set. Plug the power
cable into an outlet and switch TV set on.
Use AV button on the remote control to select PC to use your LCD
TV as a PC monitor.
Note: Please refer to “Setting Up the PC Mode” section for all the
supported PC display modes. If possible, use the 1280 x 768@60Hz
video mode to obtain the best PC image quality.
1
2
3
4
AV OUTPUT
Connect one end of the yellow Video Cable
to the VIDEO jack of AV OUT connection.
Connect the other end to the VIDEO IN jack on
the VCR.
Connect one end of the red and white Audio
Cable from the L and R AUDIO jack of AV OUT
connection to the AUDIO IN jack on the VCR.
Connect audio cable form the SPDIF jack on the
rear of the TV to the DIGITAL IN jack on the
rear of the hi-fi system.
Note: The SPDIF out is for digital audio output,
digital receiver, or amplifi er.
The SPDIF out supports PCM(plus width
modulate) format and stereo mode only when
the HDMI input source is selected.
Turn the VCR on, insert a blank VHS tape and
it’s ready to record what’s being viewed on the
TV screen.
Note: The Program recording is only possible
when the input signal is TV, AV1, AV2(Side).
The AV (Audio/Video) out jacks are great for
recording with a VCR or used to connect an
external audio system for better audio.
1
2
For VCR Connection/Recorder:
3
VCR
1
2
3
Disconnect all power sources before
making any connections.
4

9
Using HDMI cable (not supplied), connect the
DVD player’s HDMI jack to the HDMI jack
on the TV.
Plug the power cable into AC inlet on LCD
TV set. Plug the power cable into an outlet
and switch TV set on.
HDMI is the leading new standard for Digital video and
audio interconnection. With the HDMI connector you
can connect HDMI Set-Top-Box compatible DVD-R
or DVD player with HDMI, or DVI-equipped devices
like a computer or other HDMI devices to your TV.
With this connection, you can display high-defi nition
pictures on this TV in digital format.
1
2
Disconnect all power sources before making any
connections.
1
2
Wall outlet
DVD player
DVD PLAYER WITH HDMI CONNECTOR
Notes:
Due to legal requirements, it is possible that audio may be muted
when playing certain copy protected PCM audio from a device
connected to the HDMI input.
Your TV supports HDCP (High-bandwidth Digital Content
Protection). This is a system for protecting DVD content outputted
via DVI from being copied. It provides a secure digital link between
a video source (DVD,PC,etc.) and your TV. Content is encrypted at
the source device to prevent unauthorized copies from being made.
Proper working is only guaranteed with HDMI compliant consumer
products.
Digital devices from different manufacturers may differing output
standards, which may prevent your television from properly
displaying output.
If your TV does not detect a signal from your HDMI device, turn off
and then turn on the HDMI device. For optimal viewing, we
suggest you adjust your DVD player to one of the following TV
display standards:1920x1080i,1280x720p,720x480i, 720x480p,
720x576i, or 720x576p.
When HDMI is connected with DVI, there is picture display only and
no audio support.

1
快速使用與連線指南
快速使用與連線指南
目錄
重要事項
注意:本快速設置指南适用于多个不同的液晶電視型號。本手冊中介紹的所有功能(和圖例)不一定与您液晶電視
的功能完全相同。這是正常現象,不需要与經銷商聯系或請求維修。
警告:為防止火灾或電擊,不要使本產品遭受雨淋或受潮。
將液晶電視挂在牆上 . . . . . . . . . . . . . . . . . . . . . . . . . . . . .1
設置電視頻道. . . . . . . . . . . . . . . . . . . . . . . . . . . . . . . . . 2
液晶電視概覽. . . . . . . . . . . . . . . . . . . . . . . . . . . . . . . . . 2
附件. . . . . . . . . . . . . . . . . . . . . . . . . . . . . . . . . . . . . . . . . .3
安裝電池 . . . . . . . . . . . . . . . . . . . . . . . . . . . . . . . . . . . . 3
遙控器. . . . . . . . . . . . . . . . . . . . . . . . . . . . . . . . . . . . . . . 3
天線電視. . . . . . . . . . . . . . . . . . . . . . . . . . . . . . . . . . . . 4
基本的有線電視連接 . . . . . . . . . . . . . . . . . . . . . . . . . . . . . . . . .4
自動搜尋(設置頻道) . . . . . . . . . . . . . . . . . . . . . . . . . . . . . . . . . . . . . . 5
人工儲存電視頻道 . . . . . . . . . . . . . . . . . . . . . . . . . . . . . . . . . . . . . . . . . .5
分線盒(帶有 RF輸入╱輸出). . . . . . . . . . . . . . . . . . . . . . . . . . . . . . . . .6
分線盒(帶有聲音╱視頻輸出). . . . . . . . . . . . . . . . . . . . . . . . . . . . . . . . 6
VCR、DVD 播放机、或帶有 RCA 連接器的其它設備 . . . . . . . . . . . . . . . . 7
DVD 播放机或其它帶有COMPONENT 視頻連接器的視頻設備. . . . . . . . . . 7
AV 輸出 . . . . . . . . . . . . . . . . . . . . . . . . . . . . . . . . . . . . . . . . . . . . . . . . 8
PC(顯示器)連接. . . . . . . . . . . . . . . . . . . . . . . . . . . . . . . . . . . . . . . . . .8
帶有 HDMI 連接器的DVD 播放机. . . . . . . . . . . . . . . . . . . . . . . . . . . . . . .9
將液晶電視挂在牆上
快速使用與連線指南
EnglishArabic
中文
400mm
200mm
如果希望將其挂在牆上,請咨詢專業技術人員以了解正确的安裝方式。
制造商對于非專業人士進行的安裝不承担任何責任。
如果您要將液晶電視挂到牆上,底座是沒有必要安裝的。

2
快速使用與連線指南
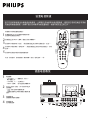
設置電視頻道
在打開包裝并接通這台新電視的電源后,立即進行自動搜尋功能設置電視,使其記憶您所在地區可用的
天線或有線電視頻道。如果不進行自動搜尋功能設置頻道,電視可能無法正常工作。
液晶電視概覽
1
2
3
4
請按照下列步驟設置電視頻道:
利用遙控器上的 AV 按鈕選擇電視信號源。
按光標向右按鈕進行确認。
按遙控器上的 MENU(菜單)按鈕以打開屏幕菜單。
按光標向下按鈕移到“設定”,然后按遙控器上的光標向右按鈕進入“設定”。
按光標向下按鈕移到“自動搜尋”,然后按遙控器上的光標向右按鈕進入“自動
搜尋”。
按光標向右按鈕開始自動設置電視頻道。
1
2
3
4
有關“自動搜尋”的詳細說明,請參閱第 5 頁的“自動搜尋”一節。
5
圖像
聲音
功能
設定
語言
自動搜尋
人工搜尋
頻道設置
復原設定
設定
主控 設定
語言
自動搜尋
人工搜尋
頻道設置
復原設定
自動搜尋
自動搜尋
主控
設定
自動搜尋
開始?
請等待
節目找到
頻率
自動搜尋
0
MHz
A/CH
AV
i
+
2
1
3
4
5
1
3
4
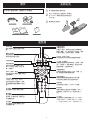
電視按鍵
‧VOLUME + / -(音量增大╱減小):
調節音量大小。
‧CHANNEL + / -:選擇節目。
‧MENU(菜單):訪問或關閉屏幕菜單。
Power(電源)按鈕、LED 指示燈和紅外
線傳感器
‧ : 打開或關閉電視的電源。
‧將遙控器指向紅外線傳感器以激活電視
控制。
背面連接器
液晶電視背面的連接器。
底部連接器
位于電視底部。
1
2
3
4

3
安裝電池
1
2
3
遙控器
附件
打開本產品包裝時,确保有下列物品:
保修卡
電源線
保
修
卡
遙控器和電池
用戶手冊和快速使用與連線指南
快速使用
與
連線
指南
用
戶
手
冊
卸下遙控器底部的電池倉盖。
將2个AA電池放入遙控器中。确保電
池 (+) 和 (-) 兩端与電池倉內側標記的
方向一致。
重新裝上電池倉盖。
3
1
2
電源線
遙控器和電池
保修卡
保
修
卡
用戶手冊和快速使用與連線指南
快速使用
與
連線
指南
用
戶
手
冊
A/CH
按鈕
按此按鈕可以返回此前選擇的頻
道。
睡眠定時按鈕
按此按鈕可以設置液晶電視,使
其在特定時間自行關閉。
未使用的按鈕
靈智聲音按鈕
反复按此按鈕可以選擇 5 种設
置:个人設定、演講、音樂、電
影、多媒體。
MENU(菜單)按鈕
按此按鈕可以激活屏幕菜單或退
出屏幕菜單。
光標按鈕
(向左、向右、向上、向下)
按這些按鈕可以高亮顯示、選擇、
返回和調整電視屏幕菜單中的項
目。
音量按鈕
按此按鈕可以增大或減小音量。
靜音按鈕
按此按鈕可以關閉或恢复液晶電
視聲音。聲音關閉時,屏幕上會
出現靜音圖標。
信息按鈕
按此按鈕可以在電視屏幕上顯示
當前頻道號碼。
未使用的按鈕
屏幕格式按鈕
反复按“格式”按鈕可以切換六种屏幕格式:
超放大屏幕、4:3、電影擴展14:9模式、電影
擴展16:9模式、字幕16:9模式、闊屏幕。
POWER(電源)按鈕
按此按鈕可以打開或關閉液晶電視的電源。
I-II 按鈕╱聲音模式
反复按此按鈕可以選擇單聲道、立体聲、双聲
道 I、双聲道 II、麗音單聲道、麗音立体聲、
麗音双聲道 I、麗音双聲道 II。
靈智圖像按鈕
反复按此按鈕可以選擇个人設定、鮮艷、自
然、柔和或多媒体等圖像設置。
虛擬環繞按鈕
使電視聲音具有更強的深度和广度效果。
可以選擇"虛擬環繞開"或"虛擬環繞關"。
頻道按鈕
按此按鈕可以選擇上一个或下一个頻道。
數字按鈕
按數字按鈕可以直接進入電視頻道。對于 2
位數頻道,先輸入第 1 位,然后輸入第 2
位。
AV 按鈕
按此按鈕可以選擇視頻輸入源:TV、HDMI、
COMP VIDEO 1、COMP VIDEO 2、S-video
1、S-video 2(Side)、AV1、AV2(Side)、PC。
A/CH
AV
i
+

4
天線電視
組合天線接收正常的广播頻道。電視背面只有一个 75 Ω(歐姆)天線插孔用于連接天線,因此連接非常簡單。
1
3
2
室內或室外天線
(VHF/UHF 組合)
接 300-75
�
适配器
的扁平雙線
或者
天線
(75
�
線纜)
牆壁電源插座
基本的有線電視連接
2
1
牆壁電源插座
來自有線電視公司的
有線電視信號
(75
�
同軸線)
您家中的有線電視輸入可能是單根線(75 歐姆)或使用分線盒解碼器。無論在哪种情况下,連接都非常簡單。按照下列步驟將有線信號連接到這
台新電視。
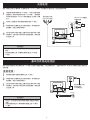
直接連線:
如果天線端頭是圓形電纜(75 歐姆),則可以直接連接到
液晶電視。如果天線是扁平双線(300 歐姆),則需要先
將天線導線連接到 300-至75-歐姆适配器(未提供)的螺
絲上。
將天線(或适配器)連接到液晶電視背面的 TV 插孔。
將電源線插入液晶電視上的交流電源插口。將電源線插入
電源插座,然后打開電視的電源。
進行自動搜尋功能在電視上設置您所在區域可用的广播或
有線頻道。如果不進行自動搜尋功能設置頻道,電視可能
無法正常工作。
1
2
3
4
‧請記住,必須首先將天線或有線電視信號連接至您的液晶
電視。
‧在設定電視頻道之前,請确保使用遙控器上的 AV 鍵選
TV 模式。
有用提示
將有線電視信號連接到液晶電視上的 TV 插孔。
將電源線插入液晶電視上的交流電源插口。將電源線插入
電源插座,然后打開電視的電源。
進行自動搜尋功能在電視上設置您所在區域可用的广播或
有線頻道。如果不進行自動搜尋功能設置頻道,電視可能
無法正常工作。
1
2
3
‧ 請記住,必須首先將天線或有線電視信號連接至您的液晶
電視。
‧ 在設定電視頻道之前,請确保使用遙控器上的 AV 鍵選
TV 模式。
有用提示

5
圖像
聲音
功能
設定
語言
自動搜尋
人工搜尋
頻道設置
復原設定
設定
主控 設定
語言
自動搜尋
人工搜尋
頻道設置
復原設定
自動搜尋
自動搜尋
主控
設定
自動搜尋
開始?
請等待
節目找到
頻率
自動搜尋
0
MHz
A/CH
AV
i
+
3
4
5
2
4
1
6
圖像
聲音
功能
設定
語言
自動搜尋
人工搜尋
頻道設置
復原設定
設定
主控 設定
語言
自動搜尋
人工搜尋
頻道設置
復原設定
人工搜尋
主控
設定
人工搜尋
節目號碼
人工搜尋
微調
儲存
人工搜尋
節目號碼
微調
儲存
主控 I 設定
人工搜尋
人工搜尋
開始?
xxx.xx MHz
人工搜尋
人工搜尋
人工搜尋
人工搜尋
節目號碼
微調
儲存
主控 I 設定
人工搜尋
節目號碼
2
節目號碼
人工搜尋
節目號碼
微調
儲存
主控 I 設定
人工搜尋
儲存
儲存?
儲存
人工搜尋
節目號碼
微調
儲存
主控 I 設定
人工搜尋
微調
微調
A/CH
AV
i
+
1
8
5
6
2
3
4
5
6
7
5
6
2
3
4
5
6
7
本液晶電視可以自動設置當地(或有線電視)的頻道。這樣,您就可以方便地按 CH(+) 或 CH(-) 按鈕選擇您所在區域的電視台。
自動搜尋(設置頻道)
1
2
3
4
5
6
按遙控器上的 MENU(菜單)按鈕以顯示屏幕菜單。
按光標向下按鈕以高亮顯示“設定”菜單。
按光標向右按鈕以進入“設定”菜單。
按光標向下按鈕以高亮顯示“自動搜尋”控制,然後按光標向
右按鈕進入。
按光標向右按鈕啟動“自動搜尋”以掃描頻道。
“自動儲存”完成后,反复按 MENU(菜單)按鈕,直至菜單
从屏幕上消失。
‧ 在打開包裝并接通這台新電視的電源后,立即進行自動搜尋功能
設置電視,使其記憶您所在地區可用的天線或有線電視頻道。如
果不進行自動搜尋功能設置頻道,電視可能無法正常工作。
‧ 進行自動搜尋功能后,檢查搜尋結果。按 CH(+) 或 CH(-) 按鈕,
看看您能選擇哪些頻道。
‧ 請記住,必須首先將天線或有線電視信號連接至您的液晶電視。
有用提示
您也可以選擇手工調出電視頻道。利用手工調台,您可以人工儲存每个頻道。
按遙控器上的 MENU(菜單)按鈕以顯示屏幕菜單。
按光標向下按鈕以高亮顯示“設定”菜單,然后按光標向右按
鈕進入子菜單。
選擇“人工儲存”,按光標向右按鈕進入子菜單,然后按光標
向右按鈕啟動搜尋頻道頻率,或者按數字按鈕以顯示所需的頻
道頻率,最後再按一次然后按光標向右按鈕啟動搜尋。
确認頻道頻率后,按光標向下按鈕選擇“節目號碼”,然后按
光標向右按鈕進入。
按光標向上/向下按鈕調整頻道號碼,按光標向右/向左按鈕確
認頻道。
如果頻道接收效果不佳,可以按光標向下按鈕高亮顯示“微
調”,按光標向右按鈕進入,然后按光標向上/下按鈕進行調
整,按光標向右/向左按鈕確認。
注意:如果頻道接收效果良好,請轉到步驟 7。
按光標向下按鈕高亮顯示“儲存”功能,按光標向右按鈕進
入,然後按光標向右按鈕确認儲存。
反复按 MENU(菜單)按鈕,直至菜單从屏幕上消失。
1
2
3
4
5
6
7
8
人工儲存電視頻道

6
分線盒(帶有 RF輸入╱輸出):
CABLE
IN
TO
TV
3 4
OUTPUT
CH
1
2
5
3
4
來自有線電視公司
的有線電視信號
分線盒
75
�
同軸線
牆壁電源插座
CABLE
IN
TO
TV
VIDEO
OUT
S VIDEO
L
R
AUDIO
OUT
3 4
OUTPUT
CH
1
2
3
4
牆壁電源插座
有線電視信號
分線盒
將有線電視信號連接到分線盒上的 IN 插孔(或者 RF IN 或
CABLE IN)。
將 RF 同軸線(未提供)連接到分線盒上的 OUT 插孔(或者
TO TV 或 RF OUT)。
將同軸線的另一端連接到液晶電視上的 TV 插孔。
將電源線插入液晶電視上的交流電源插口。將電源線插入電源
插座,然后打開電視的電源。
將分線盒的頻道 3/4(或輸出頻道)開關設在 3 或 4。將電視
設在同一頻道。在觀看電視節目時,在分線盒(或液晶電視)
上更換頻道。
1
2
3
4
5
‧ 在打開包裝并接通這台新電視的電源后,立即進行自動搜
尋功能設置電視,使其記憶您所在地區可用的天線或有線
電視頻道。如果不進行自動搜尋功能設置頻道,電視可能
無法正常工作。
‧ 在設定電視頻道之前,請确保使用遙控器上的 AV 鍵選
TV 模式。
有用提示
分線盒(帶有聲音╱視頻輸出):
此連接可以為液晶電視提供立体聲聲音。
將有線電視信號連接到分線盒上的 IN 插孔(或者 RF IN 或
CABLE IN)。
使用 S-video 視頻線(未提供)將視頻線的一端連接到分線盒上
的 Video Out 插孔。將視頻線的另一端連接到電視背面。
使用 RCA 型立体聲音頻線(未提供)將視頻線的一端連接到分
線盒上的左右兩个 Audio Out 插孔。將音頻線的另一端連接到液
晶電視背面的 Audio 插孔。音頻線通常為紅色和白色,在 Philips
或電子產品經銷商處有售。右邊的音頻插孔為紅色,左邊的音頻
插孔為白色。線纜顏色應与插孔顏色匹配。
將電源線插入液晶電視上的交流電源插口。將電源線插入電源插
座,然后打開電視的電源。
1
2
3
注意:使用遙控器上的 AV 按鈕調到分線盒信號的 AV 頻道。調整
后,在分線盒(而不是電視)上更換頻道。
使用 VCR 觀看節目時,建議您通過靈智圖像功能選擇柔和模式。
4

7
A/CH
AV
i
+
4
1
2
3
帶有 COMPONENT
視頻輸出的附屬設備
牆壁電源插座
1
2
3
1
2
CABLE
IN
TO
TV
VIDEO
OUT
S VIDEO
L
R
AUDIO
OUT
3 4
OUTPUT
CH
1
2
3
4
牆壁電源插座
有線電視信號
分線盒
A/CH
AV
i
+
3
1
2
牆壁電源插座
帶有 A/V 接口的 AV 播放机
VCR、DVD 播放机、或帶有 RCA 連接器的其它設備
利用液晶電視背面的 AV IN 插孔,可以方便地連接其它設備。這些插
孔可以連接 DVD 播放机、VCR 視頻游戲、以及攝像机等。要觀看其
它設備上播放的內容,需將液晶電視設在 AV 模式。
使用 RCA 型視頻線和音頻線(通常為黃色、紅色和白色)連接 VCR
的 Video 与 Audio Out 插孔和電視的 Video 与 Audio In 插孔。
將電源線插入液晶電視上的交流電源插口。將電源線插入電源插座,
然后打開電視的電源。
使用遙控器上的 AV 按鈕選擇 AV1(如果此連接方式使用不同的插
孔,還可選擇 AV2(Side)、S-Video1、 S-Video 2(Side))以觀看 VCR
內容。
注意:
1. 如果 VCR 配備 S-Video Out 插孔,可以使用 S-Video 連接以取
得更好的画面細節和純度效果。使用 S-Video 線連接 VCR 的
S-Video Out 插孔和電視的 S-Video In 插孔。
2. 使用 VCR 觀看節目時,建議您通過靈智圖像功能選擇柔和模式。
3. 您也可以使用電視背面 AV IN 1 和 Side AV 的 Video 和 Audio
插孔連接 VCR 或其它視頻設備。
4. 如果 DVD 播放机配備 Component (Y, Pb, Pr) Output 插孔,請
參閱“連接 DVD 播放机或其它帶有 Component 視頻連接器的視
頻設備”一節,以使用 Component 視頻連接方式在播放視頻時實
現最高色彩和画面分辨率。
DVD 播放机或其它帶有 COMPONENT 視頻連接器的視頻設備
Component 視頻輸入 (Y, Pb, Pr) 可以在播放數字信號源(如 DVD 播
放机)時提供可能的最高色彩和画面分辨率。
使用 Component 視頻線(未提供)連接 DVD 播放机的 Y、Pb、
Pr 插孔和電視上的 Y、Pb、Pr 插孔。使用 COMP VIDEO 1 或
COMP VIDEO 2 連接。
使用音頻線連接 DVD 播放机的 AUDIO OUT 插孔和電視的 AUDIO
IN 插孔 。使用COMP VIDEO 1 或 COMP VIDEO 2 連接。
將電源線插入液晶電視上的交流電源插口。將電源線插入電源插
座,然后打開電視的電源。
使用遙控器上的 AV 按鈕選擇 COMP VIDEO 1 或 COMP VIDEO 2
以觀看 DVD。
注意: Y、Pb、Pr 插孔不提供音頻,必須連接音頻線才能提供聲
音。
3
4

8
A/CH
AV
i
+
4
2
3
1
牆壁電源插座
計算机
PC(顯示器)連接:
本液晶電視也可以用作 PC 顯示器。您的計算机必須配備 VGA 型視頻
輸出和 VGA 線。
使用 VGA 線(未提供)連接 PC 的 VGA OUT 接口和電視上的
VGA 接口。使用 PC IN 連接。
使用 MINI-JACK 型音頻線(未提供)連接 PC 的 AUDIO OUT 接
口和電視上的 AUDIO 接口。使用 PC IN 連接。
將電源線插入液晶電視上的交流電源插口。將電源線插入電源插
座,然后打開電視的電源。
使用遙控器上的 AV 按鈕選擇 PC,以將液晶電視用作 PC 顯示
器。
注意: 請參閱“設置 PC 模式”一節以了解受支持的所有 PC 顯
示模式。如果可能,使用 1280 x 768@60Hz 視頻模式以獲得最
佳的 PC 圖像質量。
1
2
3
4
AV 輸出
將黃色視頻線的一端連接到 AV OUT 連接
的 VIDEO 插孔。將另一端連接到 VCR 的
VIDEO IN 插孔。
將紅色和白色音頻線的一端从 AV OUT 連
接的 L 和 R AUDIO 插孔連接到 VCR 上
的 AUDIO IN 插孔。
用音頻線纜將TV後板SPDIF插孔與HI-FI高
保真系統後板上的數碼輸入插孔相連。
注意:SPDIF輸出可用於音頻輸出,並可
將信號輸出至數位接收機或放大器。
當HDMI輸入源被選定時,SPDIF輸出僅支
援PCM格式以及立體聲模式。
打開 VCR 的電源,插入空白 VHS 磁帶,
接下來就可以錄制電視屏幕上播放的內容
了。
注 意 : 僅 當 輸 入 信 號 為 T V , A V 1 ,
AV2(Side)時才能錄制節目。
AV(音頻/視頻)輸出插孔非常有用,不但可以
連接 VCR 進行錄像,還可以連接外部音頻系統
以提高音頻效果。
在連線之前斷開所有電源線。
1
2
對 VCR 連接/錄像机:
3
VCR
1
2
3
4

9
1
2
Wall outlet
DVD player
帶有 HDMI 連接器的DVD播放機
在數碼視頻及音頻互連領域裏,HDMI屬領先標準。由於具有
了HDMI聯接器,用戶可以將HDMI機頂盒兼容DVD-R或DVD
播放機同HDMI相聯,或DVI設備如計算機或其他HDMI設備同
電視相聯。通過連接,用戶可以觀看到以數碼形式顯示的高清
晰圖像。
在連線之前斷開所有電源線。
用HDMI線纜(未提供),將DVD播放機的HDMI插孔與
電視HDMI插孔相連。
將電源線纜插頭插入LCD TV的AC插孔,並將電源線插頭
插入輸出端,打開電視機。
注意:
由於法律方面的原因,當用HDMI輸入相連設備播放受保
護的PCM拷貝時,音頻可能處於靜音狀態。
用戶TV支援HDCP(高帶寬數碼內容保護)。該系統可防
止通過DVI對DVD內容進行複製。該系統還提供了一種保
護功能,確保視頻源(DVD,PC等)與電視之間的數字
連接。內容在源設備上被加密,這樣就可預防未授權複製
行為。只有HDMI合法用戶才能受到產品保護。
不同生產商所提供的數位設備可能具有不同的輸出標準,
從而造成用戶電視不能正常輸出。
如果用戶電視不能檢測到HDMI設備信號,那麼先關閉
HDMI設備,然後再打開。要想獲得最佳的觀看效果,
建議用戶將DVD播放機進行調整,以符合如下電視顯
示解析度標準:1920x1080i,1280x720p,720x480i,
720x480p, 720x576i, or 720x576p.
當HDMI與DVI相連時,只有圖像但無音頻支援。
1
2
-
 1
1
-
 2
2
-
 3
3
-
 4
4
-
 5
5
-
 6
6
-
 7
7
-
 8
8
-
 9
9
-
 10
10
-
 11
11
-
 12
12
-
 13
13
-
 14
14
-
 15
15
-
 16
16
-
 17
17
-
 18
18


