
GUÍA DE USO Y MANTENIMIENTO
GUIDE D’UTILISATION ET D’ENTRETIEN
GUIDA ALL’USO E ALLA MANUTENZIONE
BEDIENUNGS-UND PFLEGEANLEITUNG
GIDS VOOR GEBRUIK EN ONDERHOUD
M SERIES OVEN
USE AND CARE GUIDE

2
|
English
Contents
3 Safety Precautions
5 M Series Oven Features
5 Oven Operation
10 Care Recommendations
11 Troubleshooting
11 Wolf Warranty
M SERIES OVEN
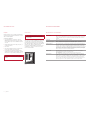
Customer Care
The model and serial number are listed on the product rating
plate. Refer to page 5 for rating plate location. For warranty
purposes, you will also need the date of installation and
name of your authorized Wolf dealer. Record this informa-
tion below for future reference.
If your product ever needs attention, be sure to use a Wolf
factory certied service provider.
SERVICE INFORMATION
Model Number
Serial Number
Date of Installation
Certied Service Name
Certied Service Number
Authorized Dealer
Dealer Number
Important Note
To ensure this product is installed and operated as safely
and efciently as possible, take note of the following types
of highlighted information throughout this guide:
IMPORTANT NOTE highlights information that is especially
important.
CAUTION indicates a situation where minor injury or product
damage may occur if instructions are not followed.
WARNING states a hazard that may cause serious injury or
death if precautions are not followed.

wolfappliance.com
|
3
SAFETY PRECAUTIONS
WARNING
The appliance and its accessible parts become hot during
use. Care should be taken to avoid touching heating ele-
ments. Children less than 8 years of age shall be kept away
unless continuously supervised.
WARNING
This appliance can be used by children aged from 8 years
and above and persons with reduced physical, sensory or
mental capabilities or lack of experience and knowledge if
they have been given supervision or instruction concerning
use of the appliance in a safe way and understand the haz-
ards involved. Children shall not play with the appliance.
Cleaning and user maintenance shall not be made by chil-
dren without supervision.
IMPORTANT INSTRUCTIONS
GENERAL SAFETY PRECAUTIONS
• Read this guide carefully before using this appliance to reduce
risk of re, electric shock or injury.
• This appliance must be properly installed and serviced by a
qualied installer or service agency and grounded (earthed) by
a qualied technician.
• Clean only those parts listed in this guide.
• Do not use oven cleaners. No commercial oven cleaner or oven
liner protective coating of any kind should be used in or around
any part of the oven.
• Do not use a steam cleaner.
• Do not use harsh abrasive cleaners or sharp metal scrapers to
clean the oven door glass since they can scratch the surface,
which may result in shattering of the glass.
CAUTION
Before using self-clean, remove any excess spillage as well
as the broiler pan, oven racks, oven rack guides and any
other utensils.

4
|
English
SAFETY PRECAUTIONS
• Do not heat unopened food containers, such as baby food jars
and cans. Pressure build-up may cause the container to burst
and cause injury.
• Do not store or use gasoline or other ammable vapors and
liquids in the vicinity of this or any other appliance.
• Do not store items of interest to children above or at the back
of this appliance, as they could climb on the appliance to reach
items and be injured.
• Do not clean oven gasket; rubbing or moving the gasket may
compromise the door seal.
• Wear proper apparel. Loose-tting or hanging garments should
never be worn while using this appliance.
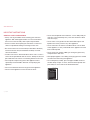
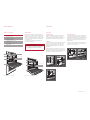
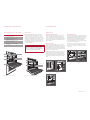
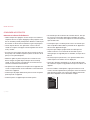
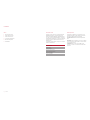
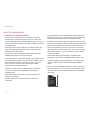
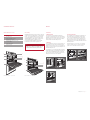
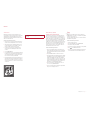
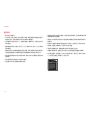
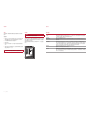
• For contemporary models, press the upper middle section of
the door rmly to open. To close, rotate the door upward, then
press rmly to close. Refer to the illustration below.
IMPORTANT INSTRUCTIONS
GENERAL SAFETY PRECAUTIONS
• Always use dry pot holders when removing pans from this
appliance. Wet or damp pot holders can cause steam burns.
Do not use a towel or bulky cloth in place of pot holders.
• Exercise caution when opening the oven door. Let hot air or
steam escape before looking or reaching into the oven.
• Be sure that the oven cool air intake (located above the door)
and oven exhaust vent (located below the door) are unob-
structed at all times.
• Position oven racks in desired locations when oven is cool. If a
rack must be repositioned after the oven is already hot, be sure
pot holder does not contact a hot heating element in the oven.
• Do not repair or replace any part of this appliance unless
specically recommended in literature accompanying this
appliance.
• Do not use aluminum foil to line any part of this appliance.
• Never use this appliance to warm or heat the room.
PRESS TO OPEN
Contemporary model.

wolfappliance.com
|
5
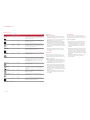
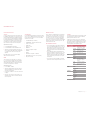
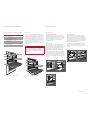
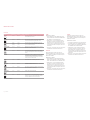
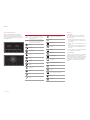
MULTIFUNCTION RACK
To insert the multifunction rack, place the two rear tabs onto
the rack guide (one tab above and one below). Refer to the
illustration below. Angle the rack slightly and slide back until
the front rack notch engages the front rack guide. Place the
multifunction pan onto the full extension rack. Refer to the
illustration below.
For roasting meats or vegetables, use rack position 3 or 4 in
convection or convection roast mode. For broiling meats or
vegetables, use rack position 5 or 6.
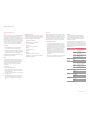
Oven Racks
OVEN RACK GUIDES
To insert the rack guides in the oven, locate the mounting
screws on the oven side walls. Place the rack guide
mounting tabs over the top screws, pivot inward and slide
down until fully seated. Refer to the illustration below.
OVEN RACKS
To insert a standard rack in the oven, place the rack anti-tip
lock under the side rack guide rails. Slide the rack back
and lift up to clear the rack stops. Continue to slide the
rack back until completely inside the oven. Refer to the
illustration below.
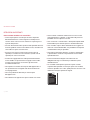
To insert a full-extension rack, place the two rear tabs onto
the rack guide (one tab above and one below). Refer to the
illustration below. Angle the rack slightly and slide back until
the front rack notch engages the front rack guide.
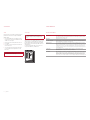
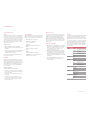
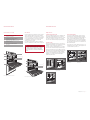
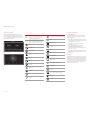
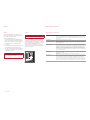
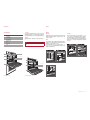
M SERIES OVEN FEATURES OVEN OPERATION
M Series Oven Features
FEATURE
1
Product Rating Plate
2
Adjustable Oven Rack
3
Full-Extension Oven Racks
4
Control Panel and Display
5
Control Knobs (professional model)
6
Convection Fans
7
Temperature Probe Receptacle
8
Halogen Lighting
Getting Started
We know you are eager to start cooking, but before you
do, please take some time to read this use and care guide.
Whether you are an occasional cook or an expert chef, it
will be to your benet to familiarize yourself with the safety
practices, features, operation and care recommendations
of your M series oven.
To ensure the best results, review cooking modes and
special features on pages 7–8.
CAUTION
Do not place cookware on the oven oor or use
aluminum foil or other material to line the oven oor or
side walls. Failure to adhere to this notice will damage
the porcelain interior and will void your warranty.
MOUNTING
TA B
ANTI-TIP
LOCK
RACK
STOP
Oven rack guides.
Oven rack anti-tip lock.
REAR TAB
Full-extension rack.
M series single oven—transitional.
4
7
8
3
6
2
1
M series double oven—professional.
4
7
6
8
3
2
5
1
REAR TAB
Install multifunction rack.
Place multifunction pan.

6
|
English
Oven Operation
PRIOR TO USE
To ensure all residual oil from the manufacturing process
has been removed, each oven must go through the fol-
lowing procedure.
1 Clean oven thoroughly with hot water and a mild deter-
gent. Rinse and dry with a soft cloth.
2 Turn on ventilation. Some smoke and odor is normal.
3 Touch or turn knob to CONVECTION ROAST (ROAST for
686 mm lower oven) and adjust temperature to 260°C for
one hour.
4 Touch OFF (turn knob for professional model) and allow
oven to cool with the door closed.
PREHEAT
During preheat, the oven is heated as quickly and evenly
as possible and is not ideal for cooking. Preheat should be
utilized for all cooking modes except broil, warm and some
modes in Gourmet. Once preheat is complete, an audible
chime indicates oven has reached set temperature.
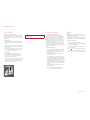
OVEN OPERATION
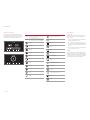
Interactive Control Panel
The interactive control panel utilizes touch technology to
select cooking modes and other functions. Refer to the
illustrations below. For professional models, cooking modes
and temperatures are selected using selector knobs.
Home screen—single transitional and contemporary shown.
Home screen—single professional shown.
QUICK
START
Touch to initiate cooking, then select from options
on the control panel. For professional model, turn
selector knob to desired mode.
GOURMET
Touch to initiate Gourmet meal preparations, then
select from options on the control panel. For pro-
fessional model, turn selector knob to
GOURMET
.
TIMER 1
INFORMATION
SETTINGS
LIGHT
TIMER 2
ENTER
CLEAR
CANCEL
BACK
OFF
PROBE
SELECTION REFERENCE
TIMED COOK / DELAYED START
MORE
ROAST
BROIL
BAKE
CONVECTION
CONVECTION ROAST
WARM
GOURMET (professional model)
DEHYDRATE
PROOF
ECO (not available on all models)
STONE
CLEAN

wolfappliance.com
|
7
Cooking Modes
The oven has 11 cooking modes—bake, roast, broil, con-
vection roast, convection, Gourmet, proof, ECO, stone,
dehydrate and warm. Stone and dehydrate require accesso-
ries. Refer to the chart on page 8. The 686 mm
lower oven
includes six cooking modes—bake, roast, broil, Gourmet,
proof and warm.
SETTING CONTROLS
1 Touch QUICK START. The oven will default to BAKE
mode. Touch or use slide bar to select desired cooking
mode. For professional model, turn selector knob to
desired cooking mode.
2 Touch START to select preset temperature. To change
temperature, touch or use slide bar to select desired
temperature, then touch START. For professional model,
turn selector knob to adjust temperature.
3 Touch OFF to end mode. For professional model, turn
selector knob to OFF.
GOURMET
Gourmet provides a variety of quick and convenient meal
preparations. Gourmet also provides recommendations for
ideal rack positions and tips to ensure cooking condence.
Choose from six categories—meat, sh, baked goods,
pizza, vegetables and one dish meals. Each category can
be rened to ensure the most effective cooking mode and
rack position to create a cooking masterpiece. Refer to the
Gourmet guide below.
GOURMET GUIDE
MEAT Beef* steak, tenderloin, roast,
prime rib, meatloaf, slow roast
Poultry* whole bird, fresh pieces,
whole breast
Pork* ribs, tenderloin, roast, steak,
chop, whole ham
Lamb* leg, roast, rib rack
FISH Steak*
Fillet*
BAKED GOODS Cookies
Cake sheet, uted, angel, pound,
cupcakes
Pie single crust, double crust
Bread quick bread, yeast loaf,
yeast rolls, biscuits
PIZZA Fresh
Par-Baked
Calzone
VEGETABLES Roasted
Sweet Potato*
Baked Potato*
ONE DISH MEALS Casserole*
Lasagna*
Quiche
*Does not require preheat.
OVEN OPERATION
Oven Operation
CLOCK
The clock is visible on the control panel during all cooking
modes, however, the oven is shipped with the standby
power feature enabled which causes the screen to go blank
after ve minutes of inactivity. To disable standby power,
refer to extended options on page 7. It is very important
the clock is set to the correct time if a timed cook feature is
used. The clock must be reset after a power failure.
Setting clock:
1 Touch SETTINGS, then select TIME.
2 Touch 12 HOUR or 24 HOUR mode.
3 Use slide bars to set time of day, select AM or PM, then
touch SET. An audible chime indicates the clock has
been set.
Time can also be adjusted by touching the time display on
the home screen.
TIMER
Each timer can be set for a maximum of 11 hours and 59
minutes. Once a time is set, the countdown is illuminated
on the control panel display. The timer is independent from
the oven. Setting the timer does not affect cook time or stop
time.
Setting timer:
1 Touch TIMER 1 or TIMER 2.
2 Use slide bars to set duration, then touch SET. An
audible chime indicates the timer has been set.
3 To cancel or edit, touch the countdown time on the
display.
4 Oven will chime and time will ash when complete. Timer
will continue to chime until canceled or reset.
EXTENDED OPTIONS
Touch SETTINGS to access extended options. Touch or use
the slide bar to select the desired option. If more information
is needed, touch INFO.
• Temperature Offset (service only).
• Calibration—screen calibration.
• Sound—volume and tone.
• Brightness.
• Time—12 hour or 24 hour.
• Sabbath Mode.
• Clock—digital or analog.
• Standby Power.
• Language.
• Units—°F/Imperial or °C/Metric.
• Showroom Mode (for showroom use only).
• About (service only).

8
|
English
PROOF
Setting controls:
1 Touch QUICK START, then select PROOF. For profes-
sional model, turn selector knob to MORE, then select
PROOF on the control panel.
2 Touch START to select preset temperature. To change
temperature, touch or use slide bar to select desired
temperature, then touch START. For professional model,
turn selector knob to adjust temperature.
3 Touch OFF to end mode. For professional model, turn
selector knob to OFF.
STONE
Accessory kit required. Accessories are avail able through an
authorized Wolf dealer. Additional use and care information
is included with the accessory kit.
Setting controls:
1 Touch QUICK START, then select STONE. For profes-
sional model, turn selector knob to MORE, then select
STONE on the control panel.
2 Touch START to select preset temperature. To change
temperature, touch or use slide bar to select desired
temperature, then touch START. For professional model,
turn selector knob to adjust temperature.
3 Touch OFF to end mode. For professional model, turn
selector knob to OFF.
DEHYDRATE
Accessory kit required. Accessories are avail able through an
authorized Wolf dealer. Additional use and care information
is included with the accessory kit.
Setting controls:
1 Place door stop supplied with accessory kit.
2 Touch QUICK START, then select DEHYDRATE. For pro-
fessional model, turn selector knob to MORE, then select
DEHYDRATE on the control panel.
3 Touch START to select preset temperature. To change
temperature, touch or use slide bar to select desired
temperature, then touch START. For professional model,
turn selector knob to adjust temperature.
4 Touch OFF to end mode. For professional model, turn
selector knob to OFF.
OVEN OPERATION
Cooking Modes
MODE
PRESET RANGE PROBE USES
BAKE 175°C 95 – 290°C
•
Best for single-rack cooking, primarily baked foods. Use for
standard recipes.
ROAST
175°C 95 – 290°C
•
Best for roasting less tender cuts of meat, that should be cov-
ered, such as chuck roasts, and stew meat.
BROIL High
Med
Low
290°C
230°C
175°C
Best for broiling meats, sh and poultry pieces up to 25 mm
thick. Utilize two-piece broiler pan and always broil with oven
door closed.
CONVECTION ROAST
165°C 95 – 290°C
•
Gently browns exterior and seals in juices. Perfect for roasting
tender cuts of beef, lamb, pork and poultry.
CONVECTION
165°C 95 – 290°C
•
Uniform air movement makes it possible to multi-level rack cook
with even browning.
GOURMET — —
•
Gourmet provides quick and convenient meal preparations with
recommendations for cooking mode and rack position. Refer to
page 7. Preset temperature and range are dependent on food
and desired doneness.
PROOF 30°C 30 – 45°C Ideal for proong, or rising bread dough. Refer to page 8.
STONE
230°C 95 – 290°C
•
Baking on a ceramic stone. Great for pizza and bread. Stone
accessory required. Refer to page 8.
DEHYDRATE
60°C 45 – 75°C Dry a variety of fruits, vegetables, herbs and meat strips. Acces-
sory racks required. Refer to page 8.
WARM 80°C 60 – 95°C
•
Designed to keep foods at serving temperature.
ECO*
190°C 95 – 290°C
•
Energy saving mode designed for roasting less tender cuts of
meat, that should be covered, such as chuck roasts and stew
meat.
*Not available on all models.

wolfappliance.com
|
9
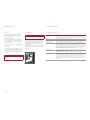
OVEN OPERATION
Temperature Probe
The temperature probe measures the internal temperature
of food while cooking. It can be used with all cooking
modes except broil, proof and dehydrate. Only use the tem-
perature probe recommended for this oven.
Setting controls:
1 Preheat oven to desired oven temperature in desired
mode (bake or stone mode for breads).
2 Insert probe into the thickest area of food. When making
bread, cook for approximately 10 minutes before
inserting probe.
3 When preheat is complete, insert probe into probe
receptacle. Refer to the illustration below. Close oven
door.
4 Touch PROBE.
5 Touch SET to select preset temperature. To change
temperature, use slide bar to select desired temperature,
then touch SET.
6 An audible chime indicates internal temperature has
reached probe set point. Remove and reinsert probe to
verify internal temperature, then select OK or OVEN OFF.
Probe receptacle.
CAUTION
Probe and probe receptacle will be very hot. Handle
with care.
Sabbath
This appliance is certied by Star-K to meet strict religious
regulations in conjunction with specic instructions found
on www.star-k.org.
Roast, bake, proof and warm modes can be used in
Sabbath.
Setting controls:
1 Turn oven light on or off.
2 Touch SETTINGS, then select SABBATH MODE.
3 Touch ON, then touch SET.
4 Select cooking mode and temperature, then touch
START.
5 Touch to initiate Sabbath mode.
6 Touch OFF to end mode. For professional model, turn
selector knob to OFF.
Auto Program
TIMED COOK / DELAYED START
Timed cook automatically turns the oven off at a specied
time. The oven will begin to heat immediately and will turn
off at the desired stop time. Delayed start automatically
turns the oven on and off at specied times. The oven will
remain idle until the desired start time and will turn off at the
desired stop time. If preheat is required, preheat time must
be accounted for when determining cooking duration. The
clock must be set to the correct time to function properly.
Use in any cooking mode except broil, Gourmet or stone.
Setting controls:
1 Touch QUICK START, then select desired cooking mode
and temperature. For professional model, turn selector
knobs to desired mode and temperature.
2 Touch TIMED COOK, then select cooking duration.
3 Touch SET to conrm stop time or use the slide bars to
select desired stop time, then touch SET. Cooking dura-
tion and stop time will appear on the display. Oven will
chime with one minute remaining. Oven will chime when
complete and will continue to chime until canceled or
reset.
4 To cancel, reset or turn oven off, touch TIMED COOK.
5 Oven will automatically turn off when cooking is com-
plete. Touch OK to clear display.

10
|
English
CARE RECOMMENDATIONS
Care Recommendations
CLEANING
Stainless steel Use a nonabrasive stainless steel cleaner and apply with a soft lint-free cloth. To bring out the natural
luster, lightly wipe surface with a water-dampened microber cloth followed by a dry polishing chamois.
Always follow the grain of stainless steel.
Black glass Spray glass cleaner on a cloth to clean.
Oven racks and guides Remove and place on a at surface near the sink. Clean with hot water and mild detergent or paste of
baking soda and water. Do not immerse in water. Towel dry.
Multifunction pan Use a soft sponge or nylon brush and hot, soapy water. Clean the pan within 8 hours of use. For stub-
born soils, soak the pan and grill for 30 minutes and use a non-scratch scrubbing pad to clean. The mul-
tifunction pan is dishwasher safe, but may be too large to t most dishwashers. The full-extension rack is
not dishwasher safe. To clean, use hot water and mild detergent or paste of baking soda and water. Do
not immerse in water. Towel dry. Do not use scouring agents, pot scouring pads or heavy-duty wire wool
on the multifunction pan.
Control panel Use spray degreaser to remove ngerprints and food soil. Spray on a cloth before wiping panel.
IMPORTANT NOTE: Do not spray cleaners directly on control panel.
Oven interior Before utilizing the clean feature, use a razor blade to gently lift baked on foods from the oven cavity and
window. For stubborn stains, spray with a mild abrasive cleaner or spray degreaser and scrub with a no-
scratch pad. Wash the entire oven cavity with soap and water to remove all cleaning chemicals before
entering the clean cycle. If residue is not cleaned from the cavity, etching of the porcelain may occur.
Once the clean cycle is complete, allow the oven to cool completely and wipe out ash with a damp cloth.
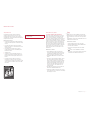
OVEN OPERATION
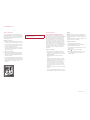
Oven Light
WARNING
Ensure that the appliance is switched off before
replacing the lamp to avoid the possibility of electric
shock.
Allow the oven to cool completely, then remove oven racks
and rack guides. To remove the light cover, gently pry the
bottom edge with a at screwdriver. Remove the existing
bulb and replace with a 40-watt halogen bulb. Refer to the
illustration below.
To replace the light bulb located on the top of the oven
cavity, contact Wolf factory certied service.
LIGHT
COVER
Light bulb replacement.
Clean
During clean, the oven is heated to an extremely high tem-
perature to burn off food soil. Oven lights are disabled.
Setting controls:
1 Touch QUICK START, then select CLEAN. For profes-
sional model, turn selector knob to MORE, then select
CLEAN on the control panel.
2 Remove oven racks and rack guides, then touch OK.
3 Touch START.
4 Touch OFF to end mode. For professional model, turn
selector knob to OFF.
5 Oven door will lock and remain locked until the clean
cycle has ended and oven temperature has cooled
below 290°C.
CAUTION
During clean, exterior surfaces may get hotter than
usual. Children should be kept away.

wolfappliance.com
|
11
TROUBLESHOOTING
Troubleshooting
OPERATION
Oven does not operate.
• Verify power is on.
• Verify electrical power to oven and home circuit breaker
is on.
OVEN
Oven temperature issue.
• Contact Wolf factory certied service.
No response from control panel touch pads.
• Unit in Sabbath mode (
displayed on control panel),
refer to page 9.
• Turn circuit breaker off for 20 seconds, then turn
back on.
Error message displayed during clean cycle.
• For double ovens, if one oven is in an active clean cycle,
the other oven can not be used.
Oven ‘pops’ or ‘bangs’ during preheat or cool down.
• Normal with new oven cavity expansion and contraction.
• Run clean cycle. If it persists, contact Wolf factory certi-
ed service.
Service
• Maintain the quality built into your product by contacting
Wolf factory certied service.
• When contacting service, you will need the model and
serial number of your product. Both numbers are listed
on the product rating plate. Refer to page 5 for rating
plate location.
• For warranty purposes, you will also need the date of
installation and name of your authorized Wolf dealer. This
information should be recorded on page 2 of this guide.
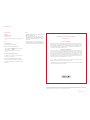
Wolf Appliance International Limited Warranty
FOR RESIDENTIAL USE
FULL TWO YEAR WARRANTY*
For two years from the date of original installation, this Wolf Appliance product warranty covers all parts
and labor to repair or replace, under normal residential use, any part of the product that proves to be
defective in materials or workmanship. All service provided by Wolf Appliance under the above warranty
must be performed by Wolf factory certied service, unless otherwise specied by Wolf Appliance, Inc.
Service will be provided during normal business hours.
LIMITED FIVE YEAR WARRANTY
For ve years from the date of original installation, Wolf Appliance will repair or replace the following parts
that prove to be defective in materials or workmanship: stainless steel briquette trays, gas valves, drip
pans, electronic control boards and electric heating elements. If the owner uses Wolf factory certied
service, the service provider will repair or replace these parts with the owner paying for all other costs,
including labor. If the owner uses non-certied service, the owner must contact Wolf Appliance, Inc. (using
the information below) to receive repaired or replacement parts. Wolf Appliance will not reimburse the
owner for parts purchased from non-certied service or other sources.
For more information regarding your Wolf product warranty, contact your authorized Wolf dealer.
Warranties must comply to all country, state, city, local and or ordinance.
*Stainless steel (doors, panels, handles, product frames and interior surfaces) are covered by a limited
60-day parts and labor warranty for cosmetic defects.
Sub-Zero, Sub-Zero & Design, Sub-Zero & Snowake Design, Dual Refrigeration, The Living Kitchen, Great American Kitchens The Fine Art of Kitchen Design, Wolf, Wolf &
Design, Wolf Gourmet, W & Design, red colored knobs, Cove, and Cove & Design, are registered trademarks and service marks of Sub-Zero Group, Inc. and its subsidiaries.
All other trademarks are property of their respective owners in the United States and other countries.

2
|
Español
Índice
3 Precauciones de seguridad
5 Características de los horno de la serie M
5 Funcionamiento del horno
10 Recomendaciones de mantenimiento
11 Localización y solución de problemas
11 Garantía Wolf
HORNO DE LA SERIE M
Atención al cliente
La información relativa al número de serie y el modelo se
muestra en la placa de datos del producto. Consulte la
página 5 para observar la ubicación de la placa de datos.
Para cuestiones relacionadas con la garantía, también nece-
sita saber la fecha de instalación y el nombre de su distri-
buidor autorizado de Wolf. Guarde la siguiente información
para tenerla como referencia en el futuro.
Si alguna vez su producto necesita asistencia, asegúrese de
acudir a un servicio técnico autorizado de Wolf.
INFORMACIÓN SOBRE EL MANTENIMIENTO
Referencia del modelo
Número de serie
Fecha de instalación
Nombre del servicio certicado
Número de servicio certicado
Distribuidor autorizado
Número del distribuidor
Nota importante:
Para garantizar que este producto se instala y funciona de
la forma más ecaz y segura posible, tenga en cuenta la
información que se destaca en esta guía:
Cuando aparece
NOTA IMPORTANTE, se resalta información
que resulta especialmente importante.
PRECAUCIÓN indica una situación en la que se pueden
sufrir heridas leves o provocar daños al producto si no se
siguen las instrucciones.
AVISO indica el peligro de que se produzcan heridas graves
o incluso la muerte si no se respetan las precauciones.

wolfappliance.com
|
3
PRECAUCIONES DE SEGURIDAD
AVISO
El aparato y sus zonas accesibles pueden calentarse durante
su uso. Tenga cuidado de no tocar los elementos calorícos.
Mantenga alejados a los niños menores de ocho años, salvo
que estén bajo supervisión permanente.
AVISO
Este aparato puede ser utilizado por niños de más de ocho
años y personas con discapacidades físicas, sensoriales
o mentales, o con falta de experiencia o conocimientos,
siempre y cuando cuenten con supervisión o se les haya
enseñado cómo utilizarlo de forma segura y comprendan
los peligros que supone. Los niños no deben jugar con el
aparato. Los niños no pueden realizar las tareas de limpieza
y mantenimiento sin supervisión.
INSTRUCCIONES IMPORTANTES
PRECAUCIONES GENERALES DE SEGURIDAD
• Lea con detenimiento esta guía antes de utilizar la unidad
para reducir el riesgo de que se produzca un incendio, una
descarga eléctrica o de sufrir lesiones.
• Este aparato debe ser instalado y revisado de manera correcta
por un instalar cualicado o por una agencia de mantenimiento
y conectado a tierra por un técnico cualicado.
• Limpie solo las piezas que se especican en esta guía.
• No utilice nunca limpiadores para hornos. No utilice en el
horno ni en sus alrededores ningún limpiador de horno comer-
cial ni materiales para proteger el revestimiento en ninguna
parte del horno.
• No utilice un limpiador de vapor.
• No utilice limpiadores abrasivos ni espátulas metálicas aladas
para limpiar el cristal de la puerta del horno ya que pueden
rayar la supercie, lo que podría hacer que el cristal se rompa.
PRECAUCIÓN
Antes de utilizar el modo de limpieza automática, limpie
cualquier posible derrame, y extraiga la bandeja para asar,
las rejillas y las guías de las rejillas y cualquier otro utensilio
que tenga dentro del horno.

4
|
Español
PRECAUCIONES DE SEGURIDAD
• No caliente recipientes con alimentos que estén cerrados, por
ejemplo, envases de comida para bebés o latas. La formación
de presión puede hacer que el recipiente explote y causar
heridas personales.
• No almacene ni utilice gasolina ni otros vapores ni líquidos
inamables cerca de este o de otros aparatos.
• No almacene artículos que puedan gustar a los niños encima
o detrás de este aparato, ya que podrían saltar sobre él para
alcanzarlos y resultar heridos.
• No limpie la junta del horno ya que al frotar o mover la junta
puede dañar el sellado hermético de la puerta.
• Lleve ropa adecuada. No lleve nunca prendas sueltas u
holgadas mientras esté utilizando este aparato.
• En modelos contemporáneos, presione rmemente en el medio
de la parte superior de la puerta para abrir. Para cerrarla, gire
la puerta hacia arriba y, a continuación, presione con rmeza.
Observe la siguiente ilustración.
INSTRUCCIONES IMPORTANTES
PRECAUCIONES GENERALES DE SEGURIDAD
• Utilice siempre elementos aislantes secos para retirar las
cazuelas de este aparato. Si los elementos aislantes están
húmedos o mojados pueden producirle quemaduras por vapor.
No utilice un paño de cocina o un paño acolchado en lugar de
un elemento aislante.
• Tenga especial cuidado al abrir la puerta del horno. Deje que el
aire caliente o el vapor salgan antes de mirar en el interior del
horno o de alcanzar algún alimento.
• Asegúrese que la entrada de aire frío (situada encima de la
puerta) y la rejilla extractora del horno (situada debajo de la
puerta) no están nunca obstruidas.
• Coloque las rejillas en las ubicaciones que desee cuando el
horno esté frío. En el caso de que tenga que colocar una rejilla
cuando el horno todavía está caliente, asegúrese de que los
elementos aislantes no toquen ningún elemento calefactor del
horno.
• No repare ni cambie ninguna pieza de este aparato a menos
que esto se recomiende especícamente en los documentos
que se proporcionan con este aparato.
• No utilice papel de aluminio para forrar ninguna parte de este
aparato.
• No utilice nunca este aparato para calentar la habitación.
PRESS TO OPEN
Modelo contemporáneo.
PRESIONE
PARA ABRIR

wolfappliance.com
|
5
Rejillas del horno
GUÍAS DE LA REJILLA DEL HORNO
Para insertar las guías de la rejilla en el horno, localice los
tornillos de montaje en las paredes laterales del horno.
Coloque las pestañas de montaje de las guías de la rejilla
sobre los tornillos superiores, gírelas hacia adentro y deslí-
celas hasta que se introduzcan en su totalidad. Observe la
siguiente ilustración.
REJILLAS DEL HORNO
Para insertar una rejilla estándar en el horno, coloque el
bloqueo anti-vuelco de la rejilla debajo de los rieles de las
guías de rejilla laterales. Deslice la rejilla hacia atrás y leván-
tela para pasarla por los topes de la rejilla. Siga deslizando
la rejilla hacia atrás hasta que esté complemente dentro del
horno. Observe la siguiente ilustración.
Para insertar una rejilla de extracción total, coloque las dos
pestañas traseras en la guía de la rejilla (una pestaña por
arriba y otra por debajo). Observe la siguiente ilustración.
Incline ligeramente la rejilla y deslícela hacia atrás hasta que
la muesca de la rejilla frontal encaje en la guía de la rejilla
frontal.
CARACTERÍSTICAS DE LOS HORNOS DE LA SERIE M FUNCIONAMIENTO DEL HORNO
Características de los hornos de la serie M
CARACTERÍSTICA
1
Placa de datos del producto
2
Bandeja de horno ajustable
3
Bandejas de horno de extracción total
4
Pantalla y panel de control
5
Mandos de control (modelo profesional)
6
Ventiladores de convección
7
Receptáculo y sensor de temperatura
8
Luces halógenas
Primeros pasos
Sabemos que está deseando empezar a cocinar, pero,
antes de hacerlo, debe leer esta guía de uso y mante-
nimiento. Tanto si es un cocinero novato como un chef
experto, le resultará útil familiarizarse con las prácticas de
seguridad, las características, el funcionamiento y las reco-
mendaciones de mantenimiento del horno de la serie M.
Para asegurarse de que logra los mejores resultados, con-
sulte el apartado sobre funciones especiales y modos de
cocción de las páginas 7 y 8.
PRECAUCIÓN
No coloque ningún utensilio de cocina sobre la super-
cie del horno, ni utilice papel de aluminio u otro mate-
rial para forrar la supercie o las paredes del horno.
Si no sigue esta advertencia, la porcelana interior del
horno se dañará y la garantía quedará anulada.
Horno sencillo de la serie M transicional.
4
7
8
3
6
2
1
Horno doble de la serie M profesional.
4
7
6
8
3
2
5
1
REJILLA MULTIFUNCIÓN
Para insertar la rejilla multifunción, coloque las dos pestañas
traseras en la guía de la rejilla (una pestaña por arriba y otra
por debajo). Observe la siguiente ilustración. Incline ligera-
mente la rejilla y deslícela hacia atrás hasta que la muesca
de la rejilla frontal encaje en la guía de la rejilla frontal.
Coloque la bandeja multifunción sobre la rejilla de extensión
total. Observe la siguiente ilustración.
Para asar carnes o verduras, utilice la posición 3 o 4 de la
rejilla en el modo de convección o asado por convección.
Para asar carnes o verduras a la parrilla, utilice la posición 5
o 6 de la rejilla.
LENGÜETA
TRASERA
Rejilla de extracción total.
PESTAÑA
TRASERA
REAR TAB
Instale la rejilla multifunción.
Coloque la bandeja
multifunción.
PESTAÑA
TRASERA
LENGÜETA
DE MONTAJE
TOPE DE
LA REJILLA
BLOQUEO
ANTI-VUELCO
Guías de la rejilla del horno.
Bloqueo anti-vuelvco de la
rejilla del horno.
TABLA DE
MONTAJE

6
|
Español
Funcionamiento del horno
ANTES DE SU USO
Para garantizar que se ha eliminado todo el aceite residual
del proceso de fabricación, cada horno debe someterse al
siguiente procedimiento.
1 Limpie el horno con agua caliente y detergente suave.
Aclárela y séquela con un paño suave.
2 Encienda la ventilación. Es normal que aparezca un poco
de humo y olor.
3 Pulse o gire el mando al to ASADO CON CONVECCIÓN
(ASADO en hornos inferiores de 686 mm) y ajuste la
temperatura a 260°C para una hora.
4 Pulse OFF (gire el mando en los modelos profesionales)
y deje que el horno se enfríe con la puerta cerrada.
PRECALENTAMIENTO
Durante el precalentamiento, el horno se calienta lo más
rápido y uniformemente posible y no es ideal para cocinar.
Se debe utilizar el precalentamiento en todos los modos
de cocción salvo en los modos parrilla, calentar y algunos
modos en Gourmet. Cuando haya nalizado el precalen-
tamiento, un pitido indica que el horno ha alcanzado la
temperatura establecida.
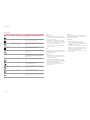
FUNCIONAMIENTO DEL HORNO
Panel de control interactivo
El panel de control interactivo utiliza tecnología táctil para
seleccionar los modos de cocción y otras funciones.
Observe las siguientes ilustraciones. En los modelos
profesionales, los modos de cocción y las temperaturas
se seleccionan utilizando los mandos selectores.
Pantalla de inicio: se muestra en los modelos sencillos contem-
poráneos y transicionales.
Pantalla de inicio: se muestra en los modelos sencillos
profesionales.
QUICK
START
Pulse para iniciar la cocción y, a continuación,
seleccione entre las opciones del panel de control.
En los modelos profesionales, gire el mando
selector al modo de cocción deseado.
GOURMET
Pulse para iniciar las preparaciones de comida
Gourmet, y luego seleccione entre las opciones
del panel de control. En los modelos profesio-
nales, gire el mando seleccionar para
GOURMET
.
TEMPORIZADOR 1
INFORMACIÓN
AJUSTES
LUZ
TEMPORIZADOR 2
INTRODUCIR
BORRAR
CANCELAR
ATRÁS
OFF
SENSOR
REFERENCIA DE SELECCIÓN
INICIO PROGRAMABLE /
COCCIÓN PROGRAMADA
MÁS
ASADO
PARRILLA
HORNEADO
CONVECCIÓN
ASADO CON CONVECCIÓN
CALENTAR
GOURMET (modelo profesional)
DESHIDRATACIÓN
FERMENTACIÓN
ECO (no disponible en todos los modelos)
PIEDRA
LIMPIAR

wolfappliance.com
|
7
Modos de cocción
El horno posee 11 modos de cocción: horneado, asado,
parrilla, asado con convección, convección Gourmet,
fermentación, ECO, piedra, deshidratación y calentar. La
piedra y la deshidratación requieren accesorios. Consulte la
gráca de la página 8. El horno inferior de 686 mm incluye
seis modos de cocción: horneado, asado, parrilla, Gourmet,
fermentación y calentar.
MANDOS DE CONFIGURACIÓN
1 Pulse QUICK START. El horno estará por defecto en
modo de HORNEADO. Pulse o utilice la barra de despla-
zamiento para seleccionar el modo de cocción deseado.
En los modelos profesionales, gire el mando selector al
modo de cocción deseado.
2 Pulse INICIO para seleccionar la temperatura predeter-
minada. Para modicar la temperatura, pulse o utilice la
barra de desplazamiento para seleccionar la temperatura
deseada, y luego pulse INICIO. En los modelos profesio-
nales, gire el mando selector para ajustar la temperatura.
3 Pulse OFF para apagar el modo. En los modelos profe-
sionales, gire el mando seleccionar para OFF.
GOURMET
Gourmet proporciona una variedad de preparaciones de
comidas prácticas y rápidas. Gourmet también ofrece
recomendaciones para la posición ideal de las bandejas y
consejos para garantizar una cocción segura.
Elija entre seis categorías:carne, pescado, alimentos
horneados, pizza, verduras y comidas de un plato. Cada
categoría puede mejorarse a n de garantizar la posición de
la bandeja y el modo de cocción más efectivos para crear
una obra maestra. Consulte la siguiente guía Gourmet.
GUÍA GOURMET
CARNE Ternera* bistec, solomillo, asado,
costilla de primera, pastel de
carne, asado a fuego lento
Aves de
corral*
ave entera, piezas frescas,
pechuga entera
Cerdo* costillas, solomillo, asado,
lete, chuleta, jamón entero
Cordero* pierna, asado, costilla
PESCADO Bistec*
Filete*
REPOSTERÍA Galletas
Bizcocho base rectangular, acanalado,
ángel, libra, magdalenas
Tarta una capa, dos capas
Pan pan rápido, pan de molde,
pan de bombón, galletas
PIZZA Fresca
Prehorneada
Calzone
VERDURAS Asadas
Batata*
Patatas asadas*
COMIDAS DE UN
PLATO
Cazuela*
Lasaña*
Quiche
*No es necesario precalentar el horno.
FUNCIONAMIENTO DEL HORNO
Funcionamiento del horno
RELOJ
El reloj está visible en el panel de control durante todos
los modos de cocción. Sin embargo, el horno viene de
fábrica con la función de modo de espera habilitada, lo que
ocasiona que la pantalla se apague tras cinco minutos de
inactividad. Para deshabilitar el modo de espera, consulte
las opciones avanzadas de la página 7. Es muy importante
que el reloj esté congurado a la hora correcta si se utiliza la
función de cocción programada. El reloj debe restablecerse
en caso de corte de alimentación.
Conguración del reloj:
1 Toque AJUSTES y, a continuación, seleccione TIEMPO.
2 Pulse el modo de 12 HORAS o 24 HORAS.
3 Utilice las barras de desplazamiento para seleccionar
la hora del día, seleccione AM o PM y, a continuación,
pulse CONFIGURAR. Un pitido indica que ha congu-
rado el reloj.
También podrá congurar la hora pulsando la hora en pan-
talla en la pantalla de inicio.
TEMPORIZADOR
Puede programar el temporizador para un máximo de
11horas y 59 minutos. Cuando haya programado el tempo-
rizador, el cronómetro se iluminará en la pantalla del panel
de control. El temporizador es independiente del horno.
Programar el temporizador no afecta a la hora de cocción o
a la de parada.
Programar el temporizador:
1 Pulse TEMPORIZADOR 1 o TEMPORIZADOR 2.
2 Utilice las barras de desplazamiento para congurar
la duración y, a continuación, pulse CONFIGURAR.
Un pitido indica que ha congurado el temporizador.
3 Para cancelar o editar, pulse el tiempo de cuenta atrás
en la pantalla.
4 El horno emitirá un pitido y la hora empezará a parpa-
dear cuando haya nalizado. El temporizador seguirá
pitando hasta que lo cancele o vuelva a congurar.
OPCIONES AVANZADAS
Pulse AJUSTES para acceder a las opciones avanzadas.
Pulse o utilice la barra de desplazamiento para seleccionar
la opción deseada. Para obtener más información, pulse
INFO.
• Intervalo de temperatura (solo para servicio).
• Calibración: calibración en pantalla.
• Sonido: volumen y tono.
• Brillo.
• Hora: 12 horas o 24 horas.
• Modo Sabbath.
• Reloj: digital o análogo.
• Modo de espera.
• Idioma.
• Unidades: °F/imperial o °C/métrica.
• Modo de exposición (solo para uso de exposición).
• Acerca de (solo servicio).

8
|
Español
FERMENTACIÓN
Controles de conguración:
1 Toque QUICK START y, a continuación, seleccione
FERMENTACIÓN. En los modelos profesionales, gire el
mando selector a MÁS y luego seleccione FERMENTA-
CIÓN en el panel de control.
2 Pulse INICIO para seleccionar la temperatura predeter-
minada. Para modicar la temperatura, pulse o utilice la
barra de desplazamiento para seleccionar la temperatura
deseada, y luego pulse INICIO. En los modelos profesio-
nales, gire el mando selector para ajustar la temperatura.
3 Pulse OFF para apagar el modo. En los modelos profe-
sionales, gire el mando seleccionar para OFF.
PIEDRA
Es necesario el kit de accesorios. Los accesorios opcio-
nales están disponibles en un distribuidor de Wolf autori-
zado. Encontrará más información sobre su utilización y
cuidado en el kit de accesorios.
Controles de conguración:
1 Toque QUICK START y, a continuación, seleccione
PIEDRA. En los modelos profesionales, gire el mando
selector a MÁS y luego seleccione PIEDRA en el panel
de control.
2 Pulse INICIO para seleccionar la temperatura predeter-
minada. Para modicar la temperatura, pulse o utilice la
barra de desplazamiento para seleccionar la temperatura
deseada, y luego pulse INICIO. En los modelos profesio-
nales, gire el mando selector para ajustar la temperatura.
3 Pulse OFF para apagar el modo. En los modelos profe-
sionales, gire el mando seleccionar para OFF.
DESHIDRATACIÓN
Es necesario el kit de accesorios. Los accesorios opcio-
nales están disponibles en un distribuidor de Wolf autori-
zado. Encontrará más información sobre su utilización y
cuidado en el kit de accesorios.
Controles de conguración:
1 Coloque el tope de puerta que se incluye en el kit de
accesorios.
2 Toque QUICK START y, a continuación, seleccione
DESHIDRATACIÓN. En los modelos profesionales, gire el
mando selector a MÁS y luego seleccione DESHIDRATA-
CIÓN en el panel de control.
3 Pulse INICIO para seleccionar la temperatura predeter-
minada. Para modicar la temperatura, pulse o utilice la
barra de desplazamiento para seleccionar la temperatura
deseada, y luego pulse INICIO. En los modelos profesio-
nales, gire el mando selector para ajustar la temperatura.
4 Pulse OFF para apagar el modo. En los modelos profe-
sionales, gire el mando seleccionar para OFF.
FUNCIONAMIENTO DEL HORNO
Modos de cocción
MODO
VALORES
PREDETERMINADOS
COCINA SENSOR USOS
HORNEADO 175 °C 95 – 290 °C
•
Diseñado especialmente para cocinar con una sola rejilla,
principalmente alimentos horneados. Utilícelo para cocinas las
recetas de siempre.
ASADO 175 °C 95 – 290 °C
•
Ideal para asar trozos de carne menos tiernos, que deben
taparse para cocerse, como carne de espalda y carne para
guisar.
PARRILLA
Alta
Media
Baja
290 °C
230 °C
175 °C
El más apropiado para asar letes de carne, pescado y pollo
con un grosor de hasta 25 mm. Utilice la bandeja para asar de
dos piezas y siempre con la puerta del horno cerrada.
ASADO CON
CONVECCIÓN
165 °C 95 – 290 °C
•
Dora suavemente el exterior y deja los alimentos muy jugosos
por dentro. Perfecto para asar letes tiernos de ternera, cordero,
cerdo o pollo.
CONVECCIÓN
165 °C 95 – 290 °C
•
El movimiento de aire uniforme permite que pueda cocinar en
rejillas situadas en varios niveles, incluso dorando alimentos.
GOURMET — —
•
Gourmet proporciona una variedad de preparaciones de
comidas prácticas y rápidas con recomendaciones para la
posición de la bandeja y el modo de cocción. Consulte la página
7. El rango y la temperatura predeterminados dependen de los
alimentos y del punto de cocción deseado.
FERMENTACIÓN
30 °C 30 – 45°C Ideal para fermentar o para hacer subir la masa del pan. Con-
sulte la página 8.
PIEDRA
230 °C 95 – 290 °C
•
Hornear en una piedra cerámica. Ideal para pizza y pan. Se
necesita accesorio para hornear a la piedra. Consulte la página
8.
DESHIDRATACIÓN 60 °C 45 – 75°C Seca una variedad de frutas, verduras, hierbas y carnes. Se
necesitan bandejas adicionales. Consulte la página 8.
CALENTAR
80 °C 60 – 95°C
•
Diseñado para mantener los alimentos a temperatura para servir.
ECO*
190°C 95 – 290°C
•
El modo de ahorro de energía está diseñado para asar trozos
de carne menos tiernos que deben taparse para cocerse, por
ejemplo, carne de espalda y carne para guisar.
*No disponible en todos los modelos..

wolfappliance.com
|
9
FUNCIONAMIENTO DEL HORNO
Sensor de temperatura
El sensor de temperatura mide la temperatura interna de la
comida durante su cocción. Puede utilizarse con todos los
modos de cocción, salvo en los modos de parrilla, fermen-
tación y deshidratación. Utilice solamente el sensor de
temperatura que se recomienda para este horno.
Conguración de los mandos:
1 Precaliente el horno a la temperatura de horno deseada
en el modo deseado (horneado o piedra para pan).
2 Introduzca el sensor en la parte más gruesa de la
comida. Cuando haga pan, hornéelo durante aproxima-
damente diez minutos antes de introducir el sensor.
3 Cuando haya terminado de precalentarse, introduzca el
sensor en su receptáculo. Observe la siguiente ilustra-
ción. Cierre la puerta del horno.
4 Pulse SENSOR.
5 Pulse CONFIGURAR para seleccionar la temperatura
predeterminada. Para modicar la temperatura, utilice la
barra de desplazamiento para seleccionar la temperatura
deseada, y luego pulse CONFIGURAR.
6 Un pitido sonoro indica que la temperatura interna ha
alcanzado el punto establecido del sensor. Retire y
vuelva a introducir el sensor para comprobar la tempera-
tura interna y, a continuación, seleccione OK o APAGAR
HORNO.
Receptáculo del sensor.
PRECAUCIÓN
El receptáculo y el sensor estarán muy calientes.
Sujételos con cuidado.
Sabbath
Este aparato lleva el certicado Star-K que indica que
cumple rigurosas normas religiosas e instrucciones
especícas que aparecen en la página www.star-k.org.
Los modos de asado, horneado, fermentación y calentar
pueden utilizar en Sabbath.
Controles de conguración:
1 Encienda o apague la luz del horno.
2 Toque AJUSTES y, a continuación, seleccione MODO
SABBATH.
3 Pulse ON, y luego CONFIGURAR.
4 Seleccione el modo de cocción y la temperatura, y luego
pulse INICIO.
5 Pulse para iniciar el modo Sabbath.
6 Pulse OFF para apagar el modo. En los modelos
profesionales, gire el mando seleccionar para OFF.
Programa automático
INICIO PROGRAMABLE / COCCIÓN PROGRAMADA
La cocción programada apaga automáticamente el horno
a una hora determinada. El horno empezará a calentarse
inmediatamente y se apagará a la hora de parada deseada.
El inicio programable enciende y apaga el horno automáti-
camente a unas horas determinadas. El horno permanecerá
en espera hasta la hora de inicio deseada y se apagará a
la hora de parada deseada. Si es necesario precalentar el
horno, deberá tener en cuenta el tiempo de precalenta-
miento al determinar la duración de la cocción. El reloj debe
congurarse a la hora correcta para que el inicio progra-
mable funcione correctamente. Podrá utilizarlo en cualquier
modo de cocción, salvo en parrilla, Gourmet o piedra.
Controles de conguración:
1 Pulse QUICK START, y luego seleccione el modo de
cocción y la temperatura deseados. En los modelos pro-
fesionales, gire el mando selector al modo y temperatura
deseados.
2 Pulse COCCIÓN PROGRAMADA y seleccione la dura-
ción de la cocción.
3 Pulse CONFIGURAR para conrmar la hora de parada
o utilice las barras de desplazamiento para seleccionar
la hora de parada deseada, y luego pulse en CONFI-
GURAR. La duración de cocción y la hora de parada
aparecerán en la pantalla. El horno emitirá un pitido
cuando quede un minuto de cocción. El horno pitará
cuando haya nalizado y seguirá haciéndolo hasta que
lo cancele o vuelva a establecer.
4 Para cancelar, restablecer o apagar el horno, pulse
COCCIÓN PROGRAMADA.
5 El horno se apagará automáticamente cuando haya
terminado la cocción. Pulse OK para borrar la pantalla.

10
|
Español
RECOMENDACIONES DE MANTENIMIENTO
Recomendaciones de mantenimiento
LIMPIEZA
Acero inoxidable Utilice un limpiador de acero inoxidable no abrasivo y aplíquelo con un paño suave que no deje pelusas.
Para que el acero inoxidable adquiera un brillo natural, frote suavemente la supercie con un paño de
microbra empapado en agua y con una gamuza seca para pulir. Siga siempre la dirección del acero
inoxidable.
Cristal negro Pulverice el limpiacristales en un paño para su limpieza.
Rejillas del horno y guías Quítelas y colóquelas en una supercie plana cerca del fregadero. Limpie con agua caliente y detergente
suave o con bicarbonato sódico y agua. No las sumerja en agua. Séquelas con una toalla.
Bandeja multifunción Utilice una esponja suave o un cepillo de nailon y agua jabonosa caliente. Limpie la bandeja después
de 8 horas de uso. En caso de suciedad resistente, coloque la bandeja y la parrilla en remojo durante
30 minutos y utilice un estropajo anti-rayaduras para limpiar. La bandeja multifunción puede lavarse en
el lavavajillas, pero es posible que sea demasiado grande para caber en la mayoría de ellos. La rejilla de
extensión total no se puede lavar en el lavavajillas. Para limpiarla, utilice agua caliente y un detergente
suave o bicarbonato sódico y agua. No la sumerja en agua. Séquelas con una toalla. No utilice agentes
abrasivos, estropajos o lana de acero en la bandeja multifunción.
Panel de control Utilice desengrasantes en spray para eliminar las huellas y las manchas de alimentos. Aplique el
producto de limpieza sobre un paño antes de limpiar el panel.
NOTA IMPORTANTE: no aplique los limpiadores directamente sobre el panel de control.
Interior del horno Antes de utilizar la función de limpieza, utilice una cuchilla para raspar los alimentos pegados de la
cavidad y la ventana. Para manchas resistentes, pulverice con un limpiador que no sea demasiado
abrasivo y frote con un estropajo anti-ralladuras. Lave toda la cavidad del horno con jabón y agua para
eliminar todos los productos químicos de limpieza antes de introducir el modo de limpieza. Si no se
limpian los residuos de la cavidad, la porcelana puede decaparse. Cuando haya nalizado el ciclo de
limpieza, deje que el horno se enfríe completamente y limpie la ceniza con un paño húmedo.
FUNCIONAMIENTO DEL HORNO
Luz del horno
AVISO
Asegúrese de que el electrodoméstico esté apagado
antes de sustituir la lámpara para evitar una posible
descarga eléctrica.
Deje que el horno se enfríe completamente y retire las guías
y las rejillas del horno. Para extraer la cubierta de la luz,
toque suavemente el extremo inferior con un destornillador
plano. Retire la bombilla y sustitúyala por una bombilla haló-
gena de 40 vatios. Observe la siguiente ilustración.
Para sustituir la bombilla situada en la parte superior de la
cavidad del horno, póngase en contacto con un servicio
técnico autorizado de Wolf.
CUBIERTA
DE LA LUZ
Cambio de la bombilla del
horno.
Limpieza
Durante la limpieza, el horno se calienta a una temperatura
muy alta para quemar las manchas de alimentos. Las luces
del horno estarán apagadas.
Controles de conguración:
1 Toque QUICK START y, a continuación, seleccione
LIMPIAR. En los modelos profesionales, gire el mando
selector a MÁS y luego seleccione LIMPIAR en el panel
de control.
2 Retire previamente del horno las rejillas y sus guías y, a
continuación, pulse OK.
3 Pulse INICIO.
4 Pulse OFF para apagar el modo. En los modelos profe-
sionales, gire el mando seleccionar para OFF.
5 La puerta del horno se bloqueará y permanecerá blo-
queada hasta que nalice el ciclo de limpieza y la tempe-
ratura del horno se haya enfriado por debajo de 290ºC.
PRECAUCIÓN
Durante la limpieza, las supercies exteriores pueden
estar más calientes de lo habitual. Mantenga alejados
a los niños.
ページが読み込まれています...
ページが読み込まれています...
ページが読み込まれています...
ページが読み込まれています...
ページが読み込まれています...
ページが読み込まれています...
ページが読み込まれています...
ページが読み込まれています...
ページが読み込まれています...
ページが読み込まれています...
ページが読み込まれています...
ページが読み込まれています...
ページが読み込まれています...
ページが読み込まれています...
ページが読み込まれています...
ページが読み込まれています...
ページが読み込まれています...
ページが読み込まれています...
ページが読み込まれています...
ページが読み込まれています...
ページが読み込まれています...
ページが読み込まれています...
ページが読み込まれています...
ページが読み込まれています...
ページが読み込まれています...
ページが読み込まれています...
ページが読み込まれています...
ページが読み込まれています...
ページが読み込まれています...
ページが読み込まれています...
ページが読み込まれています...
ページが読み込まれています...
ページが読み込まれています...
ページが読み込まれています...
ページが読み込まれています...
ページが読み込まれています...
ページが読み込まれています...
ページが読み込まれています...
ページが読み込まれています...
ページが読み込まれています...
ページが読み込まれています...
ページが読み込まれています...
ページが読み込まれています...
ページが読み込まれています...
ページが読み込まれています...
ページが読み込まれています...
ページが読み込まれています...
ページが読み込まれています...
ページが読み込まれています...
ページが読み込まれています...
ページが読み込まれています...
ページが読み込まれています...
-
 1
1
-
 2
2
-
 3
3
-
 4
4
-
 5
5
-
 6
6
-
 7
7
-
 8
8
-
 9
9
-
 10
10
-
 11
11
-
 12
12
-
 13
13
-
 14
14
-
 15
15
-
 16
16
-
 17
17
-
 18
18
-
 19
19
-
 20
20
-
 21
21
-
 22
22
-
 23
23
-
 24
24
-
 25
25
-
 26
26
-
 27
27
-
 28
28
-
 29
29
-
 30
30
-
 31
31
-
 32
32
-
 33
33
-
 34
34
-
 35
35
-
 36
36
-
 37
37
-
 38
38
-
 39
39
-
 40
40
-
 41
41
-
 42
42
-
 43
43
-
 44
44
-
 45
45
-
 46
46
-
 47
47
-
 48
48
-
 49
49
-
 50
50
-
 51
51
-
 52
52
-
 53
53
-
 54
54
-
 55
55
-
 56
56
-
 57
57
-
 58
58
-
 59
59
-
 60
60
-
 61
61
-
 62
62
-
 63
63
-
 64
64
-
 65
65
-
 66
66
-
 67
67
-
 68
68
-
 69
69
-
 70
70
-
 71
71
-
 72
72


他の言語で
- italiano: Wolf M Series Guida utente
- español: Wolf M Series Guía del usuario
- Deutsch: Wolf M Series Benutzerhandbuch
- français: Wolf M Series Mode d'emploi
- Nederlands: Wolf M Series Gebruikershandleiding
関連論文
その他のドキュメント
-
 Chef POR663SCC ユーザーマニュアル
-
Fujioh FV-EL63 ユーザーマニュアル
-
WMF digitales BBQ-Thermometer BEEF 取扱説明書
-
-
Ariston FHR 540 (AN) CN S ユーザーガイド
-
Indesit FZ 62 C.1 IX CN ユーザーガイド
-
-
-
Indesit FH 51 IX CN S ユーザーガイド
-
