
PERSONAL HEARING SYSTEM
BELLMAN AUDIO DOMINO CLASSIC

291290
DE
DK
EN
ES
FI
FR
IT
JP
NL
PL
SE
SI-CN
TR-CN
APP
目錄
290 目錄
291 簡介
292 安全規則
295 盒內有什麼物品?
295 資料參考
297 開始
297 測試
299 如何使用 Bellman Audio
Domino Classic
300 標誌和提示符號
301 充電
302 接收器的使用
302 開啟接收器
302 音量設置
303 音調設置
303 發射器的使用
303開啟發射器
304 透過發射器接聽
304 再次透過接收器內置麥克風
接聽
305 關機
305 外部聲源
306 外部麥克風
306 聯合信號資源
307 無線數位傳輸
308 電量指示
308 與另一個發射器建立臨時連接
310 配件
312 簡單故障處理
314 Appendix
328
使用场合
336 Warranty conditons
Bellman Audio Domino Classic
個人聽力系統,BE2250/BE2270
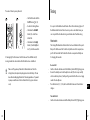
簡介
感謝您選擇 Bellman & Symfon 的產品。
Bellman Audio 是一個輔助聽力的系統,它由一組元件組成,可幫助您解
決在不同環境下的聽力難題。Bellman Audio 產品為許多人的日常生活
帶來簡便,並讓人們贏得自由追求興趣的空間。
組成 Bellman Audio Domino 的無線聽覺產品經過特殊改造,使您在各
種聽覺困難的環境下暢通無阻。採用最先進的數位通信技術、加密技術
和無線技術,為您提供極佳的音質、安全可靠的無線電信號傳輸和使用
本產品的極大自主性。通用的無線電波和簡單的電池充電器使產品能夠
在全球範圍內安全、簡便地使用。
在使用產品前請先通讀此說明書。
請參考配件和連接選擇的圖示。

293
DE
DK
EN
ES
FI
FR
IT
JP
NL
PL
SE
SI-CN
TR-CN
APP
292
安全規則
• 請閱讀這些指示。
• 請保管這些指示。
• 請注意所有警告事項。
• 請遵照所有指示。
• 請勿在靠近水的地方使用本設備。
• 僅使用乾布進行清潔。
• 請勿堵塞任何通風孔。請按照製造廠商的指示進行安裝。
• 請勿安裝在任何熱源附近,例如散熱器、熱調節器、火爐或其他可產生
熱量的設備(包括功率放大器)。
• 請勿使極性或接地型插頭喪失安全作用。極性插頭具有寬窄兩個插腳。
接地型插頭有兩個插腳和第三個用於接地的插腳。較寬的插腳或第三個
接地插腳具有安全保護作用。如果所提供的插頭不適合您的電源插座,
請與電工聯絡以更換舊電源插座。
• 防止踩踏或擠壓電源線,尤其是插頭、電源插座以及它們在設備上的出
口位置。
• 僅使用製造廠商指定的附件/配件。
• 在雷雨天氣或長時間不使用時,請拔下本設備的電源線。
• 如需各類維修服務,請諮詢合格的維修人員。如果本設備以任何方式遭
受損毀,均需進行維修。其中包括電源線或插頭損毀、液體濺入或物件
落 入 設 備 內 、本 設 備 遭 受 雨 淋 或 受 潮 、無 法 正 常 操 作 或 掉 落 。
請注意,BE2250 和 BE2270 Bellman Audio Domino Classic 個人聽
力系統不是助聽器。Bellman & Symfon 公 司 建 議 ,如 果 使 用 者 已 經
聽力損失請直接諮詢醫生。
警告!BE2250 和 BE2270 Bellman Audio Domino Classic 個人聽力
系統配備一個很強大的擴音器,如果操作不當,過度的音量可能
會引起不適,更嚴重者可能會損害聽力。因此,為了您的健康著
想,在佩戴耳機前請務必將音量調到最低。
警告!Bellman Audio Domino Classic 個人聽力系統由可充電的鋰
電子提供電量。因此,不要把電池暴露在火苗中或者直接對著陽
光 。電 池 只 能 由 Bellman & Symfon 的員工來更換並且只能更換同
一款電池。更換電池時的錯誤操作會有爆炸的危險。在第一次使
用之前,電池必須被充滿電。警告:電池只能在+5到+40攝氏度溫
度範圍內進行充電。
警告!Bellman Audio Domino Classic 個人聽力系統只能由
Bellman & Symfon 推薦的充電配件進行充電。

294 295
DE
DK
EN
ES
FI
FR
IT
JP
NL
PL
SE
SI-CN
TR-CN
APP
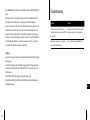
盒內有什麼物品?
盒內包括使用 Bellman Audio
Domino Classic 所需要的所有
物品。盒子內裏配有配件儲藏
處 放 置 配 件 。盒 內 包 含 :
A BE2250 接收器
B BE2270 發射器
C BE9147 旅行包
D 說明書
E BE9142 國 際 充 電 器 ,配 有 四 個
主要插頭
F BE9139 USB充 電 連 接 線 ,兩 條
G BE9135 帶 安 全 扣 的 掛 繩 ,兩 條
H BE9124 耳塞式耳機
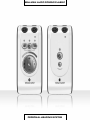
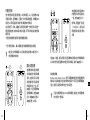
資料參考
接收器
1
接收器的內置麥克風
2
表示內置麥克風設定的LED
指示燈
3 電池狀態LED指示燈
綠 光 :開 啟 ,電 池 充 滿 電
閃爍綠光:開啟,電池電量低
閃爍橘光:開啟,電池耗盡,即
將自動關閉
橘 光 :正 在 充 電
4 表示通過發射器接聽的LED
指示燈
綠 光 :全 方 位 麥 克 風
綠 光 和 橘 光 :輸 入( 外 部 聲 源 )
5 選擇內置麥克風按鈕
警告!AC/DC適配器不能接觸到水或裝有液體的物品,如花瓶,不應放在
該聽力系統上。要切斷電源必須將AC/DC適配器插頭拔離電源插座。AC/
DC適配器插頭不能受阻,必須易於達到其預期用途。標識信息見AC/DC適
配器背面。
警告!該產品可能包含微小部件,為了您孩子的安全起見,請將其放置在兒
童接觸不到的地方。
這標誌表明,內置的電源設備絕不能把它當成是平常的生活垃圾。它應該
被投放到相應的電子設備或電器回收點。您可以從當地的政府、最近的回
收站或者您購買該產品的商店瞭解到更多的關於回收該產品的資訊。

296 297
DE
DK
EN
ES
FI
FR
IT
JP
NL
PL
SE
SI-CN
TR-CN
APP
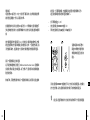
6 開關按鈕
7 選擇通過發射器接聽的按鈕
8 音量和音調LED指示燈
9 增加音量的按鈕
10 減少音量的按鈕
11 調低音的按鈕
12 調高音的按鈕
13 3.5毫米耳機插孔
14 充電插孔
15 夾子
發射器
16 發射器的內置麥克風
17 電池狀態LED指示燈
綠 光 :開 啟 ,電 池 充 滿 電
多 次 閃 爍 橘 光 和 綠 光 :一 個 外 部
聲源被接入
閃爍綠光:開啟,電池電量低
閃爍橘光:開啟,電池耗盡即將
自動關閉
橘 光 :正 在 充 電
18 開關按鈕
19 配對發射器和接收器的按鈕
20 2.5毫米外部聲源輸入插孔
21 充電插孔
22 夾子
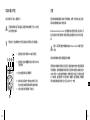
開始
測試
1 發射器和接收器都配有內置式可充電電池。在第一次使用本品前,發射
器和接收器的電池都必須充滿電。請使用配套的充電器。
2 在 耳 機 插 孔( 13)連上耳機,按住接收器上的開關按鈕
i
(6)約 2秒 ,開
啟接收器。試聽接收器上的麥克風並使用音量按鈕+或-(9或10)調 整
音量。
3 按住發射器上的開關按鈕(18)約 2秒,開啟發射器。按下外部聲源按鈕
(7)轉到通過發射器的麥克風接聽。外部聲源,譬如音樂,可以通過外
部 聲 源 輸 入 插 孔( 20)連接到發射器。
音量控制可調整音量。+和-(9和10)可以提高和降低音量,而音量和
音調LED指 示 燈( 8)會顯示聲級。越多的LED指示燈發亮表示音量越高。
音量設定後10秒,LED指示燈會熄滅。

299
DE
DK
EN
ES
FI
FR
IT
JP
NL
PL
SE
SI-CN
TR-CN
APP
298
音調的控制可以調節聲音的品質。>(12)和 <(11)可以提高降低音調。
音量和音調LED指 示 燈( 8)可以顯示音調的設置。音調設置後10秒,LED
指示燈會熄滅。
使用完畢,請通過開關按鈕
i
(6,18)關閉接收器和發射器,長按至電池
狀態LED指 示 燈( 3,17)熄 滅 。
如何使用Bellman Audio Domino Classic
Bellman Audio Domino Classic BE2250 和 BE2270 個人聽力系統經過專
門改造,給您高品質的聽覺感受。用 Bellman Audio Domino Classic 聽演
講和音樂,效果格外明顯。您可以使用接收器和發射器的內置麥克風或
者接入外部聲源。您可以使用配套的麥克風作為一個外部聲源或者用配
套的立體聲轉換線連接立體聲聲源。

300 301
DE
DK
EN
ES
FI
FR
IT
JP
NL
PL
SE
SI-CN
TR-CN
APP
充電
發射器和接收器都配有內置式可充電電池。在第一次使用本品前,發射
器和接收器的電池都必須充飽電。
Bellman Audio Domino Classic 包 含 鋰 電 池 和 通 用 充 電 器 ,適 合 歐 洲 、英
國、美國和澳大利亞使用的可替換插頭使產品適用於全球的大部分國
家。
警告:只能用配套的充電器或者是 Bellman & Symfon 的配件進行
充電。
按照本說明書的折疊式插頁圖連接充電器。
選擇適合本地區的充電插頭,連到壁上插座前請先檢查充電插頭是否與
充電器緊貼。當充電連線接到充電器時,發射器和接收器上的電池狀態
LED指示燈(3,17)會從綠光變成橘光,表明充電正在進行。充電完成大概
2.5小 時 以 後 ,指 示 燈 會 再 一 次 變 成 綠 光 ;關 機 時 ,指 示 燈 熄 滅 。充 電 器 可
同時為發射器和接收器充電,也可以為其中之一充電。
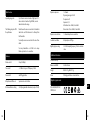
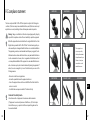
標誌和提示符號
说明书使用以下标志,图释如下:
三角警告號表示為了保證產品正確運作和特殊情況下的人身安全
所必須遵守的指示。
燈泡指示一些能幫助您充分利用產品的有用資訊(提示和建議)。
I 塗滿顏色的指示器表示LED指示燈長亮
II 塗滿顏色並有太陽圖案的指示器表示LED指
示燈閃爍
III 空白的圓圈表 示指 示燈關 閉
IV 如果按鈕必須按住一個指定的時間,則用
灰色的按鈕和指明所需時間的碼錶來表示
V 灰色的按鈕表示需要按下的按鈕
II
I
III
V
IV
5 s

302 303
DE
DK
EN
ES
FI
FR
IT
JP
NL
PL
SE
SI-CN
TR-CN
APP
接收器的使用
把 BE9122 Bellman 立體聲耳機,BE9159 Bellman 環頸線圈,BE9125
Bellman 立體聲聽筒,BE9124 Bellman 耳塞式耳機或者是其他 Bellman &
Symfon 推薦的聽力產品連接到右面的耳機輸出口(13)如本說明書折頁
式插圖所示。
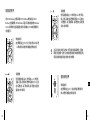
開啟接收器
按住開關按鈕
i
(6)約 3 秒 ,電 池 狀 態 LED指示燈
(3)開始閃爍,綠燈表明機器處於開啟狀態。
音量設置
使用音量控制鍵
+(9)來 升 高 或 -(10)來 降 低
音量。音量、音調的指示燈表明音量的大小。音量
越大亮燈越多。為了節省用電,指示燈會在音量設
置完成10秒內關閉。
音調設置
使用音調控制鍵<(11)來 降 低 或 >(12)來 升 高 音
調。音量、音調的指示燈表明音量的大小。音量越
大亮燈越多。為了節省用電,指示燈會在音调設置
完成10秒內關閉。
注意:接收器本身也可以作為一個可攜式的擴音器使用,但是如
果您配合發射器一起使用,您將會體現到前所未有的聽覺感受並
享受接收器和發射器為您提供的極大的便利。
發射器的使用
開啟發射器
按住開關按鈕
i
(18),電池狀態指示燈開始閃
爍,綠燈表示機器處於開啟狀態。

304 305
DE
DK
EN
ES
FI
FR
IT
JP
NL
PL
SE
SI-CN
TR-CN
APP
關機
使用完畢,可通過開關按
鈕
i
(6,18)關 閉 發 射 器 和
接收器。長按開關按鈕直
到電池狀態指示燈(3,17)
熄滅。
外部聲源
如果配備的音讯轉換線(在一端附有2.5毫米的插孔)或者外部的麥克
風被連接到發射器的外部聲源輸入插孔(20),發 射 器 的 內 置 麥 克 風 會
自動斷開連接,而外部設備的聲源將自動被選擇。電源狀態LED指示燈
顯示橘光,並閃爍幾次,以確認外部的聲源已連接。外部聲源LED指示燈
(4)將會同時亮起綠光和橘光來指示聲音屬於外部聲源。
如果外部聲源斷開連接,聲音將重新連接到發射器的內置麥克風。
用音頻轉換線連接發射器和電視、音響設備、MP3播放器或者類似的聲
源,您將體會到絕對一流的立體聲感受,並且不受電線約束。
輸入靈敏度會根據聲源類別自動進行調整。
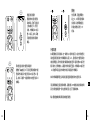
透過發射器接聽
要接聽來自發射器麥克
風 的 聲 音 ,可 按 下 接 收 器
上的R按 鈕( 7),輕 鬆
切 換 。外 部 聲 源 LED指示
燈( 4)長 亮 ,此 時 ,耳 機
可接聽發射器偵察到的
聲音。
再次透過接收器內置麥克風接聽
短暫按下M按 鈕( 5)可再次選擇接收器的內置
麥克風作為聲源。內置麥克風LED指 示 燈( 2)發
亮 ,此 時 ,耳 機 再 一 次 接 聽 到 來 自 內 置 麥 克 風( 1)
的聲音。
OFF
1 s
OFF
1 s

306 307
DE
DK
EN
ES
FI
FR
IT
JP
NL
PL
SE
SI-CN
TR-CN
APP
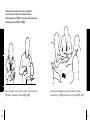
外部麥克風
把外部的麥克風連接到發射器上2.5毫米的插孔(20),電 池 狀 態 LED指
示燈顯示橘光,並閃爍幾次,已確認一項外部聲源被連接。外部聲源LED
指 示 燈( 4)同時亮起綠光和橘光表示聲音來自外部聲源。
在某些情況下,例如,演講者可以很輕易地攜帶一個外部麥克風並把一
個發射器放在他\她的衣袋裏來擴大音量,而不用大聲說話或者使用有
線麥克風。
一個發射器能夠把演講同時發射到幾個接收器。
一旦外部麥克風接入,輸入端靈敏度將自動調節到最適合的範圍。
請註意:當外部聲源插入時,發射器的電池狀態LED指 示 燈( 17)
交替閃爍綠光和橘光。
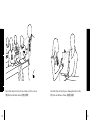
聯合信號資源
當接聽到來自發射器的麥
克風或者是外部聲源的聲
音時,這些聲音可以和接
收器內置的麥克風接收到
的 聲 音 聯 合 在 一 起 。按 下
R按 鈕( 7)選 擇 接 聽 來 自
發射器的聲音;按住M按
鈕( 5)知 道 M指 示 燈( 2)
和R指 示 燈( 4)齊 亮 。
來自發射器的聲音和來自
內置麥克風的聲音混合在
一 起 。按 住 M按 鈕( 5)
的同時,再通過按下按鈕<
(11)或 >(12),就 可 以 調
節發射器和接收器之間的
平衡。
短按R(7)按鈕,就可以輕鬆切換至接聽來自發射器或者外部聲源的聲
音。如果您想切換至接聽來自內置麥克風的聲音,請按下M按 鈕( 5)。
無線數位傳輸
Bellman Audio Domino Classic 使用了最新的無線通信技術通過數位傳
輸聲音,聲音具有超凡的音質就像來自於音響一樣。而且無線傳輸是加
密的,這樣可以保證高水準的安全性和保密性。
注 意 ,無 線 通 信 發 生 在 2.4GHz的頻率範圍,這是在全球範圍內都
允許使用的一個頻率。
2 s

308 309
DE
DK
EN
ES
FI
FR
IT
JP
NL
PL
SE
SI-CN
TR-CN
APP
的連接。一旦關閉接收器,它會重新與之前配對的發射器聯合工作。
建立接收器和發射器的臨時連接步驟如下:
• 按下開關按鈕
i
(6,18)
• 按住發射器上的CONNECT按 鈕( 19)
• 同時按住接收器上的M按鈕(5)和R按 鈕( 7)
音量和音調LED指示燈(8)
兩邊向中間部分滑動閃爍
表明臨時的連接已經成功
建立。
只有在發射器CONNECT按鈕被按下時,它才能和接收器連接。此步驟出
於安全性考慮,以防止發射器在毫無防備之下被其他接收器連接。
請注意:通過同樣的操作,您能夠很容易地用同一個發射器連接
電量指示
電池狀態LED指示燈(3,17) 在 一 般 狀 態 下 顯 示 綠 光 。這 表 明 機 器 處 於 開
啟狀態並且電量在一個令人滿意的水準。
當電量低的時候,電池狀態LED指 示 燈( 3,17)閃爍綠光直到電量差不
多耗盡時會變成橘光。在機器閃爍綠光時,請充電。電量耗盡將自動關
機。
當充電器連接到充電器插孔(14,21)的時候,機器將會自動充電。充電
的進度會同時在充電器和機器上用橘燈顯示出來。一旦電池充滿電,指
示燈會顯示綠光,並且電池會一直保持充電狀態直到充電器斷開連接。
與另一個發射器建立臨時連接
為了保 證 無 線 通信的 正常 運行,Bellman Audio Domino Classic 發射器和
接收器之間必須建立無線連接。為了方便入門,發射器和接收器總是成
對提供使用的。
無論何時,只要您想接聽來自另一個發射器的聲音,都要與之建立臨時
5 s
5 s

311
DE
DK
EN
ES
FI
FR
IT
JP
NL
PL
SE
SI-CN
TR-CN
APP
310
到多個接收器。然而,接收器的數量可能會影響該系統的正常運行。
配件
我公司可供應以下配件:
• BE9122 立體聲耳機
• BE9124 耳塞式耳機
• BE9125 立體聲聽筒
• BE9137 立體聲轉換線,1.5米的適配器,一邊是3.5毫米的插孔,
另一邊是RCA插頭
• BE9126 立體聲轉換線,5米( 16英尺)
• BE9136 帶夾子的麥克風
• BE9159 環頸線圈
• BE9141 豪華旅行包
• BE9143 USB汽車充電器
• BE1360 視頻轉換器
• BE2250 接收器
關於我公司的所有配件和更多最新配件的信息
請瀏覽網址:http://www.bellman.com

313
DE
DK
EN
ES
FI
FR
IT
JP
NL
PL
SE
SI-CN
TR-CN
APP
312
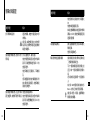
簡單故障處理
常見問題 解決
按下開關時没反應 連接充電器,檢查充電是否在10秒
內開始。
請 注 意 :如 果 充 電 沒 有 在 1 0 秒 內 開
始,請馬上斷開充電器連接並聯繫
最近的銷售商。
接 收 器 處 於 開 啟 狀 態 ,但 聽 不 到 任
何聲音
按下音量按钮(9),擴大音量。
檢查內置麥克風是否被選中作為聲
源,用手指輕輕觸碰麥克風(1)檢
查是否運作。
檢查耳機是否正確插入了耳機插
孔。
把耳機連接到其他的聲源設備(附
有3.5毫米的耳機插孔,檢查耳機是
否能夠正常運作。
接收器處於開啟狀態,並且外部聲
源已被選擇,依然聽不到任何聲音
檢查發射器是否開啟。
檢查外置麥克風是否被選中作為聲
源,用手指輕輕觸碰麥克風(16)檢
查是否運作。
常見問題 解決
檢查發射器是否處於使用範圍之
內。
檢查無線連接是否正確。
如果立體聲轉換線被連接到外部聲
源輸入口(20)請檢查聲源是否正確
連接到發射器
耳機裏的高音噪音 調低音量或者增大麥克風和耳機之
間的距離。
使麥克風遠離自己。
聲音很分散並且斷斷續續 接收器與發射器之間的距離太遠
了,把兩個機器靠近些。
不止一個接收器連接到發射器上並
且至少有一個接收器離發射器太
遠。
太多接收器連接到同一個發射器
上。
有太多2.4GH的發射器或者有太多
Domino在附近,彼此間互相影響。
請 註 意 :墻 壁 、水 泥 板 、金 屬 等 都 會
影響到接收範圍。

315
APP
314
Appendix
Settings
Bellman Audio Domino Classic has some settings that you cannot access in user
mode. Go into the Settings Menu to change settings that you do not normally
need to change.
Settings Menu
Start the Receiver Unit with the On/O button i (6) for about 3 seconds.
Hold down the On/O button i (6) and press the Volume Button -(10) within
1 second for at least 3 seconds.
You are now in Version Information mode.
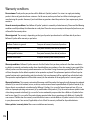
Version information
The product version information is presented here
via a pattern of lit and blinking LEDs. This internal
information is only intended as an aid for servicing
and support.
Pairing of units
The Transmitter and Receiver Units in the Bellman Audio Domino system must
have the radio link established in order for radio communication to operate. To
make it easier to get started, a Receiver Unit and a Transmitter Unit which are
paired together are always supplied so that they will work together.
Where you want to pair a Receiver Unit with a Transmitter Unit which is dier
-
ent from the Receiver Unit it was originally supplied with, you can do this in the
Settings Menu.

317
APP
316
Testing
It is easy to test the Bellman Audio Domino Classic Personal Hearing System. If
the Bellman Audio Domino Classic does not operate as described below, you
can carry out further troubleshooting as instructed under Troubleshooting.
How to test
The testing of Bellman Audio Domino Classic has been divided into three parts.
One part for the Receiver Unit for which only the Receiver Unit is required, one
part for the Transmitter Unit for which both units are required and nally one
for charging the two units.
Receiver Unit
• Switch on the unit and make sure that the Battery Status LED (3) lights up green.
• Connect the headphones to the Headphone Socket (13) and scrape carefully
on the round microphone (1) with your nger and check that there is a scraping
sound in the headphones.
• Press the buttons (9, 10, 11, 12) and check that the Volume and Tone Indicator
changes.
Transmitter Unit
• Switch on the unit and make sure that the Battery Status LED (17) lights up green.
Proceed as follows to pair up the units:
• Start both the units with the
On/O buttons i (6, 18).
• Go into the Settings Menu.
• Hold down the
CONNECT
button (19) on the Trans
-
mitter Unit.
• Hold down both the M
button (5) and the R but
-
ton (7) on the Receiver Unit.
A ”running light” on the Receiver Unit’s Volume and Tone LED Indicator (8)
moving towards the centre indicates that the link has been established.
Please note! If you pair up a Transmitter Unit and a Receiver Unit in the
Settings Menu, this replaces the pairing carried out in the factory. This can
be useful when changing a Transmitter Unit under guarantee or if you want
to pair up several Receiver Units to a Transmitter Unit (e.g. in a conference
room).
5 s
5 s

319
APP
318
• Press the R button (7) and make sure that the External Sound LED (4) lights up
green.
• Carefully scrape on the round microphone (16) on the Transmitter Unit with
your nger and check that there is a scraping sound in the headphones.
• Connect an external sound source to the External Sound Source Input (20) and
check that the sound from the sound source is heard in the headphones. The
External Sound Source Input (20) can be tested, for example, by connecting a
CD player or a radio to the input via an audio cable (accessory). The Transmitter
Unit automatically switches to an external sound source when a connector is
connected to the External Sound Source Input (20).
Charging
• Connect the charger to the mains socket and check that the LED on the charger
light up green.
• Connect the charging cables to both the charger and to the charging sockets
on the Receiver Unit and the Transmitter Unit (14, 21), see the fold-out section
of the manual.
• Check that the LED on the charger change from green to red.
• Check that the Battery Status LEDs on both the Transmitter Unit and Receiver
Unit light up orange.
Troubleshooting
Problem Solution
The Receiver Unit loses its link to the
Transmitter Unit when you switch o the
Receiver Unit.
Pair up the Receiver Unit and Transmitter
unit permanently in the Settings Menu.
Humming occurs when connecting the
stereo cable during charging.
Only use the charger supplied, BE9142.

321
APP
320
Technical information
Power supply
Battery power Internal Lithium-Ion type, 617 mAh, type NTA2617
CAUTION:
Danger of explosion if battery is incorrectly replaced.
Replace only with the same or equivalent type.
Operating time, fully charged 8-12 hours (standard battery)
Transmitter charging time 2.5 hours (standard battery)
Receiver charging time 2.5 hours (standard battery)
Input signals
Microphone Internal electret condenser type (omnidirectional)
External sound source input 2.5 mm stereo jack plug (0 dBV max input signal)
Automatically selects Aux. input or External mic.
Output signals
Headphone socket 3.5 mm stereo jack plug
Output power 100 mW @ 16 Ω load
Distortion BE9122 Headphones 0.6 % THD
BE9124 Ear Phones 0.08 % THD
Dynamic range 95 dB SNR (electrical)
Frequency range 40 – 10.000 Hz (electrical)
Max output level, saturation
BE9122 Headphones
BE9124 Ear Phones
BE9125 Stetoclips
BE2250: 124.3 dB SPL / BE2270: 124.3 dB SPL (@ 2.5 kHz)
BE2250: 132.0 dB SPL / BE2270: 130.5 dB SPL (@ 5 kHz)
BE2250: 133.7 dB SPL / BE2270: 133.6 dB SPL (@ 1 kHz)
Full on gain
BE9122 Headphones
BE9124 Ear Phones
BE9125 Stetoclips
(60 dB SPL input signal @ 1 kHz):
BE2250: 42.5 dB / BE2270: 44.0 dB
BE2250: 55.0 dB / BE2270: 57.5 dB
BE2250: 58.2 dB / BE2270: 64.2 dB
Full on gain
BE9122 Headphones
BE9124 Ear Phones
BE9125 Stetoclips
(60 dB SPL input signal, HFA):
BE2250: 46.5 dB / BE2270: 49.0 dB
BE2250: 51.5 dB / BE2270: 56.0 dB
BE2250: 52.0 dB / BE2270: 59.4 dB
Radio function
Digital radio technology 2.4 GHz frequency band, 3 channels
Co-exists with other equipment
Automatic channel selection
128 bits encryption
Topology Point-to-point or Point-to-multipoint
Diversity 2 antennas for reception, one antenna for transmission
(Rx + Rx/Tx)
Transmitting output power Max. 25 mW

323322
APP
Radio function
Operating range radio
The following may also aect
the performance
Up to 25 meters indoors clear line of sight, up to 100
meters outdoors clear line of sight. Walls, concrete
and metal reduce the range.
More than one Receiver is connected to a Transmitter
and at least one of the Receivers is too far away from
the Transmitter.
Too many Receivers are connected to the same Trans-
mitter.
Too many transmitters on 2.4 GHz or too many
Domino systems close to one another.
Features
Volume control 9 steps (5 dB/step)
Tone control +/- 10 dB in 9 steps, cut-o frequency 1.6 kHz
Power switch On/O toggle button
Microphone and RF-mode Separate mode select buttons
R/L-channel balance setting 0-20 dB programmable attenuation (in steps of 5 dB)
Dynamic compressor 10 channels
Dynamic gain range 0-35 dB
Compression 3:1
Expansion 1:1,5
Attack time 20 ms <3kHz, 25 ms ≥3kHz
Release time 110 ms <3kHz, 200 ms ≥3kHz
Dynamic noise reduction 10-channel adaptive noise reduction
Feedback cancellation Adaptive phase shift type
Digital signal processing 22.050 kHz sampling frequency, 16-bit resolution in
stereo
Additional information
For indoor use only.
Dimensions HxWxD 99 x 48 x 22 mm
Weight BE2250: 74 g, BE2270: 70 g
Colour White/grey with silver-coloured buttons.
Regulatory requirements
CE, RoHS, WEEE, FCC VOC,
FCC ID, C-tick

325324
APP
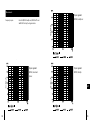
Measurements
Frequency response Acoustical (BE9122 Headphones, BE9124 Ear Phones
and BE9125 Stetoclips). See diagrams below.
Output signal with
BE9122, Stereo head
-
phones
Output signal with
BE9124, In-ear phones
Output signal with
BE9125, Stetoclips

327
APP
326
FCC compliance statement
This device complies with Part 15 of the FCC Rules. Operation is subject to the following two
conditions: (1) this device may not cause harmful interference, and (2) this device must accept
any interference received, including interference that may cause undesired operation.
Warning: Changes or modications to this unit not expressly approved by the party
responsible for compliance could void the user’s authority to operate the equipment.
Note: This equipment has been tested and found to comply with the limits for a Class
B digital device, pursuant to Part 15 of the FCC Rules. These limits are designed to pro-
vide reasonable protection against harmful interference in a residential installation.
This equipment generates, uses and can radiate radio frequency energy and, if not in-
stalled and used in accordance with the instructions, may cause harmful interference
to radio communications. However, there is no guarantee that interference will not
occur in a particular installation. If this equipment does cause harmful interference to
radio or television reception, which can be determined by turning the equipment o
and on, the user is encouraged to try to correct the interference by one or more of the
following measures:
• Reorient or relocate the receiving antenna.
• Increase the separation between the equipment and receiver.
• Connect the equipment into an outlet on a circuit dierent from that to which the
receiver is connected.
• Consult the dealer or an experienced radio/TV technician for help.
Statement for Industry Canada
Le fonctionnement de cet équipement est soumis aux conditions suivantes:
(1) l’équipement concerné ne doit pas causer d’interférences, et (2) il doit accepter
toute interférence reçue, y compris les interférences risquant d’engendrer un fonc-
tionnement indésirable.
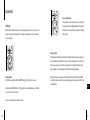
EAR PHONES HEADPHONES STETOCLIPS
SCART SWITCH CABLE KIT, 16 FEET CAR CHARGER
NECK LOOP MICROPHONE
These original acces-
sories are especially
developed to maximize
the performance of your
Domino. Contact your
nearest dealer or visit:
www.bellman.com
For Europe mainly
ページが読み込まれています...
ページが読み込まれています...
ページが読み込まれています...
ページが読み込まれています...
ページが読み込まれています...
-
 1
1
-
 2
2
-
 3
3
-
 4
4
-
 5
5
-
 6
6
-
 7
7
-
 8
8
-
 9
9
-
 10
10
-
 11
11
-
 12
12
-
 13
13
-
 14
14
-
 15
15
-
 16
16
-
 17
17
-
 18
18
-
 19
19
-
 20
20
-
 21
21
-
 22
22
-
 23
23
-
 24
24
-
 25
25


