
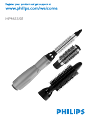
HP4653/01

2

3
1

4

HP4653/01
ENGLISH 6
INDONESIA 13
한국어 20
BAHASA MELAYU 27
ภาษาไทย 35
40
繁體中文 47
简体中文 53

6
Introduction
Congratulations on your purchase and welcome to Philips! To fully benet
from the support that Philips offers, register your product at www.philips.
com/welcome.
This new Philips Airstylist has been specially designed to give beautiful
styling results in a quick and easy way.
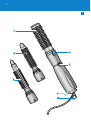
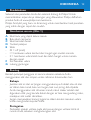
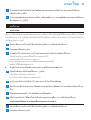
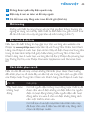
General description (Fig. 1)
A Retractable bristle brush
B Mixed bristle brush
C Large vent brush
D Release button
E Slide
O = off
I = gentle, warm airow for easy styling
II = stronger and warmer airow for fast styling
F Air inlet grille
G Hanging loop
Important
Read this user manual carefully before you use the appliance and save it
for future reference.
Danger
Keep the appliance away from water. Do not use it near or over
water contained in baths, washbasins, sinks etc. When you use the
appliance in a bathroom, unplug it after use. The proximity of water
presents a risk, even when the appliance is switched off.
Do not insert metal objects into the air inlet grille to avoid electric
shock.
Warning
Check if the voltage indicated on the appliance corresponds to the
local mains voltage before you connect the appliance.
Check the condition of the mains cord regularly. Do not use the
appliance if the plug, the mains cord or the appliance itself is damaged.
-
-
-
-
-
-
-
ENGLISH

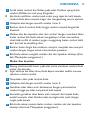
If the mains cord is damaged, you must have it replaced by Philips, a
service centre authorised by Philips or similarly qualied persons in
order to avoid a hazard.
This appliance is not intended for use by persons (including children)
with reduced physical, sensory or mental capabilities, or lack of
experience and knowledge, unless they have been given supervision
or instruction concerning use of the appliance by a person
responsible for their safety.
Children should be supervised to ensure that they do not play with
the appliance.
Caution
For additional protection, we advise you to install a residual current
device (RCD) in the electrical circuit that supplies the bathroom. This
RCD must have a rated residual operating current not higher than
30mA. Ask your installer for advice.
The attachments become hot during use. Prevent contact with the
skin.
Never block the air inlet grille.
If the appliance overheats, it switches off automatically. Unplug the
appliance and let it cool down for a few minutes. Before you switch
the appliance back on, check the grilles to make sure they are not
blocked by uff, hair, etc.
Always unplug the appliance after use.
Wait until the appliance has cooled down before you store it.
Always switch off the appliance before you put it down, even if it is
only for a moment.
Do not wind the mains cord round the appliance.
Do not use the appliance on articial hair.
Do not use the appliance for any other purpose than described in
this manual.
Never use any accessories or parts from other manufacturers or that
Philips does not specically recommend. If you use such accessories
or parts, your guarantee becomes invalid.
Keep the attachments clean and free of dust, dirt and styling products
such as mousse, spray and gel.
-
-
-
-
-
-
-
-
-
-
-
-
-
-
-
ENGLISH 7

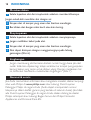
Electromagnetic elds (EMF)
This Philips appliance complies with all standards regarding
electromagnetic elds (EMF). If handled properly and according to the
instructions in this user manual, the appliance is safe to use based on
scientic evidence available today.
Preparing for use
Hair
Do not use the appliance on wet hair, dry your hair with a towel rst. The
Salon Airstylist is most effective on towel-dry hair.
1 Comb or brush the hair so that it is untangled and smooth.
2 Use a comb to divide the hair into locks.
Do not put too much hair in one lock.
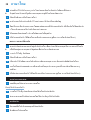
Connecting and disconnecting attachments
Do not insert the mains plug into the wall socket until after you have
connected the attachment.
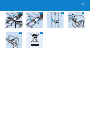
1 Connect the attachment to the styler by aligning the arrows on the
attachment with the arrows on the styler and pressing the
attachment home (‘click’) (Fig. 2).
2 To remove the attachment from the appliance, press the release
button (1) and pull the attachment in the direction of the arrow
(2). (Fig. 3)
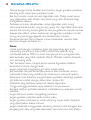
Using the appliance
Making curls
We advise you to perform a curl test to determine how long the brush
should be held in your hair to achieve a good result. Start with 8 to 10
seconds. You may have to hold the brush in your hair longer for tighter
curls. Less tight curls will require less than 8 seconds.
ENGLISH8

1 Snap the retractable bristle brush onto the appliance (see chapter
‘Preparing for use’).
2 Divide the hair into locks.
3 Take a lock of hair and wind it round the brush. Make sure the end
of the lock is wound in the required direction.
Do not wind too much hair round the brush at a time.
Do not wind a lock of hair more than twice round the brush.
The thinner the lock of hair, the tighter the curl will be.
Make sure the lock of hair is in contact with the barrel of the brush.
If you wind the hair at right angles to the scalp, you will give your
hair optimum lift and volume.
4 Switch the appliance on by selecting the preferred setting: (Fig. 4)
I: gentle airow for easy styling
II: warm airow for fast styling
5 Keep the brush in your hair until the hair is warm to the touch.
6 Switch the appliance off and remove the brush from your hair by
pressing the bristle retraction knob and turning it in the direction
of the arrows. (Fig. 5)
7 Letthecurlscooldownbeforecombing,brushingornger-
combingthehairtonishyourstyle.
8 Whenyouhavenishedcurling,switchtheapplianceoffand
remove the brush (see chapter ‘Preparing for use’).
Making shiny loose curls in short and medium-length hair
1 Snap the mixed bristle brush onto the appliance (see chapter
‘Preparing for use’).
2 Divide the hair into locks.
3 Take a lock of hair and wind it round the brush. Make sure the end
of the lock is wound in the required direction.
If you wind the hair at right angles to the scalp, you will give your
hair optimum lift and volume.
-
-
-
-
,
-
-
,
ENGLISH 9

4 Switch the appliance on by selecting setting I or II.
5 Keep the brush in your hair until the hair is warm to the touch.
6 Switch the appliance off and remove the brush from your hair by
unwindingthelockwhenyouhavenishedcurlingit.Tomakesure
the brush does not get tangled in the hair, you shouldn’t wind the
lock more than twice around the brush.
7 Letthecurlscooldownbeforecombing,brushingornger-
combingthehairtonishyourstyle.
8 Whenyouhavenishedcurling,switchtheapplianceoffand
remove the brush (see chapter ‘Preparing for use’).
Volume and shine
1 Snap the large vent brush onto the appliance to give your hair
maximum volume and shine.
Forlong-lastingresults,youcanapplysomemoussebeforestyling
your hair.
2 Place the brush in the hair.
3 Switch the appliance on by selecting setting I or II.
4 Move the brush against the direction of hair growth towards your
scalp until the brush pins touch your scalp
5 Then move the brush away from your head while turning the brush.
The hair will be lifted and will fall lightly back onto the head.
6 Whenyouhavenishedstylingyourhair,switchtheapplianceoff
and remove the brush (see chapter ‘Preparing for use’).
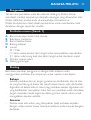
Cleaning
1
Always unplug the appliance before cleaning it.
Never rinse the appliance with water.
2 Put the appliance in a safe place and let it cool down.
3 Clean the appliance with a small brush or a dry cloth.
,
ENGLISH10

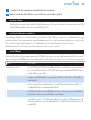
Storage
1
Always unplug the appliance before storing it.
2 Do not wind the mains cord round the appliance.
3 Put the appliance in a safe place and let it cool down.
4 The appliance can be stored by hanging it from its hanging
loop (Fig. 6).
Environment
Do not throw away the appliance with the normal household waste
at the end of its life, but hand it in at an ofcial collection point for
recycling. By doing this, you help to preserve the environment (Fig. 7).
Guarantee & service
If you need information or if you have a problem, please visit the Philips
website at www.philips.com or contact the Philips Customer Care
Centre in your country (you nd its phone number in the worldwide
guarantee leaet). If there is no Customer Care Centre in your country,
go to your local Philips dealer or contact the Service Department of
Philips Domestic Appliances and Personal Care BV.
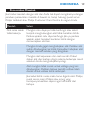
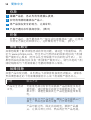
Troubleshooting
If problems should arise with the appliance and you are unable to solve
them by means of the troubleshooting guide below, please contact the
nearest Philips service centre or the Philips Customer Care Centre in you
country.
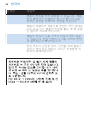
Problem Solution
The appliance
does not work
at all.
Perhaps the power supply is not working or the
socket to which the appliance has been connected is
not live. Check if the power supply is working. If it is,
check whether the socket is live by plugging in
another appliance.
-
ENGLISH 11

Problem Solution
Perhaps you failed to switch the appliance on. Make
sure the appliance is plugged in. Then switch it on by
selecting the preferred setting.
The appliance may have overheated and switched
itself off. Unplug the appliance and let it cool down
for a few minutes before you switch it on again.
The appliance may not be suitable for the voltage to
which it has been connected. Make sure that the
voltage selector has been set to the local mains
voltage.
If the mains cord is damaged, you must have it
replaced by Philips, a service centre authorised by
Philips or similarly qualied persons in order to avoid
a hazard.
ENGLISH12

13
Pendahuluan
Selamat atas pembelian Anda dan selamat datang di Philips! Untuk
memanfaatkan sepenuhnya dukungan yang ditawarkan Philips, daftarkan
produk Anda di www.philips.com/welcome.
Philips Airstylist yang baru ini dirancang untuk memberikan hasil penataan
yang indah dengan cepat dan mudah.
Gambaran umum (Gbr. 1)
A Sikat bulu yang dapat keluar-masuk
B Bulu sikat campuran
C Sikat bercelah besar
D Tombol pelepas
E Slide
O = off (mati)
I = hembusan udara lembut dan hangat agar mudah menata
II = hembusan udara lebih kuat dan lebih hangat untuk menata
dengan cepat
F Kisi masukan udara
G Lubang gantungan
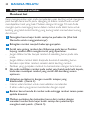
Penting
Bacalah petunjuk pengguna ini secara seksama sebelum Anda
menggunakan alat dan simpan untuk referensi di kemudian hari.
Bahaya
Jauhkan alat ini dari air. Jangan menggunakannya di dekat atau di atas
air dalam bak mandi, bak cuci tangan, bak cuci piring, dsb. Apabila
Anda menggunakan alat di kamar mandi, cabut steker setelah alat
digunakan. Alat yang berada dekat dengan air bisa mengundang risiko,
meskipun alat sudah dimatikan.
Jangan memasukkan barang logam ke dalam kisi-kisi masukan udara
untuk menghindari kejutan listrik.
Peringatan
Periksalah apakah voltase pada alat sesuai dengan voltase listrik di
rumah Anda, sebelum menghubungkan alat.
-
-
-
-
-
-
INDONESIA

Periksa kondisi kabel listrik secara teratur. Jangan menggunakan alat
apabila steker, kabel atau alat itu sendiri rusak.
Jika kabel listrik rusak, maka harus diganti oleh Philips, pusat servis
resmi Philips atau orang yang mempunyai keahlian sejenis agar
terhindar dari bahaya.
Alat ini tidak dimaksudkan untuk digunakan oleh orang (termasuk
anak-anak) dengan cacat sik, indera atau kecakapan mental yang
kurang, atau kurang pengalaman dan pengetahuan, kecuali jika mereka
diberikan pengawasan atau pengarahan mengenai penggunaan alat
oleh orang yang bertanggungjawab bagi keselamatan mereka.
Anak kecil harus diawasi untuk memastikan mereka tidak bermain-
main dengan alat ini.
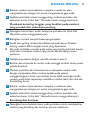
Hati-hati
Untuk perlindungan tambahan, kami sarankan agar Anda memasang
Residual Current Device (RCD) pada sirkuit listrik yang memasok
listrik ke kamar mandi. RCD ini harus memiliki arus operasi residu
terukur yang tidak boleh lebih dari 30 mA. Mintalah saran kepada
petugas yang memasang alat ini.
Piranti akan panas selama digunakan. Jangan sampai terkena kulit.
Jangan sekali-kali menghalangi kisi masukan udara.
Jika terlalu panas, alat akan mati secara otomatis. Cabut dan biarkan
dingin selama beberapa menit. Sebelum Anda menghidupkannya
kembali, periksa kisi-kisi untuk memastikannya tidak tersumbat bulu,
rambut, dll.
Selalu mencabut steker setiap kali selesai menggunakan alat.
Tunggulah sampai alat sudah dingin sebelum menyimpannya.
Selalu matikan alat sebelum diletakkan, walaupun hanya sebentar.
Jangan melilitkan kabel pada alat.
Jangan menggunakan alat pada rambut tiruan.
Jangan gunakan alat untuk keperluan selain yang diterangkan dalam
buku petunjuk ini.
Jangan sekali-kali menggunakan aksesori atau komponen apa pun dari
produsen lain atau yang tidak secara khusus direkomendasi oleh
Philips. Jika Anda menggunakan aksesori atau komponen tersebut,
jaminan Anda menjadi batal.
-
-
-
-
-
-
-
-
-
-
-
-
-
-
-
INDONESIA14

Jagalah perlengkapan agar selalu bersih, bebas debu, dan tidak kotor
juga produk penata seperti mousse, semprotan dan gel.
Medan elektromagnet (EMF)
Alat Philips ini mematuhi semua standar yang berkenaan dengan medan
elektromagnet (EMF). Jika ditangani sebagaimana layaknya dan sesuai
dengan petunjuk pengguna ini, alat tersebut aman digunakan menurut
bukti ilmiah yang kini tersedia.
Persiapan penggunaan
Rambut
Jangan gunakan alat pada rambut basah, keringkan dulu rambut Anda
dengan handuk. Salon Airstylist paling efektif pada rambut yang telah
dikeringkan dengan handuk.
1 Sisir atau sikat rambut sehingga tidak kusut lagi dan menjadi halus.
2 Gunakansisiruntukmembelah-belahrambutdandijadikan
beberapa ikatan.
Jangan terlalu banyak rambut dalam satu ikatan.
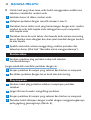
Menghubungkan dan melepaskan piranti
Jangan tancapkan steker ke stopkontak dinding hingga Anda
menghubungkan perlengkapannya.
1 Pasang perlengkapan ke alat penata dengan mensejajarkan panah
pada perlengkapan dengan panah pada alat penata dan menekan
rumah perlengkapan tersebut (‘klik’) (Gbr. 2).
2 Untuk melepaskan perlengkapan dari alat, tekan tombol pelepas (1)
dan tarik perlengkapan searah panah (2). (Gbr. 3)
Menggunakan alat
Membuat ikal
Kami sarankan Anda melakukan tes mengikal rambut untuk menentukan
berapa lama harus menahan sikat pada rambut agar hasilnya bagus.
-
INDONESIA 15

Mulailah dengan 8 hingga 10 detik. Untuk ikal keriting, Anda mungkin
harus menahan sikat lebih lama pada rambut agar ikalan lebih kecil. Ikal
yang tidak terlalu keriting memerlukan waktu kurang dari 8 detik.
1 Pasang bulu sikat yang dapat ditarik pada alat (lihat bab ‘Menyiapkan
penggunaan’).
2 Bagilah rambut menjadi beberapa ikatan.
3 Ambil seikat rambut dan lilitkan pada sikat. Pastikan ujung ikatan
rambut dililitkan ke arah yang diinginkan.
Jangan terlalu banyak melilitkan rambut pada sikat setiap kali.
Jangan melilitkan ikatan rambut pada sikat lebih dari dua kali.
Semakin tipis ikatan rambut, semakin keriting ikalnya.
Pastikan ikatan rambut bersinggungan dengan laras sikat.
Jika Anda melilitkan rambut pada sudut yang tepat ke kulit kepala,
rambut Anda akan menjadi megar dan mengembang secara optimal.
4 Hidupkan alat dengan memilih penyetelan yang diinginkan: (Gbr. 4)
I: aliran udara lembut untuk memudahkan penataan
II: aliran udara hangat untuk penataan rambut yang cepat
5 Biarkan sikat di rambut Anda hingga rambut menjadi hangat bila
disentuh.
6 Matikan alat dan lepaskan sikat dari rambut dengan menekan kenop
penarik sikat dan memutarnya searah panah. (Gbr. 5)
7 Biarkan ikalan dingin dulu sebelum menyisir, menyikat atau menyisir
rambut dengan tangan untuk menuntaskan penataan.
8 Bila Anda selesai mengikal, matikan alat dan lepaskan sikatnya (lihat
bab ‘Menyiapkan penggunaan’).
Membuat ikalan longgar menjadi bersinar untuk rambut
pendek dan sedang
1 Pasang bulu sikat campuran pada alat (lihat bab ‘Menyiapkan
penggunaan’).
2 Bagilah rambut menjadi beberapa ikatan.
-
-
-
-
,
-
-
INDONESIA16

3 Ambil seikat rambut dan lilitkan pada sikat. Pastikan ujung ikatan
rambut dililitkan ke arah yang diinginkan.
Jika Anda melilitkan rambut pada sudut yang tepat ke kulit kepala,
rambut Anda akan menjadi megar dan mengembang secara optimal.
4 Hidupkan alat dengan memilih setelan I atau II:
5 Biarkan sikat di rambut Anda hingga rambut menjadi hangat bila
disentuh.
6 Matikan alat dan lepaskan sikat dari rambut dengan membuka lilitan
ikatan rambut bila Anda selesai mengikalnya. Untuk memastikan
sikat tidak terlilit di rambut, jangan menggulung ikatan rambut lebih
dari dua kali ke sekeliling sikat.
7 Biarkan ikalan dingin dulu sebelum menyisir, menyikat atau menyisir
rambut dengan tangan untuk menuntaskan penataan.
8 Bila Anda selesai mengikal, matikan alat dan lepaskan sikatnya (lihat
bab ‘Menyiapkan penggunaan’).
Mekar dan kemilau
1 Pasang sikat bercelah besar pada alat untuk membuat rambut Anda
mekar dan kemilau.
Agar hasilnya bertahan lama, Anda dapat memakai sedikit mousse
sebelum menata rambut.
2 Tempatkan sikat pada rambut Anda.
3 Hidupkan alat dengan memilih setelan I atau II:
4 Gerakkan sikat dalam arah berlawanan dengan pertumbuhan
rambut hingga pin sikat menyentuh kulit kepala
5 Kemudian gerakkan sikat dalam arah menjauh dari kepala Anda
sambil memutar sikat. Rambut akan terangkat dan jatuh dengan
ringan pada kepala.
6 Bila Anda selesai menata ikalan rambut, matikan alat dan lepaskan
sikatnya (lihat bab ‘Menyiapkan penggunaan’).
,
,
INDONESIA 17

Membersihkan
1
Selalu lepaskan alat dari stopkontak sebelum membersihkannya.
Jangansekali-kalimembilasalatdenganair.
2 Simpan alat di tempat yang aman dan biarkan mendingin.
3 Bersihkan alat dengan sikat kecil atau kain kering.
Penyimpanan
1
Selalu lepaskan alat dari stopkontak sebelum menyimpannya.
2 Jangan melilitkan kabel pada alat.
3 Simpan alat di tempat yang aman dan biarkan mendingin.
4 Alat dapat disimpan dengan menggantungnya pada lubang
gantungan (Gbr. 6).
Lingkungan
Jangan membuang alat bersama limbah rumah tangga biasa jika alat
sudah tidak bisa dipakai lagi, tetapi serahkan ke tempat pengumpulan
barang bekas yang resmi untuk didaur ulang. Dengan melakukan hal
ini, Anda ikut membantu melestarikan lingkungan. (Gbr. 7)
Garansi & servis
Jika Anda memerlukan informasi atau mengalami masalah, silakan kunjungi
situs web Philips di www.philips.com atau hubungi Pusat Layanan
Pelanggan Philips di negara Anda (Anda dapat memperoleh nomor
teleponnya dalam leaet garansi yang berlaku di seluruh dunia). Jika tidak
ada Pusat Layanan Pelanggan di negara Anda, silakan datang ke dealer
Philips setempat atau hubungi Bagian Servis dari Philips Domestic
Appliances and Personal Care BV.
-
INDONESIA18

Pemecahan Masalah
Jika timbul masalah dengan alat dan Anda tak dapat mengatasinya dengan
panduan pemecahan masalah di bawah ini, harap hubungi pusat servis
Philips terdekat atau Philips Customer Care Centre di negara Anda.
Masalah Solusi
Alat sama sekali
tidak bekerja.
Mungkin catu dayanya tidak berfungsi atau soket
tempat menghubungkan alat tidak beraliran listrik.
Periksa apakah catu daya berfungsi. Jika ya, periksa
apakah soket tersebut beraliran listrik dengan
menancapkan alat lain.
Mungkin Anda gagal menghidupkan alat. Pastikan alat
sudah dihubungkan ke listrik. Kemudian hidupkan alat
dengan memilih setelan yang diinginkan.
Mungkin alat kepanasan dan mati sendiri. Cabut
steker alat dan biarkan dingin selama beberapa menit
sebelum Anda menghidupkannya lagi.
Alat mungkin tidak cocok untuk voltage yang kini
dihubungkan. Pastikan bahwa pemilih voltase telah
disetel untuk voltase listrik setempat.
Jika kabel listrik rusak, maka harus diganti oleh Philips,
pusat servis resmi Philips atau orang yang
mempunyai keahlian sejenis agar terhindar dari
bahaya.
INDONESIA 19

20
제품 소개
필립스 제품을 구입해 주셔서 감사합니다! 필립스가 드리는 지원
혜택을 받으실 수 있도록 www.philips.com/welcome에서 제품
을 등록하십시오.
신제품 필립스 에어스타일리스트는 아름다운 헤어 스타일링을
빠르고 쉽게 연출할 수 있도록 특별히 제작되었습니다.
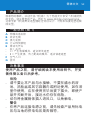
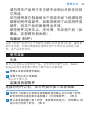
각 부의 명칭 (그림 1)
A 출입형 롤 브러시
B 혼합형 브러시
C 대형 브러시
D 열림 버튼
E 슬라이드
O = 꺼짐
I = 손쉬운 스타일링을 위한 부드러운 바람
II = 빠른 스타일링을 위한 따뜻하고 강력한 바람
F 공기 흡입구 그릴
G 걸고리
중요사항
본 제품을 사용하기 전에 이 사용 설명서를 주의 깊게 읽고 나중
에 참조할 수 있도록 잘 보관하십시오.
위험
본 제품은 물이 닿지 않는 곳에 보관하십시오. 본 제품을 욕
조, 세면대 또는 싱크대와 같이 물 가까이에서 사용하지 마십
시오. 욕실에서 사용할 경우 사용 후에는 반드시 전원 플러그
를 뽑으십시오. 전원이 꺼져 있더라도 물에 닿으면 위험할 수
있습니다.
감전 사고를 막으려면 공기 흡입구 그릴에 금속 물질을 삽입
하지 마십시오.
경고
제품에 전원을 연결하기 전에, 제품에 표시된 전압과 사용 지
역의 전압이 일치하는지 확인하십시오.
-
-
-
-
-
-
한국어
ページが読み込まれています...
ページが読み込まれています...
ページが読み込まれています...
ページが読み込まれています...
ページが読み込まれています...
ページが読み込まれています...
ページが読み込まれています...
ページが読み込まれています...
ページが読み込まれています...
ページが読み込まれています...
ページが読み込まれています...
ページが読み込まれています...
ページが読み込まれています...
ページが読み込まれています...
ページが読み込まれています...
ページが読み込まれています...
ページが読み込まれています...
ページが読み込まれています...
ページが読み込まれています...
ページが読み込まれています...
ページが読み込まれています...
ページが読み込まれています...
ページが読み込まれています...
ページが読み込まれています...
ページが読み込まれています...
ページが読み込まれています...
ページが読み込まれています...
ページが読み込まれています...
ページが読み込まれています...
ページが読み込まれています...
ページが読み込まれています...
ページが読み込まれています...
ページが読み込まれています...
ページが読み込まれています...
ページが読み込まれています...
ページが読み込まれています...
ページが読み込まれています...
ページが読み込まれています...
ページが読み込まれています...
ページが読み込まれています...
ページが読み込まれています...
ページが読み込まれています...
ページが読み込まれています...
ページが読み込まれています...
-
 1
1
-
 2
2
-
 3
3
-
 4
4
-
 5
5
-
 6
6
-
 7
7
-
 8
8
-
 9
9
-
 10
10
-
 11
11
-
 12
12
-
 13
13
-
 14
14
-
 15
15
-
 16
16
-
 17
17
-
 18
18
-
 19
19
-
 20
20
-
 21
21
-
 22
22
-
 23
23
-
 24
24
-
 25
25
-
 26
26
-
 27
27
-
 28
28
-
 29
29
-
 30
30
-
 31
31
-
 32
32
-
 33
33
-
 34
34
-
 35
35
-
 36
36
-
 37
37
-
 38
38
-
 39
39
-
 40
40
-
 41
41
-
 42
42
-
 43
43
-
 44
44
-
 45
45
-
 46
46
-
 47
47
-
 48
48
-
 49
49
-
 50
50
-
 51
51
-
 52
52
-
 53
53
-
 54
54
-
 55
55
-
 56
56
-
 57
57
-
 58
58
-
 59
59
-
 60
60
-
 61
61
-
 62
62
-
 63
63
-
 64
64


