
Not for
Reproduction
BRIGGS & STRATTON CORPORATION
MILWAUKEE, WISCONSIN, U.S.A.
Manual No. 381491GS Revision D
GS2500/GS4000/GS6500/GS6500E
Portable Generator/ Gerador Portátil/Generador portátil/
可擕式發電機
/휴대용 발전기
Operator’s Manual/ Manual do Operador/Manual de instrucciones/
操作員手冊
/작동 설명서

Not for
Reproduction
2 BRIGGSandSTRATTON.COM
2
B
A
4
A
3
A
5
A
B
C
1
B
D
F
T
S
L
G
H
U
C
K
P
N A
M
E
R
J

Not for
Reproduction
3 3
6
87
9
10
11
12
C
B
A
A
A
A

Not for
Reproduction
4 BRIGGSandSTRATTON.COM4 BRIGGSandSTRATTON.COM
Thank you for purchasing this quality-built Briggs & Stratton® generator. We are pleased that you’ve placed your confidence in the Briggs & Stratton brand. When operated and
maintained according to the instructions in this manual, your Briggs & Stratton generator will provide many years of dependable service.
This manual contains safety information to make you aware of the hazards and risks associated with generators and how to avoid them. This generator is designed and intended only
for supplying electrical power for operating compatible electrical lighting, appliances, tools and motor loads, and is not intended for any other purpose. It is important that you read
and understand these instructions thoroughly before attempting to start or operate this equipment. Save these original instructions for future reference.
This generator requires final assembly before use. Refer to the Assembly section of this manual for instructions on final assembly procedures. Follow the instructions completely.
Where to Find Us
You never have to look far to find Briggs & Stratton support and service for your generator. There are thousands of Briggs & Stratton authorized service dealers worldwide who
provide quality service. You can also find the nearest Authorized Service Dealer in our dealer locator map on the Internet at BRIGGSandSTRATTON.COM.
Table of Contents
Operator Safety . .. . .. . .. . .. . .. . .. . .. . .. . .. . .. . .. . .. . .5
Equipment Description .. . . .. . . .. . . .. . . .. . . .. . . .. . . .. . . .. . . .. . . .. . . .. . . 5
Important Safety Information ..........................................5
Assembly ...........................................7
Unpack Generator. .. . . .. . . .. . . .. . . .. . . .. . . .. . . .. . . .. . . .. . . .. . . .. . . .. . . 7
Add Engine Oil........................................................7
Add Fuel . .. . . .. . . .. . . .. . . .. . . .. . . .. . . .. . . .. . . .. . . .. . . .. . . .. . . .. . . .. . . 7
Attach Negative Battery Cable ..........................................7
Features and Controls. . .. . .. . .. . .. . .. . .. . .. . .. . .. . .. . .7
Battery Charger .......................................................7
Operation ...........................................8
Grounding Fastener ...................................................8
Generator Location....................................................8
Starting the Engine....................................................8
Connecting Electrical Loads .. . . .. . . .. . . .. . . .. . . .. . . .. . . .. . . .. . . .. . . .. . . 8
Stopping the Engine ..................................................9
Low Oil Shutdown .. . . .. . . .. . . .. . . .. . . .. . . .. . . .. . . .. . . .. . . .. . . .. . . .. . . 9
Cold Weather Operation................................................9
Don’t Overload Generator. . .. . . .. . . .. . . .. . . .. . . .. . . .. . . .. . . .. . . .. . . .. . 10
Maintenance .. . .. . .. . .. . .. . .. . .. . .. . .. . .. . .. . .. . .. .11
Maintenance Schedule. .. . . .. . . .. . . .. . . .. . . .. . . .. . . .. . . .. . . .. . . .. . . .. . 11
Generator Maintenance .. . . .. . . .. . . .. . . .. . . .. . . .. . . .. . . .. . . .. . . .. . . .. . 11
Battery Maintenance .................................................11
Fuel Valve Maintenance ...............................................11
Engine Maintenance. . . .. . . .. . . .. . . .. . . .. . . .. . . .. . . .. . . .. . . .. . . .. . . .. . 12
Storage. . .. . . .. . . .. . . .. . . .. . . .. . . .. . . .. . . .. . . .. . . .. . . .. . . .. . . .. . . .. . 13
Troubleshooting .. . .. . .. . .. . .. . .. . .. . .. . .. . .. . .. . .. .14
Specifications ......................................14
Product Specifications. .. . . .. . . .. . . .. . . .. . . .. . . .. . . .. . . .. . . .. . . .. . . .. . 14
Common Service Parts .. . . .. . . .. . . .. . . .. . . .. . . .. . . .. . . .. . . .. . . .. . . .. . 14
Warranties. . .. . .. . .. . .. . .. . .. . .. . .. . .. . .. . .. . .. . .. .15
Generator Owner Warranty. .. . . .. . . .. . . .. . . .. . . .. . . .. . . .. . . .. . . .. . . .. . 15
Copyright © 2017 Briggs & Stratton Corporation
Milwaukee, WI, USA. All rights reserved.
ORIGINAL INSTRUCTIONS
Generator
Model Number
Revision
Serial Number
Date Purchased
Engine
Model Number
Type Number
Code Number

Not for
Reproduction
5 5
Operator Safety
Equipment Description
Read this manual carefully and become familiar with your generator.
Know its applications, its limitations and any hazards involved.
Every effort has been made to ensure that the information in this manual is both
accurate and current. However, the manufacturer reserves the right to change, alter
or otherwise improve the generator and this documentation at any time without prior
notice.
Important Safety Information
The manufacturer cannot possibly anticipate every possible circumstance that might
involve a hazard. The warnings in this manual, and the tags and decals affixed to the
unit are, therefore, not all-inclusive. If you use a procedure, work method or operating
technique that the manufacturer does not specifically recommend, you must satisfy
yourself that it is safe for you and others. You must also make sure that the procedure,
work method or operating technique that you choose does not render the generator
unsafe.
Safety Symbols and Meanings
The safety alert symbol indicates a potential personal injury hazard. A signal word
(DANGER, WARNING, or CAUTION) is used with the alert symbol to designate a
degree or level of hazard seriousness. A safety symbol may be used to represent the
type of hazard. The signal word NOTICE is used to address practices not related to
personal injury.
DANGER indicates a hazard which, if not avoided, will result in death or serious
injury.
WARNING indicates a hazard which, if not avoided, could result in death or
serious injury.
CAUTION indicates a hazard which, if not avoided, could result in minor or
moderate injury.
NOTICE address practices not related to personal injury.
WARNING POISONOUS GAS HAZARD. Engine exhaust contains carbon
monoxide, a poisonous gas that could kill you in minutes. You CANNOT
see it, smell it, or taste it. Even if you do not smell exhaust fumes, you
could still be exposed to carbon monoxide gas. If you start to feel sick,
dizzy or weak while using this product, shut it off and get to fresh air
RIGHT AWAY. See a doctor. You may have carbon monoxide poisoning.
• Operate this product ONLY outside far away from windows, doors and vents to
reduce the risk of carbon monoxide gas from accumulating and potentially being
drawn towards occupied spaces.
• Install battery-operated carbon monoxide alarms or plug-in carbon monoxide
alarms with battery back-up according to the manufacturer’s instructions. Smoke
alarms cannot detect carbon monoxide gas.
• DO NOT run this product inside homes, garages, basements, crawlspaces,
sheds, or other partially-enclosed spaces even if using fans or opening doors and
windows for ventilation. Carbon monoxide can quickly build up in these spaces
and can linger for hours, even after the product has shut off.
• ALWAYS place this product downwind and point the engine exhaust away from
occupied spaces.
WARNING Starter cord kickback (rapid retraction) will pull hand and arm
toward engine faster than you can let go which could cause broken
bones, fractures, bruises, or sprains resulting in serious injury.
• When starting engine, pull cord slowly until resistance is felt and then pull rapidly
to avoid kickback.
• NEVER start or stop engine with electrical devices plugged in and turned on.
WARNING
Generator voltage could cause electrical shock or burn resulting
in death or serious injury.
• Use approved transfer equipment to prevent backfeed by isolating generator from
electric utility workers.
• When using generator for backup power, notify utility company.
• Use a residual-current device (RCD) in any damp or highly conductive area, such
as metal decking or steel work.
• DO NOT touch bare wires or receptacles.
• DO NOT use generator with electrical cords which are worn, frayed, bare or
otherwise damaged.
• DO NOT operate generator in the rain or wet weather.
• DO NOT handle generator or electrical cords while standing in water, while
barefoot, or while hands or feet are wet.
• DO NOT allow unqualified persons or children to operate or service generator.
Suffocation
Fire
Toxic Fumes
Explosion
Electrical
Shock
Kickback
Suffocation
Operator’s
Manual
Moving Parts Flying Objects
Hot Surface
Heavy Objects
Carbon
Monoxide Alarm
Alarm Bonded to
Ground
Ground
Terminal
Choke Run
Off On
Volt Meter Oil Level Fuel Start
Circuit Breaker Engine Control Do Not Start
Engine
!

Not for
Reproduction
6 BRIGGSandSTRATTON.COM6 BRIGGSandSTRATTON.COM
NOTICE
Exceeding generators wattage/amperage capacity could damage generator
and/or electrical devices connected to it.
• DO NOT exceed the generator’s wattage/amperage capacity. See Don’t Overload
Generator in the Operation section.
• Start generator and let engine stabilize before connecting electrical loads.
• Connect electrical loads in OFF position, then turn ON for operation.
• Turn electrical loads OFF and disconnect from generator before stopping
generator.
NOTICE
Improper treatment of generator could damage it and shorten its life.
• Use generator only for intended uses.
• If you have questions about intended use, ask dealer or contact local service
center.
• Operate generator only on level surfaces.
• DO NOT expose generator to excessive moisture, dust, dirt, or corrosive vapors.
• DO NOT insert any objects through cooling slots.
• If connected devices overheat, turn them off and disconnect them from
generator.
• Shut off generator if:
-electrical output is lost;
-equipment sparks, smokes, or emits flames;
-unit vibrates excessively.
WARNING Fuel and its vapors are extremely flammable and explosive which
could cause burns, fire or explosion resulting in death,
serious injury and/or property damage.
WHEN ADDING OR DRAINING FUEL
• Turn generator engine OFF and let it cool at least 2 minutes before removing fuel
cap. Loosen cap slowly to relieve pressure in tank.
• Fill or drain fuel tank outdoors.
• DO NOT overfill tank. Allow space for fuel expansion.
• If fuel spills, wait until it evaporates before starting engine.
• Keep fuel away from sparks, open flames, pilot lights, heat, and other ignition
sources.
• Check fuel lines, tank, cap and fittings frequently for cracks or leaks. Replace if
necessary.
• DO NOT light a cigarette or smoke.
WHEN STARTING EQUIPMENT
• Ensure spark plug, muffler, fuel cap, and air cleaner are in place.
• DO NOT crank engine with spark plug removed.
WHEN OPERATING EQUIPMENT
• DO NOT operate this product inside any building, carport, porch, mobile
equipment, marine applications, or enclosure.
• DO NOT tip engine or equipment at angle which causes fuel to spill.
• DO NOT stop engine by moving choke control to “Choke” position (
).
WHEN TRANSPORTING, MOVING OR REPAIRING EQUIPMENT
• Transport/move/repair with fuel tank EMPTY or with fuel shutoff valve OFF.
• DO NOT tip engine or equipment at angle which causes fuel to spill.
• Disconnect spark plug wire.
WHEN STORING FUEL OR EQUIPMENT WITH FUEL IN TANK
• Store away from furnaces, stoves, water heaters, clothes dryers, or other
appliances that have pilot light or other ignition source because they could ignite
fuel vapors.
WARNING Exhaust heat/gases could ignite combustibles, structures or
damage fuel tank causing a fire, resulting in death, serious
injury and/or property damage.
Contact with muffler area could cause burns resulting in
serious injury.
• DO NOT touch hot parts and AVOID hot exhaust gases.
• Allow equipment to cool before touching.
• Keep at least 1.5m (5ft.) of clearance on all sides of generator including overhead.
• Contact the original equipment manufacturer, retailer, or dealer to obtain a spark
arrester designed for the exhaust system installed on this engine.
• Replacement parts must be the same and installed in the same position as
the original parts.
WARNING Unintentional sparking could cause fire or electric shock resulting
in death or serious injury.
WHEN ADJUSTING OR MAKING REPAIRS TO YOUR GENERATOR
• Disconnect the spark plug wire from the spark plug and place the wire where it
cannot contact spark plug.
WHEN TESTING FOR ENGINE SPARK
• Use approved spark plug tester.
• DO NOT check for spark with spark plug removed.
WARNING Starter and other rotating parts could entangle hands, hair,
clothing, or accessories resulting in serious injury.
• NEVER operate generator without protective housing or covers.
• DO NOT wear loose clothing, jewelry or anything that could be caught in the
starter or other rotating parts.
• Tie up long hair and remove jewelry.
CAUTION Excessively high operating speeds could result in minor injury
and/or generator damage.
Excessively low speeds impose a heavy load.
• DO NOT tamper with governor spring, links or other parts to increase engine
speed.
• DO NOT modify generator in any way.

Not for
Reproduction
7 7
Assembly
Your generator is ready for use after it has been properly serviced with the
recommended fuel and oil.
If you have any problems with the servicing of your generator, contact your local Briggs
& Stratton service center. If you need assistance, please have the model, revision, and
serial number from the identification label available. See Features and Controls for
identification label location.
Unpack Generator
1. Set the carton on a rigid, flat surface.
2. Remove everything from carton.
3. Open carton completely by cutting each corner from top to bottom.
Add Oil Figure
2
4
1. Place generator on a level surface.
2. Clean the oil fill area of any debris.
3. To add oil, pour the oil slowly into the engine oil fill (4,A).
4. Remove the dipstick (2,A) and wipe with a clean cloth.
5. Insert the dipstick but do not screw in. Oil level should be at FULL mark (2,B).
Add oil if needed to reach FULL mark.
6. Replace and tighten the dipstick.
NOTICE
Improper treatment of generator could damage it and shorten its life.
• DO NOT attempt to crank or start the engine before it has been properly
serviced with the recommended oil. This could result in an engine failure.
Add Fuel Figure
1
3
Fuel must meet these requirements:
• Clean, fresh, unleaded petrol.
• A minimum of 87 octane/87 AKI (91 RON). For high altitude use, see High Altitude.
• Petrol with up to 10% ethanol (gasohol) is acceptable.
NOTICE Do not use unapproved gasolines, such as E15 and E85. Do not mix oil in
gasoline or modify the engine to run on alternate fuels. Use of unapproved fuels will
damage the engine components and void the engine warranty.
To protect the fuel system from gum formation, mix a fuel stabilizer into the fuel. See
Storage. All fuel is not the same. If starting or performance problems occur, change
fuel providers or change brands. This engine is certified to operate on gasoline. The
emissions control system for this engine is EM (Engine Modifications).
1. Clean area around fuel fill cap, remove cap.
2. Slowly add unleaded fuel to fuel tank (1,C). Be careful not to fill above the red
indicator line (3,A). This allows adequate space for fuel expansion as shown.
3. Install fuel cap and let any spilled fuel evaporate before starting engine.
High Altitude
At altitudes over 5,000 feet (1524 meters), a minimum 85 octane / 85 AKI (89 RON)
gasoline is acceptable. To remain emissions compliant, high altitude adjustment
is required. Operation without this adjustment will cause decreased performance,
increased fuel consumption, and increased emissions. Contact a Briggs & Stratton
Authorized Service Dealer for high altitude adjustment information.
Operation of the engine at altitudes below 2,500 feet (762 meters) with the high
altitude kit is not recommended.
Attach Negative Battery Cable Figure
5
On models with electric start engines, attach the negative battery cable to the battery
as follows:
1. Cut off tie wrap securing loose end of negative (black) cable.
2. Using an 8 mm socket wrench, remove screw (C), lock washer (C) and flat
washer (C) on negative battery terminal (A).
3. Slide lock washer, flat washer and negative battery cable (B) over screw as shown.
4. Reattach screw to negative battery terminal and tighten.
5. Verify that connections to battery and generator are tight and secure.
Features and Controls Figure
1
Read this Operator’s Manual and safety rules before operating your
generator. Compare the illustrations with your generator, to familiarize
yourself with the locations of various controls and adjustments. Save this
manual for future reference.
A - Engine Identification Number — Provides model, type and code of engine. Please
have these readily available if calling for assistance.
B - Generator Identification Number — Provides model and serial number of
generator. Please have these readily available if calling for assistance.
C - Fuel Tank — Check and add unleaded fuel here.
D - Grounding Fastener — Consult your local agency having jurisdiction for grounding
requirements in your area.
E - Fuel Gauge — Displays amount of fuel available in fuel tank.
F - AC Outlet — May be used to supply electrical power for the operation of AC, single
phase, electrical, lighting, appliance, tool, and motor loads.
G - Circuit Breaker — The receptacles are provided with circuit breakers to protect the
generator against electrical overload.
H - Voltmeter — Used for measuring electrical potential.
J - Oil Fill Cap/Dipstick — Check and add engine oil here.
K - Oil Drain Plug — Drain engine oil here.
L - Fuel Valve — Used to turn fuel supply on and off to engine.
M - Recoil Starter — Used to start the engine manually.
N - Air Cleaner — Protects engine by filtering dust and debris out of intake air.
P - Spark Arrester Muffler — Exhaust muffler lowers engine noise and is equipped
with spark arrester screen.
R - Spark Plug — A device in the cylinder head of engine that ignites the fuel mixture
by means of an electric spark.
S - Choke Control — Used when starting a cold engine.
T - Electric Start Switch (Electric Start) — Turn key to start (
) position to start the
engine. Turn key to off (O) position to switch off engine.
U - Low Oil Warning Light — The low oil warning light is designed to prevent engine
damage caused by not enough engine oil.
WARNING Fuel and its vapors are extremely flammable and explosive which
could cause burns, fire or explosion resulting in death, serious
injury and/or property damage.
WHEN ADDING FUEL
• Turn generator engine OFF and let it cool at least 2 minutes before removing fuel
cap. Loosen cap slowly to relieve pressure in tank.
• Fill fuel tank outdoors.
• DO NOT overfill tank. Allow space for fuel expansion.
• If fuel spills, wait until it evaporates before starting engine.
• Keep fuel away from sparks, open flames, pilot lights, heat, and other ignition sources.
• Check fuel lines, tank, cap and fittings frequently for cracks or leaks. Replace if
necessary.
• DO NOT light a cigarette or smoke.

Not for
Reproduction
8 BRIGGSandSTRATTON.COM
Operation
System Ground
The generator is provided with a grounding fastener. The generator has a system
ground that connects the generator frame components to the ground terminals on the
AC output receptacles. The system ground is connected to the AC neutral wire (the
neutral is bonded to the generator frame).
Special Requirements
There may be Federal, local codes, or ordinances that apply to the intended use of the
generator. Please consult a qualified electrician, electrical inspector, or the local agency
having jurisdiction:
• In some areas, generators are required to be registered with local utility
companies.
• If the generator is used at a construction site, there may be additional
regulations which must be observed.
Connecting to a Building’s Electrical System
Connections for standby power to a building’s electrical system must use a listed
transfer switch installed by a current licensed electrician. The connection must isolate
the generator power from the utility power and must comply with all applicable laws
and electrical codes.
Generator Location Figure
6
7
Starting the Engine Figure
1
NOTICE This engine was shipped without oil. Before you start the engine, make sure
you add oil according to the instructions in this manual. If you start the engine without
oil, it will be damaged beyond repair and will not be covered under warranty.
NOTICE Before you start the engine, make sure that all electrical devices are
disconnected from the generator outlets.
1. Make sure unit is on a flat, level surface.
NOTICE Failure to start and operate the unit on a flat, level surface will cause the unit
not to start or shut down during operation.
2. Turn fuel valve (L) to on position (I).
3. Pull choke control (S) out to close choke (
).
4A. For electric starting, turn and hold key in start switch (T) to start (
) position
until generator starts. To prolong the life of starter components, DO NOT hold key
in start (
) position for more than 15 seconds, and pause for at least 1 minute
between starting attempts.
• If engine starts, proceed to step 6.
• If engine fails to start, proceed to step 5.
NOTICE If battery is discharged, use manual starting instructions.
4B. For manual starting, turn key in start switch to run (I) position, grasp recoil
handle (M) and pull slowly until slight resistance is felt. Then pull rapidly one
time only to start engine.
• If engine starts, proceed to step 6.
• If engine fails to start, proceed to step 5.
5. Push in the choke handle half way, turn key in start switch to run (I) position
and pull recoil handle twice or turn and hold key in start switch to start (
)
position as described in step 4A.
• If engine fails to start, repeat steps 3 thru 4.
6. Open the choke gradually as the engine warms up by pushing in on the choke
handle.
NOTICE If engine floods, push choke handle all the way in and crank until engine starts.
NOTICE If engine starts after 3 pulls but fails to run, or if unit shuts down during
operation, make sure unit is on a level surface and check for proper oil level in
crankcase. This unit is equipped with a low oil protection device. If so, oil must be at
proper level for engine to start.
WARNING Exhaust heat/gases could ignite combustibles, structures or
damage fuel tank causing a fire, resulting in death, serious
injury and/or property damage.
Contact with muffler area could cause burns resulting in
serious injury.
• DO NOT touch hot parts and AVOID hot exhaust gases.
• Allow equipment to cool before touching.
• Keep at least 1.5m (5ft.) of clearance on all sides of generator including overhead.
• Contact the original equipment manufacturer, retailer, or dealer to obtain a
spark arrester designed for the exhaust system installed on this engine.
• Replacement parts must be the same and installed in the same position as
the original parts.
8 BRIGGSandSTRATTON.COM
WARNING Starter cord kickback (rapid retraction) will pull hand and arm
toward engine faster than you can let go which could cause broken
bones, fractures, bruises, or sprains resulting in serious injury.
• When starting engine, pull cord slowly until resistance is felt and then pull rapidly
to avoid kickback.
• NEVER start or stop engine with electrical devices plugged in and turned on.
WARNING POISONOUS GAS HAZARD. Engine exhaust contains carbon
monoxide, a poisonous gas that could kill you in minutes. You CANNOT
see it, smell it, or taste it. Even if you do not smell exhaust fumes, you
could still be exposed to carbon monoxide gas. If you start to feel sick,
dizzy or weak while using this product, shut it off and get to fresh air
RIGHT AWAY. See a doctor. You may have carbon monoxide poisoning.
• Operate this product ONLY outside far away from windows, doors and vents to
reduce the risk of carbon monoxide gas from accumulating and potentially being
drawn towards occupied spaces.
• Install battery-operated carbon monoxide alarms or plug-in carbon monoxide
alarms with battery back-up according to the manufacturer’s instructions. Smoke
alarms cannot detect carbon monoxide gas.
• DO NOT run this product inside homes, garages, basements, crawlspaces,
sheds, or other partially-enclosed spaces even if using fans or opening doors and
windows for ventilation. Carbon monoxide can quickly build up in these spaces
and can linger for hours, even after the product has shut off.
• ALWAYS place this product downwind and point the engine exhaust away from
occupied spaces.
WARNING
Generator voltage could cause electrical shock or burn resulting
in death or serious injury.
• Use approved transfer equipment to prevent backfeed by isolating generator from
electric utility workers.
• When using generator for backup power, notify utility company.
• Use a residual-current device (RCD) in any damp or highly conductive area, such
as metal decking or steel work.
• DO NOT touch bare wires or receptacles.
• DO NOT use generator with electrical cords which are worn, frayed, bare or
otherwise damaged.
• DO NOT operate generator in the rain or wet weather.
• DO NOT handle generator or electrical cords while standing in water, while
barefoot, or while hands or feet are wet.
• DO NOT allow unqualified persons or children to operate or service generator.

Not for
Reproduction
9 9
Connecting Electrical Loads Figure
1
Use only high quality, well-insulated extension cables with the generator’s AC outlets.
Inspect extension cables before each use. Check that all extension cables are suitably
rated and are not damaged.
1. Let engine stabilize and warm up for a few minutes after starting.
2. Check the voltmeter (H) for proper voltage.
3. Make sure the load of the electrical device is within the generator’s rated output.
NOTICE Receptacles may be marked with rating value greater than generator output
capacity.
• NEVER attempt to power a device requiring more amperage than the generator or
receptacle can supply.
• DO NOT overload the generator. See Generator Capacity.
4. Make sure the electrical device is turned off. Then connect the electrical device
to the generator’s AC outlet (F). After the electrical device is connected, turn on
the electrical device.
5. When connecting additional electrical devices, make sure the total load does
not exceed the generator’s wattage capacity. See Specifications section.
NOTICE Do not exceed the generator’s wattage capacity. Exceeding the wattage
capacity could damage generator and/or connected electrical devices.
6. Before stopping the engine, turn off and then disconnect all electrical devices.
Stopping the Engine Figure
8
9
1. Before stopping the engine, turn off and then disconnect all electrical devices.
2. Let engine run at no-load for several minutes to stabilize internal temperatures
of engine and generator.
3. Turn fuel valve to the off (
) position.
4. Electric Start: Turn the electric start switch (T) to the off ( ) position.
Oil Level Switch and Warning Light Figure
1
If the oil level is too low, a switch will stop the engine and activate a warning light (U)
on the generator. If the oil level is too low when starting the engine, the switch will
activate the warning light. If the warning light is activated, make sure the unit is on a
level surface and check for proper oil level. See the How to Check/Add Oil section.
If the oil level is below the ADD mark, add oil until it reaches the FULL mark. Start the
engine and check for oil leaks before continuing to operate.
If the oil level is between the ADD and FULL marks, do not start the engine. See a
Briggs & Stratton Authorized Dealer to have the engine inspected.
Cold Weather Operation Figure
11
Under certain weather conditions (temperatures below 40°F [4°C] combined with high
humidity), your generator may experience icing of the carburetor and/or the crankcase
breather system. To reduce this problem, you need to perform the following:
1. Make sure generator has clean, fresh fuel.
2. Open fuel valve (turn valve to on position).
3. Use SAE 5W-30 oil.
4. Check oil level daily or after every eight (8) hours of operation.
5. Maintain generator following Maintenance Schedule in Maintenance section.
6. Shelter unit from elements.
Building a Cold Weather Shelter
1. Using non combustible material with a fire rating of at least one hour, build a
shelter that will enclose three sides and the top of the generator. Make sure
muffler side of generator is exposed.
NOTICE Contact your local building material supplier for non combustible materials
with a fire rating of at least one hour.
NOTICE Be sure shelter can easily be repositioned for change in wind direction.
2. DO NOT enclose generator any more than shown. Shelter should hold enough
heat created by the generator to prevent icing problem.
NOTICE If a wheel kit is installed on the generator, enlarge shelter accordingly.
3. Cut appropriate slots to access receptacles of unit.
4. Face exposed end away from wind and elements.
5. Locate generator as described in the section Generator Location. Keep exhaust
gas from entering a confined area through windows, doors, ventilation intakes
or other openings.
6. Start generator as described in the section Starting the Engine, then place
shelter over generator. Keep at least 5 ft. (1.5 m) clearance on all sides of
generator including overhead with shelter in place.
7. Remove shelter when temperatures are above 40°F [4°C].
8. Turn engine OFF and let cool two (2) minutes before refueling. Let any spilled
fuel evaporate before starting engine.
WARNING Damaged or overloaded electrical cables could overheat, arc, and
burn resulting in death, serious injury, and/or property damage.
• ONLY use suitably rated extension cables.
• Follow all safety instructions on extension cables.
• Inspect cables before each use.
WARNING Fuel and its vapors are extremely flammable and explosive which
could cause burns, fire or explosion resulting in death,
serious injury and/or property damage.
• DO NOT stop engine by moving choke control to “Choke” position (
).
WARNING Exhaust heat/gases could ignite combustibles, structures or
damage fuel tank causing a fire, resulting in death, serious
injury and/or property damage.
Contact with muffler area could cause burns resulting in
serious injury.
• DO NOT touch hot parts and AVOID hot exhaust gases.
• Allow equipment to cool before touching.
• Keep at least 1.5m (5ft.) of clearance on all sides of generator including overhead.
• Remove shelter when temperatures are above 40°F [4°C].
WARNING POISONOUS GAS HAZARD. Engine exhaust contains carbon
monoxide, a poisonous gas that could kill you in minutes. You CANNOT
see it, smell it, or taste it. Even if you do not smell exhaust fumes, you
could still be exposed to carbon monoxide gas. If you start to feel sick,
dizzy or weak while using this product, shut it off and get to fresh air
RIGHT AWAY. See a doctor. You may have carbon monoxide poisoning.
• Operate this product ONLY outside far away from windows, doors and vents to
reduce the risk of carbon monoxide gas from accumulating and potentially being
drawn towards occupied spaces.
• Install battery-operated carbon monoxide alarms or plug-in carbon monoxide
alarms with battery back-up according to the manufacturer’s instructions. Smoke
alarms cannot detect carbon monoxide gas.
• DO NOT run this product inside homes, garages, basements, crawlspaces,
sheds, or other partially-enclosed spaces even if using fans or opening doors and
windows for ventilation. Carbon monoxide can quickly build up in these spaces
and can linger for hours, even after the product has shut off.
• ALWAYS place this product downwind and point the engine exhaust away from
occupied spaces.
WARNING
Generator voltage could cause electrical shock or burn resulting
in death or serious injury.
• Use approved transfer equipment to prevent backfeed by isolating generator from
electric utility workers.
• When using generator for backup power, notify utility company.
• Use a residual-current device (RCD) in any damp or highly conductive area, such
as metal decking or steel work.
• DO NOT touch bare wires or receptacles.
• DO NOT use generator with electrical cords which are worn, frayed, bare or
otherwise damaged.
• DO NOT operate generator in the rain or wet weather.
• DO NOT handle generator or electrical cords while standing in water, while
barefoot, or while hands or feet are wet.
• DO NOT allow unqualified persons or children to operate or service generator.

Not for
Reproduction
10 BRIGGSandSTRATTON.COM
Circuit Breaker Figure
1
The circuit breaker(s) (G) will automatically open if the load exceeds the generator’s
rated output. If the circuit breaker opens, then reduce the output load and reset the
circuit breaker before resuming operation. To determine maximum output load, see the
Generator Capacity section.
Don’t Overload Generator
Capacity
Make sure the generator’s Starting Wattage* meets or exceeds the Rated (Operating) and
Additional Surge (Starting) Watts of the electrical devices.
1. Select the items you will power at the same time.
2. Total the rated (running) watts of these items. This is the amount of power your
generator must produce to keep your items running. See Wattage Reference
Guide.
3. Estimate how many surge (starting) watts you will need. Surge wattage is the
short burst of power needed to start electric motor-driven tools or appliances
such as a circular saw or refrigerator. Because not all motors start at the same
time, total surge watts can be estimated by adding only the item(s) with the
highest additional surge watts to the total rated watts from step 2.
Example:
Total Rated (Running) Watts 1555
Highest Additional Surge Watts + 600
Total Generator Output Required =2155
NOTICE If total generator output required does not contain additional surge watts, DO
NOT exceed generator’s rated wattage.**
*See Starting Wattage in the Specifications section.
**See Rated Wattage in the Specifications section.
Power Management
Failure to properly connect electrical devices can result in damage to the generator or
to connected electrical devices. The correct and safe way to manage generator power is
to sequentially add electrical devices (loads) as follows:
1. Before you start the engine, make sure that all electrical devices are
disconnected from the generator outlets.
2. Start the engine (see the How to Start the Engine section).
3. Connect the electrical device that requires the most watts (load).
4. Let the generator output stabilize (engine runs smoothly).
5. Connect the next electrical device.
6. Again, let the generator output stabilize.
7. Continue following the above steps to add electrical devices. Make sure the
total watts (load) of all electrical devices does not exceed the generator’s
wattage capacity (see the Specifications section).
NOTICE
Exceeding generators wattage/amperage capacity could damage generator
and/or electrical devices connected to it.
• DO NOT exceed the generator’s wattage/amperage capacity.
• Start generator and let engine stabilize before connecting electrical loads.
• Connect electrical loads in OFF position, then turn ON for operation.
• Turn electrical loads OFF and disconnect from generator before stopping generator.
Tool or Appliance Rated (Running) Watts
Additional Surge
(Starting) Watts
Window Fan 300 600
Deep Freezer 500 500
Television 500 —
Security System 180 —
Light (75 Watts) 75 —
1555 Total Running Watts 600 Highest Surge Watts
Wattage Reference Guide
Tool or Appliance
Rated* (Running)
Watts
Additional Surge
(Starting) Watts
Essentials
Light Bulb - 75 watt 75 —
Deep Freezer 500 500
Sump Pump 800 1200
Refrigerator/Freezer - 18 cf 800 1600
Water Well Pump - 1/3 hp 1000 2000
Heating/Cooling
Window AC - 10,000 BTU 1200 1800
Window Fan 300 600
Furnace Fan Blower - 1/2 hp 800 1300
Kitchen
Microwave Oven - 1000 Watt 1000 —
Coffee Maker 1500 —
Electric Stove - Single Element 1500 —
Family Room
DVD/CD Player 100 —
VCR 100 —
Stereo Receiver 450 —
Color Television - 27 in 500 —
Personal Computer w/17 in monitor 800 —
Other
Security System 180 —
AM/FM Clock Radio 300 —
Garage Door Opener - 1/2 hp 480 520
DIY/Job Site
Quartz Halogen Work Light 1000 —
Airless Sprayer - 1/3 hp 600 1200
Reciprocating Saw 960 960
Electric Drill - 1/2 hp 1000 1000
Circular Saw - 7-1/4 in 1500 1500

Not for
Reproduction
11
Maintenance
Maintenance Schedule
Follow the hourly or calendar intervals, whichever occurs first. More frequent service is
required when operating in adverse conditions noted below.
†
Service more often under dirty or dusty conditions.
General Recommendations
Regular maintenance will improve the performance and extend the life of the generator.
See any authorized dealer for service.
The generator’s warranty does not cover items that have been subjected to operator
abuse or negligence. To receive full value from the warranty, the operator must
maintain the generator as instructed in this manual.
NOTICE
Improper treatment of generator could damage it and shorten its life.
• NEVER operate generator without protective housing or covers to assure proper
cooling.
Some adjustments will need to be made periodically to properly maintain your generator.
All service and adjustments should be made at least once each season. Follow the
requirements in the Maintenance Schedule chart above.
NOTICE Once a year you should clean or replace the spark plug and replace the air
filter. A new spark plug and clean air filter assure proper fuel-air mixture and help your
engine run better and last longer.
Generator Maintenance
Generator maintenance consists of keeping the unit clean and dry. Operate and store
the unit in a clean dry environment where it will not be exposed to excessive dust, dirt,
moisture, or any corrosive vapors. Cooling air slots in the generator must not become
clogged with snow, leaves, or any other foreign material.
NOTICE DO NOT use water or other liquids to clean generator. Liquids can enter
engine fuel system, causing poor performance and/or failure to occur. In addition, if
liquid enters generator through cooling air slots, some of the liquid will be retained in
voids and cracks of the rotor and stator winding insulation. Liquid and dirt buildup on
the generator internal windings will eventually decrease the insulation resistance of
these windings.
Cleaning
Daily or before use, look around and underneath the generator for signs of oil or fuel
leaks. Clean accumulated debris from inside and outside the generator. Keep the linkage,
spring and other engine controls clean. Keep the area around and behind the muffler free
from any combustible debris. Inspect cooling air slots and openings on generator. These
openings must be kept clean and unobstructed.
Engine parts should be kept clean to reduce the risk of overheating and ignition of
accumulated debris:
• Use a damp cloth to wipe exterior surfaces clean.
NOTICE
Improper treatment of generator could damage it and shorten its life.
• DO NOT expose generator to excessive moisture, dust, dirt, or corrosive vapors.
• DO NOT insert any objects through cooling slots.
• Use a soft bristle brush to loosen caked on dirt or oil.
• Use a vacuum cleaner to pick up loose dirt and debris.
Fuel System Maintenance Figure
8
12
How to Clean/Replace the Debris Strainer
1. Remove the fuel cap (12,A).
2. Remove the debris strainer (12,B).
3. If the debris strainer is dirty, clean it. If the debris strainer is torn or otherwise
damaged, replace it. If you replace the debris strainer, make sure to use an
original equipment replacement debris strainer.
How to Clean the Fuel Sediment Cup
The fuel valve is equipped with a fuel sediment cup that can be cleaned as follows:
1. Move the fuel valve to the off position.
2. Remove the sediment cup (8,A) from the fuel valve.
3. Wash the sediment cup in a nonflammable solvent. Dry thoroughly.
4. Install the sediment cup and tighten securely.
5. Move the fuel valve to the on position and check for leaks. If the fuel valve
leaks, replace with an original equipment replacement fuel valve.
Battery Maintenance
There is no required maintenance for the starting battery, if equipped. Keep battery and
terminals clean and dry.
NOTICE The starting battery charges only while the generator is operating.
First 5 Hours
• Change engine oil
Every 8 Hours or Daily
• Clean debris
• Check engine oil level
Every 25 Hours or Yearly
• Service engine air cleaner†
Every 50 Hours or Yearly
• Change engine oil
†
Every 100 Hours or Yearly
• Service fuel valve
• Service spark plug
• Inspect muffler and spark arrester
• Clean cooling system
†
WARNING Fuel and its vapors are extremely flammable and explosive which
could cause burns, fire or explosion resulting in death,
serious injury and/or property damage.
• Keep fuel away from sparks, open flames, pilot lights, heat, and other ignition
sources.
• Check fuel lines, tank cap, and fittings frequently for cracks or leaks. Replace if
necessary.
• If fuel spills, wait until it evaporates before starting engine.

Not for
Reproduction
12 BRIGGSandSTRATTON.COM
Engine Maintenance
Carburetor and Engine Speed Adjustment
Never make adjustments to the carburetor or engine speed. The carburetor was set at
the factory to operate efficiently under most conditions. Do not tamper with governor
spring, linkages, or other parts to change the engine speed. If adjustment is required,
see a Briggs & Stratton authorized dealer.
Oil
Oil Recommendations
We recommend the use of Briggs & Stratton Warranty Certified oils for best
performance. Other high-quality detergent oils are acceptable if classified for service
SF, SG, SH, SJ or higher. DO NOT use special additives.
Outdoor temperatures determine the proper oil viscosity for the engine. Use the chart
to select the best viscosity for the outdoor temperature range expected.
* Below 4°C (40°F) the use of SAE 30 will result in hard starting.
** Above 27°C (80°F) the use of 10W30 may cause increased oil consumption. Check
oil level more frequently.
Checking Oil Level
Figure
1
2
4
Oil level should be checked prior to each use or at least every 8 hours of operation.
Keep oil level maintained.
1. Make sure generator is on a level surface.
2. Clean area around oil fill (4,A), remove oil cap/dipstick and wipe dipstick with
clean cloth. Replace dipstick. Remove and check oil level.
NOTICE DO NOT screw in dipstick when checking oil level.
3. Verify oil is at full mark (2,B) on dipstick. Replace and tighten oil cap/dipstick.
Adding Engine Oil
1. Make sure generator is on a level surface.
2. Check oil level as described in Checking Oil Level.
3. If needed, slowly pour oil into oil fill opening to the full mark on dipstick. DO
NOT overfill.
NOTICE Overfilling with oil could cause the engine to not start, or hard starting.
• DO NOT overfill.
• If over the full mark on dipstick, drain oil to reduce oil level to full mark on dipstick.
4. Replace and tighten oil cap/dipstick.
Changing Engine Oil
If you are using your generator under extremely dirty or dusty conditions, or in
extremely hot weather, change the oil more often.
KEEP OUT OF REACH OF CHILDREN. DON’T POLLUTE. CONSERVE
RESOURCES. RETURN USED OIL TO COLLECTION CENTERS.
Change the oil while the engine is still warm from running, as follows:
1. Make sure unit is on a level surface.
2. Disconnect the spark plug wire from the spark plug and place the wire where it
cannot contact spark plug.
3. Clean area around oil drain plug (1,K). The oil drain plug is located at base of
engine, opposite carburetor.
4. Remove oil drain plug and drain oil completely into a suitable container.
5. Reinstall oil drain plug and tighten securely. Remove oil fill cap/dipstick.
6. Repeat steps 3 and 4 to add engine oil as described in Adding Engine Oil.
7. Wipe up any spilled oil.
CAUTION Avoid prolonged or repeated skin contact with used motor oil.
• Used motor oil has been shown to cause skin cancer in certain laboratory
animals.
• Thoroughly wash exposed areas with soap and water.
12 BRIGGSandSTRATTON.COM
WARNING Unintentional sparking could cause fire or electric shock resulting
in death or serious injury.
WHEN ADJUSTING OR MAKING REPAIRS TO YOUR GENERATOR
• Disconnect the spark plug wire from the spark plug and place the wire where it
cannot contact spark plug.
WHEN TESTING FOR ENGINE SPARK
• Use approved spark plug tester.
• DO NOT check for spark with spark plug removed.
CAUTION Excessively high operating speeds could result in minor injury
and/or generator damage.
Excessively low speeds impose a heavy load.
• DO NOT tamper with governor spring, links or other parts to increase engine speed.
• DO NOT modify generator in any way.

Not for
Reproduction
13 13
Service Spark Plug Figure
9
Changing the spark plug will help your engine to start easier and run better.
1. Clean area around spark plug.
2. Remove and inspect spark plug.
3. Check electrode gap with wire feeler gauge and reset spark plug gap to
recommended gap if necessary (see Specifications).
4. Replace spark plug if electrodes are pitted, burned or porcelain is cracked. Use
the recommended replacement spark plug. See Specifications.
5. Install spark plug and tighten firmly.
NOTICE In some areas, local law requires using a resistor spark plug to suppress
ignition signals. If the engine was originally equipped with a resistor spark plug, use
the same type for replacement.
Inspect Muffler and Spark Arrester
Inspect the muffler for cracks, corrosion, or other damage. Remove the spark arrester,
if equipped, and inspect for damage or carbon blockage. If replacement parts are
required, make sure to use only original equipment replacement parts.
Service Air Cleaner
Figure
10
Your engine will not run properly and may be damaged if you run it with a dirty air
cleaner. Service more often if operating under dirty or dusty conditions.
To service the air cleaner, follow these steps:
1. Unlatch air cleaner cover on top and bottom and remove cover (A).
2. Carefully remove air cleaner (B) to prevent debris from falling into carburetor.
3. Wash foam air cleaner in liquid detergent and water. Squeeze dry in a clean
cloth.
4. SATURATE foam air cleaner in engine oil and squeeze in a clean cloth to
remove excess oil.
5. Reinstall clean or new foam air cleaner in base (C).
6. Assemble air cleaner cover onto base and latch.
Clean Cooling System
Over time debris may accumulate in cylinder cooling fins and cannot be observed
without partial engine disassembly. For this reason, we recommend you have a Briggs
& Stratton authorized dealer clean the cooling system per recommended intervals (see
Maintenance Schedule in the Maintenance section). Equally important is to keep top of
engine free from debris. Also see Cleaning.
Storage
If you will not be using the generator for more than 30days, use the following
guidelines to prepare it for storage.
Generator Storage
• Clean the generator as outlined in Cleaning.
• Check that cooling air slots and openings on generator are open and unobstructed.
Long Term Storage Instructions
Fuel can become stale when stored over 30 days. Stale fuel causes acid and gum
deposits to form in the fuel system or on essential carburetor parts. To keep fuel
fresh, use Briggs & Stratton® Advanced Formula Fuel Treatment & Stabilizer, available
wherever Briggs & Stratton genuine service parts are sold.
For engines equipped with a FRESH START® fuel cap, use Briggs & Stratton FRESH
START® available in a drip concentrate cartridge.
There is no need to drain gasoline from the engine if a fuel stabilizer is added
according to instructions. Run the engine for 2 minutes to circulate the stabilizer
throughout the fuel system before storage. If gasoline in the engine has not been
treated with a fuel stabilizer, it must be drained into an approved container. Run
the engine until it stops from lack of fuel. The use of a fuel stabilizer in the storage
container is recommended to maintain freshness.
Change Engine Oil
While engine is still warm, drain oil from crankcase. Refill with recommended grade.
See Changing Engine Oil.
Other Storage Tips
1. DO NOT store fuel from one season to another unless it has been treated as
described in Long Term Storage Instructions.
2. Replace fuel container if it starts to rust. Rust and/or dirt in fuel can cause
problems if it’s used with this unit.
3. Cover unit with a suitable protective cover that does not retain moisture.
4. Store generator in clean, dry area.
WARNING Contact with muffler area can result in serious burns.
Exhaust heat/gases can ignite combustibles, structures or
damage fuel tank causing a fire.
• DO NOT touch hot parts and AVOID hot exhaust gases.
• Allow equipment to cool before touching.
• Keep at least 1.5 m (5feet) of clearance on all sides of generator including
overhead.
• Contact the original equipment manufacturer, retailer, or dealer to obtain a spark
arrester designed for the exhaust system installed on this engine.
• Replacement parts must be the same and installed in the same position as the
original parts.
WARNING Fuel and its vapors are extremely flammable and explosive which
could cause burns, fire or explosion resulting in death, serious
injury and/or property damage.
WHEN STORING FUEL OR EQUIPMENT WITH FUEL IN TANK
• Store away from furnaces, stoves, water heaters, clothes dryers or other
appliances that have pilot light or other ignition source because they could ignite
fuel vapors.
WHEN DRAINING FUEL
• Turn generator engine OFF and let it cool at least 2 minutes before removing fuel
cap. Loosen cap slowly to relieve pressure in tank.
• Drain fuel tank outdoors.
• Keep fuel away from sparks, open flames, pilot lights, heat, and other ignition
sources.
• Check fuel lines, tank, cap and fittings frequently for cracks or leaks. Replace if
necessary.
• DO NOT light a cigarette or smoke.
WARNING Storage covers could cause a fire resulting in death, serious
injury and/or property damage.
• DO NOT place a storage cover over a hot generator.
• Let equipment cool for a sufficient time before placing the cover on the equipment.

Not for
Reproduction
14 BRIGGSandSTRATTON.COM
Troubleshooting
Problem Cause Correction
Engine is running, but no AC output is
available.
1. Circuit breaker open.
2. Fault in generator.
3. Poor connection or damaged extension cable.
4. Inoperative electrical device.
1. Reset circuit breaker.
2. Contact authorized service facility.
3. Check and repair.
4. Connect another device that is in good condition.
Engine runs good at no-load but “bogs
down” when loads are connected.
1. Short circuit in connected electrical device.
2. Engine speed too slow.
3. Generator overloaded.
4. Shorted generator circuit.
5. Clogged or dirty fuel filter.
1. Disconnect shorted electrical load.
2. Contact authorized service facility.
3. See Don’t Overload Generator in Operation section.
4. Contact authorized service facility.
5. Clean or replace fuel filter.
Engine will not start; shuts down when
running or starts and runs rough.
1. Fuel shut off valve in off (O) position.
2. Low oil level.
3. Dirty air filter.
4. Clogged or dirty fuel filter.
5. Out of fuel.
6. Stale fuel.
7. Spark plug wire not connected to spark plug.
8. Damaged spark plug.
9. Water in fuel.
10. Carburetor flooded.
11. Excessively rich fuel mixture.
12. Intake valve stuck open or closed.
13. Engine has lost compression.
14. Electric start switch in off position.
15. Battery discharged.
1. Turn fuel valve to on (I) position.
2. Fill crankcase to proper level or place generator on
level surface.
3. Clean or replace air cleaner.
4. Clean or replace fuel filter.
5. Fill fuel tank.
6. Drain fuel tank and carburetor; fill with fresh fuel.
7. Connect wire to spark plug.
8. Replace spark plug.
9. Drain gas tank and carburetor; fill with fresh fuel.
10. Wait 5 minutes and re-crank engine.
11. Contact authorized service facility.
12. Contact authorized service facility.
13. Contact authorized service facility.
14. Turn electric stop switch to run position.
15. Charge or replace battery.
Engine lacks power.
1. Generator overloaded.
2. Dirty air filter.
3. Clogged or dirty fuel filter.
1. See Don’t Overload Generator.
2. Replace air filter.
3. Clean or replace fuel filter.
Engine “hunts” or falters.
1. Carburetor is running too rich or too lean.
2. Clogged or dirty fuel filter.
1. Contact authorized service facility.
2. Clean or replace fuel filter.
Energy Consumption
2,300 Watt 3,500 Watt 6,000 Watt
Energy consumption (gasoline) in normal operation at 50% of load 1.12 l/h 1.63 l/h 2.04 l/h
Energy consumption (gasoline) in idle mode Does not apply Does not apply Does not apply
Product or service delivered per energy consumed units Does not apply Does not apply Does not apply

Not for
Reproduction
15
Product Specifications
Model(s) 030566, 030596
Starting Wattage ..............................................2,500 Watts
Rated Wattage* ...............................................2,300 Watts
AC Output Voltage ...............................................230 Volts
Load Current at 230 Volts AC .....................................10.0 Amps
Frequency ........................................................60 Hz
Phase .....................................................Single Phase
Fuel Capacity ................................................4.0 gal (15 L)
Engine Displacement ........................................9.95 ci (163 cc)
Oil Capacity .......................................18 - 20 oz (0.54 - 0.59 L)
Spark Plug Gap .........................................0.030 in (0.76 mm)
Spark Plug Torque ........................................180 lb-in (20 Nm)
Intake Valve Clearance ........................ 0.004 - 0.006 in (0.10 - 0.15 mm)
Exhaust Valve Clearance ...................... 0.006 - 0.008 in (0.15 - 0.20 mm)
Model(s) 030570, 030597
Starting Wattage ..............................................4,000 Watts
Rated Wattage* ...............................................3,500 Watts
AC Output Voltage ...............................................230 Volts
Load Current at 230 Volts AC .....................................15.2 Amps
Frequency ........................................................60 Hz
Phase .....................................................Single Phase
Fuel Capacity ................................................6.6 gal (25 L)
Engine Displacement .......................................16.48 ci (270 cc)
Oil Capacity .......................................35 - 37 oz (1.05 - 1.09 L)
Spark Plug Gap .........................................0.030 in (0.76 mm)
Spark Plug Torque ........................................275 lb-in (31 Nm)
Intake Valve Clearance ........................ 0.005 - 0.007 in (0.13 - 0.18 mm)
Exhaust Valve Clearance ...................... 0.005 - 0.007 in (0.13 - 0.18 mm)
Model(s) 030576, 030583, 030598, 030599
Starting Wattage ..............................................6,500 Watts
Rated Wattage* ...............................................6,000 Watts
AC Output Voltage ...............................................230 Volts
Load Current at 230 Volts AC .....................................26.0 Amps
Frequency ........................................................60 Hz
Phase .....................................................Single Phase
Fuel Capacity ................................................6.6 gal (25 L)
Engine Displacement .......................................25.63 ci (420 cc)
Oil Capacity .......................................35 - 37 oz (1.05 - 1.09 L)
Spark Plug Gap .........................................0.030 in (0.76 mm)
Spark Plug Torque ........................................275 lb-in (31 Nm)
Intake Valve Clearance ........................ 0.005 - 0.007 in (0.13 - 0.18 mm)
Exhaust Valve Clearance ...................... 0.005 - 0.007 in (0.13 - 0.18 mm)
Model(s) 030588
Starting Wattage ..............................................2,500 Watts
Rated Wattage* ...............................................2,300 Watts
AC Output Voltage ...............................................115 Volts
Load Current at 115 Volts AC .....................................20.0 Amps
Frequency ........................................................60 Hz
Phase .....................................................Single Phase
Fuel Capacity ................................................4.0 gal (15 L)
Engine Displacement ........................................9.95 ci (163 cc)
Oil Capacity .......................................18 - 20 oz (0.54 - 0.59 L)
Spark Plug Gap .........................................0.030 in (0.76 mm)
Spark Plug Torque ........................................180 lb-in (20 Nm)
Intake Valve Clearance ........................ 0.004 - 0.006 in (0.10 - 0.15 mm)
Exhaust Valve Clearance ...................... 0.006 - 0.008 in (0.15 - 0.20 mm)
Model(s) 030589
Starting Wattage ..............................................4,000 Watts
Rated Wattage* ...............................................3,500 Watts
AC Output Voltage ..........................................115 / 230 Volts
Load Current at 115 Volts AC .....................................30.4 Amps
Load Current at 230 Volts AC .....................................15.2 Amps
Frequency ........................................................60 Hz
Phase .....................................................Single Phase
Fuel Capacity ................................................ 6.6 gal (25 L
Engine Displacement .......................................16.48 ci (270 cc)
Oil Capacity .......................................35 - 37 oz (1.05 - 1.09 L)
Spark Plug Gap .........................................0.030 in (0.76 mm)
Spark Plug Torque ........................................275 lb-in (31 Nm)
Intake Valve Clearance ........................ 0.005 - 0.007 in (0.13 - 0.18 mm)
Exhaust Valve Clearance ...................... 0.005 - 0.007 in (0.13 - 0.18 mm)
Model(s) 030590, 030591
Starting Wattage ..............................................6,500 Watts
Rated Wattage* ...............................................6,000 Watts
AC Output Voltage ..........................................115 / 230 Volts
Load Current at 115 Volts AC .....................................52.1 Amps
Load Current at 230 Volts AC .....................................26.0 Amps
Frequency ........................................................60 Hz
Phase .....................................................Single Phase
Fuel Capacity ................................................6.6 gal (25 L)
Engine Displacement .......................................25.63 ci (420 cc)
Oil Capacity .......................................35 - 37 oz (1.05 - 1.09 L)
Spark Plug Gap .........................................0.030 in (0.76 mm)
Spark Plug Torque ........................................275 lb-in (31 Nm)
Intake Valve Clearance ........................ 0.005 - 0.007 in (0.13 - 0.18 mm)
Exhaust Valve Clearance ...................... 0.005 - 0.007 in (0.13 - 0.18 mm)
Power Ratings: The gross power rating for individual gas engine models is labeled in accordance with SAE (Society of Automotive Engineers) code J1940 (Small Engine Power &
Torque Rating Procedure), and rating performance has been obtained and corrected in accordance with SAE J1995 (Revision 2002-05). Torque values are derived at 3060 RPM;
horsepower values are derived at 3600 RPM. The gross power curves can be viewed at www.BRIGGSandSTRATTON.COM. Net power values are taken with exhaust and air cleaner
installed whereas gross power values are collected without these attachments. Actual gross engine power will be higher than net engine power and is affected by, among other
things, ambient operating conditions and engine-to-engine variability. Given the wide array of products on which engines are placed, the gas engine may not develop the rated gross
power when used in a given piece of power equipment. This difference is due to a variety of factors including, but not limited to, the variety of engine components (air cleaner,
exhaust, charging, cooling, carburetor, fuel pump, etc.), application limitations, ambient operating conditions (temperature, humidity, altitude), and engine-to-engine variability. Due to
manufacturing and capacity limitations, Briggs & Stratton may substitute an engine of higher rated power for this Series engine.
* This generator is rated in accordance with ISO 8528 G1.
Common Service Parts
Air Cleaner - Engine Model 106200 ................................... 591717
Air Cleaner - Engine Model 160000 ................................... 591778
Air Cleaner - Engine Model 250000 ................................... 591778
Spark Plug - Engine Model 106200 ................................... 491055
Spark Plug - Engine Model 160000 ................................... 797235
Spark Plug - Engine Model 250000 ................................... 797235

Not for
Reproduction
16 BRIGGSandSTRATTON.COM
BRIGGS & STRATTON POWER PRODUCTS GROUP, LLC PORTABLE GENERATOR OWNER WARRANTY POLICY
LIMITED WARRANTY
Briggs & Stratton warrants that, during the warranty period specified below, it will repair or replace, free of charge, any part that is defective in material or workmanship or
both. Transportation charges on product submitted for repair or replacement under this warranty must be borne by purchaser. This warranty is effective for and is subject to
the time periods and conditions stated below. For warranty service, find the nearest Authorized Service Dealer in our dealer locator map at BRIGGSandSTRATTON.com. The
purchaser must contact the Authorized Service Dealer, and then make the product available to the Authorized Service Dealer for inspection and testing.
There is no other express warranty. Implied warranties, including those of merchantability and fitness for a particular purpose, are limited to one year from purchase,
or to the extent permitted by law. All other implied warranties are excluded. Liability for incidental or consequential damages are excluded to the extent exclusion
is permitted by law. Some states or countries do not allow limitations on how long an implied warranty lasts, and some states or countries do not allow the exclusion or
limitation of incidental or consequential damages, so the above limitation and exclusion may not apply to you. This warranty gives you specific legal rights and you may also
have other rights which vary from state to state or country to country.**
WARRANTY PERIOD
** In Australia - Our goods come with guarantees that cannot be excluded under the Australian Consumer Law. You are entitled to a replacement or refund for a major failure and
for compensation for any other reasonably foreseeable loss or damage. You are also entitled to have the goods repaired or replaced if the goods fail to be of acceptable quality
and the failure does not amount to a major failure. For warranty service, find the nearest Authorized Service Dealer in our dealer locator map at BRIGGSandSTRATTON.COM, or by
calling 1300 274 447, or by emailing or writing to [email protected], Briggs & Stratton Australia Pty Ltd, 1 Moorebank Avenue, NSW, Australia, 2170.
The warranty period begins on the date of purchase by the first retail end user, and continues for the period of time stated above. “Consumer Use” means personal residential
household use by a retail consumer. “Commercial Use” means all other uses, including use for commercial, income producing or rental purposes. Once equipment has experienced
commercial use, it shall thereafter be considered as commercial use for purposes of this warranty. Equipment used for prime power in place of utility are not applicable to this
warranty.
NO WARRANTY REGISTRATION IS NECESSARY TO OBTAIN WARRANTY ON BRIGGS & STRATTON PRODUCTS. SAVE YOUR PROOF OF PURCHASE RECEIPT. IF YOU DO NOT
PROVIDE PROOF OF THE INITIAL PURCHASE DATE AT THE TIME WARRANTY SERVICE IS REQUESTED, THE MANUFACTURING DATE OF THE PRODUCT WILL BE USED TO
DETERMINE THE WARRANTY PERIOD.
ABOUT YOUR WARRANTY
We welcome warranty repair and apologize to you for being inconvenienced. Any Authorized Service Dealer may perform warranty repairs. Most warranty repairs are handled
routinely, but sometimes requests for warranty service may not be appropriate. For example, warranty service would not apply if equipment damage occurred because of misuse,
lack of routine maintenance, shipping, handling, warehousing or improper installation. Similarly, the warranty is void if the manufacturing date or the serial number on the portable
generator has been removed or the equipment has been altered or modified. During the warranty period, the Authorized Service Dealer, at its option, will repair or replace any part
that, upon examination, is found to be defective under normal use and service. This warranty will not cover the following repairs and equipment:
• Normal Wear: Outdoor Power Equipment, like all mechanical devices, needs periodic parts and service to perform well. This warranty does not cover repair when normal
use has exhausted the life of a part or the equipment.
• Installation and Maintenance: This warranty does not apply to equipment or parts that have been subjected to improper or unauthorized installation or alteration and
modification, misuse, negligence, accident, overloading, overspeeding, improper maintenance, repair or storage so as, in our judgment, to adversely affect its performance
and reliability. This warranty also does not cover normal maintenance such as adjustments, fuel system cleaning and obstruction (due to chemical, dirt, carbon, lime, etc.).
• Other Exclusions: This warranty excludes wear items such as o-rings, filters, etc., or malfunctions resulting from accidents, abuse, modifications, alterations, or improper
servicing or freezing or chemical deterioration. Accessory parts such as generator adapter cord sets and storage covers are excluded from the product warranty. This
warranty excludes failures due to acts of God and other force majeure events beyond the manufacturers control. Also excluded is used, reconditioned, and demonstration
equipment; equipment used for prime power in place of utility power and equipment used in life support applications. 198195E, Rev. D, 08/24/2012
BRIGGS & STRATTON POWER PRODUCTS GROUP, LLC
MILWAUKEE, WI, USA
Effective September 1, 2012; replaces all undated Warranties and all Warranties dated before September 1, 2012.
ITEM CONSUMER USE COMMERCIAL USE
EQUIPMENT
Models: 030588, 030589, 030590, 030591
Models: 030566, 030576, 030570, 030583
030596, 030597, 030598, 030599
2 year
1 year
1 year
1 year
Engine 2 year 1 year
Battery (if equipped) 1 year 1 year

Not for
Reproduction
17

Not for
Reproduction
4 BRIGGSandSTRATTON.COM4 BRIGGSandSTRATTON.COM
Obrigado por adquirir este excelente gerador produzido pela Briggs & Stratton®. Ficamos felizes por você depositar sua confiança na marca Briggs & Stratton. Quando operado e
mantido de acordo com as instruções dente manual, o seu gerador Briggs & Stratton fornecerá muitos anos de funcionamento confiável.
Este manual contém informações de segurança para informá-lo sobre os perigos e riscos associados aos geradores e como evitá-los. Este gerador foi desenvolvido apenas para o
fornecimento de alimentação elétrica para iluminação, utensílios, ferramentas e cargas de motor elétricos, e não deve ser utilizado para qualquer outro propósito. O usuário deve ler
e compreender totalmente estas instruções antes de tentar ligar ou operar este equipamento. Guarde estas instruções originais para referência futura.
Este gerador exige uma montagem final antes do uso. Consulte a seção Montagem deste manual de instruções para obter os procedimentos da montagem final. Siga as
instruções completamente.
Onde nos encontrar
Você nunca terá que procurar muito para encontrar assistência e manutenção Briggs & Stratton para o seu gerador. Há milhares de centros de serviço autorizados Briggs & Stratton
ao redor do mundo, prontos para lhe atender com qualidade. Você pode localizar o Centro de Serviço Autorizado mais próximo através do nosso mapa localizador na Internet em
BRIGGSandSTRATTON.COM.
Índice
Segurança do operador. .. . .. . .. . .. . .. . .. . .. . .. . .. . .. . .5
Descrição do equipamento. .. . . .. . . .. . . .. . . .. . . .. . . .. . . .. . . .. . . .. . . .. . . 5
Importantes informações de segurança . .. . . .. . . .. . . .. . . .. . . .. . . .. . . .. . . 5
Montagem ..........................................7
Desembale o gerador. . .. . . .. . . .. . . .. . . .. . . .. . . .. . . .. . . .. . . .. . . .. . . .. . . 7
Adicione óleo para motor . . .. . . .. . . .. . . .. . . .. . . .. . . .. . . .. . . .. . . .. . . .. . . 7
Acrescente combustível................................................7
Conecte o cabo negativo da bateria . .. . . .. . . .. . . .. . . .. . . .. . . .. . . .. . . .. . . 7
Recursos e controles..................................7
Carregador da bateria . .. . . .. . . .. . . .. . . .. . . .. . . .. . . .. . . .. . . .. . . .. . . .. . . 7
Operação .. . .. . .. . .. . .. . .. . .. . .. . .. . .. . .. . .. . .. . .. . .8
Fixador do aterramento ................................................8
Localização do gerador .. . . .. . . .. . . .. . . .. . . .. . . .. . . .. . . .. . . .. . . .. . . .. . . 8
Ligando o motor. . .. . . .. . . .. . . .. . . .. . . .. . . .. . . .. . . .. . . .. . . .. . . .. . . .. . . 8
Conectando cargas elétricas............................................8
Desligando o motor ...................................................9
Desligamento por falta de óleo . .. . . .. . . .. . . .. . . .. . . .. . . .. . . .. . . .. . . .. . . 9
Operação em Baixas Temperaturas . .. . . .. . . .. . . .. . . .. . . .. . . .. . . .. . . .. . . 9
Não sobrecarregue o gerador .........................................10
Manutenção. .. . .. . .. . .. . .. . .. . .. . .. . .. . .. . .. . .. . .. .11
Cronograma de manutenção ..........................................11
Manutenção do gerador...............................................11
Manutenção da bateria .. . . .. . . .. . . .. . . .. . . .. . . .. . . .. . . .. . . .. . . .. . . .. . 11
Manutenção da válvula de combustível. . .. . . .. . . .. . . .. . . .. . . .. . . .. . . .. . 11
Manutenção do motor . .. . . .. . . .. . . .. . . .. . . .. . . .. . . .. . . .. . . .. . . .. . . .. . 12
Armazenamento .....................................................13
Solução de problemas ...............................14
Especificações .....................................14
Especificações do produto . .. . . .. . . .. . . .. . . .. . . .. . . .. . . .. . . .. . . .. . . .. . 14
Peças de serviço comuns. . .. . . .. . . .. . . .. . . .. . . .. . . .. . . .. . . .. . . .. . . .. . 14
Garantias ..........................................15
Garantia do proprietário do gerador. .. . . .. . . .. . . .. . . .. . . .. . . .. . . .. . . .. . 15
Copyright © 2017 Briggs & Stratton Corporation
Milwaukee, WI, USA. Todos os direitos reservados.
INSTRUÇÕES ORIGINAIS
Gerador
Número de Modelo
Revisão
Número de série
Data de aquisição
Motor
Número de modelo
Número de tipo
Número de código

Not for
Reproduction
5 5
Segurança do operador
Descrição do equipamento
Leia este manual atentamente e se familiarize com o seu gerador.
Conheça as suas aplicações, seus limites e todos os perigos envolvidos.
Empregamos grande esforço para assegurar a precisão e atualidade das informações
deste manual. Contudo, o fabricante mantém o direito de mudar, alterar ou aprimorar
de qualquer outra maneira o gerador e a respectiva documentação, a qualquer
momento, sem aviso prévio.
Importantes informações de segurança
O fabricante não tem como prever todas as circunstâncias possíveis que possam
envolver perigo. Os alertas deste manual, e as etiquetas e adesivos afixados à unidade
não são, portanto, absolutamente inclusivos. Se você usa um procedimento, um
método de trabalho ou uma técnica de operação não recomendada especificamente
pelo fabricante, ficará a seu critério julgar se é seguro para você e para outrem. Você
também deve garantir que o procedimento, a técnica de operação ou o método de
trabalho que você escolher não torna o uso do gerador perigoso.
Símbolos de segurança e significados
O símbolo de alerta de segurança indica o perigo de ferimento pessoal potencial.
Uma palavra de sinalização (PERIGO, ADVERTÊNCIA ou CUIDADO) é usada com o
símbolo de alerta para designar um grau ou nível de gravidade para o perigo. Um símbolo
de segurança pode ser usado para representar o tipo de perigo. A palavra de sinalização
AVISO é usada em referência a práticas sem relação com ferimentos pessoais.
PERIGO indica um perigo que, se não evitado,resultará em morte ou ferimentos
graves.
ADVERTÊNCIA indica um perigo que, se não evitado,poderá resultar em morte
ou ferimentos graves.
CUIDADO indica um perigo que, se não evitado,pode resultar em ferimentos
leves a moderados.
AVISO trata de práticas não relacionadas a ferimentos pessoais.
ADVERTÊNCIA
PERIGO DE GÁS VENENOSO. A exaustão do motor contém
monóxido de carbono, um gás venenoso que pode causar sua morte em
minutos. NÃO é possível identificar esse gás visualmente, pelo cheiro ou
pelo sabor. Não sentir o cheiro dos vapores de exaustão não significa
que você não está exposto ao gás monóxido de carbono. Se você
começar a se sentir mal, tonto ou fraco durante o uso deste produto, desligue-o e
vá para o ar livre IMEDIATAMENTE. Procure atendimento médico. Você corre risco
de envenenamento por monóxido de carbono.
• Opere este produto APENAS ao ar livre, longe de janelas, portas e passagens de
ventilação para evitar o risco de acúmulo de monóxido de carbono e sua entrada
em áreas ocupadas.
• Instale alarmes de monóxido de carbono operados por bateria ou alarmes de
monóxido de carbono adaptados para encaixe, com back-up de bateria, de acordo
com as instruções do fabricante. Alarmes de fumaça não são capazes de detectar
gás carbônico.
• NÃO opere este produto dentro de residências, garagens, porões, vãos, abrigos ou
outros espaços parcialmente fechados, mesmo com o uso de ventiladores ou de
portas e janelas abertas para ventilação. O monóxido de carbono pode se acumular
rapidamente e perdurar por horas, mesmo após o desligamento do produto.
• SEMPRE posicione este produto a favor do vento e aponte a exaustão para longe
de áreas ocupadas.
ADVERTÊNCIA
A retração rápida (rebote) da corda de partida puxará sua
mão e braço na direção do motor antes que você consiga soltá-la,
oquepoderá causar fraturas ósseas, cortes, distensões, contusões ou
ferimentos graves.
• Ao dar partida no motor, puxe a corda lentamente até sentir resistência e, então,
puxe rapidamente para evitar o rebote.
• NUNCA dê partida ou desligue o motor com dispositivos elétricos conectados
eligados.
ADVERTÊNCIA
A voltagem do gerador pode causar choques elétricos ou
queimaduras graves e até mesmo fatais.
• Use equipamentos de transferência aprovados para evitar retroalimentação
isolando o gerador dos trabalhadores de serviço elétrico.
• Ao usar o gerador para energia de emergência, notifique a companhia prestadora
do serviço.
• Use um dispositivo de corrente residual (DCR) em qualquer área úmida ou altamente
condutora como, por exemplo, superfícies metálicas ou estruturas de aço.
• NÃO toque em fios desencapados ou soquetes.
• NÃO use o gerador com cabos elétricos desgastados, desfiados ou danificados
dequalquer outra maneira.
• NÃO opere o gerador na chuva ou em clima úmido.
• NÃO opere ou toque no gerador ou nos cabos elétricos enquanto estiver na água,
descalço ou com as mãos ou os pés molhados.
• NÃO permita que pessoas não qualificadas ou crianças operem ou façam a
manutenção do gerador.
Sufocamento
Fogo
Vapores tóxicos
Explosão
Choque elétrico
Rebote
Sufocamento
Manual do
Operador
Peças móveis Objetos
lançados no ar
Superfície
quente
Objetos pesados
Alarme de monóxido
de carbono
Alarme Ligado à terra Terminal de
aterramento
Afogador RUN
(em funcionamento)
OFF ON
Voltímetro Nível do óleo Combustível Partida
Disjuntor Controle do motor Não dê partida
no motor
!

Not for
Reproduction
6 BRIGGSandSTRATTON.COM6 BRIGGSandSTRATTON.COM
AVISO
Exceder a capacidade de vatagem/amperagem do gerador pode danificar
ogerador e/ou dispositivos elétricos conectados a ele.
• NÃO exceda a capacidade de vatagem/amperagem do gerador. ConsulteNão
sobrecarregue o gerador na seção Operação.
• Dê partida no gerador e deixe o motor se estabilizar antes de conectar cargas
elétricas.
• Conecte cargas elétricas na posição desligada (OFF) e, somente então, mude para
aposição ligada (ON) para operação.
• DESLIGUE as cargas elétricas e, então, desconecte-as do gerador antes de parar
ogerador.
AVISO
O tratamento inadequado do gerador pode danificá-lo e abreviar sua vida útil.
• Use o gerador apenas para os usos previstos.
• Se você tiver perguntas sobre o uso correto, pergunte ao revendedor ou entre em
contato com o centro de serviço local.
• Opere o gerador apenas sobre superfícies niveladas.
• NÃO exponha o gerador a excesso de umidade, pó, poeira ou vapores corrosivos.
• NÃO insira objeto algum através das aberturas de arrefecimento.
• Em caso de superaquecimento dos dispositivos conectados, desligue-os e
desconecte-os do gerador.
• Desligue o gerador se:
-a saída elétrica for perdida;
-o equipamento emitir faísca, fumaça ou chamas;
-a unidade vibrar excessivamente.
ADVERTÊNCIA
Os combustíveis e seus vapores são extremamente
inflamáveis e explosivos, e podem causar queimaduras,
incêndios ou explosões, que poderão resultar em morte,
ferimentos graves e/ou danos à propriedade.
AO ACRESCENTAR OU DRENAR COMBUSTÍVEL
• Desligue o motor (OFF) e deixe-o esfriar por, pelo menos, 2 minutos antes de
retirar a tampa do combustível. Vagarosamente desaperte a tampa para aliviar
apressão no tanque.
• Encha ou drene o tanque ao ar livre.
• NÃO encha o tanque excessivamente. Deixe espaço para a expansão do
combustível no tanque.
• Se houver derrame de combustível, aguarde até que evapore antes de acionar omotor.
• Mantenha a gasolina distante de fagulhas, chamas vivas, luzes piloto, calor ou
outras fontes de ignição.
• Verifique as linhas de combustível, o tanque, a tampa e os encaixes
frequentemente àprocura de rachaduras ou vazamentos. Substitua, se necessário.
• NÃO acenda um cigarro ou fume.
AO ACIONAR O EQUIPAMENTO
• Certifique-se de que a vela de ignição, o silencioso, o tampão do tanque
decombustível e o purificador de ar se encontram cada um no seu lugar.
• Não ligue o motor com a vela de ignição removida.
AO OPERAR O EQUIPAMENTO
• NÃO OPERE este produto dentro de casas ou outras construções, garagens, pórticos,
varandas, equipamentos móveis, aplicações marítimas ou espaços fechados.
• NÃO incline o motor ou o equipamento para um ângulo que poderá provocar
oderramamento de combustível.
• NÃO pare o motor movendo o controle do afogador para a posição “Afogar” (
).
AO TRANSPORTAR, MOVER OU REPARAR EQUIPAMENTO
• Transporte/mova/repare com o tanque de combustível VAZIO ou com a válvula
de desligamento de combustível FECHADA.
• NÃO incline o motor ou o equipamento para um ângulo que poderá provocar
oderramamento de combustível.
• Desconecte o cabo da vela de ignição.
AO ARMAZENAR COMBUSTÍVEL OU EQUIPAMENTO COM COMBUSTÍVEL NO TANQUE
• Armazene afastado de fornalhas, fogões, aquecedores de água, secadores
deroupa ou outros aparelhos que tenham uma chama piloto ou outra fonte
deignição, uma vez que poderão inflamar os vapores do combustível.
ADVERTÊNCIA
O calor e os gases da exaustão podem provocar a ignição
decombustíveis e estruturas ou danificar o tanque de
combustível provocando incêndios, o que pode resultar em
mortes, ferimentos graves e/ou danos a propriedades.
O contato com a área de escapamento e exaustão pode causar queimaduras e
ferimentos graves.
• NÃO toque em partes quentes e MANTENHA DISTÂNCIA dos gases quentes
daexaustão.
• Espere o equipamento esfriar antes de tocá-lo.
• Mantenha ao menos 1,5 m (5 ft) de distância de todos os lados do gerador,
incluindo acima dele.
• Contate o fabricante de equipamento original, varejista ou concessionário para
obter um protetor de faísca projetado para o sistema de escapamento instalado
neste motor.
• As peças de reposição deverão ser iguais e instaladas na mesma posição que as
peças originais.
ADVERTÊNCIA
Fagulhamento acidental pode causar incêndios ou choques
elétricos, que podem provocar morte ou ferimentos graves.
AO AJUSTAR OU REPARAR O SEU GERADOR
• Desconecte o cabo da vela de ignição da vela de ignição e coloque o cabo onde
ele não possa entrar em contato com a vela de ignição.
AO TESTAR A VELA DE IGNIÇÃO
• Use um testador de vela de ignição aprovado.
• NÃO teste a existência de ignição com a vela de ignição removida.
ADVERTÊNCIA
O mecanismo de partida ou outras partes que giram podem
prender suas mãos, cabelos, roupas ou adornos, o que pode causar
ferimentos graves.
• NUNCA opere o gerador sem alojamento ou coberturas de proteção.
• NÃO use roupas largas, joias ou qualquer coisa que possa ser aprisionada na
partida ou em peças rotativas.
• Se tiver cabelo longo ou usar joias, prenda o cabelo e retire as joias.
CUIDADO
Velocidades de operação excessivamente elevadas podem resultar
em pequenos ferimentos e/ou danos ao gerador.
Velocidades excessivamente baixas impõem uma sobrecarga.
• NÃO altere a mola mestra, as ligações ou outras peças para aumentar o giro
domotor.
• NÃO modifique o gerador de nenhuma forma.
ページが読み込まれています...
ページが読み込まれています...
ページが読み込まれています...
ページが読み込まれています...
ページが読み込まれています...
ページが読み込まれています...
ページが読み込まれています...
ページが読み込まれています...
ページが読み込まれています...
ページが読み込まれています...
ページが読み込まれています...
ページが読み込まれています...
ページが読み込まれています...
ページが読み込まれています...
ページが読み込まれています...
ページが読み込まれています...
ページが読み込まれています...
ページが読み込まれています...
ページが読み込まれています...
ページが読み込まれています...
ページが読み込まれています...
ページが読み込まれています...
ページが読み込まれています...
ページが読み込まれています...
ページが読み込まれています...
ページが読み込まれています...
ページが読み込まれています...
ページが読み込まれています...
ページが読み込まれています...
ページが読み込まれています...
ページが読み込まれています...
ページが読み込まれています...
ページが読み込まれています...
ページが読み込まれています...
ページが読み込まれています...
ページが読み込まれています...
ページが読み込まれています...
ページが読み込まれています...
ページが読み込まれています...
ページが読み込まれています...
ページが読み込まれています...
ページが読み込まれています...
ページが読み込まれています...
ページが読み込まれています...
ページが読み込まれています...
ページが読み込まれています...
ページが読み込まれています...
ページが読み込まれています...
ページが読み込まれています...
ページが読み込まれています...
ページが読み込まれています...
ページが読み込まれています...
-
 1
1
-
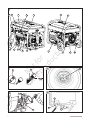 2
2
-
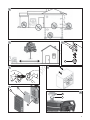 3
3
-
 4
4
-
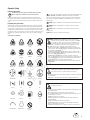 5
5
-
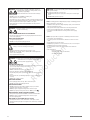 6
6
-
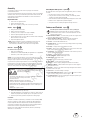 7
7
-
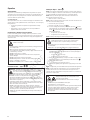 8
8
-
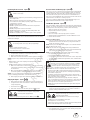 9
9
-
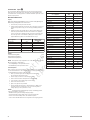 10
10
-
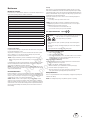 11
11
-
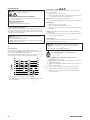 12
12
-
 13
13
-
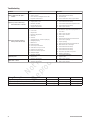 14
14
-
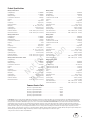 15
15
-
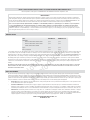 16
16
-
 17
17
-
 18
18
-
 19
19
-
 20
20
-
 21
21
-
 22
22
-
 23
23
-
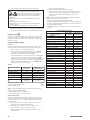 24
24
-
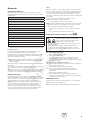 25
25
-
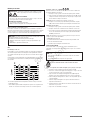 26
26
-
 27
27
-
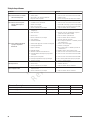 28
28
-
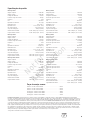 29
29
-
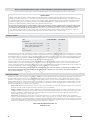 30
30
-
 31
31
-
 32
32
-
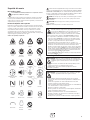 33
33
-
 34
34
-
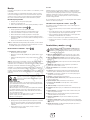 35
35
-
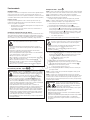 36
36
-
 37
37
-
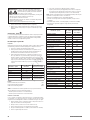 38
38
-
 39
39
-
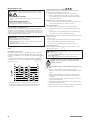 40
40
-
 41
41
-
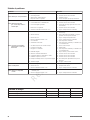 42
42
-
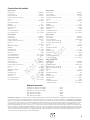 43
43
-
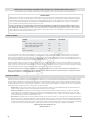 44
44
-
 45
45
-
 46
46
-
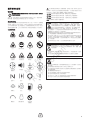 47
47
-
 48
48
-
 49
49
-
 50
50
-
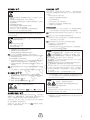 51
51
-
 52
52
-
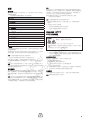 53
53
-
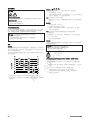 54
54
-
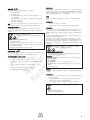 55
55
-
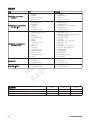 56
56
-
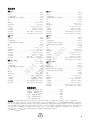 57
57
-
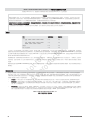 58
58
-
 59
59
-
 60
60
-
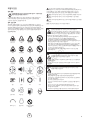 61
61
-
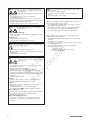 62
62
-
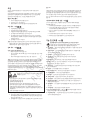 63
63
-
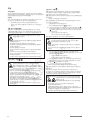 64
64
-
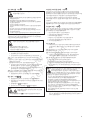 65
65
-
 66
66
-
 67
67
-
 68
68
-
 69
69
-
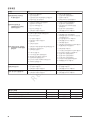 70
70
-
 71
71
-
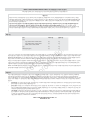 72
72


他の言語で
- español: Simplicity 030566-00 Manual de usuario
- português: Simplicity 030566-00 Manual do usuário
関連論文
-
Simplicity 030598-00 ユーザーマニュアル
-
-
-
Simplicity ENG, MDL 13A100 ユーザーマニュアル
-
-
Simplicity 13R232-0036-F1 ユーザーマニュアル
-
Simplicity ENG, MDL 083100 ユーザーマニュアル
-
Simplicity 083132-0025-F1 ユーザーマニュアル
-
-
Simplicity 15C104-0165-H8 ユーザーマニュアル
